Cooper Lighting LF606, LF604, LF603, LF605 User Manual

HALO®
HALO ARCHITECTURAL FLEXIBLE TRACK INSTALLATION INSTRUCTIONS
LF603, LF604, LF605, LF606
IMPORTANT SAFETY INSTRUCTIONS
When installing or using this track system, basic safety precautions should always be followed including the following
1.Read all of these installation instructions before installing the track system.
2.Save these instructions and refer to them when additions to or changes in the track configuration are made.
3.Do not install this track in damp or wet locations.
4.Do not install any part of this track system less than 5 feet above the floor.
5.Track is to be installed on ceiling only.
6.Disconnect electrical power before adding to or changing the configuration of the track.
7.Do not attempt to energize anything other than track lighting fixtures on the track. To reduce the risk of fire and electrical shock, do not attempt to connect power tools, extension cords, appliances and the like to the track.
8.CAUTION: This track system is not intended for use with power supply cord or convenience receptacle adapter.
9.The track system is to be supplied by one or two 240V/120V 60Hz single phase system with grounded neutral.
10.The track should be supported as follows:
Every four feet. Complexity of curve will dictate more supports at apex of curve on track.
11.CAUTION: The maximum capacity of the track system is 20A per 120 volt circuit and 25A on the 12 volt circuit. When installing, do not exceed the capacity of your circuits. Check fuses and circuits carefully before installing.
SAVE THESE INSTRUCTIONS
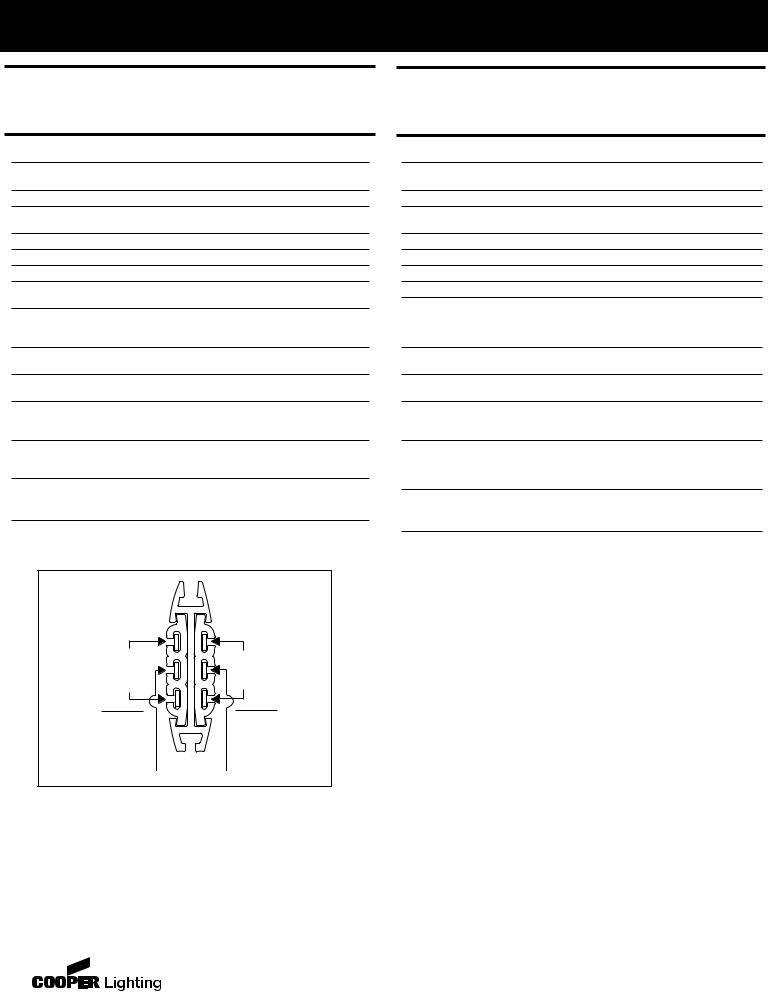
TRACK CROSS SECTION |
|
120V |
120V |
120V |
120V |
Circuit #1 |
Circuit #2 |
Neutral |
Neutral |
Neutre |
Neutre |
|
12V |
|
Circuit |
RAIL ARCHITECTURAL FLEXIBLE HALO DIRECTIVES D’INSTALLATION
LF603, LF604, LF605, LF606
DIRECTIVES DE SÉCURITÉ IMPORTANTES
Lors de l’installation ou de l’utilisation de ce sytème de rail, certaines mesures de sécurité élémentaires doivent être prises, y compris les mesures suivantes.
1.Lire la totalité de ces directives d’installation avant d’installer le système de rail.
2.Ranger ces directives et s’y reporter si des ajouts ou des changements doivent être effectués sur le rail.
3.Ne pas installer ce rail dans les endroits mouillés ou humides.
4.N’installer aucun élément de ce système de rail à moins de 5 pieds du sol.
5.Plafond installation seulement.
6.Couper le courant avant de procéder à tout ajout ou changement sur le rail.
7.Ne pas tenter de mettre sous tension autre chose que les lampes à partir du rail. Pour atténuer les risques d’incendie et de choc électrique, ne pas tenter de brancher des outils, rallonges et appareils électriques et des dispositifs du même genre sur le rail.
8.ATTENTION : Ce système de rail n’est pas destiné à être utilisé avec des cordons ou des adaptateurs d’alimentation électrique.
9.Le rail doit être alimenté par un ou deux réseaux monophasés de 240 V / 120 V et 60 Hz avec neutre à la terre.
10.Le rail doit être soutenu comme suit :
À chaque longueur de quatre pieds. La complexité des courbes peut nécessiter d’autres supports à l’apex de chaque courbe du rail.
11.ATTENTION : La capacité d’intensité maximale du système de rail est de 20 A par circuit de 120 volts et de 25 A pour le circuit de 12 volts. Ne pas dépasser ces intensités lors de l’installation. Bien vérifier les fusibles et les circuits avant l’installation.
GARDER CES DIRECTIVES
Cooper Lighting • 1121 Highway 74 South • Peachtree City GA 30269 • 770-468-4800 703218
 Loading...