


For series / Para la serie / Pour la série
MP757
MP767
MP768
EN |
Video MP3 Player |
|
Quick Start Guide................................................... |
Page 2 |
|
ES |
Reproductor de Video y MP3 |
|
Guía de Inicio Rápido......................................... |
Pagina 30 |
|
FR |
Lecteur MP3 Vidéo |
|
Guide de Démarrage Rapide................................. |
Page 58 |
Pleasereadcarefullybeforeuse•Léaelmanualantesdeusar•Veuillezlirecelivretavantutilisation
English
ÂÂThank You
Congratulations on your purchase of a Coby® Video MP3 Player. This guide is provided to help you get started quickly with your player; please read it carefully and save it for future reference.
For detailed instructions, up-to-date information, and helpful tips, please visit the Coby website at www.cobyusa.com.
The manual is available for download from the Coby website as a PDF file.
To view PDF documents, download and install the free Adobe Acrobat reader from the Adobe website at www.adobe.com.
Package Contents
Please make sure that the items shown below are included in the package. Should an item be missing, please contact the local retailer from which you purchased this product.
COBY Video MP3 player
USB cable
Professional stereo earphones
Quick start guide
This package may contain plastic bags or other materials that pose a hazard to children. Be sure to safely dispose of all packing materials after opening.
Page 2 |
Thank You |
|
|

Features
Slim and sleek multimedia player fits anywhere
Powerful solution plays MP3 and WMA music files as well as advanced OGG and APE formats
Enjoy video and photos on the large 2.4” color screen
FM radio tuner with 40-station preset memory
Touch controls with backlighting
Built-in camera shoots movies and photos (MP768 only)
Built-in speakers (MP767 and MP768 only)
Coby Media Manager software included
Rechargeable Li-poly battery
English
Page 3 |
Thank You |
|
|

English
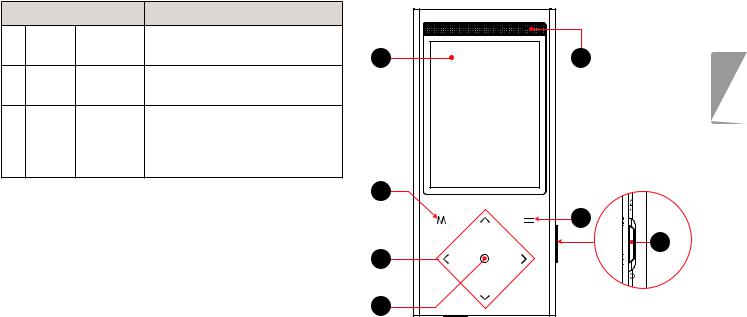
ÂÂUnit at a Glance
|
Name |
|
Description |
|
|
Name |
Description |
||
|
|
|
|
|
|
|
|
|
|
1 |
LCDscreen |
|
Colordisplayscreen. |
|
4 |
Control |
<UP> |
Browseitemsinalist. |
|
|
|
|
|
|
|
|
Key |
|
Duringmusicplayback:increasethe |
2 |
Speakers[MP767and |
Speakeroutputisautomatically |
|
||||||
|
|
|
|
volumelevel. |
|||||
|
MP768only] |
|
disabledwhenheadphonesarecon- |
|
|
|
|
||
|
|
|
|
|
|
Duringvideoplayback:skiptothe |
|||
|
|
|
|
nectedtotheplayer. |
|
|
|
|
|
|
|
|
|
|
|
|
|
previoustrack. |
|
|
|
|
|
|
|
|
|
|
|
3 |
Cancel/ |
|
<M> |
Presstoreturntothepreviousscreen. |
|
|
|
|
|
|
|
|
|
|
|
||||
|
|
|
|
<DOWN> |
Browseitemsinalist. |
||||
|
Menu |
|
|
PressandholdtoaccesstheMain |
|
|
|
||
|
|
|
|
|
|
|
Duringmusicplayback:decreasethe |
||
|
Key |
|
|
menu. |
|
|
|
|
|
|
|
|
|
|
|
|
volumelevel. |
||
|
|
|
|
Whentheplayerisconnectedtoa |
|
|
|
|
|
|
|
|
|
|
|
|
|
Duringvideoplayback:skiptothe |
|
|
|
|
|
computer,presstocanceltheUSB |
|
|
|
|
|
|
|
|
|
|
|
|
|
nexttrack. |
|
|
|
|
|
dataconnectionandswitchtoUSB |
|
|
|
|
|
|
|
|
|
|
|
|
|
|
|
|
|
|
|
|
|
|
|
|
|
|
|
|
|
powermode. |
|
|
|
<LEFT> |
Duringmusicplayback:skiptothe |
|
|
|
|
|
|
|
|
|
previoustrack. |
|
|
|
|
|
|
|
|
|
|
|
|
|
|
|
|
|
|
|
Duringvideoplayback:decreasethe |
|
|
|
|
|
|
|
|
|
volumelevel. |
|
|
|
|
|
|
|
|
<RIGHT> |
Duringmusicplayback:skiptothe |
|
|
|
|
|
|
|
|
|
nexttrack. |
|
|
|
|
|
|
|
|
|
Duringvideoplayback:increasethe |
|
|
|
|
|
|
|
|
|
volumelevel. |
Page 4 |
Unit At A Glance |
|
|
|
Name |
Description |
|
|
|
5 |
Enter |
<OK> |
Enteraselectediteminalist. |
|
|
|
Key |
|
Duringplayback:play/pause. |
1 |
2 |
6 |
Option |
<OPTION> |
Accessoptionsmenu,ifavailable. |
|
English |
|
Key |
|
|
|
|
|
|
|
|
|
|
7 |
Power/ |
<Power/ |
Slideandholdtheswitchdownto |
|
|
|
Hold |
Hold> |
turntheplayeronoroff. |
|
|
|
Switch |
|
Slideandlocktheswitchuptodisable |
|
|
|
|
|
thecontrols. |
|
|
|
|
|
|
3 |
|
|
|
|
|
|
6 |
|
|
|
|
4 |
7 |
|
|
|
|
|
|
|
|
|
|
5 |
|
Page 5 |
Unit At A Glance |
|
|
English
|
Name |
|
Description |
|
|
|
|
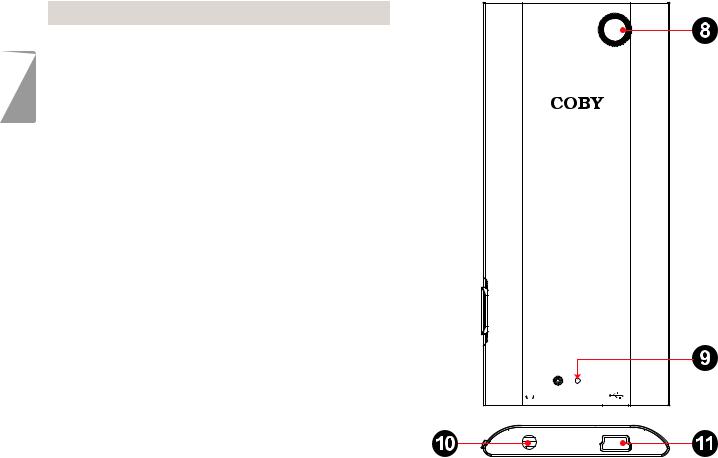
8 |
CameraLens |
|
Shoot videosandphotos. |
|
[MP768only] |
|
|
|
|
|
|
9 |
ResetKey |
<RESET> |
Useapapercliptopressthisbutton |
|
|
|
toreinitializetheplayerifitshould |
|
|
|
freezeorbehaveabnormally. |
10 |
HeadphoneJack |
Connectapairofheadphonesor |
|
|
|
|
earphoneswitha3.5mmplugfor |
|
|
|
privatelistening. |
11 |
USBPort |
|
Connecttoacomputertotransfer |
|
|
|
mediafilestotheplayer. |
|
|
|
Connecttoacomputertocharge |
|
|
|
theplayer. |
Reset
Page 6 |
Unit At A Glance |
|
|

ÂÂGetting Started
To start playing media on your player:
1.Connect the player to your computer to charge the battery.
2.Install the Coby Media Manager software from the player onto your computer.
3.Use Coby Media Manager to transfer (sync) media files from your computer to the player.
4.Enjoy your synchronized music, video, and photo files on the player!
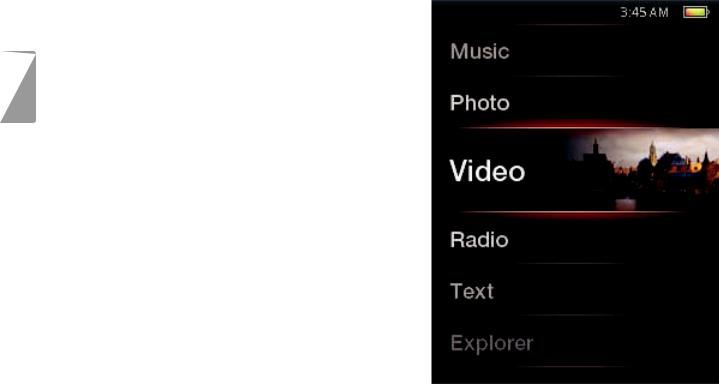
About the Main Menu
When you turn the player on, you will see the Main menu. This menu allows you to change the player’s mode.
Press <UP> or <DOWN> to select a mode; press <OK> to enter the mode.
Press and hold <M> to return to the Main menu.
In some modes, you may need to press <M> to return to the Main menu.
English
Page 7 |
Getting Started |
|
|
|
Music |
Browseandplaymusic. |
|
|
|
|
|
|
Photo |
Browseandviewphotos. |
|
|
|
|
|
English |
Video |
Browseandplayvideos. |
|
|
|
||
Radio |
ListentoFMradiobroadcasts. |
||
|
|||
|
|
|
|
|
Extras |
Camera:Shootphotos.* |
|
|
|
DV:Shootvideos.* |
|
|
|
Text:Browseandreadtextfiles. |
|
|
|
Explorer:Browseandmanageallfilesonthe |
|
|
|
player. |
|
|
Setup |
Adjusttheplayer’soptions. |
|
|
|
|
* Available on MP768 only.
Page 8 |
Getting Started |
|
|

ÂÂConnect and Charge the Battery
Upon initial use, the player should be charged fully to ensure optimal performance and battery life. If the player has not been used for a long period of time, the battery may need to be recharged.
With the included USB cable:
1.Connect the small end of the cable to the USB port of the player.
2.Connect the large end of the cable to an available USB 2.0 Hi-speed port on your computer.
When the player is connected and charging, the notice “USB Connected” will be displayed on the screen.
Tip
You can press <M> after the player is connected to cancel the data connection and switch to USB power mode. This will allow you to use the player normally while drawing power from the computer.
The computer must be powered on and not in sleep mode in order to charge the battery.
The player will not charge if it is connected to a low-power USB port.
If the player is connected to the computer through a USB hub, the hub must be selfpowered to charge the battery.
The battery used in this device may present a fire or chemical burn if mistreated. Do not disassemble, incinerate, or heat the battery. Do not leave the battery in a place subject to direct sunlight, or in a car with its windows closed. Do not connect the player to a power source other than that which is indicated here or on the label as this may result in the risk of fire or electric shock.
English
Page 9 |
Connect And Charge The Battery |
|
|

English
ÂÂInstall Coby Media Manager
Please install and use the “Coby Media Manager” (CMM) software provided on the player. Using the CMM software is the easiest way to:
Transfer (sync) media files to the player
Convert video and audio files to a format compatible with your player
Keep your player’s software up to date
Browse and play your media library on your computer.
Coby Media Manager requires a computer with Microsoft Windows 7/Vista/XP or Macintosh OS X, 100MB hard disk space available, and a USB 1.1 port (USB 2.0 recommended for high speed transfers).
Page 10 |
Install Coby Media Manager |
|
|
Microsoft Windows
1.Connect the player to a computer with the USB cable provided. Windows will display an “Autoplay” screen. Click “Open device to view files using Windows Explorer”.
English
Page 11 |
Install Coby Media Manager |
|
|
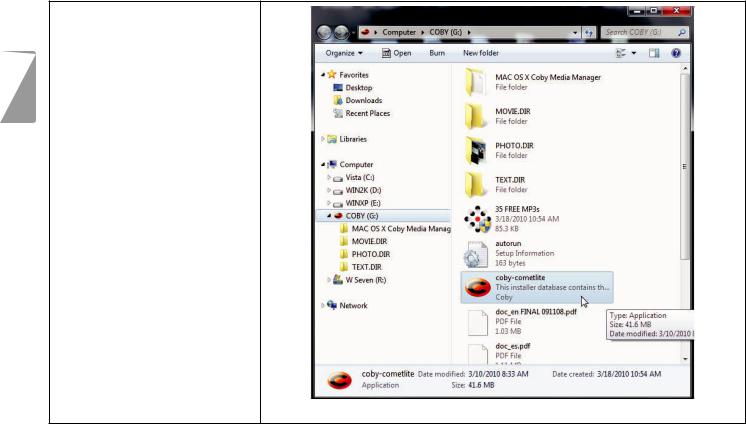
2.Double-click the player icon to view the files stored on the player.
English
Page 12 |
Install Coby Media Manager |
|
|
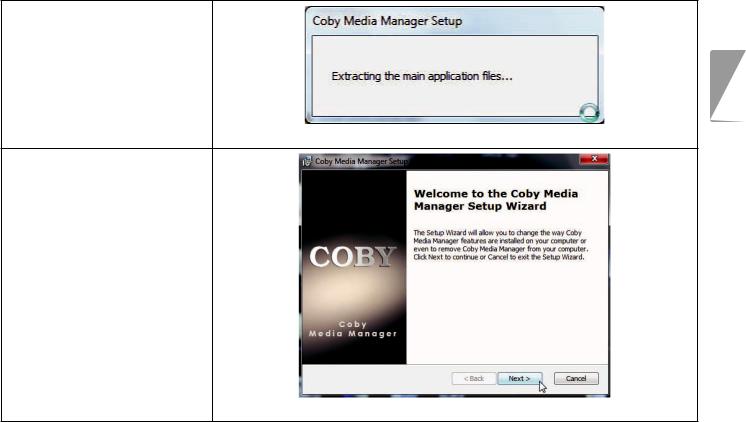
3.Find and double-click the file “coby-cometlite” and then wait for the system to extract the main application files.
4.The setup wizard will launch automatically once the files have been extracted. Follow the on-screen instructions to complete the installation process.
English
Page 13 |
Install Coby Media Manager |
|
|
English
Macintosh OS X
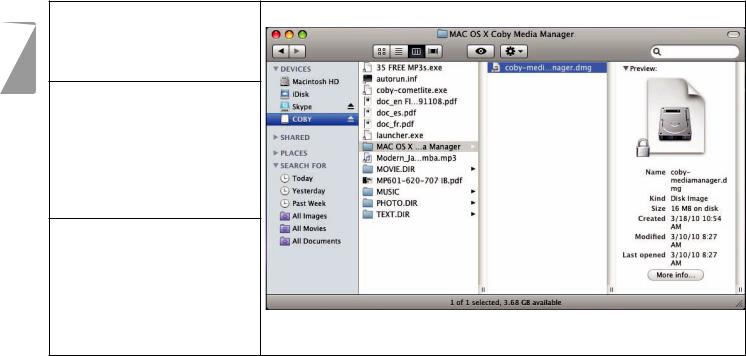
1.Connect the player to a computer with the USB cable provided.
2.Open a finder window. Click on the “Removable Disk” icon located on the left side of the finder window to view the files stored on the player.
3.Open the “MAC OS X Coby Media Manager” folder
to view its contents. Find and then double-click the file “coby-mediamanager. dmg”.
Page 14 |
Install Coby Media Manager |
|
|

4.The setup wizard will launch. Follow the onscreen instructions to complete the installation process.
English
Page 15 |
Install Coby Media Manager |
|
|
English
ÂÂTransfer Media to the Player
Use CMM to transfer media from a computer to the player.
The instruction manual for CMM can be found on your player. You may need to download and install the free Acrobat PDF reader from Adobe at www.adobe.com/go/getreader/ in order to view the instruction manual.
1.Connect the player to the computer with the USB cable provided.
2.Start the CMM program.
Page 16 |
Transfer Media To The Player |
|
|
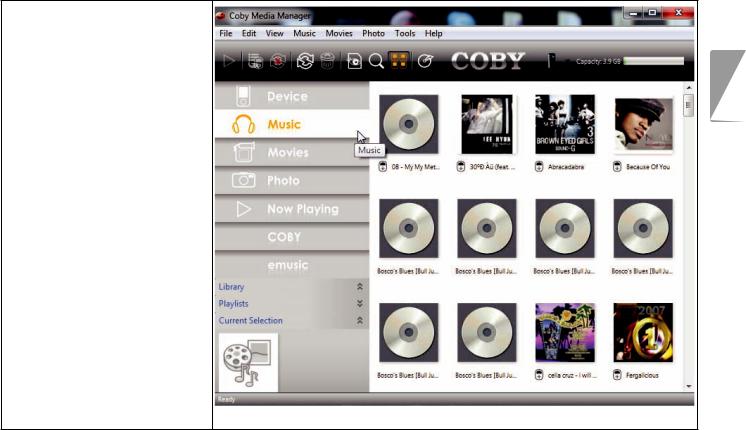
3.To find music, movies, and photos on the computer, click on the Music, Movies, or Photo tabs located in the left panel.
English
Page 17 |
Transfer Media To The Player |
|
|
English
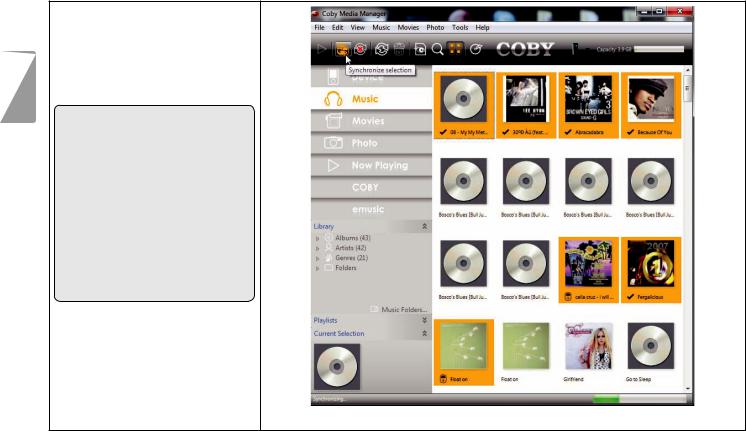
4.Click to select the files that you want to synchronize, then click the “Syncrhonize selection” button located at the top of the screen.
Tip
In Windows, hold “Ctrl” or “Shift” on the keyboard while clicking with the mouse to select multiple files.
In Mac OS X, hold “Command” or “Shift” while clicking with the mouse to select multiple files.
Page 18 |
Transfer Media To The Player |
|
|

ÂÂSpecifications
Please visit www.cobyusa.com for the latest product information. Design, specifications, and manual are subject to change without notice.
MP757 series
Memory |
Internal flash memory |
|
|
Display |
2.4” TFT LCD (320 x 240) |
|
|
Format Support |
Music: MP3, WMA, APE, |
|
OGG, WAV |
|
Video: AVI (MPEG-4/XviD), |
|
WMV9, 3GP * |
|
Photo: JPEG, BMP, GIF, PNG, |
|
TIF |
|
|
Tuner |
FM radio with 40 presets |
|
|
Audio Output |
3.5 mm headphone |
|
|
PC Interface |
USB 2.0 Hi-speed |
|
|
MP757 series
OS Support |
Microsoft Windows 7 |
|
Microsoft Windows Vista |
|
Microsoft Windows XP |
|
Macintosh OS X |
|
|
Power |
Rechargeable Li-poly battery |
|
|
Music Play Time |
8 hours ** |
*Videos may need to be converted with the included software for device playback.
**Music play time is an estimated value based on playing an MP3 encoded at 128 kbps. Actual play time may vary depending on encoding method used and other factors.
English
Page 19 |
Specifications |
|
|

MP767 series
|
Memory |
Internal flash memory |
|
English |
|
|
|
Display |
2.4” TFT LCD (320 x 240) |
||
|
|||
|
|
|
|
|
Format Support |
Music: MP3, WMA, APE, |
|
|
|
OGG, WAV |
|
|
|
Video: AVI (MPEG-4/XviD), |
|
|
|
WMV9, 3GP * |
|
|
|
Photo: JPEG, BMP, GIF, PNG, |
|
|
|
TIF |
|
|
|
|
|
|
Tuner |
FM radio with 40 presets |
|
|
|
|
|
|
Audio Output |
3.5 mm headphone |
|
|
|
Stereo speakers |
|
|
|
|
|
|
PC Interface |
USB 2.0 Hi-speed |
|
|
|
|
|
|
OS Support |
Microsoft Windows 7 |
|
|
|
Microsoft Windows Vista |
|
|
|
Microsoft Windows XP |
|
|
|
Macintosh OS X |
|
|
|
|
MP767 series
Power |
Rechargeable Li-poly battery |
|
|
Music Play Time |
8 hours ** |
*Videos may need to be converted with the included software for device playback.
**Music play time is an estimated value based on playing an MP3 encoded at 128 kbps. Actual play time may vary depending on encoding method used and other factors
Page 20 |
Specifications |
|
|
MP768 series
Memory |
Internal flash memory |
|
|
Display |
2.4” TFT LCD (320 x 240) |
|
|
Format Support |
Music: MP3, WMA, APE, |
|
OGG, WAV |
|
Video: AVI (MPEG-4/XviD), |
|
WMV9, 3GP * |
|
Photo: JPEG, BMP, GIF, |
|
PNG, TIF |
|
|
Camera |
0.3 MP (640 x 480) |
|
|
Tuner |
FM radio with 40 presets |
|
|
Audio Output |
3.5 mm headphone |
|
Integrated speaker |
|
|
PC Interface |
USB 2.0 Hi-speed |
|
|
OS Support |
Microsoft Windows 7 |
|
Microsoft Windows Vista |
|
Microsoft Windows XP |
|
Macintosh OS X |
|
|
MP768 series
Power |
Rechargeable Li-poly |
|
|
battery |
English |
|
|
|
Music Play Time |
8 hours ** |
*Videos may need to be converted with the included software for device playback.
**Music play time is an estimated value based on playing an MP3 encoded at 128 kbps. Actual play time may vary depending on encoding method used and other factors.
Page 21 |
Specifications |
|
|

English
ÂÂTroubleshooting & Support
If you have a problem with this device, please check our website at www.cobyusa.com for Frequently Asked Questions (FAQ) and product updates. If these resources do not resolve the problem, please contact Technical Support.
Address |
Coby Electronics Technical Support |
|
150 Knowlton Way |
|
Savannah, Georgia 31407 |
techsupport@cobyusa.com |
|
Web |
www.cobyusa.com |
Phone |
800-727-3592: Monday to Friday, 8:30AM–9:00PM EST |
|
Saturday, 9:00 AM–5:30PM EST |
|
718-416-3197: Monday to Friday, 8:00AM–5:30PM EST |
Page 22 |
Troubleshooting & Support |
|
|

The player does not turn on.
Ensure that the player is fully charged. Try charging the player overnight (8 hours).
Reset the player (use a paper clip to gently press the Reset button on the rear of the player) and try again.
The buttons do not work.
Reset the player (use a paper clip to gently press the Reset button on the rear of the player) and try again.
I cannot transfer files to the player.
Ensure that your computer is running a supported operating system.
If using a USB extension cable, ensure that it is securely attached to the player and the PC, or try using another USB cable.
Ensure that the player’s memory capacity is not full.
There is no sound during playback.
Check the volume level.
Ensure that the headphones are attached securely to the player.
The sound quality of the music is poor.
Try playing the file on your computer. If the sound quality is still poor, try downloading the file again or re-encoding the file yourself.
Ensure that the bit rate of the file is not too low. The higher the bit rate of the file, the better it will sound. The minimum recommended bitrate is 128kbps for MP3s and 96kbps for WMAs.
Try lowering the volume of the player.
Ensure that the headphones are attached securely to the player.
English
Page 23 |
Troubleshooting & Support |
|
|

English
The player will not play my music file.
Ensure that the file is in a compatible format.
The file may be copy-protected and you no longer have authorization to play this file. If you feel this is in error, please contact the service from which you downloaded the file.
The LCD characters are corrupted or something is wrong with the display.
Ensure that the correct menu language has been set.
Reset the player (use a paper clip to gently press the Reset button on the rear of the player) and try again.
The player has malfunctioned.
Reset the player (use a paper clip to gently press the Reset button on the rear of the player) and try again.
Page 24 |
Troubleshooting & Support |
|
|
ÂÂSafety Notices
For Customer Use:
Enter below the serial number that is located on the rear of the unit. Retain this information for future reference.
Model No.
Serial No.
English
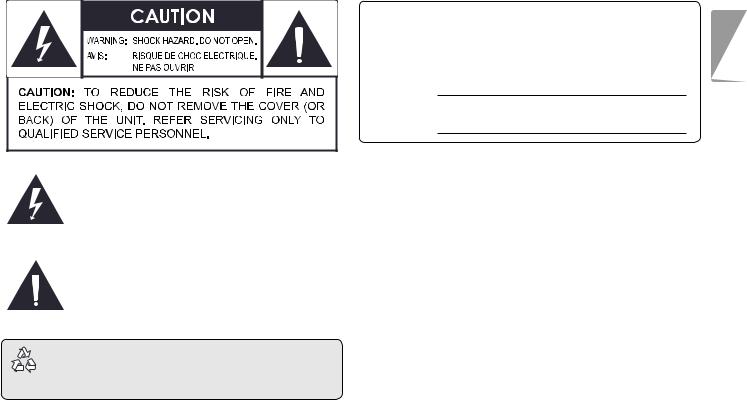
The lightning flash with arrowhead symbol within an equilateral triangle is intended to alert the user to the presence of uninsulated “dangerous voltage” within the product’s enclosure that may be of sufficient magnitude to constitute a risk of electric shock.
The exclamation point within an equilateral triangle is intended to alert the user to the presence of important operation and servicing instructions in the literature accompanying the appliance.
For recycling or disposal information about this product, please contact your local authorities or the Electronics Industries Alliance: www.eiae.org.
WARNING: To prevent fire or shock hazard, do not expose this device to rain or moisture. Dangerous high voltage is present inside the enclosure. Do not open the cabinet.
Protect your hearing: Hearing experts advise against the constant use of personal stereos played at high volume. Constant exposure to high volumes can lead to hearing loss. If you should experience ringing in the ears or hearing loss, discontinue use and seek medical advice.
Note: If the product suddenly has no response or powers off, an electrostatic discharge may be the cause. In this circumstance, please follow the procedures below for recovery:
•Reset the player (use a paper clip to gently press the Reset button on the rear of the player).
•Turn on the unit again
Page 25 |
Safety Notices |
|
|

English
FCC Statement:
This device complies with Part 15 of the FCC Rules. Operation is subject to the following two conditions:
(1)This device may not cause harmful interference, and
(2)This device must accept any interference received, including interference that may cause undesired operation.
Note: This equipment has been tested and found to comply with the limits for Class B digital devices, pursuant to Part 15 of the FCC rules. These limits are designed to provide reasonable protection against harmful interference in a residential installation. This equipment generates, uses and can radiate radio frequency energy and, if not installed and used in accordance with the instructions, may cause harmful interference to radio communications. However, there is no guarantee that interference will not occur in a particular installation. If this equipment does cause harmful interference to radio or television reception, which can be determined by turning the equipment off and on, the user is encouraged to try to correct the interference by one or more of the following measures:
•Reorient or relocate the receiving antenna.
•Increase the separation between the equipment and receiver.
•Connect the equipment into an outlet on a circuit different from that to which the receiver is connected.
•Consult the dealer or an experienced radio/TV technician for help
Use of shielded cable is required to comply with Class B limits in Subpart B of Part 15 of the FCC rules.
Do not make any changes or modifications to the equipment unless otherwise specified in the manual. If such changes or modifications should be made, you could be required to stop operation of the equipment.
Page 26 |
Safety Notices |
|
|
 Loading...