


Operating Instructions for Your Cobra® microTALK® |
2-WAY RADIO MODEL PR 1100 WX |
Instrucciones operativas del |
RADIO BIDIRECCIONAL |
MODELO PR 1100 WX |
Cobra® microTALK® |
Nothing comes close to a Cobra™
Nada se compara a Cobra™
English, pages 1-20 Español, páginas 21-38

P R O D U C T F E AT U R E S |
ENGLISH |
Antenna |
ON/OFF |
||
VOLUME |
|||
|
|||
|
COMPASS switch |
|
|
|
button |
backlit LCD |
|
|
|
||
|
|
display |
|
TALK |
|
CHANNEL |
|
button |
|
SELECT |
|
|
|
button |
|
LIGHT/MAX |
|
charger |
|
RANGE |
|
jack |
|
button |
|
ENTER button |
|
|
|
||
CALL |
|
MODE button |
|
|
|
||
button |
|
|
|
HI/LO (power) |
|
|
|
LOCK button |
|
|
|
speaker/ |
|
||
microphone |
|
||
Important |
|
|
|
FCC Licensing |
TALK |
|
|
Information |
|
||
button |
|
||
The PR 1100 WX radio |
|
||
|
|
||
operates on General |
|
|
|
Mobile Radio Service |
|
|
|
(GMRS) frequencies |
LIGHT/MAX |
|
|
which require a Federal |
|
||
Communications |
RANGE button |
|
|
Commission (FCC) |
|
|
|
license. See page 18 for |
|
|
|
licensing and additional |
|
|
|
information. |
|
|
|
1
belt clip
LOCK tab
battery compartment
external speaker/ microphone jack
ENGLISH |
P R O D U C T F E AT U R E S |
Product Features
•TWO-WAY RADIO with up to a 5 mile (8 km) range
•22 CHANNELS (7 shared with FRS/GMRS,
7 FRS only, 8 GMRS only)
•38 CTCSS PRIVACY CODES
•Selectable HI/LOW POWER Output (on all GMRS channels)
•UHF FM frequencies
•BACKLIT LCD display
•EXTERNAL SPEAKER/MICROPHONE jack
•10 MEMORY LOCATIONS
•FULL CHANNEL/CTCSS SCAN
•MEMORY SCAN
•10 NOAA weather channels
•Automatic NOAA All Hazards Alerts
•WATER RESISTANT
•SIGNAL STRENGTH Meter
•MAXIMUM RANGE Extender
•10 CALL SIGNAL selections
•VibrAlert™
•VOX MODE for hands-free transmissions
•8-point DIGITAL COMPASS
•CLOCK
•STOPWATCH
•Selectable “ROGER BEEP”
•Selectable KEYSTROKE TONES
•AUTO SQUELCH
•CALL button
•BATTERY SAVER circuitry
•LOCK button
•BELT CLIP
signal strength meter icon
compass icon
BACKLIT LCD DISPLAY
call tones and |
roger beep |
stopwatch |
keystroke |
VibrAlert™ icon |
icon |
icon |
tones icon |
|
|
|
key lock |
|
|
|
icon |
|
|
|
vox icon |
scan icon |
|
|
low power icon |
receive/transmit |
|
CTCSS Privacy |
|
tower icon |
|
Code numbers |
|
main channel |
|
memory |
memory |
|
location |
||
numbers |
|
icon |
|
power saver |
|
am/pm |
|
|
indicators |
||
icon |
NOAA |
NOAA All Hazards |
|
|
|||
|
battery level meter weather |
Alerts icon |
|
icon
2
O P E R AT I O N
Installing or Replacing
Batteries
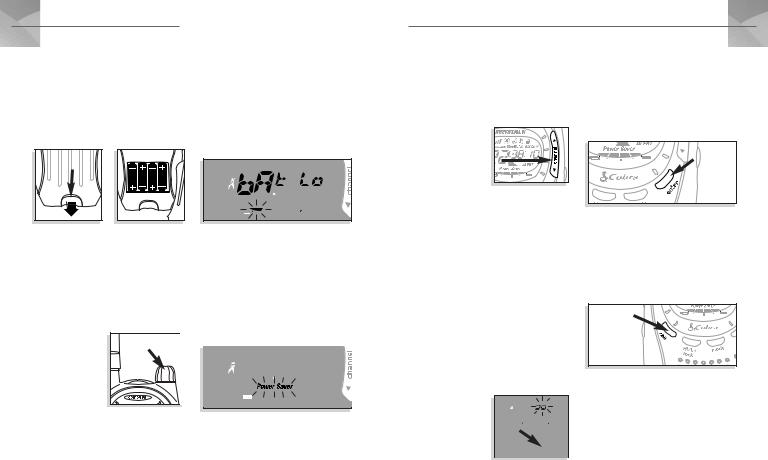
1.Pull down the LOCK tab to remove the battery compartment cover.
2.Insert four AAA batteries. (Always use high quality batteries.) Position batteries according to polarity markings.
Lock tab
(NOTE: See page 20 for information about optional battery pack, charger, and additional accessories.)
Turning On Your microTALK® Radio
1. Rotate the ON-OFF/VOLUME switch clockwise to turn
on the unit (and to adjust the volume). An audible tone will indicate the radio is on.
2.Your microTALK® is now in Standby mode, ready to receive transmissions. The radio is always in Standby mode except when the TALK, CALL, or MODE buttons are pressed.
ENGLISH
Battery Low
Battery power is indicated by the segments appearing at the bottom of the LCD. As battery power decreases, fewer segments will be visible. When BAT LO begins to flash, the batteries should be replaced. If you are using rechargeable batteries, they should be recharged.
Auto Battery Save
Your microTALK® radio has a unique circuit designed to extend battery life. If there are no transmissions within 10 seconds, the unit will automatically switch to Battery Save mode and POWER SAVER will appear in the display. This will not affect the unit’s ability to receive incoming transmissions.
ENGLISH |
O P E R AT I O N |
Selecting a Channel
Channels 1-7 are shared with FRS/GMRS. Channels 8-14 are FRS only. Channels15-22 are GMRS only. (IMPORTANT: See page 19 for FRS/GMRS frequency allocations and compatibility chart.)
1. With the radio on,
select any of the 22 channels by pushing the CHANNEL SELECT
button up or down. (NOTE: Both radios must be tuned to the same channel
to communicate.)
Selecting a CTCSS Privacy Code
CTCSS (Continuous Tone Coded Squelch System) is an advanced tone coding system allowing you to select one of 38 privacy codes to reduce interference from other users on the channel. (NOTE: If you are using a privacy code, both radios must be tuned to the same channel and privacy code to communicate. Each channel will remember the last privacy code you selected.)
To select a privacy code:
1. After selecting a 


 main channel,


 press and release


 the MODE button.

 A small number
  will flash next to the channel in the LCD.
2.Push the CHANNEL SELECT button up or down to select a privacy code. You can hold the button up or down for fast advance.
3.When your desired privacy code is displayed, press and release the ENTER button.
ENTER button
Calling Another Person
To alert another person that you are calling:
1.Press and release the CALL button. The other person will hear a 2-second ringing tone. (See page 15 on how to select between 10 call tone settings.)
CALL button
You cannot send or receive transmissions during the 2-second call tone.
3 |
4 |
O P E R AT I O N
Talking to Another Person
1. |
Press and hold the |
|
|
|
TALK button. |
TALK button |
|
2. |
With the |
||
|
|||
|
microphone about |
|
|
|
2 inches (5 cm) |
|
|
|
from your mouth, speak in a normal voice. |
||
away
 2inches
3.Release the button when you’re finished talking and listen for a response.
You cannot receive incoming calls while pressing the TALK button.
“Roger Beep” Confirmation Tone
Your listener will hear an audible tone when you release the TALK button. This alerts the other party that you are finished talking and it is OK for them to speak. (NOTE: The Roger Beep can be turned off and on, see page 15.)
Listening for a Response
When you are finished talking:
1.Release the TALK button to receive incoming transmissions. Your microTALK® is always in listening mode while the TALK button is not pressed.
ENGLISH
2.Adjust the volume by rotating the ON-OFF/VOLUME switch.
ON/OFF
VOLUME
SWITCH
Illuminating the Display
1.Press and release the LIGHT/MAX RANGE button to illuminate the display for
10 seconds.
LIGHT/MAX RANGE  button


Auto Squelch
Your microTALK® radio is equipped with Auto Squelch, which automatically shuts off weak transmissions and unwanted noise due to terrain or conditions, or if you’ve reached your maximum range limit.
(NOTE: To learn more about the range of your microTALK® radio, see page 16.)
ENGLISH |
O P E R AT I O N |
Maximum Range Extender
You can temporarily |
LIGHT/MAX |
turn off Auto Squelch, |
RANGE button |
allowing all signals |
|
to be received |
|
and extending the |
|
maximum range of your radio: |
|
1.Press and hold the LIGHT/MAX RANGE button for 5 seconds. You will hear 2 beeps indicating that Maximum Range Extender is on.
2.To turn Maximum Range Extender off, press and hold the LIGHT/MAX RANGE button for 1 second, or change channels.
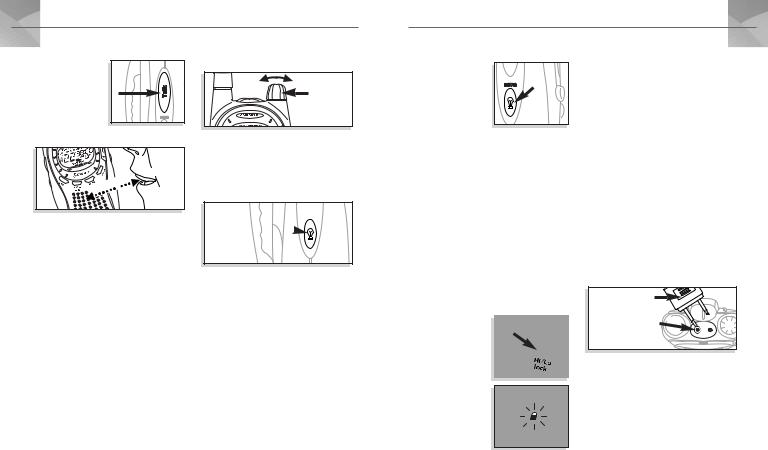
Using the Lock Function
The Lock function locks the CHANNEL, MODE and ENTER buttons to prevent accidental operation. To use the Lock function:
1. While in Standby mode, press and hold the LOCK button for one second. The Lock icon will blink
when the unit is locked. Buttons that are NOT
locked are the
CALL, LIGHT/MAX RANGE, and TALK buttons,
which are all fully functional while the unit is locked.
2.To “unlock” buttons, press and release the LOCK button again. The Lock
icon disappears and all buttons will be unlocked.
External Speaker/
Microphone Jack
Your microTALK® radio can be fitted with an external speaker/microphone, freeing your hands for other tasks. (See page 20 for optional accessories.)
To attach an external speaker/microphone:
1.Open the SPKR/MIC tab on top of the unit.
2.Insert the plug into the SPKR/MIC jack.
external microphone speaker
speaker/microphone jack
(CAUTION: Do not use an external speaker/microphone with common ground circuits with this radio. Damage
can result. We recommend using only Cobra® authorized accessories.)
5 |
6 |
O P E R AT I O N
Using the MODE button
The MODE button allows you to use and program the various functions of your microTALK® radio. If you press and hold the MODE button, the LCD will cycle through the different functions.
MODE button
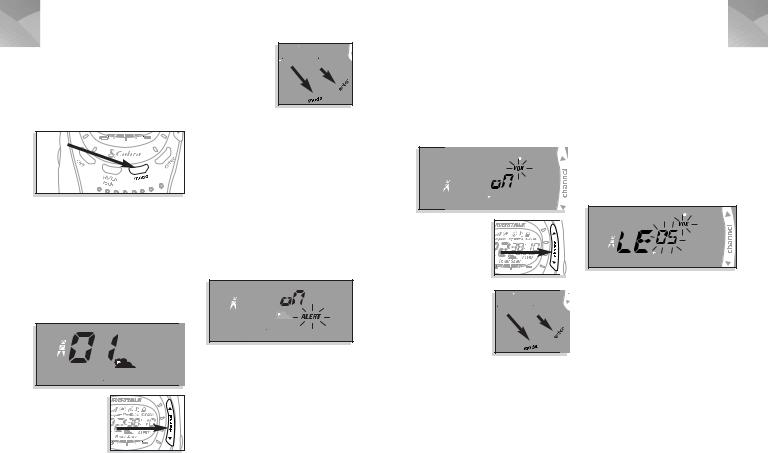
Listening to NOAA* Weather Channels
You can use your microTALK® to listen to NOAA weather channels transmitting in your area. To listen to weather channels:
1.Press the MODE button until the Weather icon and the currently selected weather channel are displayed in the LCD.
ENGLISH
3. Press and release the ENTER button
to leave Weather Channel mode, or press and release
the MODE button to proceed to other functions.
NOAA* All Hazards Alert
You can also program your microTALK® to sound a tone alert when a local NOAA channel activates an Emergency All Hazards Alert. This will warn you of weather, chemical and other civilian emergencies. To turn on All Hazards Alert:
1.Press the MODE button until the Alert icon flashes and the current setting (“on” or “off”) is displayed in the LCD.
|
|
2. Press the CHANNEL SELECT button up or |
|
|
|
down to turn All Hazards Alert on or off. |
|
2. Push the CHANNEL |
|
3. Press and release the ENTER button to save |
|
CHANNEL SELECT |
the setting and exit Alert mode, or press the |
||
SELECT button |
|||
MODE button to proceed to other functions. |
|||
button |
|||
up or down |
|||
|
The Alert icon will continue to show in the |
||
to change the |
|
||
|
LCD when All Hazards Alert is on. |
||
weather channel. |
|
||
|
|
||
|
|
*National Oceanographic and Atmospheric Administration |
ENGLISH
Using VOX Mode
In VOX mode, your microTALK® can be used "hands-free," automatically transmitting when you speak. To turn VOX mode on and off:
1. Press the MODE button until the VOX icon |
||
flashes and the current setting ("on" or |
||
"off") is displayed. |
|
|
2. Push the CHANNEL |
CHANNEL SELECT |
|
SELECT button up |
||
button |
||
or down to turn |
||
|
||
VOX mode on |
|
|
or off. |
|
|
3. Press and release the ENTER button
to enter the new setting, or press the MODE button
to enter the new setting
and proceed to other functions.
O P E R AT I O N
Setting the VOX
Sensitivity Level
You can set the VOX sensitivity level to fit the volume of your voice and avoid transmissions triggered by background noise. To set
the sensitivity:
1.Press the MODE button until the VOX icon flashes and the number for the current sensitivity level is displayed next to
the letter L (level 5 = most sensitive, level 1 = least sensitive).
2.Push the CHANNEL SELECT button up or down to change the setting.
3.Press and release the ENTER button to enter the new setting, or press the MODE button to enter the new setting and proceed to other functions.
7 |
8 |
O P E R AT I O N
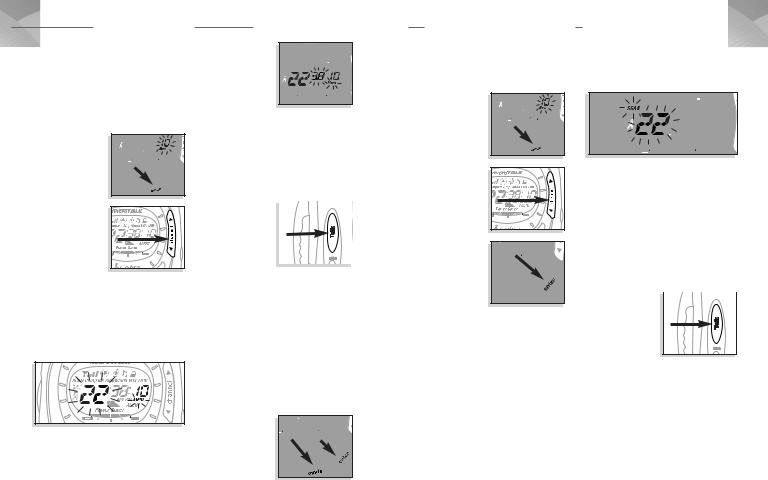
Programming Memory Locations
Your microTALK® radio has 10 memory locations (1-10) for storing your most frequently used channels and privacy codes. To program locations:
1. Push the MODE |
|
|
button until the |
MODE |
|
Memory icon and |
||
button |
||
the memory |
||
|
||
location flashes. |
|
2. Select the memory
location you wish to change by pushing the CHANNEL SELECT
button up or down. (NOTE: You must press the channel button before programming a memory location.)
3.Press and release the MODE button again. The Memory icon and the main channel number will flash.
4.Select the main channel you wish to store by pushing the CHANNEL SELECT button up or down.
ENGLISH
5. Press the MODE button again to store the main channel in memory and move to
privacy code selection. The privacy code number begins flashing and the Memory icon continues to flash.
6.Select the privacy code (00-38) you wish to store by pushing the CHANNEL SELECT button up or down.
7.Press the ENTER
button to program
your selection. You may also press the
TALK button to
transmit your selected channel and privacy code, which will be stored into the memory location you are using. (NOTE: To “unprogram” a memory location you programmed previously, select 00 for both the main channel and privacy code in steps 4 through 6.)
8.Press and release the ENTER button to return to Standby mode at your new memory location, or press and release
the MODE button to save the memory location and proceed to other functions.
ENGLISH
Recalling Memory Locations
To recall a channel you have stored in a memory location:
1. Press the MODE |
|
button until the |
MODE |
Memory icon and |
|
a memory |
button |
|
|
location flashes. |
|
2. Select your
desired memory location by pushing the CHANNEL SELECT
button up or
down. Press the ENTER button
to select your memory location channel. You will
now be in Standby Mode on that channel.
3.Repeat steps 1 and 2 to recall other memory locations.
Using the Scan Function
Your microTALK® radio can automatically scan main channels (1-22), the privacy codes (00-38) within one main channel, or memory locations.
O P E R AT I O N
To scan main channels:
1.Press the MODE button until the Scan icon and main channel number flashes.
2.Push the CHANNEL SELECT button up or down and the unit will begin scanning the main channels. (NOTE: The unit “ignores” privacy codes while scanning main channels.)
3.The radio will continue to scan all main channels and stop if an incoming transmission is detected. The unit will remain on that channel for 10 seconds. During that time you can:
a)Press and hold 
the TALK button |
TALK button |
|
and talk. The radio |
||
|
||
will remain on that |
|
|
channel and return |
|
|
to Standby mode. |
|
b)Push the CHANNEL SELECT button up or down to resume scanning main channels.
c)Press the MODE button to proceed to privacy code scanning (see following page).
If you do not press any button within 10 seconds, the radio will automatically resume scanning main channels.
9 |
10 |
O P E R AT I O N
Using the Scan Function (continued):
To scan privacy codes:
1.While in Standby mode, press the CHANNEL SELECT button up or down to choose the main channel you wish to scan.
2.Press the MODE button until the Scan icon and the privacy code number flashes.
MODE


 button
ENGLISH
c) Press the MODE button to proceed to memory location scanning (see below).
If you do not press any button within 10 seconds, the radio will automatically resume scanning privacy codes.
To scan memory locations:
1.Press the MODE button until the Scan icon, Memory Location icon and memory location number flashes.
3.Push the CHANNEL SELECT button up or down and the unit will begin scanning privacy codes within the main channel you selected.
4.The radio will continue to scan privacy codes and stop if an incoming transmission is detected. The unit will remain on that code for 10 seconds. During that time
you can:
a)Press and hold the TALK button and talk. The radio will remain on that channel and privacy code, then return to Standby mode.
b)Push the CHANNEL SELECT button up or down to resume scanning privacy codes.
2.Push the CHANNEL SELECT button up or down and the unit will begin scanning memory locations.
3.The radio will continue to scan all memory locations and stop if an incoming transmission is detected. The unit will remain on that location for 10 seconds. During that time you can:
a) Press and hold the TALK button and talk. The radio will remain on that memory
location channel and return to Standby mode.
ENGLISH |
O P E R AT I O N |
To scan memory locations (continued):
b) Push the CHANNEL SELECT button up or down to resume scanning memory locations.
CHANNEL SELECT button
c) Press the MODE button to proceed to other functions.
If you do not press any button within 10 seconds, the radio will automatically resume scanning memory locations.
(NOTE: If you want to reduce the number of memory locations being scanned you need to ”unprogram“ all unwanted locations by changing both the main channel and privacy code to 00. See Programming Memory Locations, page 9.)
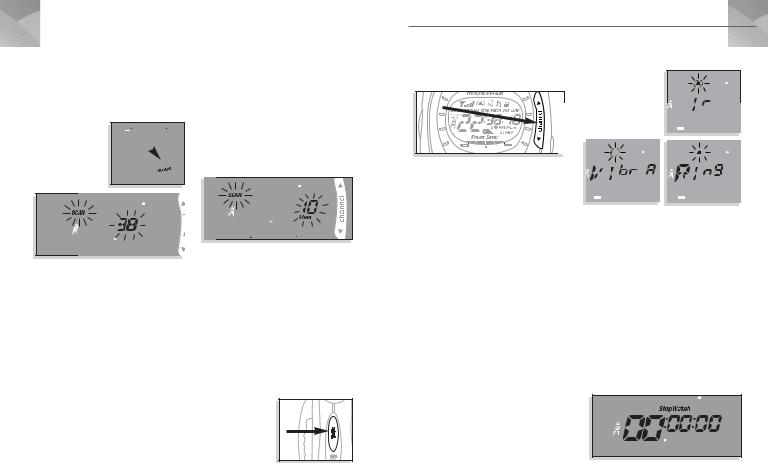
Using Call Tones
and VibrAlert™
Your microTALK® radio can alert you to incoming signals by sounding an audible call tone, by vibrating silently, or both. To change ring settings:
1.Press the MODE button until the Ring Setting icon flashes and the current
setting (Vibrate + Ring, Vibrate
Only, or Ring Only) is displayed.
 Vibrate Only
2.Push the CHANNEL SELECT button up or down to change the ring setting.
3.Press and release the ENTER button to enter the new setting, or press the MODE button to enter the new setting and proceed to other functions.
Stop Watch
You can use the timekeeping capability of your microTALK® radio as a stopwatch, including the display of “split” times. To use the stop watch:
1.Press the MODE button until “Stop Watch” and 00:oo:oo are displayed in the LCD.
11 |
12 |
 Loading...