


Model SR6000
Owner’s Guide

limited lifetime consumer warranty
This Ungo Pro Security system is warranted against defects in material and workmanship. The main unit is covered by this limited lifetime warranty. This Limited Lifetime Warranty applies to Ungo Pro Security systems that have been installed by an authorized Ungo Pro Security dealer. This warranty is to the Original Purchaser ("Owner") and to the original vehicle in which it was installed into. This warranty is not transferable to any subsequent owner(s) of the product(s).
Warranty Program: |
|
Main Unit |
Limited Lifetime |
Remote Controls |
One year from date of purchase |
Siren |
One year from date of purchase |
Shock Sensor |
One year from date of purchase |
LED |
One year from date of purchase |
Override Switch |
One year from date of purchase |
The Warranty does not cover batteries or products deemed damaged through alterations or installation. It also does not cover products mishandled, misused, neglected, abused, water damaged, or with removed/altered serial numbers.
PROOF OF PURCHASE WILL BE REQUIRED FOR WARRANTY SERVICE OF THIS PRODUCT.
This warranty does not cover the costs incurred for removal or reinstallation of the main unit and/or any damage to the vehicle or the vehicle's electrical system.
The sole responsibility of Clarion Corporation of America ("Clarion") under this Warranty shall be limited to the repair or replacement of the product, at the sole discretion of Clarion.
If it becomes necessary to send the product or any defective part to Clarion, the product must be shipped in its original carton or equivalent carton, fully insured, with shipping charges prepaid. Clarion will not assume any responsibility for any loss or damage incurred in shipping.
ALL IMPLIED WARRANTIES EXCEPT TO THE EXTENT PROHIBITED BY APPLICABLE LAW SHALL HAVE NO GREATER DURATION THAN THE WARRANTY PERIOD SET FORTH ABOVE. UNDER NO CIRCUMSTANCES SHALL CLARION CORPORATION BE LIABLE FOR ANY LOSS OR DAMAGE, DIRECT OR CONSEQUENTIAL, ARISING OUT OF THE USE OR INABILITY TO USE OF THE PRODUCT. BECAUSE SOME STATES DO NOT ALLOW LIMI-
© 2 0 0 5 d i r e c t e d e l e c t r o n i c s , i n c . |
i |
TATIONS ON HOW LONG AN IMPLIED WARRANTY LASTS OR EXCLUSIONS OR LIMITATIONS OF INCIDENTAL OR CONSEQUENTIAL DAMAGES, THE ABOVE LIMITATIONS OR EXCLUSIONS MAY NOT APPLY TO YOU.
THIS WARRANTY GIVES YOU SPECIFIC LEGAL RIGHTS, AND YOU MAY ALSO HAVE THE OTHER RIGHTS, WHICH VARY FROM STATE TO STATE.
Should you have any difficulties with the performance of this product during warranty, please call: 1-800-GO-CLARION or visit your local Ungo Pro Security dealer. You may also contact the National Service Manager at the following address below for additional service help you may need.
Clarion Corporation of America
Attn: National Service Manager
661 W. Redondo Beach Blvd.
Gardena, Ca 90247
ii
© 2 0 0 5 d i r e c t e d e l e c t r o n i c s , i n c .

table of contents
limited lifetime consumer warranty. . . . . . . . . . . . . . . . . . . . . . . . . . . . . . . . . . . . . . . . i remote configurations . . . . . . . . . . . . . . . . . . . . . . . . . . . . . . . . . . . . . . . . . . . . . . . . . 3 LCD 2-way configuration . . . . . . . . . . . . . . . . . . . . . . . . . . . . . . . . . . . . . . . . . . 3 standard 4-button configuration . . . . . . . . . . . . . . . . . . . . . . . . . . . . . . . . . . . . . 5 what is included. . . . . . . . . . . . . . . . . . . . . . . . . . . . . . . . . . . . . . . . . . . . . . . . . . . . . . 6 important information . . . . . . . . . . . . . . . . . . . . . . . . . . . . . . . . . . . . . . . . . . . . . . . . . 6 system maintenance . . . . . . . . . . . . . . . . . . . . . . . . . . . . . . . . . . . . . . . . . . . . . . 7 fcc/id notice . . . . . . . . . . . . . . . . . . . . . . . . . . . . . . . . . . . . . . . . . . . . . . . . . . . . 8 caution . . . . . . . . . . . . . . . . . . . . . . . . . . . . . . . . . . . . . . . . . . . . . . . . . . . . . . . . 9 remote functions . . . . . . . . . . . . . . . . . . . . . . . . . . . . . . . . . . . . . . . . . . . . . . . . . . . . . 9 LCD 2-way remote standard configuration. . . . . . . . . . . . . . . . . . . . . . . . . . . . . 9 Standard LCD 2-way icon configuration . . . . . . . . . . . . . . . . . . . . . . . . . . . . . 11 LCD 2-way remote operation . . . . . . . . . . . . . . . . . . . . . . . . . . . . . . . . . . . . . . . . . . 18 system signal paging features. . . . . . . . . . . . . . . . . . . . . . . . . . . . . . . . . . . . . . . 18 using your system . . . . . . . . . . . . . . . . . . . . . . . . . . . . . . . . . . . . . . . . . . . . . . . . . . . 19 warning! safety first . . . . . . . . . . . . . . . . . . . . . . . . . . . . . . . . . . . . . . . . . . . . . . 19 active arming. . . . . . . . . . . . . . . . . . . . . . . . . . . . . . . . . . . . . . . . . . . . . . . . . . . 21 passive arming. . . . . . . . . . . . . . . . . . . . . . . . . . . . . . . . . . . . . . . . . . . . . . . . . . 22 warn away® response description . . . . . . . . . . . . . . . . . . . . . . . . . . . . . . . . . . . . 23 triggered response description . . . . . . . . . . . . . . . . . . . . . . . . . . . . . . . . . . . . . . 24 multi-level security arming . . . . . . . . . . . . . . . . . . . . . . . . . . . . . . . . . . . . . . . . 25 arming while driving. . . . . . . . . . . . . . . . . . . . . . . . . . . . . . . . . . . . . . . . . . . . . 26 disarming . . . . . . . . . . . . . . . . . . . . . . . . . . . . . . . . . . . . . . . . . . . . . . . . . . . . . 27 disarming while driving. . . . . . . . . . . . . . . . . . . . . . . . . . . . . . . . . . . . . . . . . . . 27 high security disarm . . . . . . . . . . . . . . . . . . . . . . . . . . . . . . . . . . . . . . . . . . . . . 27 disarming without a remote . . . . . . . . . . . . . . . . . . . . . . . . . . . . . . . . . . . . . . . 28 silent mode . . . . . . . . . . . . . . . . . . . . . . . . . . . . . . . . . . . . . . . . . . . . . . . . . . . . 29 panic mode . . . . . . . . . . . . . . . . . . . . . . . . . . . . . . . . . . . . . . . . . . . . . . . . . . . . 29 valet® mode . . . . . . . . . . . . . . . . . . . . . . . . . . . . . . . . . . . . . . . . . . . . . . . . . . . . 30 remote start. . . . . . . . . . . . . . . . . . . . . . . . . . . . . . . . . . . . . . . . . . . . . . . . . . . . 31 valet® take-over . . . . . . . . . . . . . . . . . . . . . . . . . . . . . . . . . . . . . . . . . . . . . . . . . 33 short-run/turbo. . . . . . . . . . . . . . . . . . . . . . . . . . . . . . . . . . . . . . . . . . . . . . . . . 34 setting the clock . . . . . . . . . . . . . . . . . . . . . . . . . . . . . . . . . . . . . . . . . . . . . . . . 34 temperature check mode . . . . . . . . . . . . . . . . . . . . . . . . . . . . . . . . . . . . . . . . . . 35 timer mode . . . . . . . . . . . . . . . . . . . . . . . . . . . . . . . . . . . . . . . . . . . . . . . . . . . . 35
© 2 0 0 5 d i r e c t e d e l e c t r o n i c s , i n c . |
1 |
safety features. . . . . . . . . . . . . . . . . . . . . . . . . . . . . . . . . . . . . . . . . . . . . . . . . . . . . . . 36 starter anti-grind circuitry . . . . . . . . . . . . . . . . . . . . . . . . . . . . . . . . . . . . . . . . . 36 disabling the remote start system. . . . . . . . . . . . . . . . . . . . . . . . . . . . . . . . . . . . 37 over and under rev protection . . . . . . . . . . . . . . . . . . . . . . . . . . . . . . . . . . . . . . 37 shut down inputs . . . . . . . . . . . . . . . . . . . . . . . . . . . . . . . . . . . . . . . . . . . . . . . 37 nuisance prevention circuitry . . . . . . . . . . . . . . . . . . . . . . . . . . . . . . . . . . . . . . 38
24-hour timer mode . . . . . . . . . . . . . . . . . . . . . . . . . . . . . . . . . . . . . . . . . . . . . . . . . 39 diagnostics . . . . . . . . . . . . . . . . . . . . . . . . . . . . . . . . . . . . . . . . . . . . . . . . . . . . . . . . . 39 arming diagnostics . . . . . . . . . . . . . . . . . . . . . . . . . . . . . . . . . . . . . . . . . . . . . . 40 disarming diagnostics . . . . . . . . . . . . . . . . . . . . . . . . . . . . . . . . . . . . . . . . . . . . 40 system status chirps. . . . . . . . . . . . . . . . . . . . . . . . . . . . . . . . . . . . . . . . . . . . . . 41 table of zones . . . . . . . . . . . . . . . . . . . . . . . . . . . . . . . . . . . . . . . . . . . . . . . . . . 41 interpreting zone diagnostics. . . . . . . . . . . . . . . . . . . . . . . . . . . . . . . . . . . . . . . 42 code hopping . . . . . . . . . . . . . . . . . . . . . . . . . . . . . . . . . . . . . . . . . . . . . . . . . . . . . . . 43 high frequency . . . . . . . . . . . . . . . . . . . . . . . . . . . . . . . . . . . . . . . . . . . . . . . . . . . . . . 43 owner recognition . . . . . . . . . . . . . . . . . . . . . . . . . . . . . . . . . . . . . . . . . . . . . . . . . . . 44 rapid resume logic . . . . . . . . . . . . . . . . . . . . . . . . . . . . . . . . . . . . . . . . . . . . . . . . . . . 44 power saver mode . . . . . . . . . . . . . . . . . . . . . . . . . . . . . . . . . . . . . . . . . . . . . . . . . . . 45 programming options . . . . . . . . . . . . . . . . . . . . . . . . . . . . . . . . . . . . . . . . . . . . . . . . 45 security & convenience expansions . . . . . . . . . . . . . . . . . . . . . . . . . . . . . . . . . . . . . . 48 glossary of terms . . . . . . . . . . . . . . . . . . . . . . . . . . . . . . . . . . . . . . . . . . . . . . . . . . . . 50
2 |
© 2 0 0 5 d i r e c t e d e l e c t r o n i c s , i n c . |

remote configurations
LCD 2-way configuration
4 |
3 |
2 |
1 |
5 |
|
|
31 |
6 |
|
|
|
|
|
30 |
|
7 |
|
|
|
|
|
29 |
|
8 |
|
|
|
|
|
28 |
|
9 |
|
|
|
|
|
|
|
10 |
|
|
27 |
|
|
|
|
11 |
|
|
26 |
|
|
|
|
|
|
|
25 |
12 |
|
|
24 |
13 |
|
|
23 |
14 |
|
|
22 |
15 |
|
|
21 |
|
|
|
20 |
16 |
|
|
19 |
|
|
|
|
17 |
|
|
18 |
© 2 0 0 5 d i r e c t e d e l e c t r o n i c s , i n c . |
3 |
1 |
Vehicle Interior Temperature Indicator |
2 |
Numeric Display |
3 |
AM/PM Indicator |
4 |
Alarm Clock Mode Indicator |
5 |
Timer Function Indicator |
6 |
Transmit Range Indicator |
7 |
Transmission Indication |
8 |
Vibrate/Beep Mode Indicator |
9 |
Power Saver Mode Indicator |
10 |
Remote Start Timer Mode Indicator |
11 |
No Function |
12 |
Vehicle Page Mode Indicator |
13 |
Full Trigger Shock Sensor Indicator |
14 |
Hood/Trunk Open or Trigger Indicator |
15 |
Parking Light Indicator |
16 |
Door Open or Trigger Indicator |
17 |
Arm/Lock Button |
18 |
Disarm/Unlock Button |
19 |
Remote Start Indicator |
20 |
Hood/Trunk Open or Trigger Indicator |
21 |
Remote Start Button |
22 |
Valet® Mode Indicator |
23 |
Remote Start Safety Shutdown Indicator |
24 |
Battery Level Indicator |
25 |
Auxiliary Button |
26 |
Temperature-Controlled Remote Start Indicator |
27 |
Silent Arm/Disarm Mode Indicator |
28 |
Full Trigger Alert Indicator |
29 |
Arm/Disarm Indicator |
30 |
Function Button |
31 |
Celsius/Fahrenheit Indicator |
4 |
© 2 0 0 5 d i r e c t e d e l e c t r o n i c s , i n c . |
standard 4-button configuration
controls the Arm and Panic On/Off function.
 controls the Disarm and Panic Off function.


 controls Silent Mode™ and Auxiliary channel 2 output.


 controls the Remote Start function.
and |
pressed together control the Timer mode. |
and |
pressed together control Turbo/Short Run. |
and |
pressed together control channel 4 output. |
and |
pressed together control channel 5 output. |
© 2 0 0 5 d i r e c t e d e l e c t r o n i c s , i n c . |
5 |

what is included
Control module
ASK transceiver/antenna
One 4-button remote
One 2-way LCD remote
Stinger™ DoubleGuard® 2-stage shock sensor
Revenger™ Soft Chirp™ 6-tone programmable siren
Status LED indicator light
Push-button Valet® switch
Shut-down toggle switch
important information
Congratulations on the purchase of your combination remote start alarm system. Due to the complexity of this system, it must be installed by an authorized dealer only. Installation of this product by anyone other than an authorized dealer voids the warranty. All dealers are provided with a preprinted dealer certificate to verify authorization.
By carefully reading this Owner's Guide prior to using your system, you will maximize the use of this system and its features. You can print additional or replacement copies of this manual by accessing our web site at www.clarion.com.
6 |
© 2 0 0 5 d i r e c t e d e l e c t r o n i c s , i n c . |
system maintenance
The system requires no specific maintenance other than battery replacement for the remotes.
LCD 2-Way Remote Battery Replacement
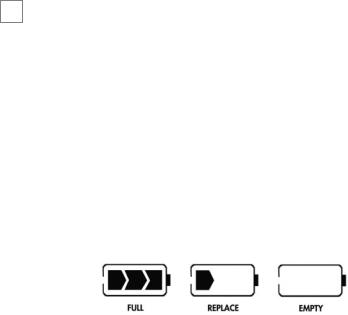
The 2-way remote is powered by a 1.5V AAA battery. The Battery Level indicator has three level indicators that serve as a visual indication of battery charge. When the battery reaches a low charge level that requires replacement, the transceiver will generate a single notification chirp, and the Battery Level indicator will flash continuously.
To replace the battery, gently pull the battery cover release tab, then slide the door down to expose the battery and remove the expired battery. Place the new battery into the transceiver observing the correct polarity. When power is returned the transceiver will light all icons in the LCD and generate all beeper tones once.
4-Button Remote Battery Replacement
Your remote is powered by a small, lightweight 3-volt lithium battery (CR2032) that will last approximately one year under normal use. When the battery begins to weaken, operating range will be reduced and the LED on the remote will dim.
© 2 0 0 5 d i r e c t e d e l e c t r o n i c s , i n c . |
7 |
fcc/id notice
This device complies with Part 15 of FCC rules. Operation is subject to the following two conditions: (1) This device may not cause harmful interference, and (2) This device must accept any interference received, including interference that may cause undesirable operation.
Directed Electronics, Inc. |
544 Series |
Tested to Comply with FCC Standards
Directed Electronics, Inc. |
477T Series |
Tested to Comply with FCC Standards
Directed Electronics, Inc. |
474V/P/S Series |
Tested to Comply with FCC Standards
Changes or modifications not expressly approved by the party responsible for compliance could void the user's authority to operate this device.
8 |
© 2 0 0 5 d i r e c t e d e l e c t r o n i c s , i n c . |

caution
This product is designed for fuel injected, automatic transmission vehicles only. Use of this product in a standard transmission vehicle is dangerous and contrary the product's intended use.
remote functions
The remote buttons are used to send commands to the system. The descriptions below reflect the standard configuration for this system. The buttons can be custom configured for the user’s specific needs by the installer.
LCD 2-way remote standard configuration
LCD 2-way button configuration


 Button
The System Arm/Lock and Multi-Level Security Arming functions are controlled by pressing this button.


 Button
The System Disarm/Unlock and High Security Disarm functions are controlled by pressing this button.


 Button
Channel 2 output is controlled by pressing and holding this button for two seconds.


 Button
The panic feature is controlled by pressing and holding this button for three seconds. Press again to disable panic mode.
© 2 0 0 5 d i r e c t e d e l e c t r o n i c s , i n c . |
9 |


 Button
The LCD backlighting will turn on when pressed for less than one second; when held for more than five seconds the transceiver will enter adjustment mode allowing the setting of the clock, timer mode, and audible melody selection. For more information, please refer to the Function Button Configurations section of this guide.


 Button
The remote start function of the system is controlled by pressing this button for one second. To stop the remote start press this button twice. Also, stepping on the brake pedal will cancel the remote start.


 Button
When pressed and held this button activates the second unlock or other accessory.


 and
and 

 Buttons
When pressed simultaneously these buttons activate remote start timer mode, engaging the remote start function every 24 hours.


 ,
, 

 and
and 


 Buttons
When pressed simultaneously these buttons display the internal temperature of the vehicle on the LCD.

 and
and 

 Buttons
When pressed simultaneously with the system armed, the system enters temperature auto start mode and automatically remote starts the vehicle if the temperature inside the vehicle drops below 0 degrees Fahrenheit.
10 |
© 2 0 0 5 d i r e c t e d e l e c t r o n i c s , i n c . |
note: Disarming the system while in temperature auto start mode will cause the system to exit this mode.


 and
and 


 Buttons
The numeric display toggles between the time of the day and the alarm clock when these buttons are pressed simultaneously.


 and
and 

 Buttons
Press these buttons simultaneously to activate the parking timer. Each additional press will toggle through the available options (10 min., 20 min., 30 min., 1 hour, 1.5 hours, 2 hours, and off).


 and
and 

 Buttons
When pressed simultaneously these buttons toggle between beep notification and vibrate notification.


 and
and 

 Buttons
When pressed simultaneously these buttons activate battery saver mode, which will drop power consumption on the transceiver battery to zero when the alarm is inactive or disarmed.
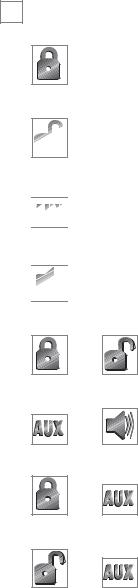
Standard LCD 2-way icon configuration

 Icon
Icon
The vehicle interior temperature icon displays the temperature of the inside of the vehicle when prompted.

 Icon
Icon
The numeric display icon will show the hours and minutes.
© 2 0 0 5 d i r e c t e d e l e c t r o n i c s , i n c . |
11 |


 Icon
Icon
The AM/PM icon indicates the time before or after noon.

 Icon
Icon
The alarm clock mode icon indicates that the alarm clock mode is active.

 Icon
Icon
The timer function icon flashes during timed functions including parking timer.

 Icon
Icon
The transmit range indicator icon stays visible as long as the system is within operating range.

 Icon
Icon
The remote transmission indicator icon displays when the transceiver is transmitting a signal.

 Icon
Icon
The vibrate/beep mode icon appears when the transceiver is set to vibrate mode.

 Icon
Icon
The power saver mode can be turned on or off with the transceiver. This icon displays the status.

 Icon
Icon
The remote start timer mode icon indicates the 24-hour autostart feature is active and automatically remote starts 24 hours from the time activated.
12 |
© 2 0 0 5 d i r e c t e d e l e c t r o n i c s , i n c . |


 Icon
Icon
The VRS mode icon has no function.

 Icon
Icon
The vehicle page mode icon displays when the alarm module is paging the transceiver.

 Icon
Icon
The full trigger shock sensor icon indicates that the shock sensor has been triggered by a hard shock.

 and
and 
 Icons
Icons
The hood/trunk open or trigger icon illuminates when the hood or trunk trigger has been activated or the hood or trunk is open, and bypasses those zones until it is closed.

 Icon
Icon
The parking light icon will flash twice when armed or disarmed. The icon also flashes during WarnAway and at the beginning and end of remote start cycles.

 Icon
Icon
The door open or trigger icon illuminates when the door trigger has been activated or the door is open, and bypasses that zone until it is closed.

 Icon
Icon
The remote start icon indicates when the vehicle is remotely started.
© 2 0 0 5 d i r e c t e d e l e c t r o n i c s , i n c . |
13 |


 Icon
Icon
The Valet® mode icon appears when the system is in Valet® mode.

 Icon
Icon
The remote start safety shut down icon indicates the vehicle may be in gear or other unsafe condition inhibiting remote start operation.

 Icon
Icon
The battery level icon indicates the level of power remaining in the battery.

 Icon
Icon
The temperature-controlled remote start icon indicates that the system has entered the temperature remote start mode and automatically starts the vehicle if the temperature of the vehicle drops below 0 degrees Fahrenheit.

 Icon
Icon
The silent arm/disarm icon appears when the system has been armed or disarmed in the silent mode.

 Icon
Icon
The full trigger alert icon illuminates when the security system has been triggered by a heavy impact, door trigger violation, optional sensor violation, or a hood/trunk trigger.

 Icon
Icon
The arm icon appears when the vehicle is armed and locked. The disarm icon appears when the vehicle is disarmed and unlocked.
14 |
© 2 0 0 5 d i r e c t e d e l e c t r o n i c s , i n c . |

 Icon
Icon
Celsius/Fahrenheit icon indicates the current mode of the
displayed temperature either in Celsius or Fahrenheit.
Standard LCD 2-way button functions
Function |
|
|
|
Button |
|
|
Icon |
|
Audible |
|||||||||
|
|
|
|
|
|
Indication |
||||||||||||
Lamp On |
|
|
|
|
|
|
|
|
|
|
|
|
|
|
|
|
|
|
|
|
|
|
|
|
|
|
|
|
|
|
|
|
|
|
|
||
(10 sec) |
|
|
|
|
|
|
|
|
|
|
|
|
|
|
|
|
|
|
|
|
|
|
|
|
|
|
|
|
|
|
|
|
|
|
|
||
|
|
|
|
|
|
|
|
|
|
|
|
|
|
|
|
|
|
|
Power-Saver Mode* |
|
|
|
|
|
|
|
|
|
|
|
|
|
Melody |
||||
|
|
+ |
|
|
|
|
|
|
|
|
|
|
|
|||||
|
|
|
|
|
|
|
|
|
|
|
||||||||
|
|
|
|
|
|
|
|
|
|
|
|
|
|
|
|
|
|
|
|
|
|
|
|
|
|
|
|
|
|
|
|
|
|
|
|
|
|
Beep/Vibrate Mode |
|
|
+ |
|
|
|
|
|
|
|
|
|
|
|
4 Vibrations/ |
|||
|
|
|
|
|
|
|
|
|
|
|
|
|
||||||
|
|
|
|
|
|
|
|
|
||||||||||
|
|
|
|
|
|
|
|
|
|
|
|
|
|
|
|
|
|
1 Beep |
|
|
|
|
|
|
|
|
|
|
|
|
|
|
|
|
|
|
|
|
|
|
|
|
|
|
|
|
|
|
|
|
|
|
|
|
|
|
Time Adjust |
|
|
|
|
for 5 Seconds |
|
|
|
|
|
|
|
|
2 Beeps |
||||
|
|
|
|
|
|
|
|
|
|
|
|
|||||||
Mode (hour)** |
|
|
|
|
|
|
|
|
|
|
|
|
|
|
|
|
|
|
|
|
|
|
|
|
|
|
|
|
|
|
|
|
|
|
|
|
|
Time Adjust |
|
|
|
1 Time*** |
|
|
|
|
|
|
|
|
|
|||||
|
|
|
|
|
|
|
|
|
|
|
|
|||||||
Mode (min)** |
|
|
|
|
|
|
|
|
|
|
|
|
|
|
|
|
|
|
|
|
|
|
|
|
|
|
|
|
|
|
|
|
|
|
|
||
|
|
|
|
|
|
|
|
|
|
|
|
|
|
|
|
|
|
|
Alarm Clock |
|
|
|
2 Times*** |
|
|
|
|
|
|
|
|
|
|||||
|
|
|
|
|
|
|
|
|
|
|
|
|||||||
Set Mode (hour)** |
|
|
|
|
|
|
|
|
|
|
|
|
|
|
|
|
|
|
|
|
|
|
|
|
|
|
|
|
|
|
|
|
|
|
|
||
|
|
|
|
|
|
|
|
|
|
|
|
|
|
|
|
|
|
|
Alarm Clock |
|
|
|
3 Times*** |
|
|
|
|
|
|
|
|
|
|||||
|
|
|
|
|
|
|
|
|
|
|
|
|||||||
Set Mode (min)** |
|
|
|
|
|
|
|
|
|
|
|
|
|
|
|
|
|
|
|
|
|
|
|
|
|
|
|
|
|
|
|
|
|
|
|
||
|
|
|
|
|
|
|
|
|
|
|
|
|
|
|
|
|
|
|
Alarm Clock Music |
|
|
|
4 Times*** |
|
|
|
|
|
|
|
|
5 Selections |
|||||
|
|
|
|
|
|
|
|
|
|
|
||||||||
or Power on Music |
|
|
|
|
|
|
|
|
|
|
|
|
|
|
|
1/2/3/4/5 |
||
Selection** |
|
|
|
|
|
|
|
|
|
|
|
|
|
|
|
|
|
|
|
|
|
|
|
|
|
|
|
|
|
|
|
|
|
|
|
|
|
Alarm Clock Adjust |
|
|
|
5 Times*** |
|
|
|
|
|
|
|
|
|
|
||||
|
|
|
|
|
|
|
|
|
|
|
|
|
||||||
Mode (on/off)** |
|
|
|
|
|
|
|
|
|
|
|
|
|
|
|
|
|
|
|
|
|
|
|
|
|
|
|
|
|
|
|
|
|
|
|
|
|
Timer Count Down |
|
|
|
6 Times*** |
|
|
|
|
|
|
|
|
|
|||||
|
|
|
|
|
|
|
|
|
|
|
|
|||||||
Adjust Mode |
|
|
|
|
|
|
|
|
|
|
|
|
|
|
|
|
|
|
(hour)** |
|
|
|
|
|
|
|
|
|
|
|
|
|
|
|
|
|
|
|
|
|
|
|
|
|
|
|
|
|
|
|
|
|
|
|
|
|
Timer Count Down |
|
|
|
7 Times*** |
|
|
|
|
|
|
|
|
|
|||||
|
|
|
|
|
|
|
|
|
|
|
|
|||||||
Adjust Mode |
|
|
|
|
|
|
|
|
|
|
|
|
|
|
|
|
|
|
(min)** |
|
|
|
|
|
|
|
|
|
|
|
|
|
|
|
|
|
|
|
|
|
|
|
|
|
|
|
|
|
|
|
|
|
|
|
|
|
© 2 0 0 5 d i r e c t e d e l e c t r o n i c s , i n c . |
15 |
 Loading...