


Owner's manual
NX702
DVD MULTIMEDIA STATION WITH BUILT-IN NAVIGATION & 7" TOUCH PANEL CONTROL

English
NX702 |
1 |

English
Contents
Thank you for purchasing this Clarion product.
•Please fully read this owner’s manual before operating this equipment and store it in a safe place.
•Check the contents of the enclosed warranty card and store it in a safe place with this manual.
1. FEATURES......................................................................................................................... |
3 |
Expanding Systems........................................................................................................... |
3 |
2. PRECAUTIONS.................................................................................................................. |
4 |
3. CAUTIONS ON HANDLING............................................................................................... |
6 |
Front Panel / Generalities.................................................................................................. |
6 |
Cleaning the body.............................................................................................................. |
6 |
USB Port............................................................................................................................ |
6 |
SD Slot............................................................................................................................... |
6 |
Handling Discs................................................................................................................... |
7 |
4. CONTROLS........................................................................................................................ |
8 |
Operational Panel.............................................................................................................. |
8 |
Names of Buttons.............................................................................................................. |
9 |
Remote Control ............................................................................................................... |
10 |
5. MAIN MENU OPERATION............................................................................................... |
12 |
6. SYSTEM SETUP.............................................................................................................. |
13 |
7. Disc Operation........................................................................................................... |
17 |
DVD System.................................................................................................................... |
17 |
Accessing a Disc.............................................................................................................. |
19 |
DVD Player Operation..................................................................................................... |
20 |
CD Player Operation........................................................................................................ |
22 |
MP3/WMA Playback........................................................................................................ |
23 |
MP4 Playback.................................................................................................................. |
25 |
8. SD/USB OPERATION...................................................................................................... |
26 |
Accessing an USB........................................................................................................... |
26 |
Accessing an SD Card..................................................................................................... |
26 |
SD/USB Audio Operation................................................................................................. |
27 |
SD/USB Video Operation................................................................................................. |
27 |
9. BLUETOOTH OPERATION............................................................................................. |
28 |
Bluetooth Telephone Operation....................................................................................... |
28 |
Bluetooth Audio Operation............................................................................................... |
30 |
10. SiriusXM Satellite Radio OPERATION......................................................................... |
31 |
11. HD Radio OPERATION.................................................................................................. |
34 |
12. itunes Tagging.............................................................................................................. |
36 |
13. iPod & iPhone Operation......................................................................................... |
37 |
14. PANDORA Operation................................................................................................ |
39 |
15. Navigation Operation........................................................................................... |
40 |
16. AUX Operation.......................................................................................................... |
40 |
17. TROUBLE SHOOTING................................................................................................... |
41 |
18. ERROR DISPLAYS........................................................................................................ |
44 |
19. SPECIFICATIONS.......................................................................................................... |
45 |
20. Wiring and Connections...................................................................................... |
47 |
2 NX702
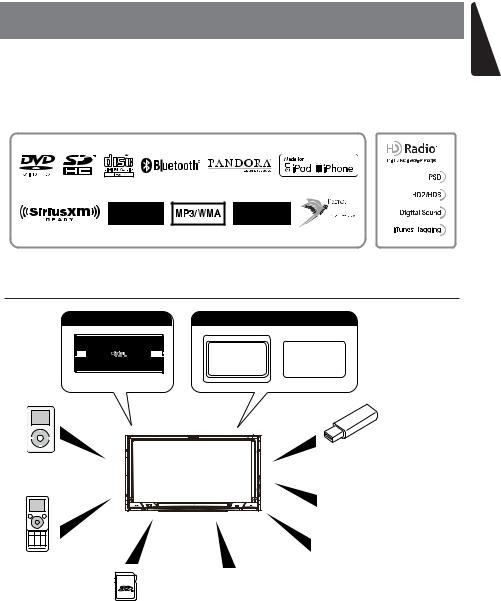
1. FEATURES
•7” Wide-VGA color LCD TOUCH PANEL
•4V/6ch RCA Output with Digital Time Alignment, 3-way Crossover and 5 Band Parametric Equalizer
•SiriusXM-Ready™ and HD Radio™ receiver with iTunes® Tagging
•Latest Map Guarantee
English
Expanding Systems
Expanding audio features Expanding visual features
Rear |
Rear Vision |
Monitor |
Camera |
6 Channel Amplifier
USB Memory
iPod® / iPhone®
(Connect via CCA-750)
Portable Player (Connect via AUX IN)
Bluetooth® cellular phone
HD Radio™ Tuner (THD301)
SiriusXM-Connect
SD Card Vehicle Tuner
Notes:
•Theitemslistedoutsideoftheframesarethecommercialproductsgenerallysold.
•CCA-750:Soldseparately.
NX702 3

English
2. PRECAUTIONS
 WARNING
For your safety, the driver should not operate the controls while driving.
Also, while driving, keep the volume to a level at which external sounds can be heard.
1.When the interior of the car is extremely cold and the player is used soon after switching on the heater, moisture may form on the disc or the optical parts of the player and proper playback may not be possible. If moisture forms on the disc, wipe it off with a soft cloth. If moisture forms on the optical parts of the player, do not use the player for about one hour.
The condensation will disappear naturally allowing normal operation.
2.Driving on extremely bumpy or rough roads can cause the disc to skip during playback.
3.This unit uses precision parts and components for its operation. In the event that trouble arises, never open the case, disassemble the unit, or lubricate the rotating parts. Contact your Clarion dealer or service center.
4.This equipment has been tested and found to comply with the limits for a Class B digital device, pursuant to Part 15 of the FCC Rules.
These limits are designed to provide reasonable protection against harmful interference in a residential installation. This equipment generates, uses, and can radiate radio frequency energy and, if not installed and used in accordance with the instructions, may cause harmful interference to radio communications. However, there is no guarantee that interference will not occur in a particular installation. If this equipment does cause harmful interference to radio reception, which can be determined by turning the equipment off and on, the user is encouraged to consult the dealer or an experienced radio technician for help.
5.“Made for iPod,” and “Made for iPhone” mean that an electronic accessory has been designed to connect specifically to iPod, or iPhone, respectively, and has been certified by the developer to meet Apple performance standards.
Apple is not responsible for the operation of this device or its compliance with safety and regulatory standards. Please note that the use of this accessory with iPod or iPhone may affect wireless performance.
iPhone, iPod and iTunes are trademarks of Apple Inc., registered in the U.S. and other countries.
6.HD Radio™ Technology manufactured under license from iBiquity Digital Corporation.
U.S. and Foreign Patents. HD Radio™ and the HD, HD Radio, and “Arc” logos are proprietary trademarks of iBiquity Digital Corp.
7.SiriusXM™ and all related marks and logos are trademarks of Sirius XM Radio, Inc. All rights reserved.
8. 


Manufactured under license from Dolby Laboratories.
“Dolby” and the double-D symbol are trademarks of Dolby Laboratories.
9.This product incorporates copyright protection technology that is protected by U.S. patents and other intellectual property rights. Use of this copyright protection technology must be authorized by Rovi Corporation, and is intended for home and other limited viewing uses only unless otherwise authorized by Rovi Corporation. Reverse engineering or disassembly is prohibited.
Use of this product by the customer is restricted to play program materials to which the Rovi copyright protection process has been applied.
10.The Bluetooth® word mark and logos are registered trademarks owned by Bluetooth SIG,
Inc. and any use of such marks by Clarion Co.,Ltd, is under license.
11.© Clear Channel Broadcasting Inc. See Clarion.com for service terms and conditions.
4 NX702
12-1. Total Traffic Network, a division of Clear Channel Broadcasting, Inc., holds the rights to the traffic incident data and RDS-TMC network through which it is delivered. You may not modify, copy, scan or use any other method to reproduce, duplicate, republish, transmit or distribute in any way any portion of traffic incident data. You agree to indemnify, defend and hold harmless Inrix, Inc. and Clear Channel Broadcasting, Inc. (and its affiliates) against any and all claims, damages, costs or other expenses that arise directly or indirectly out of (a) your unauthorized use of the traffic incident data or the RDSTMC network, (b) your violation of this directive and/or (c) any unauthorized or unlawful activities by you in connection herewith.
12-2. Total Traffic Network traffic data is informational only. User assumes all risk of use. Total Traffic makes no representations about content, traffic and road conditions, route usability, or speed.
12-3. THE LICENSED MATERIAL IS PROVIDED TO LICENSEE “AS IS” AND “WHERE IS”.
TOTAL TRAFFIC NETWORK, INCLUDING, BUT NOT LIMITED TO, ANY AND ALL THIRD PARTY PROVIDERS OF ANY OF THE LICENSED MATERIAL, EXPRESSLY DISCLAIMS, TO THE FULLEST EXTENT PERMITTED BY LAW, ALL WARRANTIES
OR REPRESENTATIONS WITH RESPECT TO THE LICENSED MATERIAL (INCLUDING WITHOUT LIMITATION, THAT THE LICENSED MATERIAL WILL BE ERROR-FREE, WILL OPERATE WITHOUT INTERRUPTION OR THAT THE TRAFFIC
DATA WILL BE ACCURATE), EXPRESS, IMPLIED OR STATUTORY, INCLUDING, WITHOUT LIMITATION, THE IMPLIED WARRANTIES OF MERCHANTABILITY, NON-
INFRINGEMENT FITNESS FOR A PARTICULAR PURPOSE, OR THOSE ARISING FROM A COURSE OF DEALING OR USAGE OF TRADE.
12-4. TOTAL TRAFFIC NETOWRK WILL NOT BE LIABLE TO YOU FOR ANY INDIRECT, SPECIAL, CONSEQUENTIAL, EXEMPLARY, OR INCIDENTAL DAMAGES (INCLUDING,
WITHOUT LIMITATION, LOST REVENUES, ANTICIPATED REVENUES, OR PROFITS
RELATING TO THE SAME) ARISING FROM ANY CLAIM RELATING DIRECTLY OR INDIRECTLY TO USE OF THE TRAFFIC DATA, WHETHER A CLAIM FOR SUCH DAMAGES IS BASED ON WARRANTY, CONTRACT, TORT (INCLUDING, WITHOUT LIMITATION, NEGLIGENCE OR STRICT LIABILITY).
English
INFORMATION FOR USERS:
Changes or modifications to this product unapproved by the manufacturer will void the warranty and will violate FCC approval.
NX702 5

English
3. CAUTIONS ON HANDLING
Front Panel / Generalities
For a longer service life, be sure to read the following cautions.
•Do not allow any liquids on the unit from drinks, umbrellas, etc. Doing so may damage the internal circuitry.
•Do not disassemble or modify the unit in any way. Doing so may result in damage.
•Do not let cigarettes burn the display. Doing so may damage or deform the body.
•If a problem should occur, have the unit inspected at your store of purchase.
•The remote control unit may not work if the remote control sensor is exposed to direct sunlight.
Cleaning the body
•Use a soft, dry cloth and gently wipe off any dirt and/or dust.
•For tough dirt, apply some neutral detergent diluted in water to a soft cloth, wipe off the dirt gently, then wipe again with a dry cloth.
•Do not use benzene, thinner, car cleaner, etc., as these substances may damage the body or cause the paint to peel. Also, leaving rubber or plastic products in contact with the body for long periods of time may cause stains.
USB Port
•The USB memory sticks must be recognized as “USB mass storage class“ to work properly.
Some models may not operate correctly.
When the memorized data is lost or damaged by any chance, Clarion shall not be liable for any damage.
When using an USB memory stick, we recommend that you backup your data stored on it before using a personal computer etc.
•Data files may be broken when using USB memory sticks in the following situation: When disconnecting the USB memory stick or turning the power off during reading data.
When affected static electricity or electric noise.
Connect/disconnect the USB memory stick when it is not accessed.
•Connecting with the computer is not covered.
SD Slot
•When using a SD card, we recommend that you backup your data stored on it before using a personal computer etc.
•Data files may be broken when using SD card in the following situation: When taking off the card or turning the power off during reading data.
When affected static electricity or electric noise.
•Connecting with the computer is not covered.
6 NX702

Handling Discs
Handling
•New discs may have some roughness around the edges. If such discs are used, the player may not work or the sound may skip. Use a ball-point pen or the like to remove any roughness from the edge of the disc.
Ball-point pen
Roughness
Cleaning
•To remove fingermarks and dust, use a soft cloth and wipe in a straight line from the center of the disc to the circumference.
•Do not use any solvents, such as commercially available cleaners, anti-static spray, or thinner to clean discs.
•After using special disc cleaner, let the disc dry off well before playing it.
On Discs
•Never turn off the power and remove the unit from the car with a disc loaded.
 CAUTION
For your safety, the driver should not insert or eject a disc while driving.
•Never stick labels on the surface of the disc or mark the surface with a pencil or pen.
•Never play a disc with any cellophane tape or other glue on it or with peeling off marks.
If you try to play such a disc, you may not be able to get it back out of the player or it may damage the player.
•Do not use discs that have large scratches, are misshapen, cracked, etc. Use of such discs may cause misoperation or damage.
•To remove a disc from its storage case, press down on the center of the case and lift the disc out, holding it carefully by the edges.
•Do not use commercially available disc protection sheets or discs equipped with stabilizers, etc. These may damage the disc or cause breakdown of the internal mechanism.
Storage
•Do not expose discs to direct sunlight or any heat source.
•Do not expose discs to excess humidity or dust.
•Do not expose discs to direct heat from heaters.
English
NX702 7

English
4. CONTROLS
Operational Panel
Remote Sensor |
|
|
|
|
[MAP PWR] |
[ - ] |
[MENU ALL ] |
[ + ] |
[OPEN/VR] |
|
[MIC] |
|
|
RESET |
Short press [OPEN] button to slide down the panel.
Left Side |
|
Front Side |
Disc Slot
[  ] EJECT
SD Card Slot |
MicroSD card slot |
|
Only navigation map card is available and don't |
||
|
||
|
remove it when unit is power on. |
8 NX702

Names of Buttons
[MAP  PWR] Knob
•Press to power on the system when ignition on.
•When power on, press to enter navigation mode.
•Press and hold this key more than 1 second to turn off the system.
[MENU  ALL] Button
•Short press to show/exit shortcut menu.
•Long press to show/exit main source menu.
[ - , + ] buttons
• Press to decrease or increase the volume.
[MIC] Hole
• Internal microphone
[RESET] Button
•Press to load original settings.
Note: When the [RESET] button is pressed, frequencies of radio stations, titles, etc. stored in memory are cleared.
[OPEN/VR] Button
•Short press to slide down and close the panel.
•Long press to VR(Voice Recognition) function.
[ ] EJECT Button
• Press to eject disc.
Speaker Setting Mode
When power on first time, “Speaker Setting Mode” dialog appears.
1.Select “Initial settings”, all speaker settings return to default setting. 3 Memory of previous speaker mode are deleted.
Touch [OK] on the dialog box, then select a mode.
2.Select “Load settings”, currennt speaker settings are kept.
3.Speaker Setting Mode
Normal mode: Front L,R; Rear L,R; Subwoofer L,R 3Way multi mode: MID L,R; HIGH L,R; Subwoofer L,R 2Way multi mode: MID L,R; HIGH L,R; REAR L,R
The way of SENSOR control (  / + / - )
MUTE
VOL UP (1 degree)
VOL DOWN (1 degree)
MENU (long press)
English
NX702 9
English
Remote Control
[SRC /  ] Button
•Show main source menu
•Power on / Power off (long press)
[OPEN] Button
•Short press to slide down and close the panel.
•Long press to VR(Voice Recognition) function.
 [+], [-] Buttons
•Adjust volume level
[MAP] Button
•Enter navigation mode
[PIC] Button
•Adjust screen
[BAND] Button
•Select tuner band
[TAG] Button
•SiriusXM / HD Radio mode – Tagging
[TITLE] Button
•DVD TITLE MENU
[RPT] Button
•Repeat playback
[ENT] Button
•Enter
[RDM] Button
•Random playback
[ROOT] Button
•DVD ROOT MENU
[ ], [
], [ ] Buttons
•Manual tune
•Fast backward/forward playback
[SUB.T] Button
•DVD subtitle
[ANGLE] Button
•DVD angle
 [
[ 
 ], [
], [
 ] Buttons (Rear)
•Chapter up/down
•Fast backward/forward playback (long press)
[SEND/END] Button
•Pick up
•Hang up
[MUTE] Button
•Mute the volume
[0]~[9] Button
•Numeric key
[SRCH] Button
•Number input mode
[BACK] Button
•Back from source menu return to previous display
[  ], [
], [ ], [
], [ ], [
], [ ] Buttons
•Move cursor up/down/left/right
10 NX702
Remote Control
[ 

 / STOP] Button
•Play/Pause
•Stop (long press)
[ 
 ], [
], [
 ] Buttons
•RADIO / HD RADIO / DAB mode
•Previous / next preset station
•Seek down/up (long press)
•SiriusXM mode
•Previous / next position.
•Seek down/up (long press)
•DVD mode Previous/next chapter.
•CD/BLUETOOTH mode Previous/next track.
[ZOOM] Button
•ZOOM (DVD)
[AUDIO] Button
•DVD audio stream change.
 [SRC] Button (Rear)
•Change next rear source
 [
[ 

 ] Button (Rear)
•Play/Pause
•Stop (long press)
Use and care of the remote control
Using the remote control
Point the remote control in the direction of the front panel to operate.
When using for the first time, pull out the film protruding from the tray.
Replacing the battery
1Slide out the back cover of the remote control.
2.Insert the battery with the plus (+) and minus (–) poles aligned properly.
•When using for the first time, pull out the film protruding from the tray.
3.Close the back cover.
 CAUTION
•Keep the battery out of the reach of children.
Should the battery be swallowed, consult a doctor immediately.
•Batteries (battery pack or batteries installed)must not be exposed to excessive heat such as sunshine, fire or the like.
 CAUTION
•Use one CR2025 (3 V) lithium battery.
•Remove the battery if the remote control is not used for a month or longer.
•There is a danger of explosion if the battery is incorrectly replaced. Replace only with the same or equivalent type.
•Do not handle the battery with metallic tools.
•Do not store the battery with metallic objects.
•If the battery leaks, wipe the remote control completely clean and install a new battery.
•When disposing of used batteries, comply with governmental regulations or environmental public institutions’ rules that apply in your country/area.
 Important
•Do not store the remote control in high temperatures or direct sunlight.
•The remote control may not function properly in direct sunlight.
•Do not let the remote control fall onto the floor, where it may become jammed under the brake or accelerator pedal.
English
NX702 11

English
5. MAIN MENU OPERATION
Long press [ MENU |
|
ALL ] button on the |
Touch the icons on the screen to enter |
|
|
||||
|
||||
PANEL to show main source menu. |
corresponding work mode, such as Disc |
|||
Short press [ MENU |
|
|
ALL ] button to show |
mode, USB mode, iPod mode, etc. |
|
|
|||
|
|
Touch [2ZoneOff] to turn off the rear zone |
||
Short cut menu. |
|
|
||
|
|
|
|
monitor. |
Front Zone Source |
Custom Setting |
||||||||||||
Touch [ - ] on the bottom of screen to show |
Touch [Custom] on the bottom of screen to |
||||||||||||
front zone sources. |
show custom setting menu. |
||||||||||||
|
|
|
|
|
|
|
|
|
|
|
|
|
|
|
|
|
|
|
|
|
|
|
|
|
|
|
|
|
|
|
|
|
|
|
|
|
|
|
|
|
|
|
|
|
|
|
|
|
|
|
|
|
|
|
|
|
|
|
|
|
|
|
|
|
|
|
|
|
|
|
|
|
|
|
|
|
|
|
|
|
|
|
|
|
|
|
|
|
|
|
|
|
|
|
|
|
|
Change page by dragging left or right or touching other [ - ] buttons.
Touch the icons on the screen to enter corresponding work mode, such as Disc mode, Tuner mode, Telephone mode, etc.
Touch [Audio Off] to mute the volume.
Rear Zone Source
Touch [Rear] on the bottom of screen to show rear zone sources.
[Settings]: Touch the icon to enter system setting menu. (see “System Setup”)
[Beat EQ]: Touch the icon to enter equalizer setting menu. (see “System Setup”)
[Short Cut]: Touch the icon to enter Shortcut setting menu. Hold the desired icon for more than 2 seconds until it’s activated, then drag it to the bottom. The name will appear on the bottom.
•Hold the center of the screen and drag left or right to show more icons.
•You can make total 5 shortcuts.
•You can access the shortcut list by pressing the [ MENU  ALL ] button.
[Illumi Color]: Touch the icon to enter
Illumination color setting menu. (see “System
Setup”)
[Wallpaper]: Touch the icon to enter
Wallpaper setting menu. (see “System
Setup”)
[Monitor Off]: Touch the icon to turn off the monitor.
To turn on the monitor, touch the monitor again.
12 NX702

6. SYSTEM SETUP
At all mode, long press [ MENU  ALL ] button to enter main source menu. Touch [Custom] on the bottom left of the screen, then select [Settings] on the screen to enter Setting menu. Touch the icons on the left of screen to select category: General, Time,
Sound, Display or Setup. To exit Setting menu, touch [  ] on the bottom left of the screen.
General
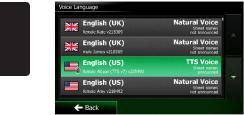
System language and Bluetooth VR language
Touch the button to the right of “System language and Bluetooth VR language” to show language list. Select desired language, touch [OK] to confirm, or touch [Cancel] to exit without saving.
Navigation VR language setting
Touch [Settings] button from navigation menu.
•Touch [Regional] button from settings menu.
Touch [Program Language] button.
Select desired language.
(When select a language, the navigation system will restart.)
•Touch [Sound and Warnings] button from navigation menu.
Touch [Voice Language] button.
Select the same language(Voice language and Program Language).
(When select the TTS Voice, the microphone icon will appears on the screen and navigation VR function will work)
English
NX702 13
English
Close operation bar
When select [Auto], the operation bar will close automatically after 10 seconds.
When select [Manual], the operation bar will not close unless you touch the blank area on the screen.
Main Menu Icons
When select [Active], main menu show animation icons.
When select [Simple], main menu show simple icons.
Illumi Color
Touch [Set] to the right of “Illumi Color” to show key illumination setting menu.
Edit Color: There are 12 preset colors and
3 custom colors, you can select one color by touch Color 1~12 or Custom 1~3.
Touch [Adjust] to show edit color menu.
Drag the color bar or inputting the RGB value to select one color, touch [OK] to confirm.
Initialize: Load original buttons backlight.
Touch [  BACK ] on the bottom left of the screen to return to main setting menu.
Wallpaper
Touch [Set] to the right of “Wallpaper” to show
Wallpaper setting menu.
Touch [  ] or [
  ] button to select the scene, and touch the picture file name on the right to preview it, then touch [Set] to confirm the setting.
To import images, touch [Import].
Select a mobile storage device on the list, then select desired images and touch [Import]. Touch [Cancel] to exit.
Monitor Angle
Touch 0~+6 buttons on the screen to select a monitor angle.
Beep
Touch [On] or [Off] to turn on/off the key beep sound.
Blinking LED
Touch [On] or [Off] to turn on/off the blinking LED.
At blinking LED [On] mode, when ACC off, the LED on the top left of the panel will blink.
Amplifier cancel
Touch [On] or [Off] to set the internal amplifier on or off.
System software
Touch [Version] to show current software version.
Factory default
Touch [Restore] to load the original factory settings.
Time
GPS sync
Touch [On] to synchronize time with GPS and the following setting is disable: “Time”.
Time
Touch the button to the right of “Time” to show time setting menu. Touch [  ] or [
  ] button to select hour or minute. Touch [Set] to confirm or [Back] to exit without saving.
24-Hour format
Touch [On] to select 24-Hour format. Touch [Off] to select 12-Hour format.
Sound
Beat EQ
Touch the button to the right of “Beat EQ” to show EQ setting menu. You can select : “Bass
Boost”, “Impact”, “Excite”, “Custom” or “Off”.
To adjust the value, touch [-] or [+] button on the screen.
Touch [Back] to exit.
Balance/Fader
Touch [Set] to the right of “Balance/Fader” to show Balance/Fader setting menu.
Touch [  ] or [
  ] button to adjust Fader, and touch [
  ] or [
  ] button to adjust
Balance.
Touch [Center] to reset the value. Touch [Back] to exit.
14 NX702
 Loading...