


Owner’s manual Mode d’emploi
Manual de instrucciones
CZ509
Bluetooth® CD/USB/MP3/WMA/AAC RECEIVER WITH
CeNET CONTROL
LECTEUR CD/USB/MP3/WMA/AAC Bluetooth® AVEC
COMMANDE CeNET
RECEPTOR DE CD/USB/MP3/WMA/AAC Bluetooth®
CON CONTROL CeNET

CLARION PRODUCT REGISTRATION INFORMATION
For USA and Canada only www.clarion.com
Dear Customer:
Congratulations on your purchase of a Clarion mobile electronic products. We are confident that you’ll enjoy your Clarion experience.
There are many benefits to registering your product. We invite you to visit our website at www.clarion.com to register your Clarion product.
We have made product registration simple with our easy to use website. The registration form is short and easy to complete. Once you’re registered, we can keep you informed of important product information.
Register at www.clarion.com - it’s easy to keep your Clarion product up to date.
INFORMATIONS DE L’ENREGISTREMENT DE PRODUITS CLARION
Pour les Étas Unis et le Canada seulement www.clarion.com
Cher client:
Nous vous remercions d’avoir acheté ce produit électronique mobile Clarion. Nous sommes confiants que vous apprécierez votre expérience Clarion.
Il y a beaucoup d’avantage à enregistrer votre produits. Nous vous invitons à visiter notre site Web www.clarion.com pour enregistrer votre produit Clarion.
Nous avons facilité la tache d’enregistrement de produit simple et facile grâce à notre site Web. Le formulaire d’enregistrement est court et facile à compléter. Lorsque vous êtes enregistrer, nous pouvons vous tenir informé des informations important de produits.
Enregistrer à www.clarion.com - c’est facile de mettre à jour votre produit Clarion.
INFORMACIÓN DEL REGISTRO DE PRODUCT O DE CLARION
Para USA y Canada nomas www.clarion.com
Querido Cliente:
Felicitaciones por su compra de producto electrónico móvil de Clarion. Estamos seguros que usted gozará de su experiencia con el producto de Clarion.
Hay muchas ventajas al registrar su producto. Le invitamos a que visite nuestro sitio en internet www.clarion.com para registrar su producto de Clarion.
Hemos hecho el registro de producto fácil en nuestro sitio. La forma de registro es corta y fácil de completar. Una vez que lo registre, podremos proporcionarle la información de su producto.
Registrese en www.clarion.com - es fácil mantener su producto de Clarion actualizado.
2 CZ509

Thank you for purchasing this Clarion product.
Please read this owner’s manual in its entirety before operating this equipment.
Check the contents of the enclosed warranty card and keep it carefully with this manual.
Contents
1. |
FEATURES ...................................................................................................................................... |
3 |
2. |
PRECAUTIONS ............................................................................................................................... |
4 |
3. |
CONTROLS ..................................................................................................................................... |
6 |
|
Names of the Buttons and Their Main Functions ............................................................................. |
6 |
4. |
DCP.................................................................................................................................................. |
8 |
5. |
REMOTE CONTROL ....................................................................................................................... |
9 |
|
Functions of Remote Control Unit Buttons ....................................................................................... |
9 |
|
Inserting the Battery ....................................................................................................................... |
10 |
6. |
OPERATIONS................................................................................................................................ |
11 |
|
Basic Operations ............................................................................................................................ |
11 |
|
Radio Operations ........................................................................................................................... |
14 |
|
CD/MP3/WMA/AAC Operations ..................................................................................................... |
15 |
|
Bluetooth Operations...................................................................................................................... |
19 |
|
Operations Common to Each Mode ............................................................................................... |
23 |
7. |
ACCESSORIES ............................................................................................................................. |
26 |
|
USB/MTP Operations..................................................................................................................... |
26 |
|
iPod Operations.............................................................................................................................. |
28 |
|
Satellite Radio Operations.............................................................................................................. |
31 |
|
CD Changer Operations................................................................................................................. |
33 |
8. |
TROUBLESHOOTING................................................................................................................... |
34 |
9. |
ERROR DISPLAYS ....................................................................................................................... |
36 |
10. |
SPECIFICATIONS ......................................................................................................................... |
37 |
11. |
OTHERS ........................................................................................................................................ |
38 |
English
1. FEATURES
•Built in Bluetooth® Hnadsfree (HFP) and Audio Streaming (A2DP & AVRCP)
•BBE MP for compressed audio improvement
•BEAT EQ for Sound Adjustment
CZ509 3
English
2. PRECAUTIONS
This equipment has been tested and found to comply with the limits for a Class B digital device, pursuant to Part 15 of the FCC Rules.
These limits are designed to provide reasonable protection against harmful interference in a residential installation.
This equipment generates, uses, and can radiate radio frequency energy and, if not installed and used in accordance with the instructions, may cause harmful interference to radio communications. However, there is no guarantee that interference will not occur in a particular installation.
If this equipment does cause harmful interference to radio reception, which can be determined by turning the equipment off and on, the user is encouraged to consult the dealer or an experienced radio technician for help.
 CAUTION
USE OF CONTROLS, ADJUSTMENTS, OR PERFORMANCE OF PROCEDURES OTHER THAN THOSE SPECIFIED HEREIN, MAY RESULT IN HAZARDOUS RADIATION EXPOSURE.
THE COMPACT DISC PLAYER SHOULD NOT BE ADJUSTED OR REPAIRED BY ANYONE EXCEPT PROPERLY QUALIFIED SERVICE PERSONNEL.
CHANGES OR MODIFICATIONS NOT EXPRESSLY APPROVED BY THE MANUFACTURER FOR COMPLIANCE COULD VOID THE USER’S AUTHORITY TO OPERATE THE EQUIPMENT.
INFORMATION FOR USERS:
CHANGES OR MODIFICATIONS TO THIS PRODUCT NOT APPROVED BY THE MANUFACTURER WILL VOID THE WARRANTY AND WILL VIOLATE FCC APPROVAL.
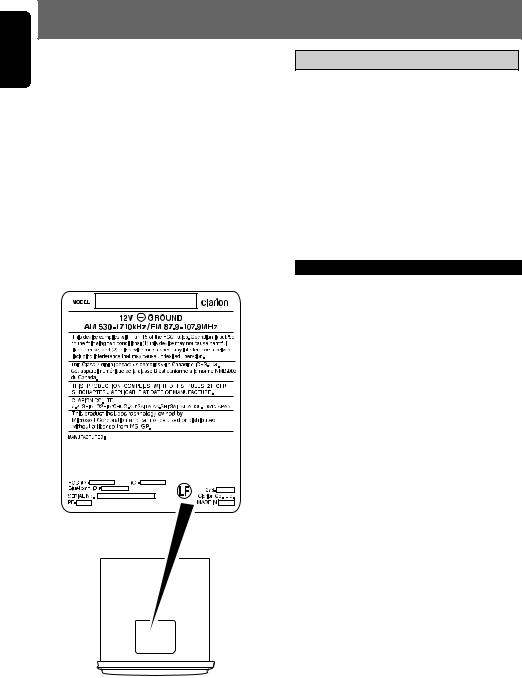
Bottom View of Source Unit
4 CZ509
Flip Down Panel
This unit uses a flip-down structure that makes possible large-size displays.
 CAUTION
When opening and closing the FLIP DOWN PANEL, be careful not to catch your fingers. They could be injured.
1.Always use this unit with the FLIP DOWN PANEL closed.
2.Do not force operations or use this device abnormally when opening or closing the FLIP DOWN PANEL.
3.Do not use the FLIP DOWN PANEL as a tray to place objects on when it is open.
4.When closing the FLIP DOWN PANEL, do not press the [OPEN] button.
Press the center of the DCP to close.
DCP 
5.Strong impacts to the operating or display section can cause damage or deformation.
6.If the FLIP DOWN PANEL does not open fully, gently open it with your hand.
Handling Compact Discs
•Compared to ordinary music CDs, CD-R and CD-RW discs are both easily affected by high temperature and humidity and some of CD-R and CD-RW discs may not be played.
Therefore, do not leave them for a long time in the car.
•Never stick labels on the surface of the compact disc or mark the surface with a pencil or pen.
Display Screen
In extreme cold, the screen movement may slow down and the screen may darken, but this is normal.
The screen will recover when it returns to normal temperature.
English
CZ509 5

English
3. CONTROLS
Names of the Buttons and Their Main Functions
[OPEN] [DISP] |
[BND] |
[IR RECEIVER] |
[ |
] |
|
|
|
|
[AUX] |
|
|
|
|
|
||
|
[SRC] |
|
|
|
|
|
|
|
[ISR] |
|
|
[SCN] |
[SOUND] |
|
|
[ROTARY] |
|
|||
|
|
|
[RPT] |
|
||
|
|
|
|
|
|
|
|
|
[ |
], [ |
] |
[RDM] |
[DIRECT] |
With the FLIP DOWN PANEL opened |
|
|||||
[Q] (EJECT) |
[CD SLOT] |
|
|
|
||
[OPEN] button
•Deeply push in [OPEN] button to unlock the flip down panel.
[DISP] button
•Switch the display indication.
[BND] button
•Change bands, or select seek tuning or manual tuning while in the radio mode.
[IR RECEIVER]
•Receiver for remote control unit. (Operating range: 30° in all directions)
[AUX] input jack
•Input jack for connecting external device.
[SOUND] button
•Press to switch to the sound adjust mode.
[DIRECT] buttons
•Store radio stations in memory or recall it directly while in radio mode.
[RDM] button
•Perform random play while in CD/MP3/WMA/ AAC/USB/iPod mode.
[RPT] button
•Perform repeat play while in CD/MP3/WMA/ AAC/USB/iPod mode.
[SCN] button
•Perform scan play for 10 seconds of each track while in CD/MP3/WMA/AAC/USB mode.
[ ] (UP), [
 ] (DN) buttons
•Select folders while in MP3/WMA/AAC/USB mode.
6 CZ509

Names of the Buttons and Their Main Functions
[ROTARY] knob
•Rotate to adjust the volume.
[ISR] button
•Recall ISR radio station in memory.
•Press and hold the button (2 sec.) to store current station into ISR memory (radio mode only).
[SRC] button
•Turn the power on/off.
[x], [v] buttons
•Commence fast-forward or fast-reverse mode.
[

 ] button
•Perform preset scan while in the radio mode.
•Play or pause a track while in CD/MP3/WMA/ AAC/USB/iPod mode.
[Q] (EJECT) button
•Press to eject disc.
[CD SLOT]
•Insert CDs here.
English
CZ509 7
English
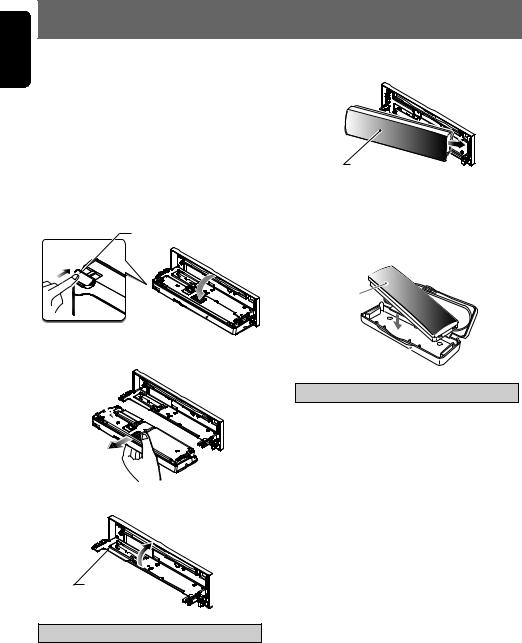
4. DCP
The control panel can be detached to prevent theft. When detaching the control panel, store it in the DCP (DETACHABLE CONTROL PANEL) case to prevent scratches.
We recommend taking the DCP with you when leaving the car.
Removing the DCP
1.Press the [SRC] button (1 sec.) to turn off the power.
2.Deeply push in [OPEN] button to unlock the flip down panel.
If the flip down panel does not open fully, gently open it with your hand.
[OPEN] button
DCP
3. Pull the DCP toward you and remove it.
DCP
4. Close the HOLD FLAP.
HOLD FLAP
2.Insert the left side of the DCP into the main unit.
2.
DCP |
1. |
Storing the DCP in the DCP Case
Hold the DCP, in the orientation as shown in the figure below, and put it into the supplied DCP case. (Ensure the DCP is in the correct orientation.)
DCP
DCP case 
 CAUTION
•The DCP can easily be damaged by shocks. After removing it, be careful not to drop it or subject it to strong shocks.
•If the FLIP DOWN PANEL is kept open, the DCP may drop due to vibration of the car. This results in damage to the DCP. So close the FLIP DOWN PANEL or remove the DCP to store into the case.
•The connector connecting the source unit and the DCP is an extremely important part. Be careful not to damage it by pressing on it with fingernails, screwdrivers, etc.
Note:
• If the DCP is dirty, wipe off the dirt with a soft, dry cloth only.
 CAUTION
Be sure to close the HOLD FLAP for safety when removing the DCP.
Attaching the DCP
1.Insert the right side of the DCP into the main unit.
8 CZ509
5. REMOTE CONTROL
Functions of Remote Control Unit Buttons
Some buttons on the remote control unit have different functions from the corresponding buttons on the main unit.
Signal transmitter
[SRC] |
[BND] |
[MUTE] |
[DISP] |
[ISR] |
[RDM] |
[SCN] |
[RPT] |
|
● Shared modes
[SRC] button
• Press the button to turn on the power. Press and hold the button (1 sec.) to turn off the power.
• Use to alternate operation mode among the various modes.
[w], [z] buttons
•Increases and decreases volume.
[MUTE] button
•Turns mute function on and off.
[ISR] button
•Recalls ISR radio station stored in memory.
•Press and hold the button (2 sec.) to store current station in ISR memory (radio mode only).
[DISP] button
• Press to select the desired display.
● Radio/Satellite Radio modes
[BND] button
•Switches reception band.
[x], [v] buttons
•Moves preset channels up and down.
[SCN] button
•Press to perform preset scan.
•Press and hold the button (2 sec.) to perform auto store.
•In the Satellite Radio mode, press once to perform category scan; hold depressed (1 sec.) to perform preset scan.
●CD/MP3/WMA/AAC and USB/MTP modes
[BND] button
•Press to play the first track.
[x], [v] buttons
•Press to select tracks.
•Press and hold the button (1 sec.) to perform fast-forward/fast-reverse (Except DRM file).
[ ] button
•Switches between playback and pause.
[SCN] button
•Press to perform scan play.
•When in MP3/WMA/AAC and USB/MTP modes, press and hold the button (1 sec.) to perform folder scan play.
[RPT] button
•Press to perform repeat play.
•When in MP3/WMA/AAC and USB/MTP modes, press and hold the button (1 sec.) to perform folder repeat play.
[RDM] button
•Press to perform random play.
•When in MP3/WMA/AAC and USB/MTP modes, press and hold the button (1 sec.) to perform folder random play.
English
CZ509 9
English
Functions of Remote Control Unit Buttons
● CD changer mode
[BND] button
•Press to switch to next disc in ascending order.
[x], [v] buttons
•Press to move the tracks up and down.
•Press and hold the button (1 sec.) to perform fast-forward/fast-backward.
[ ] button
•Switches between playback and pause.
[SCN] button
•Press to perform scan play.
•Press and hold the button (1 sec.) to perform disc scan play.
[RPT] button
•Press to perform repeat play.
•Press and hold the button (1 sec.) to perform disc repeat play.
[RDM] button
•Press to perform random play.
•Press and hold the button (1 sec.) to perform disc random play.
● iPod mode
[x], [v] buttons
•Press to move the tracks up and down.
•Press and hold the button (1 sec.) to perform fast-forward/fast-reverse.
[ ] button
•Switches between playback and pause.
[RPT] button
•Press to perform repeat play.
[RDM] button
•Press to perform random play.
•Press and hold the button (1 sec.) to perform all random play.
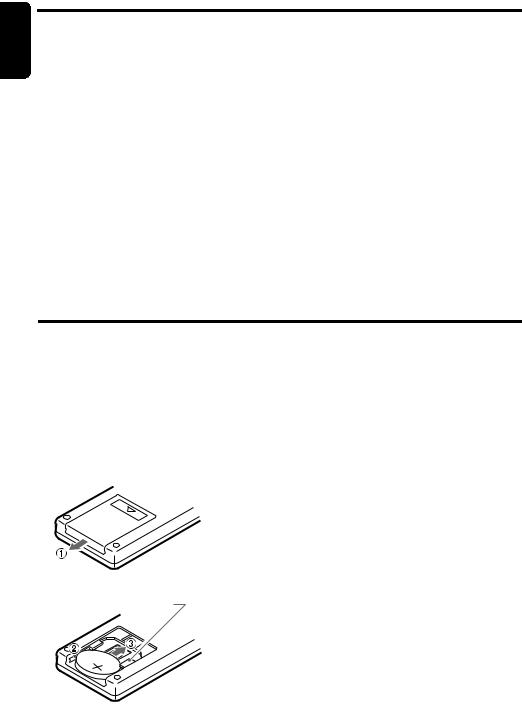
Inserting the Battery
1Turn over the remote control unit and slide the cover in the direction indicated by the arrow in the illustration.
2Insert the battery (CR2025) into the insertion guides, with the printed side (+) facing upwards.
3Press the battery in the direction indicated by the arrow so that it slides into the compartment.
4Replace the cover and slide in until it clicks into place.
Notes:
Misuse may result in rupture of the battery, producing leakage of fluid and resulting in personal injury or damage to surrounding materials. Always follow these safety precautions:
•Use only the designated battery.
•When replacing the battery, insert properly, with +/– polarities oriented correctly.
•Do not subject battery to heat, or dispose of in fire or water. Do not attempt to disassemble the battery.
•Dispose of used batteries properly.
Insertion guide
C
R
202
5
10 CZ509
6. OPERATIONS
Note:
• Be sure to read this chapter referring to the front diagrams of chapter “3. CONTROLS” on page 6.
Basic Operations
 CAUTION
Be sure to lower the volume before switching off the unit power or the ignition key. The unit remembers its last volume setting.
Turning on/off the power
Note:
1.Press the [SRC] button to turn on the power.
2.Press and hold the [SRC] button (1 sec.) to turn off the power for the unit.
Note:
•System check
The first time this unit is turned on after the wire connections are completed, it must be checked what equipment is connected. When the power is turned on, the “SYSTEM CHECK” appears in the display, then the unit returns to the clock display mode. The system check starts within the unit. Then press the [SRC] button again, the unit turn to the radio mode.
Selecting a mode
1.Press the [SRC] button to change the operation mode.
2.Each time you press the [SRC] button, the operation mode changes in the following order:
Radio (Satellite radio) CD/MP3/WMA/ AAC USB/MTP/iPod BLUETOOTH (CD changer) AUX Radio...
External equipment not connected with CeNET is not displayed.
iPod/MTP can connect to this unit via USB cable.
Switching the display
Press the [DISP] button to select the desired display.
Sound Adjustment
You can adjust a sound effect or tone quality to your preference.
To change sound setting
1.Press the [SOUND] button to switch to the sound adjustment selection display.
The factory default sound setting is “BEAT EQ”.
2.Then press the [x] or [v] button to
select the sound adjustment mode. Each time you press the [x] or [v] button, the sound adjustment mode changes as following order:
“BEAT EQ” “M-B EX” “BALANCE” “FADER” “LPF” “S-W VOL” “HPF”
In the case of display blinking “ENT”, you can press the [

 ] button to adjust the setting value.
3.Press the [ ] or [
 ] button to adjust the selected audio mode.
4.After completing settings, press the [SOUND] button to return to the previous mode.
●Setting the BEAT EQ
This unit is provided with 4 types of sound tone effects stored in memory.
Select the one you prefer.
The factory default setting is “OFF”.
2-1. Select “BEAT EQ”.
Adjusting the volume
1.Turning the [ROTARY] knob clockwise increases the volume; turning it counterclockwise decreases the volume.
The volume level is from 0 (minimum) to 33 (maximum).
English
CZ509 11
English
Basic Operations
3-1. Each time you press the [ ] or [
 ] button, the tone effect changes in the following order:
“CUSTOM” ↔ “EXCITE” ↔ “IMPACT” ↔ “B-BOOST” ↔ “OFF”
CUSTOM : user custom
EXCITE : bass and treble emphasized mid emphasized
IMPACT |
: bass and treble emphasized |
B-BOOST |
: bass emphasized |
OFF |
: no sound effect |
When “CUSTOM” is set: |
|
3-1. Press the [ |
] button. |
3-2. Press the [x] or [v] button to select the “BASS, MID” or “TREBLE” mode to adjust.
3-3. If you want to set the flat, press the [

 ] button to return to the “CUSTOM” mode, then press and hold the [

 ] button for 1second or longer, bass/mid/treble characteristics become flat.
When “EXCITE/IMPACT/B-BOOST” is set:
3-1. Press the [ |
] button. |
3-2. Press the [ |
] or [ ] button to adjust the |
setting in the range of –3 to +3. |
|
The factory default setting is “0”. |
|
3-3. Press the [ |
] button to return to the |
previous mode.
BASS<Q>:The factory default setting is “1”. (Adjustment range: 0.7/1/1.4/2)
MID<G> : The factory default setting is “0”. (Adjustment range: +7 to -7)
MID<F> : The factory default setting is “500”. (Adjustment range: 500/1K/2K)
MID<Q> : The factory default setting is “1”. (Adjustment range: 0.7/1/1.4/2)
TREBLE<G>:The factory default setting is “0”. (Adjustment range: +7 to -7)
TREBLE<F>:The factory default setting is “10K”.
(Adjustment range: 5K/10K/15K) TREBLE<Q>:The factory default setting is “1”.
(Adjustment range: 0.7/1/1.4/2)
3-4. Press the [

 ] button to return to the previous mode.
● Setting the MAGNA BASS EXTEND
The MAGNA BASS EXTEND does not adjust the low frequencies like the normal sound adjustment function, but emphasizes the deep bass frequencies to provide you with a dynamic sound.
The factory default setting is “OFF” (off).
2-1. Select “M-B EX”.
3-1. Press [ ] or [
 ] button to select “ON” or “OFF”.
● Adjusting the BASS/MID/TREBLE
This adjustment can be performed only when the BEAT EQ is set to “CUSTOM”.
Note:
•While connected with the external amplifers, please do not set the “BASS/MID/TREBLE” in the maximum level. Otherwise the speakers may be damaged.
3-1. Press the [

 ] button.
3-2. Press the [x] or [v] button to select as following order.
“BASS<G>” ↔ “BASS<F>” ↔ “BASS<Q>” ↔ “MID<G>” ↔ “MID<F>” ↔ “MID<Q>” ↔ “TREBLE<G>” ↔ “TREBLE<F>” ↔ “TREBLE<Q>”
The factory default setting is “BASS G”.
3-3. Press the [  ] or [
 ] button to select the setting.
BASS<G>:The factory default setting is “0”. (Adjustment range: +7 to –7)
BASS<F>: The factory default setting is “50”. (Adjustment range: 50/100/200)
● Adjusting the balance
2-1. Select “BALANCE”.
3-1. Press the [ ] or [
 ] button to adjust the balance of the right and left speakers.
The factory default setting is “CENTER” (center). (Adjustment range: RIGHT12 to LEFT12 (right 12 to left 12))
●Adjusting the fader
2-1. Select “FADER”.
3-1. Press the [  ] or [
  ] button to adjust the balance of the rear and front speakers.
The factory default setting is “CENTER” (center). (Adjustment range: FRONT12 to REAR12 (front 12 to rear 12))
●Setting the subwoofer
You can set the low pass filter of subwoofer. 2-1. Select “LPF”.
3-1. Each time press the [ ] or [
 ] button to select the setting, the setting changes in the following order:
“THROUGH” ↔ “60” ↔ “90” ↔ “120”
12 CZ509
 Loading...