


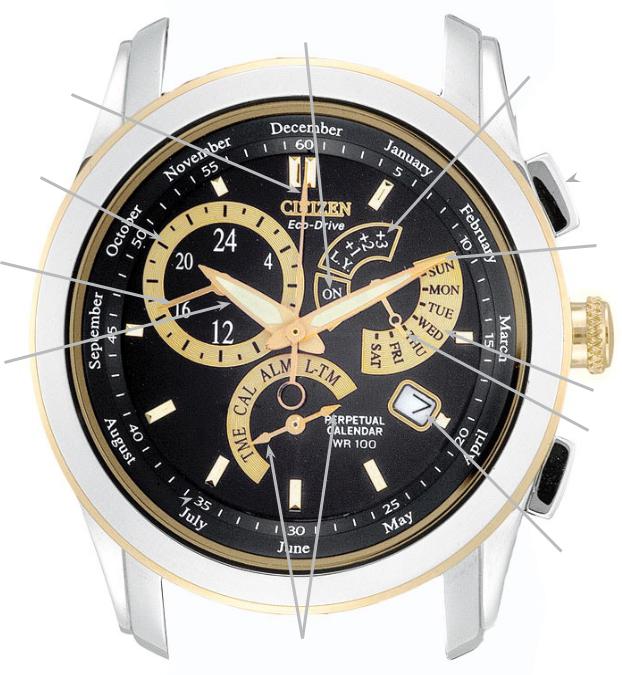
Calibre 8700 Series (mvt. cal. E870) Quick Reference
|
Alarm ON/OFF Scale |
Second Hand |
Leap Year Scale |
|
|
24-Hour Scale |
Upper Right |
|
Button (A) |
24-Hour Hand |
Minute Hand |
|
|
|
Crown |
Hour Hand |
|
|
Day of Week Scale |
Month Scale |
Function Hand |
|
|
Dial Ring |
|
|
Lower Right |
|
Button (B) |
Seconds/Minutes Track |
Date |
|
|
|
Mode Hand |
|
(either tip activates mode) |
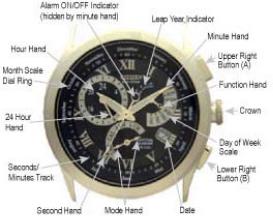
Calibre 8700 Series (mvt. cal. E870) Quick Reference
Alarm ON/OFF Scale
Second Hand
24-Hour Scale
24-Hour Hand
Hour Hand
Month Scale
Dial Ring
Seconds/Minutes Track 
Leap Year Scale
Upper Right
 Button (A)
Minute Hand
 Crown
Crown
Day of Week Scale
Function Hand
 Lower Right
Button (B)
Date
Mode Hand (either tip activates mode)
MODELS – BL80** Calibre 8700 Series
Mvt. Cal. No. E870
FEATURES
Light Powered
Time
Perpetual Calendar
Alarm
Dual Time
IMPORTANT NOTE:
If you suspect a malfunction, first check the 0-position of the hands as outlined in the 0-positioning check procedure. If the hands and date do not move to their respective 0- positions, it will be necessary to set them for proper operation.
After a full recharge from complete power loss or if abnormal operation is noted, an ALL RESET and 0- POSITIONING CORRECTION will be needed.
The second hand on this watch moves in one-second increments to indicate that the charge level is sufficient for normal time keeping operation. If it is not moving in one-second increments, be sure to charge your watch fully as outlined in your Instruction Manual.
0-POSITIONING CHECK PROCEDURE
Pull the crown out one ‘click’.
Turn the crown so that either tip of the Mode hand is pointing to the Local Time mode (L-TM).
Push the crown back in one ‘click’ to the closed position next to the case.
Press the upper right button (A) for 10 or more seconds until the hands move to the 0-position stored in memory. Release the upper right button (A). The correct 0-position for each hand is as follows:
-Hour, Minute and Second hand pointing to ’12:00’ -24 Hour hand pointing to ‘24’
-Function hand pointing to ‘SUN’ -Date indicating ‘1’
If any of the hands do not indicate their respective 0-position, it will be necessary to perform the all reset and 0-positioning correction procedure.
Press the upper right button (A) to resume normal operation in the Local Time mode.
ALL RESET and 0-POSITIONING CORRECTION PROCEDURE
Pull the crown out one ‘click’.
Turn the crown so that either tip of the Mode hand is pointing to the Local Time mode (L-TM)
Push the crown back in one ‘click’ to the closed position next
to the case.
When the hands have stopped moving, pull the crown out two ‘clicks’.
Press the upper right (A) and lower right (B) buttons simultaneously for two to three seconds, then release. Following a confirmation tone, each of the hands performs a ‘demonstration’ in the order of the Function, Minute and Second hands to indicate that the ‘all reset’ of the movement has completed.
Press the upper right button (A). The Minute hand will move to indicate the Hour, Minute and 24 Hour hands can be set. Turn the crown clockwise or counterclockwise to set Hour, Minute hands to 12:00 and the Function hand to ‘24’ (the 24 Hour hand moves in conjunction with the Hour hand and cannot be set independently.)
BENEFITS
Environmentally Clean Energy Source
Displays 12/24 Systems
Accurate to the year 2100
Daily Alarm
Second time zone
Turning the crown rapidly (‘clicking’ continuously two or more times) causes the hands to advance continuously until the crown is again turned.
Press the upper right button (A) again. The Function hand will move indicating that is the hand that can now be set. Turn the crown clockwise or counterclockwise so that Function hand points to ‘SUN’ and the date is set for 1. Turning the crown rapidly (‘clicking’ continuously two or more times) causes the hand to advance continuously until the crown is again turned.
Press the upper right button (A). The Second hand will move indicating the Second hand can now be set.
Turn the crown clockwise to move the Second hand to the ‘12:00’ position.
Push the crown in two ‘clicks’ to the closed position next to the case. This completes the all reset and 0-positioning correction.
Continue with To Set the Time.
TO SET THE TIME
Pull the crown out one ‘click’.
Turn the crown so that either tip of the Mode hand is pointing to the Time mode (TME).
Pull the crown out an additional ‘click’ to the time setting position. The Second hand will move to the 12:00 position.
Turn the crown to change the position of the Hour, Minute and 24 Hour hands electronically. Turning the crown clockwise moves the hands forward and counterclockwise moves the hands backward. Turning the crown quickly causes the hands to move in a continuous or rapid set manner. Turning the crown one 'click' in either direction while the hands are in the "rapid set" mode will cause the hands to stop.
Be sure to set time to the correct AM/PM. by referring to the 24 hour hand. After setting time, push the crown in to finalize time setting.
TO SET THE CALENDAR
Pull the crown out one ‘click’.
Turn the crown so that either tip of the Mode hand is pointing to the Calendar mode (CAL).
Pull the crown out an additional ‘click’ to the Calendar setting position. The Function hand will move to indicate the leap year set in memory. The positions are as follows:
-‘LY’= indicates the current year is a leap year -‘+1’ indicates 1 year past a leap year
-‘+2’ indicates 2 years past a leap year -‘+3’ indicates 3 years past a leap year
Turn the crown clockwise or counterclockwise to set the correct leap year position.
Press the upper right button (A). The Second hand will move to indicate the month stored in memory. Turn the crown clockwise to set the current month.
Press the upper right button (A). The Function hand will move to the middle of the day indicator indicating the date can be set. Turning the crown clockwise will advance the date, while turning the crown counterclockwise will move the date backward. Turning the crown quickly causes the hands to move in a continuous or rapid set manner. Turning the crown one 'click' in either direction while the hands are in the "rapid set" mode will cause the hands to stop. Set the date for the current date.
Press the upper right button (A). The Function hand will move to the day of the week stored in memory. Turn the crown clockwise or counterclockwise to set the current day of the week.
Push the crown to the closed position next to the case. This completes setting the Calendar.
TO SET THE ALARM
The alarm is based on a 24-hour time period and can be set to sound at the same time each day.
Pull the crown out one ‘click’.
Turn the crown so that either tip of the Mode hand is pointing to the Alarm mode (ALM). The Hour, Minute and 24 Hour hands will move to the current alarm time set position.
Pull the crown out an additional ‘click’ to the Alarm time setting position. The alarm will automatically be activated and the Function hand will move to indicate ‘ON’.
Rotate the crown either clockwise or counterclockwise to set the desired alarm time, paying close attention to the 24 Hour hand to ensure the proper AM or PM alarm time is set.
Press the lower right button (B) to turn the alarm ON or OFF.
Push the crown to the closed position next to the case.
TO SET THE LOCAL TIME
The local time (L-TM) function allows the time to be set and displayed for a different time zone other than your own. It can be set in 1-hour increments only.
Pull the crown out one ‘click’.
Turn the crown so that either tip of the Mode hand is pointing to the Local Time mode (L-TM).
Pull the crown out an additional ‘click’ to the Local time setting position.
Turn the crown clockwise to advance the time by one hour, or counterclockwise to move the time back one hour.
Once you have the local time set, push the crown in two ‘clicks’ to the closed position next to the case.
For additional features and instructions, please refer to the full instruction manual or our web site at www.citizenwatch.com.
 Loading...