


 Loading...
USER GUIDE
Cisco Small Business
IP Phone Model SPA92X, SPA94X, and SPA962

Contents
Chapter 1: Getting Started |
6 |
Overview of the Cisco SPA9000 Voice System IP Phones |
6 |
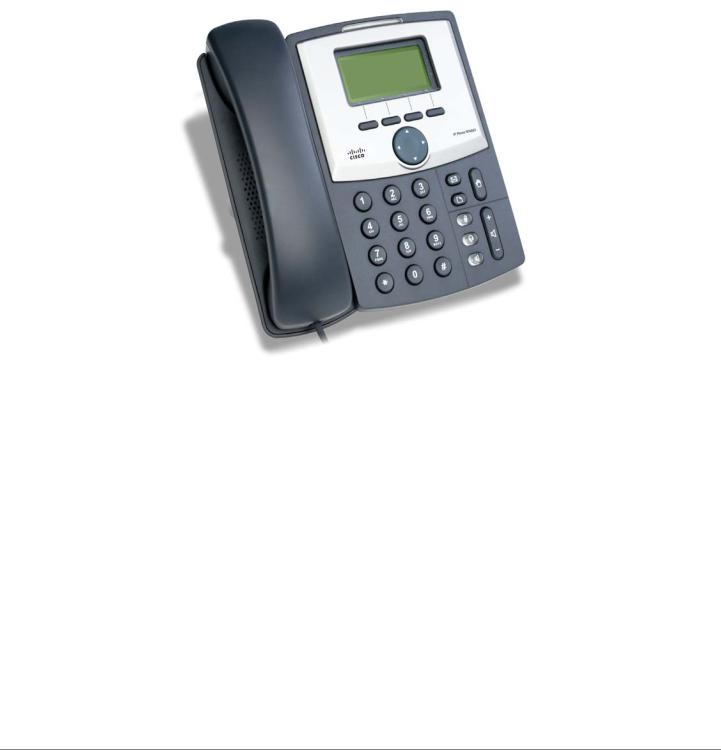
SPA921/922 IP Phone |
8 |
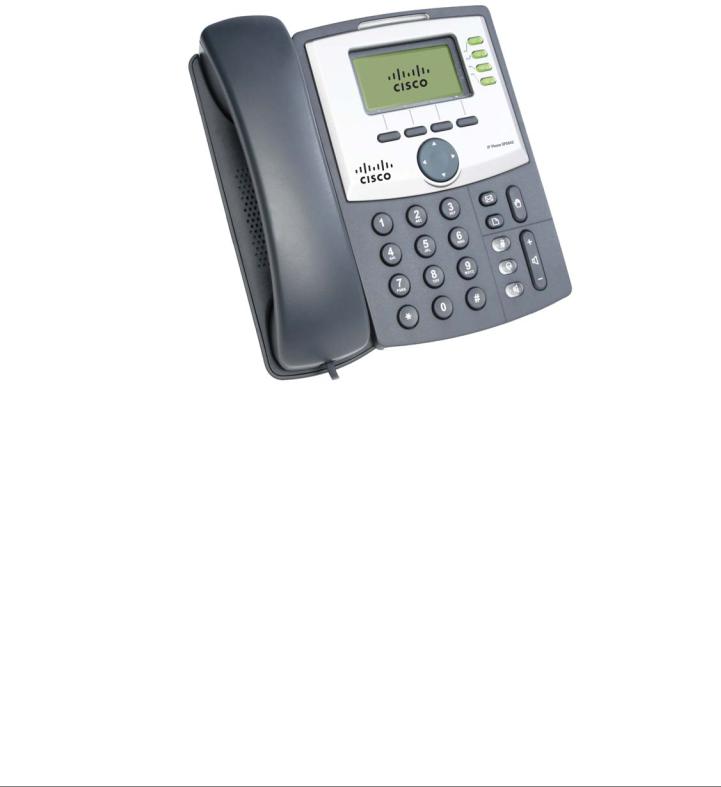
SPA941/942 IP Phone |
9 |
SPA962 IP Phone |
10 |
SPA932 Attendant Console |
11 |
Caring for Your Phone |
11 |
Chapter 2: Installing Your Phone |
12 |
Before You Begin |
13 |
Connecting the Handset |
13 |
(Optional) Attaching the Desk Stand |
15 |
(Optional) Mounting the Phone to the Wall |
15 |
Connecting Your Phone’s Power |
19 |
Connecting Your Phone to the Computer Network |
20 |
Connecting the Phone to the Wireless Network |
20 |
Verifying Phone Startup |
21 |
Upgrading Your Phone’s Firmware |
22 |
Download the Firmware |
22 |
Get Your Phone’s IP Address |
22 |
Install the Firmware |
23 |
Connecting the SPA932 Attendant Console to the SPA962 |
24 |
Connecting a Single SPA932 |
24 |
Connecting an Additional SPA932 |
27 |
Chapter 3: Using Basic Phone Functions |
30 |
Understanding Your Phone’s Lines and Buttons |
31 |
Softkey Buttons |
33 |
Using the Keypad and Buttons with Menus |
37 |
Using Keypad Shortcuts |
37 |
Using the Navigation Button |
37 |
Cisco Small Business IP Phone SPA9XX User Guide |
1 |

Contents
Entering Numbers and Text in Fields |
37 |
Using Phone Hardware and Accessories |
38 |
Using the Speakerphone |
38 |
Using Headsets |
38 |
Connecting the Headset |
38 |
Using the Headset with Your IP Phone |
39 |
Switching Between the Handset/Headset/Speakerphone |
|
During a Call |
39 |
Sending Audio to the Phone Speaker |
39 |
Choosing Your Preferred Audio Device |
40 |
Adjusting Call Volume and Muting |
40 |
Adjusting Call Volume |
40 |
Using Mute |
40 |
Placing or Answering a Call |
41 |
Using Dial Assistance |
41 |
Putting a Call on Hold |
42 |
Resuming a Call |
42 |
Ending a Call |
42 |
Transferring Calls |
42 |
Performing an Attended Transfer |
43 |
Performing an Unattended (Blind) Transfer |
43 |
Redialing |
44 |
Viewing and Returning Missed Calls |
44 |
Turning the Missed Calls Shortcut On and Off |
45 |
Forwarding Calls |
45 |
Forwarding Calls to a Single Number |
46 |
Forwarding Calls When Your Phone is Busy |
46 |
Forwarding Calls When You Don’t Answer the Phone |
47 |
Delaying Call Forwarding When You Don’t Answer the Phone |
47 |
Stopping Call Forwarding |
47 |
Changing the Call Forwarding Delay |
48 |
Cisco Small Business IP Phone SPA9XX User Guide |
2 |

Contents
Setting Do Not Disturb |
48 |
Turning Call Waiting On and Off |
49 |
Picking Up a Call |
50 |
Parking a Call |
50 |
Placing a Three-Way Conference Call |
51 |
Using the Phone Directories |
52 |
Using Your Personal Directory |
52 |
Using the Corporate Directory |
53 |
Using the Call History Lists |
54 |
Viewing the Call History Lists |
54 |
Calling from the Call History Lists |
55 |
Deleting a Number from the Call History Lists |
55 |
Saving a Call History List Number to Your Directory |
55 |
Setting or Changing a Phone Password |
56 |
Accessing Voicemail |
56 |
Chapter 4: Using Advanced Phone Features |
57 |
Configuring Privacy and Security Features |
58 |
Blocking Caller ID |
58 |
Blocking Anonymous Calls |
58 |
Using Secure Call |
59 |
Enabling Dial Assistance |
59 |
Creating Speed Dials |
60 |
Using Speed Dials |
60 |
Using the Paging Feature |
61 |
Paging Another Phone |
61 |
Configuring Auto Answer |
61 |
Monitoring/Accessing Another Phone from Your Phone |
62 |
Customizing Your LCD Screen |
62 |
Changing the LCD Screen Contrast |
62 |
Setting the Backlight Timer |
63 |
Cisco Small Business IP Phone SPA9XX User Guide |
3 |

Contents
Configuring the Phone Screen Saver |
63 |
Turning on the Screen Saver |
64 |
Changing the LCD Background Picture |
65 |
Changing the Phone Menu Color Scheme |
65 |
Using Ring Tones |
65 |
Changing Your Ring Tone |
66 |
Creating Your Own Ring Tones |
66 |
Accessing Stock Quotes, Traffic, and News on Your Phone |
68 |
Configuring Date and Time Parameters on Your Phone |
68 |
Setting Your Phone’s Date and Time |
68 |
Choosing the Time Format for Your Phone (12 or 24 Hour) |
69 |
Choosing the Date Format for Your Phone |
69 |
Using Star Codes |
70 |
Advanced Procedures for Technical Support Personnel |
72 |
Rebooting Your Phone |
73 |
Chapter 5: Using the Web Interface |
74 |
Logging in to the Web Interface |
75 |
Setting Do Not Disturb |
75 |
Configuring Call Forwarding |
76 |
Configuring Call Waiting |
76 |
Blocking Caller ID |
77 |
Blocking Anonymous Calls |
77 |
Using Your Personal Directory |
77 |
Viewing Call History Lists |
78 |
Creating Speed Dials |
79 |
Accepting Text Messages |
79 |
Adjusting Audio Volume |
80 |
Changing the LCD Contrast |
80 |
Cisco Small Business IP Phone SPA9XX User Guide |
4 |

Contents
Changing the Phone Menu Color Scheme |
81 |
Configuring the Phone Screen Saver |
81 |
Chapter 6: Using the SPA932 Attendant Console |
82 |
Monitoring an Extension |
82 |
Speed Dialing an Extension |
83 |
Transferring a Call |
83 |
Picking Up a Call |
83 |
Appendix A: Additional Information |
84 |
Regulatory Compliance and Safety Information |
84 |
Warranty |
84 |
End User License Agreement (EULA) |
84 |
Support Contacts |
84 |
Appendix B: Where to Go From Here |
85 |
Product Resources |
85 |
Related Documentation |
86 |
Cisco Small Business IP Phone SPA9XX User Guide |
5 |

1
Getting Started
This document describes how to use your SPA 9x2 phone. It contains the following chapters:
•Chapter 1—Getting Started (this chapter)—Gives a description of this book and an overview of the Cisco SPA9000 Voice System IP Phones.
•
•
•
•
•
•
•
Chapter 2, “Installing Your Phone”
Chapter 3, “Using Basic Phone Functions”
Chapter 4, “Using Advanced Phone Features”
Chapter 5, “Using the Web Interface”
Chapter 6, “Using the SPA932 Attendant Console”
Chapter A, “Additional Information”
Chapter B, “Where to Go From Here”
Overview of the Cisco SPA9000 Voice System IP Phones
The Cisco SPA IP Phones are full-featured VoIP (Voice over Internet Protocol) phones that provide voice communication over an IP network. The phones have traditional features, such as call forwarding, redialing, speed dialing, transferring calls, conference calling and accessing voice mail. Calls can be made or received with a handset, headset or over a speaker.
NOTE: If you are calling phones located outside your IP network, you will need an Internet Telephony Service Provider (ITSP) to provide VoIP service. You may also need additional equipment provided by your ITSP.
Cisco Small Business IP Phone SPA9XX User Guide |
6 |

Getting Started |
1 |
|
|
Overview of the Cisco SPA9000 Voice System IP Phones |
|
|
|
|
|
IP phones also have special features not available in traditional phones. The Cisco SPA IP phones contain Ethernet ports, or ports that allow them to be linked to the computer network. Some models have additional Ethernet ports that allow a computer to be connected to the network through the IP phone.
Unlike traditional phones, Cisco SPA IP phones require a separate power source. Some models use power adapters, and others can use Power over Ethernet (PoE). This means the phone can be connected to a switch that provides PoE to the phone, and does not require a separate power source.
The following table shows the Cisco SPA IP phones currently available and their respective features:
Cisco SPA IP Phones
Model |
Number of |
Number of |
PoE Support |
Display |
|
|
Voice Lines |
Ethernet Ports |
|
|
|
|
|
|
|
|
|
SPA901 |
1 |
0 |
N |
None |
|
|
|
|
|
|
|
SPA921 |
1 |
1 |
N |
Backlit 128 x 64 with |
|
|
|
|
|
screen saver and |
|
SPA922 |
1 |
2 |
Y |
||
customizable logo |
|||||
|
|
|
|
and background |
|
SPA941* |
2-4 |
1 |
N |
||
picture. |
|||||
|
|
|
|
||
|
|
|
|
|
|
SPA942 |
2-4 |
2 |
Y |
|
|
|
|
|
|
|
|
SPA962 |
6 |
2 |
Y |
Color 320 x 320 with |
|
|
|
|
|
screen saver and |
|
|
|
|
|
customizable logo |
|
|
|
|
|
and background |
|
|
|
|
|
picture. Also |
|
|
|
|
|
provides |
|
|
|
|
|
customizable photo |
|
|
|
|
|
album. |
|
|
|
|
|
|
*The SPA941 and SPA942 provide support for 4 lines starting with firmware release 5.2. To enable the four-line capacity, upgrade your SPA IP phone according to the instructions provided in the ”Upgrading Your Phone’s Firmware” section on
page 22.
Cisco Small Business IP Phone SPA9XX User Guide |
7 |
Getting Started |
1 |
|
|
Overview of the Cisco SPA9000 Voice System IP Phones |
|
|
|
|
|
SPA921/922 IP Phone
SPA922 IP Phone
The SPA922 provides Power over Ethernet (PoE) and an extra Ethernet port for connecting another device to the local area network. The PA-100 power supply must be ordered separately if you are not connecting the phone to a PoE source. The SPA921 is similar but does not support PoE (a PA-100 power supply is included with the SPA921).
Cisco Small Business IP Phone SPA9XX User Guide |
8 |
Getting Started |
1 |
|
|
Overview of the Cisco SPA9000 Voice System IP Phones |
|
|
|
|
|
SPA941/942 IP Phone
The SPA942 provides Power over Ethernet (PoE) and two Ethernet ports for connecting another device to the local area network. The PA-100 power supply must be ordered separately if you are not connecting the phone to a PoE source. The SPA941 is similar but does not support PoE (a PA-100 power supply is included with the SPA941).
Cisco Small Business IP Phone SPA9XX User Guide |
9 |
Getting Started |
1 |
|
|
Overview of the Cisco SPA9000 Voice System IP Phones |
|
|
|
|
|
SPA962 IP Phone
The SPA962 has a 320 x 240 true color, four-inch, LCD screen, provides up to six telephone extensions, and supports PoE. The PA-100 power supply must be ordered separately if you are not connecting the phone to a PoE source.
Cisco Small Business IP Phone SPA9XX User Guide |
10 |

Getting Started |
1 |
|
|
Caring for Your Phone |
|
|
|
|
|
SPA932 Attendant Console
The SPA932 is a 32-button attendant console for the SPA962 or SPA525, providing 32 three-color (red, green, and amber) programmable LEDS, with support for Broadsoft Busy Lamp Field and Asterisk Line Monitoring. The SPA932 attaches to the SPA962 or SPA525 with the attachment arm provided (not shown). It obtains power directly from the SPA962 or SPA525 and does not require a separate power supply. Two SPA932 units can be attached to a single SPA962 or SPA525 to monitor a total of 64 separate lines. For more information on the SPA932, see Chapter 6, “Using the SPA932 Attendant Console.”
Caring for Your Phone
The Cisco SPA IP phones are electronic devices that should not be exposed to excessive heat, sun, cold or water. To clean the equipment, use a slightly moistened paper or cloth towel. Do not spray or pour cleaning solution directly onto the hardware unit.
Cisco Small Business IP Phone SPA9XX User Guide |
11 |

2
Installing Your Phone
This chapter describes how to install and connect your Cisco SPA IP Phone. It contains the following sections:
•Before You Begin, page13
•Connecting the Handset, page13
•(Optional) Attaching the Desk Stand, page15
•(Optional) Mounting the Phone to the Wall, page15
•Connecting Your Phone’s Power, page19
•Connecting Your Phone to the Computer Network, page 20
•Verifying Phone Startup, page 21
•Upgrading Your Phone’s Firmware, page 22
•Connecting the SPA932 Attendant Console to the SPA962, page 24
Cisco Small Business IP Phone SPA9XX User Guide |
12 |

Installing Your Phone |
2 |
|
|
Before You Begin |
|
|
|
|
|
Before You Begin
Before you install and connect your phone, verify with your System Administrator (if applicable) that the network is ready for the phone, read the safety notices, and make sure you have all the phone parts and documentation available.
NOTE: The RJ-11 port marked “AUX” is reserved for connection with the SPA932 Attendant Console that works with the SPA962. It is not for use as a telephone line port.
! |
CAUTION: Do not plug a telephone line cord |
|
into the port marked “AUX.” |
||
|
Connecting the Handset
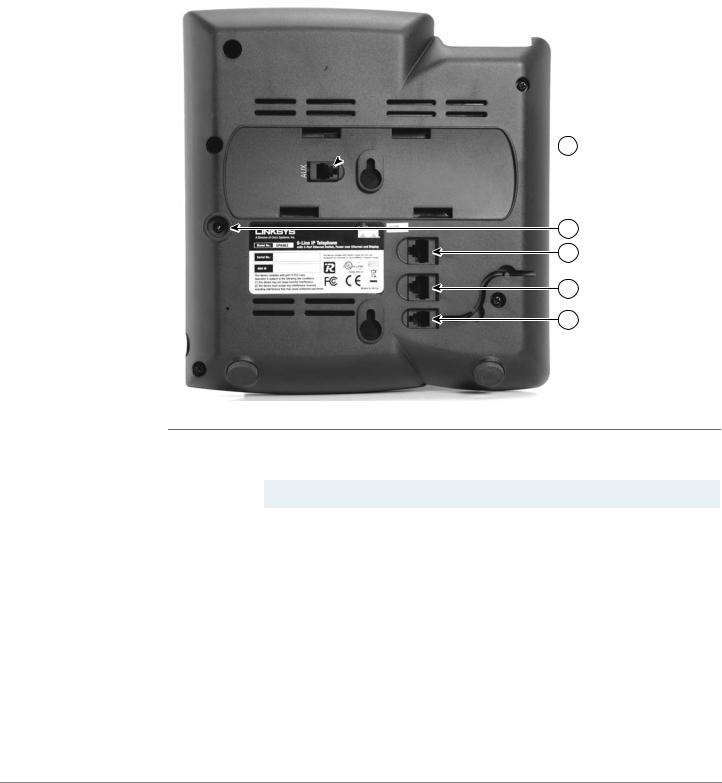
STEP 1 Find the end of the coiled phone cord that has the longer straightened end. Plug that end into the back of the phone base in the slot marked with a phone symbol. This port is labeled #5 on the Cisco SPA IP Phone Connections graphic.
STEP 2 Plug in the short straightened end of the handset cord into the jack at the bottom of the handset (not shown).
Cisco Small Business IP Phone SPA9XX User Guide |
13 |
Installing Your Phone |
2 |
|
|
Connecting the Handset |
|
|
|
|
|
Figure1 Cisco SPA IP Phone Connections
 1
1
2
3
4
5
187497
Number |
Description |
|
|
1 |
Auxiliary port. For use only with the SPA932 Attendant Console. |
|
|
2 |
Power port. |
|
|
3 |
Additional Ethernet port (available on certain models). |
|
|
4 |
WAN port. Connects the phone to the Ethernet switch. |
|
|
5 |
Handset port. |
|
|
Cisco Small Business IP Phone SPA9XX User Guide |
14 |
Installing Your Phone |
2 |
|
|
(Optional) Attaching the Desk Stand |
|
|
|
|
|
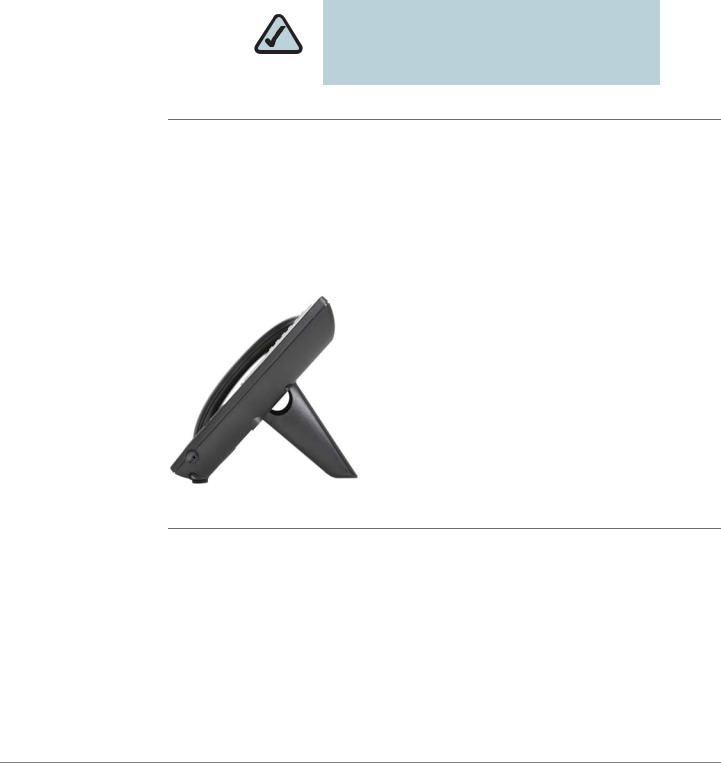
(Optional) Attaching the Desk Stand
NOTE: Do not attach the desk stand if you want to mount the phone to the wall. If you are attaching a SPA932 attendant console attach the console before attaching the desk stand.
STEP 1 Line up the tabs on the desk stand with the slots on the back of the phone.
STEP 2 Slide the bottom tabs into the slots
STEP 3 Lightly press down on the top of the desk stand. It should easily slide into the top slots. Do not force.
Figure 2 IP Phone with Desk Stand Attached
(Optional) Mounting the Phone to the Wall
To mount the phone to the wall, you must purchase the MB100 wall mount bracket kit.
Cisco Small Business IP Phone SPA9XX User Guide |
15 |
Installing Your Phone |
2 |
|
|
(Optional) Mounting the Phone to the Wall |
|
|
|
|
|
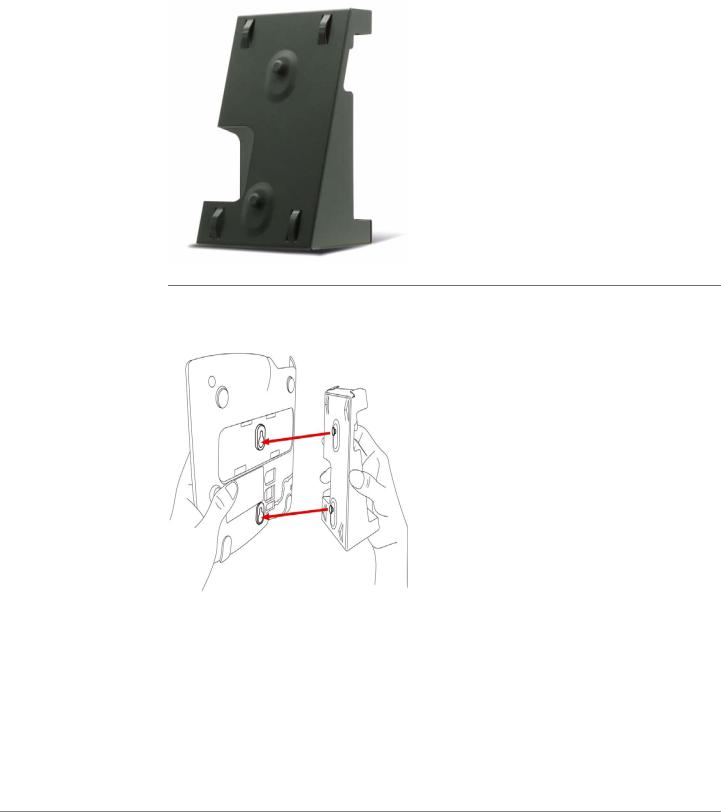
Figure 3 MB100 Wall Mount Kit
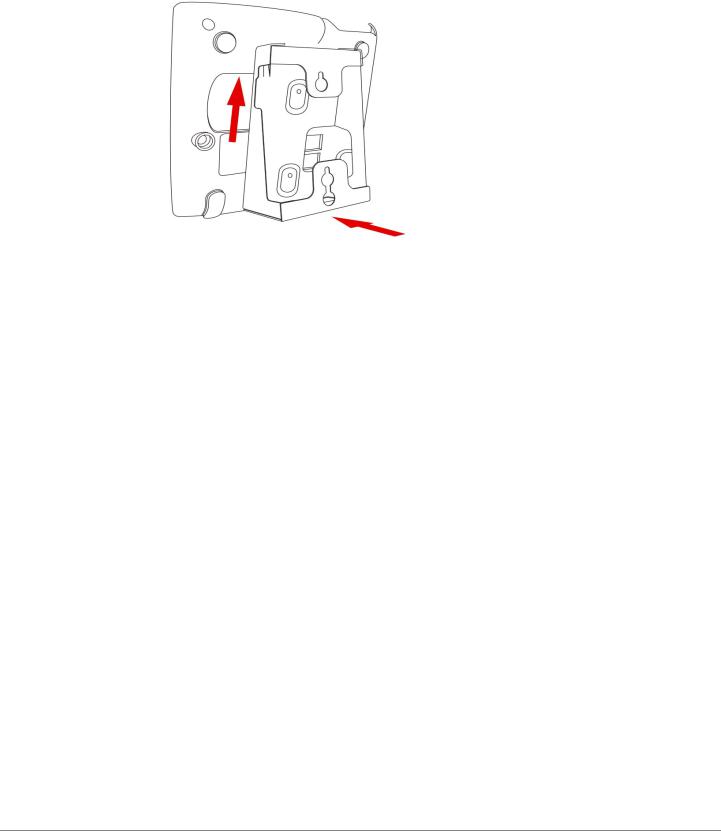
STEP 1 To attach the Mounting Bracket (MB), align the two cleats on the MB with the holes in the phone’s base.
STEP 2 Orient the MB such that the phone’s Ethernet and handset ports are accessible after installation.
STEP 3 Push the MB onto the phone’s base. Slide the MB upwards to lock it in place.
Cisco Small Business IP Phone SPA9XX User Guide |
16 |
Installing Your Phone |
2 |
|
|
(Optional) Mounting the Phone to the Wall |
|
|
|
|
|
Cisco Small Business IP Phone SPA9XX User Guide |
17 |
Installing Your Phone |
2 |
|
|
(Optional) Mounting the Phone to the Wall |
|
|
|
|
|
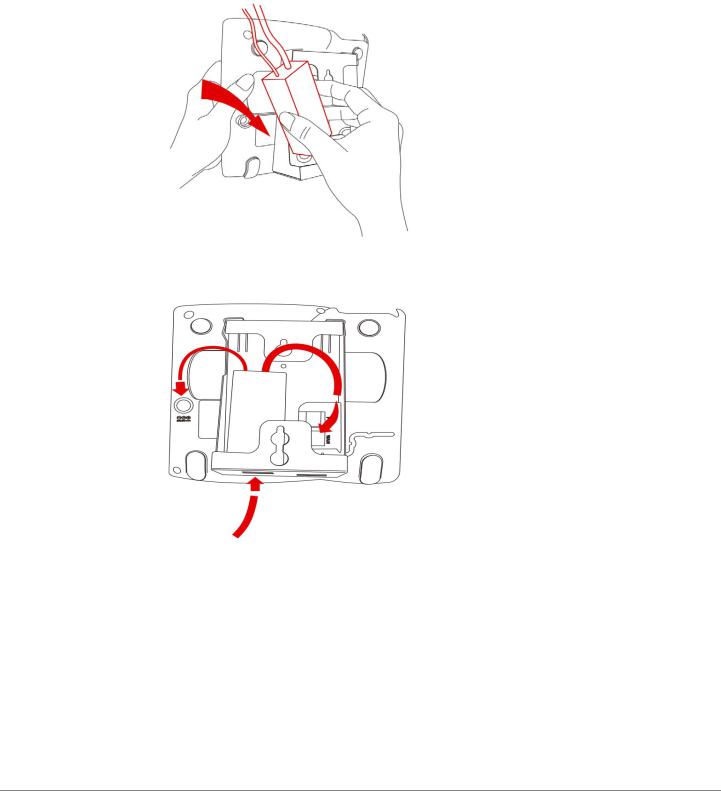
STEP 4 (Optional) If a Wi-Fi or PoE dongle is installed, place in the tray.
STEP 5 Plug in the Ethernet and power cables.
Cisco Small Business IP Phone SPA9XX User Guide |
18 |
Installing Your Phone |
2 |
|
|
Connecting Your Phone’s Power |
|
|
|
|
|
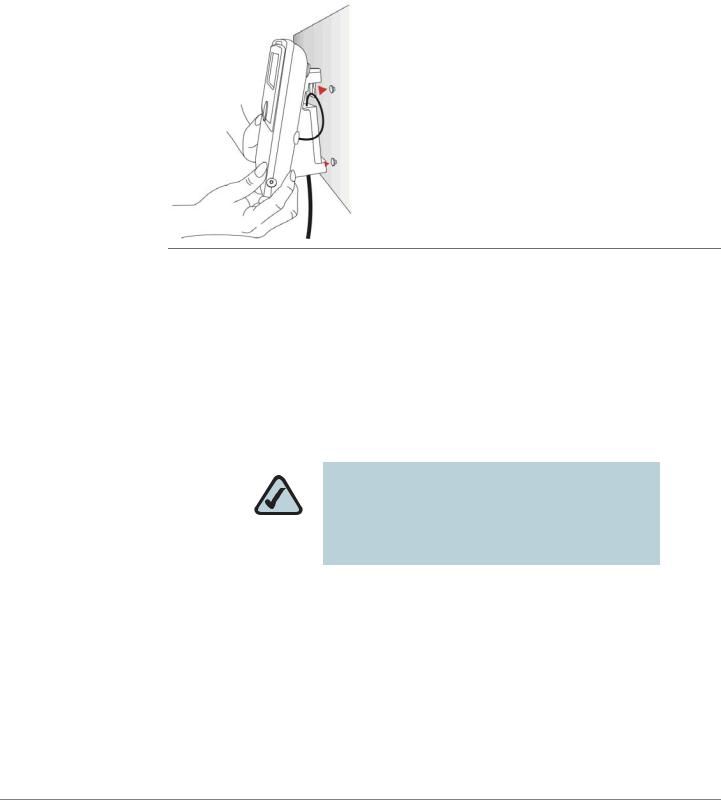
STEP 6 Hang onto screws mounted in the wall.
Connecting Your Phone’s Power
If you are using an external power source, push the power cord into the power supply, and plug the power supply into the phone base. See the Cisco SPA IP Phone Connections graphic, item, #2.
NOTE: The SPA922, SPA942, and SPA962 models do not ship with a power supply. If you are not using Power over Ethernet (PoE), you must order the PA-100 power supply separately from Cisco.
If you are using Power over Ethernet (PoE) to power the phone, the phone will receive power when you connect an Ethernet cable from the phone’s WAN port to a switch in your network that provides PoE. See the ”Connecting Your Phone to the Computer Network” section on page 20.
Cisco Small Business IP Phone SPA9XX User Guide |
19 |
Installing Your Phone |
2 |
|
|
Connecting Your Phone to the Computer Network |
|
|
|
|
|
NOTE: If you are connecting your phone to a Wireless-G network using the Cisco WBP54G, see the ”Connecting the Phone to the Wireless Network” section on page 20.
Connecting Your Phone to the Computer Network
You connect your phone to the local network by using an Ethernet cable:
STEP 1 Plug the Ethernet cable into the back of the base station into the slot marked “WAN.” This port is labeled #4 on the Cisco SPA IP Phone Connections graphic.
STEP 2 Plug the other end of the Ethernet cable into the appropriate device on your network, such as a network switch.
NOTE: The SPA922, SPA942, and SPA962 models provide a second Ethernet port. You can connect a PC to this port to provide network access to the PC. This port is labeled #3 in the Cisco SPA IP Phone Connections graphic.
Connecting the Phone to the Wireless Network
You can use the Cisco WBP54G Wireless-G Bridge for Phone Adapters to connect the SPA92X, SPA94X, or SPA962 phones to a Wireless-G network instead of the wired local network.
NOTE: This procedure requires the optional Cisco SPA9000 Voice System IP Phone PA-100 power adapter to provide power to the WBP54G.
Cisco Small Business IP Phone SPA9XX User Guide |
20 |

Installing Your Phone |
2 |
|
|
Verifying Phone Startup |
|
|
|
|
|
To connect your phone to the Cisco WBP54G:
STEP 1 Configure the Cisco WBP54G using the Setup Wizard. See the instructions in the
Wireless-G Bridge for Phone Adapters Quick Installation Guide, available at www.cisco.com/go/smallbiz.
STEP 2 During the Setup Wizard process, connect the Ethernet network cable of the WBP54G to the back of the IP phone base station into the slot marked “WAN.” This port is labeled #4 on the Cisco SPA IP Phone Connections graphic.
Connect the power cable of the WBP54G to the power port on the IP phone base. See the Cisco SPA IP Phone Connections graphic, item #2.
STEP 3 Plug the Cisco SPA9000 Voice System IP Phone power adapter into the power port of the WBP54G.
STEP 4 Plug the other end of the Cisco SPA 9000 Voice System IP Phone power adapter into an electrical outlet.
Verifying Phone Startup
After receiving power and network connectivity, the phone executes a boot-up sequence. During this sequence, the display will first show Cisco® and then “Initializing Network”. All of the lights on the phone will flash. After the sequence, which should take about five seconds, the phone will display the standard menu for the phone. The date, name and number of the phone will display on the top line of the LCD screen. At the bottom of the LCD screen, softkeys are displayed over their associated soft buttons.
If the phone does not provide this screen, confirm your installation and connections. If these are correct, try unplugging the phone and plugging it back in again. If you still don’t see the display, then contact your Phone Administrator or Internet Telephony Service Provider (ITSP).
Cisco Small Business IP Phone SPA9XX User Guide |
21 |
Installing Your Phone |
2 |
|
|
Upgrading Your Phone’s Firmware |
|
|
|
|
|
Upgrading Your Phone’s Firmware
Your phone ships with pre-installed firmware. However, later firmware versions may be available that add features and fix problems with your phone. You may need to upgrade your phone to the latest firmware for ideal performance.
IMPORTANT: If you are using your phone with ! an Internet Telephony Service Provider’s
system, do not upgrade your phone’s firmware without consulting your service provider. Your provider may automatically upgrade your phones without any action on your part necessary.
To upgrade your phone’s firmware, do one of the following:
•Download the firmware from the Cisco website and install it from your PC. See the following section for instructions.
•Upgrade using the Cisco SPA9000 Voice System Setup Wizard (if your phone is part of a Cisco SPA9000 Voice System network). See the Cisco SPA9000 Voice System Setup Wizard User Guide.
Download the Firmware
Go to www.cisco.com/go/smallbiz to download firmware.
Get Your Phone’s IP Address
Before you upgrade, you’ll need the IP address of the phone you are upgrading. To get your IP address:
STEP 1 Press the Setup button.
STEP 2 Scroll to Network and press Select.
STEP 3 Scroll to view Current IP. This is the IP address of your phone.
Cisco Small Business IP Phone SPA9XX User Guide |
22 |
Installing Your Phone |
2 |
|
|
Upgrading Your Phone’s Firmware |
|
|
|
|
|
Install the Firmware
STEP 1 Extract the firmware onto your PC.
NOTE: If you are in a VPN connection, you may need to disconnect before proceeding so that your PC can communicate directly with your phone for the upgrade.
STEP 2 Run the executable file for the firmware upgrade (for example, double click upg- spa942-5-2-8.exe).
STEP 3 Click Continue after reading the message regarding upgrading and your service provider.
STEP 4 Enter the IP address of your phone.
STEP 5 Click OK. The system displays information about your phone’s current software and hardware.
STEP 6 Click Upgrade to begin the upgrade.
NOTE: Do not disconnect your phone’s power until the upgrade is complete (the lights on your phone are no longer blinking).
STEP 7 Click OK to dismiss the status message of the upgrade.
Cisco Small Business IP Phone SPA9XX User Guide |
23 |
Installing Your Phone |
2 |
|
|
Connecting the SPA932 Attendant Console to the SPA962 |
|
|
|
|
|
Connecting the SPA932 Attendant Console to the SPA962
To connect the SPA932 Attendant Console to the SPA962, you need the following:
•SPA932 Attendant Console
•Attachment Arm
•Two (2) Attachment Arm Screws
•Auxiliary Cable
•Desktop Stand
Connecting a Single SPA932
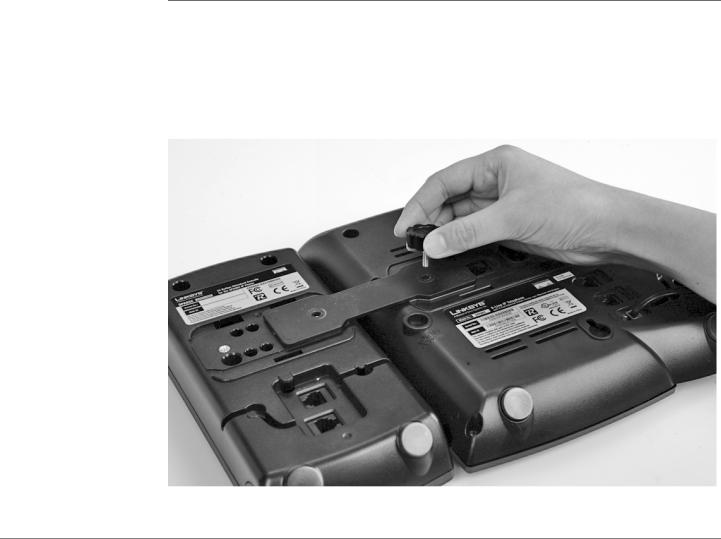
STEP 1 Turn both the SPA962 and SPA932 face down.
STEP 2 Align the hole in the SPA962 alignment recess with the hole on the attachment arm.
STEP 3 Using the attachment arm screw, secure the attachment arm to the SPA962.
Cisco Small Business IP Phone SPA9XX User Guide |
24 |
Installing Your Phone |
2 |
|
|
Connecting the SPA932 Attendant Console to the SPA962 |
|
|
|
|
|
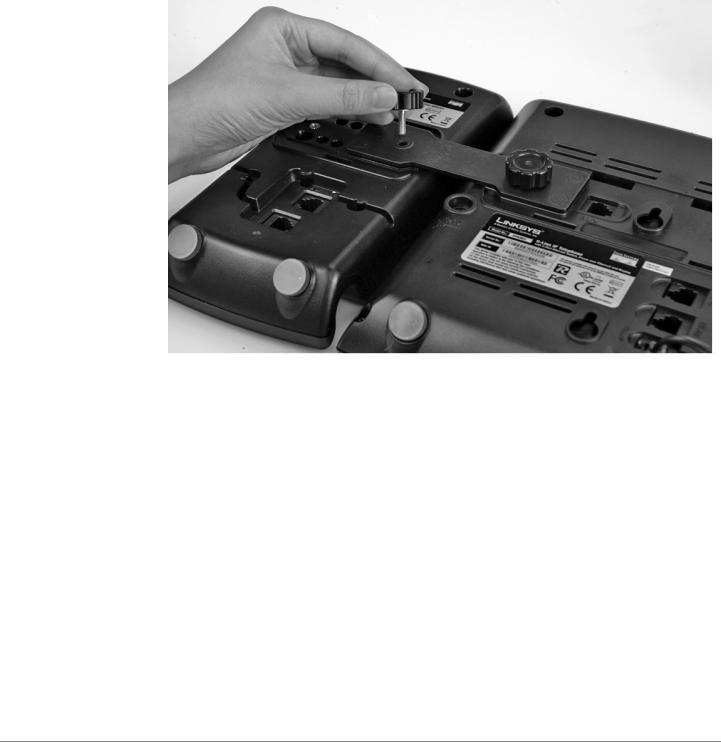
STEP 4 Align the hole in the SPA932 alignment recess with the hole on the attachment arm.
STEP 5 Using the attachment arm screw, secure the attachment arm to the SPA932.
Cisco Small Business IP Phone SPA9XX User Guide |
25 |

Installing Your Phone |
2 |
|
|
Connecting the SPA932 Attendant Console to the SPA962 |
|
|
|
|
|
IMPORTANT: Do not plug a telephone line cord ! into an AUX port. Use only the auxiliary cable
provided with the SPA932.
STEP 6 Locate the AUX IN port on the back of the SPA932. Connect one end of the auxiliary cable to this port.
Cisco Small Business IP Phone SPA9XX User Guide |
26 |
Loading...