


 Loading...
A P P E N D I X E
Installing the Wall Mount for the Cisco Unified IP Phone 6901 and 6911
This appendix contains information on installing the wall mount for use with the Cisco Unified IP Phone 6901 and 6911 phones.
Installing a Wall Mount for the Cisco Unified IP Phone 6901
The following section describes how to install the Wall Mount plate for use with the
Cisco Unified IP Phone 6901.
Cisco recommends that you use the Leviton Wall Mount plate (Leviton type number: 4108W-0SP) for mounting the Cisco Unified IP Phone 6901. The wall mount plate must be ordered separately from the phone.
Figure E-1 shows a list of items required to mount the Cisco Unified IP Phone 6901 on the wall using the Leviton Wall Mount plate.
Figure E-1 Leviton Wall Mount Plate
4 |
6 |
8 |
A |
|
|
7 |
|
|
|
|
|
|
|
|
B |
1
|
253654 |
|
2 |
1 RJ45 Connector |
2 Leviton Wall Mount Plate |
Cisco Unified IP Phone 6901 and 6911 Administration Guide for Cisco Unified Communications Manager 8.6 (SCCP and SIP)
|
OL-24582-01 |
E-1 |
|

Appendix E Installing the Wall Mount for the Cisco Unified IP Phone 6901 and 6911
Installing a Wall Mount for the Cisco Unified IP Phone 6901
Before You Begin
Before you mount the phone on the wall, ensure that the handset rest is such that the receiver will not slip out of the cradle (Figure E-2).
Figure E-2 Preparing the Handset Hookswitch
1 |
2 |
3 |
4 |
192897
1Remove the handset from the cradle and pull the plastic tab from the handset rest.
2Rotate the tab 180 degrees.
3Hold the tab between two fingers, with the corner notches facing you. Make sure the tab lines up evenly with the slot in the handset cradle. (Figure E-2).
4Press the tab evenly into the slot. An extension protrudes from the top of the rotated tab. Return the handset to the handset rest.
Cisco Unified IP Phone 6901 and 6911 Administration Guide for Cisco Unified Communications Manager 8.6 (SCCP and SIP)
|
E-2 |
OL-24582-01 |
|
|
|
Appendix E Installing the Wall Mount for the Cisco Unified IP Phone 6901 and 6911
Installing a Wall Mount for the Cisco Unified IP Phone 6901
Installing the Phone on Wall Mount Plate
To install the phone on the wall mount plate, follow these steps:
Procedure
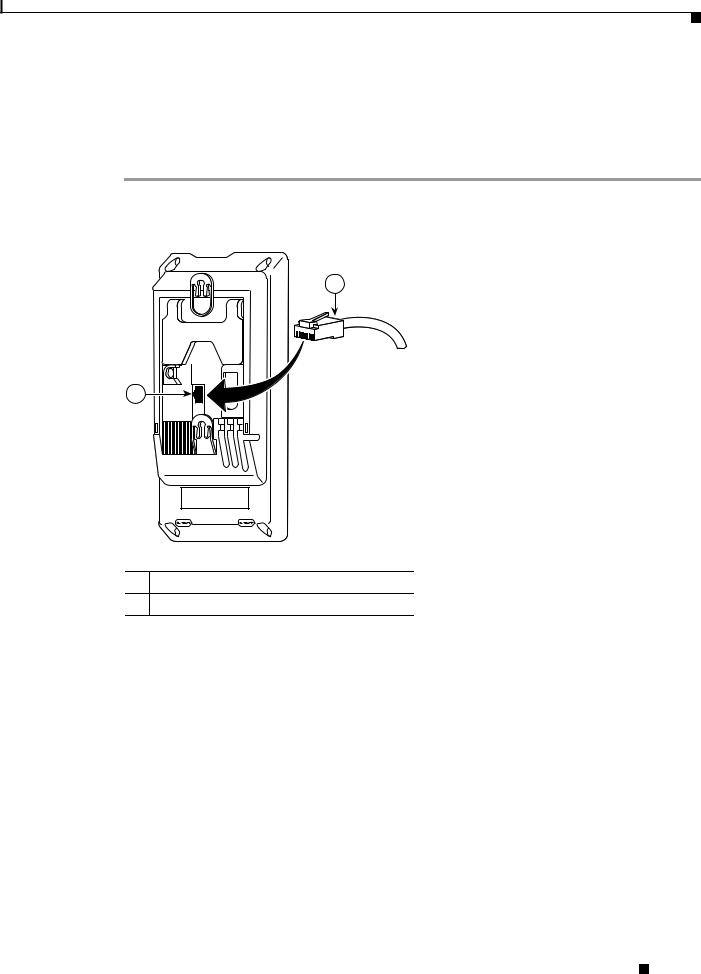
Step 1 Plug the telephone line cord (RJ45 connector) into the phone jack at the base of the phone (Figure E-3).
Figure E-3 RJ45 Connector in the Phone Jack
2
1
253655
1Network Port on the Phone
2RJ45 Connector
Cisco Unified IP Phone 6901 and 6911 Administration Guide for Cisco Unified Communications Manager 8.6 (SCCP and SIP)
|
OL-24582-01 |
E-3 |
|
Appendix E Installing the Wall Mount for the Cisco Unified IP Phone 6901 and 6911
Installing a Wall Mount for the Cisco Unified IP Phone 6901
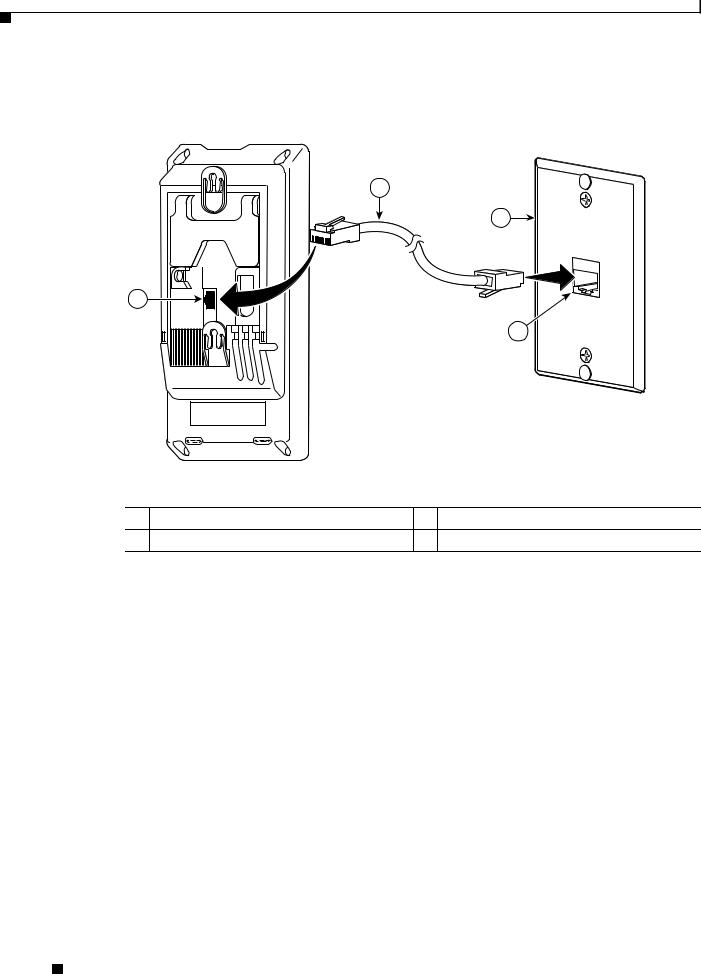
Step 2 Plug the RJ45 connector into the wall mount phone jack (Figure E-4).
Figure E-4 RJ45 Connector in the Wall Mount Jack
2
3
1
4
|
|
|
253656 |
1 |
Network Port on the Phone |
3 |
Wall Mount Plate |
2 |
RJ45 Connector |
4 |
Network Port on the Wall Mount Plate |
Cisco Unified IP Phone 6901 and 6911 Administration Guide for Cisco Unified Communications Manager 8.6 (SCCP and SIP)
|
E-4 |
OL-24582-01 |
|
|
|
Appendix E Installing the Wall Mount for the Cisco Unified IP Phone 6901 and 6911
Installing a Wall Mount for the Cisco Unified IP Phone 6901
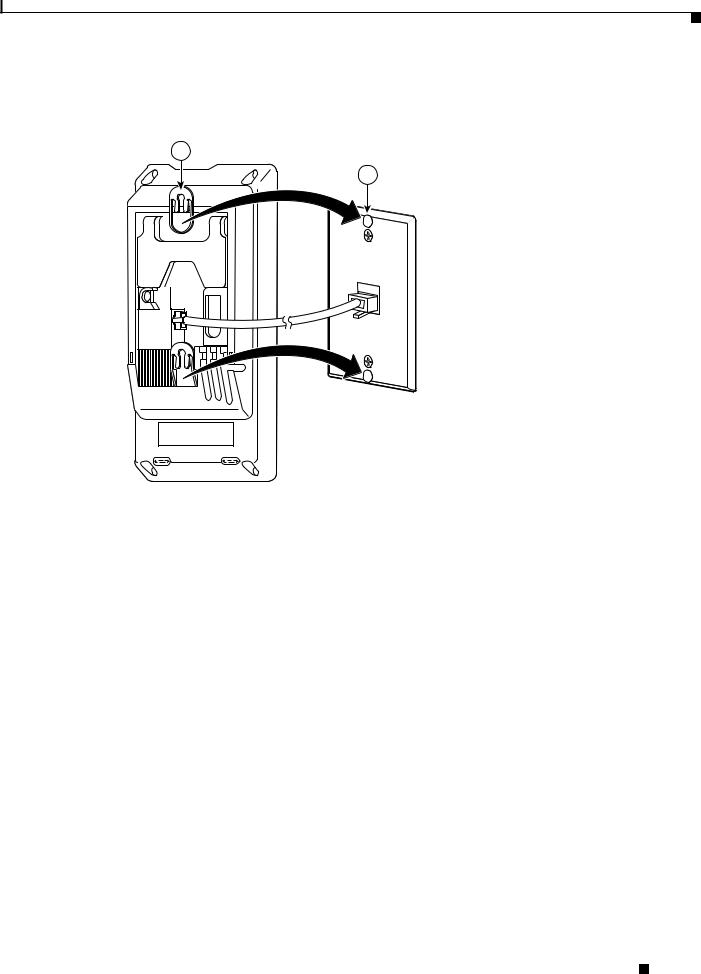
Step 3 Slip the mounting holes on the base of the wall mount plate and over the wall mount pins (Figure E-5).
Figure E-5 |
Mounting Holes |
1
2
253657
1 |
Mounting Hole on the Phone |
|
|
2 |
Wall Mount Pin on the Wall Mount Plate |
|
|
Cisco Unified IP Phone 6901 and 6911 Administration Guide for Cisco Unified Communications Manager 8.6 (SCCP and SIP)
|
OL-24582-01 |
E-5 |
|
Loading...