


 Loading...
Cisco IOS Software Configuration Guide for Cisco Aironet Access Points
Cisco IOS Releases 15.2(2)JA, 12.4(25d)JA, and 12.3(8)JEE
August 2012
Americas Headquarters
Cisco Systems, Inc. 170 West Tasman Drive
San Jose, CA 95134-1706 USA http://www.cisco.com Tel: 408 526-4000
800 553-NETS (6387) Fax: 408 527-0883
Text Part Number: OL-21881-03
THE SPECIFICATIONS AND INFORMATION REGARDING THE PRODUCTS IN THIS MANUAL ARE SUBJECT TO CHANGE WITHOUT NOTICE. ALL STATEMENTS, INFORMATION, AND RECOMMENDATIONS IN THIS MANUAL ARE BELIEVED TO BE ACCURATE BUT ARE PRESENTED WITHOUT WARRANTY OF ANY KIND, EXPRESS OR IMPLIED. USERS MUST TAKE FULL RESPONSIBILITY FOR THEIR APPLICATION OF ANY PRODUCTS. THE SOFTWARE LICENSE AND LIMITED WARRANTY FOR THE ACCOMPANYING PRODUCT ARE SET FORTH IN THE INFORMATION PACKET THAT SHIPPED WITH THE PRODUCT AND ARE INCORPORATED HEREIN BY THIS REFERENCE. IF YOU ARE UNABLE TO LOCATE THE SOFTWARE LICENSE OR LIMITED WARRANTY, CONTACT YOUR CISCO REPRESENTATIVE FOR A COPY.
The Cisco implementation of TCP header compression is an adaptation of a program developed by the University of California, Berkeley (UCB) as part of UCB’s public domain version of the UNIX operating system. All rights reserved. Copyright © 1981, Regents of the University of California.
NOTWITHSTANDING ANY OTHER WARRANTY HEREIN, ALL DOCUMENT FILES AND SOFTWARE OF THESE SUPPLIERS ARE PROVIDED “AS IS” WITH ALL FAULTS. CISCO AND THE ABOVE-NAMED SUPPLIERS DISCLAIM ALL WARRANTIES, EXPRESSED OR IMPLIED, INCLUDING, WITHOUT LIMITATION, THOSE OF MERCHANTABILITY, FITNESS FOR A PARTICULAR PURPOSE AND NONINFRINGEMENT OR ARISING FROM A COURSE OF DEALING, USAGE, OR TRADE PRACTICE.
IN NO EVENT SHALL CISCO OR ITS SUPPLIERS BE LIABLE FOR ANY INDIRECT, SPECIAL, CONSEQUENTIAL, OR INCIDENTAL DAMAGES, INCLUDING, WITHOUT LIMITATION, LOST PROFITS OR LOSS OR DAMAGE TO DATA ARISING OUT OF THE USE OR INABILITY TO USE THIS MANUAL, EVEN IF CISCO OR ITS SUPPLIERS HAVE BEEN ADVISED OF THE POSSIBILITY OF SUCH DAMAGES. Cisco and the Cisco Logo are trademarks of Cisco Systems, Inc. and/or its affiliates in the U.S. and other countries. A listing of Cisco's trademarks can be found at www.cisco.com/go/trademarks. Third party trademarks mentioned are the property of their respective owners. The use of the word partner does not imply a partnership relationship between Cisco and any other company. (1005R)
Any Internet Protocol (IP) addresses and phone numbers used in this document are not intended to be actual addresses and phone numbers. Any examples, command display output, network topology diagrams, and other figures included in the document are shown for illustrative purposes only. Any use of actual IP addresses or phone numbers in illustrative content is unintentional and coincidental.
Cisco Technical Documentation Style Guide ©1992–2012 Cisco Systems, Inc. All rights reserved.

|
|
|
|
|
|
|
|
|
|
C O N T E N T S |
|||
|
|
Audience i-xix |
|
|
|
|
|
|
|
|
|
||
|
|
Purpose |
i-xx |
|
|
|
|
|
|
|
|
|
|
|
|
Organization |
i-xx |
|
|
|
|
|
|
|
|
|
|
|
|
Conventions |
i-xxi |
|
|
|
|
|
|
|
|
|
|
|
|
Related Publications |
i-xxiv |
|
|
|
|
|
|
|
|||
|
|
Obtaining Documentation, Obtaining Support, and Security Guidelines i-xxiv |
|||||||||||
|
Overview |
|
|
|
|
|
|
|
|
|
|
|
|
C H A P T E R 1 |
1-1 |
|
|
|
|
|
|
|
|
|
|
||
|
|
Features |
1-2 |
|
|
|
|
|
|
|
|
|
|
|
|
Features Introduced in This Release |
1-2 |
|
|
|
|||||||
|
|
Management Options |
1-3 |
|
|
|
|
|
|
|
|||
|
|
Roaming Client Devices |
1-4 |
|
|
|
|
|
|
|
|||
|
|
Network Configuration Examples |
1-4 |
|
|
|
|
||||||
|
|
Root Access Point |
|
1-4 |
|
|
|
|
|
|
|
||
|
|
Repeater Access Point |
1-5 |
|
|
|
|
|
|
||||
|
|
Bridges |
1-5 |
|
|
|
|
|
|
|
|
|
|
|
|
Workgroup Bridge |
|
1-6 |
|
|
|
|
|
|
|
||
|
|
Central Unit in an All-Wireless Network 1-7 |
|||||||||||
|
Using the Web-Browser Interface |
|
|
|
|
|
|||||||
C H A P T E R 2 |
2-1 |
|
|
|
|
||||||||
|
|
Using the Web-Browser Interface for the First Time 2-2 |
|||||||||||
|
|
Using the Management Pages in the Web-Browser Interface 2-2 |
|||||||||||
|
|
Using Action Buttons |
2-3 |
|
|
|
|
|
|
||||
|
|
Character Restrictions in Entry Fields |
2-4 |
|
|
|
|||||||
|
|
Enabling HTTPS for Secure Browsing |
2-4 |
|
|
|
|
||||||
|
|
|
CLI Configuration Example |
|
2-12 |
|
|
|
|
||||
|
|
Deleting an HTTPS Certificate |
|
2-12 |
|
|
|
|
|||||
|
|
Using Online Help 2-13 |
|
|
|
|
|
|
|
|
|||
|
|
Changing the Location of Help Files |
2-13 |
|
|
|
|||||||
|
|
Disabling the Web-Browser Interface |
2-14 |
|
|
|
|||||||
|
Using the Command-Line Interface |
|
|
|
|
|
|
||||||
C H A P T E R 3 |
|
3-1 |
|
|
|
|
|||||||
|
|
Cisco IOS Command Modes |
3-2 |
|
|
|
|
|
|
||||
|
|
|
|
|
|
|
Cisco IOS Software Configuration Guide for Cisco Aironet Access Points |
|
|
|
|||
|
|
|
|
|
|
|
|
||||||
|
OL-21881-03 |
|
|
|
|
|
|
|
|
|
|
1 |
|
|
|
|
|
|
|
|
|
|
|
|
|
||

Contents
Getting Help 3-3 |
|
Abbreviating Commands |
3-3 |
Using no and default Forms of Commands 3-4 |
|
Understanding CLI Messages 3-4 |
|
Using Command History |
3-4 |
|
|
|
|
|
Changing the Command History Buffer Size |
3-5 |
|
|
|
|
|||||
|
|
|
|
|
Recalling Commands 3-5 |
|
|
|
|
|
|
|
|
||
|
|
|
|
|
Disabling the Command History Feature |
3-5 |
|
|
|
|
|
||||
|
|
|
|
|
Using Editing Features |
3-6 |
|
|
|
|
|
|
|
|
|
|
|
|
|
|
Enabling and Disabling Editing Features |
3-6 |
|
|
|
|
|
||||
|
|
|
|
|
Editing Commands Through Keystrokes |
3-6 |
|
|
|
|
|
||||
|
|
|
|
|
Editing Command Lines that Wrap |
3-7 |
|
|
|
|
|
|
|||
|
|
|
|
|
Searching and Filtering Output of show and more Commands |
3-8 |
|
|
|||||||
|
|
|
|
|
Accessing the CLI |
3-9 |
|
|
|
|
|
|
|
|
|
|
|
|
|
|
Opening the CLI with Telnet |
3-9 |
|
|
|
|
|
|
|
||
|
|
|
|
|
Opening the CLI with Secure Shell |
3-9 |
|
|
|
|
|
|
|||
|
|
Configuring the Access Point for the First Time |
|
|
|
|
|
||||||||
C H A P T E R 4 |
|
4-1 |
|
|
|
|
|||||||||
|
|
|
|
|
Before You Start |
4-1 |
|
|
|
|
|
|
|
|
|
|
|
|
|
|
Resetting the Device to Default Settings |
4-2 |
|
|
|
|
|
||||
|
|
|
|
|
Resetting to Default Settings Using the MODE Button |
4-2 |
|
|
|||||||
|
|
|
|
|
Resetting to Default Settings Using the GUI |
4-2 |
|
|
|
||||||
|
|
|
|
|
Resetting to Default Settings Using the CLI |
4-3 |
|
|
|
||||||
|
|
|
|
|
Logging into the Access Point |
4-3 |
|
|
|
|
|
|
|
||
|
|
|
|
|
Obtaining and Assigning an IP Address |
4-4 |
|
|
|
|
|
|
|||
|
|
|
|
|
Default IP Address Behavior |
4-5 |
|
|
|
|
|
|
|
||
|
|
|
|
|
Connecting to the 1100 Series Access Point Locally |
4-5 |
|
|
|
||||||
|
|
|
|
|
Connecting to the 1130 Series Access Point Locally |
4-6 |
|
|
|
||||||
|
|
|
|
|
Connecting to the 1040, 1140,1200, 1230, 1240, 1250, 1260, and 2600 Series Access Points Locally 4-6 |
||||||||||
|
|
|
|
|
Connecting to the 1300 Series Access Point/Bridge Locally 4-7 |
||||||||||
|
|
|
|
|
Default Radio Settings |
4-8 |
|
|
|
|
|
|
|
|
|
|
|
|
|
|
Assigning Basic Settings |
4-8 |
|
|
|
|
|
|
|
|
|
|
|
|
|
|
Default Settings on the Express Setup Page |
4-14 |
|
|
|
||||||
|
|
|
|
|
Configuring Basic Security Settings 4-16 |
|
|
|
|
|
|
||||
|
|
|
|
|
Understanding Express Security Settings |
4-17 |
|
|
|
|
|||||
|
|
|
|
|
Using VLANs |
4-17 |
|
|
|
|
|
|
|
|
|
|
|
|
|
|
Express Security Types |
4-18 |
|
|
|
|
|
|
|
||
|
|
|
|
|
Express Security Limitations |
4-20 |
|
|
|
|
|
|
|||
|
|
|
|
Cisco IOS Software Configuration Guide for Cisco Aironet Access Points |
|
|
|
|
|
|
|||||
|
|
|
|
|
|
|
|
|
|
||||||
|
2 |
|
|
|
|
|
|
|
|
|
|
|
OL-21881-03 |
|
|
|
|
|
|
|
|
|
|
|
|
|
|
|
|||

Contents
|
Using the Express Security Page |
4-20 |
|
|
|
|
||
|
CLI Configuration Examples |
4-21 |
|
|
|
|
|
|
|
Configuring System Power Settings for 1040, 1130, 1140, 1240, 1250, and 1260 Series Access |
|||||||
|
Points 4-26 |
|
|
|
|
|
|
|
|
Using the AC Power Adapter |
4-26 |
|
|
|
|
||
|
Using a Switch Capable of IEEE 802.3af Power Negotiation |
4-26 |
||||||
|
Using a Switch That Does Not Support IEEE 802.3af Power Negotiation 4-27 |
|||||||
|
Using a Power Injector |
4-27 |
|
|
|
|
|
|
|
dot11 extension power native Command |
4-27 |
|
|
||||
|
Support for 802.11n Performance on 1250 Series Access Points with Standard 802.3af PoE 4-27 |
|||||||
|
1250 Series Power Modes |
4-27 |
|
|
|
|
|
|
|
Assigning an IP Address Using the CLI |
4-28 |
|
|
|
|
||
|
Using a Telnet Session to Access the CLI |
4-29 |
|
|
|
|
||
|
Configuring the 802.1X Supplicant 4-29 |
|
|
|
|
|
||
|
Creating a Credentials Profile |
4-29 |
|
|
|
|
|
|
|
Applying the Credentials to an Interface or SSID |
4-30 |
|
|||||
|
Applying the Credentials Profile to the Wired Port |
4-30 |
|
|||||
|
Applying the Credentials Profile to an SSID Used For the Uplink 4-31 |
|||||||
|
Creating and Applying EAP Method Profiles |
4-32 |
|
|||||
|
Administering the Access Point |
|
|
|
|
|
|
|
C H A P T E R 5 |
5-1 |
|
|
|
|
|
|
|
|
Disabling the Mode Button 5-2 |
|
|
|
|
|
|
|
|
Preventing Unauthorized Access to Your Access Point |
5-3 |
|
|||||
|
Protecting Access to Privileged EXEC Commands |
5-3 |
|
|
||||
|
Default Password and Privilege Level Configuration |
5-4 |
|
|||||
|
Setting or Changing a Static Enable Password |
5-4 |
|
|
||||
|
Protecting Enable and Enable Secret Passwords with Encryption |
5-6 |
||||||
|
Configuring Username and Password Pairs |
5-7 |
|
|
|
|||
|
Configuring Multiple Privilege Levels |
5-8 |
|
|
|
|
||
|
Setting the Privilege Level for a Command |
5-8 |
|
|
|
||
|
Logging Into and Exiting a Privilege Level |
5-9 |
|
|
|
||
|
Controlling Access Point Access with RADIUS |
5-9 |
|
|
|
|
|
|
Default RADIUS Configuration |
5-10 |
|
|
|
|
|
|
Configuring RADIUS Login Authentication |
5-10 |
|
|
|
|
|
|
Defining AAA Server Groups |
5-12 |
|
|
|
|
|
|
Configuring RADIUS Authorization for User Privileged Access and |
||||||
|
Network Services 5-14 |
|
|
|
|
|
|
|
Displaying the RADIUS Configuration 5-15 |
|
|
|
|
|
|
|
Controlling Access Point Access with TACACS+ |
5-15 |
|
|
|
||
|
Cisco IOS Software Configuration Guide for Cisco Aironet Access Points |
|
|
|
|||
|
|||||||
|
OL-21881-03 |
|
|
|
|
3 |
|
|
|
|
|
|
|
||

Contents
|
|
|
Default TACACS+ Configuration |
5-15 |
|
|
|
|
|
||||
|
|
|
Configuring TACACS+ Login Authentication |
5-15 |
|
|
|
||||||
|
|
|
Configuring TACACS+ Authorization for Privileged EXEC Access and Network Services 5-17 |
||||||||||
|
|
|
Displaying the TACACS+ Configuration |
5-17 |
|
|
|
|
|||||
|
|
|
Configuring Ethernet Speed and Duplex Settings |
5-18 |
|
|
|
||||||
|
|
|
Configuring the Access Point for Wireless Network Management |
5-18 |
|
||||||||
|
|
|
Configuring the Access Point for Local Authentication and Authorization 5-19 |
||||||||||
|
|
|
Configuring the Authentication Cache and Profile |
5-20 |
|
|
|
||||||
|
|
|
Configuring the Access Point to Provide DHCP Service |
5-22 |
|
|
|||||||
|
|
|
Setting up the DHCP Server |
5-22 |
|
|
|
|
|
|
|||
|
|
|
Monitoring and Maintaining the DHCP Server Access Point |
5-24 |
|
||||||||
|
|
|
Show Commands |
5-24 |
|
|
|
|
|
|
|
||
|
|
|
Clear Commands |
5-25 |
|
|
|
|
|
|
|
||
|
|
|
Debug Command |
5-25 |
|
|
|
|
|
|
|
||
|
|
|
Configuring the Access Point for Secure Shell |
5-25 |
|
|
|
||||||
|
|
|
Understanding SSH |
|
5-25 |
|
|
|
|
|
|
|
|
|
|
|
Configuring SSH |
5-26 |
|
|
|
|
|
|
|
|
|
|
|
|
Configuring Client ARP Caching |
5-26 |
|
|
|
|
|
|
|||
|
|
|
Understanding Client ARP Caching |
5-26 |
|
|
|
|
|
||||
|
|
|
Optional ARP Caching |
5-26 |
|
|
|
|
|
|
|||
|
|
|
Configuring ARP Caching |
5-27 |
|
|
|
|
|
|
|
||
|
|
|
Managing the System Time and Date |
5-27 |
|
|
|
|
|
||||
|
|
|
Understanding Simple Network Time Protocol |
5-27 |
|
|
|||||||
|
|
|
Configuring SNTP |
5-28 |
|
|
|
|
|
|
|
|
|
|
|
|
Configuring Time and Date Manually |
5-28 |
|
|
|
|
|||||
|
|
|
Setting the System Clock |
5-28 |
|
|
|
|
|
|
|||
|
|
|
Displaying the Time and Date Configuration |
5-29 |
|
|
|||||||
|
|
|
Configuring the Time Zone |
5-29 |
|
|
|
|
|
||||
|
|
|
Configuring Summer Time (Daylight Saving Time) 5-30 |
|
|
||||||||
|
|
|
Defining HTTP Access |
5-32 |
|
|
|
|
|
|
|
|
|
|
|
|
Configuring a System Name and Prompt |
5-32 |
|
|
|
|
|||||
|
|
|
Default System Name and Prompt Configuration |
5-32 |
|
|
|||||||
|
|
|
Configuring a System Name |
5-32 |
|
|
|
|
|
|
|||
|
|
|
Understanding DNS |
5-33 |
|
|
|
|
|
|
|
|
|
|
|
|
Default DNS Configuration |
5-33 |
|
|
|
|
|
||||
|
|
|
Setting Up DNS |
5-34 |
|
|
|
|
|
|
|
|
|
|
|
|
Displaying the DNS Configuration |
5-35 |
|
|
|
|
|||||
|
|
|
Creating a Banner 5-35 |
|
|
|
|
|
|
|
|
|
|
|
|
|
Cisco IOS Software Configuration Guide for Cisco Aironet Access Points |
|
|
|
|
|
|||||
|
|
|
|
|
|
|
|
||||||
|
4 |
|
|
|
|
|
|
|
|
|
|
OL-21881-03 |
|
|
|
|
|
|
|
|
|
|
|
|
|
||

Contents
|
|
Default Banner Configuration |
|
5-35 |
|
|
|
|
|
|
|||
|
|
Configuring a Message-of-the-Day Login Banner 5-35 |
|
|
|
|
|||||||
|
|
Configuring a Login Banner |
5-37 |
|
|
|
|
|
|
||||
|
|
Upgrading Autonomous Cisco Aironet Access Points to Lightweight Mode 5-37 |
|||||||||||
|
|
Migrating to Japan W52 Domain |
5-37 |
|
|
|
|
|
|
||||
|
|
Verifying the Migration |
5-39 |
|
|
|
|
|
|
|
|||
|
|
Configuring Multiple VLAN and Rate Limiting for Point-to-Multipoint Bridging |
5-39 |
|
|
|
|||||||
|
|
CLI Command |
5-40 |
|
|
|
|
|
|
|
|
|
|
|
Configuring Radio Settings |
|
|
|
|
|
|
|
|
|
|||
C H A P T E R 6 |
6-1 |
|
|
|
|
|
|
|
|
||||
|
|
Enabling the Radio Interface |
6-2 |
|
|
|
|
|
|
|
|
||
|
|
Configuring the Role in Radio Network |
6-2 |
|
|
|
|
|
|||||
|
|
Universal Workgroup Bridge Mode |
6-5 |
|
|
|
|
|
|||||
|
|
Point-to-point and Multi Point bridging support for 802.11n platforms |
6-5 |
|
|
|
|||||||
|
|
Configuring Dual-Radio Fallback |
6-6 |
|
|
|
|
|
|||||
|
|
Radio Tracking |
6-7 |
|
|
|
|
|
|
|
|
|
|
|
|
Fast Ethernet Tracking |
6-7 |
|
|
|
|
|
|
|
|
||
|
|
MAC-Address Tracking |
6-7 |
|
|
|
|
|
|
|
|
||
|
|
Bridge Features Not Supported |
6-8 |
|
|
|
|
|
|||||
|
|
Configuring Radio Data Rates |
6-8 |
|
|
|
|
|
|
|
|||
|
|
Access Points Send Multicast and Management Frames at Highest Basic Rate 6-9 |
|||||||||||
|
|
Configuring MCS Rates |
6-11 |
|
|
|
|
|
|
|
|
||
|
|
Configuring Radio Transmit Power |
|
6-12 |
|
|
|
|
|
|
|||
|
|
Limiting the Power Level for Associated Client Devices 6-15 |
|
|
|
|
|||||||
|
|
Configuring Radio Channel Settings |
6-16 |
|
|
|
|
|
|||||
|
|
802.11n Channel Widths |
6-17 |
|
|
|
|
|
|
|
|||
|
|
Dynamic Frequency Selection |
|
6-18 |
|
|
|
|
|
|
|||
|
|
Radar Detection on a DFS Channel 6-19 |
|
|
|
|
|||||||
|
|
CLI Commands |
6-19 |
|
|
|
|
|
|
|
|
|
|
|
|
Confirming that DFS is Enabled |
6-20 |
|
|
|
|
|
|||||
|
|
Configuring a Channel |
6-20 |
|
|
|
|
|
|
||||
|
|
Blocking Channels from DFS Selection |
6-21 |
|
|
|
|
||||||
|
|
Setting the 802.11n Guard Interval |
6-22 |
|
|
|
|
|
|||||
|
|
Configuring Location-Based Services |
6-22 |
|
|
|
|
|
|||||
|
|
Understanding Location-Based Services |
6-22 |
|
|
|
|
||||||
|
|
Configuring LBS on Access Points |
6-23 |
|
|
|
|
|
|||||
|
|
Enabling and Disabling World Mode |
6-24 |
|
|
|
|
|
|||||
|
|
Disabling and Enabling Short Radio Preambles |
6-25 |
|
|
|
|
||||||
|
|
|
|
|
Cisco IOS Software Configuration Guide for Cisco Aironet Access Points |
|
|
|
|||||
|
|
|
|
|
|
||||||||
|
OL-21881-03 |
|
|
|
|
|
|
|
|
|
|
5 |
|
|
|
|
|
|
|
|
|
|
|
|
|
||

Contents
|
|
|
|
|
Configuring Transmit and Receive Antennas |
6-26 |
|
|
|
||||
|
|
|
|
|
Enabling and Disabling Gratuitous Probe Response |
6-27 |
|
|
|||||
|
|
|
|
|
Disabling and Enabling Aironet Extensions |
6-28 |
|
|
|
||||
|
|
|
|
|
Configuring the Ethernet Encapsulation Transformation Method |
6-29 |
|
||||||
|
|
|
|
|
Enabling and Disabling Reliable Multicast to Workgroup Bridges |
6-29 |
|
||||||
|
|
|
|
|
Enabling and Disabling Public Secure Packet Forwarding 6-30 |
|
|
||||||
|
|
|
|
|
Configuring Protected Ports |
6-31 |
|
|
|
|
|
||
|
|
|
|
|
Configuring the Beacon Period and the DTIM |
6-32 |
|
|
|
||||
|
|
|
|
|
Configure RTS Threshold and Retries |
6-32 |
|
|
|
|
|||
|
|
|
|
|
Configuring the Maximum Data Retries |
6-33 |
|
|
|
||||
|
|
|
|
|
Configuring the Fragmentation Threshold |
6-33 |
|
|
|
||||
|
|
|
|
|
Enabling Short Slot Time for 802.11g Radios |
6-34 |
|
|
|
||||
|
|
|
|
|
Performing a Carrier Busy Test |
6-34 |
|
|
|
|
|
|
|
|
|
|
|
|
Configuring VoIP Packet Handling |
6-34 |
|
|
|
|
|
||
|
|
|
|
|
Viewing VoWLAN Metrics |
6-35 |
|
|
|
|
|
|
|
|
|
|
|
|
Viewing Voice Reports |
6-36 |
|
|
|
|
|
|
|
|
|
|
|
|
Viewing Wireless Client Reports |
6-38 |
|
|
|
|
|||
|
|
|
|
|
Viewing Voice Fault Summary |
6-39 |
|
|
|
|
|
||
|
|
|
|
|
Configuring Voice QoS Settings |
6-40 |
|
|
|
|
|||
|
|
|
|
|
Configuring Voice Fault Settings |
6-41 |
|
|
|
|
|||
|
|
|
|
|
Configuring ClientLink 6-42 |
|
|
|
|
|
|
|
|
|
|
|
|
|
Using the CLI to Configure ClientLink |
6-42 |
|
|
|
||||
|
|
|
|
|
Debugging Radio Functions |
6-42 |
|
|
|
|
|
|
|
|
|
Configuring Multiple SSIDs |
|
|
|
|
|
|
|
|
|||
C H A P T E R 7 |
|
7-1 |
|
|
|
|
|
|
|
||||
|
|
|
|
|
Understanding Multiple SSIDs |
7-2 |
|
|
|
|
|
|
|
|
|
|
|
|
Effect of Software Versions on SSIDs |
|
7-2 |
|
|
|
|||
|
|
|
|
|
Configuring Multiple SSIDs |
7-4 |
|
|
|
|
|
|
|
|
|
|
|
|
Default SSID Configuration |
7-4 |
|
|
|
|
|
|
|
|
|
|
|
|
Creating an SSID Globally |
7-4 |
|
|
|
|
|
|
|
|
|
|
|
|
Viewing SSIDs Configured Globally |
7-6 |
|
|
|
||||
|
|
|
|
|
Using Spaces in SSIDs |
7-6 |
|
|
|
|
|
||
|
|
|
|
|
Using a RADIUS Server to Restrict SSIDs 7-7 |
|
|
|
|||||
|
|
|
|
|
Configuring Multiple Basic SSIDs |
7-8 |
|
|
|
|
|
||
|
|
|
|
|
Requirements for Configuring Multiple BSSIDs |
7-8 |
|
|
|||||
|
|
|
|
|
Guidelines for Using Multiple BSSIDs |
|
7-8 |
|
|
|
|||
|
|
|
|
|
Configuring Multiple BSSIDs |
7-8 |
|
|
|
|
|
||
|
|
|
|
Cisco IOS Software Configuration Guide for Cisco Aironet Access Points |
|
|
|
||||||
|
|
|
|
|
|
|
|||||||
|
6 |
|
|
|
|
|
|
|
|
|
|
OL-21881-03 |
|
|
|
|
|
|
|
|
|
|
|
|
|
||

Contents
|
CLI Configuration Example |
7-10 |
|||
|
Displaying Configured BSSIDs |
7-10 |
|||
|
Assigning IP Redirection for an SSID |
7-11 |
|||
|
Guidelines for Using IP Redirection |
7-12 |
|||
|
Configuring IP Redirection |
7-12 |
|
|
|
|
Including an SSID in an SSIDL IE |
7-13 |
|
||
|
NAC Support for MBSSID |
7-13 |
|
|
|
|
Configuring NAC for MBSSID 7-16 |
|
|||
|
Configuring Spanning Tree Protocol |
|
|
||
C H A P T E R 8 |
8-1 |
|
|||
|
Understanding Spanning Tree Protocol |
8-2 |
|||
|
STP Overview 8-2 |
|
|
|
|
|
1300 and 350 Series Bridge Interoperability 8-3 |
||||
|
Access Point/Bridge Protocol Data Units 8-3 |
||||
|
Election of the Spanning-Tree Root |
8-4 |
|||
|
Spanning-Tree Timers |
8-5 |
|
|
|
|
Creating the Spanning-Tree Topology |
8-5 |
|||
|
Spanning-Tree Interface States |
8-5 |
|
||
|
Blocking State |
8-7 |
|
|
|
|
Listening State |
8-7 |
|
|
|
|
Learning State |
8-7 |
|
|
|
|
Forwarding State |
8-8 |
|
|
|
|
Disabled State |
8-8 |
|
|
|
|
Configuring STP Features |
8-8 |
|
|
|
|
Default STP Configuration |
8-8 |
|
|
|
|
Configuring STP Settings 8-9 |
|
|
||
|
STP Configuration Examples |
8-10 |
|
||
|
Root Bridge Without VLANs |
8-10 |
|||
|
Non-Root Bridge Without VLANs |
8-11 |
|||
|
Root Bridge with VLANs |
8-11 |
|
||
|
Non-Root Bridge with VLANs |
8-13 |
|||
|
Displaying Spanning-Tree Status |
8-14 |
|
||
|
Configuring an Access Point as a Local Authenticator 9-1 |
||||
C H A P T E R 9 |
|||||
|
Understanding Local Authentication |
9-2 |
|
||
|
Configuring a Local Authenticator |
9-2 |
|
||
|
Guidelines for Local Authenticators 9-3 |
|
|
|
|
|
Configuration Overview 9-3 |
|
|
|
|
|
Configuring the Local Authenticator Access Point |
9-3 |
|
|
|
|
Cisco IOS Software Configuration Guide for Cisco Aironet Access Points |
|
|
|
|
|
|||||
|
OL-21881-03 |
|
|
7 |
|
|
|
|
|
||

Contents
|
|
|
|
Configuring Other Access Points to Use the Local Authenticator 9-6 |
||||||||||
|
|
|
|
Configuring EAP-FAST Settings |
|
9-7 |
|
|
|
|
|
|
|
|
|
|
|
|
Configuring PAC Settings |
9-7 |
|
|
|
|
|
|
|
||
|
|
|
|
Configuring an Authority ID |
9-8 |
|
|
|
|
|
|
|
||
|
|
|
|
Configuring Server Keys |
9-8 |
|
|
|
|
|
|
|
||
|
|
|
|
Possible PAC Failures Caused by Access Point Clock |
9-8 |
|
|
|||||||
|
|
|
|
Limiting the Local Authenticator to One Authentication Type |
9-9 |
|
||||||||
|
|
|
|
Unblocking Locked Usernames |
9-9 |
|
|
|
|
|
|
|
||
|
|
|
|
Viewing Local Authenticator Statistics |
9-9 |
|
|
|
|
|
||||
|
|
|
|
Using Debug Messages |
9-10 |
|
|
|
|
|
|
|
|
|
|
Configuring Cipher Suites and WEP |
|
|
|
|
|
|
|
|
|||||
C H A P T E R 10 |
10-1 |
|
|
|
|
|
|
|
||||||
|
|
|
|
Understanding Cipher Suites and WEP |
10-2 |
|
|
|
|
|
|
|||
|
|
|
|
Configuring Cipher Suites and WEP |
|
10-3 |
|
|
|
|
|
|
|
|
|
|
|
|
Creating WEP Keys 10-3 |
|
|
|
|
|
|
|
|
|
|
|
|
|
|
WEP Key Restrictions |
10-5 |
|
|
|
|
|
|
|
|
|
|
|
|
|
Example WEP Key Setup |
10-5 |
|
|
|
|
|
|
|
||
|
|
|
|
Enabling Cipher Suites and WEP |
10-6 |
|
|
|
|
|
|
|||
|
|
|
|
Matching Cipher Suites with WPA or CCKM 10-7 |
|
|
|
|||||||
|
|
|
|
Enabling and Disabling Broadcast Key Rotation |
10-8 |
|
|
|
||||||
|
Configuring Authentication Types |
|
|
|
|
|
|
|
|
|||||
C H A P T E R 11 |
11-1 |
|
|
|
|
|
|
|
||||||
|
|
|
|
Understanding Authentication Types |
11-2 |
|
|
|
|
|
|
|||
|
|
|
|
Open Authentication to the Access Point |
11-2 |
|
|
|
|
|||||
|
|
|
|
Shared Key Authentication to the Access Point |
11-3 |
|
|
|
||||||
|
|
|
|
EAP Authentication to the Network |
11-4 |
|
|
|
|
|
||||
|
|
|
|
MAC Address Authentication to the Network |
11-5 |
|
|
|
||||||
|
|
|
|
Combining MAC-Based, EAP, and Open Authentication |
11-6 |
|
|
|||||||
|
|
|
|
Using CCKM for Authenticated Clients |
11-6 |
|
|
|
|
|||||
|
|
|
|
Using WPA Key Management |
11-7 |
|
|
|
|
|
|
|
||
|
|
|
|
Software and Firmware Requirements for WPA, CCKM, CKIP, and WPA-TKIP 11-8 |
||||||||||
|
|
|
|
Configuring Authentication Types |
11-10 |
|
|
|
|
|
|
|
||
|
|
|
|
Assigning Authentication Types to an SSID |
11-10 |
|
|
|
||||||
|
|
|
|
Configuring WPA Migration Mode |
11-13 |
|
|
|
|
|||||
|
|
|
|
Configuring Additional WPA Settings |
11-14 |
|
|
|
||||||
|
|
|
|
Configuring MAC Authentication Caching |
11-15 |
|
|
|
||||||
|
|
|
|
Configuring Authentication Holdoffs, Timeouts, and Intervals |
11-16 |
|
||||||||
|
|
|
|
Creating and Applying EAP Method Profiles for the 802.1X Supplicant 11-17 |
||||||||||
|
|
|
|
Creating an EAP Method Profile |
11-18 |
|
|
|
|
|
||||
|
|
|
Cisco IOS Software Configuration Guide for Cisco Aironet Access Points |
|
|
|
|
|
|
|||||
|
|
|
|
|
|
|
|
|
||||||
|
8 |
|
|
|
|
|
|
|
|
|
|
|
OL-21881-03 |
|
|
|
|
|
|
|
|
|
|
|
|
|
|
||
Contents
|
|
Applying an EAP Profile to the Fast Ethernet Interface |
11-18 |
|
|
|
||||||||
|
|
Applying an EAP Profile to an Uplink SSID 11-19 |
|
|
|
|
|
|||||||
|
|
Matching Access Point and Client Device Authentication Types |
11-19 |
|
|
|
||||||||
|
Configuring WDS, Fast Secure Roaming, Radio Management, and Wireless Intrusion Detection |
|||||||||||||
C H A P T E R 12 |
||||||||||||||
|
|
Services 12-1 |
|
|
|
|
|
|
|
|
|
|
|
|
|
|
Understanding WDS |
12-2 |
|
|
|
|
|
|
|
|
|
|
|
|
|
Role of the WDS Device |
12-2 |
|
|
|
|
|
|
|
|
|
||
|
|
Role of Access Points Using the WDS Device |
12-3 |
|
|
|
|
|
||||||
|
|
Understanding Fast Secure Roaming |
12-3 |
|
|
|
|
|
|
|
|
|||
|
|
Understanding Radio Management |
12-5 |
|
|
|
|
|
|
|
|
|||
|
|
Understanding Layer 3 Mobility |
12-5 |
|
|
|
|
|
|
|
|
|||
|
|
Understanding Wireless Intrusion Detection Services |
12-6 |
|
|
|
|
|
||||||
|
|
Configuring WDS |
12-7 |
|
|
|
|
|
|
|
|
|
|
|
|
|
Guidelines for WDS 12-8 |
|
|
|
|
|
|
|
|
|
|
||
|
|
Requirements for WDS |
12-8 |
|
|
|
|
|
|
|
|
|
||
|
|
Configuration Overview |
12-8 |
|
|
|
|
|
|
|
|
|
||
|
|
Configuring Access Points as Potential WDS Devices |
12-9 |
|
|
|
|
|||||||
|
|
CLI Configuration Example |
12-13 |
|
|
|
|
|
|
|
|
|||
|
|
Configuring Access Points to use the WDS Device |
12-14 |
|
|
|
|
|||||||
|
|
CLI Configuration Example |
12-15 |
|
|
|
|
|
|
|
|
|||
|
|
Configuring the Authentication Server to Support WDS |
12-15 |
|
|
|
||||||||
|
|
Configuring WDS Only Mode |
|
12-19 |
|
|
|
|
|
|
|
|
||
|
|
Viewing WDS Information |
12-20 |
|
|
|
|
|
|
|
|
|||
|
|
Using Debug Messages |
12-21 |
|
|
|
|
|
|
|
|
|
||
|
|
Configuring Fast Secure Roaming |
|
12-21 |
|
|
|
|
|
|
|
|
||
|
|
Requirements for Fast Secure Roaming |
12-21 |
|
|
|
|
|
|
|||||
|
|
Configuring Access Points to Support Fast Secure Roaming |
12-22 |
|
|
|
||||||||
|
|
CLI Configuration Example |
12-24 |
|
|
|
|
|
|
|
|
|||
|
|
Configuring Management Frame Protection |
12-24 |
|
|
|
|
|
|
|||||
|
|
Management Frame Protection |
12-24 |
|
|
|
|
|
|
|
|
|||
|
|
Overview 12-25 |
|
|
|
|
|
|
|
|
|
|
|
|
|
|
Protection of Unicast Management Frames |
12-25 |
|
|
|
|
|
|
|||||
|
|
Protection of Broadcast Management Frames |
12-25 |
|
|
|
|
|
||||||
|
|
Client MFP For Access Points in Root mode |
12-25 |
|
|
|
|
|
|
|||||
|
|
Configuring Client MFP |
12-26 |
|
|
|
|
|
|
|
|
|
||
|
|
Configuring Radio Management |
12-27 |
|
|
|
|
|
|
|
|
|||
|
|
CLI Configuration Example |
12-28 |
|
|
|
|
|
|
|
|
|||
|
|
|
|
Cisco IOS Software Configuration Guide for Cisco Aironet Access Points |
|
|
|
|||||||
|
|
|
|
|
||||||||||
|
OL-21881-03 |
|
|
|
|
|
|
|
|
|
|
|
9 |
|
|
|
|
|
|
|
|
|
|
|
|
|
|
||

Contents
Configuring Access Points to Participate in WIDS
Configuring the Access Point for Scanner Mode
Configuring the Access Point for Monitor Mode
Displaying Monitor Mode Statistics
Configuring Monitor Mode Limits 12-31
|
Configuring an Authentication Failure Limit |
12-31 |
|
|||||
|
Configuring WLSM Failover |
12-31 |
|
|
|
|
|
|
|
Resilient Tunnel Recovery |
12-31 |
|
|
|
|
||
|
Active/Standby WLSM Failover |
12-32 |
|
|
|
|||
|
Configuring RADIUS and TACACS+ Servers |
|
|
|
||||
C H A P T E R 13 |
13-1 |
|
|
|||||
|
Configuring and Enabling RADIUS 13-1 |
|
|
|
|
|
||
|
Understanding RADIUS |
13-2 |
|
|
|
|
|
|
|
RADIUS Operation 13-2 |
|
|
|
|
|
|
|
|
Configuring RADIUS |
13-3 |
|
|
|
|
|
|
|
Default RADIUS Configuration |
13-4 |
|
|
|
|||
|
Identifying the RADIUS Server Host |
13-4 |
|
|
||||
|
Configuring RADIUS Login Authentication |
13-7 |
|
|||||
|
Defining AAA Server Groups |
13-9 |
|
|
|
|
||
|
Configuring RADIUS Authorization for User Privileged Access and Network Services |
13-11 |
||||||
|
Configuring Packet of Disconnect |
|
13-12 |
|
|
|||
|
Starting RADIUS Accounting m |
13-13 |
|
|
|
|||
|
Selecting the CSID Format |
13-14 |
|
|
|
|
||
|
Configuring Settings for All RADIUS Servers |
13-15 |
|
|||||
|
Configuring the Access Point to Use Vendor-Specific RADIUS Attributes 13-16 |
|
||||||
|
Configuring the Access Point for Vendor-Proprietary RADIUS Server Communication |
13-17 |
||||||
|
Configuring WISPr RADIUS Attributes |
13-18 |
|
|||||
|
Displaying the RADIUS Configuration |
|
13-19 |
|
|
|
||
|
RADIUS Attributes Sent by the Access Point |
13-20 |
|
|||||
|
Configuring and Enabling TACACS+ |
13-23 |
|
|
|
|
||
|
Understanding TACACS+ 13-23 |
|
|
|
|
|
|
|
|
TACACS+ Operation |
13-24 |
|
|
|
|
|
|
|
Configuring TACACS+ |
13-24 |
|
|
|
|
|
|
Default TACACS+ Configuration 13-25
|
|
|
Identifying the TACACS+ Server Host and Setting the Authentication Key |
13-25 |
|
|
|
|
Configuring TACACS+ Login Authentication 13-26 |
|
|
|
|
|
Configuring TACACS+ Authorization for Privileged EXEC Access and Network Services 13-27 |
||
|
|
|
Starting TACACS+ Accounting 13-28 |
|
|
|
|
|
Displaying the TACACS+ Configuration 13-29 |
|
|
|
|
|
Cisco IOS Software Configuration Guide for Cisco Aironet Access Points |
|
|
|
|
|
|
|
|
|
10 |
|
|
OL-21881-03 |
|
|
|
|
|
||

Contents
C H A P T E R 14 |
Configuring VLANs |
14-1 |
|
|
|
|
|
|
|
|
|
||
|
|
Understanding VLANs |
|
14-2 |
|
|
|
|
|
|
|
|
|
|
|
Related Documents |
14-3 |
|
|
|
|
|
|
|
|
||
|
|
Incorporating Wireless Devices into VLANs 14-4 |
|
|
|
|
|||||||
|
|
Configuring VLANs |
14-4 |
|
|
|
|
|
|
|
|
||
|
|
Configuring a VLAN |
14-5 |
|
|
|
|
|
|
|
|
||
|
|
Assigning Names to VLANs |
14-7 |
|
|
|
|
|
|
||||
|
|
Guidelines for Using VLAN Names |
14-7 |
|
|
|
|
||||||
|
|
Creating a VLAN Name |
14-8 |
|
|
|
|
|
|
||||
|
|
Using a RADIUS Server to Assign Users to VLANs |
14-8 |
|
|
|
|||||||
|
|
Using a RADIUS Server for Dynamic Mobility Group Assignment 14-9 |
|||||||||||
|
|
Viewing VLANs Configured on the Access Point 14-9 |
|||||||||||
|
|
VLAN Configuration Example |
14-10 |
|
|
|
|
|
|
||||
|
Configuring QoS |
|
|
|
|
|
|
|
|
|
|
|
|
C H A P T E R 15 |
15-1 |
|
|
|
|
|
|
|
|
|
|
||
|
|
Understanding QoS for Wireless LANs |
15-2 |
|
|
|
|
|
|||||
|
|
QoS for Wireless LANs Versus QoS on Wired LANs |
15-2 |
|
|
|
|||||||
|
|
Impact of QoS on a Wireless LAN |
15-2 |
|
|
|
|
|
|||||
|
|
Precedence of QoS Settings |
15-3 |
|
|
|
|
|
|
||||
|
|
Using Wi-Fi Multimedia Mode |
15-4 |
|
|
|
|
|
|||||
|
|
Configuring QoS |
15-5 |
|
|
|
|
|
|
|
|
|
|
|
|
Configuration Guidelines |
15-5 |
|
|
|
|
|
|
||||
|
|
Configuring QoS Using the Web-Browser Interface |
15-5 |
|
|
|
|||||||
|
|
The QoS Policies Advanced Page |
15-9 |
|
|
|
|
|
|||||
|
|
QoS Element for Wireless Phones |
15-9 |
|
|
|
|
||||||
|
|
IGMP Snooping |
15-10 |
|
|
|
|
|
|
|
|||
|
|
AVVID Priority Mapping |
15-10 |
|
|
|
|
|
|||||
|
|
WiFi Multimedia (WMM) |
15-10 |
|
|
|
|
|
|||||
|
|
Adjusting Radio Access Categories |
15-10 |
|
|
|
|
||||||
|
|
Configuring Nominal Rates 15-12 |
|
|
|
|
|
||||||
|
|
Optimized Voice Settings |
15-12 |
|
|
|
|
|
|||||
|
|
Configuring Call Admission Control |
15-12 |
|
|
|
|
||||||
|
|
QoS Configuration Examples |
15-14 |
|
|
|
|
|
|
||||
|
|
Giving Priority to Voice Traffic |
15-14 |
|
|
|
|
|
|||||
|
|
Giving Priority to Video Traffic |
15-15 |
|
|
|
|
|
|||||
|
Configuring Filters |
|
|
|
|
|
|
|
|
|
|
||
C H A P T E R 16 |
16-1 |
|
|
|
|
|
|
|
|
|
|||
|
|
Understanding Filters |
16-2 |
|
|
|
|
|
|
|
|
||
|
|
|
|
|
Cisco IOS Software Configuration Guide for Cisco Aironet Access Points |
|
|
|
|||||
|
|
|
|
|
|
||||||||
|
OL-21881-03 |
|
|
|
|
|
|
|
|
|
|
11 |
|
|
|
|
|
|
|
|
|
|
|
|
|
||

Contents
|
|
|
|
Configuring Filters Using the CLI |
16-2 |
|
|
|
|
|
||||
|
|
|
|
Configuring Filters Using the Web-Browser Interface |
16-3 |
|
||||||||
|
|
|
|
Configuring and Enabling MAC Address Filters |
16-3 |
|
||||||||
|
|
|
|
Creating a MAC Address Filter |
16-4 |
|
|
|
||||||
|
|
|
|
Using MAC Address ACLs to Block or Allow Client Association to the Access Point 16-6 |
||||||||||
|
|
|
|
Creating a Time-Based ACL |
16-8 |
|
|
|
|
|
||||
|
|
|
|
ACL Logging |
16-9 |
|
|
|
|
|
|
|
|
|
|
|
|
|
CLI Configuration Example |
16-9 |
|
|
|
|
|||||
|
|
|
|
Configuring and Enabling IP Filters |
16-9 |
|
|
|
|
|||||
|
|
|
|
Creating an IP Filter |
16-11 |
|
|
|
|
|
|
|||
|
|
|
|
Configuring and Enabling Ethertype Filters |
16-12 |
|
||||||||
|
|
|
|
Creating an Ethertype Filter |
|
16-13 |
|
|
|
|
||||
|
Configuring CDP |
|
|
|
|
|
|
|
|
|
|
|||
C H A P T E R 17 |
17-1 |
|
|
|
|
|
|
|
|
|
||||
|
|
|
|
Understanding CDP |
17-2 |
|
|
|
|
|
|
|
|
|
|
|
|
|
Configuring CDP |
17-2 |
|
|
|
|
|
|
|
|
|
|
|
|
|
Default CDP Configuration |
|
17-2 |
|
|
|
|
|
|
||
|
|
|
|
Configuring the CDP Characteristics 17-2 |
|
|
|
|||||||
|
|
|
|
Disabling and Enabling CDP |
17-3 |
|
|
|
|
|
||||
|
|
|
|
Disabling and Enabling CDP on an Interface |
17-4 |
|
||||||||
|
|
|
|
Monitoring and Maintaining CDP |
17-4 |
|
|
|
|
|||||
|
Configuring SNMP |
|
|
|
|
|
|
|
|
|
||||
C H A P T E R 18 |
18-1 |
|
|
|
|
|
|
|
|
|||||
|
|
|
|
Understanding SNMP |
18-2 |
|
|
|
|
|
|
|
|
|
|
|
|
|
SNMP Versions |
18-2 |
|
|
|
|
|
|
|
|
|
|
|
|
|
SNMP Manager Functions |
|
18-3 |
|
|
|
|
|
|
||
|
|
|
|
SNMP Agent Functions |
18-4 |
|
|
|
|
|
|
|||
|
|
|
|
SNMP Community Strings |
|
18-4 |
|
|
|
|
|
|
||
|
|
|
|
Using SNMP to Access MIB Variables |
18-4 |
|
|
|||||||
|
|
|
|
Configuring SNMP |
18-5 |
|
|
|
|
|
|
|
|
|
|
|
|
|
Default SNMP Configuration |
18-5 |
|
|
|
|
|||||
|
|
|
|
Enabling the SNMP Agent |
|
18-5 |
|
|
|
|
|
|
||
|
|
|
|
Configuring Community Strings |
18-6 |
|
|
|
|
|||||
|
|
|
|
Specifying SNMP-Server Group Names |
18-7 |
|
|
|||||||
|
|
|
|
Configuring SNMP-Server Hosts |
|
18-8 |
|
|
|
|
||||
|
|
|
|
Configuring SNMP-Server Users |
|
18-8 |
|
|
|
|
||||
|
|
|
|
Configuring Trap Managers and Enabling Traps |
18-8 |
|
||||||||
|
|
|
|
Setting the Agent Contact and Location Information 18-10 |
||||||||||
|
|
|
|
Using the snmp-server view Command |
18-10 |
|
|
|||||||
|
|
|
Cisco IOS Software Configuration Guide for Cisco Aironet Access Points |
|
|
|
|
|||||||
|
|
|
|
|
|
|
||||||||
|
12 |
|
|
|
|
|
|
|
|
|
|
|
OL-21881-03 |
|
|
|
|
|
|
|
|
|
|
|
|
|
|
||

Contents
|
|
SNMP Examples 18-10 |
|
|
|
|
|
|
|
|
|
|
||
|
|
Displaying SNMP Status |
18-12 |
|
|
|
|
|
|
|
|
|
||
|
Configuring Repeater and Standby Access Points and Workgroup Bridge Mode 19-1 |
|||||||||||||
C H A P T E R 19 |
||||||||||||||
|
|
Understanding Repeater Access Points |
|
19-2 |
|
|
|
|
|
|
||||
|
|
Configuring a Repeater Access Point |
19-3 |
|
|
|
|
|
|
|||||
|
|
Default Configuration |
19-4 |
|
|
|
|
|
|
|
|
|
||
|
|
Guidelines for Repeaters |
19-4 |
|
|
|
|
|
|
|
|
|||
|
|
Setting Up a Repeater |
19-5 |
|
|
|
|
|
|
|
|
|
||
|
|
Aligning Antennas |
19-6 |
|
|
|
|
|
|
|
|
|
|
|
|
|
Verifying Repeater Operation |
19-6 |
|
|
|
|
|
|
|
||||
|
|
Setting Up a Repeater As a LEAP Client |
19-7 |
|
|
|
|
|
||||||
|
|
Setting Up a Repeater As a WPA Client |
19-8 |
|
|
|
|
|
||||||
|
|
Understanding Hot Standby |
19-9 |
|
|
|
|
|
|
|
|
|
||
|
|
Configuring a Hot Standby Access Point |
19-9 |
|
|
|
|
|
|
|||||
|
|
Verifying Standby Operation |
19-12 |
|
|
|
|
|
|
|
||||
|
|
Understanding Workgroup Bridge Mode |
19-13 |
|
|
|
|
|
||||||
|
|
Treating Workgroup Bridges as Infrastructure Devices or as Client Devices 19-14 |
||||||||||||
|
|
Configuring a Workgroup Bridge for Roaming |
19-15 |
|
|
|
|
|||||||
|
|
Configuring a Workgroup Bridge for Limited Channel Scanning 19-15 |
||||||||||||
|
|
Configuring the Limited Channel Set |
19-15 |
|
|
|
|
|||||||
|
|
Ignoring the CCX Neighbor List |
19-16 |
|
|
|
|
|
||||||
|
|
Configuring a Client VLAN |
19-16 |
|
|
|
|
|
|
|
|
|||
|
|
Workgroup Bridge VLAN Tagging |
19-16 |
|
|
|
|
|
|
|
||||
|
|
Configuring Workgroup Bridge Mode |
19-17 |
|
|
|
|
|
|
|||||
|
|
Using Workgroup Bridges in a Lightweight Environment |
19-19 |
|
|
|
||||||||
|
|
Guidelines for Using Workgroup Bridges in a Lightweight Environment 19-19 |
||||||||||||
|
|
Sample Workgroup Bridge Configuration |
19-21 |
|
|
|
|
|||||||
|
|
Enabling VideoStream Support on Workgroup Bridges |
19-21 |
|
|
|
||||||||
|
Managing Firmware and Configurations |
|
|
|
|
|
|
|
||||||
C H A P T E R 20 |
20-1 |
|
|
|
|
|
|
|||||||
|
|
Working with the Flash File System |
20-1 |
|
|
|
|
|
|
|||||
|
|
Displaying Available File Systems |
|
20-2 |
|
|
|
|
|
|
||||
|
|
Setting the Default File System |
|
20-3 |
|
|
|
|
|
|
||||
|
|
Displaying Information About Files on a File System |
20-3 |
|
|
|
||||||||
|
|
Changing Directories and Displaying the Working Directory 20-3 |
||||||||||||
|
|
Creating and Removing Directories |
20-4 |
|
|
|
|
|
|
|||||
|
|
Copying Files |
20-4 |
|
|
|
|
|
|
|
|
|
|
|
|
|
|
|
Cisco IOS Software Configuration Guide for Cisco Aironet Access Points |
|
|
|
|||||||
|
|
|
|
|
||||||||||
|
OL-21881-03 |
|
|
|
|
|
|
|
|
|
|
|
13 |
|
|
|
|
|
|
|
|
|
|
|
|
|
|
||

Contents
|
|
|
Deleting Files 20-5 |
|
|
|
|
|
|
|
|
|
|
|
|
|
|
Creating, Displaying, and Extracting tar Files |
20-5 |
|
|
|
|
|
|||||
|
|
|
Creating a tar File |
20-5 |
|
|
|
|
|
|
|
|
|
|
|
|
|
Displaying the Contents of a tar File |
20-6 |
|
|
|
|
|
|
||||
|
|
|
Extracting a tar File |
20-7 |
|
|
|
|
|
|
|
|
|
|
|
|
|
Displaying the Contents of a File |
20-7 |
|
|
|
|
|
|
|
|
||
|
|
|
Working with Configuration Files |
20-7 |
|
|
|
|
|
|
|
|
|
|
|
|
|
Guidelines for Creating and Using Configuration Files |
|
20-8 |
|
|
|
||||||
|
|
|
Configuration File Types and Location 20-9 |
|
|
|
|
|
|
|
||||
|
|
|
Creating a Configuration File by Using a Text Editor |
20-9 |
|
|
|
|||||||
|
|
|
Copying Configuration Files by Using TFTP |
20-9 |
|
|
|
|
|
|||||
|
|
|
Preparing to Download or Upload a Configuration File by Using TFTP |
20-10 |
|
|||||||||
|
|
|
Downloading the Configuration File by Using TFTP |
20-10 |
|
|
|
|||||||
|
|
|
Uploading the Configuration File by Using TFTP |
20-11 |
|
|
|
|||||||
|
|
|
Copying Configuration Files by Using FTP |
20-11 |
|
|
|
|
|
|
||||
|
|
|
Preparing to Download or Upload a Configuration File by Using FTP |
20-12 |
|
|||||||||
|
|
|
Downloading a Configuration File by Using FTP |
20-12 |
|
|
|
|||||||
|
|
|
Uploading a Configuration File by Using FTP |
20-13 |
|
|
|
|||||||
|
|
|
Copying Configuration Files by Using RCP |
20-14 |
|
|
|
|
|
|||||
|
|
|
Preparing to Download or Upload a Configuration File by Using RCP |
20-15 |
|
|||||||||
|
|
|
Downloading a Configuration File by Using RCP |
|
20-16 |
|
|
|
||||||
|
|
|
Uploading a Configuration File by Using RCP |
20-17 |
|
|
|
|||||||
|
|
|
Clearing Configuration Information |
20-17 |
|
|
|
|
|
|
|
|
||
|
|
|
Deleting a Stored Configuration File |
20-18 |
|
|
|
|
|
|
||||
|
|
|
Working with Software Images |
20-18 |
|
|
|
|
|
|
|
|
|
|
|
|
|
Image Location on the Access Point |
20-18 |
|
|
|
|
|
|
|
|
||
|
|
|
tar File Format of Images on a Server or Cisco.com |
20-19 |
|
|
|
|||||||
|
|
|
Copying Image Files by Using TFTP |
20-19 |
|
|
|
|
|
|
|
|
||
|
|
|
Preparing to Download or Upload an Image File by Using TFTP |
20-19 |
|
|
||||||||
|
|
|
Downloading an Image File by Using TFTP |
20-20 |
|
|
|
|
||||||
|
|
|
Uploading an Image File by Using TFTP |
|
20-22 |
|
|
|
|
|
||||
|
|
|
Copying Image Files by Using FTP |
20-22 |
|
|
|
|
|
|
|
|
||
|
|
|
Preparing to Download or Upload an Image File by Using FTP |
20-23 |
|
|
||||||||
|
|
|
Downloading an Image File by Using FTP |
20-24 |
|
|
|
|
|
|||||
|
|
|
Uploading an Image File by Using FTP |
|
20-26 |
|
|
|
|
|
||||
|
|
|
Copying Image Files by Using RCP |
20-27 |
|
|
|
|
|
|
|
|
||
|
|
|
Preparing to Download or Upload an Image File by Using RCP |
20-27 |
|
|
||||||||
|
|
|
Downloading an Image File by Using RCP |
20-29 |
|
|
|
|
||||||
|
|
|
Uploading an Image File by Using RCP |
|
20-31 |
|
|
|
|
|
||||
|
|
|
Reloading the Image Using the Web Browser Interface |
20-32 |
|
|
|
|||||||
|
|
|
Cisco IOS Software Configuration Guide for Cisco Aironet Access Points |
|
|
|
|
|
|
|
|
|||
|
|
|
|
|
|
|
|
|
|
|
||||
|
14 |
|
|
|
|
|
|
|
|
|
|
|
OL-21881-03 |
|
|
|
|
|
|
|
|
|
|
|
|
|
|
||

Contents
|
|
Browser HTTP Interface |
20-32 |
|
|
|
|
|
|
|||
|
|
Browser TFTP Interface |
20-33 |
|
|
|
|
|
|
|||
|
Configuring System Message Logging |
|
|
|
|
|
|
|||||
C H A P T E R 21 |
21-1 |
|
|
|
|
|
||||||
|
|
Understanding System Message Logging |
21-2 |
|
|
|
|
|||||
|
|
Configuring System Message Logging |
21-2 |
|
|
|
|
|
||||
|
|
System Log Message Format |
21-2 |
|
|
|
|
|
|
|||
|
|
Default System Message Logging Configuration |
21-3 |
|
|
|
||||||
|
|
Disabling and Enabling Message Logging |
21-4 |
|
|
|
|
|||||
|
|
Setting the Message Display Destination Device |
21-5 |
|
|
|
||||||
|
|
Enabling and Disabling Timestamps on Log Messages 21-6 |
||||||||||
|
|
Enabling and Disabling Sequence Numbers in Log Messages 21-6 |
||||||||||
|
|
Defining the Message Severity Level |
21-7 |
|
|
|
|
|||||
|
|
Limiting Syslog Messages Sent to the History Table and to SNMP 21-8 |
||||||||||
|
|
Setting a Logging Rate Limit |
21-9 |
|
|
|
|
|
|
|
||
|
|
Configuring UNIX Syslog Servers |
21-10 |
|
|
|
|
|
||||
|
|
Logging Messages to a UNIX Syslog Daemon |
21-10 |
|
|
|
||||||
|
|
Configuring the UNIX System Logging Facility |
21-10 |
|
|
|
||||||
|
|
Displaying the Logging Configuration |
21-12 |
|
|
|
|
|
||||
|
Troubleshooting |
|
|
|
|
|
|
|
|
|
|
|
C H A P T E R 22 |
22-1 |
|
|
|
|
|
|
|
|
|
||
|
|
Checking the Top Panel Indicators |
22-2 |
|
|
|
|
|
|
|||
|
|
Indicators on 1130 Series Access Points |
22-6 |
|
|
|
|
|||||
|
|
Indicators on 1040 or 1140 Series Access Point |
22-9 |
|
|
|
||||||
|
|
Indicators on 1240 Series Access Points |
22-12 |
|
|
|
|
|||||
|
|
Indicators on 1250 Access Points |
22-14 |
|
|
|
|
|
||||
|
|
Indicators on 1260 Series Access Points |
22-16 |
|
|
|
|
|||||
|
|
Indicators on 1300 Outdoor Access Point/Bridges |
22-18 |
|
|
|
||||||
|
|
Normal Mode LED Indications |
|
22-19 |
|
|
|
|
|
|||
|
|
Power Injector |
22-21 |
|
|
|
|
|
|
|
|
|
|
|
Checking Power |
22-22 |
|
|
|
|
|
|
|
|
|
|
|
Low Power Condition |
22-22 |
|
|
|
|
|
|
|
|
|
|
|
Checking Basic Settings |
22-23 |
|
|
|
|
|
|
|
|
|
|
|
SSID 22-23 |
|
|
|
|
|
|
|
|
|
|
|
|
WEP Keys |
22-23 |
|
|
|
|
|
|
|
|
|
|
|
Security Settings |
22-23 |
|
|
|
|
|
|
|
|
|
|
|
Resetting to the Default Configuration |
22-24 |
|
|
|
|
|
||||
|
|
Using the MODE Button 22-24 |
|
|
|
|
|
|
|
|||
|
|
Using the Web Browser Interface |
22-25 |
|
|
|
|
|
||||
|
|
|
|
Cisco IOS Software Configuration Guide for Cisco Aironet Access Points |
|
|
|
|||||
|
|
|
|
|
||||||||
|
OL-21881-03 |
|
|
|
|
|
|
|
|
|
15 |
|
|
|
|
|
|
|
|
|
|
|
|
||

Contents
|
|
Using the CLI |
|
22-25 |
|
|
|
|
|
||
|
|
Reloading the Access Point Image |
22-26 |
|
|||||||
|
|
Using the MODE button |
22-27 |
|
|
|
|||||
|
|
Using the Web Browser Interface |
22-27 |
||||||||
|
|
Browser HTTP Interface |
22-28 |
|
|
||||||
|
|
Browser TFTP Interface |
22-28 |
|
|
||||||
|
|
Using the CLI |
|
22-29 |
|
|
|
|
|
||
|
|
Obtaining the Access Point Image File |
22-30 |
||||||||
|
|
Obtaining TFTP Server Software |
22-31 |
|
|||||||
|
|
Image Recovery on the 1520 Access Point |
22-31 |
||||||||
|
Protocol Filters |
|
|
|
|
|
|
|
|
|
|
A P P E N D I X A |
A-1 |
|
|
|
|
|
|
|
|
||
|
|
Supported MIBs |
|
|
|
|
|
|
|
|
|
A P P E N D I X |
B |
B-1 |
|
|
|
|
|
|
|
||
|
|
MIB List B-1 |
|
|
|
|
|
|
|
|
|
|
|
Using FTP to Access the MIB Files |
B-2 |
|
|
||||||
|
|
Error and Event Messages |
|
|
|
|
|
|
|||
A P P E N D I X |
C |
C-1 |
|
|
|
|
|
||||
|
|
Conventions |
C-2 |
|
|
|
|
|
|
|
|
|
|
Software Auto Upgrade Messages |
C-3 |
|
|
||||||
|
|
Association Management Messages |
C-5 |
|
|||||||
|
|
Unzip Messages |
C-6 |
|
|
|
|
|
|
||
|
|
System Log Messages |
C-7 |
|
|
|
|
|
|||
|
|
802.11 Subsystem Messages |
C-8 |
|
|
|
|||||
|
|
Inter-Access Point Protocol Messages |
C-21 |
||||||||
|
|
Local Authenticator Messages |
|
C-22 |
|
|
|||||
|
|
WDS Messages |
C-24 |
|
|
|
|
|
|
||
|
|
Mini IOS Messages |
C-25 |
|
|
|
|
|
|||
|
|
Access Point/Bridge Messages |
|
C-26 |
|
|
|||||
|
|
Cisco Discovery Protocol Messages |
C-26 |
|
|||||||
|
|
External Radius Server Error Messages |
C-27 |
||||||||
|
|
LWAPP Error Messages |
C-27 |
|
|
|
|
|
|||
|
|
Sensor Messages |
|
C-28 |
|
|
|
|
|
|
|
|
|
SNMP Error Messages |
C-29 |
|
|
|
|
|
|||
|
|
SSH Error Messages |
C-30 |
|
|
|
|
|
|||
Cisco IOS Software Configuration Guide for Cisco Aironet Access Points
16 |
OL-21881-03 |
|
|

Preface
Revised: August 30, 2012
OL-21881-03
Audience
This guide is for the networking professional who installs and manages Cisco Aironet Access Points. To use this guide, you should have experience working with the Cisco IOS software and be familiar with the concepts and terminology of wireless local area networks.
The guide covers Cisco IOS Releases 15.2(2)JA, 12.4(25d)JA, and 12.3(8)JEE.
Cisco IOS Releases 15.2(2)JA and 12.4(25d)JA support the following autonomous 32 Mb platforms:
•1040 series access points
•1130 series access points
•1140 series access points
•1130 series access points
•1240 series access points
•1250 series access points
•1260 series access points
•1300 outdoor access point/bridges
•2600 series access points
Cisco IOS Release 12.3(8)JEE supports the following autonomous 16 Mb platforms:
•520 series access point
•1100 series access point
•1200 series access point
Note This guide does not cover lightweight access points. Configuration for these devices can be found in the appropriate installation and configuration guides on Cisco.com.
Cisco IOS Software Configuration Guide for Cisco Aironet Access Points
|
OL-21881-03 |
xix |
|

Preface
Purpose
Purpose
This guide provides the information you need to install and configure your access point. This guide provides procedures for using the Cisco IOS software commands that have been created or changed for use with the access point. It does not provide detailed information about these commands. For detailed information about these commands, refer to the Cisco IOS Command Reference for Cisco Aironet Access Points and Bridges for this release. For information about the standard Cisco IOS software commands, refer to the Cisco IOS software documentation set available from the Cisco.com home page at Support > Documentation.
This guide also includes an overview of the access point web-based interface (APWI), which contains all the functionality of the command-line interface (CLI). This guide does not provide field-level descriptions of the APWI windows nor does it provide the procedures for configuring the access point from the APWI. For all APWI window descriptions and procedures, refer to the access point online help, which is available from the Help buttons on the APWI pages.
Organization
This guide is organized into these chapters:
Chapter 1, “Overview,” lists the software and hardware features of the access point and describes the access point role in your network.
Chapter 2, “Using the Web-Browser Interface,” describes how to use the web-browser interface to configure the access point.
Chapter 3, “Using the Command-Line Interface,” describes how to use the command-line interface (CLI) to configure the access point.
Chapter 4, “Configuring the Access Point for the First Time,”describes how to configure basic settings on a new access point.
Chapter 5, “Administering the Access Point,” describes how to perform one-time operations to administer your access point, such as preventing unauthorized access to the access point, setting the system date and time, and setting the system name and prompt.
Chapter 6, “Configuring Radio Settings,” describes how to configure settings for the access point radio such as the role in the radio network, transmit power, channel settings, and others.
Chapter 7, “Configuring Multiple SSIDs,” describes how to configure and manage multiple service set identifiers (SSIDs) and multiple basic SSIDs (BSSIDs) on your access point. You can configure up to 16 SSIDs and up to eight BSSIDs on your access point.
Chapter 8, “Configuring Spanning Tree Protocol,”describes how to configure Spanning Tree Protocol (STP) on your access point, bridge, or access point operating in a bridge mode. STP prevents bridge loops from occurring in your network.
Chapter 9, “Configuring an Access Point as a Local Authenticator,” describes how to configure the access point to act as a local RADIUS server for your wireless LAN. If the WAN connection to your main RADIUS server fails, the access point acts as a backup server to authenticate wireless devices.
Chapter 10, “Configuring Cipher Suites and WEP,” describes how to configure the cipher suites required to use authenticated key management, Wired Equivalent Privacy (WEP), and WEP features including MIC, CMIC, TKIP, CKIP, and broadcast key rotation.
Chapter 11, “Configuring Authentication Types,” describes how to configure authentication types on the access point. Client devices use these authentication methods to join your network.
Cisco IOS Software Configuration Guide for Cisco Aironet Access Points
|
xx |
OL-21881-03 |
|
|
|
Preface
Conventions
Chapter 12, “Configuring WDS, Fast Secure Roaming, Radio Management, and Wireless Intrusion Detection Services,” describes how to configure the access point to participate in WDS, to allow fast reassociation of roaming client services, and to participate in radio management.
Chapter 13, “Configuring RADIUS and TACACS+ Servers,” describes how to enable and configure the RADIUS and Terminal Access Controller Access Control System Plus (TACACS+), which provide detailed accounting information and flexible administrative control over authentication and authorization processes.
Chapter 14, “Configuring VLANs,” describes how to configure your access point to interoperate with the VLANs set up on your wired LAN.
Chapter 15, “Configuring QoS,” describes how to configure and manage MAC address, IP, and Ethertype filters on the access point using the web-browser interface.
Chapter 16, “Configuring Filters,” describes how to configure and manage MAC address, IP, and Ethertype filters on the access point using the web-browser interface.
Chapter 17, “Configuring CDP,” describes how to configure Cisco Discovery Protocol (CDP) on your access point. CDP is a device-discovery protocol that runs on all Cisco network equipment.
Chapter 18, “Configuring SNMP,” describes how to configure the Simple Network Management Protocol (SNMP) on your access point.
Chapter 19, “Configuring Repeater and Standby Access Points and Workgroup Bridge Mode,” describes how to configure your access point as a hot standby unit or as a repeater unit.
Chapter 20, “Managing Firmware and Configurations,” describes how to manipulate the Flash file system, how to copy configuration files, and how to archive (upload and download) software images.
Chapter 21, “Configuring System Message Logging,” describes how to configure system message logging on your access point.
Chapter 22, “Troubleshooting,” provides troubleshooting procedures for basic problems with the access point.
Appendix A, “Protocol Filters,” lists some of the protocols that you can filter on the access point.
Appendix B, “Supported MIBs,” lists the Simple Network Management Protocol (SNMP) Management Information Bases (MIBs) that the access point supports for this software release.
Appendix C, “Error and Event Messages,” lists the CLI error and event messages and provides an explanation and recommended action for each message.
Conventions
This publication uses these conventions to convey instructions and information:
Command descriptions use these conventions:
•Commands and keywords are in boldface text.
•Arguments for which you supply values are in italic.
•Square brackets ([ ]) mean optional elements.
•Braces ({ }) group required choices, and vertical bars ( | ) separate the alternative elements.
•Braces and vertical bars within square brackets ([{ | }]) mean a required choice within an optional element.
Cisco IOS Software Configuration Guide for Cisco Aironet Access Points
|
OL-21881-03 |
xxi |
|

Preface
Conventions
Interactive examples use these conventions:
•Terminal sessions and system displays are in screen font.
•Information you enter is in boldface screen font.
•Nonprinting characters, such as passwords or tabs, are in angle brackets (< >). Notes, cautions, and timesavers use these conventions and symbols:
Tip Means the following will help you solve a problem. The tips information might not be troubleshooting or even an action, but could be useful information.
Note Means reader take note. Notes contain helpful suggestions or references to materials not contained in this manual.
Caution Means reader be careful. In this situation, you might do something that could result equipment damage or loss of data.
Warning This warning symbol means danger. You are in a situation that could cause bodily injury. Before you work on any equipment, be aware of the hazards involved with electrical circuitry and be familiar with standard practices for preventing accidents. (To see translations of the warnings that appear in this publication, refer to the appendix “Translated Safety Warnings.”)
Waarschuwing Dit waarschuwingssymbool betekent gevaar. U verkeert in een situatie die lichamelijk letsel kan veroorzaken. Voordat u aan enige apparatuur gaat werken, dient u zich bewust te zijn van de bij elektrische schakelingen betrokken risico’s en dient u op de hoogte te zijn van standaard maatregelen om ongelukken te voorkomen. (Voor vertalingen van de waarschuwingen die in deze publicatie verschijnen, kunt u het aanhangsel “Translated Safety Warnings” (Vertalingen van veiligheidsvoorschriften) raadplegen.)
Varoitus Tämä varoitusmerkki merkitsee vaaraa. Olet tilanteessa, joka voi johtaa ruumiinvammaan. Ennen kuin työskentelet minkään laitteiston parissa, ota selvää sähkökytkentöihin liittyvistä vaaroista ja tavanomaisista onnettomuuksien ehkäisykeinoista. (Tässä julkaisussa esiintyvien varoitusten käännökset löydät liitteestä "Translated Safety Warnings" (käännetyt turvallisuutta koskevat varoitukset).)
Attention Ce symbole d’avertissement indique un danger. Vous vous trouvez dans une situation pouvant entraîner des blessures. Avant d’accéder à cet équipement, soyez conscient des dangers posés par les circuits électriques et familiarisez-vous avec les procédures courantes de prévention des accidents. Pour obtenir les traductions des mises en garde figurant dans cette publication, veuillez consulter l’annexe intitulée « Translated Safety Warnings » (Traduction des avis de sécurité).
Cisco IOS Software Configuration Guide for Cisco Aironet Access Points
|
xxii |
OL-21881-03 |
|
|
|

Preface
Conventions
Warnung Dieses Warnsymbol bedeutet Gefahr. Sie befinden sich in einer Situation, die zu einer Körperverletzung führen könnte. Bevor Sie mit der Arbeit an irgendeinem Gerät beginnen, seien Sie sich der mit elektrischen Stromkreisen verbundenen Gefahren und der Standardpraktiken zur Vermeidung von Unfällen bewußt. (Übersetzungen der in dieser Veröffentlichung enthaltenen Warnhinweise finden Sie im Anhang mit dem Titel “Translated Safety Warnings” (Übersetzung der Warnhinweise).)
Avvertenza Questo simbolo di avvertenza indica un pericolo. Si è in una situazione che può causare infortuni. Prima di lavorare su qualsiasi apparecchiatura, occorre conoscere i pericoli relativi ai circuiti elettrici ed essere al corrente delle pratiche standard per la prevenzione di incidenti. La traduzione delle avvertenze riportate in questa pubblicazione si trova nell’appendice, “Translated Safety Warnings” (Traduzione delle avvertenze di sicurezza).
Advarsel Dette varselsymbolet betyr fare. Du befinner deg i en situasjon som kan føre til personskade. Før du utfører arbeid på utstyr, må du være oppmerksom på de faremomentene som elektriske kretser innebærer, samt gjøre deg kjent med vanlig praksis når det gjelder å unngå ulykker. (Hvis du vil se oversettelser av de advarslene som finnes i denne publikasjonen, kan du se i vedlegget "Translated Safety Warnings" [Oversatte sikkerhetsadvarsler].)
Aviso Este símbolo de aviso indica perigo. Encontra-se numa situação que lhe poderá causar danos fisicos. Antes de começar a trabalhar com qualquer equipamento, familiarize-se com os perigos relacionados com circuitos eléctricos, e com quaisquer práticas comuns que possam prevenir possíveis acidentes. (Para ver as traduções dos avisos que constam desta publicação, consulte o apêndice “Translated Safety Warnings” - “Traduções dos Avisos de Segurança”).
¡Advertencia! Este símbolo de aviso significa peligro. Existe riesgo para su integridad física. Antes de manipular cualquier equipo, considerar los riesgos que entraña la corriente eléctrica y familiarizarse con los procedimientos estándar de prevención de accidentes. (Para ver traducciones de las advertencias que aparecen en esta publicación, consultar el apéndice titulado “Translated Safety Warnings.”)
Varning! Denna varningssymbol signalerar fara. Du befinner dig i en situation som kan leda till personskada. Innan du utför arbete på någon utrustning måste du vara medveten om farorna med elkretsar och känna till vanligt förfarande för att förebygga skador. (Se förklaringar av de varningar som förekommer i denna publikation i appendix "Translated Safety Warnings" [Översatta säkerhetsvarningar].)
Cisco IOS Software Configuration Guide for Cisco Aironet Access Points
|
OL-21881-03 |
xxiii |
|

Preface
Related Publications
Related Publications
These documents provide complete information about the access point:
•Getting Started Guide: Cisco Aironet 1040 Series Access Points
•Getting Started Guide: Cisco Aironet 1260 Series Access Points
•Release Notes for Cisco Aironet Access Points and Bridges for Cisco IOS Release 12.4(24d)JA and 12.3(8)JEE
•Cisco IOS Command Reference for Cisco Aironet Access Points and Bridges
•Quick Start Guide: Cisco Aironet 1100 Series Access Points
•Quick Start Guide: Cisco Aironet 1130AG Series Access Point
•Getting Started Guide: Cisco Aironet 1140 Series Autonomous Access Point
•Quick Start Guide: Cisco Aironet 1200 Series Access Points
•Quick Start Guide: Cisco Aironet 1240 Series Access Point
•Quick Start Guide: Cisco Aironet 1250 Series Access Point
•Quick Start Guide: Cisco Aironet 1300 Series Outdoor Access Point/Bridge
•Cisco Aironet Access Point Hardware Installation Guide
•Installation Instructions for Cisco Aironet Power Injectors
•Cisco 1140 Series Access Point Deployment Guide
•Installation Instructions for Cisco Aironet 1250 Series Access Point Power Injector
•Cisco Aironet 802.11g Radio Upgrade Instructions
•Cisco Aironet 1250 Series Access Point Radio Upgrade Instructions
•Getting Started Guide: Cisco Aironet 2600 Series Access Points
Obtaining Documentation, Obtaining Support, and Security
Guidelines
For information on obtaining documentation, obtaining support, providing documentation feedback, security guidelines, and also recommended aliases and general Cisco documents, see the monthly What’s New in Cisco Product Documentation, which also lists all new and revised Cisco technical documentation, at:
http://www.cisco.com/en/US/docs/general/whatsnew/whatsnew.html
Cisco IOS Software Configuration Guide for Cisco Aironet Access Points
|
xxiv |
OL-21881-03 |
|
|
|

C H A P T E R 1
Overview
Cisco Aironet Access Points (hereafter called access points) provide a secure, affordable, and easy-to-use wireless LAN solution that combines mobility and flexibility with the enterprise-class features required by networking professionals. With a management system based on Cisco IOS software, Cisco Aironet access points are Wi-Fi certified, 802.11a-compliant, 802.11b-compliant, 802.11g-compliant, and 802.11n-compliant wireless LAN transceivers.
n access point serves as the connection point between wireless and wired networks or as the center point of a stand-alone wireless network. In large installations, wireless users within radio range of an access point can roam throughout a facility while maintaining seamless, uninterrupted access to the network.
You can configure and monitor the wireless device using the command-line interface (CLI), the browser-based management system, or Simple Network Management Protocol (SNMP).
Each access point platform contains one or two radios:
•The 1040 series access point has dual-band (2.4 GHz and 5 GHz), integrated 802.11n radios and integrated antennas.
•The 1100 series access point uses a single, 802.11b, 2.4-GHz mini-PCI radio that can be upgraded to an 802.11g, 2.4-GHz radio.
•The 1130 series access point has integrated 802.11g and 802.11a radios and antennas.
•The 1140 series access point has integrated antennas for its pre-802.11n radios operating on the 2.4- or 5-GHz frequency bands.
•The 1200 series access point can contain two radios: a 2.4-GHz radio in an internal mini-PCI slot and a 5-GHz radio module in an external, modified cardbus slot. The 1200 series access point supports one radio of each type, but it does not support two 2.4-GHz or two 5-GHz radios.
•The 1230 series access point is pre-configured to include both an 802.11g and an 802.11a radio. It has antenna connectors for externally attached antennas for both radios.
•The 1240 series access point uses two externally connected antennas for each band instead of built-in antennas.
•The 1250 series access point uses three external connected antennas for its pre-802.11n radios operating on the 2.4- or 5-GHz frequency bands.
•The 1260 series access point uses three external connected antennas for its pre-802.11n radios operating on the 2.4- or 5-GHz frequency bands.
Cisco IOS Software Configuration Guide for Cisco Aironet Access Points
|
OL-21881-03 |
1-1 |
|
|
|

Chapter 1 Overview
Features
•The 1300 series outdoor access point/bridge uses an integrated antenna and can be configured to use external, dual-diversity antennas.
•The 2600 series access point contains dual-band radios (2.4 GHz and 5 GHz) with integrated and external antenna options. The access points support full inter-operability with leading 802.11n clients, and support a mixed deployment with other access points and controllers.
This chapter provides information on the following topics:
•Features, page 1-2
•Management Options, page 1-3
•Roaming Client Devices, page 1-4
•Network Configuration Examples, page 1-4
Features
This section lists features supported on access points running Cisco IOS software.
Note The proxy Mobile-IP feature is not supported in Cisco IOS Releases 12.3(2)JA and later.
Features Introduced in This Release
Table 1-1 lists the new features and supported platforms in Cisco IOS Release 15.2(2)JA, and Table 1-2 lists new features and supported platforms in Cisco IOS Releases 12.4(24d)JA and 12.3(8)JEEE.
Table 1-1 |
New Cisco IOS Software Features for Cisco IOS Release 15.2(2)JA |
|
|
|
|||||||
|
|
|
|
|
|
|
|
|
|
|
|
|
|
|
|
|
|
|
|
|
|
Cisco |
|
|
|
Cisco |
Cisco |
Cisco |
Cisco |
Cisco |
Cisco |
Cisco |
|
Aironet |
|
|
|
Cisco |
1300 |
Cisco |
|||||||
|
|
Aironet |
Aironet |
Aironet |
Aironet |
Aironet |
Aironet |
Aironet |
Aironet |
Series |
Aironet |
|
|
1040 |
1100 |
1130 |
1140 |
1240 |
1250 |
1260 |
2600 |
Outdoor |
1400 |
|
|
Series |
Series |
Series |
Series |
Series |
Series |
Series |
Series |
Access |
Series |
Feature |
|
Access |
Access |
Access |
Access |
Access |
Access |
Access |
Access |
Point/ |
Wireless |
|
Points |
Points |
Points |
Points |
Points |
Points |
Points |
Points |
Bridge |
Bridge |
|
|
|
|
|
|
|
|
|
|
|
|
|
Support for Cisco |
|
|
|
|
|
|
|
x |
|
|
|
Aironet 2600 Series |
|
|
|
|
|
|
|
|
|
|
|
Access Points |
|
|
|
|
|
|
|
|
|
|
|
|
|
|
|
|
|
|
|
|
|
|
|
PEAP support for |
x |
x |
x |
x |
x |
x |
x |
x |
x |
x |
|
Workgroup Bridges |
|
|
|
|
|
|
|
|
|
|
|
|
|
|
|
|
|
|
|
|
|
|
|
VideoStream support |
x |
x |
x |
x |
x |
x |
x |
x |
x |
x |
|
on workgroup bridges |
|
|
|
|
|
|
|
|
|
|
|
(when used as a client) |
|
|
|
|
|
|
|
|
|
|
|
|
|
|
|
|
|
|
|
|
|
|
|
Site-Survey Only |
(Supported on 3600 and 3500 series access points and 1550 series outdoor access points.) |
|
|||||||||
Mode for 3600, 3500, |
|
|
|
|
|
|
|
|
|
|
|
and 1550 Access |
|
|
|
|
|
|
|
|
|
|
|
Points |
|
|
|
|
|
|
|
|
|
|
|
|
|
|
|
|
|
|
|
|
|
|
|
Cisco IOS Software Configuration Guide for Cisco Aironet Access Points
1-2 |
OL-21881-03 |
|
|

Chapter 1 Overview
Features
Table 1-2 |
New Cisco IOS Software Features for Cisco IOS Release 15.2(2)JA |
|
|
|
|||||||
|
|
|
|
|
|
|
|
|
|
|
|
|
|
|
|
|
|
|
|
|
|
Cisco |
|
|
|
Cisco |
Cisco |
Cisco |
Cisco |
Cisco |
Cisco |
Cisco |
|
Aironet |
|
|
|
Cisco |
1300 |
Cisco |
|||||||
|
|
Aironet |
Aironet |
Aironet |
Aironet |
Aironet |
Aironet |
Aironet |
Aironet |
Series |
Aironet |
|
|
1040 |
1100 |
1130 |
1140 |
1240 |
1250 |
1260 |
2600 |
Outdoor |
1400 |
|
|
Series |
Series |
Series |
Series |
Series |
Series |
Series |
Series |
Access |
Series |
Feature |
|
Access |
Access |
Access |
Access |
Access |
Access |
Access |
Access |
Point/ |
Wireless |
|
Points |
Points |
Points |
Points |
Points |
Points |
Points |
Points |
Bridge |
Bridge |
|
|
|
|
|
|
|
|
|
|
|
|
|
Support for Cisco |
x |
|
|
|
|
|
x |
|
|
|
|
Aironet 1040 Series |
|
|
|
|
|
|
|
|
|
|
|
Access Points |
|
|
|
|
|
|
|
|
|
|
|
|
|
|
|
|
|
|
|
|
|
|
|
Support for Cisco |
x |
|
|
|
|
|
x |
|
|
|
|
Aironet 1260 Series |
|
|
|
|
|
|
|
|
|
|
|
Access Points |
|
|
|
|
|
|
|
|
|
|
|
|
|
|
|
|
|
|
|
|
|
|
|
Workgroup Bridge |
x |
- |
|
- |
- |
- |
x |
x |
- |
- |
|
(WGB) support/enable |
|
|
|
|
|
|
|
|
|
|
|
WGB radio to keep |
|
|
|
|
|
|
|
|
|
|
|
connections to client |
|
|
|
|
|
|
|
|
|
|
|
alive |
|
|
|
|
|
|
|
|
|
|
|
|
|
|
|
|
|
|
|
|
|
|
|
VLAN Tagging |
|
x |
– |
x |
x |
x |
x |
x |
x |
– |
– |
|
|
|
|
|
|
|
|
|
|
|
|
Framed Radius |
|
x |
x |
x |
x |
x |
x |
x |
x |
x |
x |
Attribute on APs |
|
|
|
|
|
|
|
|
|
|
|
|
|
|
|
|
|
|
|
|
|
|
|
WLSE/WLSE Express |
x |
- |
|
– |
- |
– |
x |
x |
– |
– |
|
support |
|
|
|
|
|
|
|
|
|
|
|
|
|
|
|
|
|
|
|
|
|
|
|
WGB wireless client |
x |
|
|
|
|
|
x |
x |
|
|
|
support |
|
|
|
|
|
|
|
|
|
|
|
|
|
|
|
|
|
|
|
|
|
|
|
Russian regulatory |
x |
|
|
|
|
|
x |
x |
|
|
|
domain support |
|
|
|
|
|
|
|
|
|
|
|
|
|
|
|
|
|
|
|
|
|
|
|
Note Cisco IOS Release 12.4(25d)JA supports the Cisco 3201 Wireless Mobile Interface Card (WMIC) in the 3200 Series Mobile Access Router (MAR). It does not support the 3202 and 3205 MAR WMIC modules. Use the c3201-k9w7-tar autonomous image for 3201 WMIC.
Note For information on the above features, see Release Notes for Cisco Aironet Access Points and Bridges on Cisco.com.
Cisco IOS Software Configuration Guide for Cisco Aironet Access Points
|
OL-21881-03 |
1-3 |
|
|
|

Chapter 1 Overview
Management Options
Management Options
You can use the wireless device management system through the following interfaces:
•The Cisco IOS command-line interface (CLI), which you use through a console port or Telnet session. Use the interface dot11radio global configuration command to place the wireless device into the radio configuration mode. Most of the examples in this manual are taken from the CLI. Chapter 3, “Using the Command-Line Interface,” provides a detailed description of the CLI.
•A web-browser interface, which you use through a Web browser. Chapter 2, “Using the Web-Browser Interface,” provides a detailed description of the web-browser interface.
•Simple Network Management Protocol (SNMP). Chapter 18, “Configuring SNMP,” explains how to configure the wireless device for SNMP management.
Roaming Client Devices
If you have more than one wireless device in your wireless LAN, wireless client devices can roam seamlessly from one wireless device to another. The roaming functionality is based on signal quality, not proximity. When signal quality drops from a client, it roams to another access point.
Wireless LAN users are sometimes concerned when a client device stays associated to a distant access point instead of roaming to a closer access point. However, if a client signal to a distant access point remains strong and the signal quality is high, the client will not roam to a closer access point. Checking constantly for closer access points would be inefficient, and the extra radio traffic would slow throughput on the wireless LAN.
Using CCKM and a device providing WDS, client devices can roam from one access point to another so quickly that there is no perceptible delay in voice or other time-sensitive applications.
Network Configuration Examples
This section describes the role of an access point in common wireless network configurations. The access point default configuration is as a root unit connected to a wired LAN or as the central unit in an all-wireless network. Access points can also be configured as repeater access points, bridges, and workgroup bridges. These roles require specific configurations.
Root Access Point
An access point connected directly to a wired LAN provides a connection point for wireless users. If more than one access point is connected to the LAN, users can roam from one area of a facility to another without losing their connection to the network. As users move out of range of one access point, they automatically connect to the network (associate) through another access point. The roaming process is seamless and transparent to the user. Figure 1-1 shows access points acting as root units on a wired LAN.
Cisco IOS Software Configuration Guide for Cisco Aironet Access Points
1-4 |
OL-21881-03 |
|
|

Chapter 1 Overview
Network Configuration Examples
Figure 1-1 Access Points as Root Units on a Wired LAN
Access point
Access point
135445
Repeater Access Point
An access point can be configured as a stand-alone repeater to extend the range of your infrastructure or to overcome an obstacle that blocks radio communication. The repeater forwards traffic between wireless users and the wired LAN by sending packets to either another repeater or to an access point connected to the wired LAN. The data is sent through the route that provides the best performance for the client. Figure 1-2 shows an access point acting as a repeater. Consult the “Configuring a Repeater Access Point” section on page 19-3 for instructions on setting up an access point as a repeater.
Note Non-Cisco client devices might have difficulty communicating with repeater access points.
Figure 1-2 Access Point as Repeater
Access point |
Repeater |
135444
Cisco IOS Software Configuration Guide for Cisco Aironet Access Points
|
OL-21881-03 |
1-5 |
|
|
|
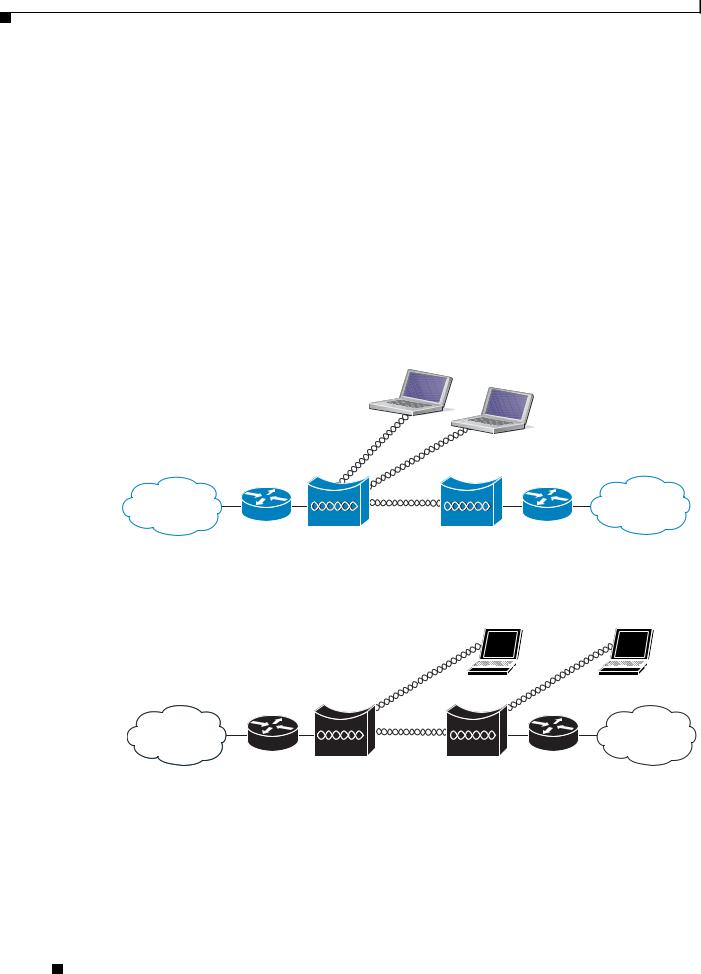
Chapter 1 Overview
Network Configuration Examples
Bridges
The 1140, 1200, 1240, and 1250 series access points and the 1300 access point/bridge can be configured as root or non-root bridges. In this role, an access point establishes a wireless link with a non-root bridge. Traffic is passed over the link to the wired LAN. Access points in root and non-root bridge roles can be configured to accept associations from clients. Figure 1-3 shows an access point configured as a root bridge with clients. Figure 1-4 shows two access points configured as a root and non-root bridge, both accepting client associations. Consult the “Configuring the Role in Radio Network” section on page 6-2 for instructions on setting up an access point as a bridge.
When wireless bridges are used in a point-to-multipoint configuration the throughput is reduced depending on the number of non-root bridges that associate with the root bridge. The maximum throughput is about 25 Mbps in a point to point link. The addition of three bridges to form a point-to-multipoint network reduces the throughput to about 12.5 Mbps.
Figure 1-3 Access Point as a Root Bridge with Clients
135447
Root bridge |
Non-root bridge |
Figure 1-4 Access Points as Root and Non-root Bridges with Clients
135446
Root bridge |
Non-root bridge |
Workgroup Bridge
You can configure access points as workgroup bridges. In workgroup bridge mode, the unit associates to another access point as a client and provides a network connection for the devices connected to its Ethernet port. For example, if you need to provide wireless connectivity for a group of network printers,
Cisco IOS Software Configuration Guide for Cisco Aironet Access Points
1-6 |
OL-21881-03 |
|
|
Loading...