


ELECTRONIC CASH REGISTER
Introduction
TE-4000F Setting Up
TE-4500F Getting Started
User’s Manual |
|
Paper Installation |
|
||
|
|
|
Set Date/time |
|
|
|
Introducing the Terminal |
|
|||
|
|
||||
|
|
Display/Keyboard |
|
||
|
|
|
|||
|
|
|
Sheet Holder |
|
|
|
Operations & Setups |
|
|||
|
|
||||
|
|
|
Registrations |
|
|
|
|
|
|
||
|
|
|
Programs |
|
|
TE-4000F |
Advanced Operations |
|
|||
|
|||||
|
|
||||
|
|
Useful Features |
|
||
|
|
|
|||
|
|
|
Reports |
|
|
|
|
Troubleshooting |
|
||
|
|
|
|||
|
|
|
|
|
|
|
|
Error Code Table |
|
||
|
|
|
|||
User Maintenance
Paper Replacement
TE-4500F
Eu |
Di |
U.K. |
CI |
Canada |
Introduction
Congratulations on your selection of a CASIO TE-4000F/4500F series electronic cash register. This ECR is the product of the world's most advanced electronic technology, for outstanding versatility and reliability. Simplified operation is made possible by a specially designed keyboard layout and a wide selection of automated, programmable functions.
A specially designed keyboard layout and a bright, easy-to-read display help to take the fatigue out of long hours operation.
Casio Electronics Co., Ltd.
Unit 6, 1000 North Circular Road
London NW2 7JD, U.K.
WARNING: This is a Class A product. In a domestic environment this product may cause radio interference in which case the user may be required to take adequate measures.
Please keep all information for future reference.
GUIDELINES LAID DOWN BY FCC RULES FOR USE OF THE UNIT IN THE U.S.A. (Not applicable to other areas)
WARNING: This equipment has been tested and found to comply with the limits for a Class A digital device, pursuant to Part 15 of the FCC Rules. These limits are designed to provide reasonable protection against harmful interference when the equipment is operated in a commercial environment. This equipment generates, uses, and can radiate radio frequency energy and, if not installed and used in accordance with the instruction manual, may cause harmful interference to radio communications. Operation of this equipment in a residential area is likely to cause harmful interference in which case the user will be required to correct the interference at his own expense.
FCC WARNING: Changes or modifications not expressly approved by the party responsible for compliance could void the user’s authority to operate the equipment.
Introduction & Contents
Apparaten skall anslutas till jordat nätuttag.
The main plug on this equipment must be used to disconnect mains power.
Please ensure that the socket outlet is installed near the equipment and shall be easily accessible.
TE-4000F/4500F User's Manual |
3 E |
Safety Precautions
•To use this product safely and correctly, read this manual thoroughly and operate as instructed.
After reading this guide, keep it close at hand for easy reference. Please keep all informations for future reference.
•Always observe the warnings and cautions indicated on the product.
About the icons
In this guide various icons are used to highlight safe operation of this product and to prevent injury to the operator and other personnel and also to prevent damage to property and this product. The icons and definitions are given below.
Indicates that there is a risk of severe injury or death if used incorrectly.
Indicates that injury or damage may result if used incorrectly.
Icon examples
To bring attention to risks and possible damage, the following types of icons are used.
The  symbol indicates that it includes some symbol for attracting attention (including warning). In this triangle the actual type of precautions to be taken (electric shock, in this case) is indicated.
The  symbol indicates a prohibited action. In this symbol the actual type of prohibited actions (disassembly, in this case) will be indicated.
The  symbol indicates a restriction. In this symbol the type of actual restriction (removal of the power plug from an outlet, in this case) is indicated.
 Warning!
Handling the register
Should the register malfunction, start to emit smoke or a strange odor, or otherwise behave abnormally, immediately shut down the power and unplug the AC plug from the power outlet. Continued use creates the danger of fire and electric shock.
• Contact CASIO service representative.
Do not place containers of liquids near the register and do not allow any foreign matter to get into it. Should water or other foreign matter get into the register, immediately shut down the power and unplug the AC plug from the power outlet. Continued use creates the danger of shorting, fire and electric shock.
• Contact CASIO service representative.
Should you drop the register and damage it, immediately shut down the power and unplug the AC plug from the power outlet. Continued use creates the danger of shorting, fire and electric shock.
•Attempting to repair the register yourself is extremely dangerous. Contact CASIO service representative.
E 4
 Warning!
Never try to take the register apart or modify it in any way. High-voltage components inside the register create the danger of fire and electric shock.
• Contact CASIO service representative for all repair and maintenance.
Power plug and AC outlet
Use only a proper AC electric outlet (100V~240V) . Use of an outlet with a different voltage from the rating creates the danger of malfunction, fire, and electric shock. Overloading an electric outlet creates the danger of overheating and fire.
Make sure the power plug is inserted as far as it will go. Loose plugs create the danger of electric shock, overheating, and fire.
• Do not use the register if the plug is damaged. Never connect to a power outlet that is loose.
Use a dry cloth to periodically wipe off any dust built up on the prongs of the plug. Humidity can cause poor insulation and create the danger of electric shock and fire if dust stays on the prongs.
Do not allow the power cord or plug to become damaged, and never try to modify them in any way. Continued use of a damaged power cord can cause deterioration of the insulation, exposure of internal wiring, and shorting, which creates the danger of electric shock and fire.
•Contact CASIO service representative whenever the power cord or plug requires repair or maintenance.
 Caution!
Do not place the register on an unstable or uneven surface. Doing so can cause the register — especially when the drawer is open — to fall, creating the danger of malfunction, fire, and electric shock.
Do not place the register in the following areas.
•Areas where the register will be subject to large amounts of humidity or dust, or directly exposed to hot or cold air.
•Areas exposed to direct sunlight, in a close motor vehicle, or any other area subject to very high temperatures.
The above conditions can cause malfunction, which creates the danger of fire.
Do not overlay bend the power cord, do not allow it to be caught between desks or other furniture, and never place heavy objects on top of the power cord. Doing so can cause shorting or breaking of the power cord, creating the danger of fire and electric shock.
Be sure to grasp the plug when unplugging the power cord from the wall outlet. Pulling on the cord can damage it, break the wiring, or cause short, creating the danger of fire and electric shock.
Never touch the plug while your hands are wet. Doing so creates the danger of electric shock. Pulling on the cord can damage it, break the wiring, or cause short, creating the danger of fire and electric shock.
Never touch the printer head and the platen.
Introduction & Contents
TE-4000F/4500F User's Manual |
5 E |

Introduction & Contents |
|
Introduction & Contents ............................................................................................................ |
3 |
Getting Started ......................................................................................................................... |
10 |
Remove the cash register from its box. ..................................................................................................... |
10 |
Remove the tape holding parts of the cash register in place. ................................................................... |
10 |
Remove the cash drawer from its box. ...................................................................................................... |
10 |
Connect the drawer.................................................................................................................................... |
10 |
Mount the cash register. ............................................................................................................................ |
11 |
Plug the cash register into a wall outlet. .................................................................................................... |
11 |
Insert the mode key marked “OW” into the mode switch........................................................................... |
11 |
Install receipt/journal paper........................................................................................................................ |
12 |
Set the date. .............................................................................................................................................. |
15 |
Set the time. ............................................................................................................................................... |
15 |
Introducing TE-4000F/4500F .................................................................................................... |
16 |
General guide ............................................................................................................................................ |
16 |
Display ....................................................................................................................................................... |
20 |
Keyboard (TE-4000F) ................................................................................................................................ |
22 |
Keyboard (TE-4500F) ................................................................................................................................ |
24 |
Allocatable functions .................................................................................................................................. |
26 |
How to remove/replace the sheet holder (TE-4000F only) ....................................................................... |
28 |
How to install a menu sheet in the sheet holder (TE-4000F only) ............................................................ |
29 |
Basic Operations and Setups ................................................................................................. |
30 |
How to read the printouts ............................................................................................................... |
30 |
How to use your cash register ........................................................................................................ |
31 |
Assigning a clerk ....................................................................................................................................... |
32 |
Clerk button ............................................................................................................................................ |
32 |
Clerk lock/clerk key ................................................................................................................................. |
32 |
Clerk secret number key ......................................................................................................................... |
32 |
Displaying the time and date ..................................................................................................................... |
33 |
To display and clear the date/time .......................................................................................................... |
33 |
Preparing coins for change ........................................................................................................................ |
33 |
Preparing and using department/flat-PLU keys ............................................................................. |
34 |
Registering department/flat-PLU keys ...................................................................................................... |
34 |
Programming department/flat-PLU keys ................................................................................................... |
35 |
To program a unit price for each department/flat-PLU ........................................................................... |
35 |
To program the tax calculation status for each department/flat-PLU ..................................................... |
35 |
To program high amount limit for each department/flat-PLU ................................................................. |
36 |
Registering department/flat-PLU keys by programming data ................................................................... |
37 |
Preset price ............................................................................................................................................ |
37 |
Preset tax status ..................................................................................................................................... |
37 |
Locking out high amount limitation ......................................................................................................... |
37 |
Preparing and using PLUs ............................................................................................................. |
38 |
Programming PLUs ................................................................................................................................... |
38 |
To program a unit price for each PLU ..................................................................................................... |
38 |
To program tax calculation status for each PLU ..................................................................................... |
38 |
Registering PLUs ....................................................................................................................................... |
39 |
Shifting the taxable status of an item ............................................................................................. |
41 |
Calculation merchandise subtotal ............................................................................................................. |
41 |
Preparing and using discounts ....................................................................................................... |
42 |
Programming discounts ............................................................................................................................. |
42 |
Registering discounts ................................................................................................................................ |
42 |
Discount for items and subtotals ............................................................................................................ |
42 |
Preparing and using reductions ..................................................................................................... |
43 |
Programming for reductions ...................................................................................................................... |
43 |
To program preset reduction amount ..................................................................................................... |
43 |
E 6

Registering reductions ............................................................................................................................... |
43 |
Reduction for items ................................................................................................................................. |
43 |
Reduction for subtotal ............................................................................................................................. |
44 |
Registering credit and check payments ......................................................................................... |
45 |
Check ...................................................................................................................................................... |
45 |
Credit ...................................................................................................................................................... |
45 |
Mixed tender (cash, credit and check) ................................................................................................... |
45 |
Registering both the Euro and local currency ................................................................................ |
46 |
Registering returned goods in the REG mode ............................................................................... |
48 |
Registering returned goods in the RF mode .................................................................................. |
48 |
Normal refund transaction ......................................................................................................................... |
48 |
Reduction of amounts paid on refund ....................................................................................................... |
49 |
Registering money received on account ........................................................................................ |
49 |
Registering money paid out ........................................................................................................... |
49 |
Registering loan amounts .............................................................................................................. |
50 |
Registering pick up amounts .......................................................................................................... |
50 |
Changing media in drawer ............................................................................................................. |
50 |
Making corrections in a registration ............................................................................................... |
51 |
To correct an item you input but not yet registered ................................................................................... |
51 |
To correct an item you input and registered .............................................................................................. |
52 |
To cancel all items in a transaction ............................................................................................................ |
53 |
No sale registration ........................................................................................................................ |
53 |
Printing the daily sales reset report ................................................................................................ |
54 |
Advanced Operations .............................................................................................................. |
56 |
Stock check .................................................................................................................................... |
56 |
Clerk interrupt function ................................................................................................................... |
56 |
Single item cash sales.................................................................................................................... |
57 |
Addition .......................................................................................................................................... |
58 |
Addition (plus) ............................................................................................................................................ |
58 |
Premium (%+) ............................................................................................................................................ |
59 |
Tray total ......................................................................................................................................... |
60 |
Tray total premium/discount ....................................................................................................................... |
60 |
Multiple item totalling function ................................................................................................................... |
60 |
Coupon transactions ...................................................................................................................... |
61 |
Coupon registration using <COUPON> (coupon key) .............................................................................. |
61 |
Coupon registration using <COUPON2> (coupon 2 key) ......................................................................... |
61 |
Registering the second unit price ................................................................................................... |
62 |
Preset tender amount ..................................................................................................................... |
63 |
Bottle link operation ........................................................................................................................ |
64 |
Bottle returns ............................................................................................................................................. |
64 |
Bottle return key ..................................................................................................................................... |
64 |
Arrangement key registrations ....................................................................................................... |
65 |
Set menu ........................................................................................................................................ |
65 |
Currency exchange function ........................................................................................................... |
66 |
Registering foreign currency...................................................................................................................... |
66 |
Full amount tender in foreign currency ................................................................................................... |
66 |
Partial tender in a foreign currency ........................................................................................................ |
67 |
Food stamp function ....................................................................................................................... |
68 |
Food stamp registration ............................................................................................................................. |
68 |
No change due ....................................................................................................................................... |
68 |
Mixed food stamp/cash change .............................................................................................................. |
69 |
Food stamp registration (Illinois rule) ........................................................................................................ |
71 |
No change due ....................................................................................................................................... |
71 |
Mixed food stamp/cash change .............................................................................................................. |
73 |
Introduction & Contents
TE-4000F/4500F User's Manual |
7 E |

Introduction & Contents
Electronic benefits transfer ........................................................................................................................ |
75 |
About mixed EBT card tenders .............................................................................................................. |
75 |
No change due ....................................................................................................................................... |
75 |
Tips ................................................................................................................................................. |
76 |
Inputting the number of customers ................................................................................................. |
77 |
Temporarily releasing compulsion .................................................................................................. |
78 |
Text recall ....................................................................................................................................... |
78 |
Printing slip ..................................................................................................................................... |
79 |
Printing slips .............................................................................................................................................. |
79 |
To perform auto batch printing 1 ............................................................................................................. |
80 |
To perform auto batch printing 2 ............................................................................................................. |
80 |
About the maximum number of slip lines ............................................................................................... |
80 |
Check tracking systems.................................................................................................................. |
80 |
Check tracking system ............................................................................................................................... |
80 |
Opening a check ..................................................................................................................................... |
81 |
Adding to a check ................................................................................................................................... |
81 |
Issuing a guest receipt ........................................................................................................................... |
82 |
Closing a check memory ........................................................................................................................ |
82 |
New/old check key operation .................................................................................................................. |
83 |
Add check ............................................................................................................................................... |
84 |
Separate check ....................................................................................................................................... |
85 |
Clerk transfer .......................................................................................................................................... |
86 |
Table transfer .......................................................................................................................................... |
86 |
Price reductions (red price) ............................................................................................................ |
87 |
Condiment/preparation PLUs ......................................................................................................... |
88 |
VAT breakdown printing .................................................................................................................. |
89 |
Deposit registrations ....................................................................................................................... |
89 |
Deposit from customer ........................................................................................................................... |
89 |
Deposit from customer during sales transaction .................................................................................... |
89 |
Bill copy .......................................................................................................................................... |
90 |
Actual stock quantity inquiry ........................................................................................................... |
91 |
Unit price inquiry ............................................................................................................................ |
91 |
Previous item void using <review> ................................................................................................. |
92 |
Scanning PLU ................................................................................................................................ |
93 |
Item registration ......................................................................................................................................... |
93 |
By scanner/code input/one touch NLU key ............................................................................................ |
93 |
Not found PLU ........................................................................................................................................ |
93 |
Programming to clerk ..................................................................................................................... |
94 |
Programming clerk number ....................................................................................................................... |
94 |
Programming trainee status ...................................................................................................................... |
94 |
Programming commission rate .................................................................................................................. |
94 |
Programming descriptors and messages ....................................................................................... |
95 |
Programming receipt message, machine No. and clerk name .................................................................. |
95 |
Programming department/transaction key descriptor ............................................................................... |
97 |
Programming flat-PLU descriptor .............................................................................................................. |
98 |
Entering characters ........................................................................................................................ |
99 |
Using character keyboard .......................................................................................................................... |
99 |
Entering characters by code .................................................................................................................... |
100 |
Character code list ................................................................................................................................ |
100 |
Editing characters .................................................................................................................................... |
101 |
Correcting a character just entered ...................................................................................................... |
101 |
Correcting and adding a PLU descriptor already set ........................................................................... |
101 |
Correcting a key descriptor already set ................................................................................................ |
101 |
Correcting a message descriptor already set ...................................................................................... |
101 |
E 8

Printing read/reset reports ........................................................................................................... |
102 |
To print the individual department, PLU/flat-PLU read report ................................................................. |
102 |
To print the financial read report .............................................................................................................. |
103 |
To print the individual clerk read/reset report .......................................................................................... |
103 |
To print the daily sales read/reset report ................................................................................................. |
104 |
To print the PLU/flat-PLU read/reset report ............................................................................................. |
106 |
To print the hourly sales read/reset report .............................................................................................. |
106 |
To print the monthly sales read/reset report ............................................................................................ |
107 |
To print the group read/reset report ......................................................................................................... |
107 |
To print the periodic 1/2 sales read/reset reports .................................................................................... |
108 |
To print other sales read/reset reports .................................................................................................... |
110 |
Reading the cash register's program ........................................................................................... |
11 |
To print unit price/rate program (except PLU/scanning PLU) .................................................................. |
111 |
To print key descriptor, name, message program (except PLU) ............................................................. |
112 |
To print the PLU/flat-PLU program .......................................................................................................... |
113 |
Troubleshooting ..................................................................................................................... |
114 |
When an error occurs ................................................................................................................... |
114 |
When the register does not operate at all .................................................................................... |
116 |
Clearing a machine lock up .......................................................................................................... |
117 |
In case of power failure ................................................................................................................ |
117 |
User Maintenance and Options ............................................................................................ |
118 |
To replace journal paper ............................................................................................................... |
118 |
To replace receipt paper ............................................................................................................... |
119 |
Options ......................................................................................................................................... |
119 |
Specifications ......................................................................................................................... |
120 |
Index ........................................................................................................................................ |
121 |
Introduction & Contents
TE-4000F/4500F User's Manual |
9 E |
Getting Started
This section outlines how to unpack the cash register and get it ready to operate. You should read this part of the manual even if you have used a cash register before. The following is the basic set up procedure, along with page references where you should look for more details.
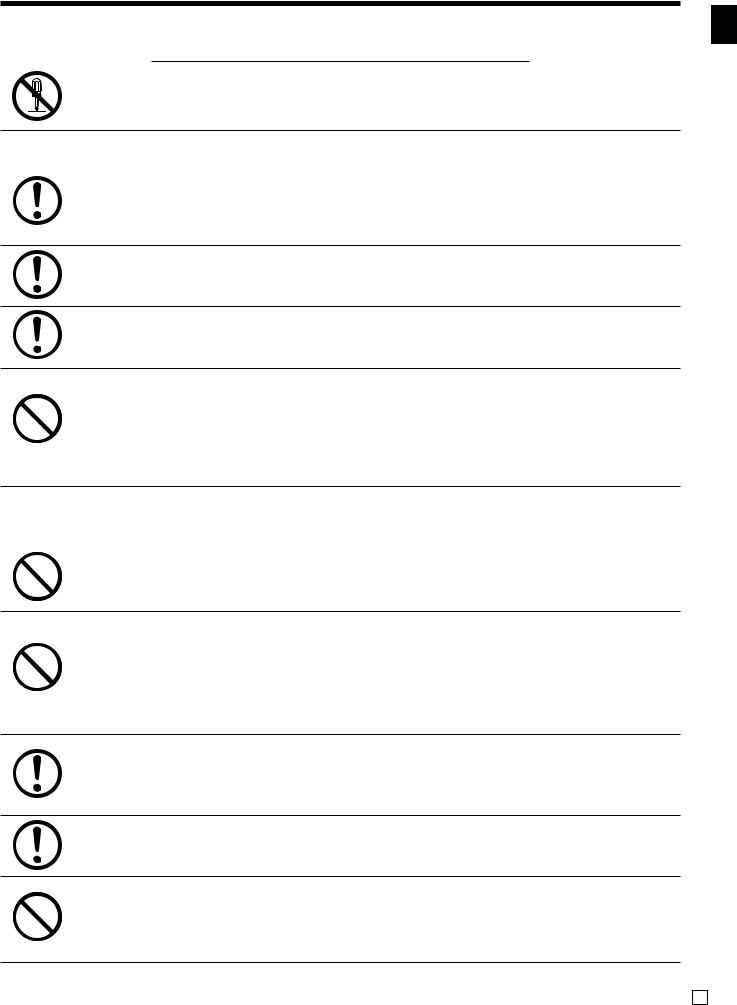
1. Remove the cash register from its box.
2. Remove the tape holding parts of the cash register in place.
Also remove the small plastic bag taped to the printer cover. Inside you will find the mode keys.
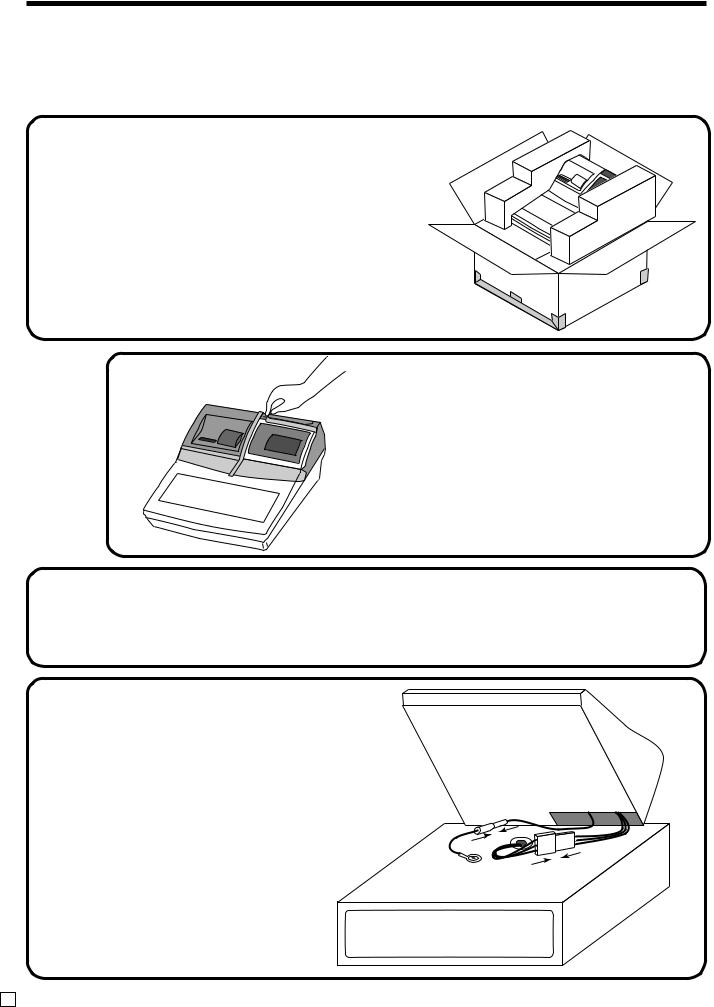
3. Remove the cash drawer from its box.
The cash register and cash drawer are packed separately.
4.Connect the drawer.
1.Connect drawer connector (three color lead on drawer) to the cash register.
2.Connect frame drawer connector (green lead on
drawer) to the cash register.
E 10
5. Mount the cash register.
1.Screw in 2 fixing screws bottom side of the register.
2. Stick rubber plate on the each corner of the 2 bottom side of the register.
3.Mount the cash register on the top of the drawer, ensuring that the feet on the bottom of the cash register go into the holes on the drawer.
2 

1 |
1 |
2
2 
Getting Started
6.
7. Insert the mode key marked “OW” into the mode switch.
Plug the cash register into a wall outlet.
Be sure to check the sticker on the side of the cash register to make sure that its voltage matches that of the power supply in your area. The printer will operate for a few seconds. Please do not pass the power cable under the drawer.
REG2
REG1
OFF
RF
PGM
TE-4000F/4500F User’s Manual |
11 E |
Getting Started
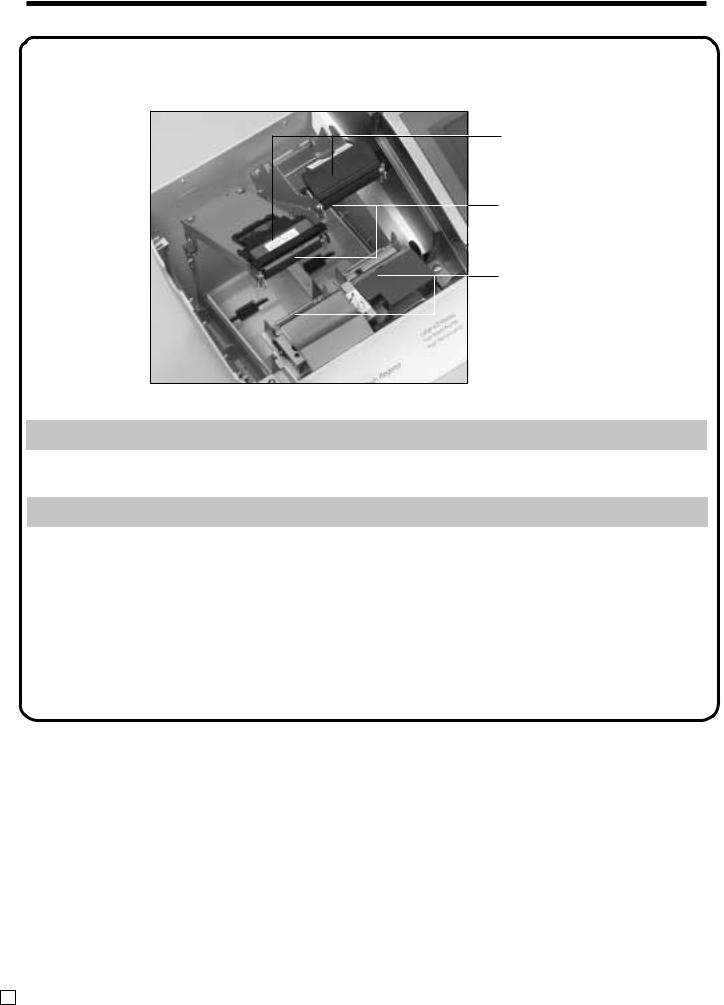
8. Install receipt/journal paper.
Platen arm
Platen
Printer
Important!
Take away the head protection sheet from the printer and close the platen arm.
Caution! (in handling the thermal paper)
•Never touch the printer head and the platen.
•Unpack the thermal paper just before your use.
•Avoid heat/direct sunlight.
•Avoid dusty and humid places for storage.
•Do not scratch the paper.
•Do not keep the printed paper under the following circumstances:
High humidity and temperature/direct sunlight/contact with glue, thinner or a rubber eraser.
E 12
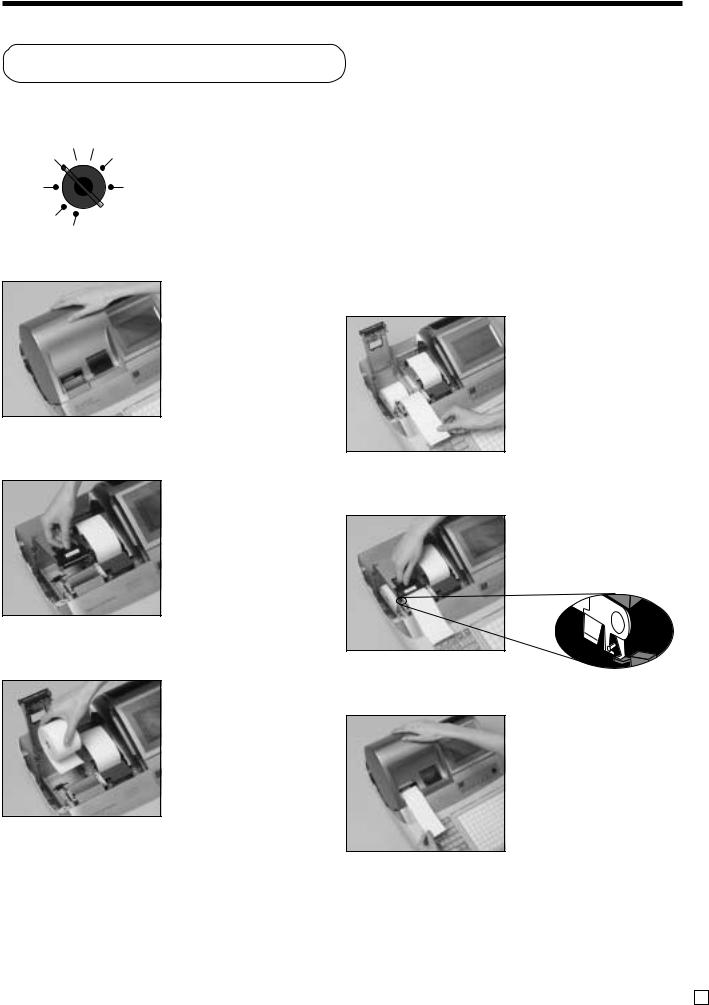
To install receipt paper
REG2 X1
REG1 
 Z1
Z1
OFF |
X2/Z2 |
RF
PGM
Step 1
Turn the mode switch to REG1 position.
Step 2
Remove the printer cover.
(If the cover is locked, unlock by using the printer cover key before this step.)
Step 3
Open the platen arm.
Step 4
Ensuring the paper is being fed from the bottom of the roll, lower the roll into the space behind the printer.
|
|
|
Step 5 |
GettingStarted |
|
|
|
|
Put the leading end of the paper over the printer.
Step 6
Close the platen arm slowly until it locks steadily.
Locking platen
Complete
Close the printer cover, passing the leading end of the paper through the cutter slot.
TE-4000F/4500F User’s Manual |
13 E |
Getting Started
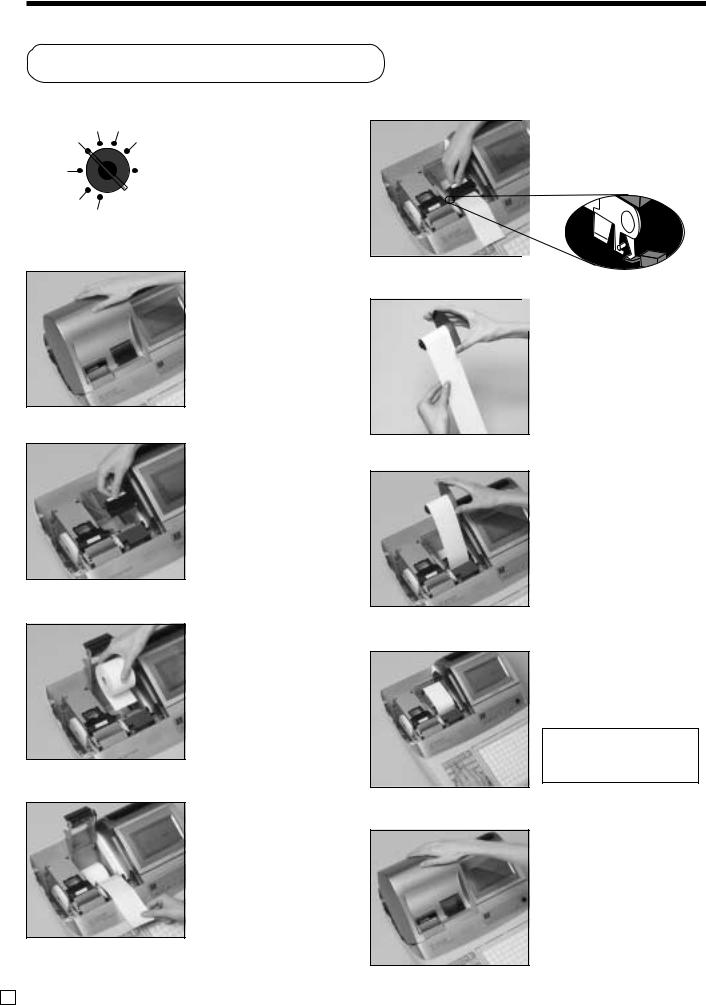
To install journal paper
REG2 |
X1 |
Step 1 |
||
REG1 |
|
Z1 |
||
|
|
|||
OFF |
|
|
X2/Z2 Turn the mode switch to |
|
|
|
|||
RF |
|
|
|
REG1 position. |
|
|
|
|
|
PGM
Step 2
Remove the printer cover.
(If the cover is locked, unlock by using the printer cover key before this step.)
Step 3
Open the platen arm.
Step 4
Ensuring the paper is being fed from the bottom of the roll, lower the roll into the space behind the printer.
Step 5
Put the leading end of the paper over the printer.
Step 6
Close the platen arm slowly until it locks steadily.
Locking platen
Step 7
Slide the leading end of the paper into the groove on the spindle of the take-up reel and wind it onto the reel two or three turns.
Step 8
Place the take-up reel into place behind the printer, above the roll paper.
Step 9
Press the jkey to take up any slack in the paper.
During machine installation, press the j key after power on.
Complete
Close the printer cover.
E 14
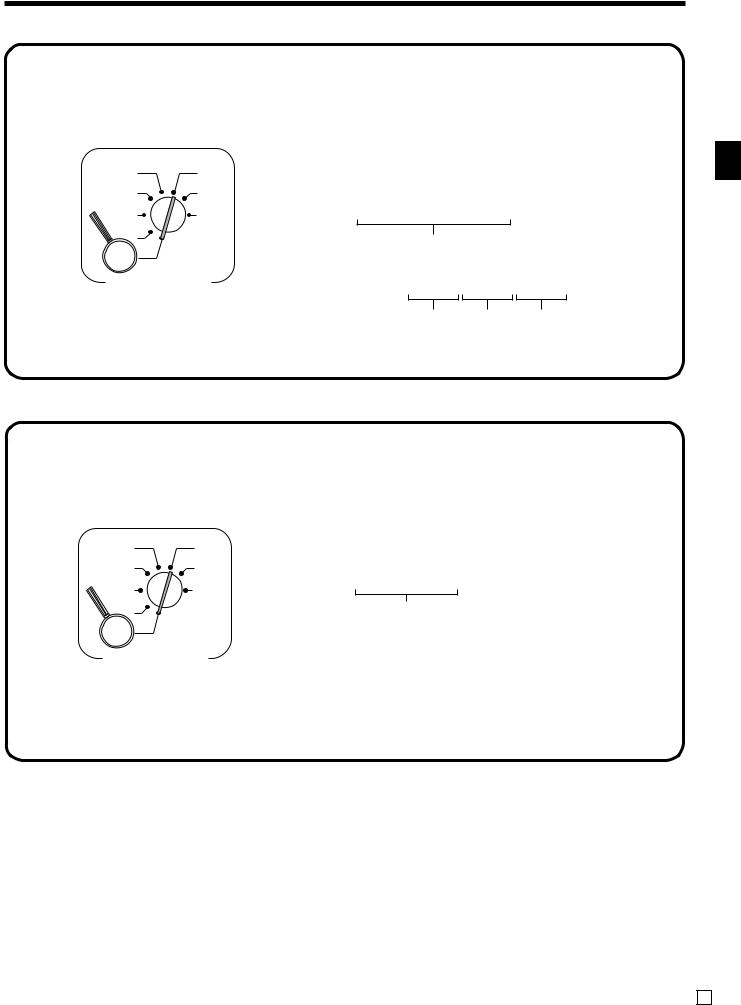
9. Set the date.
REG2 |
X1 |
|
|
x |
|
|
REG1 |
Z1 |
6 1s6 ::::::6 |
6 C |
|||
or |
||||||
OFF |
X2/Z2 |
|||||
|
|
|
|
|
||
RF |
|
Current date |
|
X |
|
|
PGM |
|
Example: |
|
|
|
|
|
|
|
|
|
||
Mode Switch |
April 3, 2004 2 040403 |
|
||||
|
|
Year Month |
Day |
|
||
10. Set the time.
REG2 |
X1 |
|
x |
|
REG1 |
Z1 |
|
||
6 |
1s6 ::::6 or 6 C |
|||
OFF |
X2/Z2 |
|||
|
Current time X |
|||
RF |
|
|
||
PGM |
|
Example: |
||
Mode Switch |
|
08:20 AM 2 0820 |
||
|
|
|
09:45 PM 2 2145 |
|
|
|
|
(24-hour military time) |
|
Getting Started
TE-4000F/4500F User’s Manual |
15 E |
Introducing TE-4000F/4500F
General guide
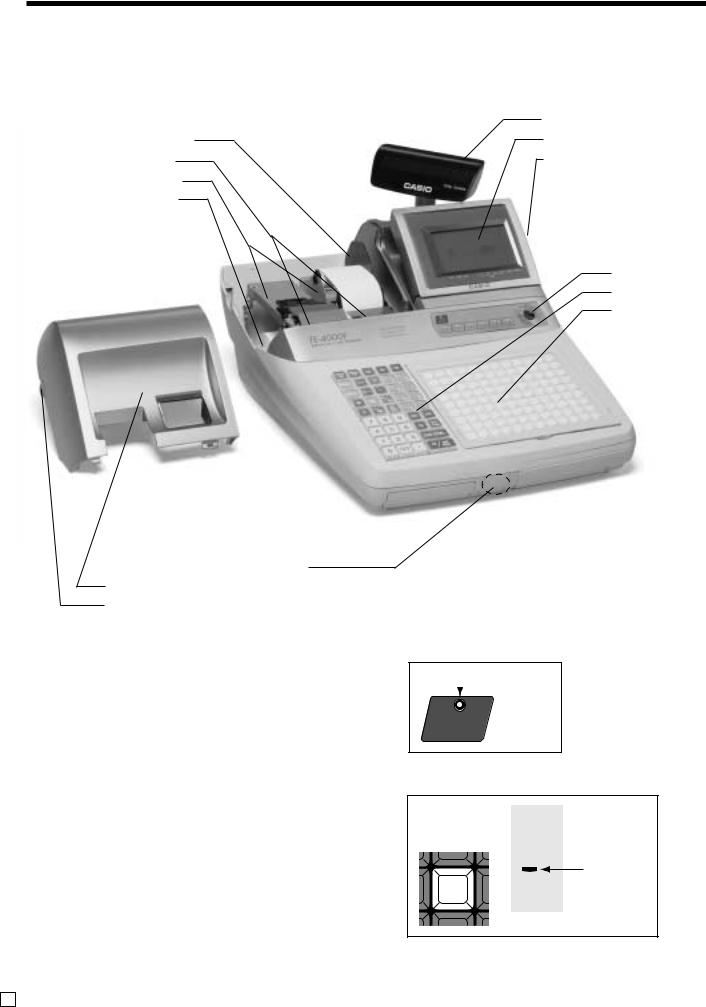
This part of the manual introduces you to the cash register and provides a general explanation of its various parts.
|
Pop-up display |
Take-up reel |
Main display |
Printer |
Contrast control knob |
Platen arm |
|
Roll paper |
|
Mode switch
Keyboard Menu sheet holder
TE-4000F
Dallas key receiver (option)
Printer cover
Printer cover key
Roll paper
You can use the roll paper to print receipts and a journal (pages 12 ~ 14).
Receipt on/off switch / key
Use the receipt on/off switch/key in REG1, REG2 and RF modes to control issuance of receipts. In other modes, receipts or reports are printed regardless the receipt switch/key setting.
A post-finalization receipt can still be issued after finalization when the switch/key is set to off. The cash register can also be programmed to issue a post-finali- zation receipt even when the switch/key is set to on.
Receipt on/off switch
 Indicator
RECEIPT
ON/OFF
Receipt on/off key
8
Indicator
RECEIPT |
RCT |
ON/OFF |
|
When the register issues receipts, this indicator is lit.
E 16
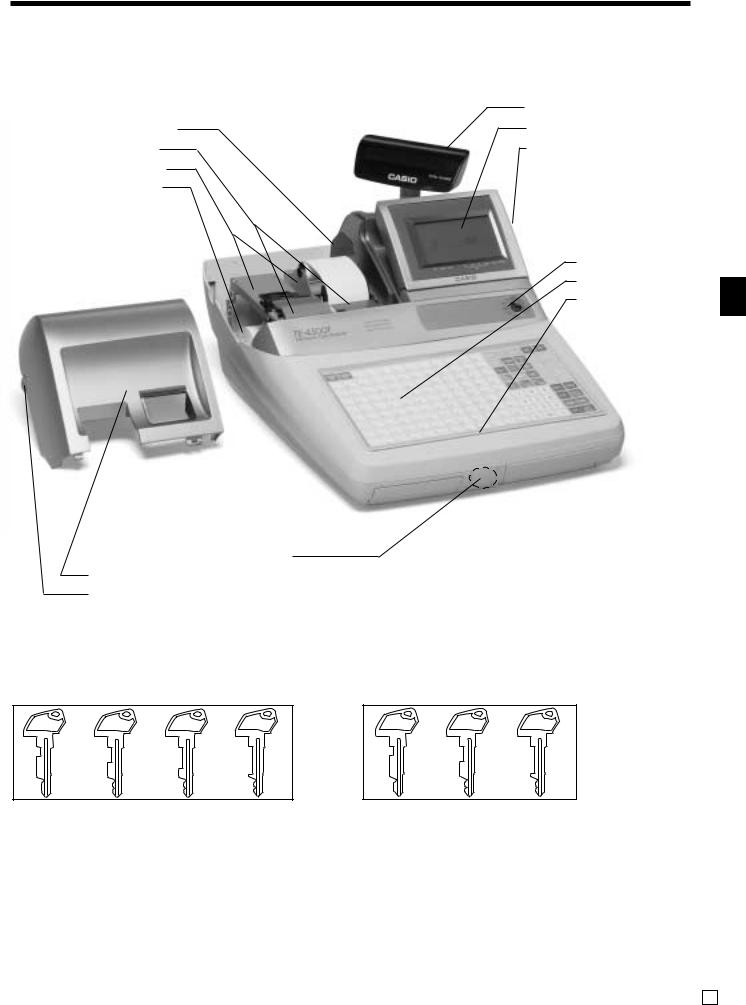
Take-up reel
Printer
Platen arm
Roll paper
Dallas key receiver (option)
Printer cover
Printer cover key
Mode key (for U.K., U.S. and Canada)
The following four types of mode keys are provided with the unit in the United Kingdom, the United States and Canada.
Pop-up display
Main display
Contrast control knob
Mode switch
Keyboard
Wetproof cover
|
TE-4000F/4500F |
TE-4500F |
Introducing |
|
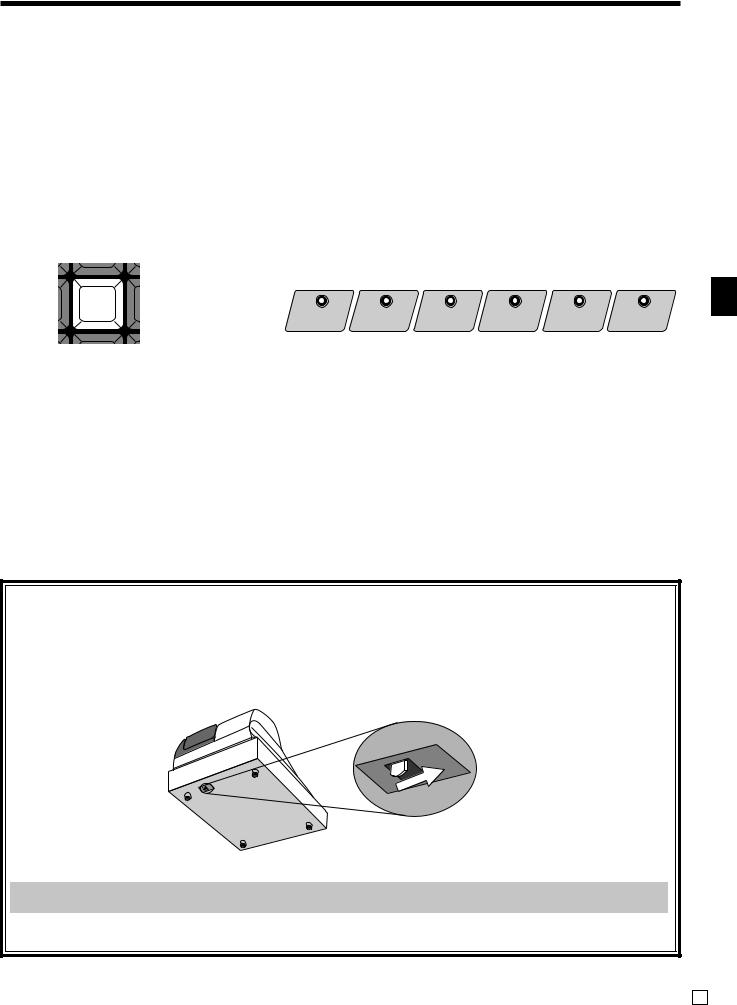
Mode key (for other area)
The following three types of mode keys are provided with the unit in areas outside of the United Kingdom, the United States and Canada.
OP |
M |
OW |
PGM |
OP |
M |
OW |
a.OP (Operator) key
Switches between OFF and REG1.
b.M (Master) key
Switches between OFF, REG1, REG2, X1 and RF.
c.OW (Owner) key
Switches between OFF, REG1, REG2, X1, Z1, X2/ Z2 and RF.
d.PGM (Program) key Switches to any position.
a.OP (Operator) key
Switches between OFF and REG1.
b.M (Master) key
Switches between OFF, REG1, REG2, X1 and RF.
c.OW (Owner) key Switches to any position.
TE-4000F/4500F User’s Manual |
17 E |

Introducing TE-4000F/4500F
Mode switch
Use the mode keys to change the position of the mode |
REG2 |
X1 |
|||||||||
switch and select the mode you want to use. |
REG1 |
|
|
|
Z1 |
||||||
|
|
|
|
|
|
||||||
|
|
|
OFF |
|
|
|
|
|
|
X2/Z2 |
|
|
|
|
|
|
|
|
|
|
|||
|
|
|
RF |
|
|
|
|
|
|||
|
|
|
|
|
PGM |
|
|
|
|
|
|
|
|
|
|
|
|
|
|
|
|
|
|
Mode |
Mode name |
|
Description |
|
|
|
|
|
|||
switch |
|
|
|
|
|
|
|||||
|
|
|
|
|
|
|
|
|
|
||
OFF |
Stand-by |
Any of the mode control keys can be inserted and removed from the mode switch in this |
|||||||||
position. |
|
|
|
|
|
|
|
|
|||
|
|
|
|
|
|
|
|
|
|
||
|
|
|
|||||||||
REG1 |
Register 1 |
Used for normal sales transactions. Any of the mode control keys can be inserted and |
|||||||||
removed from the mode switch in this position. |
|
|
|
|
|
||||||
|
|
|
|
|
|
|
|||||
|
|
|
|||||||||
|
|
Used for special operations. Since switching to REG2 requires a special key, such |
|||||||||
REG2 |
Register 2 |
functions as discounts, credit sales, charge sales, check payments, and paid outs can be |
|||||||||
|
|
controlled by programming them as prohibited in REG1 and allowed in REG2. |
|||||||||
|
|
|
|||||||||
RF |
Refund |
Used for processing refunds. When the mode switch of the register is in RF position, you |
|||||||||
Reg minus |
can access either the refund mode or the register minus mode. |
||||||||||
|
|||||||||||
|
|
|
|||||||||
X1 |
Daily sales read |
Used to obtain daily reports without resetting (clearing) all total data. |
|||||||||
|
|
|
|||||||||
Z1 |
Daily sales reset |
Used to obtain daily reports while resetting (clearing) all total data. |
|||||||||
|
|
|
|||||||||
X2/Z2 |
Periodic sale read/ |
Used to obtain periodic sales reports without resetting total data or while resetting all |
|||||||||
reset |
total data. |
|
|
|
|
|
|
|
|
||
|
|
|
|
|
|
|
|
|
|||
|
|
|
|||||||||
PGM |
Program |
Used when programming functions and preset data such as unit prices and tax rates. Also |
|||||||||
used when reading program data. |
|
|
|
|
|
|
|
|
|||
|
|
|
|
|
|
|
|
|
|
||
|
|
|
|
|
|
|
|
|
|
|
|
E 18
Clerk key/button/lock
On models available in the United States, Canada and Germany, clerk or cashier assignment can be performed using clerk secret numbers only (clerk buttons are not equipped).
In other areas, you can assign clerks or cashiers by using clerk button or by clerk secret number. The method you are assigning clerk depends on the programming of your cash register.
Clerk secret number key |
Clerk button |
When the cash register is programmed to use clerk |
You can assign the clerk or cashier using the six but- |
secret numbers for clerk or cashier assignment, the |
tons located below the display panel. |
clerk buttons are not functional. |
|
CLK#
CLK1 CLK2 CLK3 CLK4 CLK5 CLK6
Drawer
The drawer opens automatically whenever you finalize a registration and whenever you issue a read or reset report.
Drawer lock (for medium size drawer) |
Drawer open key (for large size drawer) |
Use the drawer key to lock and unlock the drawer. |
Use the drawer open key to open the drawer. |
When the cash drawer does not open! (for medium size drawer only)
In case of power failure or the machine is in malfunction, the cash drawer does not open automatically. Even in these cases, you can open the cash drawer by pulling drawer release lever (see below).
Important!
The drawer will not open, if it is locked with a drawer lock key.
Introducing TE-4000F/4500F
TE-4000F/4500F User’s Manual |
19 E |

Introducing TE-4000F/4500F
Display
Display panel
Main display
|
|
|
|
|
|
|
|
|
|
|
4 ST |
$27.83 |
|
|
|||||
|
Langue-de-chat |
|
|||||||
|
|
RPT |
|
|
|
AMOUNT |
|
|
|
|
|
|
|
|
"70 |
|
|||
|
|
|
|
|
|
|
|
|
|
|
RCT 2ND@ 3RD@ |
T1 T2 T3 T4/FS TOTAL CHANGE |
|||||||
|
|
|
|
|
|
|
|
||
|
|
|
|
|
|
TAX |
|||
Customer display
5&78
TOTAL CHANGE
Contrast control knob
light
|
RPT |
|
|
|
|
|
|
|
|
AMOUNT |
|
RCT |
2ND@ 3RD@ |
|
|
|
|
|
|
|
|
|
|
|
T1 |
T2 |
T3 |
T4/FS |
|
|
|
|
TOTAL CHANGE |
||
|
|
|
|
|
|
dark
Tilt the LCD |
Backlight color control switch |
|
RPT |
|
|
|
|
|
|
|
|
|
|
|
|
|
|
AMOUNT |
|
|
|
|
|
|
|
|
|
RCT |
2ND@ 3RD@ |
|
|
|
|
|
|
|
|
|
|
|
|
|
|
|
|
|
|
|
|
|
|
|
|
|
T1 |
T2 |
T3 |
|
|
|
|
|
|
|
|
|
|
|
T4/FS |
TOTAL |
|
|
|
|
|
|
|
||
|
|
|
|
|
CHANGE |
|
|
|
|
|
|
|
|
|
|
|
|
|
|
RPT |
|
|
|
|
|
|
|
|
|
|
|
|
|
|
AMOUNT |
|
|
|
|
|
|
|
|
|
RCT |
2ND@ 3RD@ |
|
|
|
|
|
|
|
|
|
|
|
|
|
|
|
|
|
|
|
|
|
|
|
|
|
T1 |
T2 |
T3 |
|
|
|
|
|
|
|
|
|
|
|
T4/FS |
TOTAL |
|
||
|
|
|
|
|
|
|
|
|
|
|
CHANGE |
|
1 2 3
Backside of the
display panel
1.pastel green
2.pastel pink
3.white
as default
E 20
Display example
Item registration
34
|
|
|
|
|
|
|
1Amount/Quantity |
|
|
|
|
|
|
|
|
|
|
|
|
|
|
||
|
|
4 ST |
$27.83 |
||||
|
|
|
This part of the display shows monetary amounts. It |
||||
|
Langue-de-chat |
|
also can be used to show the current time. |
||||
|
|
|
|||||
|
RPT |
|
|
|
AMOUNT |
|
2Item descriptor |
|
|
|
|
|
|
When you register a department/PLU/scanning |
|||
|
|
|
|
|
|
"70 |
||
|
|
|
|
|
|
PLU, the item descriptor appears here. |
||
RCT |
2ND@ |
3RD@ |
T1 |
T2 |
T3 |
T4/FS |
TOTAL CHANGE |
3Item counter |
|
|
|
|
|
TAX |
|
|
|
|
|
|
|
|
|
|
Number of item sold is displayed. |
|
|
|
2 |
|
|
|
|
1 |
|
|
|
|
|
|
|
|
||
Repeat registration
6 ST |
$43.75 |
|||
Langue-de-chat |
||||
|
RPT |
|
|
AMOUNT |
3 |
|
|
"54 |
|
|
|
|
|
|
|
|
|
|
|
|
|
|
|
|
|
2ND@ 3RD@ |
|
|
T1 |
|
T2 |
T3 T4/FS TOTAL CHANGE |
|||||
|
|
|
|||||||||||
|
|
|
|
|
|
|
|
|
|
|
|
|
|
|
|
|
|
|
|
|
|
|
|
TAX |
|
|
|
|
|
|
|
|
|
|
|
|
|
|
|
|
|
5 |
6 |
|
|
|
|
7 |
|
|
|
||||
Totalize operation
4Subtotal amount
Current subtotal amount (add-on tax excluded) is displayed.
5Number of repeats
Anytime you perform a repeat registration (pages 34, 39), the number of repeats appears here.
Note that only one digit is displayed for the number of repeats. This means that a “5” could mean 5, 15 or even 25 repeats.
62nd, 3rd menu indicator
When you press BPRICE to designate the 2nd/3rd unit
SHIFT
price, the corresponding number is displayed.
7Taxable sales status indicators
When you register a taxable item, the corresponding
|
8 9 |
|
|
|
|
indicator is lit. |
|
|
|
|
|
|
|
||
CASH |
|
|
$50.00 |
8Amount tendered key descriptor/amount |
|||
|
|
9Change descriptor/amount |
|||||
CHANGE |
|
|
|
|
|||
|
|
|
|
|
|
||
|
RPT |
|
|
AMOUNT |
0Total/Change indicators |
||
|
|
|
|
|
$71 |
When the TOTAL indicator is lit, the displayed |
|
|
|
|
|
|
value is monetary total or subtotal amount. When |
||
RCT |
2ND@ 3RD@ |
T1 |
T2 |
T3 |
T4/FS TOTAL CHANGE |
the CHANGE indicator is lit, the displayed value is |
|
the change due. |
|||||||
|
|
|
TAX |
|
|||
A |
|
|
|
|
9 0 |
ARCT indicator |
|
|
|
|
|
|
|
||
|
RECEIPT |
|
|
|
|
When the register issues receipts, this indicator is lit. |
|
|
ON/OFF |
|
|
|
|
|
|
Introducing TE-4000F/4500F
TE-4000F/4500F User’s Manual |
21 E |
Introducing TE-4000F/4500F
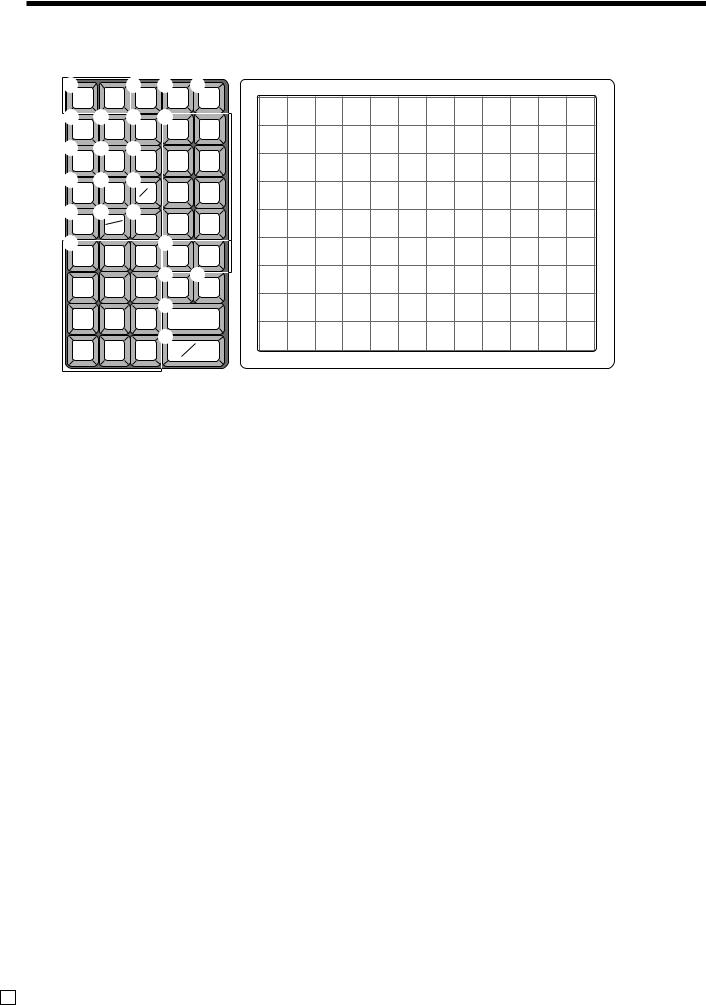
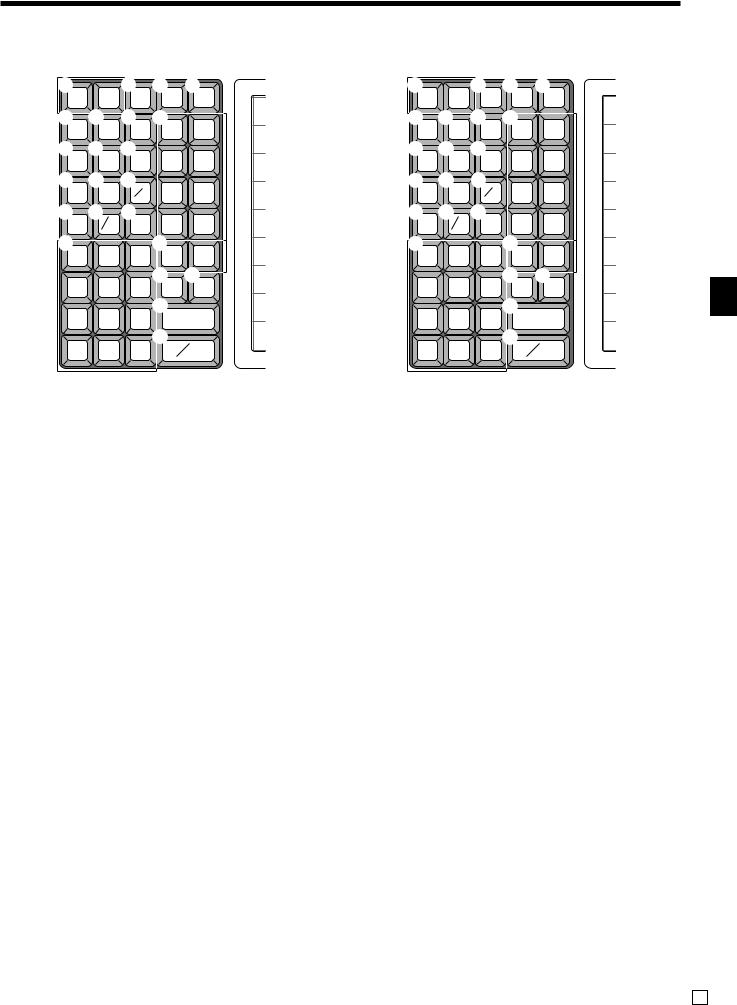
Keyboard (TE-4000F)
1 |
JOURNAL |
8 K L |
S |
|
|
|
|
|
|
|
|
|
|
|
|||
RECEIPT |
CLK# |
RC |
PD |
|
|
|
|
|
|
|
|
|
|
|
|||
FEED |
FEED |
|
|
|
|
|
|
|
|
|
|
|
|
||||
|
|
|
|
|
|
|
|
|
|
|
|
|
|
|
|||
2 0 A M |
|
9 |
18 |
27 |
36 |
45 |
54 |
63 |
72 |
81 |
90 |
99 |
108 |
||||
RECEIPT |
%– |
– |
4 |
8 |
|
|
|
|
|
|
|
|
|
|
|
|
|
3 D E |
|
|
8 |
17 |
26 |
35 |
44 |
53 |
62 |
71 |
80 |
89 |
98 |
107 |
|||
RECEIPT |
T/S1 |
T/S2 |
3 |
7 |
|
|
|
|
|
|
|
|
|
|
|
|
|
ON/OFF |
|
|
7 |
16 |
25 |
34 |
43 |
52 |
61 |
70 |
79 |
88 |
97 |
106 |
|||
5 F G |
|
|
|||||||||||||||
|
|
|
|
|
|
|
|
|
|
|
|
|
|
||||
RF |
CE |
# |
2 |
6 |
|
|
|
|
|
|
|
|
|
|
|
|
|
NS |
6 |
15 |
24 |
33 |
42 |
51 |
60 |
69 |
78 |
87 |
96 |
105 |
|||||
6 HX/FOR |
JERR. |
|
|
||||||||||||||
|
|
|
|
|
|
|
|
|
|
|
|
|
|
||||
C |
DATE |
CORR |
1 |
5 |
5 |
14 |
23 |
32 |
41 |
50 |
59 |
68 |
77 |
86 |
95 |
104 |
|
CANCEL |
|||||||||||||||||
7 |
TIME |
N |
|
||||||||||||||
|
|
|
|
|
|
|
|
|
|
|
|
|
|
|
|||
7 |
8 |
9 |
CR1 |
CR2 |
4 |
13 |
22 |
31 |
40 |
49 |
58 |
67 |
76 |
85 |
94 |
103 |
|
4 |
5 |
6 |
O P |
|
|
|
|
|
|
|
|
|
|
|
|
||
CH |
CHK/ |
3 |
12 |
21 |
30 |
39 |
48 |
57 |
66 |
75 |
84 |
93 |
102 |
||||
TEND |
|||||||||||||||||
1 |
2 |
3 |
Q |
|
2 |
11 |
20 |
29 |
38 |
47 |
56 |
65 |
74 |
83 |
92 |
101 |
|
SUBTOTAL |
|||||||||||||||||
0 |
00 |
• |
R |
|
1 |
10 |
19 |
28 |
37 |
46 |
55 |
64 |
73 |
82 |
91 |
100 |
|
CA |
AMT |
||||||||||||||||
|
|
|
|
|
|
|
|
|
|
|
|
||||||
|
TEND |
|
|
|
|
|
|
|
|
|
|
|
|
||||
for the U.S.
• Register Mode
1Paper feed key f, j
Hold this key down to feed paper from the printer.
2Post receipt key ;
Use this key to produce a post-finalization receipt.
3Receipt on/off key Q
Use this key twice to change the status “receipt issue” or “no receipt.” In case of “receipt issue”, the indicator is lit.
4Open key O
Use this key to temporarily release a limitation on the number of digits that can be input for a unit price.
5 Refund key R
BLoan key l
This key is used to input the amount of money provided for making change. This operation affects media totals, rather than sales totals. Loans are made for all types of money which can be specified by the finalize key.
CPick up key L
When the amount in drawer exceeds the limit value (sentinel function), the manager performs a pick up operation. This key is used for this function. This operation affects media totals, rather than sales totals. Pick ups are made for all types of money which can be specified by the finalize key.
D Tax status shift 1 key t
Use this key to input refund amounts and void certain entries.
6 Clear key C
Use this key to change the Taxable 1 status of the next item.
E Tax status shift 2 key T
Use this key to clear an entry that has not yet been registered.
7Ten key pad 0, 1~ 9, -, ^
Use these keys to input numbers.
8Clerk number key o
Use this key to sign clerk on and off the register.
9VAT key V
Use this key to print a VAT breakdown.
0Discount key p
Use this key to register discounts.
AMinus key m
Use this key to input values for subtraction.
Use this key to change the Taxable 2 status of the next item.
FCurrency exchange E
Use this key to convert foreign currency to local currency or vice versa using the exchange rate preset for the key and displays the result.
Use this key for conversions of a home currency subtotal or merchandise subtotal to equivalent of another country's currency.
Use this key for conversions of another country's currency to the equivalent of the home currency.
E 22
1 |
|
9 K L |
S |
1 |
|
9 K L |
S |
||||
RECEIPT JOURNAL |
CLK# |
RC |
PD |
RECEIPT JOURNAL |
VAT |
RC |
PD |
||||
FEED |
FEED |
|
FEED |
FEED |
|
||||||
|
|
|
|
|
|
|
|
||||
2 B C M |
|
|
2 B C M |
|
|
||||||
RECEIPT |
LOAN |
PICK |
4 |
8 |
|
RECEIPT |
LOAN |
PICK |
4 |
8 |
|
UP |
|
UP |
|
||||||||
|
|
|
|
|
|
||||||
3 0 A |
|
|
|
4 0 A |
|
|
|
||||
RECEIPT |
%– |
– |
3 |
7 |
|
OPEN |
%– |
– |
3 |
7 |
|
ON/OFF |
|
|
|
|
|
|
|
||||
5 F G |
|
|
|
5 F G |
|
|
|
||||
RF |
CE |
# |
2 |
6 |
|
RF |
CE |
# |
2 |
6 |
|
NS |
|
NS |
|
||||||||
|
|
|
|
|
|
||||||
6 IX |
JERR. |
1 |
5 |
|
6 IX |
JERR. |
1 |
5 |
|
||
C |
DATE |
CORR |
|
C |
DATE |
CORR |
|
||||
|
TIME |
CANCEL |
|
|
|
|
TIME |
CANCEL |
|
|
|
7 |
8 |
9 |
N |
|
|
7 |
8 |
9 |
N |
|
|
7 |
CR1 |
CR2 |
|
7 |
CR1 |
CR2 |
|
||||
4 |
5 |
6 |
O P |
|
4 |
5 |
6 |
O P |
|
||
CH |
CHK/ |
|
CH |
CHK/ |
|
||||||
TEND |
|
TEND |
|
||||||||
1 |
2 |
3 |
Q |
|
|
1 |
2 |
3 |
Q |
|
|
SUBTOTAL |
|
SUBTOTAL |
|
||||||||
0 |
00 |
• |
R |
|
|
0 |
00 |
• |
R |
|
|
CA |
AMT |
|
CA |
AMT |
|
||||||
|
TEND |
|
|
TEND |
|
||||||
for German |
|
|
|
for other area |
|
|
|||||
G Non-add/No sale key N |
|
|
M Department keys !, ", #~ % |
||||||||
Non-add key: To print reference number (to identify a personal check, credit card, etc.) during a transaction, use this key after some numerical entries.
No sale key: Use this key to open the drawer without registering anything.
HMultiplication/For/Date/Time key x
Use this key to input a quantity for a multiplication operation and registration of split sales of packaged items. Between transactions, this key displays the current time and date.
IMultiplication/Date/Time key X
Use this key to input a quantity for a multiplication operation. Between transactions, this key displays the current time and date.
JError correction/Cancellation key e
Use this key to correct registration errors and to cancel registration of entire transactions.
K Received on account key r
Use these keys to register items to departments.
NCredit key c, d
Use this key to register a credit sale.
OCharge key h
Use this key to register a charge sale.
PCheck key k
Use this key to register a check tender.
QSubtotal key s
Use this key to display and print the current subtotal (includes add-on tax) amount.
RCash/Amount tendered key a
Use this key to register a cash tender.
SFlat PLU key (, )~ /
Use these keys to register items to flat PLUs.
Use this key following a numeric entry to register money received for non-sale transactions.
LPaid out key P
Use this key following a numeric entry to register money paid out from the drawer.
Except for the U.S. and Canada, use this key to convert the main currency to the sub currency (the euro/the local money), when registering a subtotal amount. This key is also used for specifying sub currency while entering an amount of payment or declaration in drawers.
Introducing TE-4000F/4500F
TE-4000F/4500F User’s Manual |
23 E |
Introducing TE-4000F/4500F
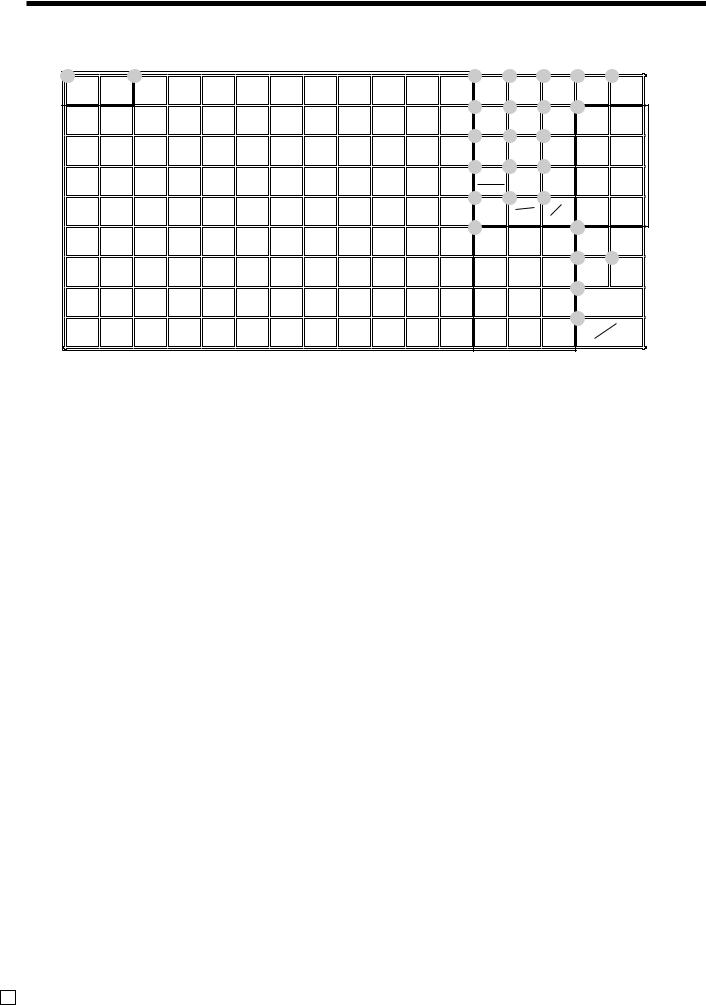
Keyboard (TE-4500F)
1 |
2 |
|
|
|
|
|
|
|
|
|
3 |
|
4 |
5 |
L |
M |
|||||
RECEIPT |
JOURNAL |
|
|
|
|
|
|
|
|
|
|
RECEIPT |
CE |
|
CLK# |
RC |
|
PD |
|||
FEED |
FEED |
|
|
|
|
|
|
|
|
|
|
|
|
||||||||
25 |
34 |
43 |
52 |
61 |
70 |
79 |
88 |
97 |
1066 |
|
7 |
8 |
N |
|
|
||||||
|
|
|
|
|
|||||||||||||||||
|
|
|
|
|
|
|
|
|
|
|
|
RECEIPT |
LOAN |
PICK |
|
|
4 |
8 |
|||
|
|
|
|
|
|
|
|
|
|
|
|
ON/OFF |
|
|
UP |
|
|
||||
8 |
16 |
24 |
33 |
42 |
51 |
60 |
69 |
78 |
87 |
96 |
1059 |
|
0 |
A |
|
|
|
|
|||
|
|
|
|
|
|
|
|
|
|
|
|
|
%– |
|
— |
|
RF |
|
|
3 |
7 |
7 |
15 |
23 |
32 |
41 |
50 |
59 |
68 |
77 |
86 |
95 |
104BERR. C |
D |
|
|
|||||||
|
|
|
|
||||||||||||||||||
|
|
|
|
|
|
|
|
|
|
|
|
CORR |
|
T/S1 |
|
T/S2 |
|
|
2 |
6 |
|
6 |
14 |
22 |
31 |
40 |
49 |
58 |
67 |
76 |
85 |
94 |
103 |
CANCEL |
|
|
|
|
|
||||
|
|
|
|
|
|
|
|
|
|
|
G |
HX/FOR J# |
|
|
|
|
|||||
|
|
|
|
|
|
|
|
|
|
|
|
|
C |
|
DATE |
NS |
|
|
1 |
5 |
|
5 |
13 |
21 |
30 |
39 |
48 |
57 |
66 |
75 |
84 |
93 |
102 |
|
|
TIME |
O |
||||||
|
|
|
|
|
|
|
|
|
|
|
K |
|
|
|
|
|
|||||
4 |
12 |
20 |
29 |
38 |
47 |
56 |
65 |
74 |
83 |
92 |
101 |
|
7 |
|
8 |
|
9 |
|
CR1 |
CR2 |
|
|
|
|
Q |
P |
|||||||||||||||||
|
|
|
|
|
|
||||||||||||||||
|
|
|
|
|
|
|
|
|
|
|
|
|
4 |
|
5 |
|
6 |
||||
|
|
|
|
|
|
|
|
|
|
|
|
|
|
|
|
CHK/ |
CH |
||||
3 |
11 |
19 |
28 |
37 |
46 |
55 |
64 |
73 |
82 |
91 |
100 |
|
|
|
|
TEND |
|||||
|
|
|
|
|
|||||||||||||||||
|
|
|
|
|
|
|
|
|
|
|
|
|
1 |
|
2 |
|
3 |
R |
|
|
|
2 |
10 |
18 |
27 |
36 |
45 |
54 |
63 |
72 |
81 |
90 |
99 |
|
|
|
|
SUBTOTAL |
|||||
|
|
|
S |
|
|
||||||||||||||||
|
|
|
|
|
|
|
|
|
|
|
|
|
|
|
|
|
|
|
|
||
|
|
|
|
|
|
|
|
|
|
|
|
|
0 |
|
00 |
|
• |
|
CA |
|
AMT |
1 |
9 |
17 |
26 |
35 |
44 |
53 |
62 |
71 |
80 |
89 |
98 |
|
|
|
|
|
|
TEND |
|||
• Register Mode
1Paper feed key f, j
Hold this key down to feed paper from the printer.
2Flat PLU key (, )~ .
Use these keys to register items to flat PLUs.
3Post receipt key ;
Press this key to produce a post-finalization receipt.
4Currency exchange E
Use this key to convert foreign currency to local currency or vice versa using the exchange rate preset for the key and displays the result.
Use this key for conversions of a home currency subtotal or merchandise subtotal to equivalent of another country's currency.
Use this key for conversions of another country's currency to the equivalent of the home currency.
5Clerk number key o
Use this key to sign clerk on and off the register.
6Receipt on/off key Q
Use this key twice to change the status “receipt issue” or “no receipt.” In case of “receipt issue”, the indicator is lit.
7Loan key l
This key is used to input the amount of money provided for making change. This operation affects media totals, rather than sales totals. Loans are made for all types of money which can be specified by the finalize key.
for the U.S./Canada
8Pick up key L
When the amount in drawer exceeds the limit value (sentinel function), the manager performs a pick up operation. This key is used for this function. This operation affects media totals, rather than sales totals. Pick ups are made for all types of money which can be specified by the finalize key.
9Discount key p
Use this key to register discounts.
0Minus key m
Use this key to input values for subtraction.
ARefund key R
Use this key to input refund amounts and void certain entries.
BError correction/Cancellation key e
Use this key to correct registration errors and to cancel registration of entire transactions.
CTax status shift 1 key t
Use this key to change the Taxable 1 status of the next item.
DTax status shift 2 key T
Use this key to change the Taxable 2 status of the next item.
EOpen key O
Use this key to temporarily release a limitation on the number of digits that can be input for a unit price.
FVAT key V
Use this key to print a VAT breakdown.
E 24
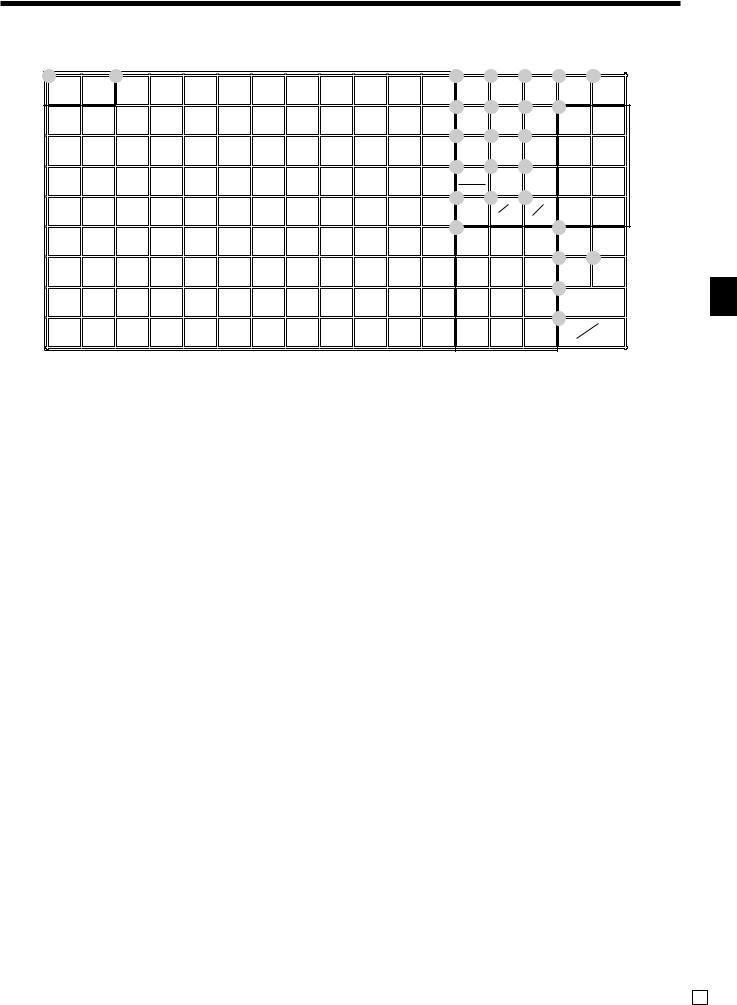
1 |
2 |
|
|
|
|
|
|
|
|
|
3 |
4 |
5 |
L |
M |
|||||
RECEIPT |
JOURNAL |
|
|
|
|
|
|
|
|
|
|
RECEIPT |
CE |
|
CLK# |
RC |
|
PD |
||
FEED |
FEED |
|
|
|
|
|
|
|
|
|
|
|
|
|||||||
25 |
34 |
43 |
52 |
61 |
70 |
79 |
88 |
97 |
1066 |
7 |
8 |
N |
|
|
||||||
|
|
|
|
|||||||||||||||||
|
|
|
|
|
|
|
|
|
|
|
|
RECEIPT |
LOAN |
PICK |
|
|
4 |
8 |
||
|
|
|
|
|
|
|
|
|
|
|
|
ON/OFF |
|
|
UP |
|
|
|||
8 |
16 |
24 |
33 |
42 |
51 |
60 |
69 |
78 |
87 |
96 |
1059 |
0 |
A |
|
|
|
|
|||
|
|
|
|
|
|
|
|
|
|
|
|
%– |
|
— |
|
RF |
|
|
3 |
7 |
7 |
15 |
23 |
32 |
41 |
50 |
59 |
68 |
77 |
86 |
95 |
104BERR. E |
F |
|
|
||||||
|
|
|
|
|||||||||||||||||
|
|
|
|
|
|
|
|
|
|
|
|
CORR |
|
OPEN |
VAT |
|
|
2 |
6 |
|
6 |
14 |
22 |
31 |
40 |
49 |
58 |
67 |
76 |
85 |
94 |
103 |
CANCEL |
|
J# |
|
|
||||
|
|
|
|
|
|
|
|
|
|
|
G |
IX |
|
|
|
|
||||
|
|
|
|
|
|
|
|
|
|
|
|
C |
|
DATE |
NS |
|
|
1 |
5 |
|
5 |
13 |
21 |
30 |
39 |
48 |
57 |
66 |
75 |
84 |
93 |
102 |
|
TIME |
O |
||||||
|
|
|
|
|
|
|
|
|
|
|
K |
|
|
|
|
|||||
4 |
12 |
20 |
29 |
38 |
47 |
56 |
65 |
74 |
83 |
92 |
101 |
7 |
|
8 |
|
9 |
|
CR1 |
CR2 |
|
|
|
P |
Q |
|||||||||||||||||
|
|
|
|
|
||||||||||||||||
|
|
|
|
|
|
|
|
|
|
|
|
4 |
|
5 |
|
6 |
||||
|
|
|
|
|
|
|
|
|
|
|
|
|
|
|
CH |
|
CHK/ |
|||
3 |
11 |
19 |
28 |
37 |
46 |
55 |
64 |
73 |
82 |
91 |
100 |
|
|
|
|
TEND |
||||
|
|
R |
|
|||||||||||||||||
|
|
|
|
|
|
|
|
|
|
|
|
1 |
|
2 |
|
3 |
|
|
||
2 |
10 |
18 |
27 |
36 |
45 |
54 |
63 |
72 |
81 |
90 |
99 |
|
|
|
SUBTOTAL |
|||||
|
|
S |
|
|
||||||||||||||||
|
|
|
|
|
|
|
|
|
|
|
|
|
|
|
|
|
|
|
||
|
|
|
|
|
|
|
|
|
|
|
|
0 |
|
00 |
|
• |
|
CA |
|
AMT |
1 |
9 |
17 |
26 |
35 |
44 |
53 |
62 |
71 |
80 |
89 |
98 |
|
|
|
|
|
TEND |
|||
for U.K.
GClear key C
Use this key to clear an entry that has not yet been registered.
HMultiplication/For/Date/Time key x
Use this key to input a quantity for a multiplication operation and registration of split sales of packaged items. Between transactions, this key displays the current time and date.
IMultiplication/Date/Time key X
Use this key to input a quantity for a multiplication operation. Between transactions, this key displays the current time and date.
JNon-add/No sale key N
Non-add key: To print reference number (to identify a personal check, credit card, etc.) during a transaction, use this key after some numerical entries.
No sale key: Use this key to open the drawer without registering anything.
KTen key pad 0, 1~ 9, -, ^
Use these keys to input numbers.
L Received on account key r
NDepartment keys !, ", #~ %
Use these keys to register items to departments.
OCredit key c, d
Use this key to register a credit sale.
PCharge key h
Use this key to register a charge sale.
QCheck key k
Use this key to register a check tender.
RSubtotal key s
Use this key to display and print the current subtotal (includes add-on tax) amount.
SCash/Amount tendered key a
Use this key to register a cash tender.
Use this key following a numeric entry to register money received for non-sale transactions.
MPaid out key P
Use this key following a numeric entry to register money paid out from the drawer.
Except for the U.S. and Canada, use this key to convert the main currency to the sub currency (the euro/the local money), when registering a subtotal amount. This key is also used for specifying sub currency while entering an amount of payment or declaration in drawers.
Introducing TE-4000F/4500F
TE-4000F/4500F User’s Manual |
25 E |

Introducing TE-4000F/4500F
Allocatable functions
You can tailor a keyboard to suit your particular type of business.
Add check
Use this key in a check tracking system to combine the details of more than one check into a single check.
Arrangement
Use this key to activate an arrangement program programmed in the arrangement file. Any operation that can be performed from the keyboard, as well as mode, can be programmed in an arrangement program, and can be performed merely by pressing this key. In addition, one numeric entry can be included in an arrangement program. In this case, input the number and press this key.
The mode control function of this key can be programmed for all modes except for the OFF and PGM mode.
Bill copy
Use this key to issue bill copy.
Bottle return
Use this key to specify next item as bottle return.
Cancel
Invalidates all preceding data registered for departments, PLUs and set menus within a transaction. This key must be pressed before the transaction involving the data to be invalidated is finalized. It is also effective even after calculation of subtotal amount.
Check endorsement
Use this key to print a preset check endorsement message using the slip printer.
Check print
Use this key to print the check on the slip printer.
Clerk transfer
Use this key to transfer opened checks to another clerk.
Clock-in/-out
Use this key to register the time when the employees start/ finish their job.
Coupon
Use this key for registering coupons.
Coupon 2
Use this key to declare the next item registration as coupon.
Cube
This key provides the same functions as the Square key. In addition, this key also has a cube multiplication function.
Customer number
Use this key to register the number of customers.
Declaration
Use this key to declare in drawer amount for money declaration.
Deposit
Use this key to register deposits.
Eat-in
Use this key to specify if the customer eats in the restaurant. Before closing a transaction press this key.
EBT (electronic benefit transfer)
Use this key to register an EBT amount with a tender amount input.
Food stamp shift
Use this key to change food stamp status.
Food stamp subtotal
Use this key to obtain the food stamp applicable amount.
Food stamp tender
Use this key to register a food stamp payment amount with a tender amount input.
Ketten Bon
Use this key to enter quantities for multiplication. Multiplication by this key issues singular order prints.
Manual tax
Use this key to register a tax amount.
Media change
Use this key to change media in drawer amount. Pressing this key enters media change operation.
Menu shift
Use this key to shift key to the 1st ~ 6th menu.
Merchandise subtotal
Use this key to obtain subtotal excluding the add-on tax amount and the previous balance.
New balance
Use this key for adding the latest registered total amount to the previous balance to obtain a new balance.
New check
Use this key in a check tracking system to input a new check number in order to open a new check under that number.
New/Old check
Use this key in a check tracking system to input check numbers in order to open new checks and to reopen existing checks. When the clerk inputs a check number, the register checks to see if that number already exists in the check tracking memory. If there is no matching number in the memory, a new check is opened under the input number. If the check number input matches a number already stored in the memory, that check is reopened for further registration or finalization.
No sale
Use this key to open the drawer between transaction.
Non add
Use this key to print reference numbers (personal check number, card number, etc.)
Normal receipt
Use this key to change the order status from Bon to normal.
OBR (Optical barcode reader)
Use this key to input optical barcodes manually.
Old check
Use this key in a check tracking system to input the number of an existing check (previously created by the New check key) whose details are stored in the check tracking memory. Existing checks are reopened to perform further registration or to finalize them.
One touch NLU
Use this key to register scanning PLU directly from the keyboard. There is one One touch NLU key for one scanning PLU, and multiple one touch NLU keys can be set on the keyboard.
Open 2
Use this key to suspend the compulsory specifications.
E 26

Open check
Use this key to issue an open check report of an assigned clerk.
Operator number
Use this key to enter a clerk number during clerk transfer.
Operator X/Z
Use this key to issue a clerk’s individual X/Z report.
Plus
Use this key for registering surcharge.
Premium
Use this key to apply a preset % or manual input % to obtain the premium amount for the last registered item or subtotal.
Previous balance
Use this key to register the previous negative/positive balance at the beginning of or during a transaction.
Previous balance subtotal
Use this key to obtain subtotal excluding the add-on tax amount and current balance.
Price
Use this key to register an open PLU.
Price change
Use this key to change scanning PLU unit price temporarily.
Price inquiry
Use this key to confirm the price and descriptors of PLU without registering.
Price shift
Use this key to shift a PLU item/flat-PLU key to the 1st ~ 2nd unit price, a scanning PLU to the 1st ~ 3rd unit price.
Rate tax
Use this key to activate the preset tax rate or manually input rate to obtain the tax for the preceding taxable status 1 amount.
Recall
Use this key for recalling the transferred check number by the store key. When this key is pressed, the check number will appear in order of the oldest record.
Red price
Use this key to register a new (discounted) price of an item.
Review
Use this key to examine the current transaction by displaying item descriptor and registered amount. This key is also used for void operation or separate check operation.
Scale
Use this key to read the weight of the item and shows it on the display. This key is also used to input the weight manually.
Separate check
Use this key in a check tracking system to separate selected items from one check to another check.
Slip feed/release
Use this key to feed slips inserted into the slip printer. This is done by specifying the number of feed lines. This key is also used to release the slip paper holder if numbers are not entered.
Slip back feed/release
Use this key to back feed slips inserted into the slip printer. This is done by specifying the number of feed lines. This key is also used to release the slip paper holder if numbers are not entered.
Slip print
Use this key to execute a slip batch printing on the slip printer. Pressing this key prints the sales details. Actual printing is performed following receipt issuance.
Square
This key provides the same functions as the Multiplication key. In addition, this key also has a square multiplication function.
Stock inquiry
Use this key to check the current stock quantity for a PLU without registering.
Store
Use this key for storing the check number of the registered items. When this key is pressed, registered item data will be stored, and then these data will transfer to the youngest check number.
Table number
Use this key to input table numbers.
Table transfer
Use this key to transfer the contents of a check to another check.
Takeout
Use this key to specify if the customer takes out items. Before total a transaction. Press this key for the tax exemption.
Tare
Use this key to input tare weight.
Tax exempt
Use this key to change taxable amounts to nontaxable amounts.
Taxable amount subtotal
Use this key to obtain taxable amount subtotal.
Text print
Use this key to enter characters to print.
Text recall
Use this key to print preset characters.
Tip
Use this key to register tips.
Tray total
Use this key to display the total amount for all registrations from the last registration until this key is pressed or registrations between presses of this key.
Unit weight
Use this key to input the unit weight of a scalable item.
Validation
Use this key to validate transaction amounts on slip.
Void
Use this key to invalidate preceding item data registered.
Introducing TE-4000F/4500F
TE-4000F/4500F User’s Manual |
27 E |
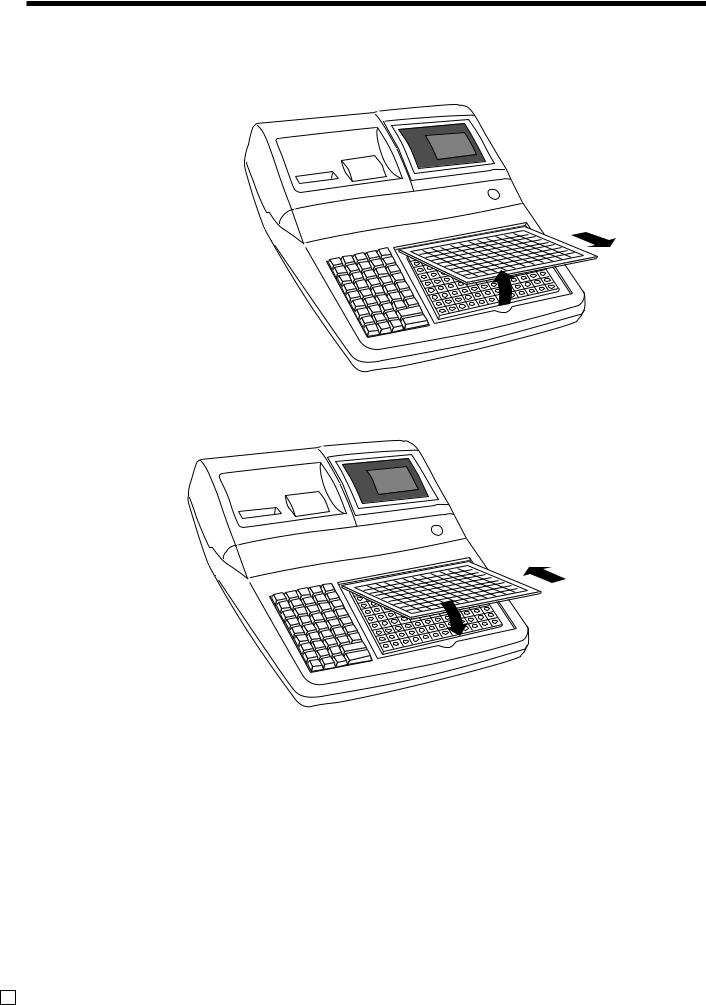
Introducing TE-4000F/4500F
How to remove/replace the sheet holder (TE-4000F only)
Remove the sheet holder
Follow steps 1 ~ 2.
2
1
Replace the sheet holder
Follow steps 3 ~ 4.
3
4
E 28

How to install a menu sheet in the sheet holder (TE-4000F only)
Open the sheet holder
Follow the steps 1 ~ 3.
1
1
1 |
P |
|
U |
UP
2
3
Set a menu sheet in the sheet holder
Follow the steps 4 ~ 6.
4
Back |
5 |
|
|
|
|
|
|
|
|
|
|
|
|
|
|
|
|
|
|
|
|
|
side |
|
|
|
|
|
|
|
|
|
|
|
|
|
|
|
|
|
|
|
|
|
|
UP |
|
|
|
|
|
|
|
|
|
|
|
|
|
|
|
|
|
|
|
|
|
|
|
|
|
|
|
|
|
|
|
|
|
|
|
|
|
|
|
|
|
|
|
|
1 |
|
UP |
|
|
|
|
|
|
|
|
|
|
|
|
|
|
|
|
|
|
|
|
|
UP |
|
|
|
|
|
|
|
|
|
|
|
|
|
|
|
|
|
|
|
|
|
|
|
UP |
|
|
|
|
|
|
|
|
|
|
|
|
|
|
|
|
|
|
|
|
|
|
side |
|
|
|
|
|
|
|
|
|
|
|
|
|
|
|
|
|
|
|
|
|
|
Back |
|
|
|
|
|
|
|
|
|
|
|
|
|
|
|
|
|
|
|
|
|
|
6 |
|
|
|
|
|
|
|
|
|
|
|
|
108 |
|
|
|
|
|
|
|
|
|
|
|
|
|
|
|
|
|
|
|
|
|
99 |
|
|
|
|
|
|
|
||
|
|
|
|
|
|
|
|
|
|
|
|
81 |
90 |
|
|
|
|
|
|
|
|
|
|
|
|
|
|
|
|
|
|
|
|
|
98 |
107 |
|
|
|
|
|
|
|||
|
|
|
|
|
|
|
|
|
|
|
|
72 |
|
|
|
|
|
|
|
|
||
|
|
|
|
|
|
|
|
|
|
|
54 |
63 |
89 |
|
|
|
|
|
|
|
|
|
|
|
|
|
|
|
|
|
|
|
45 |
80 |
|
|
|
106 |
|
|
|
|
|
||
|
|
|
|
|
|
|
|
36 |
|
|
|
71 |
88 |
97 |
|
|
|
|
|
|
|
|
|
|
|
|
|
27 |
|
|
|
|
|
53 |
62 |
|
|
|
|
5 |
|
|
|
|
|
|
9 |
|
18 |
|
|
|
35 |
44 |
70 |
|
|
96 |
10 |
|
|
|
|
|||||
|
|
|
|
|
26 |
|
|
61 |
87 |
|
|
|
|
|
|
|
|
|||||
|
|
|
|
17 |
|
|
|
|
|
52 |
78 |
|
|
|
|
|
4 |
|
|
|
||
|
|
8 |
|
|
|
|
34 |
43 |
69 |
|
|
|
95 |
10 |
|
|
|
|||||
|
|
|
|
|
|
|
|
|
|
86 |
|
|
|
|
|
|||||||
|
|
|
|
|
|
|
25 |
|
|
|
60 |
|
|
|
|
|
|
|
|
|||
|
|
|
|
|
16 |
|
|
|
42 |
51 |
77 |
|
|
|
|
|
103 |
|
|
|||
|
|
|
7 |
|
|
|
|
|
|
|
68 |
|
85 |
94 |
|
|
|
|
||||
|
|
|
|
|
|
|
|
24 |
33 |
59 |
76 |
|
|
|
|
2 |
|
|
||||
|
|
|
|
6 |
15 |
|
|
|
|
41 |
|
|
|
|
93 |
10 |
|
|
||||
|
|
|
|
|
|
|
|
|
|
67 |
|
|
84 |
|
|
1 |
||||||
|
|
|
|
|
|
|
|
|
23 |
32 |
58 |
75 |
|
|
|
|
1 |
|||||
|
|
|
|
|
5 |
14 |
|
|
|
40 |
|
|
|
|
|
10 |
||||||
|
|
|
|
|
|
|
|
|
|
31 |
66 |
|
|
|
83 |
92 |
|
|
||||
|
|
|
|
|
|
|
|
|
|
22 |
57 |
|
74 |
|
|
|
100 |
|
||||
|
|
|
|
|
|
|
|
|
|
|
48 |
|
|
|
|
|
91 |
|
||||
|
|
|
|
|
4 |
|
|
13 |
|
|
0 |
39 |
65 |
|
|
|
|
|
|
|
|
|
|
|
|
|
|
|
|
|
|
|
|
|
|
|
|
|
|
|
|
|
|
||
Introducing TE-4000F/4500F
TE-4000F/4500F User’s Manual |
29 E |
Basic Operations and Setups
How to read the printouts
•The journal and receipts are records of all transactions and operations.
•The contents printed on receipts and journal are almost identical.
•You can choose the journal skip function.
If the journal skip function is selected, the cash register will print the total amount of each transaction, and the details of premium, discount and reduction operations only, without printing department and PLU item registrations on the journal.
•The following items can be skipped on receipts and journal.
•Consecutive number
•Taxable status
•Taxable amount
•Item counter
Receipt Sample |
Journal Sample |
Journal Sample |
|
(Item lines Included) |
(Item lines Skipped) |
||
|
************************ |
|
|
|
|
|
|||||
|
* THANK YOU * |
|
|
— |
Logo message |
|
|
|
||
** |
|
CALL AGAIN |
|
** |
|
|
|
|||
|
|
|
|
1 DEPT01 |
T1 |
•1.00 |
||||
************************ |
|
|
||||||||
|
|
1 DEPT02 |
T1 |
•2.00 |
||||||
|
|
|
|
|
|
|
||||
* |
COMMERCIAL MESSAGE |
* |
|
|
5 DEPT03 |
|
•5.00 |
|||
|
|
|
7 No |
|
||||||
* |
COMMERCIAL MESSAGE |
* |
— |
Commercial message |
|
|
||||
TA1 |
|
•3.00 |
||||||||
* |
COMMERCIAL MESSAGE |
* |
|
|||||||
|
|
TX1 |
|
•0.15 |
||||||
* |
COMMERCIAL MESSAGE |
* |
|
|
|
|||||
|
|
TL |
|
•8.15 |
||||||
|
|
|
|
|
|
|
|
|||
REG 03-06-2000(SAT) 11:58 |
— |
Mode/Date/Time |
CASH |
|
•10.00 |
|||||
CG |
|
•1.85 |
||||||||
C01 |
|
MC#01 |
000123— |
Clerk/Machine No. |
|
|||||
|
REG 03-06-2000(SAT) 11:59 |
|||||||||
|
|
|
|
|
|
Consecutive No. |
||||
1 DEPT01 |
T1 |
•1.00— |
Q’ty/Item |
C01 |
MC#01 |
000124 |
||||
1 DEPT01 |
T1 |
•1.00 |
||||||||
1 DEPT02 |
T1 |
•2.00 |
|
|
||||||
|
|
1 DEPT12 |
T1 |
•1.00 |
||||||
5 DEPT03 |
|
•5.00 |
|
|
||||||
|
|
|
5 DEPT03 |
|
•6.00 |
|||||
|
|
7 No |
|
|
— |
Item counter |
|
|||
|
|
|
|
|
7 No |
|
||||
TA1 |
|
•3.00 |
|
|
|
|
||||
|
|
|
TA1 |
|
•2.00 |
|||||
TX1 |
|
•0.15 |
|
|
|
|||||
|
|
|
TX1 |
|
•0.10 |
|||||
TL |
|
•8.15 |
|
|
|
|||||
|
|
|
TL |
|
•8.10 |
|||||
CASH |
|
•10.00 |
|
|
|
|||||
|
|
|
CASH |
|
•10.00 |
|||||
CG |
|
|
•1.85 |
|
|
|
||||
|
|
|
|
CG |
|
•1.90 |
||||
|
|
|
|
|
|
|
|
|||
***BOTTOM MESSAGE ***
***BOTTOM MESSAGE ***
*** |
BOTTOM MESSAGE |
*** |
— Bottom message |
*** |
BOTTOM MESSAGE |
*** |
|
1 |
DEPT02 |
T1 |
•2.00 |
5 |
DEPT03 |
|
•5.00 |
|
|
7 No |
|
|
TA1 |
|
•3.00 |
|
TX1 |
|
•0.15 |
|
TL |
|
•8.15 |
|
CASH |
|
•10.00 |
|
CG |
|
•1.85 |
REG 03-06-2000(SAT) 11:59 |
|||
C 01 |
MC#01 |
000124 |
|
1 |
DEPT01 |
T1 |
•1.00 |
1 |
DEPT12 |
T1 |
•1.00 |
5 |
DEPT03 |
|
•6.00 |
|
|
7 No |
|
|
TA1 |
|
•2.00 |
|
TX1 |
|
•0.10 |
|
TL |
|
•8.10 |
|
CASH |
|
•10.00 |
|
CG |
|
•1.90 |
|
|
|
|
In the operation examples contained in this manual, the print samples are what would be produced if the roll paper is being used for receipts. They are not actual size. Actual receipts are 58 mm wide. Also, all sample receipts and journals are printout images.
E 30
 Loading...