


 Loading...
Casio XJ-A145V, XJ-A255V, XJ-A140V, XJ-A150V, XJ-A245V User Manual
...
E
DATA PROJECTOR
XJ-A130V/XJ-A135V* XJ-A140V/XJ-A145V* XJ-A150V/XJ-A155V* XJ-A230V/XJ-A235V* XJ-A240V/XJ-A245V* XJ-A250V/XJ-A255V*
* USB Port Models
User’s Guide
Be sure to read the precautions in the separate User’s Guide (Basic Operations). For details about setting up the projector, see the User’s Guide (Basic Operations).
Be sure to keep all user documentation handy for future reference.

DLP is a registered trademark of Texas Instruments of the United States.
Microsoft, Windows, and Windows Vista are registered trademarks or trademarks of Microsoft Corporation in the United States and other countries.
HDMI, the HDMI Logo and High-Definition Multimedia Interface are trademarks or registered trademarks of HDMI Licensing LLC.
XGA is a registered trademark of IBM Corporation of the United States.
Other company and product names may be registered product names or trademarks of their respective owners.
The contents of this User’s Guide are subject to change without notice.
Copying of this manual, either in part or its entirety is forbidden. You are allowed to use this manual for your own personal use. Any other use is forbidden without the permission of CASIO COMPUTER CO., LTD.
CASIO COMPUTER CO., LTD. shall not be held liable for any lost profits or claims from third parties arising out of the use of this product or this manual.
CASIO COMPUTER CO., LTD. shall not be held liable for any loss or lost profits due to loss of data due to malfunction or maintenance of this product, or any other reason.
The sample screens shown in this manual are for illustrative purposes only, and may not be exactly the same as the screens actually produced by the product.
2

Contents |
|
About this manual... ............................................................................... |
4 |
Projector Overview ......................................................... |
5 |
Projector Features and Main Functions ................................................. |
5 |
Remote Controller and Projector Keys................................................... |
7 |
Operation During Projection .......................................... |
9 |
Image Operations During Projection ...................................................... |
9 |
Adjusting Image Brightness......................................................................................... |
9 |
Selecting the Color Mode .......................................................................................... |
10 |
Zooming an Image ..................................................................................................... |
10 |
Momentarily Cutting Off the Input Source Image ...................................................... |
11 |
Freezing an Image...................................................................................................... |
11 |
Displaying a Pointer in the Projected Image.............................................................. |
12 |
Changing the aspect ratio of the projected image .................................................... |
13 |
Adjusting the Volume Level .................................................................. |
14 |
To adjust the volume level ......................................................................................... |
14 |
To mute the audio...................................................................................................... |
14 |
Eco Mode (Power Saving, Low Noise) ................................................. |
15 |
Changing the Eco Mode Setting................................................................................ |
15 |
Using the [FUNC] Key .......................................................................... |
16 |
Configuring Advanced Projector Settings.................. |
17 |
Basic Setup Menu Operations ............................................................. |
17 |
Displaying the Setup Menu........................................................................................ |
17 |
Configuring Setup Menu Settings.............................................................................. |
17 |
Basic Setup Menu Example....................................................................................... |
18 |
Direct Power On......................................................................................................... |
20 |
Password Protecting the Projector ...................................................... |
21 |
Inputting a Password ................................................................................................. |
21 |
Using the Password Feature...................................................................................... |
21 |
Entering the Password when Turning On the Projector ............................................ |
23 |
Restoring Projector Settings to Their Initial Factory Defaults .............. |
24 |
3

Setup Menu Contents .......................................................................... |
26 |
Image Adjustment 1 Main Menu................................................................................ |
26 |
Image Adjustment 2 Main Menu................................................................................ |
28 |
Volume Adjustment Main Menu................................................................................. |
28 |
Screen Settings Main Menu....................................................................................... |
29 |
Input Settings Main Menu.......................................................................................... |
31 |
Option Settings 1 Main Menu .................................................................................... |
32 |
Option Settings 2 Main Menu .................................................................................... |
33 |
USB Settings Main Menu (USB Port Models Only) ................................................... |
34 |
Wireless Main Menu (USB Port Models Only) ........................................................... |
34 |
Operational Info Main Menu ...................................................................................... |
35 |
Restore All Defaults Main Menu................................................................................. |
35 |
Cleaning the Projector.................................................. |
36 |
Cleaning the Projector Exterior ............................................................ |
36 |
Cleaning the Lens................................................................................. |
36 |
Cleaning Intake and Exhaust Vents...................................................... |
36 |
Error Indicators and Warning Messages .................... |
37 |
Appendix ........................................................................ |
40 |
Connecting to a Component Video Output Device.............................. |
40 |
Connecting the HDMI Output of a Video Device or Computer |
|
to the Projector..................................................................................... |
41 |
Remote Controller Signal Range.......................................................... |
42 |
Projection Distance and Screen Size ................................................... |
43 |
Aspect Ratio Setting and Projection Image ......................................... |
44 |
Supported Signals................................................................................ |
48 |
About this manual...
All of the operations in this manual are explained using the remote controller that comes with the projector.
4

Projector Overview
This section describes the features of the projector, and explains the functions of the projector and remote controller keys.
Projector Features and Main Functions
XJ-A130V/XJ-A135V/XJ-A140V/XJ-A145V/XJ-A150V/XJ-A155V/XJ-A230V/ XJ-A235V/XJ-A240V/XJ-A245V/XJ-A250V/XJ-A255V
A laser and LED hybrid light source provides high brightness of 2,000 to 3,000 lumens along with low power consumption and low heat generation.
Slim and compact:
A4 file size and approximately 43mm slim. Compact enough to install or use just about anywhere.
HDMI video/audio input:
HDMI (High Definition Multimedia Interface) input support enables direct connectivity with today’s HDMI enabled notebook PCs, high-definition video devices (BD, HD DVD, DVD players, etc.), games, and other image projection and audio output devices.
Connection requires a commercially available HDMI cable.
Wide projection range:
A wide angle 2X zoom allows projection even when projector-to-screen distance is severely limited. When using a projection size of 60 inches, projection can be performed from a distance of
1.4 meters (XJ-A230V/XJ-A235V/XJ-A240V/XJ-A245V/XJ-A250V/XJ-A255V) or
1.7 meters (XJ-A130V/XJ-A135V/XJ-A140V/XJ-A145V/XJ-A150V/XJ-A155V).
A selection of possible input sources:
Computer RGB, composite video, component video (Y·Cb·Cr/Y·Pb·Pr), and HDMI video/audio are all supported as input sources.
Pointer:
The remote controller can be used to select one of a variety of different pointers for use during projection.
Direct Power On:
The projector can be configured to turn on automatically and start projecting as soon as it is plugged into a power outlet.
XJ-A230V/XJ-A235V/XJ-A240V/XJ-A245V/XJ-A250V/XJ-A255V
WXGA Resolution:
The XJ-A230V/XJ-A235V/XJ-A240V/XJ-A245V/XJ-A250V/XJ-A255V models support WXGA (1280 × 800) resolution for optimal viewing of content formatted for today’s widescreen displays. This makes it perfect for projecting images from widescreen notebook PCs and HD video input sources.
5
XJ-A135V/XJ-A145V/XJ-A155V/XJ-A235V/XJ-A245V/XJ-A255V
Projection of Data from USB Memory or a Memory Card without a Computer:
USB memory or a memory card (using a commercially available USB card reader) can be connected directly to the projector’s USB port. The projector comes with special software for converting PowerPoint presentation data to a format that can be stored to USB memory or a memory card and projected without using a computer. Images and movies also can be projected directly from USB memory or a memory card.
Multi Projection Camera (YC-400, YC-430) Connection:
A CASIO Multi Projection Camera can be connected directly to the projector’s USB port for fine resolution projection of documents and other images. Document camera capabilities allow projection of data without going through a computer.
Graphic Scientific Function Calculator Connection:
Certain CASIO graphic scientific calculator models can be connected directly to the projector’s USB port for projection of the calculator screen contents.
Projection of Computer Screen Contents via Wireless LAN:
The projector comes with a wireless LAN adapter. After a wireless LAN connection is established, the contents of the computer screen can be sent to the projector for projection.
6
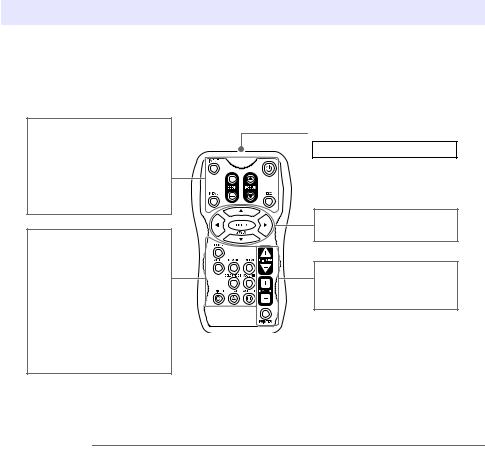
Remote Controller and Projector Keys
Operations in this manual are presented based on the remote controller that comes with the projector. Major operation keys are also provided on the projector unit, so the most of the same procedures can also be performed directly on the projector.
Remote Controller Keys
[INPUT] key [MENU] key
[ZOOM +] [ZOOM –] keys [FOCUS ] [FOCUS ] keys [P] (Power) key
[ESC] key
[FUNC] key [AUTO] key [BLANK] key [FREEZE] key
[COLOR MODE] key [VOLUME] key [BRIGHT] key ([O] key) [ECO] key ([f] key) [ASPECT] key ([Z] key)
Remote control signal emitter
CLASS 1 LED PRODUCT
Cursor keys (///) [ENTER] key ([STYLE] key)
[D-ZOOM +] [D-ZOOM –] keys [KEYSTONE +] [KEYSTONE –] keys [POINTER] key
The remote controller does not come with batteries loaded. You need to load the two supplied batteries before use.
 Important!
To avoid running down the batteries, store the remote control unit so its keys are not pressed inadvertently.
7
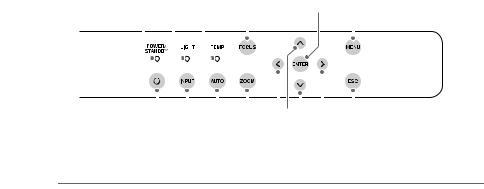
Projector Keys and Indicators
|
|
TEMP indicator |
[FOCUS] key |
||||||
LIGHT indicator |
|
|
|
[ENTER] key |
|||||
|
|
|
|
|
|
|
[MENU] key |
||
POWER/STANDBY indicator |
|
|
|
|
|
||||
|
|
|
|
|
|
|
|
|
|
|
|
|
|
|
|
|
|
|
|
|
|
|
|
|
|
|
|
|
|
|
|
|
|
|
|
|
|
|
|
|
|
|
|
|
|
|
|
|
|
[P] (Power) key |
|
|
|
|
|
|
[ESC] key |
||
|
|
|
|
|
|
||||
[INPUT] key |
|
|
|
Cursor keys (q/w/U/I) |
|||||
|
[AUTO] key |
[ZOOM] key |
|||||||
 Note
Note
Functions of projector keys and remote controller keys that have the same name are identical.
The projector [ZOOM] key corresponds to the remote controller [ZOOM +] and [ZOOM –] keys, while the projector [FOCUS] key corresponds to the remote controller [FOCUS ] and [FOCUS ] keys. For information about using these keys, see “Adjusting the Projected Image” in the separate “User’s Guide (Basic Operations)”.
8
Operation During Projection
This section explains the various types of operations you can perform while the projector is projecting an image.
Image Operations During Projection
You can perform the following operations while projecting an image.
Image brightness adjustment
Color mode selection
Image zooming
Momentary cut off of the input source image and projection of a black or blue screen, or a logo
Image freeze
Pointer display in the projected image
Aspect ratio switching
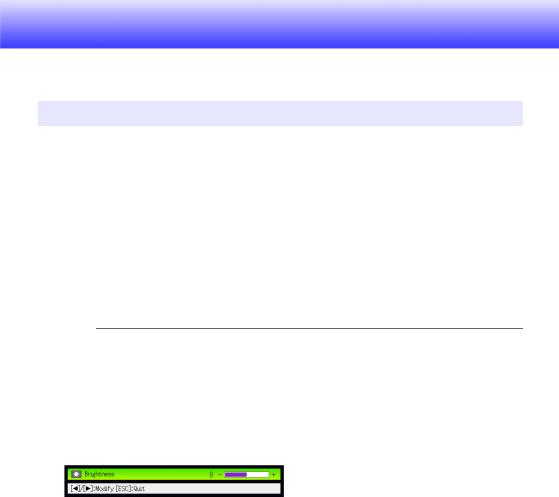
Adjusting Image Brightness
 Note
Note
(for USB port model users)
Use the setup menu (page 17) to adjust image brightness when the input source is an external device connected to the USB port or via the wireless adapter.
To adjust image brightness
1.
2.
Press the [BRIGHT] key.
This displays the brightness adjustment window.
Use the [] and [] keys to adjust image brightness.
3. To hide the window, press the [ESC] key.
9

Selecting the Color Mode
You can select from among various different color mode settings in accordance with image contents and projection conditions.
 Important!
The color mode cannot be selected while “Off” is selected for the Eco Mode (page 15).
To change the color mode
1. Press the [COLOR MODE] key.
This displays the color mode selection window. The currently selected color mode is the one whose button is selected (filled in).
2.Use the [] and [] keys to move the highlighting to the color mode you want to select, and then press the [ENTER] key.
This will select the button next to the highlighted color mode name.
For details on what each color mode does, see “Color Mode” under “Image Adjustment 1 Main Menu” on page 27.
3.To hide the window, press the [ESC] key.
Zooming an Image
1. Press the [D-ZOOM +] key.
This will enlarge the center of the projected image one step.
2.To zoom in on the center of the projected image more, press the [D-ZOOM +] key again. To zoom out, press the [D-ZOOM –] key.
Each press of [D-ZOOM +] zooms in (increases the zoom factor), while [D-ZOOM –] zooms out. Holding down either key continuously scrolls the zoom factor.
3.While an image is zoomed, use the [], [], [], and [] keys to scroll the view to other parts of the image.
4.To exit the zoom operation, press the [ESC] key.
10
Momentarily Cutting Off the Input Source Image
1. Press the [BLANK] key.
This temporarily cuts off the image from the input source and projects a black screen in its place.
2.To resume projection of the image from the input source, press the [BLANK] key (or [ESC] key).
 Note
Note
You can specify projection of a black screen or blue screen, or a logo. For details, see “Blank Screen” under “Screen Settings Main Menu” on page 30.
Freezing an Image
Pressing the [FREEZE] key freezes the projected image.
To freeze the projected image
1. While an image is being projected from an input source, press the [FREEZE] key.
This will capture the image that is on the screen at the moment you press [FREEZE] and stores it in projector memory. That image remains projected on the screen.
2.To restore projection of the image from an input source, press the [ESC] key.
11
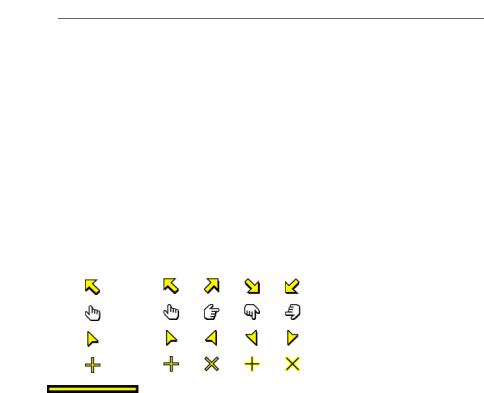
Displaying a Pointer in the Projected Image
You can select from among different pointer styles, including various arrow styles, for display in the projected image. Pointers can be used during a presentation to indicate or highlight a specific part of the image.
 Note
Note
Depending on the pointer style you are using, the pointer may not display properly when you are using keystone correction. If this happens, use the [KEYSTONE +] and [KEYSTONE –] keys to change the keystone correction value to zero.
To display a pointer in the image
1. Press the [POINTER] key.
This will cause a pointer to appear in the image.
You also can use the setup menu to specify the pointer type that appears first when you press the [POINTER] key. For details, see “Pointer” under “Option Settings 2 Main Menu” on
page 33.
2.Use the cursor keys to move the pointer to the location you want.
Holding down a cursor key moves the cursor at high speed.
3.To modify the pointer as described below, press the [STYLE] key.
For this pointer type: |
Pressing [STYLE] will change it like this: |
||
|
|
|
|
|
|
|
|
|
|
|
|
|
|
|
|
|
|
|
|
|
|
|
|
|
|
|
|
|
|
||
|
Toggle between flashing and not flashing |
||
|
|
|
|
To select the pointer type
1.
2.
Press the [POINTER] key to display the pointer.
Keep pressing the [POINTER] key until the pointer you want is displayed.
Each press of the [POINTER] key cycles through the available pointer types.
To clear the pointer from the image
Press the [ESC] key.
12

Changing the aspect ratio of the projected image
Press the [ASPECT] key to cycle through the aspect ratio settings for the projected image.
Available settings depend on your projector model as shown below. For details about the meaning of each setting, see the “Aspect Ratio” setting (page 29) on the “Screen Settings Main Menu”.
XJ-A230V/XJ-A235V/XJ-A240V/XJ-A245V/XJ-A250V/XJ-A255V
Pressing the [ASPECT] key will cycle through settings in accordance with the current input source as shown below.
Input Source |
Pressing [ASPECT] will cycle through these settings: |
VIDEO, Component, HDMI (DTV) |
Normal 16:9 Letter Box |
|
|
RGB, HDMI (PC) |
Normal Full True |
|
|
XJ-A130V/XJ-A135V/XJ-A140V/XJ-A145V/XJ-A150V/XJ-A155V
Pressing the [ASPECT] key will toggle between settings in accordance with the current input source as shown below.
Input Source |
Pressing [ASPECT] will toggle between these settings: |
VIDEO, Component, HDMI (DTV) |
Normal 16:9 |
|
|
RGB, HDMI (PC) |
Normal Full |
|
|
 Note
Note
When the input source is a component or an HDMI (DTV) signal with an aspect ratio of 16:9, the aspect ratio is fixed at 16:9. In this case, pressing the [ASPECT] key will not change the aspect ratio setting.
For details about how the aspect ratio setting affects the projected image, see “Aspect Ratio Setting and Projection Image” (page 44).
You also can change the aspect ratio setting using the setup menu. For details, see “Aspect Ratio” under “Screen Settings Main Menu” on page 29.
 Important!
Note that enlarging or reducing the size of an image using the [ASPECT] key for commercial purposes or public presentation may infringe on the legally protected copyright of the copyright holder of the original material.
13
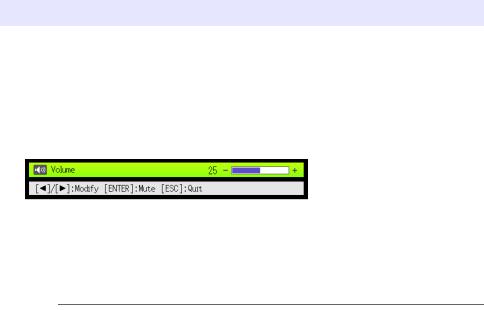
Adjusting the Volume Level
You can use the remote controller keys to adjust the volume level of the audio that is output from the projector’s speaker.
To adjust the volume level
1. Press the [VOLUME] key.
This causes the [Volume] screen to appear on the projected image.
2.Press the [] key to increase the volume, or the [] key to lower the volume.
3.After the setting is the way you want, press the [ESC] key.
This causes the [Volume] screen to disappear.
 Note
Note
You also can use the setup menu to adjust the volume level. For details, see “Volume Adjustment Main Menu” on page 28.
To mute the audio
1.
2.
Press the [VOLUME] key.
Press the [ENTER] key.
This stops output from the speaker.
3. To restore the audio, press the [VOLUME] key again.
14

Eco Mode (Power Saving, Low Noise)
The following three Eco Mode settings are available to specify whether priority should be given to low-power, low-noise operation or light source unit brightness.
Save: Gives maximum priority to low-power, low-noise operation.
Eco |
: Provides low-power, low-noise operation while maintaining light source unit brightness to |
|
some level. |
Off |
: Gives maximum priority to light source unit brightness. |
Changing the Eco Mode Setting
1. Press the [ECO] key.
This displays the Eco Mode selection window. The currently selected Eco Mode is the one whose button is selected (filled in).
2.Use the [] and [] keys to move the highlighting to the Eco Mode you want to select, and then press the [ENTER] key.
This will select the button next to the highlighted Eco Mode name.
3.To hide the window, press the [ESC] key.
 Note
Note
(for USB port model users)
Use the setup menu (page 17) to select the Eco Mode when the input source is an external device connected to the USB port or via the wireless adapter.
15
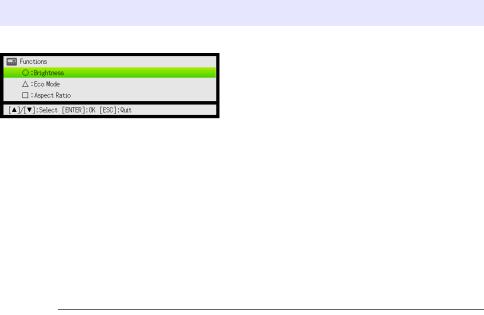
Using the [FUNC] Key
Pressing the [FUNC] key displays the menu shown below.
You can use this menu to perform the operations described below.
Adjust image brightness
Highlight “Brightness” and then press the [ENTER] key.
This performs the same operation as pressing the [BRIGHT] key (O key) described on page 9.
Turn the Eco Mode on or off
Highlight “Eco Mode” and then press the [ENTER] key.
This performs the same operation as pressing the [ECO] key (f key) described on page 15.
Select the aspect ratio of the projected image
Highlight “Aspect Ratio” and then press the [ENTER] key.
This performs the same operation as pressing the [ASPECT] key (Z key) described on page 13.
 Note
Note
(for USB port model users)
When the input source is an external device connected to the USB port or via the wireless adapter, use the [FUNC], [O], [f], and [Z] keys to control the connected device. For details, see the “USB Function Guide” and “Wireless Function Guide” on the bundled CD-ROM.
16
Loading...