


|
|
|
|
|
|
|
|
|
|
|
|
|
|
|
|
|
|
|
|
|
|
|
|
|
|
|
|
|
|
|
|
|
|
|
|
|
|
|
|
|
|
|
|
|
|
|
|
|
|
|
|
|
User Guide |
ENGLISH |
|
|
|
|
|
|
|
|
|
||
|
|
|
|
|
|
|
|
|
|
|
|
|
|
|
|
|
|
|
|
|
|
|
|
|
|
|
|
|
|
|
|
|
|
|
|
|
|
|
|
|
|
|
|
|
|
|
|
|
|
|
|
|
|
|
|
|
|
|
|
|
|
|
|
|
|
|
|
|
|
|
|
|
|
|
|
|
|
|
|
|
|
|
|
|
|
|
|
|
|
|
|
|
|
|
|
|
|
|
|
|
|
|
|
|
|
|
|
|
|
|
|
|
|
|
|
|
|
|
|
|
ГДТПН Гбопо Гпнрбгф Рипфп Ртйофет
printer, be sure to install the software and the (Canon Гпнрбгф Рипфп Printer Solution Disk). screen contents and procedures may differ slightly
DE.SPN
!
|
|
2006.05.01 |
CDI-M238-010 |
xxxxxxxx |
© 2006 CANON INC. PRINTED IN JAPAN |
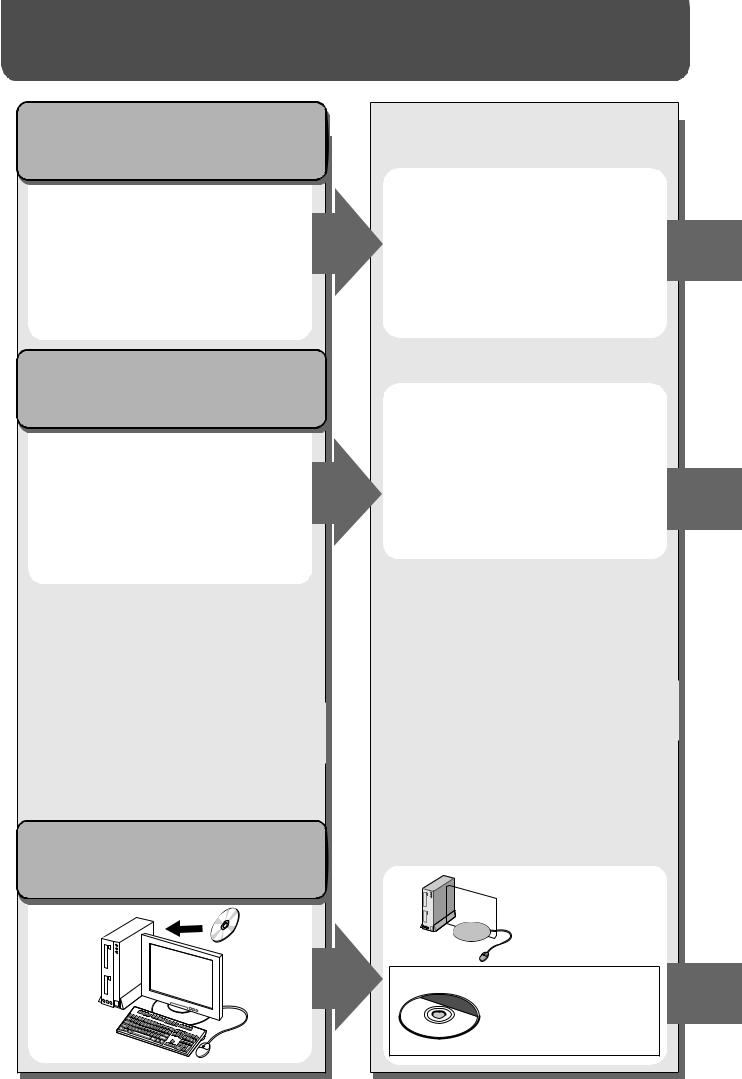
SELPHY ES1 Allows You to Do the Following
Print from a memory card |
and print |
Insert the memory card into the appropriate memory card slot.
Before you connect the printer to the computer, be sure to install the software following the procedure on page 52.
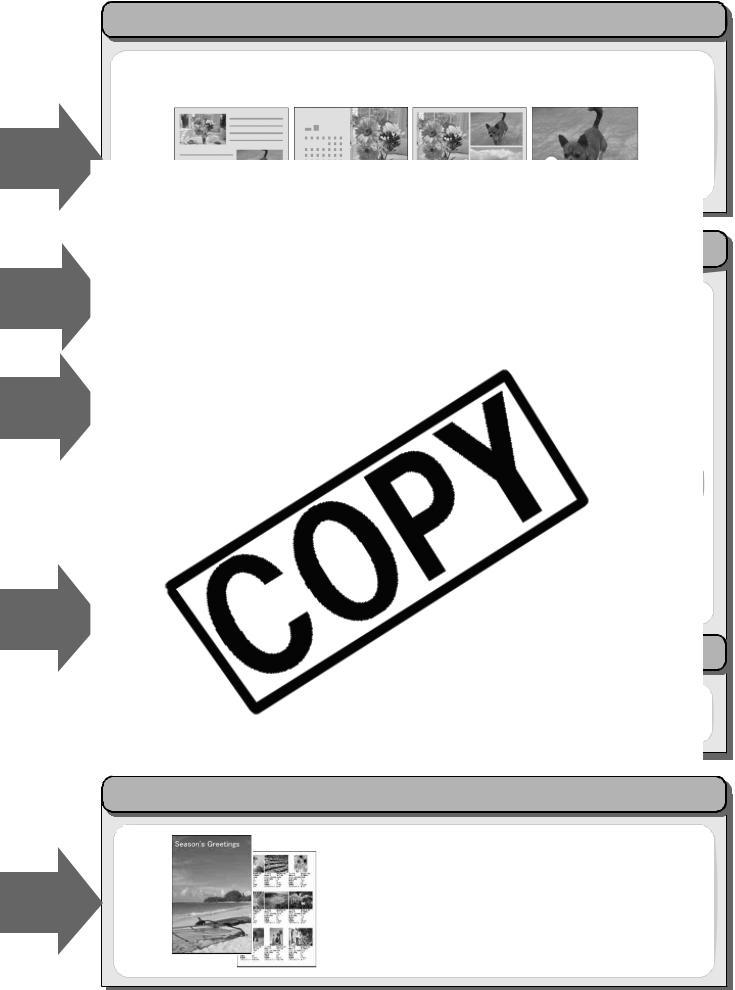
You can print in various designs and layouts
•You can use the Creative Print function to arrange the images in a more enjoyable way (only when printing from an inserted memory card).
You can easily print images saved on a computer
•You can use the software provided to correct and trim images.
1

Contents
SELPHY ES1 Allows You to Do the Following . . . . . . . . . . . . . . . . . . . . . . . . . . . . . . . . . 1 Quick Start . . . . . . . . . . . . . . . . . . . . . . . . . . . . . . . . . . . . . . . . . . . . . . . . . . . . . . . . . . . . . . 4 Before You Begin . . . . . . . . . . . . . . . . . . . . . . . . . . . . . . . . . . . . . . . . . . . . . . . . . . . . . . . . 7 About This Guide . . . . . . . . . . . . . . . . . . . . . . . . . . . . . . . 8
Safety Precautions . . . . . . . . . . . . . . . . . . . . . . . . . . . . . . . 9
Proper Usage and Handling . . . . . . . . . . . . . . . . . . . . . . . 13
16
16
17
19
19
19
20
22
22
23
24
25
26
27
27
28
29
31
32
32
34
35
36
37
38
Connecting to a Camera for Printing
Connecting to a Canon Camera for Printing . . . . . . . . 39 Connecting to a Non-Canon Digital Camera
for Printing . . . . . . . . . . . . . . . . . . . . . . . . . . . . . . . . . . . 41
Disconnect the camera . . . . . . . . . . . . . . . . . . . . . . . . . . . . 41
2

English
Wireless Printing
Infrared (IrDA) Wireless Printing . . . . . . . . . . . . . . . . . . 42 Printing via a Wireless LAN . . . . . . . . . . . . . . . . . . . . . . 43 Printing via Bluetooth . . . . . . . . . . . . . . . . . . . . . . . . . . 44
Before Use . . . . . . . . . . . . . . . . . . . . . . . . . . . . . . . . . . . . . 44 Setting Bluetooth . . . . . . . . . . . . . . . . . . . . . . . . . . . . . . . . 45 46
48
49
50
51
52
52
55
58
60
60
61
61
61
61
61
61
62
Battery Status . . . . . . . . . . . . . . . . . . . . . . . . . . . . . . . . . . . 63
Appendix
Handling of the Battery Pack (Sold Separately) . . . . . 64
Cleaning the Printer . . . . . . . . . . . . . . . . . . . . . . . . . . . . 66
Troubleshooting . . . . . . . . . . . . . . . . . . . . . . . . . . . . . . . 67
Error Messages. . . . . . . . . . . . . . . . . . . . . . . . . . . . . . . . 70
Specifications . . . . . . . . . . . . . . . . . . . . . . . . . . . . . . . . . 73
3

Quick Start
This section explains the procedures required to print with the trial cartridge (Postcard size (100 x 148 mm (4 x 6 in.)) paper) included with your printer from a memory card.
Things to Prepare
Printer (SELPHY ES1)
Ink and Paper Integrated Cartridge (Postcard size, 10 sheets)
Compact Power Adapter CA-ES100
Power Cord
When closed, make sure the cover lever is pushed all the way down.
The colored paper on the top side of the cartridge is the protective paper. Load the cartridge with this paper still attached.
4

Quick Start (Continued)
2 Connecting the Printer to a Power Source (p. 24)
1Insert the power cord into the compact power adapter and plug the other end into a power outlet.
2Connect the compact power adapter to the printer’s DC IN terminal.
About the Carrying Handle
When lifted vertically, the handle locks, making it convenient for carrying.
Before using the printer, press down lightly on the handle and rotate it towards the back of the printer.
5

4 Inserting the Memory Card* into the Printer (p. 27)
Insert the memory card all the way into the appropriate card slot.
zInsert the memory card with the top side up.
zAn image is displayed on the LCD monitor. If an image is not displayed, make sure that there are images on the memory card and that the memory card is fully inserted. Images cannot be displayed if a camera or wireless adapter is connected.
zPush the SD memory card, Memory Stick or their variants in until it clicks.
2 Press the SET or PRINT/STOP button, and check the setting on the LCD monitor.
zPress the  or
or  button to specify the number of prints.
3 Press the PRINT/STOP button.
zThe print receptacle cover opens automatically and printing starts. During printing, the printer’s power button blinks green.
zPress the PRINT/STOP button again to stop printing.
6

Before You Begin
Thank you for your purchase of the Canon Compact Photo Printer SELPHY ES1. This guide explains the printer’s general flow of operations, from camera print settings to printing and computer connection operations to printing.
Before using your printer for the first time, please read through the Safety Precautions (p. 9).
Warning against Copyright Infringement
Please
This while
For |
list |
This as
•
•
7

About This Guide
Symbols Used
: This mark denotes issues that may affect the printer’s operation.
: This mark denotes additional topics that complement the basic operating procedures.
power
Also, |
. |
z
z
z
z
z
z
8
Safety Precautions
zBefore using the printer, please ensure that you have read and understood the safety precautions described below. Always ensure that the printer is operated correctly.
zThe safety precautions noted on the following pages are intended to instruct you in the safe and correct operation of the printer to prevent injuries or damage to yourself and other persons.
Devices: Printer, Compact power adapter Battery: Battery pack (sold separately)
|
|
Do |
- |
the
to
z
zIf .
zIf
z
z
cord
z
z
Continued use of the equipment may result in fire or electric shock.
9

Power
zDo not exceed the cable and power outlet ratings when operating this product. Do not operate this product outside of the specified voltage rating. Check that the voltage of the outlet is compatible with the equipment before plugging it in.
zIf the power cord becomes damaged (if internal wiring is exposed, etc.), immediately unplug it from the power outlet.
zBe sure that the power cord is plugged all the way in. |
|
zDo not damage, modify, or rest heavy objects on the power cord. |
|
z |
|
z |
that |
z |
|
|
|
z |
|
Heat
z |
this |
Heat
|
|
z |
|
z |
|
z |
|
z |
the |
z |
|
Use |
|
or |
|
leaks |
|
flush |
|
|
|
z |
the |
battery charger while it is charging. |
|
Heat will build up and could result in a fire. |
|
zWhen charging the battery pack, use only the printer. Do not use other equipment.
Heat will build up and could result in fire or electric shock.
zBefore you discard a battery, cover the terminals with tape or other insulators to prevent direct contact with other objects.
Contact with the metallic components of other materials in waste containers may lead to fire
or explosions.
10

Usage Location
zDo not place the equipment on an unstable or tilted table or desk.
There is risk that the equipment may fall and cause injury.
 CAUTIONS
z
z
z
Such
z
shock
z
way
z z z
Doing
11

Usage Location
zDo not use the equipment in locations that are smoky, humid, dusty, or subject to strong vibration.
zDo not leave the equipment in places subject to strong sunlight or close to heating equipment, such as the dashboard or trunk (boot) of a car.
The above-mentioned can cause leakage, overheating or explosion, resulting in fire, burns or other injuries. High temperatures may also cause deformation of the casing.
zDo not use the equipment near an open flame.
z
12

Proper Usage and Handling
Usage Location
zLeave about 15 cm (6 in.) of clearance at the front and back of the equipment and 10 cm
(4 in.) of clearance on both sides.
Be sure to leave clearance around the paper-handling slot (at the front) so that paper has sufficient room to extend out from the slot during printing.
zDo not use near strong magnets or near devices that produce strong electromagnetic
in
z
If
z
|
|
z |
it. |
|
|
|
|
z
If
z
equipment.
If Condensation Forms Inside the Printer
zStop using the printer immediately.
Continued use may damage the equipment.
Wait until the water droplets have evaporated completely before resuming use.
13

Printer
zPlease avoid turning the printer’s power on and off needlessly as the printer initialization consumes ink.
There may not be enough ink left for the allotted sheets in the set.
zNever use volatile compounds or insecticides on the printer, and do not allow rubber or vinyl material to remain in prolonged contact with the printer.
These materials may cause deformation of the printer’s casing.
zIf the printer overheats, it will temporarily stop operating. This does not mean that the
•
•
•
z
zIf
 1
1
z
z z
If
zPlease use only the cartridge type specified for use by Canon. zDo not touch or pull on the ink sheet.
There may not be enough ink left for the allotted sheets in the set. zDo not handle the cartridge with wet or sweaty hands.
zDo not apply excessive force to the cartridge.
zDo not remove the protective paper from the cartridge or do not press down hard on the paper.
Force or impact on the paper may result in paper jams or equipment damage.
14

Paper
zDo not touch the paper while it is being printed.
During printing, the sheet repeatedly moves back and forth along the top of the print receptacle and in and out through the paper-handling slot. Please do not touch the sheet during this process as this could damage the printer.
zDo not allow too many sheets to accumulate in the print receptacle during printing.
Do not allow more than 50 sheets to accumulate in the print receptacle.
z
• |
|
• |
|
• |
|
• |
. |
zIf |
or |
z |
|
• |
|
• |
|
• |
|
z |
|
15

Getting Started
Package Contents
In addition to the printer, the package contains the following accessories.
|
|
Cartridge |
Cleaner Unit*1 |
Compact Photo Printer |
||||
(Postcard size, for 10 |
|
|
|
Solution Disk |
||||
|
|
trial printouts) |
|
|
|
|
||
|
|
|
|
|
|
|
|
|
|
|
|
|
|
|
|
|
|
|
|
|
|
|
|
|
|
|
|
|
|
|
|
|
|
|
|
|
|
|
|
|
|
|
|
|
|
|
|
|
|
|
|
|
|
*1
For
Easy |
|
|
|
Easy |
|
|
|
Easy |
|
|
|
Easy |
|
|
|
Easy |
|
|
|
Easy |
|
|
|
Easy Photo Pack E-P25BW |
Printing cartridge for black and white postcard size, 25 |
|
sheets |
|
|
Battery Pack NB-ES1L |
Battery pack |
|
|
Bluetooth Unit BU-20 |
Enables wireless printing from devices that support the |
|
Bluetooth standard. |
|
|
16
Components Guide
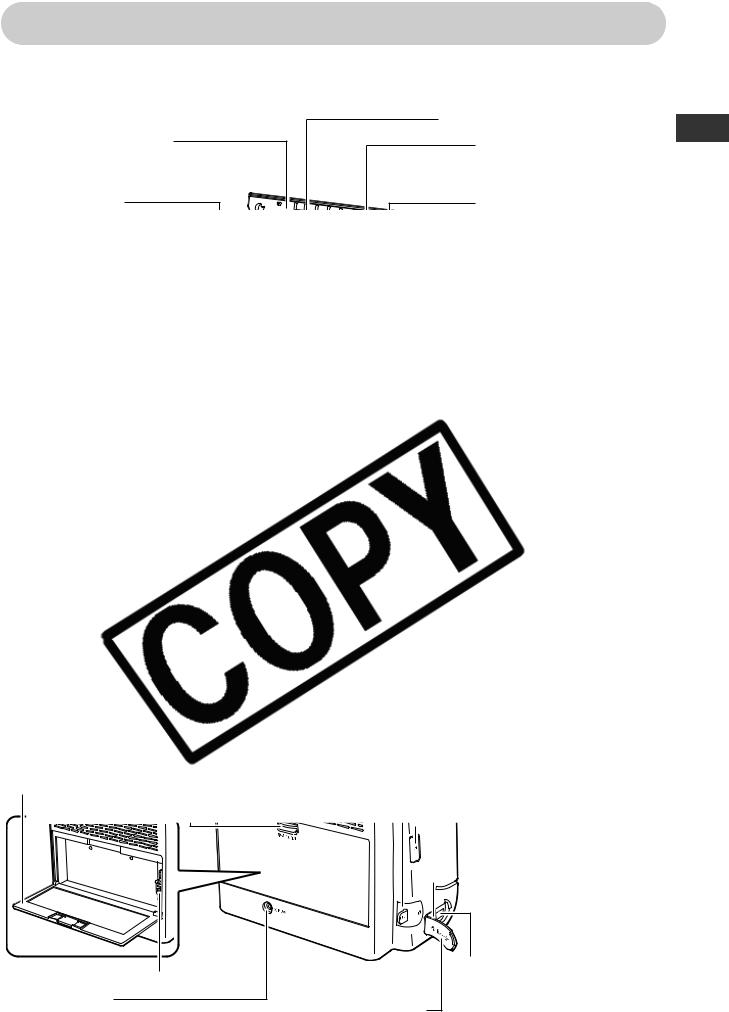
Compact Photo Printer SELPHY ES1
Front View |
Print Receptacle (Output Tray) |
|
|
||
Print Receptacle Cover |
Cartridge Compartment |
|
Opens automatically |
||
The cartridge is inserted |
||
when printing starts. |
||
into this compartment. |
||
|
||
Print Receptacle |
Cartridge Lever |
|
it |
|
Paper
Slot
in
Card
Card
Battery Lever 
DC IN Terminal
Connects to the compact power
adapter.
.
 USB Cable Retract
Button
 USB Port
Connects commercially available USB cables to a computer.
Direct Print Port
Connects the interface
Terminal Cover cable (included with the camera) to the camera.
17

Operation Panel |
Operation Buttons |
|
Used for selecting images |
||
|
||
LCD Monitor |
and making print settings. |
|
Displays images, operation mode |
Button (p. 28) |
|
and error details. |
Displays an enlarged |
|
DISP. (Display) Button |
view of the image. |
|
Displays the information |
Button (p. 28) |
|
of the selected image. |
||
Displays a reduced |
||
|
||
EDIT Button |
view of the image. |
|
PRINT/STOP |
||
(pp. 28, 48) |
||
Sets various |
Button |
|
useful |
|
|
to |
|
|
be |
|
and
The button’s surrounding area lights to indicate the printer status.
Green |
Lit |
Ready to print |
|
|
|
|
Blinking |
Printing/Communicating |
|
|
|
Orange |
Lit |
Charging the battery pack (sold separately) |
|
|
|
|
Blinking |
Battery pack depleted (p. 62) |
|
|
|
Red |
Lit |
Error (p. 70) |
|
|
|
|
Blinking |
Error (p. 70) |
|
|
|
18
About LCD Monitor and Main Display Details
Adjusting the Angle of the LCD Monitor and Switching the Display
DISP. (Display) Button
Each press of this button switches the monitor display.
Operation commands 
LCD Monitor
The angle of the LCD monitor can be manually adjusted to any angle.
Total
|
|
|
|
|
|
|
|
|
|
|
|
|
|
|
|
|
|
Number of prints |
|
|
|
|
|
|
|
||
Paper Size |
|
|||||
|
|
|
|
|
|
|
|
P 4x6 |
Postcard size |
|
|||
|
|
|
|
|
|
|
|
|
L |
L size |
|
||
|
|
|
|
|
|
|
|
|
C |
Card size |
|
||
|
|
|
|
|
|
|
|
C Label |
Card size (full-sized label sheet) |
|
|||
|
|
|
|
|
|
|
|
|
BW |
Postcard size (black and white) |
|
||
|
|
|
|
|
|
|
|
|
|
|
|
|
|
|
|
|
|
|
|
|
|
|
|
|
|
|
|
|
|
|
|
|
|
|
|
|
|
|
|
|
|
|
|
|
|
|
|
|
|
|
|
|
|
|
|
|
|
|
|
|
|
|
|
|
|
|
|
|
|
|
|
|
|
|
|
|
|
|
|
|
|
|
|
|
|
|
|
|
|
|
|
|
|
|
|
|
|
|
|
|
|
|
|
|
|
|
|
|
|
|
|
|
|
|
|
|
|
|
|
|
|
|
|
|
|
|
|
|
|
|
|
|
|
|
|
|
|
|
|
|
|
|
|
|
|
|
|
|
|
|
|
|
|
|
|
|
|
|
|
|
|
|
|
|
|
|
|
|
|
|
|
|
|
|
|
|
|
|
|
|
|
|
|
|
|
|
|
|
|
|
|
|
|
|
|
|
|
|
|
|
|
|
|
|
|
|
|
|
|
|
|
|
|
|
|
|
|
|
|
|
|
|
|
|
|
|
|
|
|
|
|
|
|
|
|
|
|
|
|
|
|
|
|
|
|
|
|
|
|
|
|
|
|
|
|
|
|
|
|
|
|
|
|
|
|
|
|
|
|
|
|
|
|
|
|
|
|
|
|
|
|
|
|
|
|
|
|
|
|
|
|
|
|
|
|
|
|
|
|
|
|
|
|
|
|
|
|
|
|
|
|
|
|
|
|
|
|
|
|
|
|
|
|
|
|
|
|
|
|
|
|
|
|
|
|
|
|
|
|
|
|
|
|
|
|
|
|
|
|
|
|
|
|
|
|
|
|
|
|
|
|
|
|
|
|
|
|
|
|
|
|
|
|
|
|
|
|
|
|
|
|
|
|
|
|
|
|
|
|
|
|
|
|
|
|
|
|
|
|
|
|
|
|
|
|
|
|
|
|
|
|
|
|
|
|
|
|
|
|
|
|
|
|
|
|
|
|
|
|
|
|
|
|
|
|
|
|
|
|
|
|
|
|
|
|
|
|
|
|
|
|
|
|
|
|
|
|
|
|
|
|
|
|
|
|
|
|
|
|
|
|
|
|
|
|
|
|
|
|
|
|
|
|
|
|
|
|
|
|
|
|
|
|
|
|
|
|
|
|
|
|
|
|
|
|
|
|
|
|
|
|
|
|
|
|
|
|
|
|
|
|
|
|
|
|
|
|
|
|
|
|
|
|
|
|
|
|
|
|
|
|
|
|
|
|
|
|
|
|
|
|
|
|
|
|
|
|
|
|
|
|
|
|
|
|
|
|
|
|
|
|
|
|
|
|
|
|
|
|
|
|
|
|
|
|
|
|
|
|
|
|
|
|
|
|
|
|
|
|
|
|
|
|
|
|
|
|
|
|
|
|
|
|
|
|
|
|
|
|
|
|
|
|
|
|
|
|
|
|
|
|
|
|
|
|
|
|
|
|
|
|
|
|
|
|
|
|
|
|
|
|
|
|
|
|
|
|
|
|
|
|
|
|
|
|
|
|
|
|
|
|
|
|
|
|
|
|
|
|
|
|
|
|
|
|
|
|
|
|
|
|
|
|
|
|
|
|
|
|
|
|
|
|
|
|
|
|
|
|
|
|
|
|
|
|
|
|
|
|
|
|
|
|
|
|
|
|
|
|
|
|
|
|
|
|
|
|
|
|
|
|
|
|
|
|
|
|
|
|
|
|
|
|
|
|
|
|
|
|
|
|
|
|
|
|
|
|
|
|
|
|
|
|
|
|
|
|
|
|
|
|
|
|
|
|
|
|
|
|
|
|
|
|
|
|
|
|
|
|
|
|
|
|
|
|
|
|
|
|
|
|
|
|
|
|
|
|
|
|
|
|
|
|
|
|
|
|
|
|
|
|
|
|
|
|
|
|
|
|
|
|
|
|
|
|
|
|
|
|
|
|
|
|
|
|
|
|
|
|
|
|
|
|
|
|
|
|
|
|
|
|
|
|
|
|
|
|
|
|
|
|
|
|
|
|
|
|
|
|
|
|
|
|
|
|
|
|
|
|
|
|
|
|
|
|
|
|
|
|
|
|
|
|
|
|
|
|
|
|
|
|
|
|
|
|
|
|
|
|
|
|
|
|
|
|
|
|
|
|
|
|
|
|
|
|
|
|
|
|
|
|
|
|
|
|
|
|
|
|
|
|
|
|
|
|
|
|
|
|
|
|
|
|
|
|
|
|
|
|
|
My Colors |
(p. 50) |
||||||||
|
|
|
|
|
|
|
|
|
|
|
|
|
|
||||||||||
|
|
|
|
|
|
|
|
|
|
|
|
|
|
|
|
|
|
|
|
|
|
|
|
Paper status (guideline) |
|
|
|||||||||||||||||||||
|
|
|
|
|
|
|
|
|
|
|
|
|
|
|
|
|
|
|
|
|
|
||
|
|
* |
|
1/2 full or more |
|
||||||||||||||||||
|
|
|
|
|
|
|
|
|
|
|
|
|
|
|
|
|
|
|
|
|
|
|
|
|
|
|
|
|
|
|
|
|
|
|
|
|
|
|
|
|
|
|
|
|
|
|
|
|
|
|
|
|
|
|
|
|
|
|
|
|
|
|
|
|
|
About 1/4 full or more |
|
||||
|
|
|
|
|
|
|
|
|
|
|
|
|
|
|
|
|
|
|
|||||
|
|
|
|
|
|
|
|
|
|
|
|
|
|
|
|
|
|
|
|
|
|
|
|
|
|
|
|
|
|
|
|
|
|
|
|
|
|
|
|
|
|
|
|
|
|
|
|
|
|
|
|
|
|
|
|
|
|
|
|
|
|
|
|
|
|
About 1/8 full or more |
|
||||
|
|
|
|
|
|
|
|
|
|
|
|
|
|
|
|
|
|
|
|||||
|
|
|
|
|
|
|
|
|
|
|
|
|
|
|
|
|
|
|
|
|
|
|
|
|
|
|
|
|
|
|
|
|
|
|
|
|
|
|
|
|
|
|
|
|
|
|
|
|
|
|
|
|
|
|
|
|
|
|
|
|
|
|
|
|
|
Empty |
|
|
|||
|
|
|
|
|
|
|
|
|
|
|
|
|
|
|
|
|
|
|
|
||||
|
|
|
|
|
|
|
|
|
|
|
|
|
|
|
|
|
|
|
|
|
|
||
|
|
|
|
|
|
|
|
|
|
|
|
|
|
|
|
|
|
|
|
|
|
|
|
|
|
No Display |
The status is not clear |
|
|||||||||||||||||||
|
|
|
|
|
|
|
|
|
|
|
|
|
|
|
|
|
|
|
|
|
|
|
|
*The trial cartridge is different from the standard one |
|
and is not shown in this table. |
19 |
|

Printing Procedure and Reference Guides
Preparing |
Printing from a |
memory card |
printer to |
for printing |
printing |
Solution Disk. Be sure to install the software before connecting the printer to the computer using the procedure on page 52.
When an Error Occurs and Troubleshooting
20

Connecting |
Printing |
|
User Guide (This Guide) p. 58 |
Printer Software Guide (CD- |
|
ROM included with your printer) |
||
|
Troubleshooting or Error Messages: User Guide (This Guide) p. 67, 70
Printer Software Guide (CD-ROM included with your printer)
 Contacting us for repairs: Canon Customer Support Leaflet
21

Let’s Prepare
Preparing a Cartridge
An ink and paper integrated cartridge is used in this printer. Prepare a cartridge with the size of the paper you will print.
The cartridge differs according to the paper size and ink type.
Cartridge Name*
*The
When storing cartridges, return the cartridge to its original package to prevent dust from accumulating on the cartridge.
22
 Loading...