


Copyright
This manual is copyrighted by Canon Computer Systems, Inc. (CCSI) with all rights reserved. Under the copyright laws, this manual may not be reproduced in any form, in whole or part, without prior written consent of CCSI.
©1998 Canon Computer Systems, Inc.
Disclaimer
Canon Computer Systems, Inc. has reviewed this manual thoroughly in order to make it an easy to use guide for your Canon MultiPASS C5500 system. All statements, technical information, and recommendations in this manual and in any guides or related documents are believed reliable, but the accuracy and completeness thereof are not guaranteed or warranted, and they are not intended to be, nor should they be understood to be, representations or warranties concerning the products described.
Your MultiPASS C5500 and the software media included with your system have been sold to you subject to the limited warranties set forth in the warranty and license agreement enclosed with the respective products. All software is licensed AS IS, as described in the license agreement enclosed with the software media. Further, CCSI reserves the right to make changes in the specifications of the products described in this manual at any time without notice and without obligation to notify any person of such changes.
Trademarks
Canon and BJ are registered trademarks and BCI, Bubble Jet, MultiPASS, and UHQ are trademarks and SelectExchange is a service mark of Canon Inc.
All other product and brand names are registered trademarks, trademarks or service marks of their respective owners.
ENERGY STAR® COMPLIANT
As an ENERGY STAR® Partner, Canon U.S.A., Inc. has determined that this product meets the ENERGY STAR® guidelines for energy efficiency.
ii

USERS IN U.S.A.
PRE-INSTALLATION REQUIREMENTS FOR CANON FACSIMILE EQUIPMENT
A.Location
Supply a suitable table, cabinet, or desk. See Appendix A for the unit’s dimensions and weight.
B.Order Information
1.Only a single line, touch-tone or rotary telephone set is to be used.
2.Order an RJ11-C modular jack (USOC code), which should be installed by the phone company. If the RJ11-C jack is not present, installation cannot occur.
3.Order a normal business line from your telephone company’s business representative. The line should be a regular voice grade line or equivalent. Use one line per unit.
DDD (DIRECT DISTANCE DIAL) LINE or
IDDD (INTERNATIONAL DIRECT DISTANCE DIAL) LINE IF YOU COMMUNICATE OVERSEAS
NCanon recommends an individual line following industry standards [e.g., the 2500 (touch-tone) or 500 (rotary/pulse dial) telephones]. A dedicated extension off a PBX unit without “Call Waiting” can be used with your MultiPASS C5500. Key telephone systems are not recommended because they send non-standard signals to individual telephones for ringing and special codes, which may cause a fax error.
C.Power Requirements
This equipment should be connected to a standard 120 volt AC, three-wire grounded outlet only. Do not connect this unit to an outlet or power line shared with other appliances that cause “electrical noise.” Air conditioners, electric typewriters, copiers, and machines of this sort generate noise which often interferes with communications equipment and the sending and receiving of documents.
CONNECTION OF THE EQUIPMENT
This equipment complies with Part 68 of the FCC rules. On the rear panel of this equipment is a label that contains, among other information, the FCC Registration Number and Ringer Equivalence Number (REN) for this equipment. If requested, this information must be given to the telephone company. This equipment may not be used on coin service provided by the telephone company. Connection to party lines is subject to state tariffs.
iii

IN CASE OF EQUIPMENT MALFUNCTION
Should any malfunction occur which cannot be corrected by the procedures described in this User’s Manual, disconnect the equipment from the telephone line or unplug the power cord. The telephone line should not be reconnected or the power cord plugged in until the problem is completely resolved. Users should contact Canon Authorized Service Facilities for servicing of equipment. Information regarding Authorized Service Facility locations can be obtained by calling the Canon Computer Systems Customer Care Center. (See page 1-4 for details.)
RIGHTS OF THE TELEPHONE COMPANY
Should the equipment cause harm to the telephone network, the telephone company may temporarily disconnect service. The telephone company also retains the right to make changes in facilities and services which may affect the operation of this equipment. When such changes are necessary, the telephone company is required to give adequate prior notice to the user.
WARNING
Do not make any changes or modifications to the equipment unless otherwise specified in the manual. If such changes or modifications should be made, you could be required to stop operation of the equipment.
NThis equipment has been tested and found to comply with the limits for a Class B digital device, pursuant to Part 15 of the FCC Rules. These limits are designed to provide reasonable protection against harmful interference in a residential installation. This equipment generates, uses and can radiate radio frequency energy and, if not installed, and used in accordance with the instructions, may cause harmful interference to radio communications.
However, there is no guarantee that interference will not occur in a particular installation. If this equipment does cause harmful interference to radio or television reception, which can be determined by turning the equipment off and on, the user is encouraged to try to correct the interference by one of the following measures:
●Reorient or relocate the receiving antenna.
●Increase the separation between the equipment and receiver.
●Connect the equipment into an outlet on a circuit different from that to which the receiver is connected.
●Consult the dealer or an experienced radio/TV technician for help.
The Telephone Consumer Protection Act of 1991 makes it unlawful for any person to use a computer or other electronic device to send any message via a telephone fax machine unless such message clearly contains in a margin at the top or bottom of each transmitted page or on the first page of the transmission, the date and time it is sent and an identification of the business or other entity, or other individual sending the message and the telephone number of the sending machine or such business, other entity, or individual.
To automatically enter this information into your MultiPASS C5500, follow the instructions in your Quick Start Guide.
iv

USERS IN CANADA
PRE-INSTALLATION REQUIREMENTS FOR CANON FACSIMILE EQUIPMENT
A.Location
Supply a suitable table, cabinet, or desk. See Appendix A for the unit’s dimensions and weight.
B.Order Information
1.Provide only a single-line to touch-tone or rotary telephone set terminated with a standard 4-pin modular phone plug. (Touch-tone is recommended if available in your area.)
2.Order an RJ11-C modular jack (USOC code), which should be installed by the phone company. If the RJ11-C jack is not present, installation cannot occur.
3.Order a normal business line from your telephone company’s business representative. The line should be a regular voice grade line or equivalent. Use one line per unit.
DDD (DIRECT DISTANCE DIAL) LINE or
IDDD (INTERNATIONAL DIRECT DISTANCE DIAL) LINE IF YOU COMMUNICATE OVERSEAS
NCanon recommends an individual line following industry standards [e.g., the 2500 (touch-tone) or 500 (rotary/pulse dial) telephones]. A dedicated extension off a PBX unit without “Camp On” signals is also permissible with your MultiPASS C5500. Key telephone systems are not recommended because they send non-standard signals to individual telephones for ringing and special codes, which may cause a fax error.
C.Power Requirements
The power outlet should be a three-prong grounded receptacle (Single or Duplex). It should be independent from copiers, heaters, air conditioners, or any electric equipment that is thermostatically controlled. The rated value is 120 volts and 15 amperes. The RJ11-C modular jack should be relatively close to the power outlet to facilitate installation.
NOTICE
The Industry Canada label identifies certified equipment. This certification means that the equipment meets telecommunications network protective, operational and safety requirements as prescribed in the appropriate Terminal Equipment Technical Requirements document(s). The Department does not guarantee the equipment will operate to the user’s satisfaction.
v

Before installing this equipment, users should ensure that it is permissible to be connected to the facilities of the local telecommunications company. The equipment must also be installed using an acceptable method of connection. The customer should be aware that compliance with the above conditions may not prevent degradation of service in some situations.
Repairs to certified equipment should be coordinated by a representative designated by the supplier. Any repairs or alterations made by the user to this equipment, or equipment malfunctions, may give the telecommunications company cause to request the user to disconnect the equipment.
Users should ensure for their own protection that the electrical ground connections of the power utility, telephone lines and internal metallic water pipe system, if present, are connected together. This precaution may be particularly important in rural areas.
CAUTION
Users should not attempt to make such connections themselves, but should contact the appropriate electric inspection authority, or electrician, as appropriate.
The Ringer Equivalence Number (REN) assigned to each terminal device provides an indication of the maximum number of terminals allowed to be connected to a telephone interface. The termination on an interface may consist of any combination of devices subject only to the requirement that the sum of the Ringer Equivalence Numbers of all the devices does not exceed 5.
CANON CANADA INC. 1-800-263-1121
24 HOURS A DAY, SEVEN DAYS A WEEK
vi

Using Your Documentation
The following documentation is supplied with the MultiPASS C5500 to help you use your new Canon multi-talented color printer.
Quick Start Guide
This booklet describes how you unpack, set up, and start using your MultiPASS C5500. It includes how to install the software that comes with the MultiPASS C5500, including the MultiPASS Desktop Manager for Windows®, ScanGear for MultiPASS, and the MultiPASS Printer Driver. This software enables you to use all the features of the MultiPASS C5500—color printing, color scanning, color copying, and PC faxing.
User’s Manual
This manual offers detailed information on how to operate your MultiPASS C5500. It includes how to use the MultiPASS C5500 as a monochrome or color printer, stand-alone plain paper fax, PC fax, color scanner, and color copier. It also includes maintenance, troubleshooting, and specifications.
Conventions
This User’s Manual uses the following conventions to alert you to information that will help you operate the MultiPASS C5500 correctly and safely.
NNotes provide advice or suggestions regarding the use of the MultiPASS C5500.
CCautions alert you to operations that could cause damage to your hardware or software, or cause injury to yourself.
vii

Distinctive typefaces identify the buttons you press, the lights on the operator panel, and any commands you enter at your computer.
The buttons you press appear in this typeface: START/COPY.
The names of lights you see appear in this typeface: ALARM.
What you see in the LCD display appears in this typeface:
REGISTRATION.
When you type something on your computer, it appears in this typeface: DIR/P.
viii

Contents
1 Introduction |
|
Supplies and Accessories...................................................................................... |
1-2 |
BJ Cartridges and BJ Tanks........................................................................... |
1-2 |
Canon Specialty Papers................................................................................. |
1-3 |
Getting Help From Canon .................................................................................. |
1-4 |
Servicing the MultiPASS C5500 .................................................................. |
1-5 |
Important Safety Instructions ............................................................................. |
1-5 |
Main Components of the MultiPASS C5500 ..................................................... |
1-7 |
Front View .................................................................................................... |
1-7 |
Back View ...................................................................................................... |
1-8 |
Inside the Printer Area ................................................................................. |
1-8 |
Using the Operator Panel ................................................................................... |
1-9 |
Special Function Buttons.............................................................................. |
1-11 |
Loading Paper in the Sheet Feeder ..................................................................... |
1-12 |
Preparing Documents for Faxing, Copying, or Scanning ................................ |
1-13 |
Loading the Document ................................................................................ |
1-14 |
Adding Pages to the Document ................................................................... |
1-16 |
Setting the Document Feed Lever ............................................................... |
1-16 |
Identifying Your Documents ............................................................................... |
1-17 |
Copying Documents ............................................................................................ |
1-18 |
Miscellaneous ...................................................................................................... |
1-21 |
If the Power Goes Out ................................................................................. |
1-21 |
Using Switch Boxes ....................................................................................... |
1-21 |
2 Printing With the MultiPASS C5500 |
|
Paper Handling ................................................................................................... |
2-2 |
Selecting Paper ............................................................................................. |
2-2 |
Paper Guidelines ........................................................................................... |
2-4 |
Installing a Printer Driver ................................................................................... |
2-5 |
Printing a Document .......................................................................................... |
2-5 |
Printer Setup Within Windows .......................................................................... |
2-7 |
Opening the Printer Properties Dialog Box in Windows 98/95 ................ |
2-7 |
Using the Printer Driver in Windows 98/95 ............................................... |
2-7 |
Using the Windows Tabs .............................................................................. |
2-8 |
Specifying Your Printing Options ............................................................... |
2-10 |
Recommended Graphics Settings ................................................................ |
2-11 |
Using the Setup Analyzer ............................................................................. |
2-12 |
ix

Printing Speed Versus Color ............................................................................... |
2-13 |
For Quick Color Printing ............................................................................ |
2-13 |
For High Quality Color Printing ................................................................. |
2-13 |
For Monochrome Printing .......................................................................... |
2-14 |
Other Ways to Improve Print Speed in Windows ...................................... |
2-14 |
Setting the Paper Thickness Lever ..................................................................... |
2-16 |
Printer Settings for Various Print Media ........................................................... |
2-18 |
Loading Paper ...................................................................................................... |
2-19 |
Automatically Feeding Paper ....................................................................... |
2-19 |
Auto Feed Guidelines ................................................................................... |
2-21 |
Manually Feeding Paper .............................................................................. |
2-23 |
Printing On Envelopes ........................................................................................ |
2-25 |
Using Canon’s Specialty Papers .......................................................................... |
2-28 |
Specialty Paper Guidelines ........................................................................... |
2-28 |
Canon’s High Resolution Paper HR-101 .................................................... |
2-30 |
Fabric Sheet FS-101 ...................................................................................... |
2-33 |
Printing On Banner Paper .................................................................................. |
2-36 |
3 Using the MultiPASS Desktop Manager |
|
Starting the MultiPASS Desktop Manager ......................................................... |
3-2 |
Exploring the MultiPASS Desktop Manager Window ...................................... |
3-3 |
Using the Desktop Manager Folders .................................................................. |
3-6 |
System-defined Folders ................................................................................ |
3-6 |
User-defined Folders .................................................................................... |
3-7 |
Viewing Documents in the Desktop Manager .................................................. |
3-9 |
Document View ............................................................................................ |
3-9 |
List View ........................................................................................................ |
3-10 |
Setting Up the Address Book .............................................................................. |
3-12 |
Opening the Address Book .......................................................................... |
3-12 |
Working With Address Book Entries .......................................................... |
3-13 |
Sorting the Address Book ............................................................................ |
3-13 |
Adding and Editing an Individual Address ................................................ |
3-14 |
Adding and Editing a Group Address ......................................................... |
3-16 |
Printing the Address Book ........................................................................... |
3-17 |
Importing an Address Book ........................................................................ |
3-18 |
Exporting the Address Book ........................................................................ |
3-19 |
4 Sending Faxes With the MultiPASS C5500 |
|
Sending a Document .......................................................................................... |
4-2 |
Regular Dialing ............................................................................................. |
4-2 |
Automatic Dialing ........................................................................................ |
4-4 |
Sending a Document Using Group Dialing ............................................... |
4-6 |
Redialing ....................................................................................................... |
4-7 |
Resending a Fax After an Error ................................................................... |
4-8 |
Manual Sending ............................................................................................ |
4-9 |
Cancel Sending ............................................................................................. |
4-10 |
x

Sending a Document to More Than One Location |
|
(Sequential Broadcasting) ............................................................................. |
4-11 |
Transmitting the Document ........................................................................ |
4-11 |
Adjusting the Quality of Your Faxes .................................................................. |
4-13 |
Setting the Resolution .................................................................................. |
4-13 |
Setting the Contrast ..................................................................................... |
4-15 |
Sending PC Faxes ................................................................................................ |
4-16 |
Specifying Send Fax Information ................................................................ |
4-16 |
Creating a Fax Memo ................................................................................... |
4-22 |
Sending a PC Fax From a Windows Application ....................................... |
4-23 |
Using the Send Fax Manager .............................................................................. |
4-25 |
Fax Status ...................................................................................................... |
4-26 |
Stopping an Active Job ................................................................................. |
4-28 |
Sending a Scheduled, Held, Failed, or Stopped PC Fax ............................. |
4-28 |
Viewing a Job ................................................................................................ |
4-29 |
Deleting a Job ............................................................................................... |
4-29 |
Using the Fax Log ................................................................................................ |
4-29 |
Displaying the Fax Log.................................................................................. |
4-30 |
Designing a Fax Cover Page ............................................................................... |
4-31 |
Opening the MultiPASS Cover Page Designer ........................................... |
4-31 |
Using the Cover Page Designer ................................................................... |
4-32 |
Creating a New Cover Page ......................................................................... |
4-34 |
Modifying a Predefined Fax Cover Page ..................................................... |
4-42 |
Adding Additional Annotations to Your Cover Page ................................. |
4-49 |
Reverting to the Last Saved Version ............................................................ |
4-51 |
Renaming a Cover Page ............................................................................... |
4-51 |
Printing a Cover Page ................................................................................... |
4-52 |
Deleting a Cover Page .................................................................................. |
4-52 |
5 Receiving Faxes |
|
Receiving Documents ......................................................................................... |
5-1 |
Receiving Documents Automatically—Fax Only Mode ............................ |
5-2 |
Receiving Both Documents and Telephone Calls Automatically— |
|
Fax/Tel Mode ............................................................................................ |
5-2 |
Receiving Documents Manually—Manual Mode ...................................... |
5-3 |
Using an Answering Machine—Ans. Machine Mode ................................ |
5-4 |
Printing Documents Received in Memory ........................................................ |
5-5 |
Receiving While Copying, Printing, or Registering .......................................... |
5-6 |
Receiving Faxes to the MultiPASS Desktop Manager ....................................... |
5-6 |
Receiving a Fax Into the In Box ................................................................... |
5-7 |
Printing a Received Fax When Your Computer Is Off ............................... |
5-8 |
Using the Distinctive Ring Pattern Detection (DRPD) Feature ....................... |
5-9 |
Types of Ring Patterns ................................................................................. |
5-9 |
How DRPD Responds to Calls .................................................................... |
5-10 |
Communicating Using the Distinctive Ring Pattern Detection |
|
(DRPD) Feature ....................................................................................... |
5-10 |
xi
6 Scanning With the MultiPASS C5500 |
|
Exploring the ScanGear Window ....................................................................... |
6-2 |
Displaying Information About the Scan Driver ......................................... |
6-3 |
Scanning With the Desktop Manager ................................................................ |
6-3 |
Scanning From a Windows Application ............................................................ |
6-4 |
Setting the Preview Scan Options ...................................................................... |
6-5 |
Setting the Scan Mode ................................................................................. |
6-5 |
Setting the Scan Resolution ......................................................................... |
6-6 |
Setting Preferences ....................................................................................... |
6-7 |
Setting Paper Size ......................................................................................... |
6-8 |
Setting Black and White Options ................................................................ |
6-9 |
Adjusting the Preview Image for Final Scan ..................................................... |
6-9 |
Clearing the Preview Area ........................................................................... |
6-9 |
Adjusting the Preview Image View .............................................................. |
6-10 |
Adjusting the Selection Size ......................................................................... |
6-10 |
Moving an Image ......................................................................................... |
6-11 |
Reversing the Image Tone ............................................................................ |
6-12 |
Mirroring an Image ...................................................................................... |
6-12 |
Rotating an Image ........................................................................................ |
6-12 |
Scaling the Image Output Size .................................................................... |
6-12 |
Adjusting the Tone of the Preview Image .......................................................... |
6-13 |
Exploring the Tone Tab ................................................................................ |
6-13 |
Auto Tone ..................................................................................................... |
6-14 |
Adjusting Contrast and Brightness ............................................................. |
6-15 |
Changing Gamma Curve Values ................................................................. |
6-16 |
Adjusting Histogram Tone Levels ............................................................... |
6-17 |
Using Tone Curves ....................................................................................... |
6-19 |
Adjusting Conrast/Brightness for Black and White Scan Mode ............... |
6-21 |
7 Working With Documents in The Desktop Manager |
|
Managing Your Documents in the Desktop Manager ...................................... |
7-1 |
Selecting Documents in the Desktop Manager .......................................... |
7-1 |
Printing a Document in the Desktop Manager .......................................... |
7-3 |
Creating a Folder .......................................................................................... |
7-4 |
Moving a Document .................................................................................... |
7-4 |
Copying a Document ................................................................................... |
7-5 |
Renaming a Document or Folder ................................................................ |
7-5 |
Deleting a Document or Folder .................................................................. |
7-6 |
Restoring a Deleted Document ................................................................... |
7-7 |
Emptying the Trash Folder .......................................................................... |
7-8 |
Importing a Document ................................................................................ |
7-8 |
Exporting a Document ................................................................................ |
7-9 |
Attaching a Document to Electronic Mail (E-mail) .................................. |
7-9 |
Manipulating a Document in Document View .......................................... |
7-10 |
Merging a Document ................................................................................... |
7-12 |
Indexing and Searching for Documents ..................................................... |
7-12 |
xii

Modifying a Document ...................................................................................... |
7-22 |
Exploring the MultiPASS Viewer Window ................................................. |
7-23 |
Adjusting the Size and View of a Document .............................................. |
7-25 |
Editing the Base Image ................................................................................. |
7-29 |
Adding Annotations to Your Document ..................................................... |
7-30 |
Revising Your Annotations .......................................................................... |
7-36 |
Selecting One or More Annotations ........................................................... |
7-37 |
Reverting to the Last Saved Version ............................................................ |
7-38 |
Printing the Document ....................................................................................... |
7-38 |
Previewing the Document Before Printing ................................................ |
7-39 |
Adjusting the MultiPASS Viewer Default Options ............................................ |
7-39 |
8 Setup and Other Utilities in the Desktop Manager |
|
Fax Setup ............................................................................................................. |
8-2 |
Setting Up Fax Preferences .......................................................................... |
8-3 |
Setting Up Send Fax Options ...................................................................... |
8-4 |
Setting Up Advanced Send Fax Fax Options .............................................. |
8-5 |
Setting Up Receive Fax Options .................................................................. |
8-7 |
Setting Up Advanced Receive Fax Options ................................................. |
8-9 |
Setting Up Speed Dial Assignments ............................................................ |
8-12 |
System Setup ........................................................................................................ |
8-14 |
Launcher Setup ................................................................................................... |
8-15 |
Editing a Launcher Application ................................................................... |
8-17 |
Using the Launcher ...................................................................................... |
8-17 |
Making a Phone Call From the Desktop Manager ........................................... |
8-18 |
Placing a Phone Call .................................................................................... |
8-18 |
Using the MultiPASS Server ............................................................................... |
8-19 |
Using the Minimized MultiPASS Server ..................................................... |
8-20 |
Using the MultiPASS Server Window ......................................................... |
8-20 |
Status Messages ............................................................................................. |
8-21 |
Closing the MultiPASS Server ............................................................................ |
8-22 |
Removing the MultiPASS Server From StartUp ......................................... |
8-23 |
Restarting the MultiPASS Server ................................................................. |
8-23 |
Adding the MultiPASS Server to Startup .................................................... |
8-24 |
Disconnecting the MultiPASS ............................................................................ |
8-24 |
Uninstalling the Desktop Manager .................................................................... |
8-25 |
Removing the Printer and Fax Drivers ....................................................... |
8-25 |
Uninstalling the Desktop Manager ............................................................. |
8-25 |
Uninstalling the Scan Software (ScanGear) ................................................ |
8-26 |
Completing the Uninstall Process ............................................................... |
8-26 |
Reinstalling the Desktop Manager .............................................................. |
8-26 |
9 Maintaining the MultiPASS C5500 |
|
MultiPASS Guidelines ......................................................................................... |
9-2 |
Routine Maintenance .......................................................................................... |
9-3 |
Cleaning Inside the MultiPASS .......................................................................... |
9-3 |
Cleaning the Scanner Components.............................................................. |
9-4 |
xiii

Printing the Nozzle Check .................................................................................. |
9-7 |
Cleaning the BJ Cartridge Print Head ............................................................... |
9-8 |
BJ Cartridge Guidelines ...................................................................................... |
9-9 |
BJ Cartridge and BJ Tank Maintenance ...................................................... |
9-10 |
Using Ink ....................................................................................................... |
9-11 |
Replacing the BJ Cartridge ................................................................................. |
9-11 |
Replacing a BJ Tank in the BC-21e Color BJ Cartridge .................................... |
9-16 |
Storing a BJ Cartridge ......................................................................................... |
9-19 |
Transporting the MultiPASS ............................................................................... |
9-20 |
10 Troubleshooting |
|
Paper Jams ........................................................................................................... |
10-3 |
Jams in the Automatic Document Feeder (ADF) ....................................... |
10-3 |
Jams in the Sheet Feeder .............................................................................. |
10-5 |
LCD Messages ...................................................................................................... |
10-6 |
Printing Problems ............................................................................................... |
10-11 |
Print Quality Problems........................................................................................ |
10-14 |
Color Printing and Copying Problems............................................................... |
10-16 |
Paper Feeding Problems ...................................................................................... |
10-17 |
Faxing Problems .................................................................................................. |
10-19 |
Telephone Problems ............................................................................................ |
10-23 |
Copying Problems ............................................................................................... |
10-23 |
General Problems ................................................................................................ |
10-24 |
Technical Notes ................................................................................................... |
10-25 |
Using Other Bi-directional Devices ............................................................ |
10-25 |
MultiPASS Hardware Cannot Initialize ...................................................... |
10-25 |
Memory Clear Report ......................................................................................... |
10-26 |
Appendix A Specifications |
|
Printing Specifications ........................................................................................ |
A-1 |
BJ Cartridges ....................................................................................................... |
A-4 |
Facsimile .............................................................................................................. |
A-5 |
Copier .................................................................................................................. |
A-7 |
Scanner ................................................................................................................ |
A-7 |
MultiPASS Desktop Manager for Windows ...................................................... |
A-9 |
General Specifications ......................................................................................... |
A-10 |
Receiving Faxes and Phone Calls Automatically—Fax/Tel Mode .................... |
A-12 |
Appendix B Using the MultiPASS C5500 as a Stand-alone Fax |
|
LCD Menu System .............................................................................................. |
B-1 |
Entering Information in the MultiPASS ............................................................ |
B-2 |
Entering Your User Information ................................................................. |
B-2 |
Glossary ....................................................................................................................... |
G-1 |
Index ............................................................................................................................ |
I-1 |
xiv
Introduction 1
Thank you for purchasing the Canon MultiPASS C5500—the multitalented color printer for your home office and the whole family. We are sure that your MultiPASS C5500 will provide all you need in one machine: Color Bubble Jet printer, color scanner, color copier, plain paper fax, and PC fax.
This chapter introduces you to the MultiPASS C5500. It includes:
Supplies and accessories
Getting help from Canon
Important safety instructions
Examining the main components of the unit
Using the operator panel
Loading paper in the sheet feeder
Preparing documents for faxing, copying, or scanning
Identifying your documents
Copying documents
Chapter 1 |
Introduction 1-1 |
Introduction
MPC-5500—USERS MANUAL/V000/08-98

Supplies and Accessories
Your MultiPASS C5500 supports excellent and unique print media options that will allow you to produce dazzling, professional, and fun presentations. All of these print media are specially designed and manufactured to work with your Canon MultiPASS C5500 so you can produce the finest output possible.
Canon has an extensive dealer network equipped to offer you supplies as you need them. To find a dealer near you, call the Canon Referral Service at 1-800-848-4123.
If supplies are not available from your local dealer, you can order directly from Canon by calling 1-800-385-2155.
BJ Cartridges and BJ Tanks
Your MultiPASS C5500 comes with:
One BC-21e Color BJ® Cartridge
One SB-21 Ink Cartridge Storage Box
One extra BCI-21 Black BJ Tank
You can also purchase the following BJ cartridges for use with the MultiPASS C5500:
BC-20 Black BJ Cartridge
BC-22e Photo BJ Cartridge
BC-29F Neon BJ Cartridge
You can purchase the following BJ tanks for use in the BC-21e Color BJ Cartridge:
BCI-21 Black BJ Tank (one extra BJ tank comes with the printer)
BCI-21 Color BJ Tank
1-2 Introduction |
Chapter 1 |

|
BJ cartridges contain the Bubble Jet print head and ink, while BJ tanks |
|
|
contain ink only. Some BJ cartridges, like the BC-21e Color BJ |
|
|
Cartridge, contain replaceable BJ tanks; when you run out of ink, you |
|
N can replace the empty tank. Some BJ cartridges, like the BC-20 Black |
|
|
|
BJ Cartridge, contain both the print head and ink; when you run out of |
|
|
ink, you replace the entire BJ cartridge. See Chapter 9, Maintaining the |
Introduction |
|
MultiPASS C5500, for details on replacing BJ cartridges and BJ tanks. |
|
|
|
|
|
|
|
|
|
|
|
Canon has more engineers dedicated to creating quality ink for |
|
|
providing the best results for output on Bubble Jet products than any |
|
|
other organization. Canon does not prohibit the use of third-party inks |
|
N and the use of third-party inks does not invalidate the product’s limited |
|
|
|
warranty. However, Canon cannot guarantee the quality or performance |
|
|
of your MultiPASS C5500 when you are using inks from other suppliers. |
|
|
Canon’s limited warranty does not cover damage caused to Canon’s |
|
|
Bubble Jet products that is attributable to the use of third party parts or |
|
|
supplies, including inks. The limited warranty remains in effect for its |
|
|
life once that particular damage has been properly repaired. |
|
|
For optimum printing results, Canon recommends that you use only |
|
|
Canon ink cartridges. |
|
|
|
|
Canon Specialty Papers |
|
|
|
Canon manufactures numerous specialty papers, including: |
|
|
Glossy Photo Paper GP-201 |
|
|
Banner Paper |
|
|
Brilliant White Paper |
|
|
High Resolution Paper HR-101 |
|
|
T-Shirt Transfers TR-101 |
|
|
Greeting Cards GC-101 |
|
|
Bubble Jet Paper LC-301 (water resistant) |
|
|
Fabric Sheet FS-101 |
|
|
Transparencies CF-102 |
|
|
Back Print Film BF-102 |
|
|
High Gloss Film HG-101 |
|
|
See Chapter 2, Printing With the MultiPASS C5500, for details on |
|
|
Canon’s Specialty Papers. |
|
Chapter 1 |
Introduction 1-3 |

You can also purchase the optional Canon BC-22e Photo Kit, which includes everything you need to produce photo-realistic images:
BC-22e Photo BJ Cartridge
SB-21 Ink Cartridge Storage Box
Canon High Resolution Paper HR-101 (60 sheets)
Getting Help From Canon
Canon Computer Systems, Inc. offers a full range of customer technical support* options including:
24-hour, 7-day-a-week, toll-free automated support for troubleshooting issues on most current products (1-800-423-2366)
Speak to a technician free of service charge (currently Monday– Friday, 8:00 A.M.–10:00 P.M. EST, excluding holidays) for products still under warranty** (1-757-413-2848)
Speak to a technician for a service charge (currently $24.99 per call) during holidays and days/hours not listed above regarding urgent product questions or for products no longer under warranty (1-800-423-2366)
Or for a charge of $2.50 per minute, to a maximum of $25.00 per call (1-900-246-1200)
E-mail support via the Canon Computer Systems, Inc. Web site (www.ccsi.canon.com)
24-hour, toll-free Fax Retrieval System (1-800-526-4345)
To download the latest drivers using your modem, 24-hour Bulletin Board Service (1-757-420-2000)
*Support program specifics subject to change without notice. **Refer to individual product information for warranty details.
24 hours a day, 7 days a week (1-800-263-1121)
In other countries, please contact your Canon dealer.
1-4 Introduction |
Chapter 1 |

Servicing the MultiPASS C5500
The Canon MultiPASS C5500 is designed with the latest technology to provide trouble-free operation. The warranty card that comes with
your MultiPASS describes Canon’s limited warranty. Be sure to read the warranty information to find out about the different service options available to you.
NSave your sales receipt for proof of purchase. In the event that your printer needs service, you will need your proof of purchase to obtain warranty service.
Be sure to fill out the Registration card and send it in. This will help Canon give you better support service.
If you seem to have a problem, try to solve it by referring to the troubleshooting information in Chapter 10. If you cannot solve the problem, contact the Canon Computer Systems Customer Care Center (see previous page for details).
If you feel your MultiPASS needs servicing, contact Canon on the World Wide Web to locate the Canon Authorized Service Facility (ASF) nearest you. If you do not have access to the Web, you can call Canon (see previous page for details).
Important Safety Instructions
Read these safety instructions and refer to them later if you have any questions.
CExcept as explained in this manual, do not attempt to service the MultiPASS C5500 yourself. Opening and removing interior covers may expose you to dangerous voltage points or other risks. Refer all servicing to a Canon Authorized Service Facility (ASF). Call the Customer Care Center for details.
Follow all warnings and instructions marked on the MultiPASS and inside the printer cover.
Place the MultiPASS on a sturdy level surface. Do not place it on an unstable cart, stand, or table. If the unit falls, it could be seriously damaged.
Introduction
Chapter 1 |
Introduction 1-5 |

Do not use the MultiPASS near water. If you spill liquid on
or into the unit, unplug it immediately and call the Customer Care Center.
Slots and openings in the cabinet and the back or bottom are provided for ventilation. To ensure reliable operation of the MultiPASS and to protect it from overheating, do not block or cover these openings. Do not block the openings by placing the unit on a bed, sofa, rug, or other similar surface. Do not place the unit near a radiator, nor in a closet or built-in cabinet unless proper ventilation is provided.
Operate the MultiPASS only from the type of power source indicated on the unit’s label. If you are not sure of the type of power available, consult your dealer or local power company.
Do not allow anything to rest on the power cord, and do not locate the MultiPASS where the cord will be walked on. Make sure the power cord is not knotted or kinked.
Do not push metal objects of any kind into the slots or openings on the cabinet. This could result in a risk of fire or electric shock.
Do not allow small objects (such as pins, paper clips, or staples) to fall into the MultiPASS. If something does fall into it that you cannot remove, unplug the unit immediately and call the Customer Care Center.
Unplug this product from the wall outlet and call the Customer Care Center if any of the following conditions exist:
•The power cord or plug is damaged or frayed.
•Liquid is spilled into the unit, or if the unit is exposed to rain or water.
•Smoke, unusual noises, or odors come from the unit.
•The unit has been dropped or the cabinet has been damaged.
•The unit does not operate normally when you have followed the operating instructions. Adjust only those controls that are covered by the operating instructions in the Quick Start Guide and this User’s Manual. Improper adjustment of other controls may result in damage and may require extensive work by a qualified technician to restore the product to normal operation.
1-6 Introduction |
Chapter 1 |

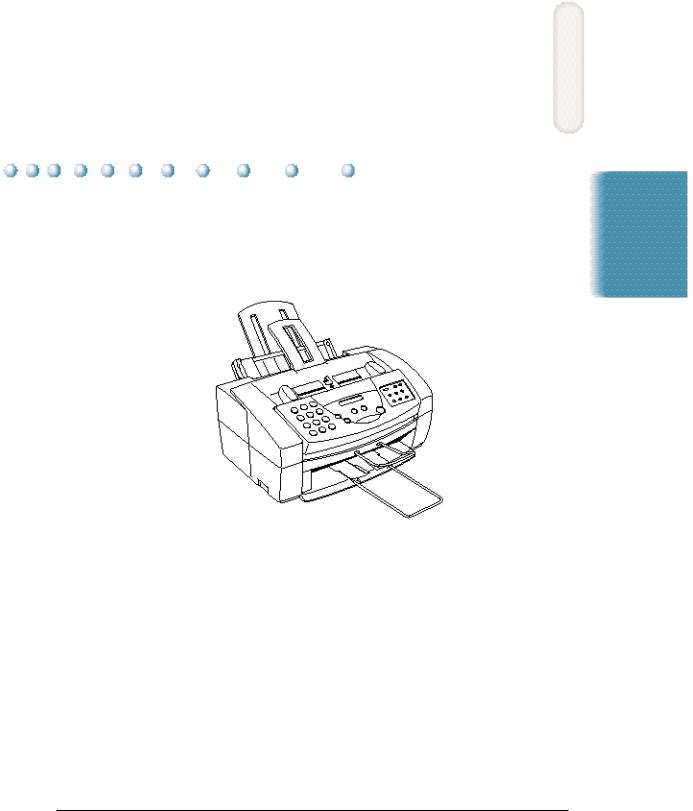
Main Components of the MultiPASS C5500
Before using the MultiPASS C5500, it’s a good idea to familiarize yourself with the components and understand their functions.
Front View
|
|
|
|
|
|
|
|
|
|
|
|
|
|
|
|
SENDING DOCUMENT SUPPORT |
||||||
|
|
|
|
|
|
|
|
|
|
|
|
|
|
|
|
|||||||
|
|
|
|
|
|
|
|
|
|
|
|
|
|
|
|
HOLDS DOCUMENTS AS THEY FEED |
||||||
|
|
|
|
|
|
|
|
|
|
|
|
|
|
|
|
INTO ADF |
||||||
PAPER REST |
|
|
|
|
|
|
|
|
|
|
|
|
|
|
|
|
||||||
|
|
|
|
|
|
|
|
|
|
|
|
|
|
|
|
|
||||||
SUPPORTS PAPER |
|
|
|
|
|
|
|
|
|
|
|
|
|
|||||||||
STACKED IN THE |
|
|
|
|
|
|
|
|
|
|
AUTOMATIC DOCUMENT |
|||||||||||
SHEET FEEDER |
|
|
|
|
|
|
|
|
FEEDER (ADF) AND |
|||||||||||||
|
|
|
|
|
|
|
|
|
|
|
|
|
|
|
|
|
|
|
|
PRINTER COVER |
||
|
|
|
|
|
|
|
|
|
|
|
|
|
|
|
|
|
|
|
|
HOLDS DOCUMENTS |
||
SHEET FEEDER |
|
|
|
|
|
|
|
|
|
|
|
|
|
|
|
|
|
|
|
TO BE SCANNED (UP |
||
|
|
|
|
|
|
|
|
|
|
|
TO 30 SHEETS) |
|||||||||||
|
|
|
|
|
|
|
|
|
|
|||||||||||||
HOLDS 100 SHEETS |
|
|
|
|
|
|
|
|
|
|
|
|||||||||||
OF PLAIN PAPER |
|
|
|
|
|
|
|
PAPER GUIDES |
||||||||||||||
|
|
|
|
|
|
|
|
|
|
|
|
|
|
|
|
|
|
|
|
|
|
|
|
|
|
|
|
|
|
|
|
|
|
|
|
|
|
|
|
|
|
|
|
|
|
|
|
|
|
|
|
|
|
|
|
|
|
|
|
|
|
|
|
|
|
|
|
ADJUST TO WIDTH |
|
|
|
|
|
|
|
|
|
|
|
|
|
|
|
|
|
|
|
|
|
|
OF DOCUMENT TO |
|
|
|
|
|
|
|
|
|
|
|
|
|
|
|
|
|
|
|
|
|
|
BE SCANNED |
OPERATOR PANEL |
|
|
|
|
|
|
|
|
|
|
|
|
|
|
|
|
|
|
|
|||
|
|
|
|
|
|
|
|
|
|
|
|
|||||||||||
USE TO CONTROL |
|
|
|
|
|
|
|
|||||||||||||||
THE MultiPASS C5500 |
|
|
|
|
|
DOCUMENT SUPPORT |
||||||||||||||||
|
|
|
|
|
|
|
|
|
|
|
|
|
|
|
|
|
|
|
|
|
||
|
|
|
|
|
|
|
|
|
|
|
|
|
|
|
|
|
|
|
|
|
HOLDS SCANNED |
|
|
|
|
|
|
|
|
|
|
|
|
|
|
|
|
|
|
|
|
|
|
DOCUMENTS AS |
|
|
|
|
|
|
|
|
|
|
|
|
|
|
|
|
|
|
|
|
|
|
||
|
|
|
|
|
|
|
|
|
|
|
|
|
|
|
|
|
|
|
|
|
THEY EXIT THE |
|
|
|
|
|
|
|
|
|
|
|
|
|
|
|
|
|
|
|
|
|
|
||
|
|
|
|
|
|
|
|
|
|
|
|
|
|
|
|
|
|
|
|
|
MultiPASS C5500 |
|
|
|
|
OUTPUT TRAY |
|
|
|
|
|
|
|
|
|
|
|
|
|
|
|
||||
|
|
|
|
|
|
|
|
|
|
|
|
|
|
|
|
|||||||
|
|
|
|
|
|
|
|
|
|
|
|
|
|
|
|
|||||||
|
|
|
HOLDS PRINTED DOCUMENTS AS |
|
|
|
|
|
|
|
|
|||||||||||
|
|
|
THEY EXIT THE MultiPASS C5500 |
|
|
|
|
|
|
|
|
|||||||||||
|
|
|
PAPER OUTPUT GUIDES |
|
|
|
|
|
|
|
|
OUTPUT TRAY EXTENSION |
||||||||||
|
|
|
|
|
|
|
|
|
|
|
||||||||||||
|
|
|
|
|
|
|
|
HOLDS PRINTED DOCUMENTS AS |
||||||||||||||
|
|
|
|
|
|
|
|
|||||||||||||||
|
|
|
HOLD HIGH RESOLUTION |
|
|
THEY EXIT THE MultiPASS C5500 |
||||||||||||||||
|
|
|
PAPER WHEN USING THE |
|
|
|
|
|
|
|
||||||||||||
|
|
|
BC-22e PHOTO BJ CARTRIDGE |
|
|
|
|
|
|
|
||||||||||||
Introduction
Chapter 1 |
Introduction 1-7 |
Back View
|
|
|
|
|
|
|
|
|
|
|
|
|
|
|
|
|
|
|
|
|
|
|
|
|
|
|
|
|
|
|
|
|
|
|
|
LINE JACK TELEPHONE/ |
|||
|
|
|
|
|
|
|
ANSWERING |
||
|
|
|
|
|
|
|
MACHINE/ |
||
|
|
|
|
|
|
|
MODEM |
||
POWER CORD |
|
|
|
|
|
|
JACK |
||
|
|
|
|
|
|
||||
CONNECTOR |
|
|
|
|
|
||||
MANUAL FEED |
|
|
|
|
|
|
|||
PARALLEL CABLE |
|||||||||
|
|||||||||
SLOT |
CONNECTOR |
||||||||
Inside the Printer Area
PAPER THICKNESS LEVER
CARTRIDGE HOLDER
PRINTER COVER
1-8 Introduction |
Chapter 1 |
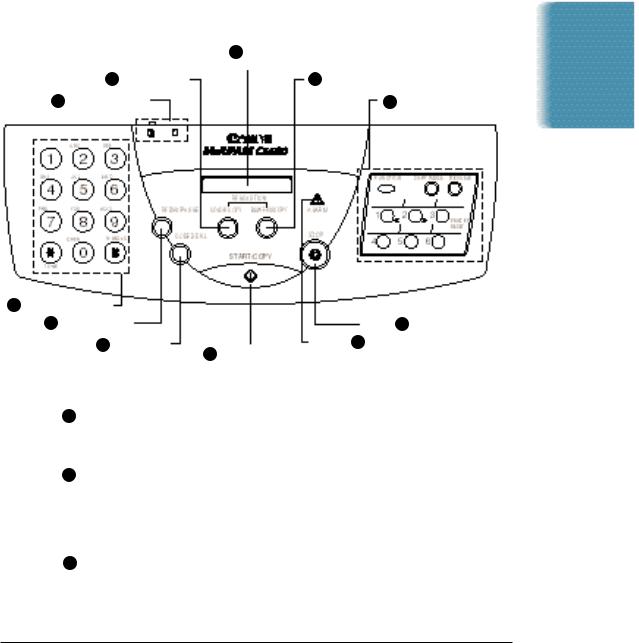
Using the Operator Panel
This section presents a brief description of the operator panel on the MultiPASS C5500.
3LCD DISPLAY
2 COLOR COPY |
4 B&W FAX/COPY |
1 DOCUMENT FEED |
5 ONE-TOUCH SPEED DIAL/ |
LEVER |
FUNCTION BUTTONS |
11 NUMBER BUTTONS |
|
10 REDIAL/PAUSE |
STOP 6 |
9 CODED DIAL |
ALARM 7 |
8 |
START/COPY |
1Document feed lever
Set this lever to the left ( ) for automatic feed or to the right (
 ) for manual document feed.
2COLOR COPY button
Use this button to change the resolution when making color copies using the operator panel. This button has no function during fax transmissions. For color scanning, change the resolution from your software.
3LCD display
Displays messages and prompts during operation. Displays selections, text, numbers, and names when registering information.
Introduction
Chapter 1 |
Introduction 1-9 |

4 B&W FAX/COPY button
Use this button when sending faxes or making copies in black and white only. For black and white scanning, set the resolution from the MultiPASS Desktop Manager.
5One-touch Speed Dial/Function buttons
Use for one-touch speed dialing, entering user information, printing documents stored in memory, and cleaning the print head. (See the next page for details.)
6 |
STOP button |
|
Press to cancel sending, receiving, or any other operation. |
7 |
ALARM light |
|
Flashes when an error occurs, when the MultiPASS is out of paper or |
|
ink, or when received faxes are stored in memory. |
8 |
START/COPY button |
|
Press to begin sending, receiving, copying, or other operations, or to |
|
select functions when registering information. |
9 |
CODED DIAL button |
|
Press this button (followed by a two-digit code) to dial a number that |
|
you have registered for coded speed dialing. |
10 |
REDIAL/PAUSE button |
|
Press to redial the last number that was dialed using the number |
|
buttons, or to enter pauses between digits when dialing fax numbers. |
11Number buttons
Use these buttons to enter numbers and names when registering information, and to dial fax/telephone numbers that are not registered for automatic dialing.
1-10 Introduction |
Chapter 1 |
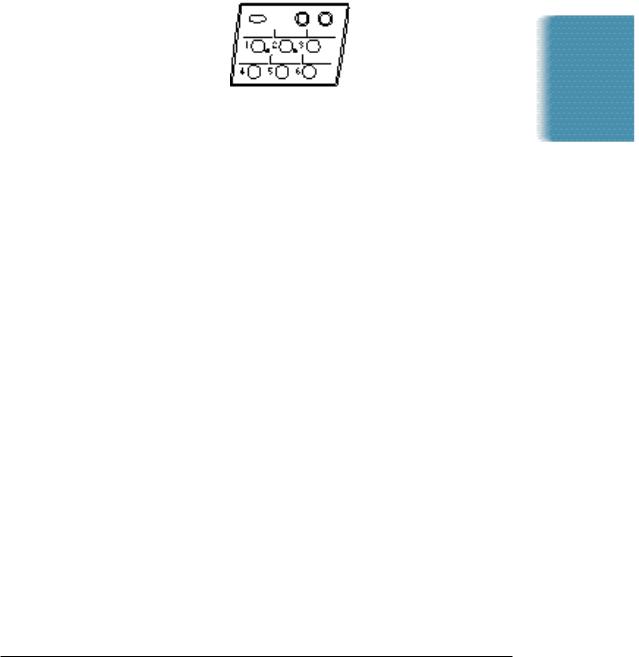
Special Function Buttons
FUNCTION button
Use to register user settings, to run the print head cleaning process, or to print faxes stored in the MultiPASS’s memory.
CARTRIDGE button
Press to move the BJ cartridge holder to the center of the unit when installing or replacing the cartridge. (Press again after installing the cartridge to move the holder back to its home position on the right.)
RESUME button
Press when you want to form-feed paper when printing.
PRINTER RESET button
Press to reset the MultiPASS to Standby mode if the LCD displays
PRINTER MODE.
Arrow buttons
Use to scroll through menu selections, or to move the cursor when registering data.
Introduction
Chapter 1 |
Introduction 1-11 |

Loading Paper in the Sheet Feeder
The paper you load in the sheet feeder is used for printing documents or for incoming faxes. For printing documents, you can use any of the Canon Specialty Papers described in Chapter 2, Printing With the MultiPASS C5500. For receiving faxes, use plain paper (such as copier paper).
When the message LOAD PAPER appears in the LCD display, you need to add paper to the sheet feeder. The sheet feeder holds approximately 100 sheets of plain paper.
Fan the paper. For best results, fan the paper before loading it.
Always fan a stack of paper along the edge that will feed into the MultiPASS first.
Make sure the |
Pull the paper rest up until it stops. |
paper rest |
Move the paper guide to the left to match the size of |
is extended. |
|
|
your paper. |
1-12 Introduction |
Chapter 1 |
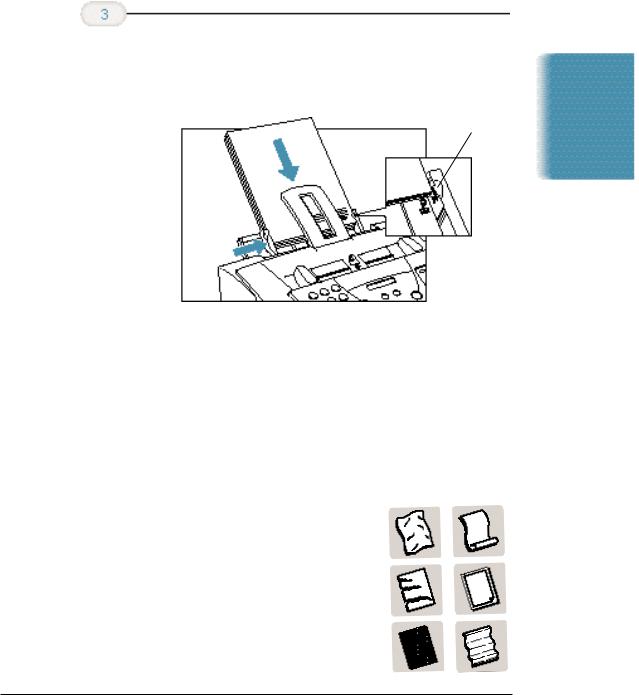
Slide the stack of paper into the sheet feeder until it stops.
Align the edge of the paper with the right edge of the sheet
Secure
TAB
Introduction
Preparing Documents for Faxing,
Copying, or Scanning
You can use the MultiPASS to fax, copy, or scan documents that are printed on standard letter, legal, or A4 size paper. Follow these guidelines to prepare your documents.
Do not attempt to feed the following types of documents into the MultiPASS:
•
•
•
•
•
•
wrinkled or creased paper
curled or rolled paper
torn paper
carbon-paper or carbon-backed paper
coated paper
onion skin or thin paper
Chapter 1 |
Introduction 1-13 |
Remove all staples, paper clips, and the like before feeding the document.
Make sure any glue, ink, or correction fluid on the paper is completely dry before feeding the document.
Make a photocopy of any document that will not feed into the MultiPASS. You can then feed the copy.
Do not feed documents with pages that are different sizes or of different thicknesses.
Loading the Document
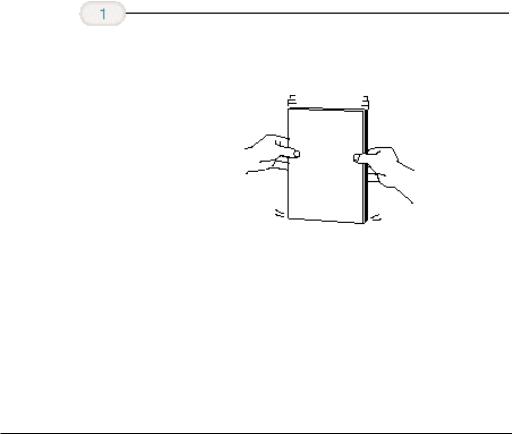
You can load up to 30 letter or A4 size sheets and up to 10 legal size sheets at a time into the Automatic Document Feeder (ADF).
Stack your |
For a multiple-page document, fan the sheets and tap the |
documents. |
document on a flat surface to even the stack. |
1-14 Introduction |
Chapter 1 |

Feed the document.
Insert the document face down (letterhead first) into the ADF
Adjust document
Introduction
The MultiPASS automatically feeds the pages one by one from the bottom.
If you have problems feeding multiple-page documents, insert the pages one at a time into the ADF. This stacks the pages on a slant so they feed correctly into the ADF. (Do not attempt to stack more than 30 sheets in the ADF.)
Chapter 1 |
Introduction 1-15 |
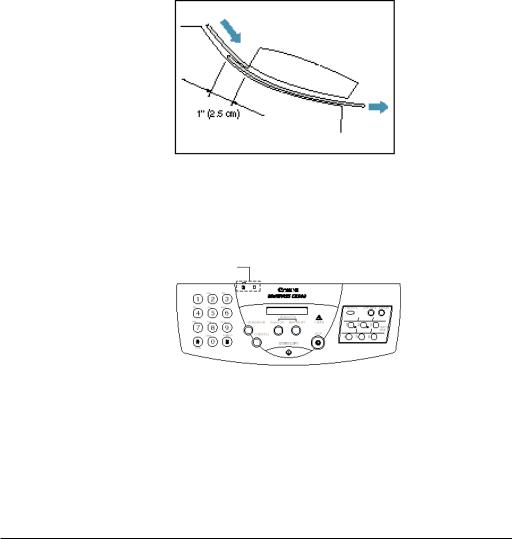
Adding Pages to the Document
If you want to add pages while the MultiPASS is sending a document, wait until the last page is feeding into the unit and then insert the new sheets. Insert the first new page so it overlaps the last page by about one inch (2.5 cm).
Always wait until the last page is being fed into the MultiPASS before you add new pages.
Setting the Document Feed Lever
You use the document feed lever on the ADF to select multiple documents ( ) or single sheets (
 ).
).
DOCUMENT FEED LEVER
Always set the document feed lever to single sheets and manually feed the following types of documents:
Thick paper
Thin paper
Small documents (postcards, business cards)
Documents with uneven surfaces
Photographs
Special types of paper
1-16 Introduction |
Chapter 1 |

Identifying Your Documents
When sending a document, the following information is printed out by the receiving fax:
and time. This Identification) and type.
NIn the United States, information every
By identifying the documents you send, the receiving party will recognize your fax messages at a glance. The illustration below shows a sample document with the identifying information.
THE DATE AND
TIME YOU SENT
THE DOCUMENT
YOUR FAX/ |
|
THE NAME OF THE |
|
|
PARTY WHO IS |
THE PAGE NUMBER |
|
TELEPHONE |
YOUR NAME OR |
RECEIVING THE |
|
NUMBER |
COMPANY NAME |
DOCUMENT |
|
The top line includes the name of the receiving party if you send the document using one-touch speed dialing, coded speed dialing, or group dialing and you registered the party’s name. It also includes the page number.
NYou entered your fax header information during the MultiPASS installation procedure. If you followed the installation procedure, this information will be printed on the top of your outgoing faxes. If you did not install the MultiPASS Desktop Manager, see Appendix B, Using the MultiPASS C5500 as a Stand-alone Fax, for details on how to enter this information.
Introduction
Chapter 1 |
Introduction 1-17 |
 Loading...