


 Loading...
PUB.DIE-274
Digital Video Camcorder
Instruction Manual English
Introduction
Prerparations
Basic
Functions
Advanced
Functions
Mini |
Digital |
|
Video |
|
Cassette |
External
Connections
Additional
Information
PAL
2
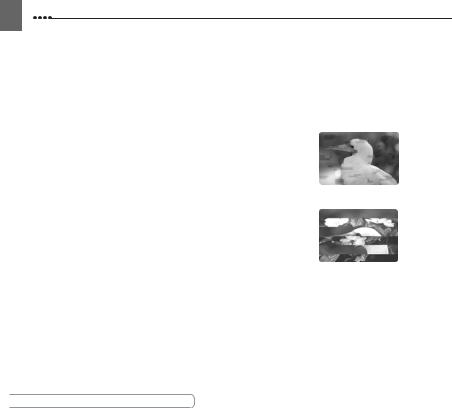
Cleaning the Video Heads
Digital video camcorders record video signals on the tape in very thin lines (as thin as 1/8 of the width of a hair). The following symptoms may appear if the video heads become dirty even a little.
•Mosaic or other blocky video artifacts (Fig. 1) or banding (Fig. 2) appear on the picture during playback.
•Sound becomes distorted, or there is no sound during playback.
•The message “HEADS DIRTY, USE CLEANING CASSETTE” appears.
If such symptoms appear, clean the video heads with the Canon DVM-CL Digital Video Head Cleaning Cassette* or a commercially available dry cleaning cassette.
If the symptoms reappear shortly after the cleaning, the videocassette may be defective. Stop using it.
* Availability differs from area to area.
Video heads may become dirty under the following conditions:
•When using the camcorder in humid or hot places.
•When using cassettes with damaged or dirty tape.
•When using the camcorder in dusty places.
•When using the video heads without cleaning them for a long time.
 NOTES
NOTES
Fig. 1
Fig. 2
Before you make important recordings, clean the video heads and make a test recording first. We also recommend cleaning the video heads after use, before storing the camcorder.
Do not use wet type cleaning cassettes as this may damage the camcorder.
Even after cleaning the video heads you may not be able to play back correctly tapes that were recorded with dirty video heads.
3
Important Usage Instructions
WARNING!
TO REDUCE THE RISK OF ELECTRIC SHOCK, DO NOT REMOVE COVER (OR BACK). NO USER SERVICEABLE PARTS INSIDE. REFER SERVICING TO QUALIFIED SERVICE PERSONNEL.
WARNING!
TO REDUCE THE RISK OF FIRE OR ELECTRIC SHOCK, DO NOT EXPOSE THIS PRODUCT TO RAIN OR MOISTURE.
CAUTION:
TO REDUCE THE RISK OF ELECTRIC SHOCK AND TO REDUCE ANNOYING INTERFERENCE, USE THE RECOMMENDED ACCESSORIES ONLY.
CAUTION:
DISCONNECT THE MAINS PLUG FROM THE SUPPLY SOCKET WHEN NOT IN USE.
The Mains plug is used as the disconnect device. The Mains plug shall remain readily operable to disconnect the plug in case of an accident.
While using the compact power adapter, do not wrap it or cover it with a piece of cloth, and do not place it in confined narrow spaces. Heat may build up, the plastic case may deform and it could result in electric shock or fire.
CA-590E identification plate is located on the bottom.
Using any device other than the Compact Power Adapter CA-590E may damage the camcorder.
European Union (and EEA) only.
This symbol indicates that this product is not to be disposed of with your household waste, according to the WEEE Directive (2002/96/EC) and your national law. This
product should be handed over to a designated collection point, e.g., on an authorized one-for-one basis when you buy a new similar product or to an authorized collection site for recycling waste electrical and electronic equipment (EEE). Improper handling of this
type of waste could have a possible negative impact on the environment and human health due to potentially hazardous substances that are generally associated with EEE. At the same time, your cooperation in the correct disposal of this product will contribute to the effective usage of natural resources. For more information about where you can drop off your waste equipment for recycling, please contact your local city office, waste authority, approved WEEE scheme or your household waste disposal service. For more information regarding return and recycling of WEEE products, please visit
www.canon-europe.com/environment. (EEA: Norway, Iceland and Liechtenstein)
Introduction

4
Table of contents
Introduction
About this Manual ........................................................................................... |
6 |
Getting to Know the Camcorder |
|
Supplied Accessories...................................................................................... |
8 |
Components Guide ......................................................................................... |
9 |
Screen Displays ............................................................................................ |
11 |
Preparations |
|
|
|
Getting Started |
|
Charging the Battery Pack ............................................................................ |
13 |
Installing the Backup Battery ........................................................................ |
14 |
Inserting and Removing a Tape .................................................................... |
15 |
Preparing the Camcorder.............................................................................. |
16 |
Adjusting the LCD Screen............................................................................. |
16 |
Using the Menus |
|
Selecting a FUNC. Menu Option................................................................... |
17 |
Selecting an Option from the Setup Menus .................................................. |
18 |
First Time Settings |
|
Changing the Language................................................................................ |
19 |
Changing the Time Zone............................................................................... |
19 |
Setting the Date and Time ............................................................................ |
20 |
Basic Functions |
|
|
|
Recording |
|
Recording Movies ......................................................................................... |
21 |
Zooming ........................................................................................................ |
22 |
Playback |
|
Playing Back Movies..................................................................................... |
23 |
Locating the End of the Last Scene .............................................................. |
24 |
Magnifying the Playback Image .................................................................... |
24 |
Advanced Functions |
|
|
|
Menu Options Lists |
|
FUNC. Menu ................................................................................................. |
25 |
Setup menus................................................................................................. |
25 |
Camera Setup (Digital Zoom, Image Stabilizer, etc.).......................... |
25 |
VCR Setup (Recording Mode, TV Type, etc.)..................................... |
27 |
Audio Setup (Audio Mode, Wind Screen, etc.) ................................... |
27 |
Display Setup (LCD Brightness, Language, etc.) ............................... |
28 |
System Setup (Beep, etc.).................................................................. |
29 |
Date/Time Setup................................................................................. |
29 |
Recording Programs |
|
Using the Recording Programs..................................................................... |
30 |
: Changing the Shutter Speed and Special Scene Programs ................... |
31 |
Adjusting the Picture: Exposure, Focus and Color |
|
Manual Exposure Adjustment ....................................................................... |
32 |
Manual Focus Adjustment ............................................................................ |
33 |
White Balance............................................................................................... |
34 |

5
Image Effects................................................................................................. |
35 |
Audio Recording and Playback |
|
Audio Recording Mode .................................................................................. |
35 |
Audio Playback Modes .................................................................................. |
36 |
Other Functions |
|
Data Code ..................................................................................................... |
37 |
Self Timer ...................................................................................................... |
37 |
Digital Effects................................................................................................. |
38 |
External Connections |
|
Connecting to a TV or VCR |
|
Connection Diagrams .................................................................................... |
40 |
Playback on a TV Screen .............................................................................. |
42 |
Recording to a VCR or Digital Video Recorder ............................................. |
42 |
Digital Video Dubbing....................................................................... |
43 |
Connecting to a Computer |
|
PC Connection Diagrams .............................................................................. |
45 |
Transferring Video Recordings ...................................................................... |
46 |
Additional Information |
|
Trouble? |
|
Troubleshooting ............................................................................................. |
47 |
List of Messages............................................................................................ |
49 |
Do’s and Don’ts |
|
Handling Precautions .................................................................................... |
51 |
Maintenance/Others ...................................................................................... |
53 |
Using the Camcorder Abroad ........................................................................ |
55 |
General Information |
|
System Diagram (Availability differs from area to area) ................................ |
56 |
Optional Accessories..................................................................................... |
57 |
Specifications................................................................................................. |
59 |
Index.............................................................................................................. |
61 |
Introduction
6
About this Manual
Thank you for purchasing the Canon MD120/MD111/MD110/MD101. Please read this manual carefully before you use the camcorder and retain it for future reference. Should your camcorder fail to operate correctly, refer to the Troubleshooting table
( 47).
47).
Conventions Used in the Manual
IMPORTANT: Precautions related to the camcorder’s operation.
NOTES: Additional topics that complement the basic operating procedures. POINTS TO CHECK: Restrictions that apply if the function described is not
available in all operating modes (the operating mode to which the camcorder should be set, etc.).
 : Reference page number.
 : Option or feature that applies to or is available only with a specific model. “Screen” refers to the LCD and the viewfinder screen.
The photos included in the manual are simulated pictures taken with a still camera. Note that unless indicated otherwise, illustrations in this manual refer to the 
model.
|
First Time Settings |
|||
|
Changing the Language |
|||
Menu item shown at its default position |
The language for on-screen and menu |
|||
displays can be changed. The list of |
||||
|
available languages depends on the |
|||
Buttons and switches to be operated |
region where you purchased the |
|||
camcorder. |
|
|||
Language Set A |
||||
|
||||
|
English, German, Spanish, French, Italian, Polish, |
|||
|
Russian, Simplified Chinese and Japanese. |
|||
|
Language Set B |
|||
|
English, Simplified Chinese, Traditional Chinese |
|||
|
and Korean. |
|
||
|
|
|
Default value |
|
Brackets [ ] and capital letters are used to refer to menu |
|
DISPLAY SETUP/ |
||
options as they are displayed on screen. Menu options in |
|
LANGUAGE ENGLISH |
||
boldface indicate the default setting (for example [ON], |
|
|||
|
|
|
||
[OFF]). |
FUNC. |
|
||
|
( |
24) |
|
|
|
1 Press FUNC.. |
|||
|
2 Select ( |
) the icon and press |
||
|
( |
) to open the setup menus. |
||
|
3 Select ( |
) [DISPLAY SETUP/ ] |
||
|
and press ( ). |
|||
Names of buttons and switches other than the joystick are |
4 Select ( |
) [LANGUAGE] and press |
||
( |
). |
) the desired option and |
||
indicated within a “button” frame (for example FUNC. ). |
5 Select ( |
|||
press ( |
). |
|||
|
6 Press FUNC. to close the menu. |
|||
|
|
NOTES |
|
|
|
If you changed the language by mistake, |
|||
|
follow the |
mark next to the menu item to |
||
About the Joystick and the Joystick Guide
The mini joystick allows you to control many of the camcorder’s operations and to make selections and changes in the camcorder’s menus.
Push the joystick up, down, left or right ( ,
, 
 ) to select an item or change settings.
Press the joystick itself (  ) to save the settings or confirm an action. On menu screens, this is indicated by the joystick icon
 .
.
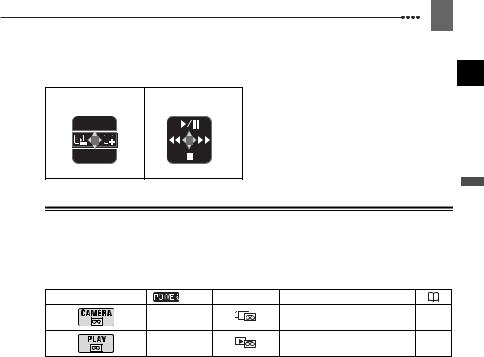
7
The functions assigned to the joystick change according to the operation mode. You can display the joystick guide to remind you of the joystick’s functions in each operating mode.
Recording: Playback:
EXP
FOCUS
About the Operating Modes
The camcorder’s operating mode is determined by the position of the 

 switch. In the manual,
  indicates that a function is available in the operating mode shown and
  indicates that the function is not available. When no operating mode icons are given, the function is available in all operating modes.
Operating Mode |
Switch Icon Display |
Operation |
|
|
CAMERA |
Recording movies on a tape |
21 |
|
|
||
|
PLAY |
Playing movies from a tape |
23 |
|
|
Trademark Acknowledgements
• is a trademark.
•Windows® is a registered trademark of Microsoft Corporation in the United States and/or other countries.
•Macintosh and Mac OS are trademarks of Apple Computer, Inc., registered in the United States and other countries.
•Other names and products not mentioned above may be trademarks or registered trademarks of their respective companies.
Introduction

8 Getting to Know the Camcorder 

Supplied Accessories
CA-590E Compact |
BP-2L5 Battery Pack |
Lithium Button Battery |
STV-250N Stereo Video |
Power Adapter |
|
CR1616 |
Cable |
(incl. power cord) |
|
|
|
|
|
|
|
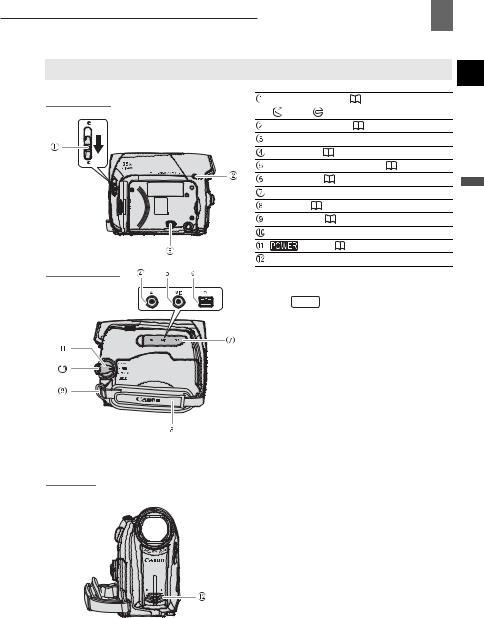
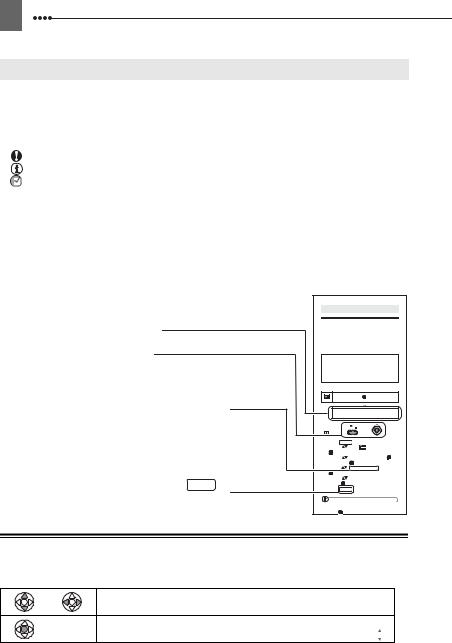
Components Guide
Left side view
Right Side View
Front view

 Getting to Know the Camcorder 9
Lens cover switch ( |
21) |
|
||
( open, |
closed) |
|
|
|
CHARGE indicator ( |
13) |
|
||
Speaker |
|
|
|
|
AV terminal ( |
|
40) |
|
|
MIC (microphone) terminal ( |
36) |
|||
DV terminal ( |
|
40, 45) |
|
|
Terminal cover |
|
|
Introduction |
|
Grip belt ( |
16) |
|
||
|
|
|||
Strap mount ( |
|
58) |
|
|
Lock button |
|
|
|
|
switch ( |
7) |
|
|
|
Stereo microphone |
|
|
||
Names of buttons and switches other than the joystick are indicated within a “button” frame (for example FUNC. ).

10 Getting to Know the Camcorder 

Back view
Top view
Bottom view
Viewfinder ( |
16) |
|
|
|
Dioptric adjustment lever ( |
16) |
|
||
BATT. (battery release) switch ( |
13) |
|||
LCD screen ( |
16) |
|
|
|
Backup battery compartment ( |
14) |
|||
Start/stop button ( |
21) |
|
|
|
 Serial number, Battery attachment unit (
 13)
13)
DC IN terminal ( |
13) |
|
D.EFFECTS button ( |
38) |
|
FUNC. button ( |
17, 25) |
|
Joystick ( 6) |
|
|
Zoom lever ( |
22) |
|
Mode switch ( |
30) |
|
Easy recording |
|
|
Recording programs |
|
|
Cassette compartment ( |
15) |
|
 OPEN/EJECT
  switch (
 15)
15)
 Cassette compartment cover (
 15)
15)
 Tripod socket (
 22)
22)
Names of buttons and switches other than the joystick are indicated within a “button” frame (for example FUNC. ).
Screen Displays
 Recording
 Playback

 Getting to Know the Camcorder 11
Zoom ( |
22), Exposure |
( |
32) |
|||
Recording program ( |
30) |
|
||||
White balance ( |
34) |
|
|
|
||
Image effect ( |
35) |
|
|
|
||
Digital effects ( |
|
38) |
|
|
|
|
Condensation warning ( |
|
54) |
|
|||
Shutter speed ( |
31) |
|
|
Introduction |
||
Self timer ( |
|
37) |
|
|
|
|
|
|
|
|
|
||
Exposure adjustment ( |
|
32) |
|
|||
Manual focus ( |
|
33) |
|
|
|
|
Image stabilizer ( |
26) |
|
|
|
||
Recording mode ( |
27) |
|
|
|||
Tape operation |
|
|
|
|
||
Time code (hours : minutes : seconds) |
|
|||||
Remaining tape |
|
|
|
|
||
Remaining battery charge |
|
|
||||
Widescreen 16:9 mode ( |
|
26) |
|
|||
Wind screen off ( |
27) |
|
|
|
||
Audio recording mode ( |
|
35) |
|
|||
Backup battery warning |
|
|
|
|||
Level marker ( |
|
28) |
|
|
|
|
Recording reminder |
|
|
|
|||
Operating mode ( |
7) |
|
|
|
||
Audio playback mode ( |
|
36) |
|
|||
Search function display |
|
|
|
|||
END SEARCH ( |
24) |
|
|
|
||
Playback time |
|
|
|
|
|
|
(hours : minutes : seconds : frames) |
|
|||||
Joystick guide ( |
6) |
|
|
|
||
Data code ( |
37) |
|
|
|
||
12 Getting to Know the Camcorder 

 Tape operation
 Record,
 Record pause,
  Stop,
Stop,  Eject,
 Fast forward,
  Rewind,
 Playback,
 Playback pause,
 Fast forward playback,
  Rewind playback
 Remaining tape
Indicates the remaining time of the tape in minutes. “ ” moves during recording. When the tape reaches its end, the display changes to “
 END”.
END”.
•When the time left is less than 15 seconds, the remaining tape time may not appear.
•Depending on the type of tape, the remaining time displayed may not be correct. In any case, you will be able to record on the tape the number of minutes that appears on the videocassette’s label (for example, 85 minutes).
 Remaining battery charge
•When “ ” starts flashing in red replace the battery pack with a fully charged one.
•When you attach an empty battery pack, the power may turn off without displaying “ ”.
”.
•Depending on the conditions under which the camcorder and the battery pack are used, the actual battery charge may not be indicated accurately.
 Backup battery warning
flashes in red when the lithium button battery is not installed, or when it needs to be replaced.
 Recording reminder
The camcorder counts from 1 to 10 seconds when you start recording. This is helpful to avoid scenes that are too short.
Getting Started
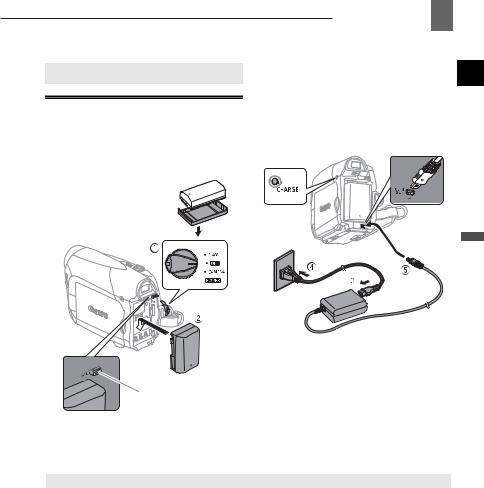
Charging the Battery Pack
The camcorder can be powered with a battery pack or directly using the compact power adapter. Charge the battery pack before use.
Remove the battery terminal cover before attaching the battery

 Getting Started 13
1Turn off the camcorder.
2Attach the battery pack to the camcorder.
• Press the battery pack lightly and slide it down until it clicks.
DC IN CHARGE terminal indicator
Preparations
3 |
Connect the power cord to the |
4 |
compact power adapter. |
Plug the power cord into a power |
|
BATT. switch |
outlet. |
Charging, Recording and Playback Times
The times given in the table below are approximate and vary depending on the actual charging, recording or playback conditions.
Battery Pack |
BP-2L5 |
NB-2L |
NB-2LH |
BP-2L12 |
BP-2L14 |
Charging Time |
145 min. |
150 min. |
160 min. |
240 min. |
285 min. |
Maximum Recording Times |
|
|
|
|
|
Viewfinder |
105 min. |
120 min. |
145 min. |
250 min. |
305 min. |
LCD [NORMAL] |
100 min. |
120 min. |
145 min. |
245 min. |
300 min. |
LCD [BRIGHT] |
95 min. |
110 min. |
135 min. |
230 min. |
280 min. |
Typical Recording Times* |
|
|
|
|
|
Viewfinder |
60 min. |
65 min. |
80 min. |
135 min. |
165 min. |
LCD [NORMAL] |
55 min. |
65 min. |
80 min. |
130 min. |
165 min. |
LCD [BRIGHT] |
50 min. |
60 min. |
75 min. |
125 min. |
155 min. |
Playback Times |
110 min. |
125 min. |
150 min. |
265 min. |
320 min. |
* Approximate times for recording with repeated operations such as start/stop, zooming, power on/off.

14 Getting Started 

5Connect the compact power adapter to the camcorder’s DC IN terminal.
•The CHARGE indicator starts flashing. The indicator will stay on when the charging is completed.
•You can also use the compact power adapter without attaching a battery pack.
•When the compact power adapter is connected, even if a battery is attached its power will not be consumed.
ONCE THE BATTERY IS FULLY CHARGED
1Disconnect the compact power adapter from the camcorder.
2Unplug the power cord from the power outlet and the compact power adapter.
TO REMOVE THE BATTERY PACK
Press BATT. to release the battery pack. Lift the battery pack and then pull it out.
 IMPORTANT
You may hear some noise from the compact power adapter during use. This is not a malfunction.
We recommend charging the battery pack in temperatures between 10 ºC and 30 ºC. Outside the temperature range of 0 ºC to 40 ºC, the charging will not start.
Do not connect to the camcorder’s DC IN terminal or to the compact power adapter any electrical equipment that is not expressly recommended for use with this camcorder.
To prevent equipment breakdowns and excessive heating, do not connect the supplied compact power adapter to voltage converters for overseas travels or special power sources such as those on aircraft and ships, DC-AC inverters, etc.
 NOTES
NOTES
The CHARGE indicator also serves as a rough estimate of the battery charge status. Continuously on: Battery fully charged. Flashes approx. twice per second: Battery over 50% charged.
Flashes approx. once per second: Battery less than 50% charged.
The charging time will vary depending on the surrounding temperature and the battery pack’s initial charge condition. In cold places, the effective usage time of the battery will decrease.
We recommend that you prepare battery packs 2 to 3 times longer than you think you might need.
Installing the Backup Battery
The backup battery (lithium button battery CR1616) allows the camcorder to retain the date, time ( 19) and other camcorder settings while the power source is disconnected. Connect a power source to the camcorder when replacing the backup battery to retain the settings.
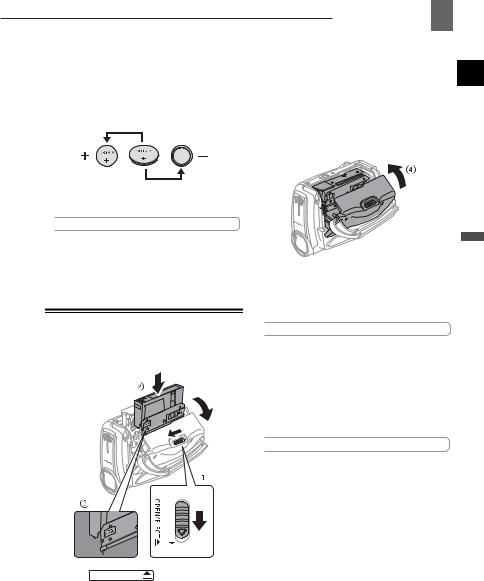
1If a battery pack is attached, remove it first.
2Open the backup battery cover.
3Insert the backup battery with the + side facing out.
4Close the cover.
 NOTES
NOTES
The backup battery has a life span of about a year.  flashes in red to inform you that it needs to be replaced.
Inserting and Removing a Tape
Use only videocassettes marked with the  logo.
logo.
1 Slide OPEN/EJECT fully in the direction of the arrow and open the cassette compartment cover.
The cassette compartment opens automatically.

 Getting Started 15
2Insert the cassette.
•Insert the cassette with the window facing the grip belt.
•To remove a cassette pull it straight out.
3Press the  mark on the cassette compartment until it clicks.
4Wait for the cassette compartment to retract automatically and close the cassette compartment cover.
 IMPORTANT
Do not interfere with the cassette compartment while it is opening or closing automatically, or attempt to close the cover before the cassette compartment has fully retracted.
Be careful not to get your fingers caught in the cassette compartment cover.
 NOTES
NOTES
If the camcorder is connected to a power source, cassettes can be inserted/removed even if the  switch is set to
  .
.
Preparations
16 Getting Started 

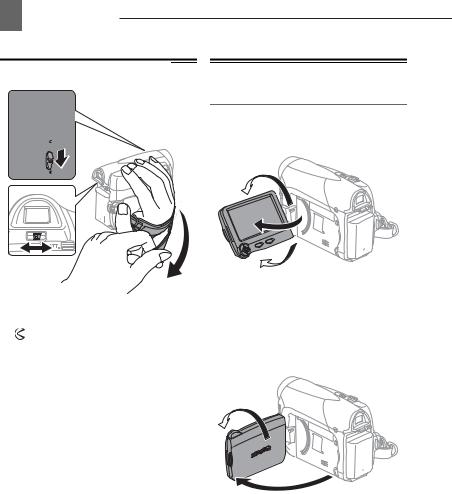
Preparing the Camcorder
1Turn on the camcorder.
2Move the lens cover switch down to to open the lens cover.
3Adjust the viewfinder.
Keep the LCD panel closed to use the viewfinder and adjust the dioptric adjustment lever as necessary.
4 Fasten the grip belt.
Adjust the grip belt so that you can reach the zoom lever with your index finger, and the start/stop button with your thumb.
Adjusting the LCD Screen
Rotating the LCD Panel
Open the LCD panel 90 degrees.
You can rotate the panel 90 degrees downward.
180°
90°
You can rotate the panel 180 degrees toward the lens (allowing the subject to monitor the LCD screen while you use the viewfinder). Rotating the panel 180 degrees is also useful if you wish to include yourself when recording with the self timer.
Subject can monitor the LCD screen
LCD Backlight
You can set the brightness of the LCD screen at normal or bright.
FUNC.
(  17)
17)
1Press FUNC. .
2Select ( ) the
) the 
 icon and press (
  ) to open the setup menus.
3Select ( ) [
) [  DISPLAY SETUP/
 ] and press (
 ).
).
4Select ( ) [BACKLIGHT] and press (
  ).
).
5Select ( ) the desired option and press (
  ).
).
6Press FUNC. to close the menu.
 NOTES
NOTES
This setting does not affect the brightness of the recording or the viewfinder screen.
Using the [BRIGHT] setting will shorten the effective usage time of the battery pack.

 Using the Menus 17
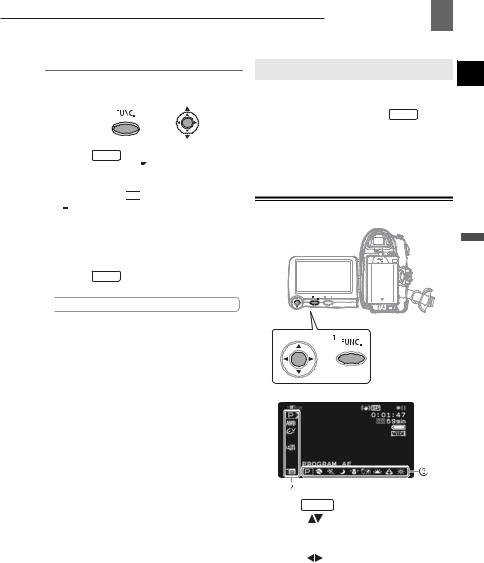
Using the Menus
Many of the camcorder’s functions can be adjusted from the menus that open after pressing the FUNC. button ( FUNC. ).
For details about the available menu options and settings, refer to Menu Options Lists ( 25).
25).
Selecting a FUNC. Menu Option
Preparations
1 |
Press FUNC. . |
|
2 |
Select ( |
) the icon of the function |
|
you want to change from the left |
|
3 |
side column. |
|
Select ( |
) the desired setting from |
|
|
the available options at the bottom |
|
|
bar. |
|
|
The selected option will be highlighted |
|
in light blue. Menu items not available will appear grayed out.
18 Using the Menus 

4 Press FUNC. to save the settings and close the menu.
•You can press FUNC. to close the menu at any time.
•With some settings you will need to
press (  ) and make further selections. Follow the additional operation guides that will appear on the screen (such as the joystick icon
 , small arrows, etc.).
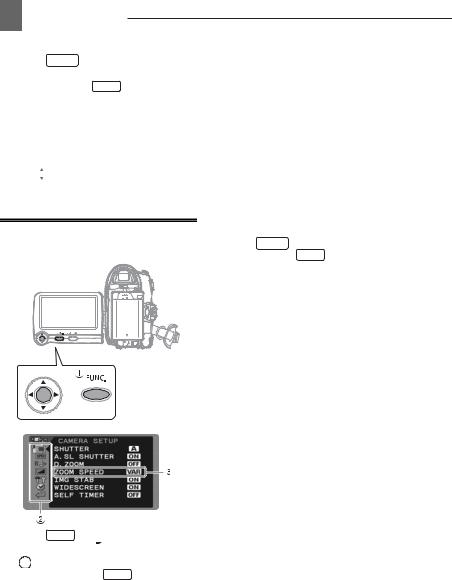
Selecting an Option from the Setup Menus
1Press FUNC. .
2Select ( ) the
) the 
 icon and press (
  ) to open the setup menus.
You can also hold FUNC. pressed down for more than 2 seconds to open directly the setup menus screen.
3Select ( ) the desired menu from the left side column and press (
 ).
).
The title of the selected menu appears on top of the screen and under it the list of settings.
4Select ( ) the setting you want to change and press (
 ).
).
•An orange frame will indicate the menu item currently selected. Menu items not available will appear grayed out.
•To return to the menu selection
screen, select ( ) [
) [ RETURN] and press (
  ).
).
5Select ( ) the desired option and press (
 ) to save the setting.
6Press FUNC. .
You can press FUNC. to close the menu at any time.
First Time Settings
Changing the Language
The language for on-screen and menu displays can be changed. The list of available languages depends on the region where you purchased the camcorder.
Language Set A
English, German, Spanish, French, Italian, Polish,
Romanian, Turkish, Russian, Ukrainian, Arabic
and Persian.
Language Set B
English, Simplified Chinese, Traditional Chinese
and Thai.
Default value
DISPLAY SETUP/
LANGUAGE ENGLISH
FUNC.
(  17)
17)
1 Press FUNC. .
2Select ( ) the
) the 
 icon and press (
  ) to open the setup menus.
3Select ( ) [DISPLAY SETUP/
 ] and press (
  ).
).
4Select ( ) [LANGUAGE] and press (
  ).
).
5Select ( ) the desired option and press (
  ).
).
6Press FUNC. to close the menu.
 NOTES
NOTES
If you changed the language by mistake, follow the  mark next to the menu item to change the setting.

 First Time Settings 19
Changing the Time Zone
Default value
DATE/TIME SETUP
T.ZONE/DST PARIS
FUNC.
( |
17) |
|
|
|
|
1 |
Press FUNC. . |
|
|
||
2 |
Select ( |
) the |
icon and press |
Preparations |
|
3 |
( ) to open the setup menus. |
||||
|
|||||
Select ( |
) [DATE/TIME SETUP] |
|
|||
4 |
and press ( ). |
|
|
||
Select ( |
) [T.ZONE/DST] and |
|
|||
|
press ( |
). |
|
|
|
The time zone setting appears. The default setting is Paris or Singapore, depending on the region of purchase.
5 Select ( ) your time zone and press (
  ).
).
To adjust for daylight saving time, select the time zone with the  mark next to the area.
6 Press FUNC. to close the menu.
Time Zones
Once you have set the time zone, date and time, you do not need to reset the clock every time you travel to another time zone. Select the time zone referring to the date and time displayed on the screen.
Loading...