


 Loading...
Series
Basic Guide |
What Can I Do with This Machine? |
|
Before Using the Machine |
||
|
||
|
Document Handling |
|
|
Print Media |
|
|
Sending Faxes (MF6550/MF6560PL/ |
|
|
MF6580PL Only) |
|
|
Receiving Faxes (MF6550/MF6560PL/ |
|
|
MF6580PL Only) |
|
|
Copying |
|
|
Printing |
|
|
Scanning |
|
|
PC Faxing (MF6550/MF6560PL/ |
|
|
MF6580PL Only) |
|
|
Remote UI (MF6580PL Only) |
|
|
Maintenance |
|
|
Troubleshooting |
|
|
Machine Settings |
|
|
Appendix |
Please read this guide before operating this equipment.
After you finish reading this guide, store it in a safe place for future reference.
ENG

 Manuals for the Machine
●Machine Set-Up
●Software Installation
●Basic Features
●Maintenance
●Basic Features
●Maintenance
●Machine Settings
●Specifications
●Advanced Features
●Network and Remote User Interface
●System Monitor
●Reports and Lists
●Scanning Features
Starter Guide
Basic Guide
(This Document)
Advanced Guide
Scanner Driver Guide
CD-ROM
CD-ROM
CD-ROM
CD-ROM Indicates the manual is supplied in PDF format in the accompanying CD-ROM.
●To view the manuals in PDF format, Adobe Reader/Adobe Acrobat Reader is required. If Adobe Reader/Adobe Acrobat Reader is not installed on your system, please download it from the Adobe Systems Incorporated website.
●Considerable effort has been made to make sure that the manuals for the machine are free of inaccuracies and omissions. However, as we are constantly improving our products if you need an exact specification, please contact Canon.
●The machine illustration on the cover may differ slightly from your machine.
i

What Can I Do with This Machine?
What Can I Do with This Machine?
Fax Features (MF6550/MF6560PL/MF6580PL Only)
Specify a recipient with a single key
One-Touch Speed Dialing
→ p. 4-7
Specify a recipient with a two-digit code
Coded Speed Dialing
→ p. 4-15
Specify multiple recipients with a single key
Group Dialing
→ p. 4-23
Look up a particular recipient
AAAAA
BBBBB
CCCCC
Address Book Dialing
→ Advanced Guide
Redial when the line is busy
Automatic Redialing
→ Advanced Guide
ii
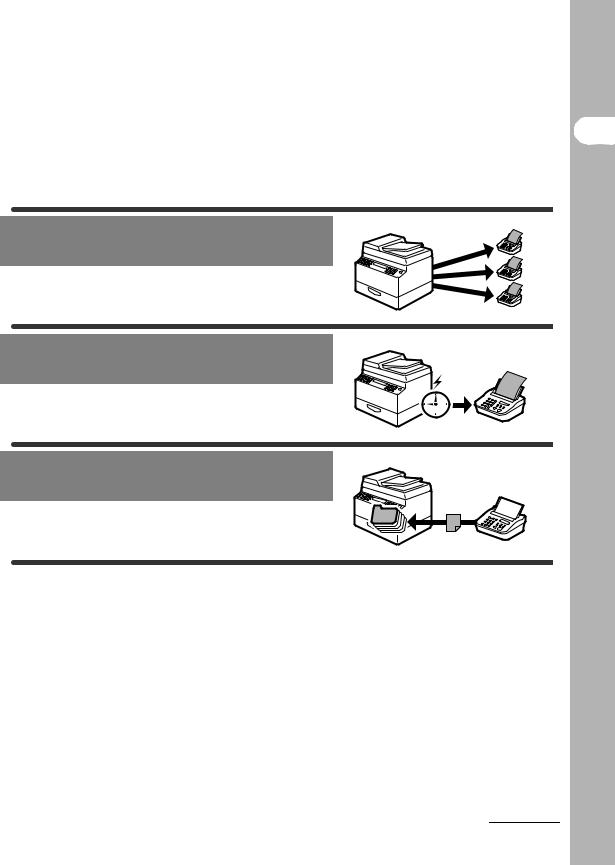
Send a fax to multiple recipients
Broadcasting
→ Advanced Guide
Send a fax at a specified time
Delayed Sending
→ Advanced Guide
Receive faxes in memory without printing out
Memory Reception
→ Advanced Guide
Machine? This with Do I Can What
iii
What Can I Do with This Machine?
Copy Features
Select a scan mode depending on |
|
|
|
|
|
|
the type of image |
|
|
|
|
|
|
|
ABC |
|
|
|
|
|
Image Quality |
|
ABC |
|
|
|
|
|
ABC |
|
|
|
|
|
→ p. 6-3 |
|
ABC |
|
|
|
|
|
|
|
|
|
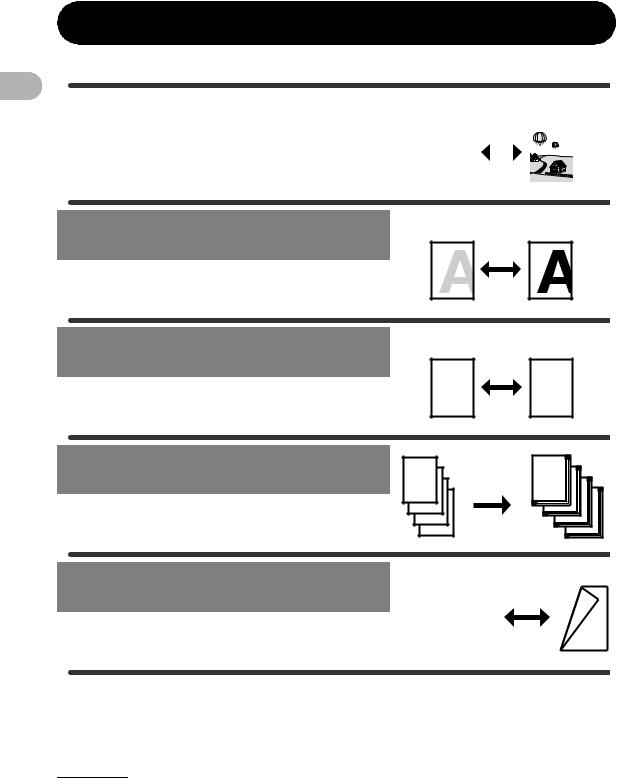
Adjust the density level of scanned images
Density
→ p. 6-4
Enlarge or reduce copied images
Zoom Ratio
→ p. 6-6
Sort copies by page order
Collate Copying
→ Advanced Guide
A |
A |
|
|
||
AAAA |
AAAA |
|
AAAABBBB |
AAAA |
|
AAAA |
AAAA |
|
BBBBCCCC |
AAAA |
|
AAAA |
AAAA |
|
BBBB |
1 |
|
CCCC1DDDD |
AAAA |
|
BBBBCCCC |
1 |
|
DDDD2 |
|
|
CCCC |
AAAA |
|
|
AAAA |
|
DDDD |
|
1 |
3 |
|
AAAA |
DDDD |
|
|
4 |
|
1 |
|
|
|
Make two-sided copies
|
ABC |
|
DEF |
Two-Sided Copy |
ABC |
|
DEF |
ABC |
|
DEF |
|
→ Advanced Guide |
ABC |
|
DEF |
1 |
|
2 |
DEABC E F AFBC
FABC
ABC
1
iv
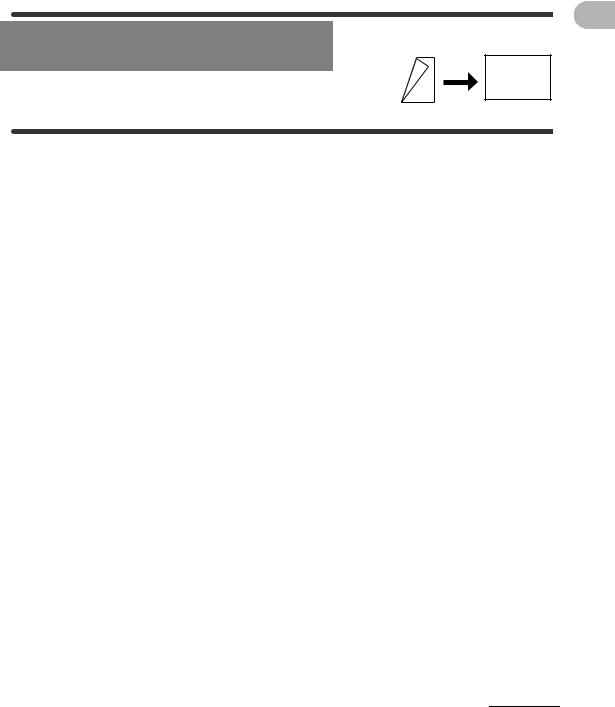
Copy two documents on one sheet
|
ABC |
|
|
|
ABC |
|
|
|
|
||
|
|
DEF |
|
|
ABC |
|
|
2 on 1 Combination |
|
DEF |
|
ABC |
|
||
|
|
DEF1 |
|
→ Advanced Guide |
|
DEF |
|
|
2 |
|
|
DEABC E F AFBC
FABC
ABC
1
ABC DEF ABC DEF ABC DEF
ABC DEF
1 2
Machine? This with Do I Can What
v
What Can I Do with This Machine?
Printer Feature
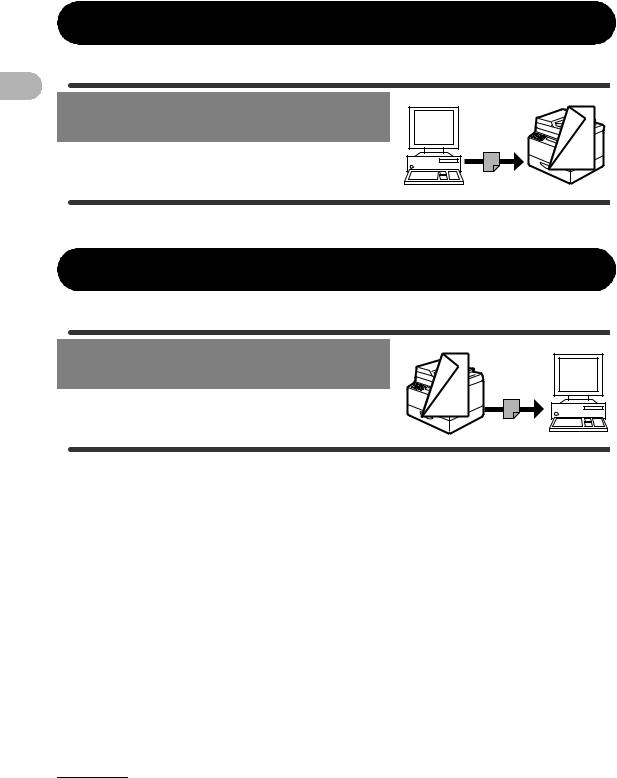
Print a document from a PC
Printing
→ Online help
Scanner Feature
Specify detailed scanning options to suit various images
Scanning
→ Scanner Driver Guide
ABCEF
EFABC FABC
ABC
1
EAFBC EFABC FABC
ABC
1
vi
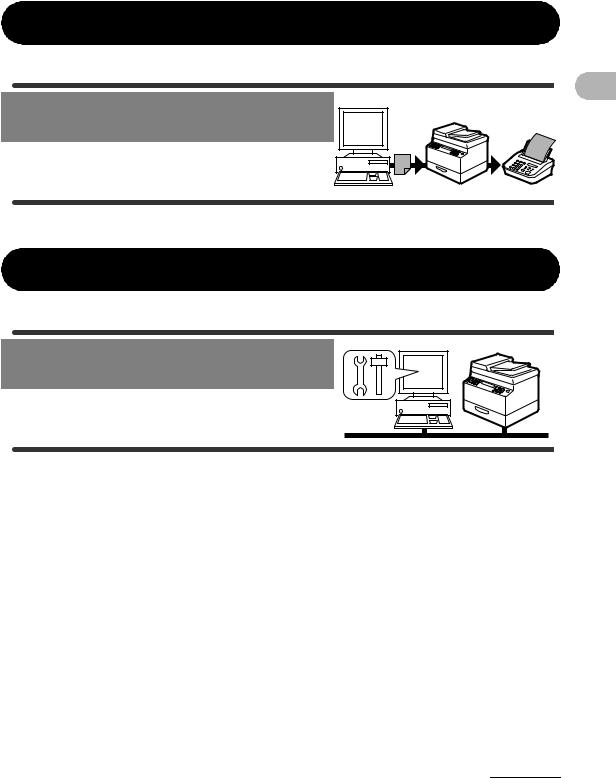
PC Fax Feature (MF6550/MF6560PL/MF6580PL Only)
Send a fax from a PC
PC Faxing
→ Online help
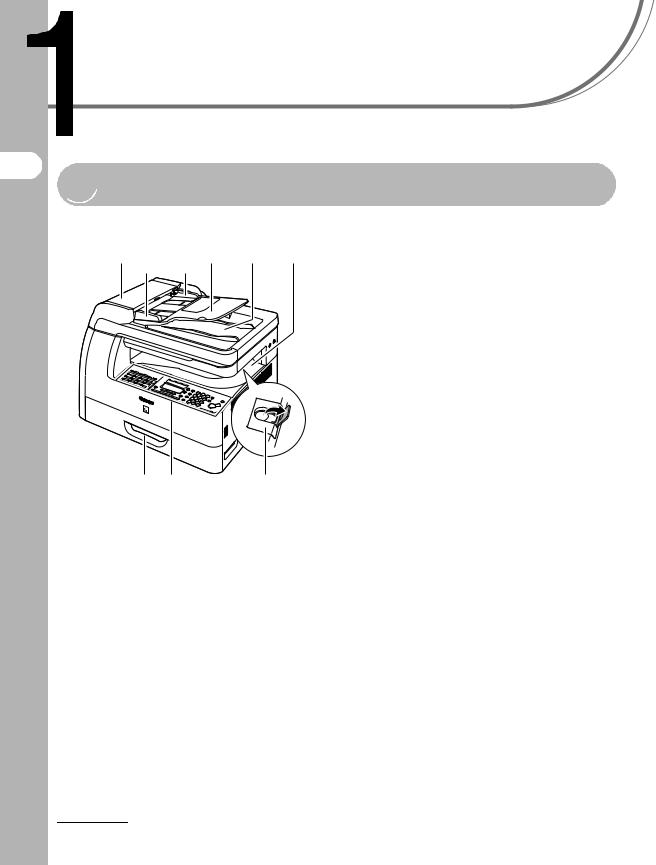
Remote UI Feature (MF6580PL Only)
Access and manage the machine from a PC
Remote UI
→ Advanced Guide
Machine? This with Do I Can What
vii

What Can I Do with This Machine?

 Contents
Manuals for the Machine................................................................. |
i |
What Can I Do with This Machine? ............................................... |
ii |
Fax Features (MF6550/MF6560PL/MF6580PL Only) ..... |
ii |
Copy Features ................................................................ |
iv |
Printer Feature................................................................ |
vi |
Scanner Feature ............................................................. |
vi |
PC Fax Feature |
|
(MF6550/MF6560PL/MF6580PL Only)........................... |
vii |
Remote UI Feature (MF6580PL Only)............................ |
vii |
Contents ....................................................................................... |
viii |
How to Use This Guide................................................................. |
xii |
Symbols Used in This Manual ........................................ |
xii |
Illustrations Used in This Manual................................... |
xiii |
Legal Notices ............................................................................... |
xiv |
Trademarks.................................................................... |
xiv |
Copyright ....................................................................... |
xiv |
Disclaimer ...................................................................... |
xiv |
1 Before Using the Machine ...................................................... |
1-1 |
Machine Components ................................................................. |
1-1 |
Operation Panel ........................................................................... |
1-3 |
Main Operation Panel ................................................... |
1-3 |
Facsimile Operation Panel |
|
(MF6550/MF6560PL/MF6580PL Only)......................... |
1-5 |
LCD (Standby Mode) ................................................................... |
1-6 |
Copy Mode ................................................................... |
1-6 |
Fax Mode...................................................................... |
1-6 |
Scan Mode.................................................................... |
1-6 |
Optional Handset (MF6550/MF6560PL/MF6580PL Only).......... |
1-7 |
Maintaining the Handset ............................................... |
1-7 |
viii

Toner Cartridge............................................................................ |
1-8 |
Maintaining the Toner Cartridge ................................... |
1-8 |
Timer Settings............................................................................ |
1-10 |
Setting Sleep Mode .................................................... |
1-10 |
Setting Auto Clear Time.............................................. |
1-13 |
Setting Daylight Saving Time...................................... |
1-15 |
2 Document Handling................................................................. |
2-1 |
Document Requirements ............................................................ |
2-1 |
Scanning Area.............................................................................. |
2-3 |
Loading Documents .................................................................... |
2-4 |
On the Platen Glass...................................................... |
2-4 |
In the ADF..................................................................... |
2-6 |
3 Print Media ............................................................................... |
3-1 |
Paper Requirements.................................................................... |
3-1 |
Printable Area .............................................................................. |
3-3 |
Paper Guidelines ......................................................................... |
3-4 |
Loading Paper.............................................................................. |
3-5 |
In the Multi-Purpose Tray (e.g., Envelopes) ................. |
3-5 |
Setting Paper Type and Size....................................................... |
3-8 |
For the Paper Cassette................................................. |
3-8 |
For the Multi-Purpose Tray ......................................... |
3-11 |
4 Sending Faxes (MF6550/MF6560PL/MF6580PL Only) |
.......... 4-1 |
Scan Settings ............................................................................... |
4-3 |
Image Quality................................................................ |
4-3 |
Density.......................................................................... |
4-5 |
Speed Dialing ............................................................................... |
4-6 |
Registering Recipients for Speed Dialing ..................... |
4-6 |
Using Speed Dialing ................................................... |
4-32 |
Manual Sending ......................................................................... |
4-34 |
Direct Sending ........................................................................... |
4-36 |
ix
Machine? This with Do I Can What
What Can I Do with This Machine?
5 Receiving Faxes (MF6550/MF6560PL/MF6580PL Only) |
.......5-1 |
6 Copying .................................................................................... |
6-1 |
Scan Settings ............................................................................... |
6-3 |
Image Quality................................................................ |
6-3 |
Density.......................................................................... |
6-4 |
Zoom Ratio ................................................................... |
6-6 |
7 Printing ..................................................................................... |
7-1 |
8 Scanning .................................................................................. |
8-1 |
9 PC Faxing (MF6550/MF6560PL/MF6580PL Only).................. |
9-1 |
10 Remote UI (MF6580PL Only)............................................... |
10-1 |
11 Maintenance......................................................................... |
11-1 |
Cleaning the Machine................................................................ |
11-1 |
Exterior ....................................................................... |
11-1 |
Interior......................................................................... |
11-2 |
Fuser Roller ................................................................ |
11-4 |
Scanning area............................................................. |
11-5 |
Cleaning the ADF Automatically ................................. |
11-8 |
Transcription Roller..................................................... |
11-9 |
Replacing the Toner Cartridge ............................................... |
11-10 |
Redistributing Toner ................................................. |
11-10 |
Replacing the Toner Cartridge.................................. |
11-12 |
Transporting the Machine....................................................... |
11-16 |
12 Troubleshooting .................................................................. |
12-1 |
Clearing Jams ............................................................................ |
12-1 |
Document Jams.......................................................... |
12-1 |
Paper Jams................................................................. |
12-3 |
LCD Messages ........................................................................... |
12-5 |
x

Error Codes (MF6550/MF6560PL/MF6580PL Only)............... |
12-11 |
If a Power Failure Occurs........................................................ |
12-13 |
If You Cannot Solve a Problem .............................................. |
12-14 |
13 Machine Settings ................................................................. |
13-1 |
Machine Settings ....................................................................... |
13-1 |
Printing USER’S DATA LIST ...................................... |
13-1 |
Accessing the Setting Menu ....................................... |
13-3 |
Setting Menu .............................................................................. |
13-5 |
COMMON SETTINGS ............................................... |
13-5 |
COPY SETTINGS .................................................... |
13-10 |
FAX SETTINGS |
|
(MF6550/MF6560PL/MF6580PL Only) .................... |
13-12 |
ADDRESS BOOK SET. |
|
(MF6550/MF6560PL/MF6580PL Only) .................... |
13-18 |
PRINTER SETTINGS .............................................. |
13-20 |
TIMER SETTINGS ................................................... |
13-24 |
ADJUST./CLEANING .............................................. |
13-26 |
REPORT SETTINGS ............................................... |
13-28 |
SYSTEM SETTINGS ............................................... |
13-29 |
14 Appendix .............................................................................. |
14-1 |
Specifications ............................................................................ |
14-1 |
General ....................................................................... |
14-1 |
Copier ......................................................................... |
14-2 |
Printer ......................................................................... |
14-3 |
Facsimile (MF6550/MF6560PL/MF6580PL Only) ...... |
14-3 |
Telephone (MF6550/MF6560PL/MF6580PL Only)..... |
14-4 |
Index ........................................................................................... |
14-5 |
Machine? This with Do I Can What
xi

What Can I Do with This Machine?

 How to Use This Guide
Symbols Used in This Manual
The following symbols are used throughout the manuals for the machine and indicate the warnings, cautions and notes you should keep in mind when using the machine.
Indicates a warning that may lead to death or serious injury if not WARNING observed.
Explains how to avoid actions that could injure you or damage your
CAUTION
machine.
NOTE |
Explains operating restrictions and how to avoid minor difficulties. |
In addition, this guide uses distinctive notations to identify keys and information in the LCD:
–The keys you press appear in square brackets: [Stop].
–Information in the LCD appears in angle brackets: <DOCUMENT READY>.
The numbers that point to the keys on the operation panel diagram correspond to the order of steps to take in the procedure.
xii

Illustrations Used in This Manual
Unless otherwise mentioned, illustrations used in this manual are those taken when no optional equipment is attached to the LaserBase MF6580PL.
Machine? This with Do I Can What
The model LaserBase MF6580PL is used for illustration purposes in this manual. When there is any difference among MF6530, MF6540PL, MF6550, MF6560PL, MF6580PL, it is clearly indicated in the text, e.g., “MF6580PL Only.”
xiii

What Can I Do with This Machine?

 Legal Notices
Trademarks
Canon, the Canon logo and LaserBase are trademarks of Canon Inc.
All other product and brand names are registered trademarks, trademarks or service marks of their respective owners.
Copyright
Copyright © 2006 by Canon Inc. All rights reserved. No part of this publication may be reproduced, transmitted, transcribed, stored in a retrieval system, or translated into any language or computer language in any form or by any means, electronic, mechanical, magnetic, optical, chemical, manual, or otherwise, without the prior written permission of Canon Inc.
Disclaimer
The information in this document is subject to change without notice.
CANON INC. MAKES NO WARRANTY OF ANY KIND WITH REGARD TO THIS MATERIAL, EITHER EXPRESS OR IMPLIED, EXCEPT AS PROVIDED HEREIN, INCLUDING WITHOUT LIMITATION, THEREOF, WARRANTIES AS TO MARKETABILITY, MERCHANTABILITY, FITNESS FOR A PARTICULAR PURPOSE OF USE OR AGAINST INFRINGEMENT OF ANY PATENT. CANON INC. SHALL NOT BE LIABLE FOR ANY DIRECT, INCIDENTAL, OR CONSEQUENTIAL DAMAGES OF ANY NATURE, OR LOSSES OR EXPENSES RESULTING FROM THE USE OF THIS MATERIAL.
xiv

What Can I Do with This Machine?
xv
Before Using the Machine
Before Using the
Machine

 Machine Components
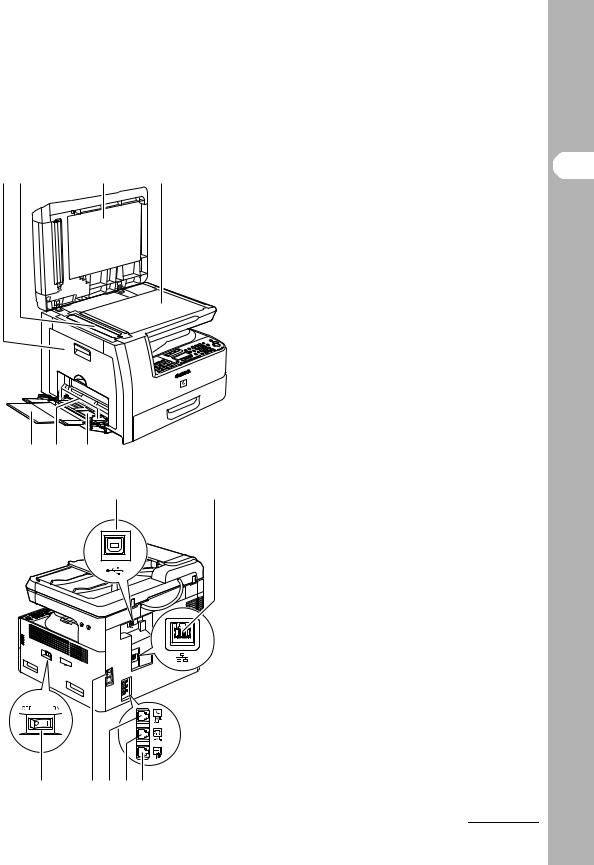
A ADF (Automatic Document Feeder)
A |
B |
C |
D |
E |
Holds documents and feeds them |
|
automatically into the scanning area. |
||||||
|
|
|
|
|
|
|
B Slide guides
Adjusts to the width of the document.
C Document feeder tray
Holds documents.
D Document delivery tray
Receives documents.
E Paper delivery tray
Receives copies, prints and faxes.
F Paper stopper
|
|
|
Prevents the paper from falling off the paper |
|
|
|
delivery tray. |
H |
G |
F |
Open the stopper from its original position for |
|
A4 size paper.
G Operation panel
Machine controls.
H Paper cassette
Holds the paper supply.
1-1
I J |
|
I |
Left cover |
K |
L |
Open this cover when replacing the toner |
|
|
|
|
cartridge or clearing paper jams. |
|
|
J |
Scanning area |
|
|
|
Scans documents from the ADF. |
|
|
K |
Platen glass cover |
|
|
|
Open this cover when placing a document on |
|
|
|
the platen glass. |
|
|
L |
Platen glass |
|
|
|
Place documents. |
|
|
M |
Multi-purpose tray |
|
|
|
Feeds non-standard size or thick/thin type |
|
|
|
paper stacks. |
|
|
N |
Slide guides for multi-purpose tray |
|
|
|
Adjusts to the width of the paper. |
|
|
O |
Multi-purpose tray extension |
O N |
M |
|
Pull out to load paper stack. |
|
P |
P |
USB port |
|
Q |
Connect the USB (Universal Serial Bus) |
|
|
|
|
|
|
|
|
cable. |
|
|
Q Ethernet port (MF6580PL only) |
|
|
|
|
Connect the network cable. |
|
|
R |
Telephone line jack (MF6550/ |
|
|
|
MF6560PL/MF6580PL only) |
|
|
|
Connect the external telephone cable. |
|
|
S |
External device jack (MF6550/ |
|
|
|
MF6560PL/MF6580PL only) |
|
|
|
Connect an external device. |
|
|
T |
Handset jack |
|
|
|
Connect an optional handset cable. |
|
|
U |
Power socket |
|
|
|
Connect the power cord. |
|
|
V |
Main power switch |
|
|
|
Turns the power on or off. |
V |
U T S |
R |
|
1-2
Machine the Using Before

 Operation Panel
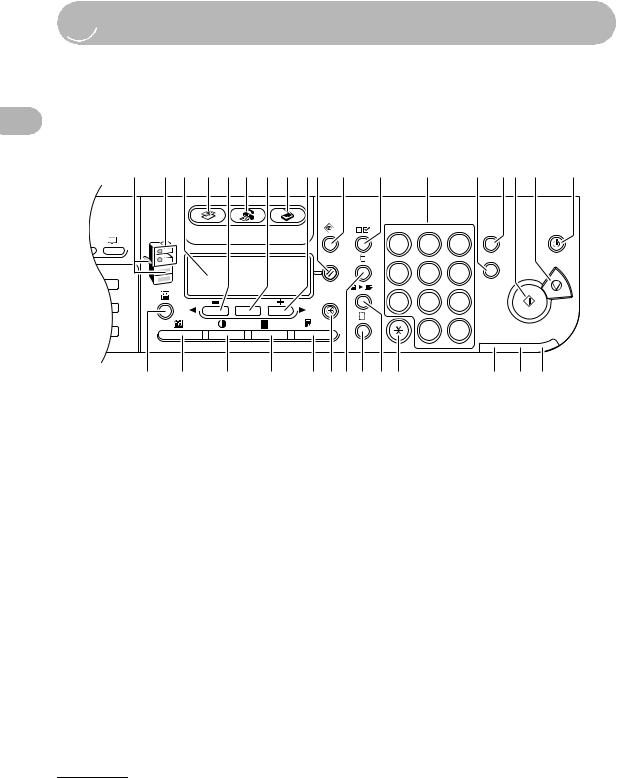
Main Operation Panel
|
●MF6550/MF6560PL/MF6580PL |
|
|
|
|
|
||||
Using the Machine |
A B C D E F G H I J K |
L |
M |
|
N O P Q |
R |
||||
|
COPY |
FAX |
|
SCAN |
@./ |
ABC |
DEF |
ON/OFF |
|
|
Before |
|
|
|
|||||||
|
|
1 |
2 |
3 |
|
|||||
|
|
|
|
|
C |
|
||||
|
|
|
|
|
GHI |
JKL |
MNO |
|
|
|
|
|
|
|
|
|
4 |
5 |
6 |
ID |
|
|
|
|
|
|
|
PQRS |
TUV |
WXYZ |
|
|
|
|
|
OK |
|
|
7 |
8 |
9 |
|
|
|
|
|
|
|
|
|
|
|
|
|
|
|
|
|
|
|
|
0 |
# |
|
|
|
|
|
|
|
|
T |
|
|
|
|
|
e |
d |
c |
b |
a Z Y X W V |
|
|
U T S |
|
|
APaper Select indicator
Indicates the selected paper source.
BJam Location indicator
Indicates the location of paper jams.
CLCD display
Displays messages and prompts during operation. Displays selection, text, and numbers when adjusting the settings.
DCOPY key
Press to switch to Copy mode.
E key
key
Press to decrease the value for various settings. Also press to see the previous item in the menu.
FFAX key
Press to switch to Fax mode.
GOK key
Press to determine the contents you set or register.
HSCAN key
Press to switch to Scan mode.
I key
key
Press to increase the value for various settings. Also press to see the next item in the menu.
JReset key
Press to return the machine to standby mode.
KSystem Monitor key
Press to check fax transmission, print, copy, or report output status.
LView Settings key
Press to confirm settings of the copy function.
MNumeric keys
Enter letters and numbers.
1-3
NID key
Press to enter a password for the machine. (Enter password → Press ID to enable functions. Press ID again after operations to return to the display for entering password.)
To register a password,
[Additional Functions] → <SYSTEM SETTINGS> → <MANAGE DEPT. ID>.
OClear key
Press to clear entered alphanumeric characters.
PStart key
Press to start copying, scanning and sending faxes.
QStop key
Press to cancel machine operations.
RON/OFF key (operation panel power switch)
Press to turn the operation panel on/off. Also press to enter Sleep mode or to resume the normal mode from Sleep mode manually.
SPower indicator
Lights up when the main power is turned on.
TError indicator
Flashes or lights up when an error has occurred.
UProcessing/Data indicator
Flashes when the machine is working. Lights up when the machine has waiting jobs.
VTone key
Press to switch from rotary pulse to tone dialing.
W2 on 1 key
Press to set 2 on 1 copying.
XFrame Erase key
Press to set frame erase for copying.
YCollate key
Press to set collate copying.
ZAdditional Functions key
Press to select or cancel modes in Additional Functions.
aTwo-Sided key
Press to set two-sided copying or faxing.
bEnlarge/Reduce key
Press to enlarge or reduce copy ratio.
cDensity key
Press to lighten or darken the copies or faxes.
dImage Quality key
Press to select image quality for copying and faxing.
ePaper Select key
Press to select a paper source (paper cassette or multi-purpose tray).
●MF6530/MF6540PL
A B C D E G H |
I J |
K |
L |
M |
|
N O P Q |
R |
|
COPY |
SCAN |
|
|
1 |
2 |
3 |
C |
ON/OFF |
|
|
|
|
|
||||
|
|
|
|
4 |
5 |
6 |
ID |
|
|
|
|
OK |
7 8 |
9 |
|
|
|
|
0 |
# |
e |
d |
c |
b |
a Z Y X W |
U T S |
Machine the Using Before
1-4
Before Using the Machine
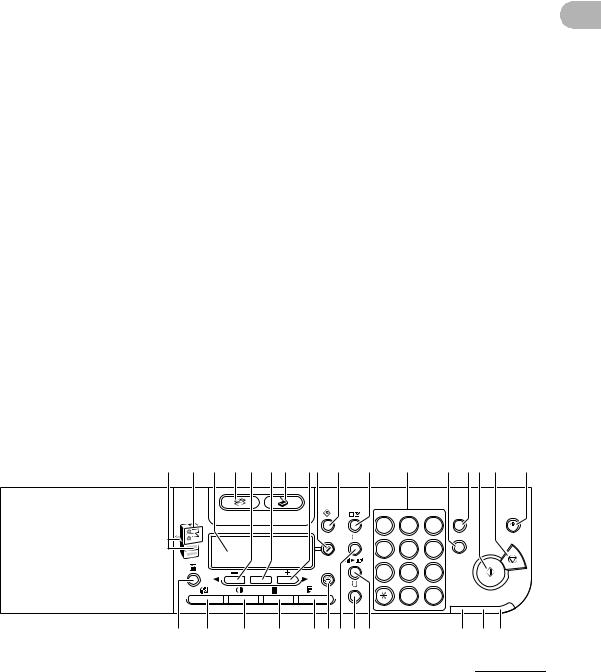
Facsimile Operation Panel (MF6550/MF6560PL/
MF6580PL Only)
A B C D E F
Panel open |
|
|
|
|
R |
|
C |
|
|
|
|
|
/P |
||
13 |
14 |
15 |
16 |
01 |
02 |
03 |
04 |
17 |
18 |
19 |
20 |
05 |
06 |
07 |
08 |
21 |
22 |
23 |
|
09 |
10 |
11 |
12 |
G H
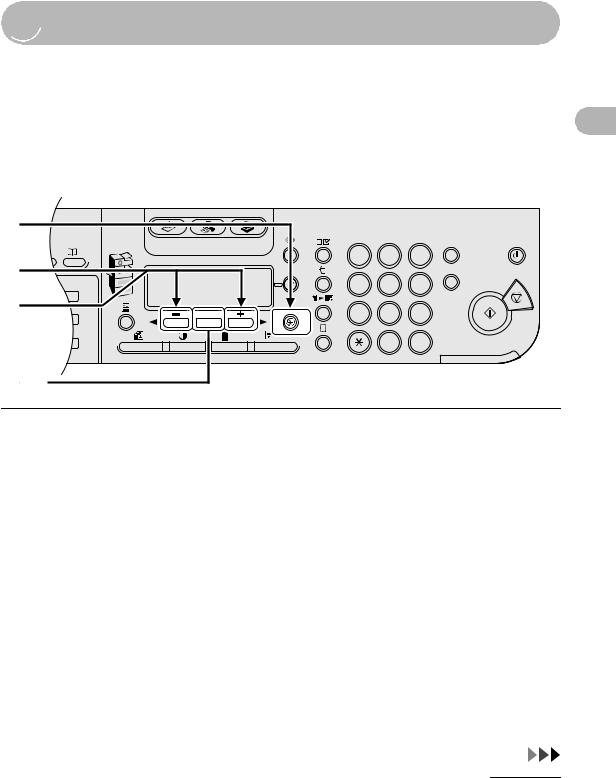
ADirect TX key
Press to set Direct Sending.
BR key
Press to dial an outside line access number or an extension number when the unit is connected through a switchboard (PBX).
CHook key
Press when you want to dial without lifting the optional handset or the handset of the external telephone.
DRedial/Pause key
Press to redial the last dialed number when fax is standing by.
Press to enter a pause between or after the telephone/fax number when dialing or registering numbers.
G
ECoded Dial key
Press to perform coded speed dialing.
FAddress Book key
Press to search preregistered destinations under one-touch speed dialing keys or coded speed dialing numbers by name.
GOne-Touch Speed Dial keys
Press to use one-touch speed dialing (Preregistered frequently used numbers).
HDelayed TX key
Press to set Delayed Sending.
1-5

 LCD (Standby Mode)
Copy Mode
●Without optional cassette
|
|
A |
|
|
|
|
|
B |
C |
|||||
|
|
|
|
|
|
|
|
|
|
|
|
|
|
|
|
1 0 0 % |
|
|
|
|
|
A 4 |
|
O 1 |
|
||||
|
|
|
|
|
|
|
|
|
|
|
|
|
||
|
|
A |
|
|
T E X T |
|
|
|
|
|
||||
|
|
|
|
|
|
|
|
|
|
|
|
|
|
|
|
|
D |
|
|
E |
|
|
|
||||||
AZoom ratio
BPaper size
CQuantity
DDensity
EImage quality
Fax Mode*
A
3 1 / 1 2 2 0 0 6 S U N 1 0 : 5 0
|
F a x O n l y |
|
F I N E |
|
||
|
|
|
|
|
|
|
|
B |
C |
||||
ADate & Time
BReceive mode
CImage quality
* MF6550/MF6560PL/MF6580PL Only
●With optional cassette
|
|
A |
|
|
|
|
B |
C |
|||||||
|
|
|
|
|
|
|
|
|
|
|
|
|
|
|
|
|
1 0 0 % |
|
|
|
A U T O |
|
O 1 |
|
|||||||
|
|
|
|
|
|
|
|
|
|
|
|
|
|
||
|
|
A |
|
|
|
T E X T |
|
|
|
||||||
|
|
|
|
|
|
|
|
|
|
|
|
|
|
|
|
D E
Scan Mode
S C A N N I N G M O D E
Machine the Using Before
1-6
Before Using the Machine

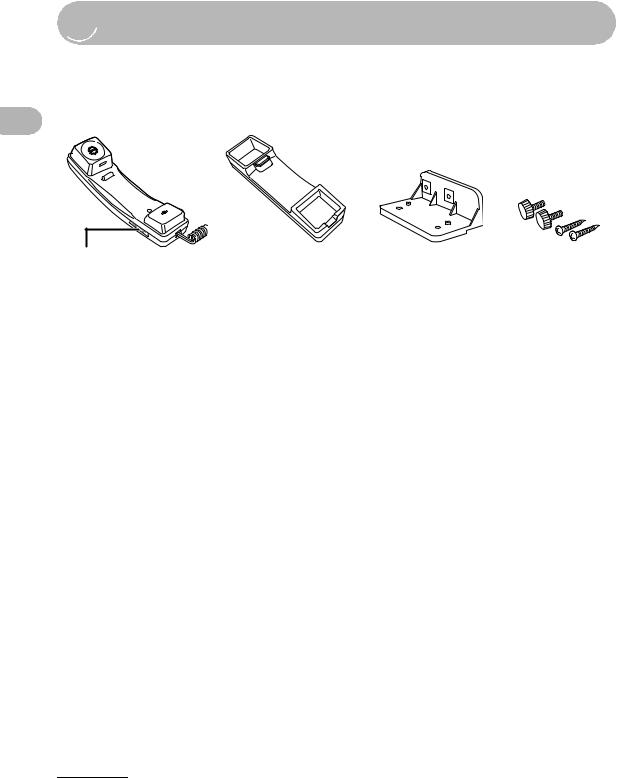
 Optional Handset (MF6550/MF6560PL/MF6580PL Only)
If you want to use the machine as a telephone and a fax machine, or if you want to receive faxes manually, install the optional handset available from your local authorized Canon dealer or the Canon help line.
Use a sharp object (e.g., pen) to select the ring volume of the handset.
 NOTE
NOTE
For how to install the handset, see “Connect Telephone Cables and Install Handset,” in the Starter Guide.
Maintaining the Handset
–Do not leave the handset exposed to direct sunlight.
–Do not install the handset in hot or humid conditions.
–Do not spray aerosol polish on the handset as it may cause damage.
–Use a damp cloth to wipe clean the handset.
1-7


 Toner Cartridge
The lifetime of the Canon Genuine toner cartridge used in this machine is approximately 5,000 pages. The page counts are on the basis of ISO/IEC 19752* when printing A4 size paper with the default print density setting. The level of toner consumption varies depending on the type of documents printed. If your average document contains a lot of graphics, tables, or charts, the life of the toner cartridge will be shorter as they consume more toner. To purchase a new Canon genuine toner cartridge, contact your local authorized Canon dealer or Canon help line.
*“ISO/IEC 19752” is the global standard related to “Method for the determination of toner cartridge yield for monochromatic electrophotographic printers and multi-function devices that may contain printer components” issued by ISO (International Organization for Standardization).
Toner Cartridge name:
Canon Cartridge 706
Machine the Using Before
Maintaining the Toner Cartridge
●Keep the toner cartridge away from computer screens, disk drives, and floppy disks. The magnet inside the toner cartridge may harm these items.
●Avoid locations subject to high temperature, high humidity, or rapid changes in temperature.
●Do not expose the toner cartridge to direct sunlight or bright light for more than five minutes.
●Store the toner cartridge in its protective bag. Do not open the bag until you are ready to install the toner cartridge in the machine.
●Save the toner cartridge’s protective bag in case you need to repack and transport the toner cartridge at a later date.
●Do not store the toner cartridge in a salty atmosphere or where there are corrosive gases such as from aerosol sprays.
●Do not remove the toner cartridge from the machine unnecessarily.
1-8

Before Using the Machine
●Do not open the drum protective shutter on the toner cartridge. Print quality may deteriorate if the drum surface is exposed to light or is damaged.
●Always hold the toner cartridge by its handle to avoid touching the drum protective shutter.
●Do not stand the toner cartridge on end, and do not turn it upside down. If toner becomes caked in the toner cartridge, it may become impossible to free it even by
shaking the toner cartridge.
 CAUTION
Do not place the toner cartridge in fire. Toner powder is flammable.
1-9

 Timer Settings
Setting Sleep Mode
When the machine remains idle for a certain period of time, it automatically enters Sleep mode.
1 |
|
|
|
|
|
|
|
|
|
COPY |
FAX |
SCAN |
@./ |
|
ABC |
DEF |
ON/OFF |
|
|
1 |
2 |
3 |
||||
2 |
|
|
|
|
C |
|||
|
|
|
|
GHI |
|
JKL |
MNO |
|
3 |
4 |
|
|
|
4 |
5 |
6 |
ID |
|
|
PQRS |
|
|||||
|
|
|
|
|
TUV |
WXYZ |
|
|
|
8 |
OK |
|
|
7 |
8 |
9 |
|
|
|
|
|
|
||||
|
2 |
|
|
|
|
|
|
|
|
|
|
|
|
0 |
# |
|
|
|
|
|
|
|
|
|
||
|
|
|
|
|
T |
|
|
|
[OK] |
|
|
|
|
|
|
|
|
1 Press [Additional Functions].
2 Press [
 ] or [
 ] to select <TIMER SETTINGS>, then press [OK].
3 Press [
 ] or [
 ] to select <AUTO SLEEP TIME>, then press [OK].
Machine the Using Before
1-10
COPY |
FAX |
SCAN |
@./ |
ABC |
DEF |
ON/OFF |
|
|
|
|
4 |
|
|
1 |
2 |
3 |
C |
|
|
|
GHI |
|
JKL |
MNO |
6 |
|
5 |
4 |
|
4 |
5 |
6 |
ID |
|
PQRS |
|
|||||
Machine |
|
|
|
TUV |
WXYZ |
|
|
|
8 |
OK |
7 |
8 |
9 |
|
|
|
|
|
|||||
|
|
|
|
||||
|
|
2 |
|
|
|
|
|
|
|
|
|
0 |
# |
|
|
the |
|
|
|
|
|
||
|
|
|
T |
|
|
|
|
UsingBefore |
|
|
|
|
|
|
|
[OK] |
|
|
|
|
|
|
|
|
|
|
|
|
|
|
4 Confirm that <ON> is displayed, then press [OK].
5 |
Press [ |
] or [ |
] to select the desired interval, then press [OK]. |
You can set the interval from 3 to 30 minutes (in one-minute increments).
You can also enter values using numeric keys.
6 Press [Stop] to return to standby mode.
1-11

 NOTE
NOTE
–To resume normal mode from Sleep mode, press [ON/OFF] on the operation panel.
–To enter Sleep mode manually, press [ON/OFF] on the operation panel.
–The machine will not enter Sleep mode when:
•the machine is in operation
•a system error occurs
•the optional handset or the handset of the external telephone is off the hook*
–The machine will leave Sleep mode when:
•you press [ON/OFF] on the operation panel
•a computer performs a scan through the machine
* MF6550/MF6560PL/MF6580PL Only
Machine the Using Before
1-12

Before Using the Machine
Setting Auto Clear Time
If the machine remains idle for a certain period of time, the display returns to standby mode (Auto Clear function).
1
2 |
COPY FAX SCAN |
@./ |
ABC |
DEF |
ON/OFF |
|
1 |
2 |
3 |
||||
|
C |
|||||
|
|
|
|
|
GHI |
|
JKL |
|
MNO |
|
|
3 |
4 |
|
|
4 |
|
5 |
|
6 |
ID |
|
PQRS |
TUV |
WXYZ |
|
|||||
|
8 |
OK |
|
7 |
|
8 |
|
9 |
|
|
|
|
|
|
|
||||
|
2 |
|
|
|
|
|
|
|
|
|
|
|
|
|
0 |
|
# |
|
|
|
|
|
|
|
|
|
|
||
|
|
|
|
T |
|
|
|
|
|
[OK] |
|
|
|
|
|
|
|
|
|
1 |
Press [Additional Functions]. |
|||
2 |
Press [ |
|
] or [ |
] to select <TIMER SETTINGS>, then press [OK]. |
|
||||
3 |
Press [ |
|
] or [ |
] to select <AUTO CLEAR TIME>, then press [OK]. |
|
||||
1-13
4 |
COPY |
FAX |
SCAN |
@./ |
|
ABC |
|
DEF |
|
|
ON/OFF |
|
1 |
|
2 |
|
3 |
C |
|||||
|
|
|
|
|
|
6 |
|||||
|
|
|
|
|
|
|
|||||
|
|
|
|
GHI |
|
JKL |
|
MNO |
|
|
|
|
|
|
|
|
|
|
|
|
|||
5 |
4 |
|
|
|
4 |
|
5 |
|
6 |
ID |
|
|
|
PQRS |
TUV |
WXYZ |
|
|
|||||
|
8 |
OK |
|
|
7 |
|
8 |
|
9 |
|
|
|
|
|
|
|
|
|
|
||||
|
2 |
|
|
|
|
|
|
|
|
|
|
|
|
|
|
|
|
0 |
|
# |
|
|
|
|
|
|
|
|
|
|
|
|
|
||
|
|
|
|
|
T |
|
|
|
|
|
|
[OK] |
|
|
|
|
|
|
|
|
|
|
|
4 Confirm that <ON> is displayed, then press [OK].
5 |
Press [ |
] or [ |
] to select the desired interval, then press [OK]. |
You can set the interval from 1 to 9 minutes (in one-minute increments).
You can also enter values using numeric keys.
6 Press [Stop] to return to standby mode.
Machine the Using Before
1-14
Loading...