


 Loading...
imageCLASS MF5700 Series Software Guide
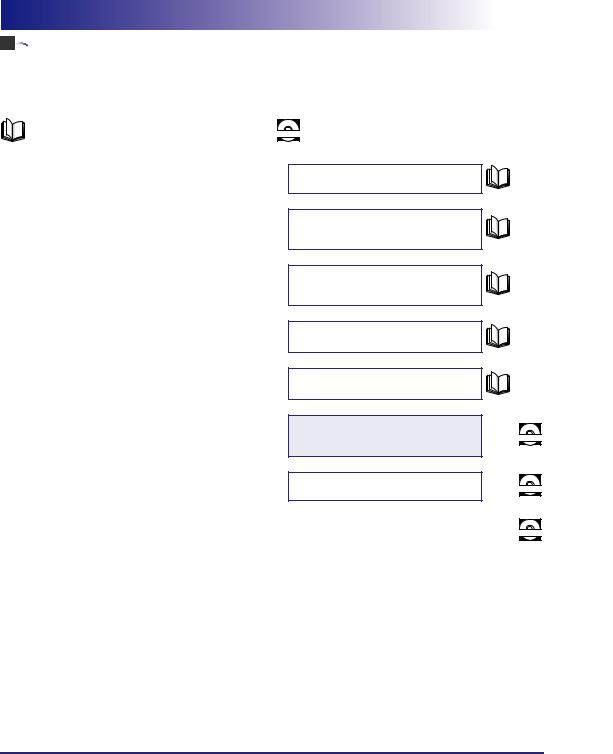


 Manuals for the Machine
The manuals for this machine are divided as follows. Please refer to them for detailed information. Depending on the system configuration and product purchased, some manuals may not be needed.
Guides with this symbol are printed manuals.
Guides with this symbol are PDF manuals included on the CD-ROM accompanying CD-ROM. (See footnote.)
•Setting Up the Machine
•Software Installation
•Setting Up the Machine
•Software Installation
•Network Settings
•Copying and Printing Instructions
•Troubleshooting
•Fax Instructions
•Troubleshooting
•Software Installation and Instructions
•Printing, Scanning and PC Faxing Instructions
•Troubleshooting
•Remote User Interface Instructions
Set-Up Instructions
Only for the MF5730/MF5750 models.
Set-Up Instructions
for the Machine
Only for the MF5770 model.
Set-Up Instructions for Networking and Printing
Only for the MF5770 model.
Basic Guide
Facsimile Guide
Only for the MF5750/MF5770 models.
Software Guide
(This Manual)
Remote UI Guide
Only for the MF5770 model.
• Network Connectivity and Setup Instructions |
Network Guide |
|
|
|
Only for the MF5770 model. |
\
\
CD-ROM
CD-ROM
CD-ROM
To view the manual in PDF format, Adobe Reader/Acrobat Reader/Acrobat is required. If Adobe Reader/Acrobat Reader/Acrobat is not installed on your system, please download it from the Adobe Systems Incorporated website (http://www.adobe.com).


 How This Manual Is Organized
Chapter 1 |
Installation |
|
|
Chapter 2 |
Printing |
|
|
Chapter 3 |
Scanning |
|
|
Chapter 4 |
PC Faxing (MF5750/MF5770 Models Only) |
|
|
Chapter 5 |
Troubleshooting |
|
|
Chapter 6 |
Appendix |
|
|
Considerable effort has been made to ensure that this manual is free of inaccuracies and omissions. However, as we are constantly improving our products, if you need an exact specification, please contact Canon.

Contents
Preface . . . . . . . . . . . . . . . . . . . . . . . . . . . . . . . . . . . . . . . . . . . . . . . . . . . . . . . . . ix How to Use This Manual . . . . . . . . . . . . . . . . . . . . . . . . . . . . . . . . . . . . . . . . . . . ix
Symbols Used in This Manual . . . . . . . . . . . . . . . . . . . . . . . . . . . . . . . . . . . . . . ix Buttons Used in This Manual . . . . . . . . . . . . . . . . . . . . . . . . . . . . . . . . . . . . . . . ix Displays Used in This Manual . . . . . . . . . . . . . . . . . . . . . . . . . . . . . . . . . . . . . . x Abbreviations Used in This Manual . . . . . . . . . . . . . . . . . . . . . . . . . . . . . . . . . . x
Legal Notices . . . . . . . . . . . . . . . . . . . . . . . . . . . . . . . . . . . . . . . . . . . . . . . . . . . . .xi
Trademarks . . . . . . . . . . . . . . . . . . . . . . . . . . . . . . . . . . . . . . . . . . . . . . . . . . . . xi Copyright . . . . . . . . . . . . . . . . . . . . . . . . . . . . . . . . . . . . . . . . . . . . . . . . . . . . . . xi Notice . . . . . . . . . . . . . . . . . . . . . . . . . . . . . . . . . . . . . . . . . . . . . . . . . . . . . . . . . xi
Chapter 1 Installation
System Requirements . . . . . . . . . . . . . . . . . . . . . . . . . . . . . . . . . . . . . . . . . . . . .1-1 Where to Find Help . . . . . . . . . . . . . . . . . . . . . . . . . . . . . . . . . . . . . . . . . . . . . . .1-3 Installing Software on Your Computer. . . . . . . . . . . . . . . . . . . . . . . . . . . . . . . .1-4
To Use the Machine as a Local Printer, Scanner or for PC Faxing (USB Connection) . . . . . . . . . . . . . . . . . . . . . . . . . . . . . . . . . . . . . . . . . . . . . . . . . . .1-5 Step 1 Install the MF Drivers (USB Connection) . . . . . . . . . . . . . . . . . . . . . . .1-6 Step 2 Install the MF Toolbox . . . . . . . . . . . . . . . . . . . . . . . . . . . . . . . . . . . . . .1-8 Step 3 Connect the USB Cable . . . . . . . . . . . . . . . . . . . . . . . . . . . . . . . . . . .1-10 Install Accompanying Applications . . . . . . . . . . . . . . . . . . . . . . . . . . . . . . . . .1-11 Read User’s Manual. . . . . . . . . . . . . . . . . . . . . . . . . . . . . . . . . . . . . . . . . . . .1-11 To Use the Machine as a Network Printer (Network Connection)
(MF5770 Model Only) . . . . . . . . . . . . . . . . . . . . . . . . . . . . . . . . . . . . . . . . . .1-12 Step 1 Specifying Network Settings . . . . . . . . . . . . . . . . . . . . . . . . . . . . . . . .1-12 Step 2 Connecting the Machine to a Network . . . . . . . . . . . . . . . . . . . . . . . .1-15 Step 3 Checking Network Settings. . . . . . . . . . . . . . . . . . . . . . . . . . . . . . . . .1-15 Step 4 Install the MF Network Drivers (Network Connection) . . . . . . . . . . . .1-16
Checking Installation. . . . . . . . . . . . . . . . . . . . . . . . . . . . . . . . . . . . . . . . . . . . .1-20
Uninstalling and Reinstalling the Software. . . . . . . . . . . . . . . . . . . . . . . . . . .1-21
Removing the MF Toolbox . . . . . . . . . . . . . . . . . . . . . . . . . . . . . . . . . . . . . . .1-21
Removing the MF Drivers. . . . . . . . . . . . . . . . . . . . . . . . . . . . . . . . . . . . . . . .1-22
Reinstalling the Software . . . . . . . . . . . . . . . . . . . . . . . . . . . . . . . . . . . . . . . .1-23
iv

Chapter 2 Printing
Printing a Document . . . . . . . . . . . . . . . . . . . . . . . . . . . . . . . . . . . . . . . . . . . . . . 2-1
Canceling Printing . . . . . . . . . . . . . . . . . . . . . . . . . . . . . . . . . . . . . . . . . . . . . . 2-3
Changing Print Settings . . . . . . . . . . . . . . . . . . . . . . . . . . . . . . . . . . . . . . . . . . . 2-4
From a Windows Application . . . . . . . . . . . . . . . . . . . . . . . . . . . . . . . . . . . . . . 2-4
Opening the Printing Preferences or Properties Dialog Box . . . . . . . . . . . 2-4
From the [Printers and Faxes]
(Windows 98/Me/2000: [Printers]) Folder . . . . . . . . . . . . . . . . . . . . . . . . . . . . 2-5
Opening the Properties Dialog Box . . . . . . . . . . . . . . . . . . . . . . . . . . . . . . 2-5 Opening the Printing Preferences Dialog Box
(Windows 2000/XP/Server 2003) . . . . . . . . . . . . . . . . . . . . . . . . . . . . . . . . 2-5
Windows 98/Me Properties . . . . . . . . . . . . . . . . . . . . . . . . . . . . . . . . . . . . . . . . . 2-6
General Tab . . . . . . . . . . . . . . . . . . . . . . . . . . . . . . . . . . . . . . . . . . . . . . . . 2-6 Details Tab . . . . . . . . . . . . . . . . . . . . . . . . . . . . . . . . . . . . . . . . . . . . . . . . . 2-7 Sharing Tab . . . . . . . . . . . . . . . . . . . . . . . . . . . . . . . . . . . . . . . . . . . . . . . . 2-8 Page Setup Tab . . . . . . . . . . . . . . . . . . . . . . . . . . . . . . . . . . . . . . . . . . . . . 2-9 Finishing Tab . . . . . . . . . . . . . . . . . . . . . . . . . . . . . . . . . . . . . . . . . . . . . . 2-15 Quality Tab . . . . . . . . . . . . . . . . . . . . . . . . . . . . . . . . . . . . . . . . . . . . . . . . 2-17 Profiles . . . . . . . . . . . . . . . . . . . . . . . . . . . . . . . . . . . . . . . . . . . . . . . . . . . 2-22
Windows 2000/XP/Server 2003 Properties and Printing Preferences . . . . . 2-27
Properties . . . . . . . . . . . . . . . . . . . . . . . . . . . . . . . . . . . . . . . . . . . . . . . . . . . 2-27
General Tab . . . . . . . . . . . . . . . . . . . . . . . . . . . . . . . . . . . . . . . . . . . . . . . 2-28 Sharing Tab . . . . . . . . . . . . . . . . . . . . . . . . . . . . . . . . . . . . . . . . . . . . . . . 2-29 Ports Tab . . . . . . . . . . . . . . . . . . . . . . . . . . . . . . . . . . . . . . . . . . . . . . . . . 2-30 Advanced Tab . . . . . . . . . . . . . . . . . . . . . . . . . . . . . . . . . . . . . . . . . . . . . 2-31 Color Management Tab . . . . . . . . . . . . . . . . . . . . . . . . . . . . . . . . . . . . . . 2-32 Security Tab . . . . . . . . . . . . . . . . . . . . . . . . . . . . . . . . . . . . . . . . . . . . . . . 2-33 Profile Tab . . . . . . . . . . . . . . . . . . . . . . . . . . . . . . . . . . . . . . . . . . . . . . . . 2-34 Add/Edit Profile . . . . . . . . . . . . . . . . . . . . . . . . . . . . . . . . . . . . . . . . . . . . 2-36
Printing Preferences . . . . . . . . . . . . . . . . . . . . . . . . . . . . . . . . . . . . . . . . . . . 2-37
Page Setup Tab . . . . . . . . . . . . . . . . . . . . . . . . . . . . . . . . . . . . . . . . . . . . 2-38 Edit Watermark. . . . . . . . . . . . . . . . . . . . . . . . . . . . . . . . . . . . . . . . . . . . . 2-41 Finishing Tab . . . . . . . . . . . . . . . . . . . . . . . . . . . . . . . . . . . . . . . . . . . . . . 2-45 Quality Tab . . . . . . . . . . . . . . . . . . . . . . . . . . . . . . . . . . . . . . . . . . . . . . . . 2-47 Profiles . . . . . . . . . . . . . . . . . . . . . . . . . . . . . . . . . . . . . . . . . . . . . . . . . . . 2-52
Using the Machine on Your Network . . . . . . . . . . . . . . . . . . . . . . . . . . . . . . . . 2-57
Setting the Machine as a Shared Printer . . . . . . . . . . . . . . . . . . . . . . . . . . . . 2-57
Windows 2000/XP/Server 2003 Server Settings . . . . . . . . . . . . . . . . . . . 2-57 Windows 98/Me Server Settings . . . . . . . . . . . . . . . . . . . . . . . . . . . . . . . 2-61
Using the Shared Printer on Your Network . . . . . . . . . . . . . . . . . . . . . . . . . . 2-64
Network Download. . . . . . . . . . . . . . . . . . . . . . . . . . . . . . . . . . . . . . . . . . 2-64 Add Printer Wizard (Windows 2000/XP/Server 2003) . . . . . . . . . . . . . . . 2-65 Add Printer Wizard (Windows 98/Me) . . . . . . . . . . . . . . . . . . . . . . . . . . . 2-66
v

Chapter 3 Scanning
Scanning with [Start] on the Machine . . . . . . . . . . . . . . . . . . . . . . . . . . . . . . . .3-1 Setting the Scanning Function for [Start] . . . . . . . . . . . . . . . . . . . . . . . . . . . . .3-3
Setting Up [Start] to Operate in a Different Way from [Save] . . . . . . . . . . . . . .3-3 Setting Up [Start] in the [Settings] Dialog Box . . . . . . . . . . . . . . . . . . . . . . . . .3-4 Setting Up [Start] in the [Scanners and Cameras] Folder
(Windows 98/2000: the [Scanners and Cameras Properties] Dialog Box). . . .3-5
Scanning with the MF Toolbox . . . . . . . . . . . . . . . . . . . . . . . . . . . . . . . . . . . . . .3-7 MF Toolbox Settings . . . . . . . . . . . . . . . . . . . . . . . . . . . . . . . . . . . . . . . . . . . . .3-10
Scanner Settings . . . . . . . . . . . . . . . . . . . . . . . . . . . . . . . . . . . . . . . . . . . . . .3-10 Save Scanned Image to . . . . . . . . . . . . . . . . . . . . . . . . . . . . . . . . . . . . . . . . .3-12 Link Scanned Images to. . . . . . . . . . . . . . . . . . . . . . . . . . . . . . . . . . . . . . . . .3-13 Confirmation of the Scanned Image and Exif Settings
(Confirm Scanned Image) . . . . . . . . . . . . . . . . . . . . . . . . . . . . . . . . . . . . . . .3-13
Scanning an Image from an Application . . . . . . . . . . . . . . . . . . . . . . . . . . . . .3-15 Creating One PDF File from Two or more Pages . . . . . . . . . . . . . . . . . . . . . .3-16 Setting Preferences and Scanning with ScanGear MF . . . . . . . . . . . . . . . . .3-19
Switching between Simple Mode and Advanced Mode . . . . . . . . . . . . . . . . .3-19 Using Simple Mode . . . . . . . . . . . . . . . . . . . . . . . . . . . . . . . . . . . . . . . . . . . .3-20
Add/Delete the Output Size . . . . . . . . . . . . . . . . . . . . . . . . . . . . . . . . . . .3-21 Simple Mode Toolbar . . . . . . . . . . . . . . . . . . . . . . . . . . . . . . . . . . . . . . . .3-22
Using Advanced Mode . . . . . . . . . . . . . . . . . . . . . . . . . . . . . . . . . . . . . . . . . .3-23
Advanced Mode Toolbar . . . . . . . . . . . . . . . . . . . . . . . . . . . . . . . . . . . . .3-24
Advanced Mode - Specifying the Parameters of a Scan . . . . . . . . . . . . . . . .3-25
To Select the Parameters of a Scan Automatically. . . . . . . . . . . . . . . . . .3-25 To Specify the Parameters of a Scan . . . . . . . . . . . . . . . . . . . . . . . . . . . .3-25
Advanced Mode Settings . . . . . . . . . . . . . . . . . . . . . . . . . . . . . . . . . . . . . . . .3-26
Input Settings . . . . . . . . . . . . . . . . . . . . . . . . . . . . . . . . . . . . . . . . . . . . . .3-26 Output Settings. . . . . . . . . . . . . . . . . . . . . . . . . . . . . . . . . . . . . . . . . . . . .3-27 Image Settings . . . . . . . . . . . . . . . . . . . . . . . . . . . . . . . . . . . . . . . . . . . . .3-28 Color Settings . . . . . . . . . . . . . . . . . . . . . . . . . . . . . . . . . . . . . . . . . . . . . .3-32 [Preferences] Dialog Box . . . . . . . . . . . . . . . . . . . . . . . . . . . . . . . . . . . . .3-40
Determining Resolution . . . . . . . . . . . . . . . . . . . . . . . . . . . . . . . . . . . . . . . . .3-44
Scanning with the WIA Driver (Windows XP Only). . . . . . . . . . . . . . . . . . . . .3-46
Scanning from the [Scanner and Camera Wizard] Dialog Box . . . . . . . . . . .3-46
Advanced Properties . . . . . . . . . . . . . . . . . . . . . . . . . . . . . . . . . . . . . . . .3-52
Scanning from an Application . . . . . . . . . . . . . . . . . . . . . . . . . . . . . . . . . . . .3-53
vi

Chapter 4 PC Faxing (MF5750/MF5770 Models Only)
Sending a Fax . . . . . . . . . . . . . . . . . . . . . . . . . . . . . . . . . . . . . . . . . . . . . . . . . . . 4-1
Characters and Symbols for Fax Numbers . . . . . . . . . . . . . . . . . . . . . . . . . . . 4-3
Fax Sending Settings. . . . . . . . . . . . . . . . . . . . . . . . . . . . . . . . . . . . . . . . . . . . 4-3
Sending Settings Tab . . . . . . . . . . . . . . . . . . . . . . . . . . . . . . . . . . . . . . . . . 4-4
Edit Address Book Tab . . . . . . . . . . . . . . . . . . . . . . . . . . . . . . . . . . . . . . . 4-6
Cover Sheet Tab. . . . . . . . . . . . . . . . . . . . . . . . . . . . . . . . . . . . . . . . . . . . . 4-7
Changing Fax Settings . . . . . . . . . . . . . . . . . . . . . . . . . . . . . . . . . . . . . . . . . . . 4-13
From a Windows Application . . . . . . . . . . . . . . . . . . . . . . . . . . . . . . . . . . . . . 4-13
Opening the Canon MF5700 Series (FAX) Printing Preferences or
Canon MF5700 Series (FAX) Properties Dialog Box . . . . . . . . . . . . . . . . 4-13
From the [Printers and Faxes] (Windows 98/Me/2000: [Printers]) Folder . . . 4-14
Opening the Canon MF5700 Series (FAX) Properties Dialog Box. . . . . . 4-14 Opening the Canon MF5700 Series (FAX) Printing Preferences
Dialog Box (Windows 2000/XP/Server 2003 Only) . . . . . . . . . . . . . . . . . 4-14
Windows 98/Me Fax Properties . . . . . . . . . . . . . . . . . . . . . . . . . . . . . . . . . . . . 4-16
General Tab . . . . . . . . . . . . . . . . . . . . . . . . . . . . . . . . . . . . . . . . . . . . . . . 4-16 Details Tab . . . . . . . . . . . . . . . . . . . . . . . . . . . . . . . . . . . . . . . . . . . . . . . . 4-17 Sharing Tab . . . . . . . . . . . . . . . . . . . . . . . . . . . . . . . . . . . . . . . . . . . . . . . 4-18 Edit Address Book Tab . . . . . . . . . . . . . . . . . . . . . . . . . . . . . . . . . . . . . . 4-19 Register Cover Sheet Tab . . . . . . . . . . . . . . . . . . . . . . . . . . . . . . . . . . . . 4-24 Special Tab . . . . . . . . . . . . . . . . . . . . . . . . . . . . . . . . . . . . . . . . . . . . . . . 4-25 Configuration Tab. . . . . . . . . . . . . . . . . . . . . . . . . . . . . . . . . . . . . . . . . . . 4-27
Windows 2000/XP/Server 2003 FAX Properties and
FAX Printing Preferences . . . . . . . . . . . . . . . . . . . . . . . . . . . . . . . . . . . . . . . . . 4-28
The FAX Properties Dialog Box . . . . . . . . . . . . . . . . . . . . . . . . . . . . . . . . 4-28 The FAX Printing Preferences Dialog Box . . . . . . . . . . . . . . . . . . . . . . . . 4-28
FAX Properties. . . . . . . . . . . . . . . . . . . . . . . . . . . . . . . . . . . . . . . . . . . . . . . . 4-28
General Tab . . . . . . . . . . . . . . . . . . . . . . . . . . . . . . . . . . . . . . . . . . . . . . . 4-29 Sharing Tab . . . . . . . . . . . . . . . . . . . . . . . . . . . . . . . . . . . . . . . . . . . . . . . 4-29 Ports Tab . . . . . . . . . . . . . . . . . . . . . . . . . . . . . . . . . . . . . . . . . . . . . . . . . 4-29 Advanced Tab . . . . . . . . . . . . . . . . . . . . . . . . . . . . . . . . . . . . . . . . . . . . . 4-30 Color Management Tab . . . . . . . . . . . . . . . . . . . . . . . . . . . . . . . . . . . . . . 4-30 Security Tab . . . . . . . . . . . . . . . . . . . . . . . . . . . . . . . . . . . . . . . . . . . . . . . 4-31 Configuration Tab. . . . . . . . . . . . . . . . . . . . . . . . . . . . . . . . . . . . . . . . . . . 4-31
FAX Printing Preferences. . . . . . . . . . . . . . . . . . . . . . . . . . . . . . . . . . . . . . . . 4-31
Edit Address Book Tab . . . . . . . . . . . . . . . . . . . . . . . . . . . . . . . . . . . . . . 4-32 Register Cover Sheet Tab . . . . . . . . . . . . . . . . . . . . . . . . . . . . . . . . . . . . 4-37 Special Tab . . . . . . . . . . . . . . . . . . . . . . . . . . . . . . . . . . . . . . . . . . . . . . . 4-38
Canon Cover Sheet Editor . . . . . . . . . . . . . . . . . . . . . . . . . . . . . . . . . . . . . . . . 4-41
Installing and Uninstalling Cover Sheet Editor. . . . . . . . . . . . . . . . . . . . . . . . 4-41
Installation . . . . . . . . . . . . . . . . . . . . . . . . . . . . . . . . . . . . . . . . . . . . . . . . 4-41
Launching . . . . . . . . . . . . . . . . . . . . . . . . . . . . . . . . . . . . . . . . . . . . . . . . 4-44
Uninstalling . . . . . . . . . . . . . . . . . . . . . . . . . . . . . . . . . . . . . . . . . . . . . . . 4-44
vii

Opening, Saving, and Closing a File . . . . . . . . . . . . . . . . . . . . . . . . . . . . . . .4-45
Opening a File . . . . . . . . . . . . . . . . . . . . . . . . . . . . . . . . . . . . . . . . . . . . .4-45
Saving and Closing a File. . . . . . . . . . . . . . . . . . . . . . . . . . . . . . . . . . . . .4-46
Creating an Original Cover Sheet . . . . . . . . . . . . . . . . . . . . . . . . . . . . . . . . .4-47
Inserting Text . . . . . . . . . . . . . . . . . . . . . . . . . . . . . . . . . . . . . . . . . . . . . .4-47
Adjusting Text Properties . . . . . . . . . . . . . . . . . . . . . . . . . . . . . . . . . . . . .4-48
Specifying Fields . . . . . . . . . . . . . . . . . . . . . . . . . . . . . . . . . . . . . . . . . . .4-53
Creating Objects . . . . . . . . . . . . . . . . . . . . . . . . . . . . . . . . . . . . . . . . . . .4-57
Editing Objects. . . . . . . . . . . . . . . . . . . . . . . . . . . . . . . . . . . . . . . . . . . . .4-59
Specifying Object Properties . . . . . . . . . . . . . . . . . . . . . . . . . . . . . . . . . .4-63
Arranging Objects . . . . . . . . . . . . . . . . . . . . . . . . . . . . . . . . . . . . . . . . . .4-63
Specifying Grid Options . . . . . . . . . . . . . . . . . . . . . . . . . . . . . . . . . . . . . .4-65
Printing a Cover Sheet . . . . . . . . . . . . . . . . . . . . . . . . . . . . . . . . . . . . . . . . . .4-68
Registering an Original Cover Sheet as a Template . . . . . . . . . . . . . . . . . . .4-68
Chapter 5 Troubleshooting
Printer Problems . . . . . . . . . . . . . . . . . . . . . . . . . . . . . . . . . . . . . . . . . . . . . . . . .5-1
Driver Problems . . . . . . . . . . . . . . . . . . . . . . . . . . . . . . . . . . . . . . . . . . . . . . . . . .5-4
Scanning Problems . . . . . . . . . . . . . . . . . . . . . . . . . . . . . . . . . . . . . . . . . . . . . . .5-6
Installing and Uninstalling Problems. . . . . . . . . . . . . . . . . . . . . . . . . . . . . . . .5-11
Chapter 6 Appendix
Printer Specifications . . . . . . . . . . . . . . . . . . . . . . . . . . . . . . . . . . . . . . . . . . . . .6-1
Hardware . . . . . . . . . . . . . . . . . . . . . . . . . . . . . . . . . . . . . . . . . . . . . . . . . . . . .6-1
Software . . . . . . . . . . . . . . . . . . . . . . . . . . . . . . . . . . . . . . . . . . . . . . . . . . . . . .6-2
Glossary . . . . . . . . . . . . . . . . . . . . . . . . . . . . . . . . . . . . . . . . . . . . . . . . . . . . . . . .6-3
Index . . . . . . . . . . . . . . . . . . . . . . . . . . . . . . . . . . . . . . . . . . . . . . . . . . . . . . . . . .6-13
viii

Preface
Thank you for purchasing the Canon imageCLASS MF5700 Series. Please read this manual thoroughly before operating the product in order to familiarize yourself with its capabilities, and to make the most of its many functions. After reading this manual, store it in a safe place for future reference.
How to Use This Manual
Symbols Used in This Manual
The following symbols are used in this manual to explain procedures, restrictions, handling precautions, and instructions that should be observed for safety.
IMPORTANT |
Indicates operational requirements and restrictions. Be sure to read |
|
these items carefully in order to operate the machine correctly, and to |
|
avoid damage to the machine. |
NOTE |
Indicates a clarification of an operation, or contains additional |
|
explanations for a procedure. Reading these notes is highly |
|
recommended. |
See the Basic
Guide
machine
default
Refer to the Basic Guide for details on the topic of the previous sentence.
The word “machine” refers to Canon imageCLASS MF5700 Series machine.
A setting that remains in effect unless you change it.
Buttons Used in This Manual
A button or an item is referred to in [brackets] as follows in this manual.
• A button or an item on the screen ........ |
[OK] |
• Name of window or dialog box ............. |
[Add Printer Wizard] |
• A button on a toolbar ............................ |
(Help) |
ix

Displays Used in This Manual
Screen shots of computer operation screens used in this manual may differ from the ones you actually see depending on the model or options that come with your machine.
Abbreviations Used in This Manual
In this manual, product names and model names are abbreviated as follows: Microsoft® Windows® 98 operating system is referred to as Windows 98. Microsoft® Windows® Millennium Edition operating system is referred to as Windows Me.
Microsoft® Windows® 2000 operating system is referred to as Windows 2000. Microsoft® Windows® XP operating system is referred to as Windows XP. Microsoft® Windows® Server 2003 operating system is referred to as Windows Server 2003.
x
Legal Notices
Trademarks
Canon, the Canon Logo and imageCLASS are trademarks of Canon USA, Inc.
Microsoft and Windows are either registered trademarks or trademarks of Microsoft Corporation in the United States and/or in other countries.
Other brand and product names are trademarks or registered trademarks of their respective companies.
In this manual, Microsoft and Microsoft Windows are referred to as Microsoft and Windows respectively.
Copyright
Copyright © 2005 by Canon Inc. All rights reserved.
No part of this publication may be reproduced, transmitted, transcribed, stored in a retrieval system, or translated into any language or computer language, in any form or by any means, electronic, mechanical, magnetic, optical, chemical, manual, or otherwise, without the prior written permission of Canon Inc.
Notice
The information in this manual is subject to change without notice.
CANON INC. MAKES NO WARRANTY OF ANY KIND WITH REGARD TO THIS MATERIAL, EITHER EXPRESS OR IMPLIED, EXCEPT AS PROVIDED HEREIN, INCLUDING WITHOUT LIMITATION, THEREOF, WARRANTIES AS TO MARKETABILITY, MERCHANTABILITY, FITNESS FOR A PARTICULAR PURPOSE OF USE OR AGAINST INFRINGEMENT OF ANY PATENT. CANON INC. SHALL NOT BE LIABLE FOR ANY DIRECT, INCIDENTAL, OR CONSEQUENTIAL DAMAGES OF ANY NATURE, OR LOSSES OR EXPENSES RESULTING FROM THE USE OF THIS MATERIAL.
xi

|
|
|
|
|
|
Installation |
1 |
|
|
CHAPTER |
|
|
|
|
This chapter explains the procedure to install the drivers and software on your computer. Once the corresponding drivers are installed, you can print, fax* and scan from your computer.
* Only for the MF5750/MF5770 models.
System Requirements
The drivers can be installed and used in the following system environments.
■Operating System
Windows 98, Windows Me, Windows 2000, Windows XP, Windows Server 2003*.
■Computer
Any computer on which Windows 98, Windows Me, Windows 2000, Windows XP, or Windows Server 2003* runs properly.
■Hardware Environment
•IBM or IBM-compatible PC
•CD-ROM drive or network environment with the access to CD-ROM
•PC equipped with a USB port and the USB class driver installed
OS |
CPU |
RAM |
Available free disk space |
|
|
|
|
|
|
|
Intel Pentium® 90 MHz or |
32 MB of RAM, |
|
|
Windows 98 |
64 MB or |
At least 115 MB, 200 MB or |
||
greater |
greater is |
greater is recommended |
||
|
||||
|
|
recommended |
|
|
|
|
|
|
* Only for network connection.
System Requirements |
1-1 |

1
Installation
OS |
CPU |
RAM |
Available free disk space |
|
|
|
|
|
|
|
Intel Pentium® 150 MHz |
32 MB of |
|
|
Windows Me |
RAM, 64 MB |
At least 115 MB, 200 MB or |
||
or greater |
or greater is |
greater is recommended |
||
|
||||
|
|
recommended |
|
|
|
|
|
|
|
|
Intel Pentium® 133 MHz |
64 MB of |
|
|
|
or greater, or compatible |
|
||
|
RAM, 128 MB |
At least 115 MB, 200 MB or |
||
Windows 2000* |
micro processors (up to 2 |
|||
|
processors are |
or greater is |
greater is recommended |
|
|
recommended |
|
||
|
supported) |
|
||
|
|
|
||
|
|
|
|
|
|
Pentium Family® |
64 MB of |
|
|
Windows XP* |
RAM, 128 MB |
At least 115 MB, 200 MB or |
||
300 MHz or greater |
or greater is |
greater is recommended |
||
|
||||
|
|
recommended |
|
|
|
|
|
|
|
|
Pentium Family® |
64 MB of |
|
|
Windows |
RAM, 128 MB |
At least 115 MB, 200 MB or |
||
Server 2003 |
300 MHz or greater |
or greater is |
greater is recommended |
|
|
|
recommended |
|
|
|
|
|
|
* Log on as a user account with administrator privileges is recommended.
 NOTE
NOTE
The USB 2.0 Hi Speed connection requires a PC equipped with a CPU faster than 300 MHz and more than 64 MB of RAM and with Windows XP SP1 installed, or with a CPU faster than 133 MHz and more than 64 MB of RAM and with Windows 2000 SP4 installed. If your PC meets all of these requirements and is preinstalled with USB 2.0 Host Controller, the USB 2.0 connection will be guaranteed.
1-2 System Requirements

Where to Find Help
When you encounter a problem during installation of the driver software or while operating your machine, consult the following:
■In This Manual
See Chapter 5, “Troubleshooting.”
■In the Basic Guide
See Chapter 9, “Troubleshooting.”
■README. TXT File
The hints, limitations, and restrictions you need to be aware of when installing and using the drivers are included in the README.TXT file provided with the drivers.
■Online Help
You can locate additional help in the online Help file provided with the driver software. In the [Properties] dialog box, you can click [Help] to display information about every feature and option in the drivers.
■Context Sensitive Help
This Help displays the explanation of each item in the current dialog box. Use one of the following procedures to activate a context sensitive help.
- Click  (Help) in the title bar of the dialog box click the desired item.
-Right-click the desired item select [What’s this?].
-Select the desired item press [F1].
■Canon Support Center
If the above Help does not provide the information you need, please contact the Canon Support Center at 1-800-828-4040 between the hours of 8:00 A.M. to 8:00 P.M. EST Monday through Friday and 10:00 A.M. to 8:00 P.M. on Saturday.
■Self Help
For 24 hour interactive troubleshooting, e-mail technical support, the latest driver downloads and answers to frequently asked questions please visit the Canon Support site at www.canontechsupport.com.
1
Installation
Where to Find Help |
1-3 |

1
Installation
Installing Software on Your Computer
This section provides installation procedure of drivers to use the Canon imageCLASS MF5700 Series as a network or a local printer, fax and a local scanner (connected directly to your computer). (Fax function is available for the MF5750/MF5770 models only.)
When installing the drivers, follow the steps shown in the [MF5700 Series Setup] screen.
Before you install the software, be sure to:
•Confirm the machine is not connected to your computer.
•Turn on the machine. (See the Set-Up Instructions (for MF5730/MF5750 users) or
Set-Up Instructions for the Machine (for MF5770 users).)
•Quit any Windows application running on your computer.
 IMPORTANT
If you are using Windows 2000/XP/Server 2003, be sure to log on as a member of Administrators.
 NOTE
NOTE
•Use of a cable 9.8 ft (3 m) long or less is recommended.
•The screen shots shown are from Windows XP. However, the installation procedure is essentially the same for other versions of Windows.
1-4 Installing Software on Your Computer
To Use the Machine as a Local Printer, Scanner or for PC Faxing (USB Connection)
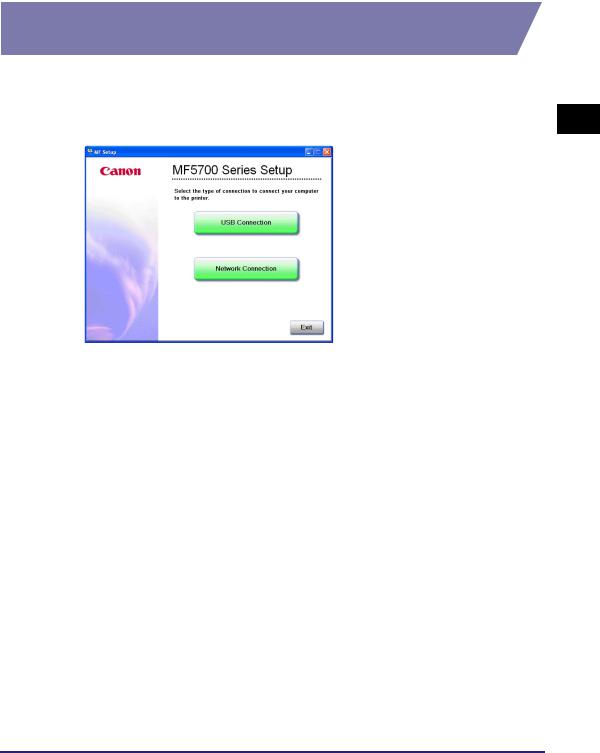
1 Insert the CD-ROM into your CD-ROM drive.
The [MF5700 Series Setup] screen appears.
1
Install the software following steps 1, 2 and 3 in the [Install Drivers] screen.
Installation
[MF5700 Series Setup] screen
If the [MF5700 Series Setup] screen is not displayed, on the Windows desktop, click [start] [My Computer] (Windows 98/Me/2000: double-click [My Computer]). Open the CD-ROM icon double-click [Setup(Setup.exe)].
If you are installing from a copy saved on a network or hard disk, double-click [Setup(Setup.exe)] in the copy.
Installing Software on Your Computer |
1-5 |
Step 1 Install the MF Drivers (USB Connection)
|
1 |
In the [MF5700 Series Setup] screen, click [USB Connection]. |
|
2 |
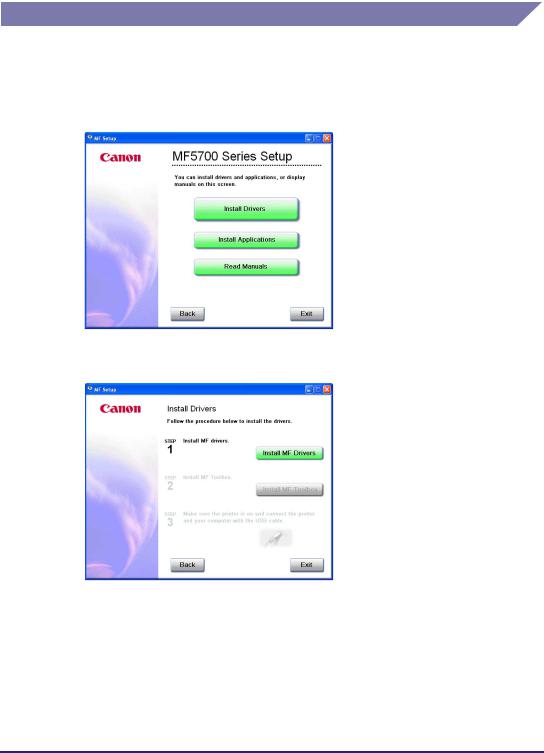
Click [Install Drivers]. |
1 |
||
|
|
|
Installation |
|
|
3 Click [Install MF Drivers].
1-6 Installing Software on Your Computer

4 Read the License Agreement click [Yes].
1
Installation
5 Click [Exit].
NOTE
If you are using Windows 98/Me, a message recommending you to restart your computer may appear. In this case, continue installing after restarting your computer.
Installing Software on Your Computer |
1-7 |
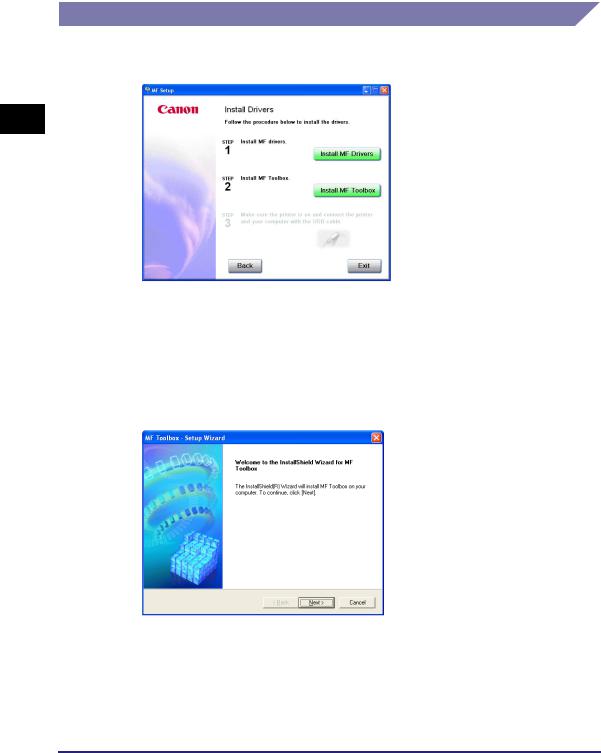
Step 2 Install the MF Toolbox
1 In the [Install Drivers] screen, click [Install MF Toolbox].
1
Installation
If you have closed the [Install Drivers] screen, on the Windows desktop, click [start] [My Computer] (Windows 98/Me/2000: double-click [My Computer]). Open the CD-ROM icon double-click [Setup(Setup.exe)].
If you are installing from a copy saved on a network or hard disk, double-click [Setup(Setup.exe)] in the copy.
2 Click [Next >].
1-8 Installing Software on Your Computer

3
4
Click [Continue].
Read the License Agreement click [Yes].
1
Installation
5 When the [Choose Destination Location] dialog box appears, click [Next >].
Installing Software on Your Computer |
1-9 |
6 Click [Next >].
1
Installation
7 Click [Exit].
Step 3 Connect the USB Cable
1
2
Make sure that the machine is turned on.
Connect the USB cable after MF Toolbox installation.
Connect the USB cable to the machine and computer USB port.
When you connect the USB cable to the computer, the machine is automatically detected as a new hardware. Wait for a while as your computer performs various settings.
Depending on your computer, a message may display asking you to restart your computer.
After restarting your computer, wait for a while for your computer to continue performing various settings.
1-10 Installing Software on Your Computer

Install Accompanying Applications
To install the accompanying applications, in the [MF5700 Series Setup] screen, click [Install Applications].
You can also install it later.
Read User’s Manual
To read the PDF manual on the CD-ROM, click [Read Manuals] on the [MF5700 Series Setup] screen.
Installation is now complete. In the [MF5700 Series Setup] screen, click [Exit] to close the screen. Then remove the CD-ROM from the disk drive.
1
Installation
Installing Software on Your Computer |
1-11 |

1
Installation
To Use the Machine as a Network Printer (Network Connection) (MF5770 Model Only)
 IMPORTANT
The machine needs to be restarted for the specified settings to become effective. To restart the machine, disconnect the power cord, wait for at least 10 seconds, and connect the power cord again.
 NOTE
NOTE
•For details on specifying network settings, see Chapter 2, “Specifying the Network Settings,“ in the Network Guide.
•For additional network protocol settings, see the Network Guide.
•For the values of the network settings, consult your network administrator or internet service provider (ISP).
•The machine does not support Network Scanning or PC Faxing. The printer must be connected via USB for scanning and PC faxing.
Step 1 Specifying Network Settings
1 Press [Menu]  or
or  to select <6.NETWORK SETTINGS> on the LCD press [Set].
MENU
6.NETWORK SETTINGS
2 Press  or
or  to select <1.LAN SETTINGS> press [Set].
NETWORK SETTINGS 1.LAN SETTINGS
3 Press  or
or  to select <1.IP ADDRESS AUTO.> press [Set].
LAN SETTINGS
1.IP ADDRESS AUTO.
1-12 Installing Software on Your Computer

To obtain an IP address automatically (dynamic allocation):
4 Press  or
or  to select <ON> press [Set].
IP ADDRESS AUTO.
ON
5 Press  or
or  to select <1.DHCP>, <2.BOOTP>, or <3.RARP> press [Set].
IP ADDRESS AUTO. 1.DHCP
6 Press  or
or  to select <ON> press [Set].
DHCP
ON
7 Press [Stop/Reset] to return to the standby display.
8 Restart the machine by disconnecting the power cord, and then reconnecting it.
To specify an IP address manually (static allocation):
4 Press  or
or  to select <OFF> press [Set].
IP ADDRESS AUTO.
OFF
5 Press  or
or  to select <2.IP ADDRESS> press [Set].
LAN SETTINGS 2.IP ADDRESS
1
Installation
Installing Software on Your Computer |
1-13 |

1
Installation
6 Enter an IP address of the machine using the numeric keys press [Set].
Write down the IP address you entered: |
|
, |
|
, |
|
, |
IP ADDRESS 000.000.000.000
7 Press  or
or  to select <3.SUBNET MASK> press [Set].
LAN SETTINGS 3.SUBNET MASK
8 Enter the subnet mask using the numeric keys press [Set].
Write down the subnet mask you entered: , , ,
SUBNET MASK 000.000.000.000
9 Press  or
or  to select <4.DEFAULT GATEWAY> press [Set].
LAN SETTINGS 4.DEFAULT GATEWAY
10 Enter the default gateway address using the numeric keys press
[Set].
Write down the gateway address you entered: , , ,
DEFAULT GATEWAY 000.000.000.000
11 Press [Stop/Reset] to return to the standby display.
12 Restart the machine by disconnecting the power cord, and then reconnecting it.
1-14 Installing Software on Your Computer
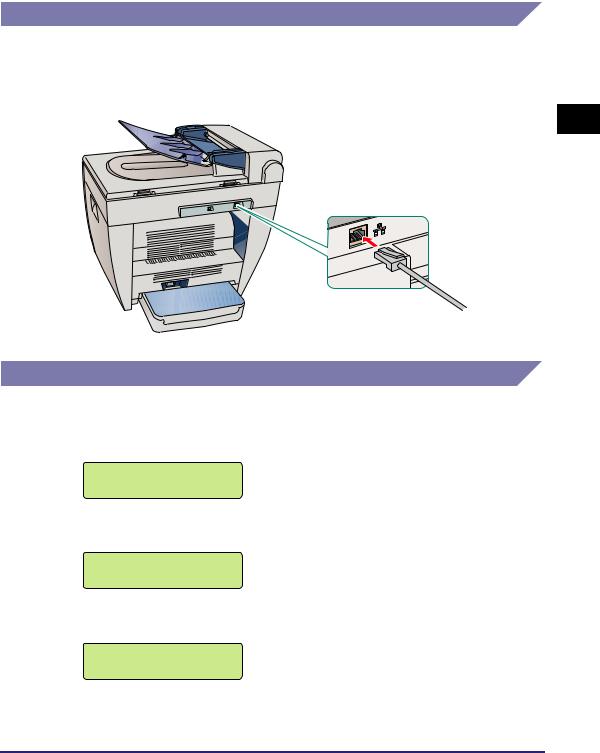
Step 2 Connecting the Machine to a Network
1 Connect a Category 5 rated (Cat 5) twisted-pair LAN cable to the 10Base-T/100Base-TX port on the back of the machine. Connect the other end of the cable to a network router or a hub.
1
Installation
Step 3 Checking Network Settings
1 Press [Menu]  or
or  to select <6.NETWORK SETTINGS> on the LCD press [Set].
2
3
MENU
6.NETWORK SETTINGS
Press  or
or  to select <2.VIEW IP ADDRESS> press [Set].
NETWORK SETTINGS 2.VIEW IP ADDRESS
Press  or
or  to select the desired setting press [Set].
VIEW IP ADDRESS 1.IP ADDRESS
4 Press [Stop/Reset] to return to the standby display.
Installing Software on Your Computer |
1-15 |
1
Installation
Step 4 Install the MF Network Drivers (Network
Connection)
 NOTE
NOTE
For Windows 2000/XP/Server 2003, log on as Administrator to install the software.
1 Insert the CD-ROM into your CD-ROM drive.
The [MF5700 Series Setup] screen appears.
Install the software following steps in the [Install Drivers] screen.
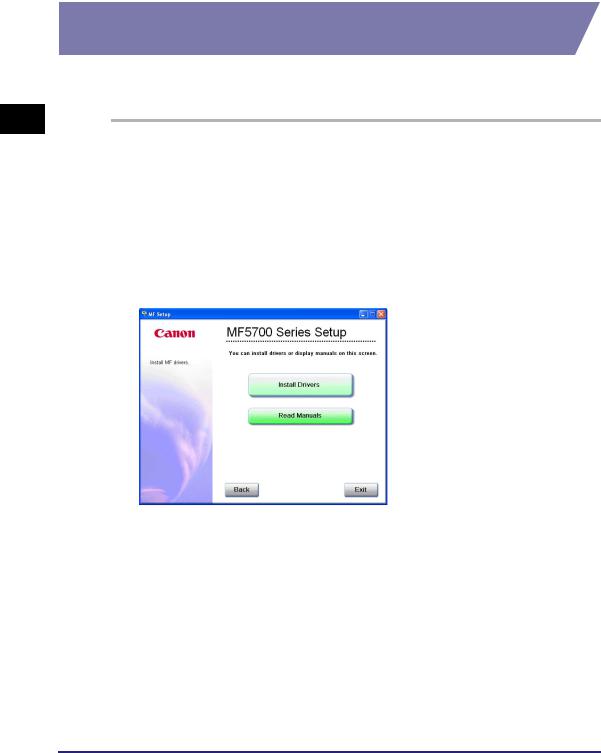
2 In the [MF5700 Series Setup] screen, click [Network Connection].
3 Click [Install Drivers].
 NOTE
NOTE
You can click [Read Manuals] to read PDF manuals.
1-16 Installing Software on Your Computer
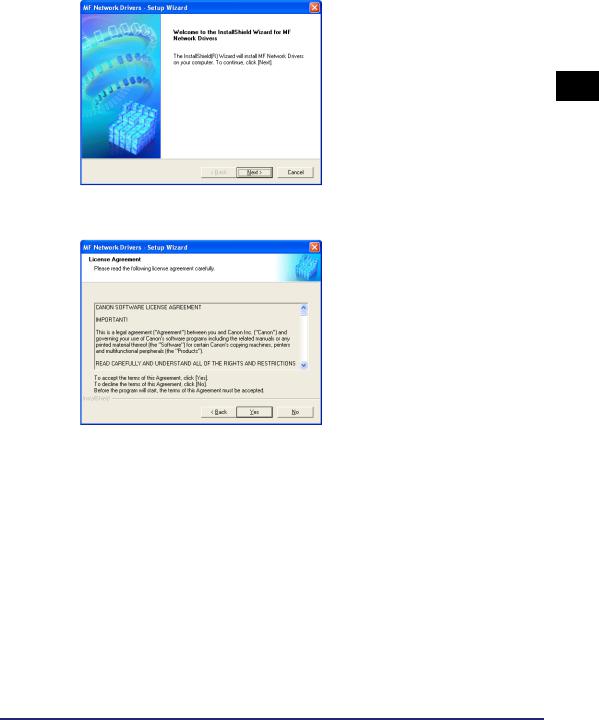
4 Click [Next >].
1
Installation
5 [License Agreement] screen appears, then click [Yes].
Installing Software on Your Computer |
1-17 |
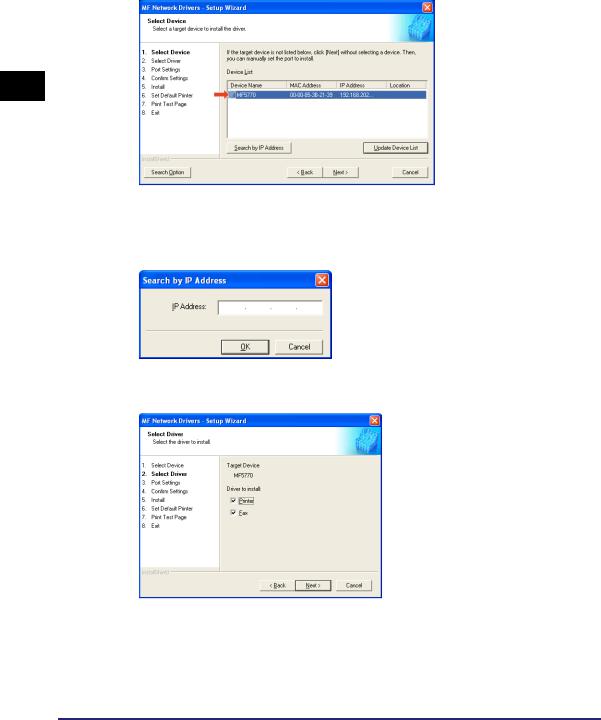
6 Select the target machine in the Device List click [Next >].
1
Installation
 NOTE
NOTE
If the target machine is not listed in the Device List, click [Search by IP Address] and enter the IP address click [OK]. If you do not know the machine’s IP address, see Checking Network Settings on p. 1-15.
7 Select the driver(s) to install click [Next >].
1-18 Installing Software on Your Computer
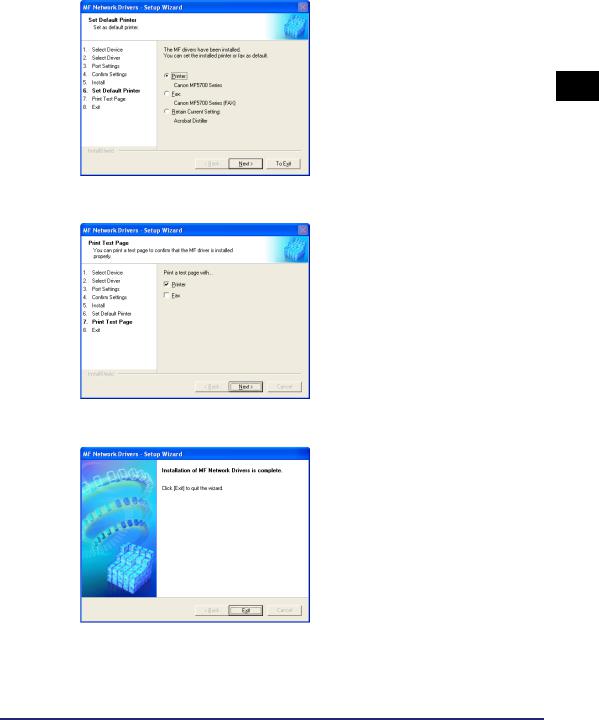
8 Select the default printer or fax click [Next >].
1
Installation
9
10
Select the driver type (Printer and/or Fax) click [Next >].
Click [Exit].
 NOTE
NOTE
When a screen prompting you to restart your computer is appeared instead of the screen above, select [Yes, I want to restart my computer now.] or [No, I will restart my computer later.] and then click [Exit].
Installing Software on Your Computer |
1-19 |
Loading...