


Not For Resale – Free Download at http://www.joe-chan.com/manuals
Not For Resale – Free Download at http://www.joe-chan.com/manuals
Welcome to the large family of well satisfied F-1 owners. The F-1, along with its seemingly endless array of features and accessories for use in the home, the laboratory or for professional work, is the product of many years of studious research coupled with the development of Canon's superior camera technology. The Canon F-1 epitomizes the high quality and performance standards that Canon prides itself in. We at Canon hope that you make the most of your new F-1 and have many rewarding experiences with your F-1 system.
Before Using...
Please read this instruction booklet thoroughly, familiarizing yourself carefully with the F-1, master the basic functions of the camera completely and you will be ready to fully utilize your new F-1.
2

Not For Resale – Free Download at http://www.joe-chan.com/manuals
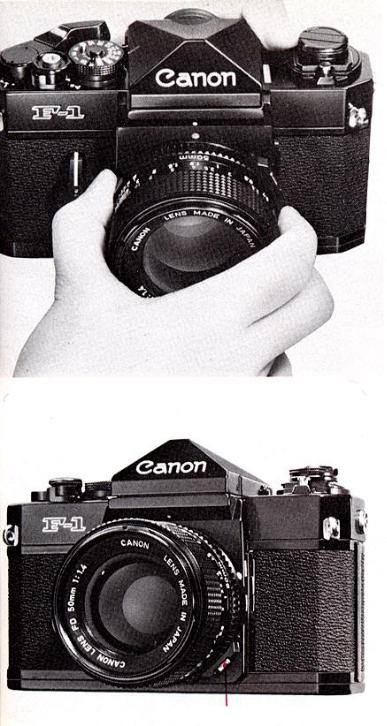
Bayonet Ring for Cap and Hood Canon Lens FD 50mm f/1.4
Focus Ring
Mount Positioning Point
Distance Scale
Preset Aperture Ring
EE Lock Pin
Servo EE Finder
Coupling Socket
Light-Taking Window for Meter Information
Flash Socket
Safety Button
Film Rewind Crank
Film Plane Indicator
Viewfinder Release Button
|
Guide Pin |
|
Shutter Speed Dial |
Interchangeable |
|
Prism |
ASA Film Speed Scale |
Multi-Purpose Lever
Film Speed Set Ring
Frame Counter
Time Lock/Shutter
Lock Lever
Shutter Release
Button
Film Advance Lever
Shutter Speed
Coupling Pin
Not For Resale – Free Download at http://www.joe-chan.com/manuals
The system built around the F-1, from its initial stages, is designed to satisfy all possible photographic needs. Both versatility and variety were prime concerns for Canon's planning and designing staff. The system's ten thousand component parts are all built with a degree of accuracy which the complete interchangeability of the system requires. Furthermore, tests have demonstrated that the reliability of the Canon F-1 and its accessories is to an extent as of yet unmatched by any other product in the photographic industry. The F-1's accessories, including powerful motor drive systems, a unique Servo EE Finder, the Booster T Finder for dim light situations, the Film Chamber 250 and the incomparable FD series of interchangeable lenses, lend the versatility to the F-1 that makes the F-1 and all-embracing photographic system.
Not For Resale – Free Download at http://www.joe-chan.com/manuals
Contents
Technical Data ............................................................... |
6 |
Uses of Lenses ............................................................ |
10 |
Mercury Battery Loading and Checking .................. |
16 |
Film Loading ................................................................ |
19 |
Film Winding ................................................................ |
22 |
Shutter and Aperture Adjustment ............................. |
24 |
Manual Diaphragm Control ........................................ |
27 |
Using the Built-in Exposure Meter ............................ |
30 |
Exposure Settings ....................................................... |
32 |
Coupling Range of Built-in Exposure Meter ........... |
35 |
Holding the Camera .................................................... |
36 |
Viewing and Focusing ................................................ |
37 |
Film Rewinding ............................................................ |
40 |
Lens Signal Coupling ................................................. |
42 |
Flash Photography ...................................................... |
47 |
Multiple Exposures ..................................................... |
49 |
Using the Self-Timer ................................................... |
50 |
Removing the Bottom and Back Covers ................. |
51 |
Accessories for the F-1 ........................................ |
53-59 |
Motor Drive System and Power System ............. |
54 |
Viewfinder System .................................................. |
56 |
Close-up, Photomacrography |
|
and Photomicrography ..................................... |
58 |
Filters ........................................................................ |
60 |
Data Imprinting System |
|
and Other Accessories ..................................... |
61 |
Proper Care of the Camera ........................................ |
63 |
5

Not For Resale – Free Download at http://www.joe-chan.com/manuals
Technical Data
Type: 35mm single-lens reflex camera with focal plane shutter. Picture size: 24 x 36mm.
Interchangeable Lenses: Canon FD series lenses with aperture signal lever. FL and R series
of lenses are also compatible.
Standard Lens: Canon FD 55mm f/1.2 S.S.C., FD 50mm f/1.4, or FD 50mm f/1.8.
Viewfinder: Removable pentagonal prism viewfinder. Interchangeable with Servo EE Finder, Booster T Finder, Speed Finder, Waist-Level Finder.
Viewfinder Attachments: Angle Finders A2 and B, Magnifier R, Dioptric Adjustment Lenses, Eyecup R, Rubber Eyepiece Ring.
Focusing Screen: Fresnel lens, standard focusing glass with split-image/microprism rangefinder and eight other interchangeable types. With metering beam-splitting condenser.
Field-of-view: 97% of actual picture area. 0.77X magnification with standard 50mm lens at infinity.
Finder Information: Meter needle and aperture needle, outside shutter speed coupling range indicator, stopped-down metering and battery check, shutter speed scale, metering limit
marks.
Dioptric Adjustment Lenses: Viewfinder with lensless ring (R–1); interchangeable with R+3, R+2, R+1.5, R+1, R+0.5, R0, R-0.5, R-2, R-3, and R-4 dioptric adjustment lenses.
Mirror: Quick return mirror with shock-absorbing mechanism. Possible to lock mirror in up-position, requiring manual operation of the aperture.
Lens Mount: Canon Breech-lock FD mount.
Function: FD lenses; Pull aperture metering, automatic diaphragm operation. FL lenses; Stopped-down metering, automatic diaphragm operation. R lenses; Stopped-down metering, manually operated diaphragm.
Shutter: Focal plane shutter using a super thin titanium screen. Designed for elimination of functioning noise. Possible to lock shutter release button.
Shutter Speed Dial: With shutter scales and ASA film speed scales. Two coupling pins for setting attachments are provided.
Shutter Speeds: B, 1-1/2000. Multiple series. Equiinterval index. X contact at "60".
Film Speed Scale: ASA 25-3200
Self-Timer: Built-in. Activate with shutter release button. Approx. 10 sec. time lag.
Exposure Adjusting Mechanism: Built-in. Using -a CdS photocell. Coupled to shutter speeds,
6

Not For Resale – Free Download at http://www.joe-chan.com/manuals
film speeds and f/stop. Match needle type, TTL full aperture metering mechanism. Central area metering system, measures 12% of the picture area. Stopped-down metering possible with nonFD lenses. Stop-down lever and index. Locking of the lever possible.
Exposure Meter Coupling Range: With ASA 100 film, EV 2.5 (f/1.2 at 1/4 sec.) to EV 18 (f/11 at 1/2000 sec.).
Meter Battery: One 1.35V mercury battery.
Battery Checker: Built-in.
TTL Full Aperture Metering System: Servo EE Finder and Battery Case in combination.
Full aperture metering with FD lens.
Ultra-low Illumination Metering: Metering possible with ASA 100, between EV 15 (f/22 at 1/60 sec.) and EV-3.5 (f/1.2 at 15 sec.), with use of the Booster T Finder.
Synchronized Flash: FP and X contact. Automatic time lag adjustment.
Flash Socket: Screw-in/plug-in type.
Accessory Shoe: Flash Couplers D, L.
Canon Auto Tuning (CAT) System: Diaphragm control by recharge completion signal and focusing distance signal by using the Speedlite 133D, Flash-Auto Ring A2/B2, Flash Coupler L and the prescribed chrome-mount-ring FD lens.
Synchronizing Range: FP class: 1/2000-1/125 sec. and 1/30 sec. or slower. Speedlite: 1/60 sec. or slower. M, MF class: 1/30 sec. or slower.
Film Loading: With multislit film spool.
Film Winding: Short-stroke winding possible. Single operation 139° winding lever. Play: 30°
Film Rewinding: Performed by rewind button and crank.
Multiple Exposure: Possible by operating film rewind button.
Back Cover: Removable for Film Chamber 250 and Data Back.
Bottom Cover: Removable for Motor Drive Unit or Motor Drive MF.
Frame Counter: Additive, self-resetting type activated by opening back cover.
Size: 99.5x 146.7x49.5mm (3-15/16" x5-3/4" x 1-15/16")
Weight: Body: 845g (1 Ib. 13-13/16 ozs.). With FD 50mm f/1.4. Lens: 1,085g (2 Ibs. 6-1/4 ozs.).
Subject to change without notice. 7

Not For Resale – Free Download at http://www.joe-chan.com/manuals
Follow these simple steps for
Normal photography:
1 Load the film. (See pages 19–21.)
2 Set the ASA film speed. (See page 31.)
3 Wind the film advance lever. (See page 22.)
4 Remove the lens cap. (See pages 10-11.)
8
Not For Resale – Free Download at http://www.joe-chan.com/manuals
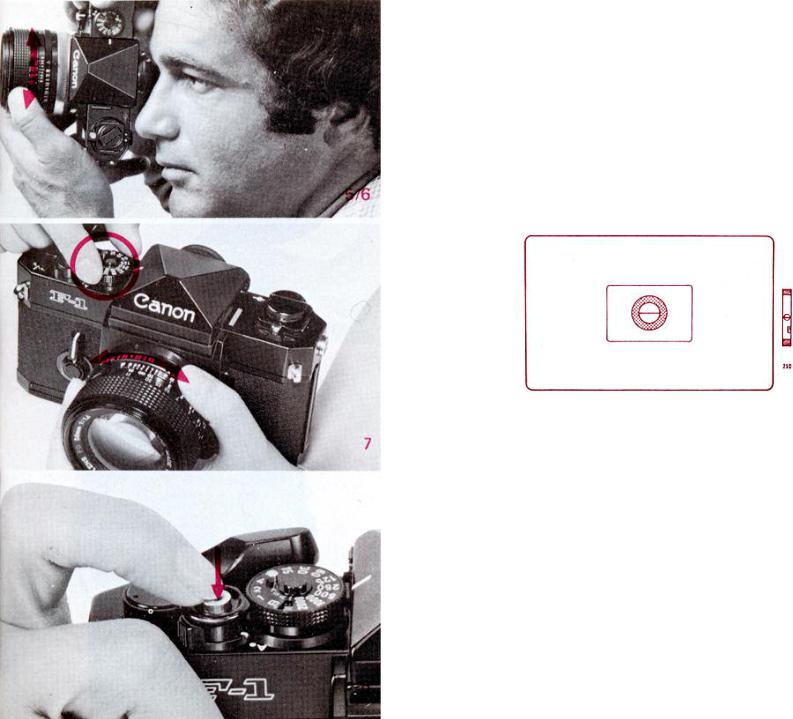
5
6
Look through the viewfinder and focus. (See page 37.)
Compose the picture.
7 Determine the exposure with built-in meter. (See pages 32-34.)
8 Press the shutter release button gently.
9
Not For Resale – Free Download at http://www.joe-chan.com/manuals
Uses of Lenses
Lens Cap and Rear Dust Cap
The front and rear lens caps should always be on the lens when the lens is not on the camera. For protection when the lens is mounted on the camera but not in use, please see to it that the front lens cap is attached.
Lens Cap
Most Canon lenses are provided with a clip-on front lens cap which is easily attached and removed from the front of the lens by pressing in the tabs on both sides of the cap. This type of cap may also be attached to a Canon filter screwed into the lens.
Rear Dust Cap
The rear dust cap must be removed before mounting the lens.
Operation with an FD lens which lacks a chrome Breech-lock mount ring:
The rear dust cap for this type of lens has serrated edges. Do not mount a rear dust cap which lacks the serrated edges.
Removal from Lens
1 Turn the cap counterclockwise until it stops.
2 Pull the cap out.
10
Not For Resale – Free Download at http://www.joe-chan.com/manuals
Reattachment
1
2
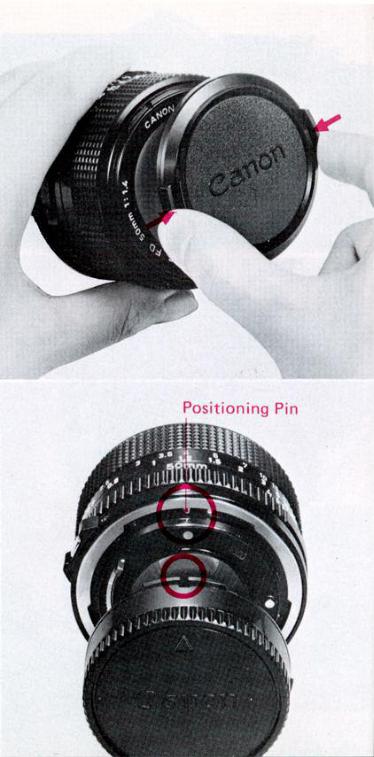
Align the arrow on the cap with the red dot at the rear of the lens.
In that position, apply slight pressure to the cap and turn it clockwise until it is tight.
Operation with an FD lens which has a chrome Breech-lock mount ring or with an FL lens: Removal from Lens
1
2
Turn the tens' mount ring clockwise until it stops.
Pull the cap out.
Once the rear cap is removed, the Breech-lock mount ring is locked so that it cannot be turned. (The diaphragm blades are also locked and will not move even if the aperture ring is rotated.)
Reattachment
1 Make sure the mount ring is locked so that it cannot be turned.
2 Align the arrow on the cap with the red dot on the lens' mount ring.
3 In that position, push lightly down on the cap and turn the mount ring counterclockwise until it is tight.
11
Not For Resale – Free Download at http://www.joe-chan.com/manuals
Mounting on the Camera and Dismounting Pre-Mounting Checklist
1 Make sure the camera's multi-purpose lever is not set for stopped-down metering (see p. 33). If it is, a red warning dot will appear beside the coupling lever inside
the camera body.
2 Make sure the automatic aperture lever at the rear of an FD lens is not set for manual diaphragm control
(see p. 27).
3 Remove the lens' rear dust cap.
4 Remove the camera's body cap.
12
Not For Resale – Free Download at http://www.joe-chan.com/manuals
Procedure for an FD lens which lacks a chrome
Breech-lock mount ring:
Mounting
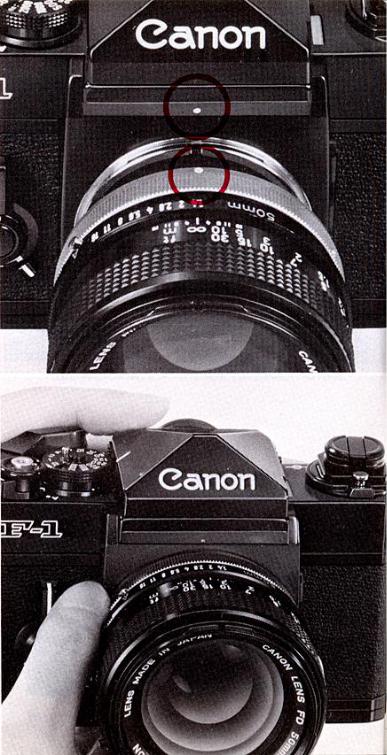
|
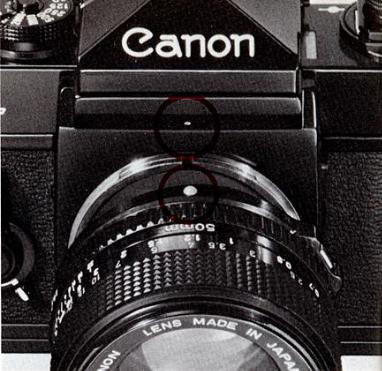
Align the projecting red mount positioning point with the |
1 |
red dot above the camera mount. |
|
In this position, apply slight pressure to the lens, and |
2 |
simply rotate the whole lens clockwise until it stops and |
the lens release button pops out with a click.
Do not press the lens release button while mounting the lens. Only when this button pops out can you be sure that the lens is properly mounted and that it will function properly. It is also possible to mount this type of lens when it is not perfectly aligned with this camera.
To facilitate mounting when it is very dark or when you are in a great hurry, the mount positioning point is rounded. Simply find this point with your finger and align it as closely as possible with the red dot on the camera. Turn the lens slightly back and forth while applying slight pressure until it drops into position and continue with step 2 above. Excessive sloppiness will make mounting impossible; take care to be as accurate as possible.
Dismounting
1
2
Turn the lens counterclockwise until it stops while pressing the lens release button.
Pull the lens out.
When the lens is dismounted, the diaphragm blades are
Lens Release Button locked in a half-closed position and will not move even if you turn the lens aperture ring.
Not For Resale – Free Download at http://www.joe-chan.com/manuals
Procedure for an FD lens which has a chrome Breech-lock mount ring or for an FL lens: Mounting
1 Make sure the Breech-lock ring is locked so that it cannot be turned.
2 Align the red dot of the Breech-lock ring with the red dot on the camera body above the camera mount.
3 In this position, fit the rear of the lens into the camera body and turn the Breech-lock ring clockwise
until it is tight.
Dismounting
1 Turn the Breech-lock ring counterclockwise until it stops.
2 Pull the lens out from the camera body.
When removing a lens, take special care not to damage the protruding pins and levers on the rear. With the exception of the Fish-eye 7.5mm lens, always put a lens down with the rear facing up.
For more information on general use and care of the lens, please see the lens instruction booklet.
14
Not For Resale – Free Download at http://www.joe-chan.com/manuals
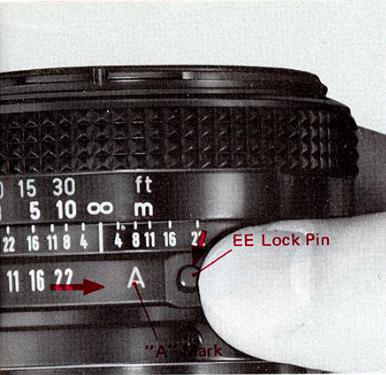
Note
On the aperture ring of an FD lens there is a green "A". The aperture ring can be turned to or from this mark by pressing the EE lock pin. Setting the lens to "A" permits AE photography when the accessory Servo EE Finder is mounted on the F-1. At any other time the aperture ring should be off "A". Please note that some early FD lenses have a green circle instead of "A" and that the aperture ring can be turned freely to that mark since these lenses lack an EE lock pin.
Neckstrap
Thread the tips of the neckstrap through the corresponding rings on the camera so that the tips are on the inside. Then adjust the strap to the length most comfortable for you.
Eyecup 3R
The F-1's rubber eyepiece ring can be replaced by this accessory eyecup. The eyecup is attached by snapping it into the eyepiece grooves after removal of the screw-in eyepiece ring. Its use is not mandatory, but viewing with it may be more comfortable, and it helps block extraneous light from entering the viewfinder.
15
Not For Resale – Free Download at http://www.joe-chan.com/manuals
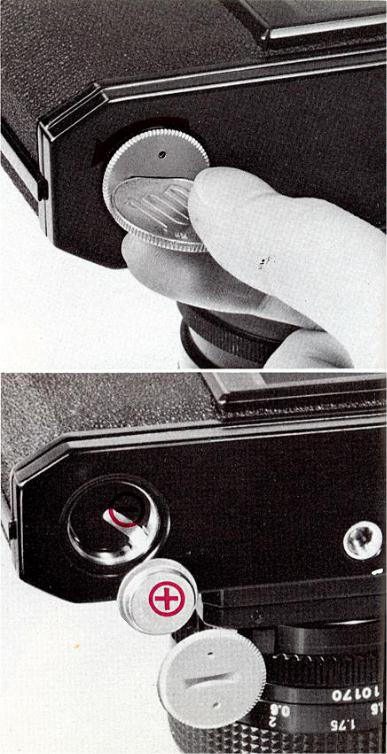
Mercury Battery Loading and Checking
The built-in exposure meter of the Canon F-1 functions only when the mercury battery is properly loaded.
1 Insert a coin into the groove of the battery compartment cover and turn it to the left to remove
the cover.
2 Insert the battery into the compartment with negative pole first.
3 Replace the compartment cover and turn to the right to tighten.
Before inserting the battery, wipe off fingerprints or stains on the battery poles with a dry cloth. Unclean poles may cause corrosion and damage the camera.
A 1.35V H-D mercury battery should be used — a Mallory PX-625 or Eveready EPX-625 is recommended.
Do not use 1.4V mercury batteries.
Be sure to insert the battery in the correct direction. Otherwise, the meter will not function properly and the cover cannot be screwed-in.
If the camera will not be used for an extended length of time, the battery should be taken out of the battery compartment to prevent possible damage to the terminals from battery corrosion.
16
Not For Resale – Free Download at http://www.joe-chan.com/manuals
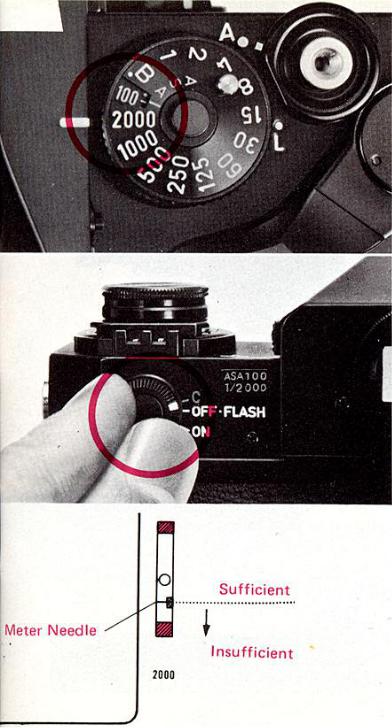
Battery Check
Check the mercury battery after loading it. Especially when loading a new battery, be sure to check the power level.
1 Set the film speed scale at ASA 100 and the shutter speed dial at "2000". To set the film speed, lift up the outer ring on the shutter speed dial and turn. (See page
31.)
A positive check cannot be made if other settings are used.
2 Turn the meter switch, situated on the back side of the camera near the film rewind crank, to the "C" index
mark.
3 If the meter needle inside the viewfinder swings into the meter index, the battery has sufficient power. If the needle stays below the meter index, the voltage is
insufficient and the battery must be replaced.
Life of the battery in normal use is approximately one year.
4 When using the camera, be sure to turn the meter switch to "ON".
17
Not For Resale – Free Download at http://www.joe-chan.com/manuals
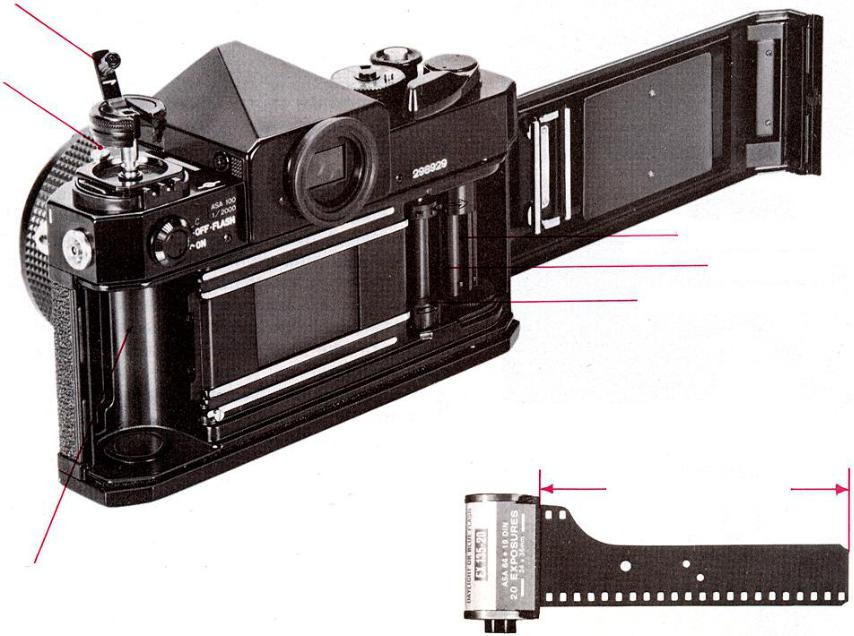
Film Rewinding Crank
Safety Stopper
Film Inserting Slit
Take-up Spool
Film Advance Sprocket
Position in which film is placed in camera (emulsified surface facing towards the lens)
Leader part of the film
Cartridge Compartment
18
Not For Resale – Free Download at http://www.joe-chan.com/manuals
Film Loading
The Canon F-1 accepts color or black and white film in standard 35mm cartridges. When loading and un-loading film, avoid direct sunlight.
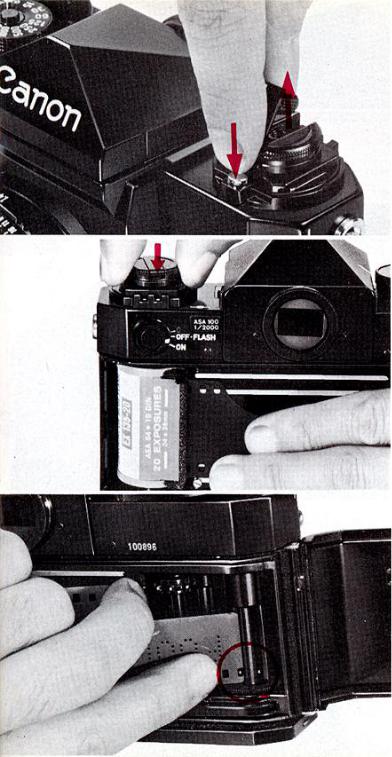
1 Pull up the film rewind crank as far as possible while pressing the safety button. The camera's back cover
will pop open.
2 Open the cover fully. Place the film cartridge in the film compartment so that the emulsion faces the lens when the film is unwound as illustrated on page 18. Push the film rewind crank down. The crank fork will slip into the film cartridge. In case the crank does not
fully return, turn it slightly to the left or right.
3 Pull the film leader across the camera and insert the film tip into the slit of the film take-up spool.
19
Not For Resale – Free Download at http://www.joe-chan.com/manuals
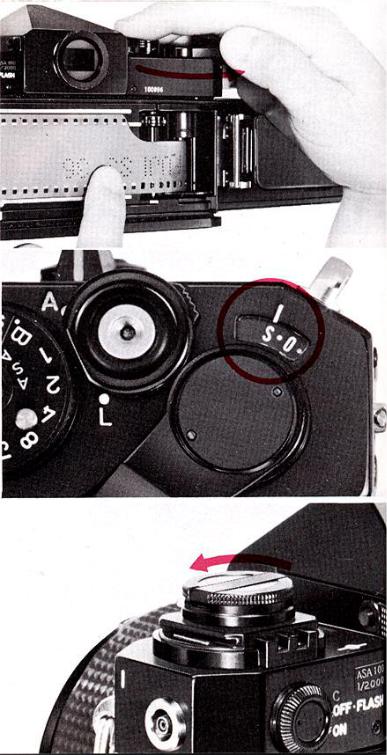
4 Turn the film advance lever and wind the film around the film take-up spool.
5 Check to insure that the teeth of both the take-up spool and the film advance sprocket engage the perforations
in the film.
6 Close the back cover. If the film is slack, the cartridge will rise and the back cover will not close.
7 Leave the lens cap on and take two blank shots, each time turning the film advance lever and releasing the shutter. The frame counter will advance from the "S" mark to "0". With one more advance, the camera will be
ready for the first shot.
Checking Correct Film Loading
The film is properly loaded and advanced if the film rewind crank rotates when you wind the film advance lever. If the film rewind crank does not rotate, take out the film and reload it.
20
 Loading...