


Camera User Guide
•BeforeCOPYuse, be sure to read this guide, including the safety precautions.
•This guide will familiarize you with how to use the camera correctly.
•Keep the guide handy for future reference.
ENGLISH
 Package Contents
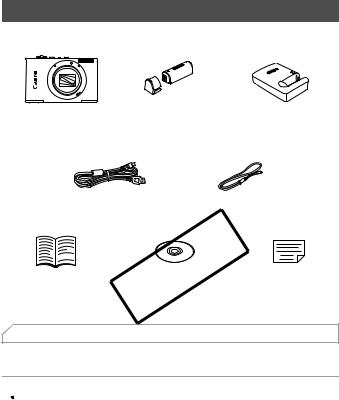
Before use, make sure the following items are included in the package. If anything is missing, contact your camera dealer.
Camera |
Battery Pack NB-9L |
Battery Charger |
|
(with terminal cover) |
CB-2LB/2LBE |
Interface Cable |
Wrist Strap |
IFC-400PCU |
WS-DC11 |
Getting Started |
COPY |
Warranty Card |
DIGITAL CAMERA |
Solution Disk
• A memory card is not included (p. 3).
For information about the included software, refer to the ImageBrowser EX User Guide, in PDF format (p. 26).
 • Adobe Reader is required to view the PDF manuals.
2

 Compatible Memory Cards
The following memory cards (sold separately) can be used, regardless of capacity.
•microSD memory cards*
•microSDHC memory cards*
•microSDXC memory cards*
*Conforms to SD specifications. However, not all memory cards have been verified to work with the camera.
• Always confirm beforehand that memory cards are supported on other devices such as card readers and computers (including the current version of your operating system).
 Preliminary Notes and Legal
Information
•Take and review some test shots initially to make sure the images were recorded correctly. Please note that Canon Inc., its subsidiaries and
affiliates, and its distributors are not liable for any consequential damages arising from any malfunctionCOPYof a camera or accessory, including memory cards, that results in the failure of an image to be recorded or to be recorded in a way that is machine readable.
•Images recorded by the camera are intended for personal use. Refrain from unauthorized recording that infringes on copyright law, and note that even for personal use, photography may contravene copyright or other legal rights at some performances or exhibitions, or in some commercial settings.
•The camera warranty is valid only in the area of purchase. In case of camera problems while abroad, return to the area of purchase before contacting a Canon Customer Support Help Desk.
•Although the LCD monitor is produced under extremely high-precision manufacturing conditions and more than 99.99% of the pixels meet design specifications, in rare cases some pixels may be defective or may appear as red or black dots. This does not indicate camera damage or affect recorded images.
•The LCD monitor may be covered with a thin plastic film for protection against scratches during shipment. If covered, remove the film before using the camera.
•When the camera is used over an extended period, it may become warm. This does not indicate damage.
3
 Part Names and Conventions in This
Guide
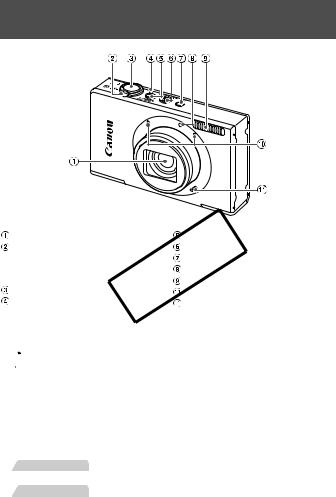
Lens |
|
Power button |
Zoom lever |
COPY |
|
|
Mode switch |
|
Shooting: i (telephoto) / j (wide |
1 ( layback) button |
|
angle) |
|
Lamp |
Playback: k (magnify) / g (index) |
Flash |
|
Shutter button |
|
Microphone |
Indicator |
|
Speaker |
|
|
|
• : Important information you should know
• : Notes and tips for expert camera use
•(p. xx): Pages with related information (in this example, “xx” represents a page number)
•Instructions in this guide apply to the camera under default settings.
•For convenience, all supported memory cards are simply referred to as “the memory card”.
•The tabs shown above titles indicate whether the function is used for still images, movies, or both.
Still Images : Indicates that the function is used when shooting or viewing still images.
Movies : Indicates that the function is used when shooting or viewing movies.
4
Part Names and Conventions in This Guide
|
|
|
|
|
|
|
|
|
|
|
|
|
|
|
|
|
|
|
|
|
|
|
|
|
|
|
|
|
|
|
|
|
|
|
|
|
|
|
|
|
|
|
|
|
|
|
|
|
|
|
|
|
|
|
|
|
|
|
|
|
|
|
|
|
|
|
|
|
|
|
|
|
|
|
|
|
|
|
|
|
|
|
|
|
|
|
|
|
|
|
|
|
|
|
|
|
|
|
|
|
|
|
|
|
|
|
|
|
|
|
|
|
|
|
|
|
|
|
|
|
|
|
|
|
|
|
|
|
|
|
|
|
|
|
|
|
|
|
|
|
|
|
|
|
|
|
|
|
|
|
|
|
|
|
|
|
|
|
|
|
|
|
|
|
|
|
|
|
|
|
|
|
|
|
|
|
|
|
|
|
|
|
|
|
|
|
|
|
|
|
|
|
|
|
|
|
|
|
|
|
|
|
|
|
|
|
|
|
|
|
|
|
|
|
|
|
|
|
|
|
|
|
|
|
|
|
|
|
|
|
|
|
|
|
|
|
|
|
|
|
|
|
|
|
|
|
|
|
|
|
|
|
|
|
|
|
|
|
|
|
|
|
|
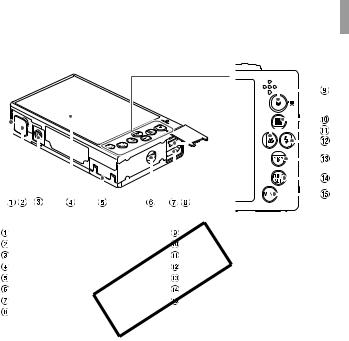
Battery cover |
|
|
|
|
|
|
|
|
|
|
|
|
|
|
|
|
|||||
Movie button |
|
||||||||||||||||||||
DC coupler terminal cover |
b(Exposure compensation) / Up button |
|
|||||||||||||||||||
Tripod socket |
COPY |
|
|
e (Macro) / Left button |
|
Screen (LCD monitor) |
|
h (Flash) / Right button |
Memory card cover |
|
l (Display) / Down button |
Strap mount |
|
FUNC./SET button |
HDMITM terminal |
|
nbutton |
AV OUT (Audio/video output) / |
|
|
DIGITAL terminal |
|
|
•In this guide, icons are used to represent the corresponding camera buttons and switches on which they appear or which they resemble.
•The following camera buttons are represented by icons.
o Up button  on back q Left button
  on back r Right button
  on back p Down button
  on back
m FUNC./SET button  on back
• On-screen text is indicated in brackets.
5

 Contents
Package Contents ............................. |
|
2 |
|
Special Modes for Other |
|
||
Compatible Memory Cards ................ |
|
3 |
|
Purposes....................................... |
93 |
||
Preliminary Notes and Legal |
|
|
|
|
Shooting Various Movies .............. |
101 |
|
Information....................................... |
|
3 |
|
|
|
||
Part Names and Conventions in |
4 |
|
4 G mode ........................... |
103 |
|||
This Guide ....................................... |
|
|
Shooting in Program AE Mode |
|
|||
Contents |
|
6 |
|
|
|||
|
|
(G Mode) |
104 |
||||
Contents: Basic Operations |
|
8 |
|
|
|||
|
|
Image Brightness |
|
||||
Safety Precautions |
|
10 |
|
|
|||
|
|
|
(Exposure Compensation) |
105 |
|||
Initial Preparations |
|
13 |
|
|
|||
|
|
Color and Continuous Shooting |
108 |
||||
Trying the Camera Out |
|
21 |
|||||
|
Shooting Range and Focusing |
113 |
|||||
Included Software, PDF Manuals |
26 |
||||||
Flash |
121 |
||||||
Accessories |
|
33 |
|||||
|
Other Settings |
123 |
|||||
|
|
|
|
||||
|
|
|
|
|
|
|
|
1 Camera Basics |
|
35 |
|
|
|
|
|
|
|
|
5 Playback Mode ............... |
125 |
|||
On/Off .............................................. |
|
36 |
|
Viewing |
126 |
||
Clock |
|
|
|
|
|||
COPY41 |
|
||||||
Shutter Button.................................. |
|
37 |
|
Browsing and Filtering Images...... |
130 |
||
...............................Shooting Modes |
|
37 |
|
Editing Face ID Information........... |
133 |
||
................Shooting Display Options |
|
38 |
|
Image Viewing Options |
135 |
||
FUNC. Menu |
|
39 |
|
|
|||
|
|
|
Protecting Images |
139 |
|||
n Menu |
|
40 |
|
||||
|
|
Erasing Images |
143 |
||||
Indicator Display |
|
41 |
|
||||
|
|
Rotating Images |
146 |
||||
|
|
|
|
|
|||
|
|
|
|
|
Image Categories.......................... |
148 |
|
|
|
|
|
|
Editing Still Images........................ |
152 |
|
2 Smart Auto Mode ............. |
|
43 |
|
Editing Movies............................... |
157 |
||
Shooting in Smart Auto Mode.......... |
44 |
Common, Convenient Features....... |
53 |
Using Face ID .................................. |
59 |
Image Customization Features........ |
68 |
Helpful Shooting Features ............... |
74 |
Customizing Camera Operation ...... |
77 |
3 Other Shooting Modes..... |
79 |
Specific Scenes ............................... |
80 |
Applying Special Effects .................. |
84 |
6 Setting Menu................... |
159 |
Adjusting Basic Camera |
|
Functions .................................... |
160 |
7 Accessories .................... |
171 |
Tips on Using Included |
|
Accessories................................. |
172 |
Optional Accessories .................... |
173 |
Using Optional Accessories .......... |
175 |
Printing Images ............................. |
180 |
6

|
|
|
|
Contents |
|
|
|
|
|
|
On-Screen Messages |
198 |
|
|
|
|
|
|
|
|
|
||
|
|
|
|
|
|
||
8 Appendix......................... |
193 |
|
|
|
|||
On-Screen Information |
200 |
|
|
|
|||
Troubleshooting |
194 |
|
|
|
|
||
|
Functions and Menu Tables |
.......... 204 |
|
|
|
||
Handling Precautions.................... |
197 |
Index.............................................. |
212 |
|
|
|
|
COPY
7
 Contents: Basic Operations
4 Shoot |
|
|
|
z Use camera-determined settings (Auto Mode) ............................. |
44 |
||
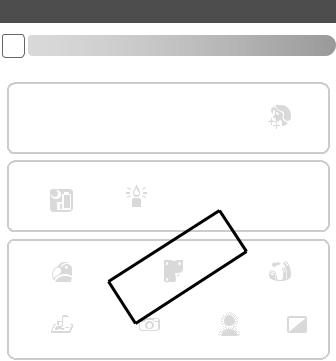
Shooting people well |
|
|
|
Portraits |
Against Snow |
|
|
I |
P |
Smooth Skin |
|
(p. 80) |
(p. 81) |
|
(p. 83) |
Matching specific scenes |
|
|
|
|
|
|
t |
Night Scenes |
Low Light |
UnderSWater |
Fireworks |
(p. 80) |
(p. 81) |
(p. 81) |
(p. 81) |
|
COPY |
|
|
Applying special effects |
|
|
|
Vivid Colors |
Poster Effect |
Fish-Eye Effect |
|
(p. 84) |
(p. 84) |
|
(p. 85) |
Miniature Effect |
Toy Camera Effect |
Soft Focus |
Monochrome |
(p. 86) |
(p. 87) |
(p. 88) |
(p. 89) |
z Focus on faces ............................................................... |
|
|
44, 80, 115 |
z Without using the flash (Flash Off) ............................................... |
|
56 |
|
z With myself in the shot (Self-Timer)........................................ |
|
54, 96 |
|
z Add the shooting date and time (Date Stamp).............................. |
57 |
||
z Use Face ID.......................................................................... |
|
|
59, 127 |
z Movie clips and photos together (Movie Digest)........................... |
93 |
||
8

|
Contents: Basic Operations |
1 View |
|
z View images (Playback Mode) ................................................... |
126 |
z Automatic playback (Slideshow)................................................. |
136 |
z On a TV ...................................................................................... |
175 |
z On a computer.............................................................................. |
27 |
z Browse through images quickly.................................................. |
130 |
z Erase images.............................................................................. |
143 |
E Shoot/View Movies |
|
z Shoot movies........................................................................ 44, 101 |
|
z View movies ............................................................................... 126 |
|
z Fast-moving subjects, slow-motion playback ............................. 101 |
|
c Print |
|
z Print pictures............................................................................... 180 |
|
Save |
COPY |
z Save images to a computer.......................................................... |
27 |
9

 Safety Precautions
•Before using the product, please ensure that you read the safety precautions described below. Always ensure that the product is used correctly.
•The safety precautions noted on the following pages are intended to prevent injuries to yourself and other persons, or damage to the equipment.
•Be sure to also check the guides included with any separately sold accessories you use.
Warning Denotes the possibility of serious injury or death.
• Do not trigger the flash in close proximity to people’s eyes.
Exposure to the intense light produced by the flash could damage eyesight. In particular, remain at least one meter (39 inches) away from infants when using the flash.
•Store this equipment out of the reach of children and infants.
Strap: Putting the strap around a child’s neck could result in asphyxiation.
•Use only recommended power sources.
•Do not attempt to disassemble, alter or apply heat to the product.
•Avoid dropping or subjecting the product to severe impacts.
•To avoid the risk of injury, do not touch the interior of the product if it has been dropped or otherwise damaged.
•Stop using the product immediatelyCOPYif it emits smoke, a strange smell, or otherwise behaves abnormally.
•Do not use organic solvents such as alcohol, benzine, or thinner to clean the product.
•Do not let the product come into contact with water (e.g. sea water) or other liquids.
•Do not allow liquids or foreign objects to enter the camera.
the camera off and remove the battery.
If the battery charger becomes wet, unplug it from the outlet and consult your camera distributor or a Canon Customer Support Help Desk.
•Use only the recommended battery.
•Do not place the battery near or in direct flame.
•Unplug the power cord periodically, and using a dry cloth, wipe away any dust and dirt that has collected on the plug, the exterior of the power outlet, and the surrounding area.
•Do not handle the power cord with wet hands.
•Do not use the equipment in a manner that exceeds the rated capacity of the electrical outlet or wiring accessories. Do not use if the power cord or plug are damaged, or not fully plugged into the outlet.
•Do not allow dirt or metal objects (such as pins or keys) to contact the terminals or plug.
The battery may explode or leak, resulting in electrical shock or fire. This could cause injury and damage the surroundings. In the event that a battery leaks and the battery electrolyte contacts eyes, mouth, skin or clothing, immediately flush with water.
10
Safety Precautions
• Turn the camera off in places where camera use is prohibited.
The electromagnetic waves emitted by the camera may interfere with the operation of electronic instruments and other devices. Exercise adequate caution when using the camera in places where use of electronic devices is restricted, such as inside airplanes and medical facilities.
•Do not play the supplied CD-ROM(s) in any CD player that does not support data CD-ROMs.
It is possible to suffer hearing loss from listening with headphones to the loud sounds of a CD-ROM played on an audio CD player (music player). Additionally, this could damage the speakers.
Caution |
Denotes the possibility of injury. |
|
|
•When holding the camera by the strap, be careful not to bang it, subject it to strong impacts or shocks, or let it get caught on other objects.
•Be careful not to bump or push strongly on the lens.
This could lead to injury or damage the camera.
•When using the flash, beCOPYcareful not to cover it with your fingers or clothing.
This could result in burns or damage to the flash.
•Avoid using, placing or storing the product in the following places:
-Places subject to strong sunlight
-Places subject to temperatures above 40 °C (104 °F)
-Humid or dusty areas
These could cause leakage, overheating or an explosion of the battery, resulting in electrical shock, fire, burns or other injuries.
High temperatures may cause deformation of the camera or battery charger casing.
•Viewing images on the camera screen for prolonged periods may cause discomfort.
Caution Denotes the possibility of damage to the equipment.
•Do not aim the camera at bright light sources (such as the sun on a clear day).
Doing so may damage the image sensor.
•When using the camera on a beach or at a windy location, be careful not to allow dust or sand to enter the camera.
This may cause the product to malfunction.
11

Safety Precautions
• In regular use, small amounts of smoke may be emitted from the flash.
This is due to the high intensity of the flash burning dust and foreign materials stuck to the front of the unit. Please use a cotton swab to remove dirt, dust or other foreign matter from the flash to prevent heat build-up and damage to the unit.
• Remove and store the battery when you are not using the camera.
If the battery is left inside the camera, damage caused by leakage may occur.
•Before you discard the battery, cover the terminals with tape or other insulators.
Contacting other metal materials may lead to fire or explosions.
•Unplug the battery charger from the power outlet after charging is complete, or when you are not using it.
•Do not place anything, such as cloth, on top of the battery charger while it is
charging.
Leaving the unit plugged in for a long period of time may cause it to overheat and distort, resulting in fire.
• Do not place the battery near pets.
Pets biting the battery could cause leakage, overheating or explosion, resulting in fire or damage.
•Do not sit down with the camera in your pocket.
Doing so may cause malfunctionsCOPYor damage the screen.
•When putting the camera in your bag, ensure that hard objects do not come into contact with the screen.
•Do not attach any hard objects to the camera.
12
 Initial Preparations
Prepare for shooting as follows.

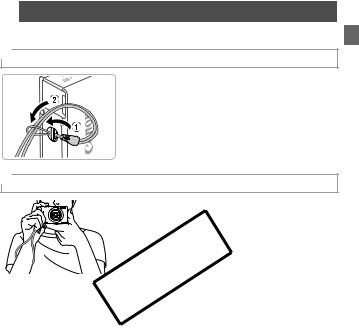
 Attaching the Strap
z Thread the end of the strap through the strap hole ( ), and then pull the other end of the strap through the loop on the threaded end (
 ).
).

 Holding the Camera
z Place the strap around your wrist.
z When shooting, keep your arms close to your body and hold the camera securely to
prevent it from moving. Do not rest your COPYfingers on the flash.
13
Initial Preparations

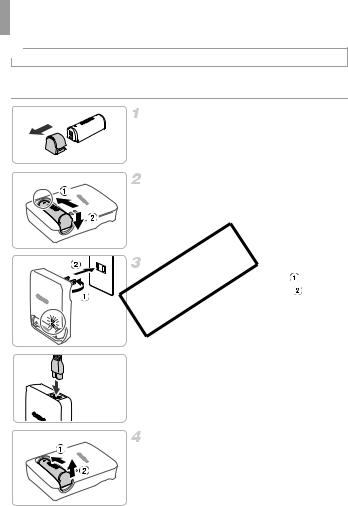
 Charging the Battery
Before use, charge the battery with the included charger. Be sure to charge the battery initially, because the camera is not sold with the battery charged.
Remove the cover.
Insert the battery.
z After aligning the Smarks on the battery and charger, insert the battery by pushing it in
( ) and down (
 ).
).
CB-2LB |
COPY |
|
|
Charge the battery. |
|
|
z For CB-2LB: Flip out the plug ( |
) and plug |
|
the charger into a power outlet ( |
). |
z For CB-2LBE: Plug the power cord into the charger, then plug the other end into a power outlet.
XThe charging lamp turns orange and charging begins.
XWhen the charging is finished, the lamp turns green.
CB-2LBE
Remove the battery.
z After unplugging the battery charger, remove the battery by pushing it in ( ) and up (
 ).
).
14
Initial Preparations
• To protect the battery and keep it in optimal condition, do not charge it continuously for more than 24 hours.
•For battery chargers that use a power cord, do not attach the charger to other objects. Make sure that it can always move freely.
• For details on charging time and the number of shots and recording time possible with a fully charged battery, see “Specifications” in the Getting Started guide.

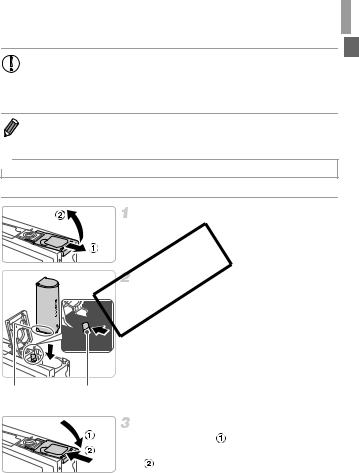
 Inserting the Battery
Insert the included battery.
Open the cover.
z Slide the cover ( ) and open it (
 ).
).
|
COPY |
|
Insert the battery. |
|
z While pressing the battery lock in the |
|
direction of the arrow, insert the battery |
|
facing as shown and push it in until it clicks |
|
into the locked position. |
|
z Batteries inserted facing the wrong way |
|
cannot be locked into the correct position. |
|
Always confirm that the battery is facing the |
Terminals |
right way and locks when inserted. |
Battery Lock |
|
|
Close the cover. |
|
z Lower the cover ( ) and hold it down as you |
|
slide it until it clicks into the closed position |
|
( ). |
15
Initial Preparations

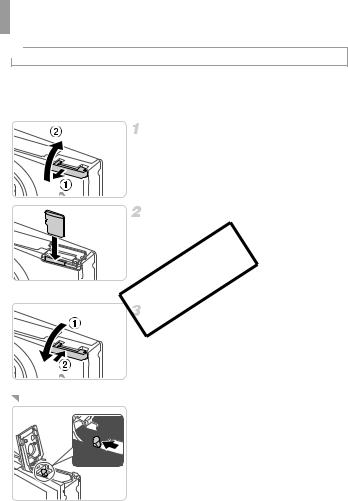
 Inserting the Memory Card
Insert a memory card (sold separately).
Note that before using a new memory card (or a memory card formatted in another device), you should format the memory card with this camera
(p. 164).
Open the cover.
z Slide the cover ( ) and open it (
 ).
).
Insert the memory card.
z Insert the memory card facing as shown until it clicks into the locked position.
z Make sure the memory card is facing the right COPYway when you insert it. Inserting memory
cards facing the wrong way may damage the camera.
lose the cover.
z Lower the cover ( ) and hold it down as you slide it until it clicks into the closed position (
 ).
).
Removing the Battery
zOpen the cover and press the battery lock in the direction of the arrow.
XThe battery will pop up.
16
Initial Preparations
Removing the Memory Card
z Open the cover and push the memory card in until it clicks, and then slowly release the memory card.
XThe memory card will pop up.

 Setting the Date and Time
A screen for setting the date and time is displayed the first time you turn the camera on. Be sure to specify the date and time, which is the basis for dates and times added to your images.
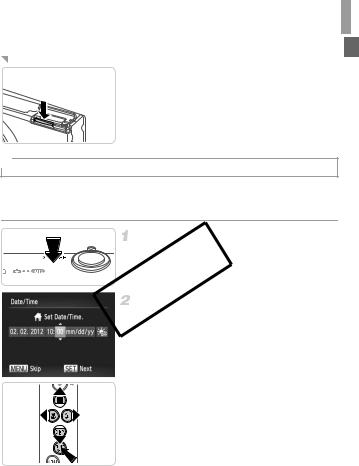
Turn the camera on.
z Press the power button.
 COPY
COPY XThe [Date/Time] screen is displayed.
Set the date and time.
z Press the qr buttons to choose an option. z Press the op buttons to specify the date
and time.
z When finished, press the m button.
17

Initial Preparations
Set the local time zone.
zPress the qr buttons to choose your local time zone.
Finish the setup process.
z Press the m button when finished. After a confirmation message, the setting screen is no longer displayed.
z To turn off the camera, press the power button.
• Unless you set the date, time, and local time zone, the [Date/Time]
screen will be displayed each time you turn the camera on. Specify |
||
|
COPY |
|
the correct information. |
|
|
• To set daylight saving time (1 hour ahead), choose |
in step 2 and then |
|
choose |
by pressing the opbuttons. |
|
18
Initial Preparations
Changing the Date and Time
Adjust the date and time as follows.
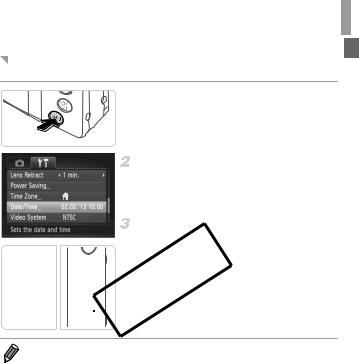
 Access the camera menu. z Press the n button.
Choose [Date/Time].
zMove the zoom lever to choose the 3 tab.
zPress the op buttons to choose [Date/ Time], and then press the m button.
Change the date and time.
z Follow step 2 on p. 17 to adjust the settings.

 z Press the n button to close the menu.


 COPY
COPY  • Date/time settings can be retained for about 3 weeks by the camera’s built-in
date/time battery (backup battery) after the battery pack is removed.
• The date/time battery will be charged in about 4 hours once you insert a charged battery or connect the camera to an AC adapter kit (sold separately, p. 173), even if the camera is left off.
• Once the date/time battery is depleted, the [Date/Time] screen will be displayed when you turn the camera on. Follow the steps on p. 17 to set the date and time.
19
Initial Preparations

 Display Language
The display language can be changed as needed.
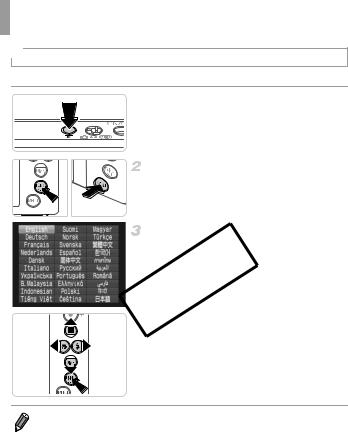
 Enter Playback mode. z Press the 1 button.
Access the setting screen.
z Press and hold the m button, and then immediately press the n button.
Set the display language.
z Press the opqr buttons to choose a COPYlanguage, and then press the m button.
XOnce the display language has been set, the setting screen is no longer displayed.
•A clock icon is displayed if you wait too long in step 2 after pressing the mbutton before you press the nbutton. In this case, press the mbutton to dismiss the clock icon and repeat step 2.
•You can also change the display language by pressing the n button and
choosing [Language  ] on the 3 tab.
20
Still Images |
Movies |
 Trying the Camera Out
Follow these instructions to turn the camera on, shoot still images or movies, and then view them.

 Shooting (Smart Auto)
For fully automatic selection of the optimal settings for specific scenes, simply let the camera determine the subject and shooting conditions.
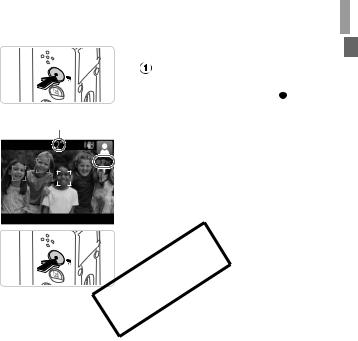
Turn the camera on.
z Press the power button.
XThe startup screen is displayed.
Enter Amode.
zSet the mode switch to A.
zAim the camera at the subject. As the camera
COPYdetermines the scene, it will make a slight clicking noise.
XIcons representing the scene and image stabilization mode are displayed in the upper right of the screen.
XFrames displayed around any subjects that are detected indicate that they are in focus.
Compose the shot.
zTo zoom in and enlarge the subject, move the zoom lever toward i (telephoto), and to zoom away from the subject, move it toward
j (wide angle).
21
Trying the Camera Out
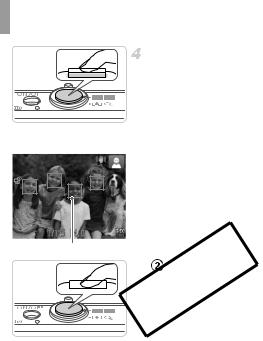
Shoot.
Shooting Still Images
 Focus.
z Press the shutter button lightly, halfway down. The camera beeps twice after focusing, and AF frames are displayed to indicate image areas in focus.
AF Frames
COPYz Shoot.
Press the shutter button all the way down.
XAs the camera shoots, a shutter sound is
played, and in low-light conditions, the flash fires automatically.
XKeep the camera still until the shutter sound ends.
XYour shot remains displayed on the screen for about two seconds.
zEven while the shot is displayed, you can take another shot by pressing the shutter
button again.
22
Trying the Camera Out
|
Shooting Movies |
|
Start shooting. |
|
z Press the movie button. The camera beeps |
|
once as recording begins, and [ Rec] is |
|
displayed with the elapsed time. |
Elapsed Time |
XBlack bars displayed on the top and bottom |
|
edges of the screen indicate image areas not |
|
recorded. |
|
XFrames displayed around any faces that are |
|
detected indicate that they are in focus. |
|
z Once recording begins, you can take your |
|
finger off the movie button. |
 Finish shooting.
z Press the movie button again to stop COPYshooting. The camera beeps twice as
recording stops.
XRecording will stop automatically when the memory card becomes full.
23
Trying the Camera Out

 Viewing
After shooting images or movies, you can view them on the screen as follows.
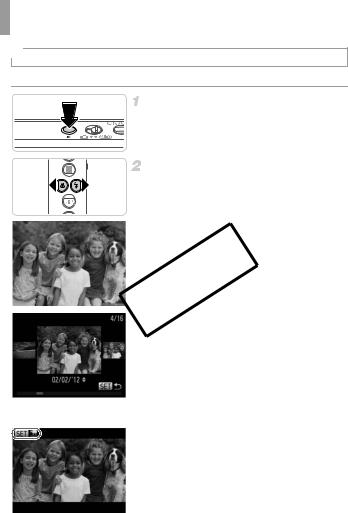
Enter Playback mode.
z Press the 1 button.
XYour last shot is displayed.
Browse through your images.
zTo view the previous image, press the q button. To view the next image, press the r
button.
COPYz To access Scroll Display mode, press and hold the qrbuttons for at least one second. In this mode, press the qrbuttons to browse through images.
z To return to single-image display, press the m button.
z To browse images grouped by shooting date, press the op buttons in Scroll Display mode.
z Movies are identified by a
 icon. To play movies, go to step 3.
24
Trying the Camera Out
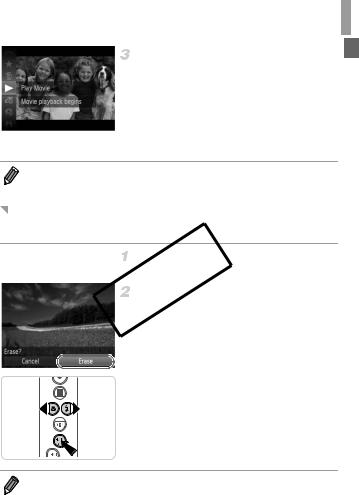
Play movies.
zPress the mbutton, press the op buttons
to choose  , and then press the mbutton again.
zPlayback now begins, and after the movie is finished, 
 is displayed.
zTo adjust the volume, press the opbuttons during playback.
• To switch to Shooting mode from Playback mode, press the shutter button halfway.
Erasing the Images
You can choose and erase unneeded images one by one. Be careful when erasing images, because they cannot be recovered.
Choose an image to erase.
COPYz Press the qr buttons to choose an image.
Erase the image.
z Press the mbutton, press the op buttons to choose a, and then press the m button again.
z After [Erase?] is displayed, press the qr buttons to choose [Erase], and then press the m button.
XThe current image is now erased.
z To cancel erasure, press the qr buttons to choose [Cancel], and then press the m button.
 • You can also erase all images at once (p. 143).
25
 Included Software, PDF Manuals
The software and PDF manuals on the included CD-ROM are introduced below, with instructions for installation, saving images to a computer, and using the PDF manuals.

 Features of the Included Software
After installing the software on the CD-ROM, you can do the following things on your computer.
ImageBrowser EX
zImport images and change camera settings
zManage images: view, search, and organize
zPrint and edit images
zUpdate to the latest software version with the auto update function
Auto Update Function
Using the included software, you can update to the latest version, and download new functions via the Internet (some software excluded). Be sure
to install |
COPY |
you can |
|
||
use this |
|
|
account
• This function may not be available depending on the camera or region you live in.

 PDF Manuals
Installing the software on the CD-ROM will also install the following PDF manuals on your computer.
Camera User Guide
Once you are familiar with the information in Getting Started, refer to this for a more indepth understanding of camera operation.
ImageBrowser EX User Guide
Refer to this guide when using the included software.
This guide can be referenced from the ImageBrowser EX Help function.
•Depending on the country or region where you purchased your camera, the ImageBrowser EX User Guide may not be accessible from the Help function. In such cases, it will either be included on the CD-ROM bundled with your camera, or you can download the latest version from the Canon website.
26

Included Software, PDF Manuals

 System Requirements
The included software can be used on the following computers. Adobe Reader is required to view the PDF manuals.
Windows
Windows 7 SP1
Operating System Windows Vista SP2
Windows XP SP3
Computer |
Computers running one of the above operating systems |
||
(preinstalled), with an included USB port and Internet connection |
|||
|
|||
|
|
||
Processor |
1.6 GHz or higher (still images), Core 2 Duo 2.6 GHz or higher (movies) |
||
|
|
|
|
|
Windows 7 |
(64 bit): 2 GB or more |
|
RAM |
Windows 7 |
(32 bit), Windows Vista (64 bit, 32 bit): |
|
1 GB or more (still images), 2 GB or more (movies) |
|||
|
|||
|
Windows XP: 512 MB or more (still images), 2 GB or more (movies) |
||
Interfaces USB
*In Windows XP, MicrosoftCOPY.NET Framework 3.0 or later (max. 500 MB) must be installed. Installation may take some time, depending on computer performance.
Operating System
Computer
Processor
RAM
Interfaces
Free Hard Disk
Space
Display
Mac OS X 10.6
Computers running one of the above operating systems (preinstalled), with an included USB port and Internet connection
Core Duo 1.83 GHz or higher (still images), Core 2 Duo 2.6 GHz or higher (movies)
1 GB or more (still images), 2 GB or more (movies)
USB
550 MB or more
1024 x 768 resolution or higher
•Check the Canon website for the latest system requirements, including supported OS versions.
27
Included Software, PDF Manuals

 Installing the Software and PDF Manuals
Windows 7 and Mac OS X 10.6 are used here for the sake of illustration. Using the software auto update function, you can update to the latest version and download new functions via the Internet (some software excluded), so be sure to install the software on a computer with an Internet connection.
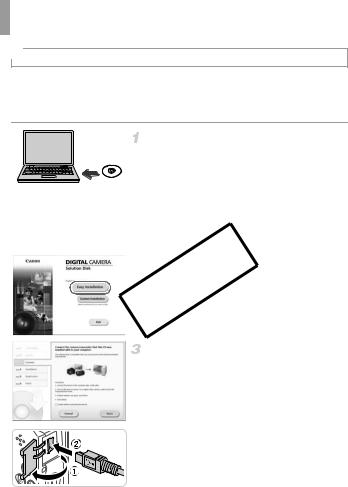
Insert the CD-ROM in the computer’s CD-ROM drive.
z Insert the included CD-ROM (DIGITAL CAMERA Solution Disk) (p. 2) in the computer’s CD-ROM drive.
zOn a Macintosh computer, after inserting the
disc, double-click the desktop disc icon to open it, and then double-click the  icon displayed.
COPY Begin the installation.
z Click [Easy Installation] and follow the onscreen instructions to complete the installation process.
When a message is displayed prompting you to connect the camera, connect it to a computer.
z With the camera turned off, open the cover ( ). With the smaller plug of the included interface cable (p. 2) in the orientation shown, insert the plug fully into the camera terminal (
 ).
).
28
Included Software, PDF Manuals
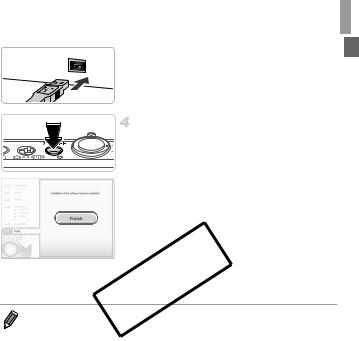
z Insert the larger plug of the interface cable in the computer’s USB port. For details about USB connections on the computer, refer to the computer user manual.
Install the files.
z Turn the camera on, and follow the on-screen instructions to complete the installation process.
XThe software will connect to the Internet to update to the latest version and download
new functions. Installation may take some time, depending on computer performance and the Internet connection.
z Click [Finish] or [Restart] on the screen after
-Some functions mayCOPYnot be installed.
-The first time you connect the camera to the computer, drivers will be installed, so it may take a few minutes until camera images are accessible.
•If you have several cameras that were bundled with ImageBrowser EX on the included CD-ROMs, be sure to use each camera with their included CD-ROM and follow the on-screen installation instructions for each. Doing so will ensure
that each camera will receive the correct updates and new functions via the auto update function. installation and remove the CD-ROM when
29
Included Software, PDF Manuals

 Saving Images to a Computer
Windows 7 and Mac OS X 10.6 are used here for the sake of illustration.
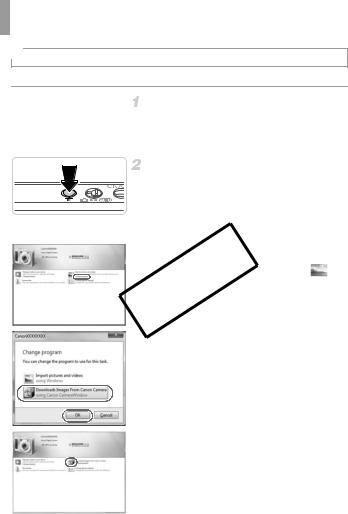
Connect the camera to the computer.
zFollow step 3 on p. 28 to connect the camera to a computer.
Turn the camera on to access CameraWindow.
z Press the 1 button to turn the camera on. z On a Macintosh computer, CameraWindow is
displayed when a connection is established between the camera and computer.
z For Windows, follow the steps introduced
below. |
|
z In the screen that displays, click the |
link |
to modify the program. |
|
COPYz Choose [Downloads Images From Canon |
|
Camera using Canon CameraWindow] and then click [OK].
z Double click  .
.
30
 Loading...