


DIGITAL DOCUMENT CAMERA
DZ-3600U
User’s Manual
Setup for Operation with a Computer
▼ ▼ ▼ ▼ ▼
Mastering the
Basics
▼ ▼ ▼ ▼ ▼
An introduction
to the Features
▼ ▼ ▼ ▼ ▼
Operating without a Computer
▼ ▼ ▼ ▼ ▼
Troubleshooting
▼ ▼ ▼ ▼ ▼
Appendix
▼ ▼ ▼ ▼ ▼
1
2
3
4
5
Please read this User’s Guide carefully before operation. |
|
Be sure to read the “Safe Use of the Equipment” section before using this equipment. |
|
Store this Guide in a readily accessible location for future reference. |
ENGLISH |

Introduction
Thank you for purchasing a Canon DZ-3600U Digital Document Camera. Please read this Users Guide thoroughly to use this product safely and extend its life. In particular, please read and observe the safety precautions.
Features of the DZ-3600U Digital Document Camera
• High-Resolution
This device employs the Variable Refraction Optical System (VAROS) and a built-in 12 power zoom lens to achieve high-resolution image capturing. Connect it to a computer with a USB (universal serial bus) cable and discover how it handles high-resolution images that could not be accommodated by earlier generations of visualizers.
• Multiple Applications
The DZ-3600U functions in a multitude of capacities, serving as a document camera for presentations when used with a projector, as a scanner for desktop publishing applications or as a videoconferencing camera.
• Versatile
Record anything from flat documents to 3-dimensional objects, OHP transparencies, negative films and others. Just turn the camera head to capture white board images or to pan a conference room.
• Remote Controls
You can conduct a computer-driven presentation without having to touch the computer, if it is linked via a USB cable, since you can control it from the DZ-3600U’s remote control or control panel.
• All the Advantages of Traditional Visualizers Plus More
It is also equipped with video out ports like conventional visualizers, making it possible to monitor the video feed from the camera in real-time and to conduct a presentation without a computer.
The instructions for opening the product package, the packing list and the components guide are contained in the appendix at the back of this guide. Please refer to them as required.
Exclusion of Liability
If the DZ-3600U is connected to a recording device, such as a VCR, Canon Inc. accepts no responsibility whatsoever for any financial losses that may be incurred as a result of the loss of recorded information or images, regardless of the cause of the loss.
3

Introduction
How to Use the Guides
The following guides are supplied with the DZ-3600U Digital Document Camera. Read the descriptions below to make the most efficient use of them to suit your own purposes.
Users Guide (This Guide)
This guide starts off with an introduction and explanation of the safe use of the equipment, then the first chapter discusses procedures for connecting the power cord and other devices, instructions for installing the software and preparations for using the equipment with a computer. The second chapter explains the basic operating procedures for use with a computer. We encourage first-time users to actually try these procedures as they read.
The third chapter lists all of the operations that can be accomplished with the equipment connected to a computer.
The fourth chapter tells how to use it as a conventional visualizer (video output device) without a computer.
The fifth chapter is devoted to troubleshooting tips. Read this section before contacting the dealer if you are experiencing a problem with the equipment.
The appendix contains instructions for unpacking the equipment, the packing list, a components guide and other useful information to which you may refer as required.
Quick Reference Guide (Pamphlet)
This handy reference can be used like a crib sheet in case you forget or wish to confirm a command during a meeting or presentation. Although it provides comprehensive coverage of how to execute commands using the remote control, control panel and computer, you are recommended to read chapters 2 through 4 of the Users Guide first before relying on it. It also includes a White Balance Adjustment Chart in case the color balance requires resetting.
Copyright Compliance
Please note that use of video or still images recorded by the DZ-3600U, other than for personal use, is subject to copyright laws and is prohibited without the consent of the copyright holder.
1.No part of this document may be reproduced or transmitted in any form or by any means, electronic or mechanical, for any purpose, without the express written permission of Canon Inc.
2.The equipment and software described in this guide are subject to change without notice. 3.Although every effort has been made to ensure the accuracy of this guide, please contact us at the
address listed on the back cover to report any oversights, errors or omissions.
4.Notwithstanding the above, please note that Canon Inc. accepts no liability for any results arising from the operation of the equipment or software mentioned herein.
•Canon and the Canon logo are registered trademarks of Canon Inc.
•Microsoft, PowerPoint and Windows are registered trademarks of Microsoft Corporation in the United States and other countries.
•Intel, Pentium and MMX are registered trademarks of Intel Corporation.
•Other products and names mentioned in this guide may be trademarks or registered trademarks of the respective companies.
4
 Safe Use of the Equipment
 An exclamation point within a triangle is intended to alert the user to the presence of important operating and maintenance (servicing) instructions in the literature accompanying the equipment.
1. Important Warnings
TO REDUCE THE RISK OF ELECTRIC SHOCK, DO NOT REMOVE
THE COVER (OR BACK) OF THE EQUIPMENT. THERE ARE NO
USER-SERVICEABLE PARTS INSIDE. REFER SERVICING TO QUALIFIED SERVICE PERSONNEL.
The serial number of this equipment may be found on the rear of the equipment. No others have the same serial number as yours. You should record the number and other vital information here and retain this guide as a permanent record of your purchase to aid identification in case of theft.
Date of Purchase:
Dealer:
Dealer Address:
Dealer Phone No.:
Model No.: |
DZ-3600U |
Serial No.:
2. Important Operational Instructions
TO REDUCE THE RISK OF ELECTRIC SHOCK, DO NOT EXPOSE
THE EQUIPMENT TO RAIN OR MOISTURE.
TO REDUCE THE RISK OF ELECTRIC SHOCK, AND TO REDUCE
ANNOYING ELECTROMAGNETIC INTERFERENCE, USE THE
RECOMMENDED ACCESSORIES ONLY.
FDA Regulation
This document camera has not been evaluated by the Food and Drug Administration (FDA) for use as a medical device. When incorporated into a system with medical applications, FDA regulations may apply. Therefore, please consult your legal advisor to determine whether FDA regulations apply.
5

Safe Use of the Equipment
FCC Notice
DZ-3600U Digital Document Camera
This device complies with Part 15 of the FCC Rules. Operation is subject to the following two conditions: (1) this device may not cause harmful interference, and (2) this device must accept any interference received, including interference that may cause undesired operation.
Note:
This device has been tested and found to comply with the limits for a Class B digital device, pursuant to Part 15 of the FCC Rules. These limits are designed to provide reasonable protection against harmful interference in a residential installation. This device generates, uses and can radiate radio frequency energy and, if not installed and used in accordance with the instructions, may cause harmful interference to radio communications.
However, there is no guarantee that interference will not occur in a particular installation. If this device does cause harmful interference to radio or television reception, which can be determined by turning the device off and on, the user is encouraged to try to correct the interference by one or more of the following measures:
-Reorient or relocate the receiving antenna.
-Increase the separation between the device and receiver.
-Connect the device into an outlet on a circuit different from that to which the receiver is connected.
-Consult the dealer or an experienced radio/TV technician for help.
Use of shielded cable is required to comply with Class B limits in Subpart B of Part 15 of the FCC Rules.
Do not make any changes or modifications to the device unless otherwise specified in the manual. If such changes or modifications should be made, you could be required to stop operation of the device.
Canon U.S.A. Inc.
One Canon Plaza, Lake Success, NY 11042, U.S.A.
Tel No. (516) 328-5600
IC NOTICE
This device does not exceed the Class B limits for radio noise emissions from digital apparatus as set out in the Interference-causing device standard entitled ‘Digital Apparatus’, ICES-003 of Industry Canada.
NOTIFICATION IC
Cet appareil numérique respecte les limites de bruits radioélectriques applicables aux appareils numériques de Classe B prescrites dans la norme sur le matériel brouilleur: “Appareils Numériques” NMB-003 édictée par l’Industrie Canada.
6
Safe Use of the Equipment
 Important Safety Instructions
In these safety instructions, the word ‘equipment’ refers to the Canon DZ-3600U Digital Document Camera and all its accessories.
1.Read Instructions - All the safety and operating instructions should be read before the equipment is operated.
2.Retain Instructions - The safety and operating instructions should be retained for future reference.
3.Heed Warnings - Pay attention to all warnings on the equipment and in the operating instructions.
4.Follow Instructions - All operating and maintenance instructions should be followed.
5.Cleaning - Unplug the equipment from the electrical outlet before cleaning. Wipe the equipment with a clean soft cloth. If necessary, put a
cloth in diluted neutral detergent and wring it well before wiping the equipment with it. Finally, clean the equipment with a clean dry cloth. Do not use benzene, thinners or other volatile liquids or pesticides as they may damage the finish of the equipment. When using chemically treated cleaning cloths, observe those precautions accordingly.
6.Accessories - Do not use accessories not recommended in this guide because they may be hazardous. Always use the specified connection cables. Ensure that devices are correctly connected.
7. Water and Moisture: Hazard of Electric Shock -Do not use the equipment near water or in rainy/moist situations. Do not put a heater near this equipment.
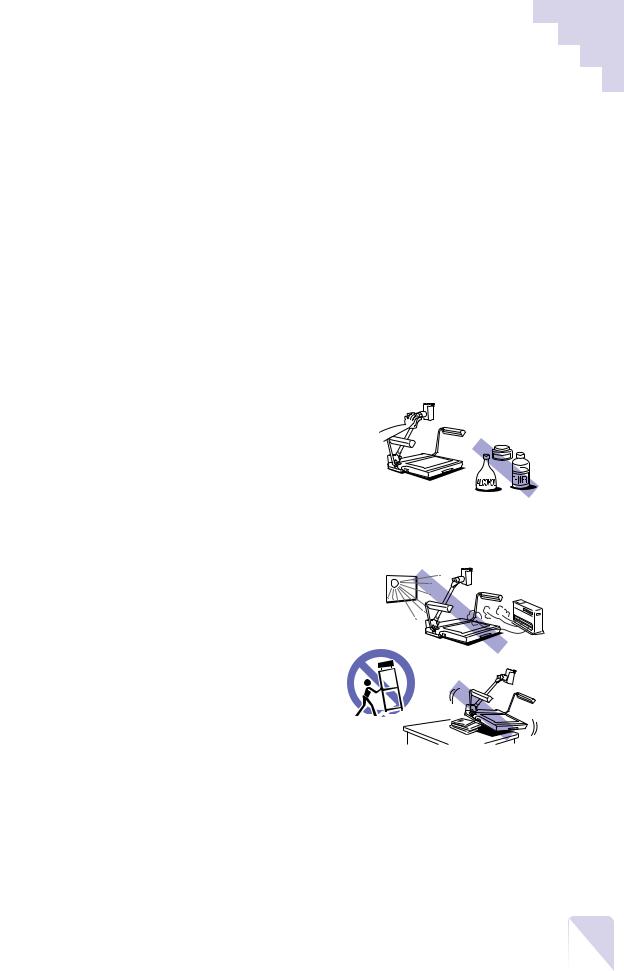
8. Placement and Transport - Do not place the equipment
on an unstable cart, stand, tripod, bracket or table. The equipment may fall, causing serious injury to a child or adult, and serious damage to the equipment. An
equipment and cart combination should be moved with  care. Quick stops, excessive force and uneven surfaces may
cause the equipment and cart to overturn.
9.Power Sources - This equipment should be operated only from the type of power source indicated on the marking label. If you are not sure of the type of power supply in your home, consult your product dealer or local power company.
10.Grounding - This equipment is equipped with a three-pronged grounding plug (the plug has a third grounding pin). The three-pronged grounding plug will fit into a grounding-type power outlet. This is a safety feature. If you are unable to insert the plug into the outlet, contact your electrician to replace your obsolete outlet. Do not defeat the safety purpose of the grounding-type plug.
7

Safe Use of the Equipment
11.Power Cord Protection - Power cords should be routed so that they are not likely to be walked on or pinched by items placed upon or against them. Pay particular attention to plugs and the point from which the cords exit the equipment.
12.Lightning - For added protection of this equipment during a lightning storm, or when it is left unattended and unused for long periods of time, disconnect it from the electrical outlet.
This will prevent damage to the equipment due to lightning and power-line surges.
13.Overloading - Do not overload electrical outlets and extension cords because this can result in fire or electric shock.
14.Entry of Objects and Liquids - Never push objects of any kind into this equipment through openings as they may touch electric components or short circuit parts, resulting in fire or electric shock. Be careful not to spill liquid of any kind onto the equipment.
15. Servicing - Do not attempt to service this equipment yourself because opening or removing covers may expose you to dangerous electrical currents or other hazards. Refer all servicing to qualified personnel.
16.Damage Requiring Service - Disconnect this equipment from the electrical outlet and all power sources including batteries, and refer servicing to qualified service personnel under the following conditions.
a.When the power cord or plug is damaged.
b.If any liquid has been spilled into, or objects have fallen into, the equipment. c.If the equipment has been exposed to rain or water.
d.If the equipment does not operate normally even if you follow the operating instructions. Adjust only those controls that are covered by the operating instructions. Improper adjustment of other controls may result in damage and will often require extensive work by a qualified technician to restore the equipment to its normal operation.
e.If the equipment has been dropped or the casing has been damaged.
f.When the equipment exhibits a distinct change in performance. This indicates a need for servicing.
17.Replacement Parts - When replacement parts are required, be sure the service technician has used replacement parts that are specified by Canon or that have the same characteristics as the original parts. Unauthorized substitutions may result in fire, electric shock or other hazards.
18.Safety Check - Upon completion of any service or repairs to the equipment, ask the service technician to perform safety checks to determine that the equipment is in safe operating order.
8

Safe Use of the Equipment
19.Do not install the equipment in the following locations as this can cause fire or electric shock.
-Hot locations.
-Locations close to open flame or fire.
-Very humid or dusty locations.
-Locations exposed to direct sunlight.
-Locations exposed to salt spray.
-Locations close to flammable solvents (alcohol, thinners, etc.).
20.When any of the following occurs, immediately switch off the equipment, unplug it from the main power supply and contact your nearest Canon dealer. Do not continue to use the equipment because this can lead to fire or electric shock.
-The equipment emits smoke, heat, abnormal noise or unusual odors.
-A metal object falls into the equipment.
-The equipment is damaged in some way.
21.Please observe the following when using the equipment. Failure to do so can result in fire or electric shock.
-Do not use flammable sprays near the equipment.
-Do not subject the equipment to strong impacts.
22.Please observe the following when handling the batteries. Failure to do so may result in the batteries bursting or emitting heat, sparks or corrosive fluid.
-Do not throw the batteries into a fire, and do not heat, short-circuit or attempt to disassemble them.
-Do not attempt to recharge the batteries.
-Do not use batteries other than those specified for use with the equipment.
-Remove the batteries when they are used up or when the equipment will not be used for an extended period.
-When replacing the batteries, always replace the entire set and do not use different types of batteries together.
-Ensure that the positive (+) and negative (-) terminals are correctly positioned when you load the batteries.
-If any soiling or leakage of the internal battery fluid occurs, thoroughly clean off the soiling or leaked fluid with water.
9

A La Carte Menu of
DZ-3600U Applications
The DZ-3600U can be used in an amazing variety of applications, such as those introduced below.
As a Presentation Tool
Used with the accompanying DZ-3600U Presentation Software, the equipment becomes a highly effective presentation tool that works in conjunction with a computer and projector. Its single remote control places the powerful features of the DZ-3600U, its software and other programs, such as PowerPoint, at your fingertips.
Control at your fingertips with the ultimate presentation tool.
Presentation Examples
|
• Conference papers |
|
• OHP transparencies |
|
• Pictures of products and landscapes, slide films, negatives (numerous |
|
photographs can be lined up and compared or analyzed) |
|
• Books (opened to any page) |
|
• Full-size products or scale models |
|
• Films, including X-rays |
|
• Specimens |
10 |
• Conference room white boards |

A La Carte Menu of DZ-3600U Applications
As a Scanner for 3-D Objects
With the supplied DZ-3600U TWAIN Driver, the equipment can be used with standard graphics programs to capture a remarkable assortment of three-dimensional objects and films.
Instant 3-D scanning to capture those difficult contours.
As a Conventional Visualizer
Of course the DZ-3600U fits the bill as a conventional visualizer (video output device) connected directly to a video monitor or a projector.
Get your message across clearly with the superior reproduction of the DZ-3600U. |
11 |
|
Table of Contents |
|
|
|
Safe Use of the Equipment ................................................. |
5 |
Chapter 1 |
Setup for Operation with a Computer |
|
|
Connecting to a Power Source................................................ |
16 |
|
Connecting to a Computer ..................................................... |
17 |
|
Computer System Requirements ................................................ |
18 |
|
Installing the Software ......................................................... |
19 |
|
Important Instructions for the Remote Control ...................... |
23 |
|
Aim the Remote Control at the Camera Head .............................. |
24 |
|
Checking the Battery Charge Prior to Use .................................. |
24 |
Chapter 2 |
Mastering Basic Operation |
|
|
Assembly .............................................................................. |
26 |
|
Turning On the Power ........................................................... |
28 |
|
Starting the Software ............................................................ |
29 |
|
Placing Objects ..................................................................... |
30 |
|
A Few of the Basics ............................................................... |
31 |
|
Zooming ................................................................................ |
32 |
|
Capturing Images .................................................................... |
33 |
|
Rotating Captured Images ........................................................ |
34 |
|
Closing Software Programs .................................................... |
35 |
|
Turning Off the Power .......................................................... |
36 |
|
Knock-Down ......................................................................... |
37 |
|
Transport Precaution ............................................................... |
38 |
Chapter 3 |
An Introduction to the Features |
|
|
About the Bundled Software.................................................. |
40 |
|
The Two Programs to Install ..................................................... |
40 |
|
DZ-3600U Presentation Software ............................................... |
40 |
|
DZ-3600U TWAIN Driver ........................................................... |
41 |
|
Preview Mode and Still Mode ................................................. |
42 |
|
Preview Mode ......................................................................... |
42 |
|
Still Mode .............................................................................. |
43 |
|
Toolbar and Status Bar .......................................................... |
44 |
|
Toolbar .................................................................................. |
44 |
|
Status Bar .............................................................................. |
44 |
|
Display/Hide the Toolbar and Status Bar ................................... |
45 |
|
Capturing Images ......................................................... |
46 |
|
Selecting the Capture Resolution .................................. |
48 |
|
Switching to Preview Mode ............................................... |
50 |
|
Selecting the Display Resolution ....................................... |
51 |
|
Saving Images .............................................................. |
53 |
|
Saving Images As Presentation Software Files ............................ |
54 |
|
Saving Just the Displayed Image .............................................. |
55 |
|
Saving All Images and the HTML Index ..................................... |
56 |
12

Table of Contents
|
Opening Saved Images ................................................. |
58 |
|
Forwarding/Reversing the Display to the Next Image |
.... 59 |
|
Selecting Images from the List ..................................... |
61 |
|
Adjusting the Display Size of Preview Images ................... |
62 |
|
Changing the Display Size of Captured Images .................. |
63 |
|
Adjusting the Brightness of Preview Images ..................... |
65 |
|
Adjusting the Focus of Preview Images ............................. |
67 |
|
Adjusting the Detail of Preview Images ............................. |
69 |
|
Adjusting the Color Balance of Preview Images ................. |
70 |
|
Adjusting the Orientation of Preview Images .................... |
72 |
|
Rotating Captured Images ................................................. |
74 |
|
Capturing an Object in Monochrome Mode ......................... |
76 |
|
Using the Front Lights and Backlight ................................ |
77 |
|
Shooting Negatives ........................................................... |
79 |
|
Reversing or Inverting Images .......................................... |
80 |
|
Shooting the Surroundings ............................................... |
81 |
|
Using the Finger Pointer .................................................. |
82 |
|
Displaying the Finger Pointer ................................................... |
82 |
|
Moving the Finger Pointer........................................................ |
83 |
|
Interfacing with PowerPoint ......................................... |
84 |
|
Switching between Application Programs .................................. |
84 |
|
Controlling Slides ................................................................... |
85 |
|
Scanning Images with TWAIN Driver ..................................... |
86 |
|
Selecting the Input Device....................................................... |
86 |
|
Using TWAIN Driver ................................................................. |
87 |
|
refers to preview mode functions |
|
|
refers to still mode functions |
|
Chapter 4 |
Operating without a Computer |
|
|
Connecting to a Video Monitor or Projector ........................... |
90 |
|
S Video Cable ......................................................................... |
90 |
|
BNC Video Cable ...................................................................... |
91 |
|
Connecting to Other Image Input Devices .............................. |
92 |
|
Connecting to an External Input Device .................................... |
93 |
|
Assembly, Knock-Down and Power On/Off.............................. |
94 |
|
Assembly and Knock-Down ...................................................... |
94 |
|
Turning On the Power .............................................................. |
94 |
|
Turning Off the Power ............................................................. |
94 |
|
Button Functions .................................................................. |
95 |
|
Control Panel ......................................................................... |
95 |
|
Remote Control ....................................................................... |
96 |
|
Camera Head .......................................................................... |
97 |
|
Displaying Images from External Input Devices ..................... |
98 |
13

Table of Contents
Chapter 5 |
Troubleshooting |
|
|
Troubleshooting tips ........................................................... |
100 |
|
Error Messages .................................................................... |
103 |
Appendix |
|
|
|
Removing the Equipment from the Box ............................... |
106 |
|
Packing List........................................................................ |
108 |
|
Changing the Remote Control Batteries ............................... |
109 |
|
Components Guide .............................................................. |
110 |
|
Main Unit ............................................................................. |
110 |
|
Rear Panel of the Main Unit .................................................... |
111 |
|
Control Panel ........................................................................ |
112 |
|
Remote Control ...................................................................... |
113 |
|
Camera Head ......................................................................... |
114 |
|
Toolbar (Preview Mode) .......................................................... |
115 |
|
Toolbar (Still Mode) ............................................................... |
116 |
|
Specifications ..................................................................... |
117 |
|
Glossary ............................................................................. |
118 |
|
Index.................................................................................. |
120 |
14

Chapter 1
Setup for
Operation with a Computer
▼ ▼ ▼ ▼ ▼
1
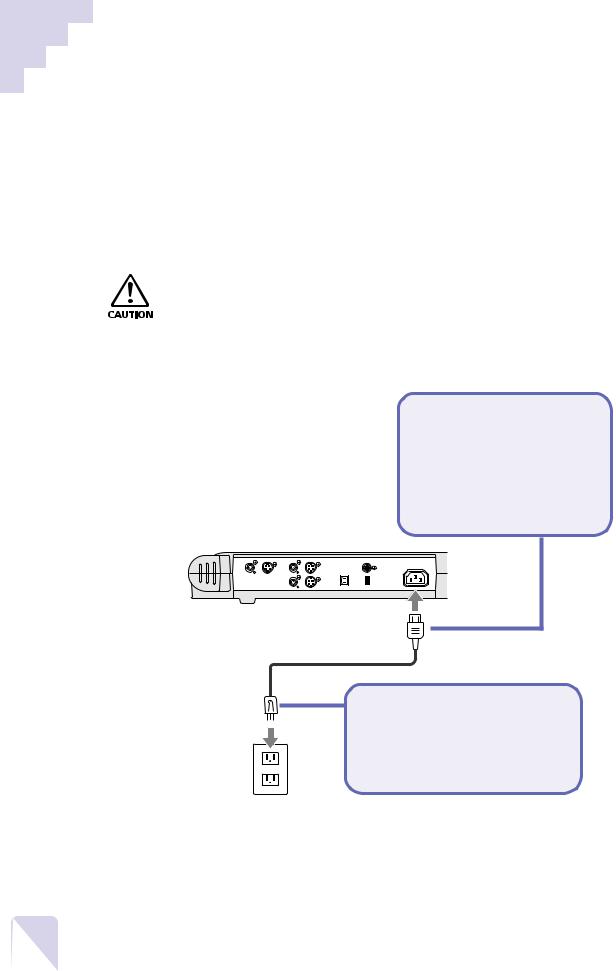
Connecting to a Power Source
Connect the DZ-3600U to a power source with the supplied power cord.
This explanation assumes that you have already removed the main unit and accessories from the box and placed them on a stable surface. If you have not yet unpacked them, read and follow the steps described in Removing the Equipment from the Box (P.106), then find a suitable location.
!!! Important !!!
• Do not use a power cord other than the one supplied. Plug it into a 120volt electrical outlet only. Use with other voltages may result in fire, electric shock or other hazards.
•Ensure that the power switch on the main unit is set to Off before you plug in the power cord.
1.
Insert the female end of the power cord (the end with 3 holes) into the AC Inlet on the main unit’s rear panel.
Rear Panel of the Main Unit
VIDEO |
S VIDEO |
VIDEO |
S VIDEO |
RS-232C |
OUTPUT |
|
EXT |
|
AC INLET |
|
IN 1 |
|
|
|
USB |
|
60/100 |
EXT |
HandShake |
Reserved |
|
IN 2 |
Service Mode |
OFF ON
Power Cord (supplied)
2.
Plug the other end of the power cord into an electrical outlet.
16
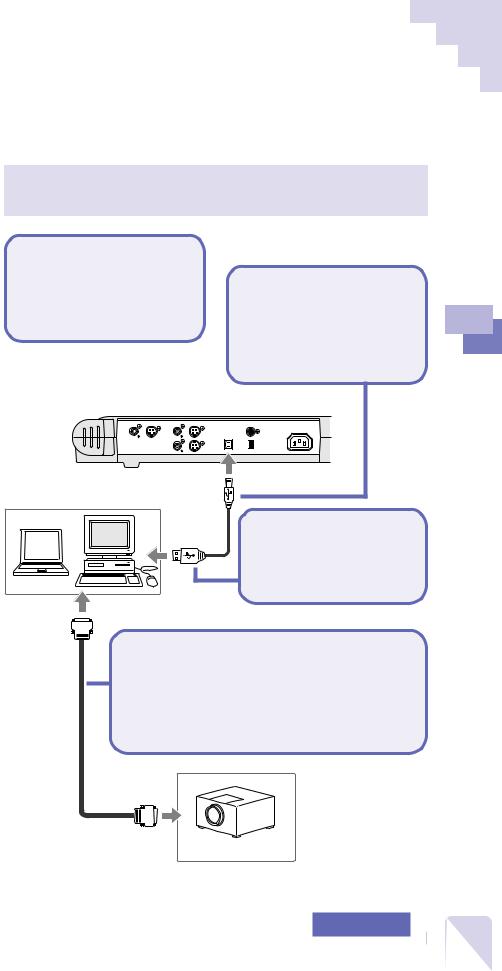
Connecting to a Computer
When connected to a computer, the main unit can load captured images onto the computer or be controlled from the computer.
For instructions on how to operate the equipment without a computer, see Chapter 4, Operating without a Computer.
1.
Confirm that the power is off on the main unit and all other devices.
2.
Insert one end of the USB cable into the USB port on the main unit’s rear panel.
Rear Panel of the Main Unit
VIDEO |
S VIDEO |
VIDEO |
S VIDEO |
RS-232C |
OUTPUT |
|
EXT |
|
AC INLET |
|
IN 1 |
|
|
|
USB |
|
60/100 |
EXT |
HandShake |
Reserved |
|
IN 2 |
Service Mode |
OFF ON
Computer
USB Cable |
3. |
|
Insert the other end of the USB cable into the computer’s USB port.
To Connect a Projector or Large Screen Monitor
Insert one end of the VGA cable into the VGA Cable computer’s video output port, and the
other end into the video input port of the projector or large screen monitor.
|
There are many |
|
varieties of video |
|
output ports on |
|
computers and video |
|
input ports on |
|
projectors and large |
|
screen monitors. |
Projector or Large |
Ensure that your |
Screen Monitor |
cables match your |
|
equipment. |
1
Computer a with Operation for Setup
Computer 17

Connecting to a Computer
Computer System Requirements
The following minimum requirements must be met by your computer for it to successfully run the software for the DZ-3600U.
CPU
166 MHz MMX Pentium or higher
(266 MHz Pentium II or higher is recommended) USB interface
Memory
32 MB or more (64 MB or more is recommended)
Free Hard Disk Space
20 MB or more recommended (software requires approximately 5 MB and 50 high-resolution captured images require approximately 15 MB)
Display
800 x 600 (SVGA) or bigger display board or PC monitor capable of displaying any one of the 16-bit, 24-bit or 32-bit modes
(1024 x 768 (XGA) or better display is recommended)
Operating System
Windows 95 4.00.950b (OSR 2.1 with USB Supplement)
Windows 95 4.00.950c (OSR 2.5 with USB Supplement)
Windows 98
Some computers may have the USB interface switched off. Please refer to your computer manual or contact the manufacturer for instructions to switch it on.
18

Installing the Software
The bundled software must be installed onto the hard drive of your computer for it to work with the DZ-3600U.
The instructions below will show you how to install two programs: DZ3600U Presentation Software (hereafter referred to as Presentation Software) and DZ-3600U TWAIN Driver (hereafter referred to as TWAIN Driver). As its name suggests, Presentation Software works with your computer to deliver presentations, serving as the key interface between the two. TWAIN Driver is the software that enables the DZ-3600U to capture and load images into TWAIN-compliant application programs, such as the major graphics programs on the market.
!!!Important !!!
•These instructions cover the basic procedures for installing the software. Persons new to PCs should follow these instructions to the letter.
•••Note •••
•Experienced computer users who wish to change the target directory or folder for the installation, should comply with the on-screen instructions.
1.
Confirm that the main unit’s power is off.
!!!Important !!!
•Make sure that the DZ-3600U’s power is off before you install the software. Attempting to install it with the power on will result in an [Unknown device] error message after installation. If you have already started to install the software with the power on, stop the installation, shut down Windows and turn off your computer. Then reinstall with the DZ-3600U’s power off.
2.
Turn on the computer’s monitor (and any other peripherals) and then the CPU.
• Windows will start.
1
Computer a with Operation for Setup
19
Installing the Software
3.
Place the software CD-ROM into the computer’s drive.
•The setup utility will automatically start after a few moments.
•If the setup utility does not automatically start up after a long interval, double-click the [My Computer] icon on the Windows desktop and double-click the CD-ROM icon in the My Computer window. Double-click the [SETUP] icon which appears in the next window. The setup utility will start.
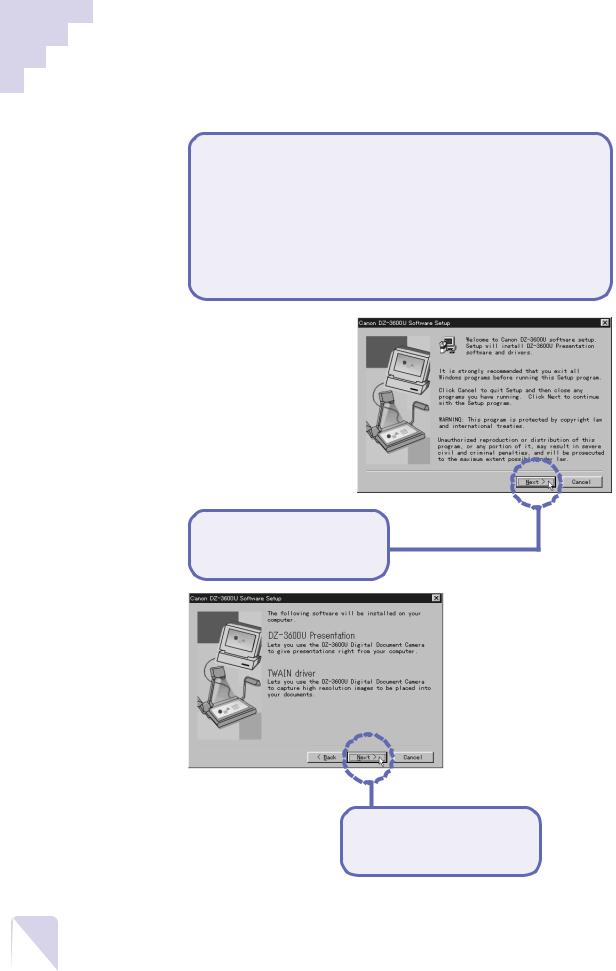
4.
Click the [Next] button.
5.
Click the [Next] button.
20
Installing the Software
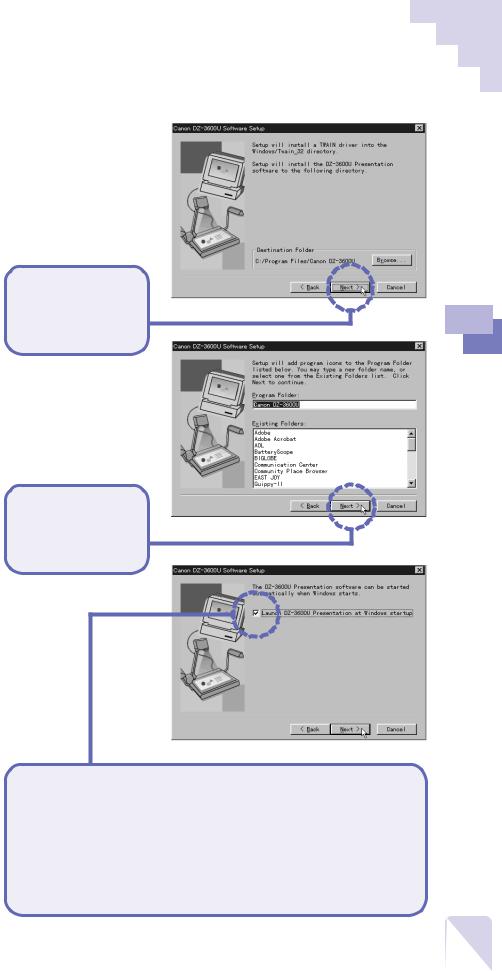
6.
Click the [Next] button.
7.
Click the [Next] button.
8.
If you wish the software to start automatically, click this check box to place a check mark in it.
By placing a check mark in this box you are setting it so that Presentation Software will automatically start when you turn on the computer and run Windows (a shortcut will be placed in Window’s Startup folder). (p. 29)
1
Computer a with Operation for Setup
21
Installing the Software
9.
Click the [Next] button.
• The software installation will start. The window below will display when the installation is finished.
10.
Click the [Finish] button.
• The software installation is complete.
This concludes the software installation process.
12.
Turn off the computer, its monitor and any other peripherals.
11.
Click the Windows [Start] button on the taskbar, select [Shut Down] from the menu and follow the correct procedures to shut down Windows.
•Alternatively, you may keep Windows running, turn on the DZ-3600U and start up Presentation Software at this point (p. 29).
22

Important Instructions for the Remote Control
A remote control is supplied with the DZ-3600U. It can be used to control various functions while you are standing at a podium or among the audience.
CAPTURE RESOLUTION PREVIEW
W |
ZOOM |
|
T |
LIGHTS |
|
–BRIGHTNESS+ |
COLOR |
|
|
FOCUS |
|
AUTO |
NEAR |
FAR |
APP |
REV |
FWD |
ROTATE
1
Computer a with Operation for Setup
We will have you try various operations using this remote control in the next chapter. If there are no batteries in the remote control, see Changing the Remote Control Batteries (P.109) for instructions.
•••Note •••
•There are some differences between the functions that can be accessed through the main unit’s control panel and the remote control.
23
Important Instructions for the Remote Control
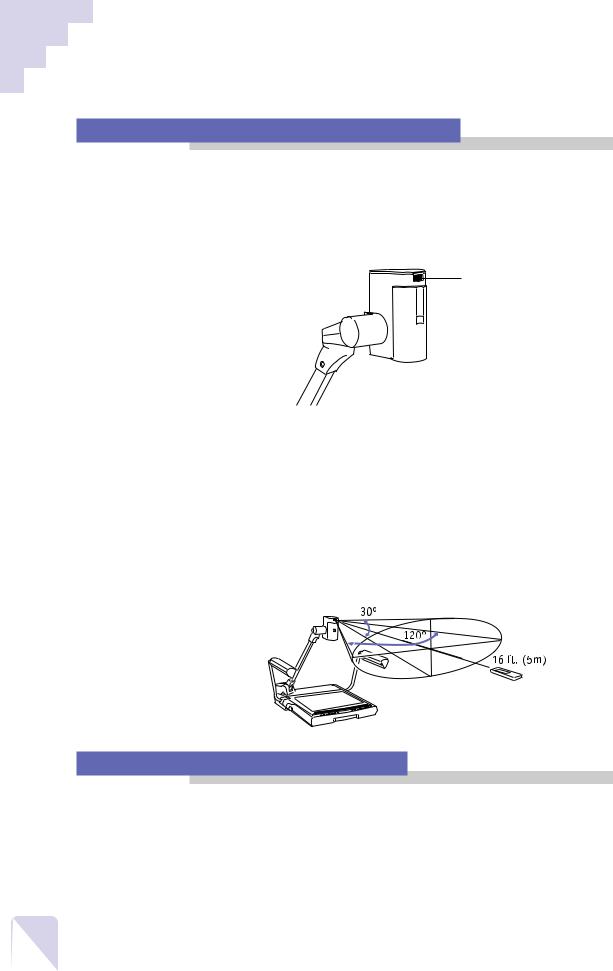
Aim the Remote Control at the Camera Head
The remote control sensor (the component that receives the infrared signals from the remote control) is located on the camera head. You must aim the remote control at the camera head for it to be effective. Pointing it at the monitor or screen on which images are being displayed will not work.
Remote Control Sensor
Even if people understand this intellectually, once they get up in front of a real audience, many end up pointing the remote control at the screen and clicking with all their might. We highly recommend that you plan an on-site rehearsal before starting a presentation.
••• Note •••
•The effective range of the remote control from the remote control sensor is approximately 16 ft. (5 m) at 120 degrees horizontally and 30 degrees vertically.
Check the Battery Charge Prior to Use
The cause of a remote control not responding at all during a presentation is generally an insufficient battery charge. Remember to always check the battery charge before you need the remote control. Keep an extra set of batteries handy if you are uncertain about the remaining charge. See Changing the Remote Control Batteries (p. 109) for instructions.
24

Chapter 2
Mastering Basic
Operations
▼ ▼ ▼ ▼ ▼
2
Assembly
This chapter explains the most fundamental and important operating procedures step by step. We encourage you to try each step as you read about it.
!!! Important !!!
•This chapter assumes that you have correctly set up the DZ-3600U for use with a computer and installed Presentation Software. If you have not yet done this, follow the instructions in Chapter 1, Setup for Operation with a Computer, before resuming the steps below.
•Do not place the equipment on an unsteady table or object subject to vibration. Movement of the camera head or filmed object and changes in lighting may corrupt the image capture.
•Skip this and the following page if the three arms (two front lights and one camera arm) have already been erected. Start from Turning On the Power (P.28).
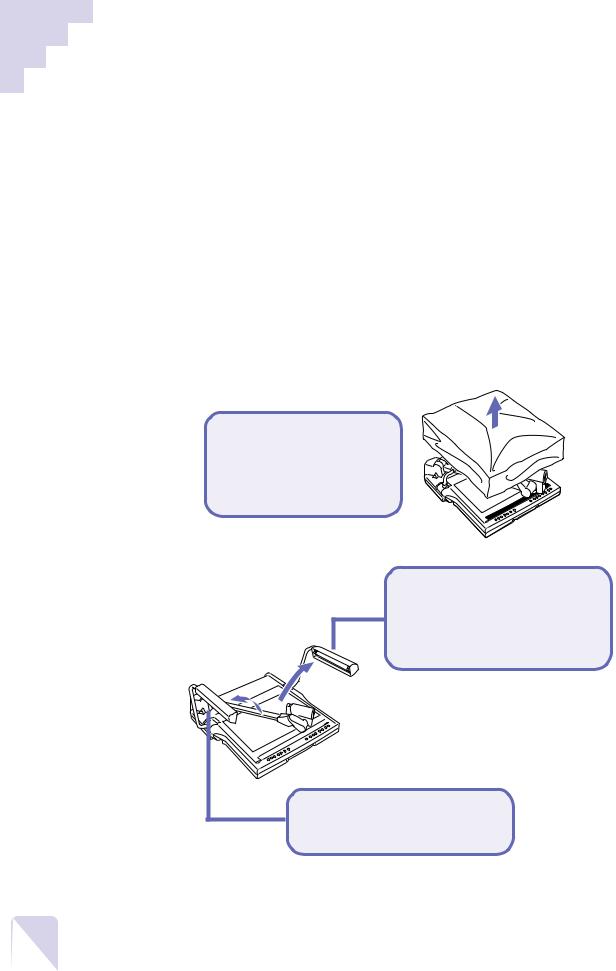
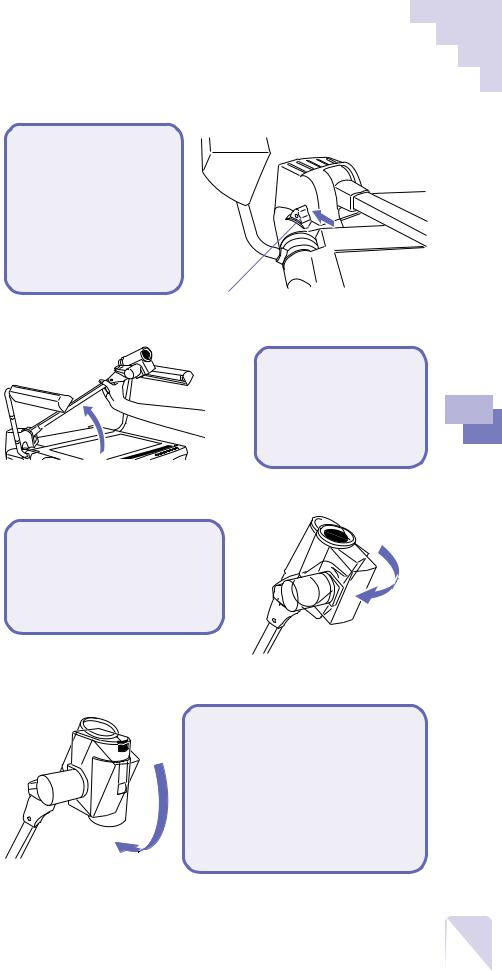
1.
Gently remove the cover from the main unit if it is on.
2.
Facing the front of the main unit, lift up the right front light.
3.
Lift up the left front light.
26
Assembly
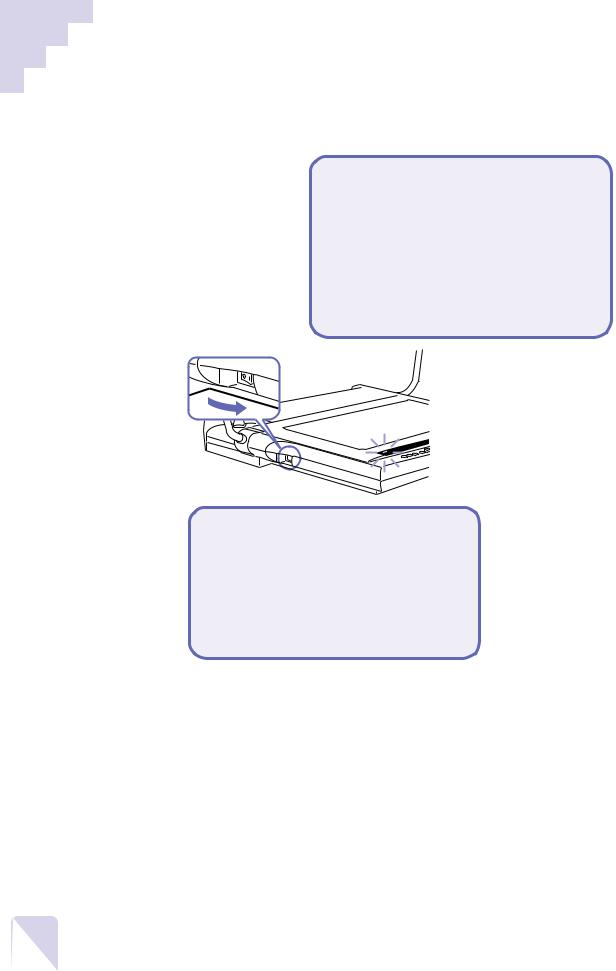
4.
Push the arm lock release lever, which can be found on the main unit’s left side at the back.
• The camera arm will now float freely.
Arm Lock Release Lever
5.
Grasp the camera arm and lift it up until it locks into place with a click.
6.
Swivel the camera head horizontally until it clicks into place.
7.
Orient the camera head so that the lens points directly onto the object stage.
• Check to make sure that the switch for the closeup lens on the right of the camera head is set to On (p. 97).
2
Operations Basic Mastering
27
Turning On the Power
Turn on the power of each device in the correct sequence.
1.
Press the power switch on the main unit to set it to the ( | ) position.
•All the indicators on the control panel will light for about 20 seconds after the power is turned on while the main unit initializes itself. It will indicate the ready state when only the power indicator and a few other indicators remain lit.
POWER
2.
Turn on the other devices that you’ll be using (computer monitor, computer CPU, projector, etc.).
•Actually, there is no predetermined order in which the main unit, computer and
projector has to be turned on.
28

Starting the Software
If you have set Presentation Software to start automatically (see step 8 at page 21) after Windows has initialized as described in Chapter 1, the following window will display. If this is the case, proceed directly to the next page.
The toolbar will vanish from the display after a few moments. There is no need for concern. This is discussed in Chapter 3.
If the above window does not automatically appear and only the Windows desktop displays (a shortcut to the program was not placed in Window’s Startup folder), use the following procedures to start the program.
1.
Click the Windows [Start] button on the taskbar and select [Programs], [Canon DZ-3600U] and [Presentation].
• Presentation Software will start and display the window above.
2
Operations Basic Mastering
!!!Important !!!
•Do not detach the USB cable or turn off the main unit while an application program is running.
•••Note •••
•If you wish to stop Presentation Software from automatically starting when you run Windows, click the Windows [Start] button and select [Settings] and [Taskbar]. Click the [Start Menu Programs] tab, then click the [Remove] tab. Open the [Startup] folder from the list that displays, select [DZ-3600U Presentation] and click the [Remove] button.
29
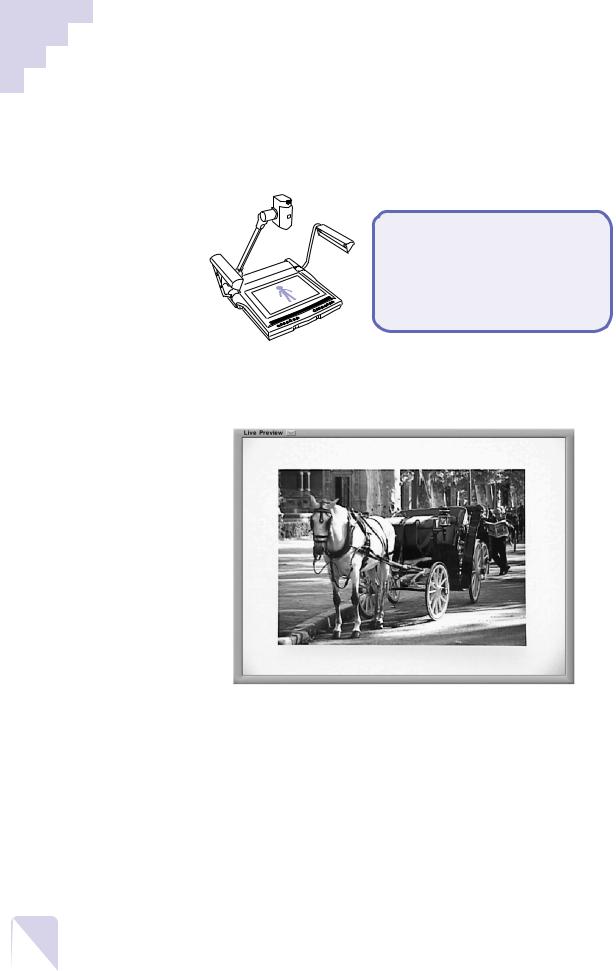
Placing Objects
Find a document or other object and place it at the center of the object stage, the white translucent portion.
1.
Place the document or object in the center of the object stage, orienting it as shown in the illustration.
Is the document or object displayed correctly in the large screen monitor, projector screen or your computer monitor? If it does not display, see Chapter 5, Troubleshooting.
Now try putting your hand on the document or object. Notice how the display changes in real time. The movement may appear slightly irregular on the screen. This real-time display is referred to as the ‘preview’ mode. More details about this are contained in Chapter 3. At this point, it is sufficient to confirm that the real-time display is working.
••• Note •••
•Please note that the minor decrease in image quality and irregularity of movement is due to the limitations imposed by the transfer rate of the USB cables. The difference in quality between images captured in still mode and preview mode is so great as to preclude comparison.
30

A Few of the Basics
We will now introduce you to a few procedures involving the remote control.
!!!Important !!!
•Aim the remote control at the sensor on the camera head to execute commands. For details, see the section entitled Important Instructions for the Remote Control (P.23).
•••Note •••
•Each of the functions introduced in this section, such as zooming, can also be controlled from the main unit’s control panel or your computer. This explanation in this chapter is written on the premise that you will probably use the remote control in an actual presentation. For instructions for controlling the DZ-3600U from the control panel or a computer, see the respective explanations in Chapter 3.
•In this chapter, we explained how one image is captured and displayed. In fact, more than one image can be captured and saved onto the computer disks. See Chapter 3 for more detail on the wide array of DZ-3600U functions.
2
Operations Basic Mastering
31
 Loading...