


ENGLISH
Camera User Guide
Please read the Read This First section (p. 6).
Please also read the Canon Digital Camera Software Starter Guide Disk and the Direct Print User Guide.
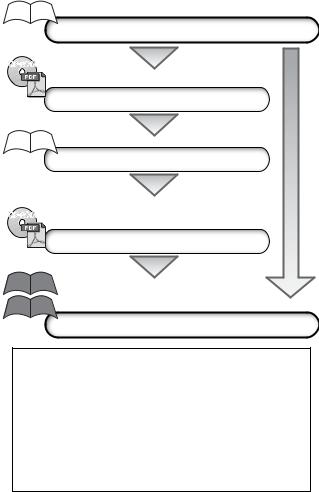
Flowchart and Reference Guides
This Guide
Shooting with the Camera
Canon Digital Camera Software Starter Guide Disk
Installing the Software
This Guide
Connecting the Camera to a Computer
 This Guide
Canon Digital Camera Software Starter Guide Disk
Downloading Images to a Computer
Direct Print User Guide
Printer User Guide
Using the Printer and Printing
Use of genuine Canon accessories is recommended.
This product is designed to achieve excellent performance optimally when used with genuine Canon accessories. Canon shall not be liable for any damage to this product and/or accidents such as fire, etc., caused by the malfunction of non-genuine Canon accessories (e.g., a leakage and/or explosion of a battery pack). Please note that this warranty does not apply to repairs arising out of the malfunction of non-genuine Canon accessories, although you may request such repairs on a chargeable basis.
Camera Body Temperature
If your camera is used for prolonged periods, the camera body may become warm. Please be aware of this and take care when operating the camera for an extended period.
About the LCD Monitor
The LCD monitor is produced with extremely high-precision manufacturing techniques. More than 99.99% of the pixels operate to specification. Less than 0.01% of the pixels may occasionally misfire or appear as red or black dots. This has no effect on the recorded image and does not constitute a malfunction.
Video Format
Please set the camera’s video signal format to the one used in your region before using it with a TV monitor (p. 141).
Charging the Date/Time Battery
•The camera has a built-in rechargeable lithium-ion battery that maintains the date, time and other camera settings. This battery recharges when the main battery pack is inserted into the camera. When you first purchase the camera, place a charged battery pack in it for at least 4 hours to charge the date/time battery. It will charge even when the camera power is turned off.
•If the Date/Time menu appears when the camera power is turned on, it means that the date/time battery charge is depleted. Recharge it as described above.
1

About This Guide
Conventions Used in the Text
Icons appearing beside or below titles indicate the modes in which the procedure can be used. In the example below, the procedure can be used in the following mode.
When the mode switch is set to  (Shooting)
Postcard Date Imprint Mode
Shooting Mode 
When the Shooting mode is set to the following modes
• |
Auto |
• |
Manual |
• |
Portrait |
• |
Night Snapshot |
• |
Kids&Pets |
• |
Indoor |
• 
 Underwater
*When a shooting mode icon is shown in gray, the procedure cannot be performed in that mode.
*The  symbol indicates the Stitch Assist mode.
 : This mark denotes issues that may affect the camera’s operation.
 : This mark denotes additional topics that complement the basic operating procedures.
•This guide uses illustrations from the DIGITAL IXUS 40 in its explanations.
•In this guide an SD memory card (Secure Digital, a copyright protection system) is referred to as an SD card.
2

Table of Contents
Items marked with  are lists or charts that summarize camera functions or procedures.
Read This First
Please Read......................................................................................... |
6 |
Safety Precautions .............................................................................. |
7 |
Preventing Malfunctions ................................................................... |
12 |
Components Guide
Components Guide............................................................................ |
13 |
DIGITAL IXUS 40 .......................................................................... |
13 |
DIGITAL IXUS 30 .......................................................................... |
16 |
Preparing the Camera
Charging the Battery Pack ................................................................. |
21 |
Installing the Battery Pack................................................................. |
24 |
Installing the SD Card ....................................................................... |
26 |
Formatting SD Cards..................................................................... |
28 |
Setting the Date and Time ................................................................. |
31 |
Setting the Language ........................................................................ |
34 |
Basic Functions
Turning the Power On ....................................................................... |
36 |
Switching Between Shooting/Playback.............................................. |
38 |
Using the LCD Monitor...................................................................... |
39 |
Information Displayed on the LCD Monitor ....................................... |
41 |
Using the Viewfinder ......................................................................... |
45 |
Using the Zoom................................................................................. |
46 |
Pressing the Shutter Button .............................................................. |
47 |
Selecting Menus and Settings ........................................................... |
49 |
Menu Settings and Factory Defaults.................................................. |
53 |
Resetting Settings to Their Default Values ........................................ |
58 |
Shooting
Shooting in Auto Mode ..................................................................... |
59 |
|
Reviewing an Image Right after Shooting ......................................... |
60 |
|
Changing Resolution/Compression Settings .................................... |
62 |
|
Using the Flash ............................................................................. |
64 |
|
Selecting a Shooting Mode ............................................................... |
66 |
|
Auto ............................................................................................. |
66 |
3 |
|
|

Manual .......................................................................................... |
66 |
Portrait .......................................................................................... |
66 |
Digital Macro ................................................................................. |
66 |
Night Snapshot.............................................................................. |
66 |
Kids&Pets...................................................................................... |
67 |
Indoor............................................................................................ |
67 |
Underwater.................................................................................... |
67 |
Shooting Close-Ups/ Infinity Shots..................................... |
68 |
Magnified Close-Up Shooting (Digital Macro) ................................... |
70 |
Using the Digital Zoom ...................................................................... |
72 |
Continuous Shooting................................................................... |
73 |
Postcard Date Imprint Mode.............................................................. |
74 |
Using the Self-timer ..................................................................... |
76 |
Shooting a Movie......................................................................... |
78 |
Shooting Panoramic Images (Stitch Assist) ...................................... |
82 |
Switching between Focusing Modes.................................................. |
85 |
Shooting Hard-to-Focus Subjects (Focus Lock, AF Lock).................. |
86 |
Locking the Exposure Setting (AE Lock)............................................ |
88 |
Locking the Flash Exposure Setting (FE Lock) ................................... |
89 |
Switching between Light Metering Modes .................................. |
90 |
Adjusting the Exposure Compensation .............................................. |
91 |
Shooting in Long Shutter Mode......................................................... |
92 |
Adjusting the Tone (White Balance)................................................... |
94 |
Changing the Photo Effect ................................................................. |
97 |
Adjusting the ISO Speed.................................................................... |
98 |
Setting the Auto Rotate Function ....................................................... |
99 |
Resetting the File Number ............................................................... |
100 |
Playback |
|
Displaying Images Individually ........................................................ |
103 |
Magnifying Images .................................................................... |
104 |
Viewing Images in Sets of Nine (Index Playback) .................... |
105 |
Viewing Movies ............................................................................... |
106 |
Editing Movies ................................................................................. |
109 |
Rotating Images in the Display ........................................................ |
111 |
Attaching Sound Memos to Images................................................. |
112 |
Automated Playback (Slide Shows) ................................................. |
114 |
Protecting Images ........................................................................... |
118 |
4

Erasing |
|
Erasing Single Images ............................................................... |
119 |
Erasing All Images .......................................................................... |
120 |
Print Settings |
|
About Printing ................................................................................. |
122 |
Setting the DPOF Print Settings ...................................................... |
124 |
Image Transmission Settings (DPOF Transfer Order) |
|
Selecting Images for Transferring ................................................... |
130 |
Connecting the Camera to a Computer |
|
Connecting the Camera to a Computer............................................ |
133 |
Computer System Requirements ................................................ |
133 |
Downloading Images by Direct Transfer ......................................... |
137 |
Connecting the Camera to the Computer to Download Images without |
|
Installing Software .................................................................. |
139 |
Downloading Directly from an SD Card........................................... |
139 |
Viewing Images on a TV set |
|
Viewing Images on a TV set ............................................................ |
140 |
Customizing the Camera (My Camera Settings) |
|
Changing My Camera Settings ........................................................ |
142 |
Registering My Camera Settings ..................................................... |
144 |
List of Messages |
|
List of Messages ............................................................................. |
148 |
Troubleshooting |
|
Troubleshooting .............................................................................. |
150 |
Appendix |
|
Using an AC Adapter Kit (Sold Separately)...................................... |
154 |
Camera Care and Maintenance ........................................................ |
155 |
Specifications.................................................................................. |
156 |
Photo Tips and Information............................................................. |
164 |
Index................................................................................................ |
167 |
Functions Available in Each Shooting Mode .................................... |
176 |
5

Read This First
Please Read
Test Shots
Before you try to photograph important subjects, we highly recommend that you shoot several trial images to confirm that the camera is operating and being operated correctly.
Please note that Canon, its subsidiaries and affiliates, and its distributors are not liable for any consequential damages arising from any malfunction of a camera or accessory, including SD memory cards, that results in the failure of an image to be recorded or to be recorded in a format that is machine readable.
Warning Against Copyright Infringement
Please note that Canon digital cameras are intended for personal use and should never be used in a manner that infringes upon or contravenes international or domestic copyright laws and regulations. Please be advised that in certain cases the copying of images from performances, exhibitions, or commercial properties by means of a camera or other device may contravene copyright or other legal rights even if the image was shot for personal use.
Warranty Limitations
For information on your camera's warranty, please refer to the Canon European Warranty System (EWS) Booklet supplied with your camera.
For Canon Customer Support contacts, please see rear of this booklet or the European Warranty System (EWS) Booklet.
6

Safety Precautions
•Before using the camera, please ensure that you read and understand the safety precautions described below. Always ensure that the camera is operated correctly.
•The safety precautions noted on the following pages are intended to instruct you in the safe and correct operation of the camera and its accessories to prevent injuries or damage to yourself, other persons and equipment.
•In the next few pages, the term equipment refers primarily to the camera and its power supply accessories, such as the battery charger and separately sold compact power adapter. See the System Map for power supply accessory details.
 Storing SD cards
Store the SD memory card out of the reach of children and infants.
It may be swallowed accidentally. If this occurs, consult a doctor immediately.
 Warnings
•Do not aim the camera directly into the sun or at other intense light sources that could damage your eyesight.
•Do not trigger the flash in close proximity to human or animal eyes.
Exposure to the intense light produced by the flash may damage eyesight. In particular, remain at least one meter (39 inches) away from infants when using the flash.
•Store this equipment out of the reach of children and infants. Accidental damage to the camera or battery pack by a child could result in serious injury. In addition, placement of the strap around the child’s neck could result in asphyxiation.
•Do not attempt to disassemble or alter any part of the equipment that is not expressly described in this guide. Disassembly or alteration may result in high-voltage electrical shock. Internal inspections, alterations and repairs should be conducted by qualified service personnel authorized by your camera distributor or a Canon Customer Support Help Desk.
7

•To avoid the risk of high-voltage electrical shock, do not touch the flash portion of the camera if it has been damaged. Similarly, never touch internal portions of the equipment that become exposed as a result of damage. There is a risk of high-voltage electrical shock. Please take the first opportunity to consult your camera distributor or the closest Canon Customer Support Help Desk.
•Stop operating the equipment immediately if it emits smoke or noxious fumes. Failure to do so may result in fire or electrical shock. Immediately turn the camera power off, remove the battery pack or unplug the battery charger from the power outlet. Confirm that smoke or fume emissions have ceased. Please consult your camera distributor or the closest Canon Customer Support Help Desk.
•Stop operating the equipment if it is dropped or the casing is damaged.
Failure to do so may result in fire or electrical shock. Immediately turn the camera power off, remove the battery pack or unplug the power cable from the power outlet. Please consult your camera distributor or the closest Canon Customer Support Help Desk.
•Do not allow the equipment to come into contact with, or become immersed in, water or other liquids. Do not allow liquids to enter the interior. The camera has not been waterproofed. If the exterior comes into contact with liquids or salt air, wipe it dry with a soft, absorbent cloth. If water or other foreign substances enter the interior, immediately turn the camera power off and remove the camera battery pack or unplug the power cord from the power outlet. Continued use of the equipment may result in fire or electrical shock. Please consult your camera distributor or the closest Canon Customer Support Help Desk.
•Do not use substances containing alcohol, benzene, thinners or other flammable substances to clean or maintain the equipment. The use of these substances may lead to fire.
•Remove the power cord on a regular periodic basis and wipe away the dust and dirt that collects on the plug, the exterior of the power outlet and the surrounding area. In dusty, humid or greasy environments, the dust that collects around the plug over long periods of time may become saturated with humidity and short-circuit, leading to fire.
8
•Do not cut, damage, alter or place heavy items on the power cord.
Any of these actions may cause an electrical short circuit, which may lead to fire or electrical shock.
•Do not handle the power cord if your hands are wet. Handling it with wet hands may lead to electrical shock. When unplugging the cable, ensure that you hold the solid portion of the plug. Pulling on the flexible portion of the cable may damage or exposure the wire and insulation, creating the potential for fires or electrical shocks.
•Use only recommended power accessories. Use of power sources not expressly recommended for this equipment may lead to overheating, distortion of the equipment, fire, electrical shock or other hazards.
•Do not place the battery pack near a heat source or expose it to direct flame or heat. Neither should you immerse it in water. Such exposure may damage the battery pack and lead to the leakage of corrosive liquids, fire, electrical shock, explosion or serious injury.
•Do not attempt to disassemble, alter or apply heat to the battery pack.
There is serious risk of injury due to an explosion. Immediately flush with water any area of the body - including the eyes and mouth, or clothing - that comes into contact with the inner contents of a battery. If the eyes or mouth contact these substances, immediately flush with water and seek medical assistance.
•Avoid dropping or subjecting the battery pack to severe impacts that could damage the casings. It could lead to leakage and injury.
•Do not short-circuit the battery terminals with metallic objects, such as key holders. It could lead to overheating, burns and other injuries. Use the supplied terminal cover to transport or store the battery pack.
•Before you discard a battery, cover the terminals with tape or other insulators to prevent direct contact with other objects. Contact with the metallic components of other materials in waste containers may lead to fire or explosions. Discard the battery pack in specialized waste facilities if available in your area.
•Use only recommended battery pack and accessories. Use of battery pack not expressly recommended for this equipment may cause explosions or leaks, resulting in fire, injury and damage to the surroundings.
9

•Use the specified battery charger to charge Battery Pack NB-4L. Use of other chargers may lead to overheating, distortion of the equipment, fire or electrical shock.
•Disconnect the battery charger and compact power adapter from both the camera and the power outlet after recharging and when they are not in use to avoid fire and other hazards. Continuous use over a long period may cause a unit to overheat and distort, resulting in fire.
•The battery charger and compact power adapter are designed for exclusive use with your camera. Do not use it with other products or batteries. There is a risk of fire and other hazards.
Caution about magnetic fields
Keep objects that are sensitive to magnetic fields (such as credit cards) away from the speaker of the camera (p.14, 17). Such items may lose data or stop working.
10

 Cautions
•Avoid using, placing or storing the equipment in places subject to strong sunlight or high temperatures, such as the dashboard or trunk (boot) of a car. Exposure to intense sunlight and heat may cause the batteries to leak, overheat or explode, resulting in fire, burns or other injuries. High temperatures may also cause deformation of the casing. Ensure that there is good ventilation when using the battery charger to charge the battery pack.
•Do not store the equipment in humid or dusty areas. Storage in such areas could lead to fire, electrical shock or other damage.
•Be careful not to bang the camera or subject it to strong impacts or shocks that could lead to injury or damage the equipment when wearing or holding it by the strap.
•Be careful not to cover the flash with your fingers or clothing when shooting. The flash may be damaged and emit smoke or noise. In addition, do not touch the surface of the flash after taking several pictures in rapid succession. Either action could result in burns.
•Do not operate the flash with dirt, dust or other items stuck to its lens.
The resulting heat build-up could damage the flash.
•Ensure that the battery charger is plugged into a power outlet of the specified rating, not over the specified rating. The plug of the battery charger varies according to region.
•Do not use the battery charger or compact power adapter if the plug or cable is damaged, or if the plug is not fully inserted into the power outlet.
•Do not allow metal objects (such as pins or keys) or dirt to contact the charger terminals or plug.
•If your camera is used for prolonged periods, the camera body may become warm. Please take care when operating the camera for extended periods as your hands may experience a burning sensation.
11

Preventing Malfunctions
Avoid Strong Magnetic Fields
Never place the camera in close proximity to electric motors or other equipment generating strong electromagnetic fields. Exposure to strong magnetic fields may cause malfunctions or corrupt image data.
Avoid Condensation Related Problems
Moving the equipment rapidly between hot and cold temperatures may cause condensation (water droplets) to form on its external and internal surfaces. You can avoid this by placing the equipment in an airtight, resealable plastic bag and letting it adjust to temperature changes slowly before removing it from the bag.
If Condensation Forms Inside the Camera
Stop using the camera immediately if you detect condensation. Continued use may damage the equipment. Remove the SD card and battery pack or compact power adapter from the camera and wait until the moisture evaporates completely before resuming use.
Extended Storage
When not using the camera for extended periods of time, remove the battery pack from the camera or battery charger and store the equipment in a safe place. Storing the camera for extended periods with a battery pack installed will run down the battery pack. However the date, time and other camera settings may reset to default settings if the battery pack has been removed for more than three weeks.
12

Components Guide
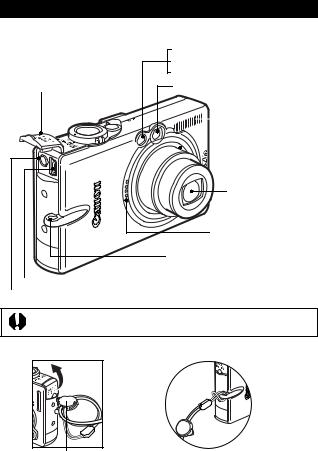
DIGITAL IXUS 40
Front View
Terminal Cover
DIGITAL Terminal (p. 134)
AF-assist Beam (p. 48)
Red-Eye Reduction Lamp (p. 65)
Self-timer Lamp (p. 76)
Viewfinder Window (p. 45)
 Flash (p. 64)
Lens
Microphone (p. 112)
Wrist Strap Mount
A/V OUT (Audio/Video OUT) Terminal (p. 140)
The interface cable and AV cable cannot be connected simultaneously.
How to Open the Terminal Cover |
Attaching the Wrist Strap* |
You can use this toggle to open the terminal cover or SD card slot/battery cover.
*When carrying the camera by the strap, be careful not to swing the camera or catch it on other items.
Guide Components
13
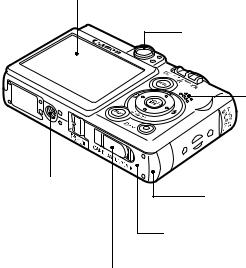
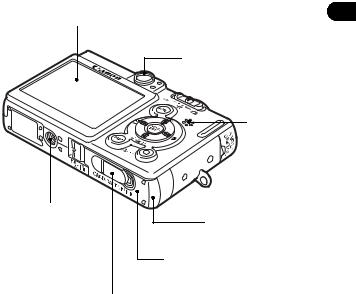
Back View
LCD Monitor (p. 39)
Viewfinder Window (p. 45)
Speaker
Tripod Socket
Battery Compartment (SD card/battery compartment)
SD Card Slot/
Battery Cover (pp. 24, 26)
DC Coupler Terminal Cover (p. 154)
14
Operation Panel
ON/OFF Button (p. 36)
Indicators (p. 19)
Power Lamp
Lights when the power is on or transmission preparations are complete when connected to a computer
Zoom Lever |
|
|
||||
Shooting: |
|
|
||||
|
|
(Wide Angle)/ |
|
|
|
(Telephoto) (p. 46) |
|
|
|
|
|||
|
Playback: |
|
|
|||
|
|
(Index) (p. 105)/ |
|
(Magnify) (p. 104) |
||


 Shutter Button (p. 47)

 Mode Switch (p. 38)
Guide Components
|
(Print/Share) |
|
Button (p. 20) |
|
FUNC./SET (Function/Set) Button |
MENU Button (p. 50) |
(p. 49) |
|
|
|
DISP. (Display) Button (p. 39) |
 (Light Metering) Button (p. 90)/
 Button
 (Flash) Button (p. 64)/
 Button

 (Single Image Erase) Button (p. 119)/


 (Continuous) Button (p. 73)/
 (Self-timer) Button (p. 76)/
 Button
 (Macro) /
  (Infinity) Button (p. 68)/
 Button
15
DIGITAL IXUS 30
Front View
Terminal Cover
DIGITAL Terminal (p. 134)
AF-assist Beam (p. 48)
Red-Eye Reduction Lamp (p. 65)
Self-timer Lamp (p. 76)
Viewfinder Window (p. 45)
 Flash (p. 64)
Lens
Microphone (p. 112)
Wrist Strap Mount
A/V OUT (Audio/Video OUT) Terminal (p. 140)
The interface cable and AV cable cannot be connected simultaneously.
How to Open the Terminal Cover |
Attaching the Wrist Strap* |
You can use this toggle to open the terminal cover or SD card slot/battery cover.
*When carrying the camera by the strap, be careful not to swing the camera or catch it on other items.
16
Back View
LCD Monitor (p. 39)
Viewfinder Window (p. 45)
Speaker
Tripod Socket
Battery Compartment (SD card/battery compartment)
SD Card Slot/
Battery Cover (pp. 24, 26)
DC Coupler Terminal Cover (p. 154)
Guide Components
17
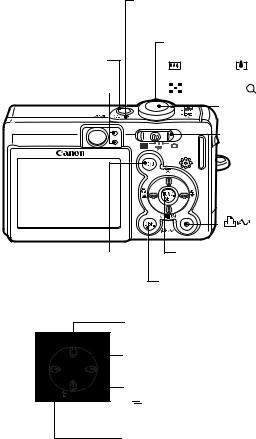
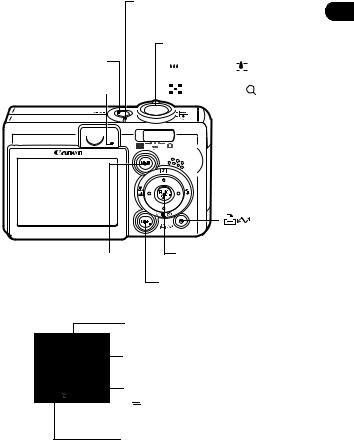
Operation Panel
Power Lamp
Lights when the power is on or transmission preparations are complete when connected to a computer
|
Zoom Lever |
|
|
ON/OFF Button (p. 36) |
Shooting: |
|
|
(Wide Angle)/ |
(Telephoto) (p. 46) |
||
|
|||
Indicators (p. 19) |
Playback: |
|
|
(Index) (p. 105)/ |
(Magnify) (p. 104) |
||
|
|||
|
Shutter Button (p. 47) |
||
|
Mode Switch (p. 38) |
||
|
(Print/Share) |
|
Button (p. 20) |
|
FUNC./SET (Function/Set) Button |
MENU Button (p. 50) |
(p. 49) |
|
|
|
DISP. (Display) Button (p. 39) |
 (Light Metering) Button (p. 90)/
 Button
 (Flash) Button (p. 64)/
 Button

 (Single Image Erase) Button (p. 119)/


 (Continuous) Button (p. 73)/
 (Self-timer) Button (p. 76)/
 Button
 (Macro) /
  (Infinity) Button (p. 68)/
 Button
18
DIGITAL IXUS 40
DIGITAL IXUS 30
Holding the Camera
Images become blurred if the camera moves when the shutter button is pressed. Hold the camera as shown below to avoid camera movement when shooting.
Hold the camera firmly with both hands and let your elbows rest at your sides. Place your finger on the shutter button as you hold the camera.
•Make sure that your hair or fingers do not obstruct the lens, flash, selftimer lamp, microphone or speaker.
•Fix the camera onto a tripod when shooting infinity shots or in dark places.
Indicators
The indicators light or blink when the ON/OFF button or shutter button is pressed.
Upper Indicator
Green: Ready to shoot
Blinking Green: Recording to SD card / Reading SD card / Erasing from SD card/Transmitting data (during a computer connection)
Orange: Ready to shoot (flash on)
Blinking Orange: Ready to shoot (camera shake warning)
Lower Indicator
Yellow: Macro mode / Infinity mode/ AF lock Blinking Yellow: Focusing difficulty (single beep).
Although you can still press the shutter button when the indicator blinks yellow, you are recommended to shoot using the focus lock or AF lock (p. 86).
Guide Components
19

The following operations are accessible through one easy press of the  (Print/Share) button.
•Printing: See the Direct Print User Guide (supplied with the camera)
•Downloading images (Windows only): See p.132 of this guide and the
Canon Digital Camera Software Starter Guide Disk (supplied with the
camera)
The indicator blinks or lights during a printer or computer connection. Blue: Ready to print/Ready to transfer images
Blinking blue: Printing/Transferring
The following cables are used to connect the camera to a computer or printer.
Computer (p. 132)
Interface Cable IFC-400PCU (supplied with the camera)
Direct Print Compatible Printers (Sold Separately)
•Compact Photo Printer (SELPHY CP series)/Card Photo Printer Interface Cable IFC-400PCU (supplied with the camera) or the Direct Interface Cable DIF-100 (supplied with the printer).
•Bubble Jet Printers (PIXMA series/SELPHY DS series)
-Canon Direct Print Compatible Printers:
Please refer to your Bubble Jet printer user guide.
-PictBridge Compliant Printers:
Interface Cable IFC-400PCU (supplied with the camera)
•PictBridge Compliant Non-Canon Printers
Interface Cable IFC-400PCU (supplied with the camera)
Please refer to the System Map or the Direct Print User Guide supplied with the camera for direct print compatible printer information.
20
Preparing the Camera
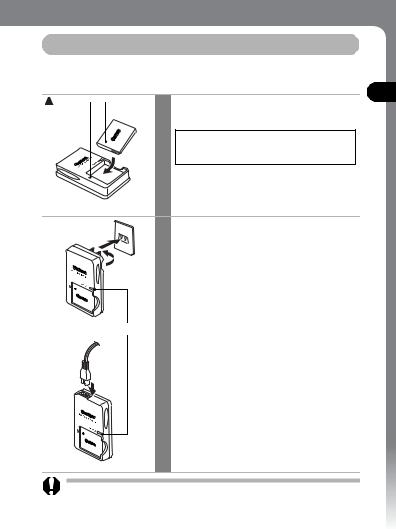
Charging the Battery Pack
Use the following procedures to charge the battery pack the first time you use the camera or when the “Change the battery pack” message displays.
|
Symbol |
|
|
|
|
1 |
Insert the battery pack into the |
||
|
|
|||
|
|
|||
|
|
|
|
battery charger. |
Align the  on the battery pack and battery charger and insert it correctly.
|
Battery charger model names and types |
|
2 vary by region. |
|
(For CB-2LV) |
|
Plug the battery charger into a |
|
power outlet. |
|
(For CB-2LVE) |
|
Attach the power cord to the battery |
Charge Indicator |
charger and plug it into a power outlet. |
|
• The charge indicator will light orange |
|
while the battery pack is charging. It will |
|
change to green when the charge is |
|
complete. |
|
• After charging, unplug the battery charger |
|
and immediately remove the battery pack. |
Camera the Preparing
To protect the battery pack and prolong its life, do not charge it for longer than 24 hours continuously.
21

• Since this is a lithium-ion battery pack, you need not completely discharge it before recharging. It can be recharged at any point. However, since the maximum number of charge cycles is approximately 300 times (battery life based on Canon’s testing standards), you are recommended to charge the battery pack after having discharged it completely to prolong battery life.
•It takes approximately 90 minutes to fully charge the battery pack from a fully discharged state (based on Canon’s testing standards). Charging it within a temperature range of 5° to 40 °C (41° to 104 °F) is recommended.
•Charge times may vary according to the ambient temperature and the battery pack’s charge state.
•You may hear a noise during charging. This is not a malfunction.
•See Battery Capacity (Battery Pack NB-4L (Fully charged)) (p. 162).
Battery Pack Handling Precautions
zKeep the battery pack terminals ( ) clean at all times. Dirty terminals may cause poor contact between the battery pack and camera. Polish the terminals with a soft cotton swab before charging or using the battery pack.
zDo not rapidly overturn or wave the battery charger around when it contains the battery pack. The battery pack could fly out.
zAt low temperatures, battery pack performance may be reduced and the low battery icon may appear earlier than usual. Under these conditions, resuscitate the battery pack by warming it in a pocket immediately before use. However, ensure that there are no metallic items in the pocket that could cause a short circuit, such as a key holder, etc.
zDo not place anything, such as tablecloths, carpets, bedding or cushions, on top of the battery charger while it is charging. Heat will build up and could result in a fire.
zDo not charge batteries other than Battery Pack NB-4L in this charger. zThe battery pack continues to discharge a minimal portion of its power while installed in the camera, even with the power off, or in the charger.
This will shorten battery life.
22
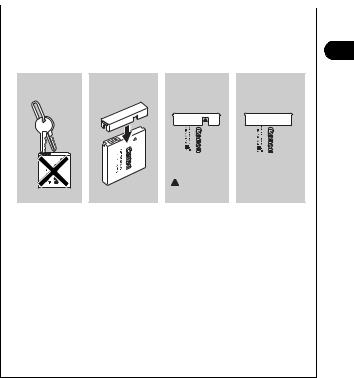
zDo not allow any metal objects such as key rings to touch the  and
and  terminals (Fig. A), as this can damage the battery pack. To carry the battery pack or store it during periods of disuse, always replace the terminal cover (Fig. B). You may be able to check the charge state when Battery Pack NB4L is used depending upon how the terminal cover is attached (Fig. C, D).
Fig. A |
Fig. B |
Fig. C |
Fig. D |
|||
|
|
Charged Battery |
Spent Battery |
|||
|
|
|
|
|
|
|
|
|
|
|
|
|
|
|
|
|
|
|
|
|
|
|
|
|
|
|
|
Attach it so the |
Attach it the |
is visible. |
opposite way to |
|
Fig. C. |
zEven charged battery packs continue to discharge naturally. You are advised to charge the battery on the day of use, or one day before, to ensure a full charge.
zSince storing a fully charged battery pack for long periods of time (about one year) may shorten its life cycle or affect its performance, you are recommended to use it in the camera until it is completely discharged and to store it in an indoor location with low relative humidity and between the temperatures of 0 to 30 °C (32 to 86 °F). If you do not use the battery pack for long periods of time, charge it fully and discharge it fully in the camera about once a year before returning it to storage.
zIf the performance of the battery pack diminishes substantially even when it is fully charged, its life has been exceeded and it should be replaced.
Camera the Preparing
23
Installing the Battery Pack
Install Battery Pack NB-4L (supplied).
Please recharge the battery pack (p. 21) before you use it for the first time.
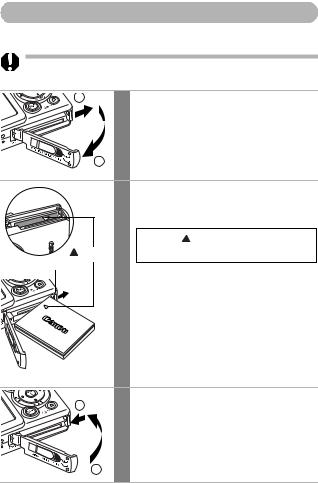
1
2
1 Slide the SD card slot/battery cover in the direction of the arrows.
2 Press the battery lock while inserting the battery pack all the way in until the lock clicks.
|
Align the |
on the battery pack and |
Symbol |
battery chamber and insert it correctly. |
|
Battery Lock
To remove the battery pack, press the battery lock in the direction of the arrow and hold it while pulling the battery pack out.
3 Slide the SD card slot/battery cover
2
closed.
1
24

• Please watch the loading slot area carefully as you insert and remove the battery pack.
•Do not turn off the power or open the SD card slot/battery cover while the indicator blinks green. The camera is writing, reading, erasing or transmitting an image to or from the SD card.
•Remove the battery pack when the camera is not in use. Please note, however, that the date, time and other camera settings may reset to the default settings if the battery pack has been removed for more than three weeks.
Please use an AC Adapter Kit ACK-DC10 (sold separately) for extended use of the camera (p. 154).
Battery Pack Charge
The following icons and messages will display when the battery pack charge is low.
Battery pack charge is low. Recharge it as soon as possible before it is required for an extended period.
When the LCD monitor is off, this icon will display when you press any button other than the ON/OFF, FUNC./SET, MENU or
 (Print/Share) button.
Change the Battery charge is insufficient to operate the camera. Replace battery pack the battery pack immediately.
See Battery Capacity (Battery Pack NB-4L (Fully charged)) (p. 162).
Camera the Preparing
25
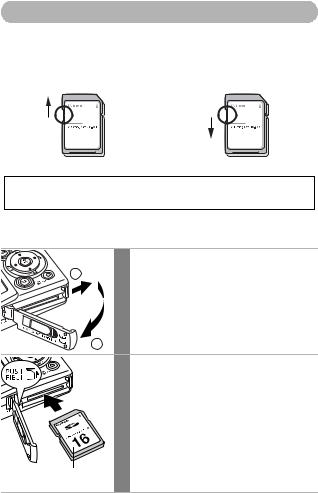
Installing the SD Card
Write Protect Tab
The SD card has a write protect tab. Sliding the tab downward prevents recording of data and protects existing data (e.g. images). When recording to, erasing from or formatting the SD card, slide the tab upward.


 Write Protect Tab


Writing/Erasing Possible |
Writing/Erasing Impossible |
Ensure that the SD card is correctly oriented before inserting it in the camera. It may damage the camera if inserted backward by mistake.
Turn the camera power off and insert the SD card with the following procedures.
1 |
Slide the SD card slot/battery cover |
1 |
in the direction of the arrows. |
2
2
Front
Insert the SD card.
•Push it in with your finger or the white portion of the wrist strap, as illustrated on the camera bottom, until it clicks into place.
•Do not touch or allow metal objects to contact the terminals on the back of the SD card.
26
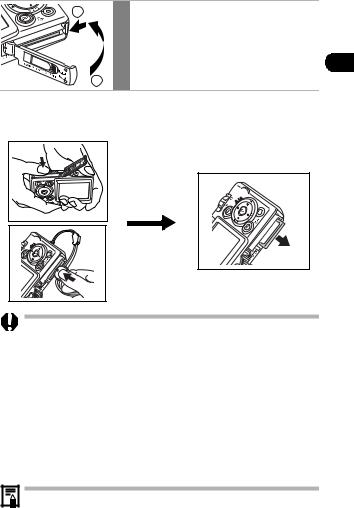
2 |
3 |
Slide the SD card slot/battery cover |
|
|
closed. |
1
To Remove the SD card
Push the SD card with your finger or the toggle on the wrist strap until it clicks and then release it.
•Please watch the loading slot area carefully as you insert and remove the SD card.
•Since the camera is writing, reading, erasing or transmitting data to or from the SD card when the indicator blinks green, never perform the following actions during this time. It could corrupt the image data.
-Subject the camera body to vibration or shocks.
-Turn the camera’s power off, or open the SD card slot/battery cover.
•Please note that SD cards formatted with other manufacturers’ cameras or a computer, or formatted or edited with application programs, may slow down writing to the SD card or may not operate correctly in the camera.
•You are recommended to use SD cards that have been formatted in your camera (p. 28). The card supplied with the camera may be used without further formatting.
See SD Cards and Estimated Capacities (p. 160).
Camera the Preparing
27
Formatting SD Cards
You should always format a new SD card or one from which you wish to erase all images and other data.
Please note that formatting (initializing) an SD card erases all data, including protected images and other file types.
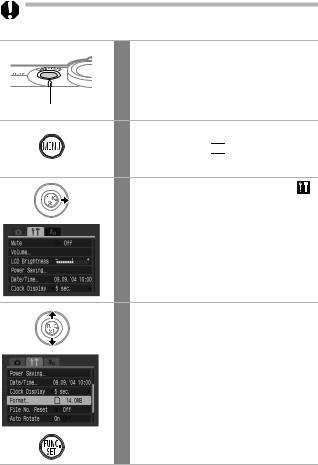
1 Press the ON/OFF button until the power lamp lights green.
Power Lamp
2 Press the MENU button.
The  (Rec.) or

 (Play) menu is displayed.
3 Use the  button to select the (Set up) menu.
4 Use the  or
or  button to select [Format] and press the FUNC./SET button.
28
 Loading...