


 Loading...
BJ-200ex
USER’S
MANUAL
Canon

Contents
Chapter 1 |
Introduction |
|
Features and Benefits |
|
Option and Supplies |
|
Ink Cartridge |
|
Print Media |
|
Related Publication |
|
Customer Support |
|
Servicing the Printer |
Chapter 2 |
Setting Up the Printer |
|
Unpacking Your Printer |
|
Removing the Shipping Materials |
|
Selecting a Location for Your Printer |
|
Examining the Printer |
|
From the Front |
|
Operator Panel |
|
From the Back |
|
Inside the Printer |
|
Attaching the Power Cord |
|
Connecting Your Printer to the Computer |
|
Installing the Ink Cartridge |
|
Turning On the Printer |
|
Cleaning the Print Head |
|
Loading a Stack of Paper |
|
Printing a Test Pattern |
|
Installing a Printer Driver |
|
Installing the Windows Printer Driver and Visual Guide |
|
Using the Visual Guide |
|
Using the BJ-200ex Windows Driver |
|
Installing the Canon TrueType Fonts for Microsoft Windows 3.1 |
|
Managing Your Printer's Features |
|
Software Applications |
|
Operator Panel Buttons |
|
DIP Switches |
|
Line Printer Versus Page Printers |
|
Line Printers and Processing |
|
Page Printers and Processing |
Chapter 3 |
Using the Printer |
|
Selecting Paper Types |
|
Before Loading Paper |
|
Setting the Paper Thickness Lever |
|
Setting the Paper Selection Lever |
|
Printer Settings for Various Print Media |
|
Printing Documents |
|
Specifying Print Options |
|
Automatically Feeding Paper |
|
Auto Feed Guidelines |
|
Printing Single Sheets |
|
Specifying Manual Feed |
|
Manually Feeding Paper |
|
Printing on Transparencies |
|
Printing on Envelopes |
|
Preparing Your Software |
|
Turning On the Printer's Envelope Mode |
|
Preparing the Printer |
|
Turning off Envelope Mode |
|
Printing on Legal-size Paper |
|
Printing in Landscape Orientation |
|
Printing the Test Patterns |
|
Self Tests |
|
Font List |
|
Demo Prints 1 and 2 |
|
Pausing a Print Operation |
Chapter 4 |
Using the Printer With Your Software |
|
Printer Setup Within Windows |
|
Selecting Printing Options |
|
Special Options |
|
Printing a Document |
|
Ways to Improve Print Speed in Windows |
|
Using the Windows Print Manager |
|
Setting Up MS-DOS Application Programs |
|
Selecting a Printer Driver |
|
Selecting a Printer Control Mode |
|
Setting Up WordPerfect for Your Printer |
|
Software and Printer Compatibility |
Chapter 5 |
Using the Operator Panel |
|
Feeding Paper |
|
Selecting a Print Mode |
|
Using the Reduction Modes |
|
Two-thirds Reduction Mode |
|
One-half Reduction Mode |
|
Selecting the Reduction Mode |
|
Performing Automatic Line Feeds |
Chapter 6 |
Maintaining the Printer |
|
Printer Guidelines |
|
Cleaning the Printer |
|
Replacing the Ink Cartridge |
|
Ink Cartridge Guidelines |
|
Using Ink |
|
Installing the Ink Cartridge |
|
Cleaning the Print Head |
|
Storing the Ink Cartridges |
|
Ink Cartridges Continually Run Out of Ink |
|
Transporting the Printer |
Chapter 7 |
Troubleshooting |
|
Check List |
|
Error Light Problems |
|
Operational Problems |
|
Printing Problems |
|
Paper Loading Problems |
|
Print Quality Problems |
|
Windows Problems |
|
Clearing Paper Jams |
Chapter 8 |
Customizing the Printer |
|
Factory Default Settings |
|
DIP Switch Setting |
|
BJ-10 Mode |
|
Epson LQ Mode |
|
Changing a DIP Switch Setting |
Appendix A |
Specifications |
Appendix B |
Application Notes |
|
Printing Envelopes in Microsoft Windows |
|
AmiPro 3.0 |
|
Microsoft Publisher |
|
Microsoft Word for Windows |
|
WordPerfect |
|
Works 3.0 for Windows |
Glossary |
|
Index
editiing by Jason Plank and Cindy Cassat
Chapter 1
Introduction
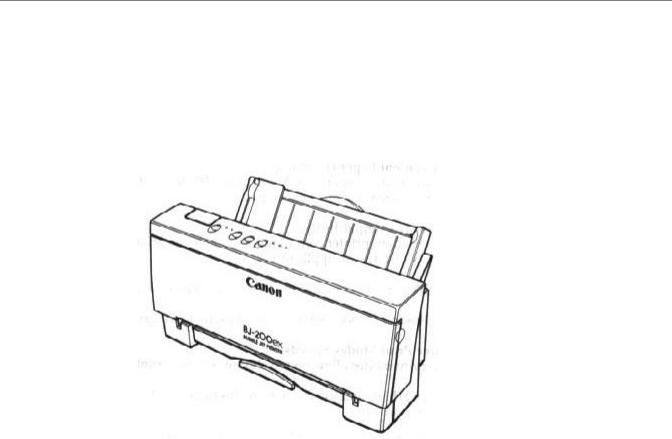
Congratulations on your purchase of the Canon BJ-200ex Bubble Jet Printer. We appreciate your choosing this printer to meet your printing needs.
The BJ-200ex offers excellent print quality, fast print speed, and trouble-free operation with the convenience of compact size and low cost. We are certain you will be satisfied with its advanced bubble jet technology.
This chapter introduces you to the features of your new printer, lists the options and supplies you can purchase for the printer, and describes Canon's customer support procedures.
Features and Benefits
The BJ-200ex Bubble Jet Printer produces high quality printing by incorporating many useful features.
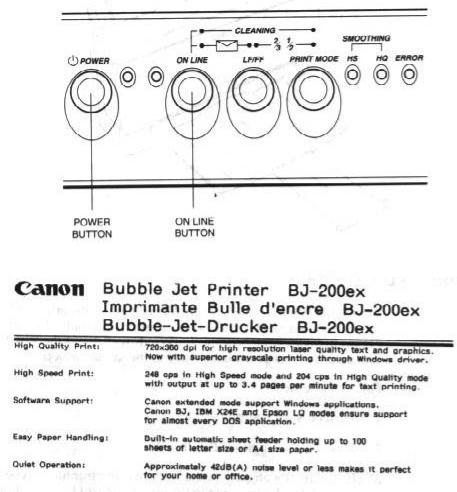
Excellent Print Quality
The printer's high performance print head offers 720 (horizontal) by 300 (vertical) dots per inch (dpi) for high resolution text and graphics. The printer produces excellent grayscale quality when using Microsoft® Windows™ graphics applications through the BJ-200ex printer driver for Windows.
Convenient Paper Handling
An automatic sheet feeder holds up to 100 sheets of plain paper, 40 transparencies, or 15 envelopes.
Software Compatibility
Two resident printer control modes enable the printer to work with a wide variety of software applications:
§BJ-10 mode emulates the IBM Proprinter X24E printer.
§Epson LQ mode emulates the Epson LQ-510 printer.
Three Print Modes/Speeds
The print modes allow you to choose between print quality and speed.
§HQ(high quality) mode provides high quality at 204 characters per second (cps).
§HS(high speed) mode provides draft quality printing at 248 cps.
§Smoothing mode refines your printout by polishing away the jagged edges and ragged stair-stepping curves of characters and graphics, and enables the printer to print both text and graphics at 720 x 360 dpi.
Reduction Mode
The printer offers two reduction modes for printing spreadsheets and other wide documents on regular paper. In reduction mode, the printer reduces the output to two-thirds or one-half of its full size.
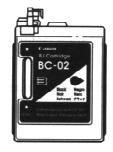
High Quality Ink
The ink in the BC-02 ink cartridge is not easily affected by light, dries quickly, and is smudge-resistant.
Automatic Capping System
To ensure trouble-free operation, the printer automatically moves the print head to the home position and caps the print head whenever the printer is inactive or set off-line.
Simple Maintenance
The replaceable ink cartridge contains both the ink and the print head; when it runs out of ink, you simply replace it.
TrueType Fonts
The Canon TrueType™ Font Pack enhances your font capability and improves your print quality.
Compact Desktop Design
The printer is lightweight (6.6 lb / 3.0 kg) and occupies a minimum amount of desk space.
Quiet Printing
The nonimpact printing method offers quiet operation.
On-Line Documentation
A detailed Visual Guide makes learning about the printer easy and fast by displaying helpful information on your computer screen within the Microsoft Windows
environment. It includes detailed instructions for setting up and using your printer as well as troubleshooting and technical information.
Options and Supplies
Canon has an extensive dealer network equipped to offer you supplies as you need them. To find a dealer near you, call the Canon referral service at 1-800-848-4123.
If you want to purchase supplies directly from Canon, you may do so by calling Canon Accessories at 1-800-671- 1090. Supplies are offered at the manufacturer's suggested list price.
Ink Cartridge
Canon offers the following ink cartridge:
§Canon Ink Cartridge BC-02 (black)
Print Media
Canon manufactures the following print medium for this bubble jet printer.
Canon Transparencies Q07-001-M1
These overhead clear transparencies (also called Over Head Projection or OHP film) are specially designed for Canon Bubble Jet printers. Other overhead clear transparencies may cause problems in your Canon printer by not feeding correctly into the printer or by not allowing the ink to dry properly. Canon overhead clear transparencies are specially designed to produce crisp and professional overhead presentations. Letter size is available.
Related Publication
Programmer's Manual
The information in the BJ-200ex Programmer's Manual is intended for the software designer, the advanced programmer, and the operator who can use a programming language to send commands to the printer.
To obtain this manual, call the Canon help desk as listed in the next section.
Customer Support
Help Desk
Canon provides customer support and service for all Canon printer products. If you have any questions regarding your new printer, call the Canon Computer Systems help desk at 1-800-423-2366. Help is available Monday through Friday from 8 A.M. to 11 P.M. Eastern Standard Time (EST) and on Saturday from 11 A.M. to 6 P.M. EST. The help desk is closed on Sundays and holidays.
If you seem to have an operational problem, try to solve it by referring to the information in Chapter 7, Troubleshooting, or by using your Visual Guide. If you cannot quickly resume normal operations, contact Canon's experienced support personnel at the help desk number above.
Fax Number
You can send suggestions, and technical questions to Canon via facsimile. The number for this service is 1-714- 438-3317, which accesses a G3 fax machine. Be sure to state your question and provide a phone number or fax number for a response.
Fax Retrieval System
Canon also provides a 24-hour toll-free fax retrieval system. You can use this service to get helpful documents faxed directly to your fax machine. These documents contain useful information to assist you in the operation of your Canon printer. To access this service, call 1-800-526-
4345.
Bulletin Board Services
Canon also provides a bulletin board service (BBS), which is useful for obtaining newly developed, third-party drivers. Call 1-714-438-3325. The protocol for the BBS is up to 14,400 bps, eight data bits, one stop bit, and no parity.
If you use CompuServe®, you can access the Canon Peripherals Forum. This allows you to talk with other users, send a message to Canon, or download printer drivers. Just type GO CANON at any CompuServe prompt.
Canada
Customer support for Canadian residents is available 24 hours a day (seven days a week) at 1-800-263-1121.
In other countries, please contact your Canon dealer.
Supplies
To order supplies, call Canon Accessories at 1-800-671- 1090 from 9 A.M. to 7 P.M. EST.
Servicing the Printer
The Canon BJ-200ex Bubble Jet Printer is designed with the latest technology to provide trouble-free operation. The warranty card that came with your printer describes Canon's limited two-year warranty for its Bubble Jet printers. Be sure to read the warranty information and save the card.
If you seem to have a problem, try to solve it by referring to the information in Chapter 7, Troubleshooting. If you cannot solve the problem, contact Canon's support personnel at the help desk.
If you fell that your BJ-200ex Bubble Jet Printer needs servicing, call the Canon help desk to locate the Canon Authorized Service Facility (ASF) nearest you or how to find out about the exclusive Canon InstantExchange limited warranty service.
At the time of this manual's writing, Canon does not offer an extended warranty program beyond the two-year warranty; however, some authorized Canon dealers may offer such programs for a fee. If you are interested in an extended warranty, contact your Canon Authorized Service Facility to see if it offers such a service.
Chapter 2
Setting Up the Printer
This chapter describes how to unpack the printer and select a location for setting it up, examines the printer's components, and explains how to assemble the printer. It also describes how to load a stack of paper and print a self test followed by installing the printer driver and managing your printer's features.
If you already set up your printer using the Quick Start Guide, you may want to look through this chapter to find any additional information it supplies.
Unpacking the Printer
Follow these steps to unpack your printer:
1.Carefully remove all items from the box.
§If you have lifted the printer's box using the built in handles, press the cardboard handles toward the outside of the box before trying to lift the printer out of the box.
§It is best to have someone hold the box while you lift the printer and its protective packaging out of the carton.
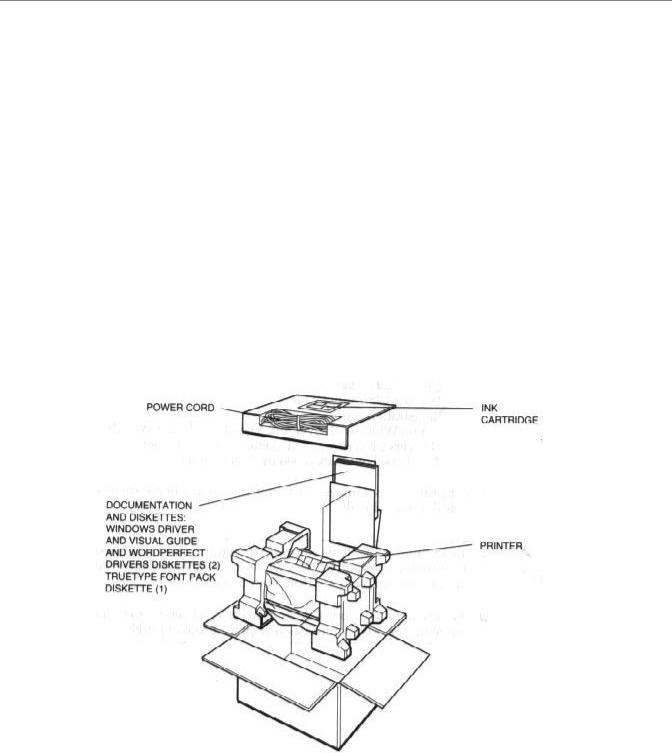
2.Check to see that you have the following items:
§Hardware
§Documentation and Diskettes:
User's Manual (this manual) Quick Start Guide
Product Warranty Card Registration Card
Canon Windows Driver and Visual Guide and WordPerfect™
Drivers diskettes (two diskettes in an envelope)
TrueType Font Pack (diskette in envelope)
If your printer was damaged in shipping, or if any items are missing, notify your dealer immediately.
§In addition to the items shipped with your printer, you need a Centronic®-compatible, parallel interface cable, which you can purchase from your dealer.
§Be sure to fill out your Registration card and send it to Canon Computer Systems, Inc. Save your sales receipt for proof of purchase.
Removing the Shipping Materials
As you unpack the printer, save the carton and packing materials in case you want to move or ship the printer in the future. Follow these steps:
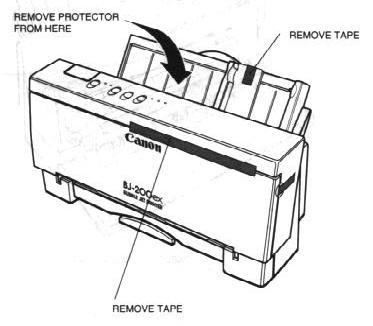
1. Remove the shipping tape from the outside of the printer.
§Remove all pieces of tape. (The shipping tape may not be in the exact locations shown here; just be sure to remove all the tape from the outside of the printer.)
§Remove the protector (plastic or Styrofoam) inside the sheet feeder.
§Move the paper guide to the left.
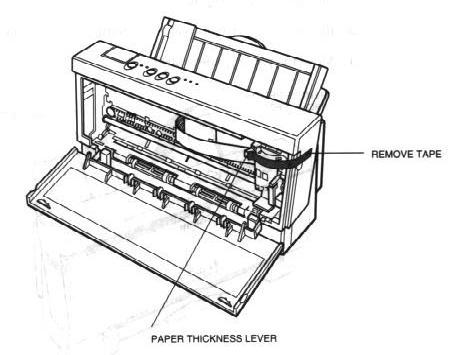
2.Remove the shipping tape inside the printer.
§Open the front cover by grasping the sides of the cover and pulling it down.
§Remove the tape that secures the ink cartridge holder.
§Make sure the paper thickness lever is set to the left for printing on normal paper.
Selecting a Location for Your Printer
Before you set up your printer, choose the best location for it. Follow these guidelines:
§Choose a flat, sturdy surface with enough space for the paper to flow freely into and out of the printer. Angled print stands may cause quality and reliability problems.
§Fully extend the paper rest and paper output tray to ensure enough space is available for proper operation. The printer requires this much space:
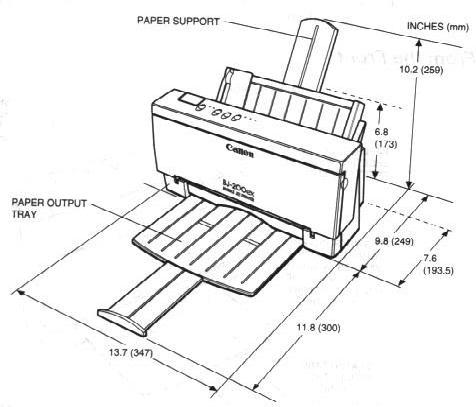
§Place the printer where the temperature is stable and set for human comfort. Avoid areas of excessive heat or humidity as well as direct sunlight.
§Do not install the printer near devices that contain magnets or generate magnetic fields (such as loudspeakers or base units of cordless telephones). These devices can erase information on the printer's intelligent circuits.
§Do not subject the printer to strong physical shock or vibrations.
§Keep the printer clean. Dust accumulation may prevent the printer from functioning properly.
§To protect the printer from damage, hold both sides when you move it.
§While the BJ-200ex Bubble Jet Printer is small and compact, it is not designed for mobile printing.
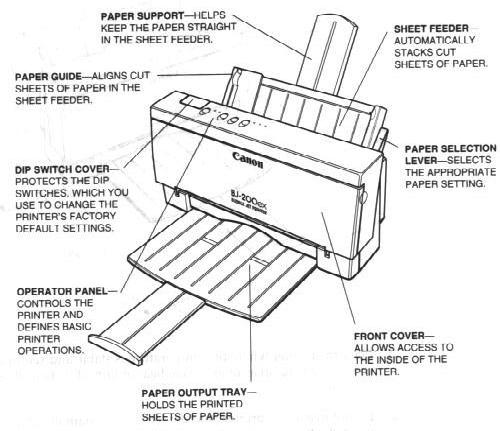
Examining the Printer
Before setting up the printer, it's a good idea to familiarize yourself with its parts and understand their functions.
From the Front
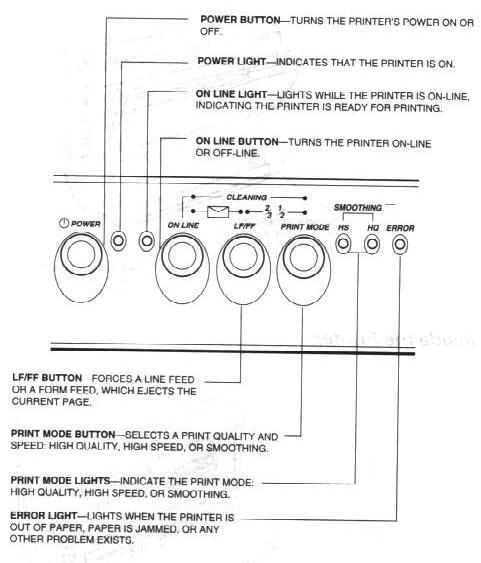
Operator Panel
From the Back
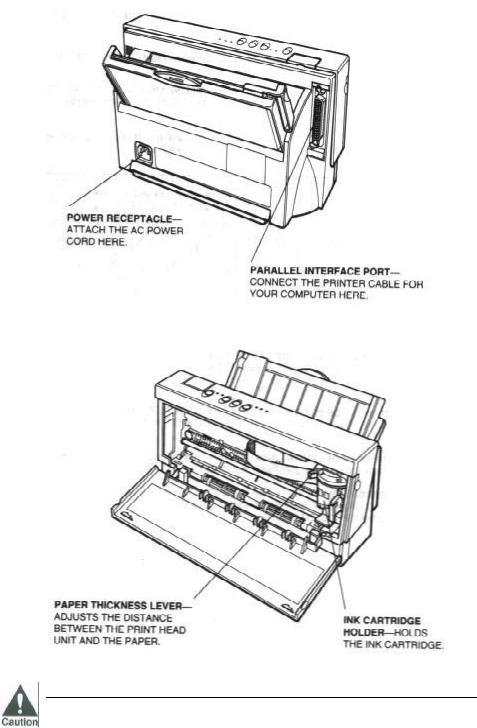
Inside the Printer
Attaching the Power Cord
§Use a power supply that is the appropriate voltage and frequency: AC 120 V, 60 Hz 0.5A. This is the standard for an electrical outlet in the United States or Canada.
§Use only the power cord that came with the printer. Using a longer cord or an extension cord may result in reduced voltage or malfunctions.
§If you smell a peculiar odor or see smoke, unplug the power cord immediately.
§Do not place anything in front of your wall outlet that may obstruct your access to it or put pressure on the power cord.
§When unplugging the power cord, always remove it by holding the plug and not the cord.
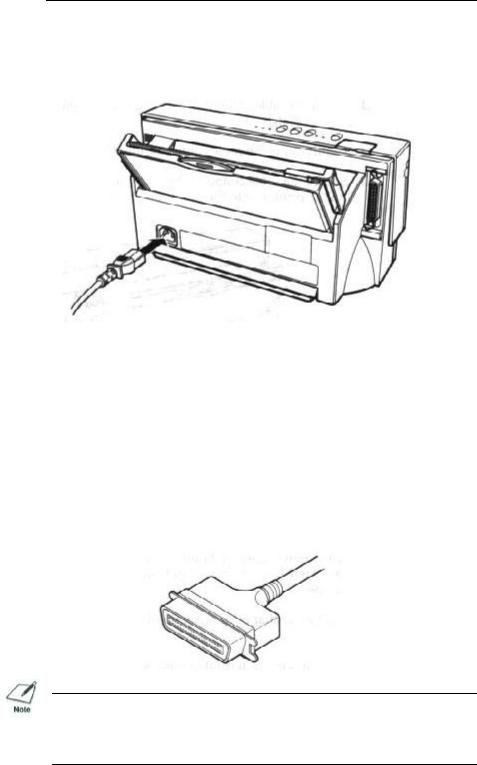
To attach the power cord, follow the steps below.
1. Attach the power cord to the AC power receptacle on the back of the printer.
2. Plug the power cord into a properly grounded AC outlet.
Connecting Your Printer to the Computer
Your printer has an 8-bit parallel interface port, which allows you to use it with IBM PCs and compatible computers. You need to purchase a Centronics-compatible parallel interface cable from your dealer. Ask your dealer for assistance if you need help selecting the right cable.
NOTE: For reliable data communications between your computer and the printer, use a short cable, six feet or less in length.
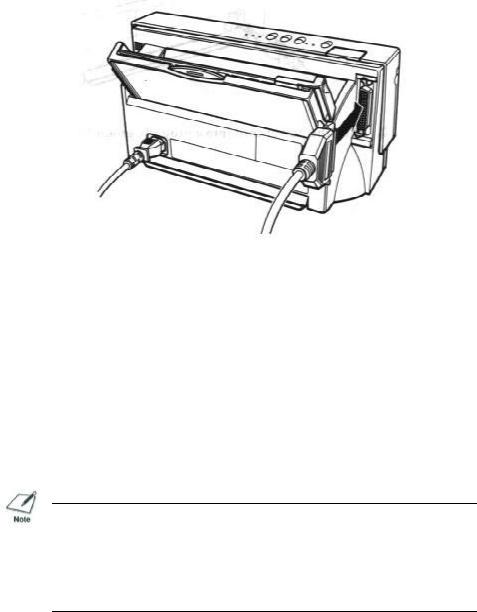
To connect the computer to the host computer, follow the steps below:
1.Make sure both the printer and the computer are turned off.
2.Connect the parallel cable.
§Align the cable connector with the printer's interface port so the shapes match.
§Gently press the cable connector into the port.
§Secure the cable connector by snapping the two wire clips (located on the printer) into the cable connector.
3. Connect the other end of the interface cable to the parallel interface port on your computer.
Installing the Ink Cartridge
You use the BC-02 ink cartridge with this printer. Each ink cartridge can print about 400 to 500 lettersize pages (700,000 characters) in HQ mode and 800 to 1000 pages (1,400,000 characters) in HS mode. The actual amount varies according to the print density of a page. If you print a lot of graphics, you may need to change cartridges more often.
NOTE: Canon makes numerous ink cartridges; the BC-02 is designed specifically for the BJ-200ex and is the only one you should use. Using the BC-01 cartridge will result in decreased print quality.
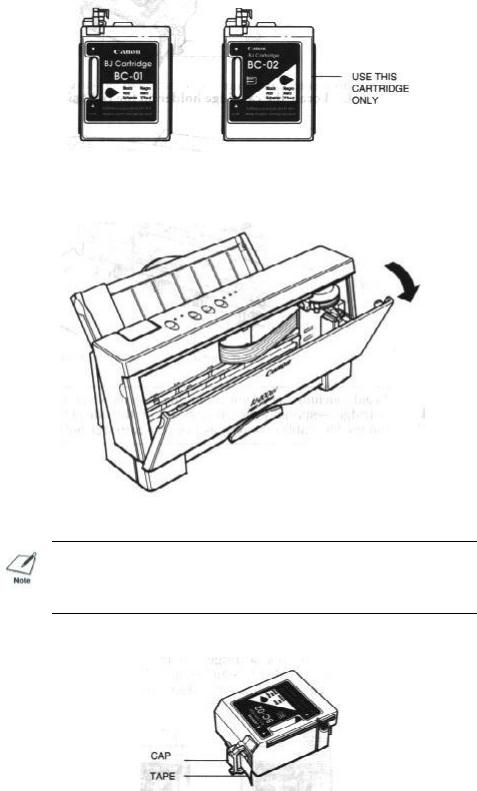
To install the in cartridge, follow these steps:
1.Grasp the sides of the front cover and open it so you can access the cartridge holder.
2.Take the ink cartridge out of its protective packaging.
NOTE: Install the ink cartridge immediately after removing it from its protective packaging.
3.Slide off the orange protective cap from the print head and remove the orange tape.
4.Locate the cartridge holder on the right side of the printer.

5.Lift the green lock lever on the cartridge holder.
6.Fit the ink cartridge over the yellow mounting base with the print head facing down.
§When installed correctly, the label on the cartridge will appear upside down.
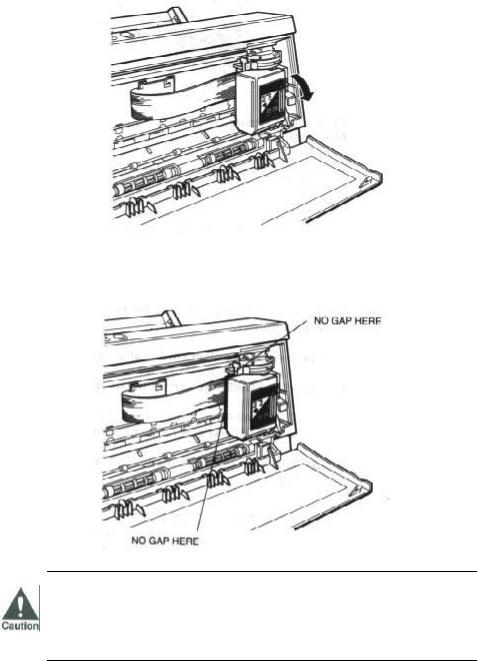
7.Push the lock lever down until it locks into place.
§Use one hand only to set the cartridge and press the lock lever down.
§Make sure there is no resistance when you press on the lock lever. The lever should lock easily into place.
§If you hear any snapping noises or feel any resistance as you press down on the lever, remove the cartridge and try again.
8.Be sure no gap exists between the ink cartridge and cartridge holder.
§When secure, the ink cartridge makes contact with the circuit card inside the cartridge holder.
Do not move the ink cartridge after installing it. Moving the ink cartridge to the left and leaving it there may uncap the print head and cause it to dry out.
9.Close the front cover.
When you turn off the printer, the ink cartridge moves to the home position on the right and caps itself to keep itself

from drying out. The cartridge will not cap and may dry out or clog in the following cases:
§If you unplug the printer while it is printing.
§If you power off the printer via a power strip while it is printing.
§If you move the ink cartridge from the home position.
If, after installing the new ink cartridge, the printer seems to be printing but no ink appears, stop the print operation. Remove and replace the ink cartridge making sure it is secure.
Turning On the Printer
To turn on the printer's power, follow these steps:
1.Make sure the parallel interface cable is connected to your printer and computer.
2.Make sure the power cord is attached to the printer and a wall outlet.
3.Press the POWER button on the operator panel.
§The POWER light flashes and the printer makes several sounds as it warms up and gets ready to print.
§When the printer is ready to print, the POWER, ON LINE, and HQ lights are on.
To turn off the printer, press the POWER button again. After turning off the printer, always wait at least five seconds before turning it back on again.
Never unplug the printer or turn it off a power strip to which the printer is attached when the printer's power is turned on. This may prevent the print head from returning to the home position. Once in the home position, the print head is capped, which prevents damage or drying out. This is critical. If left uncapped, the print head may clog, and you may have to purchase a replacement.

Cleaning the Print Head
The print head on a new ink cartridge needs to be cleaned to ensure the best possible print quality. The printer automatically cleans the print head when you follow these steps:
1.Make sure the printer is turned on and on-line.
2.Press the ON LINE and PRINT MODE buttons at the same time.
§When the ON LINE light starts to blink, release the buttons.
The ON LINE indicator will blink for about 12 seconds while the printer cleans the print head. When complete, the ON LINE indicator will stop blinking and go off. The printer will stay off-line until you press the ON LINE button.
Cleaning the print head consumes a small amount of ink. Repeating this procedure unnecessarily reduces the life of the cartridge.
Loading a Stack of Paper
These steps show how to load a stack of plain paper and test your printer. In the next chapter, you'll learn how to print on different types of print.
You can stack about 100 sheets of plain paper in the sheet feeder.
1.Make sure the paper selection lever is set to the back position.
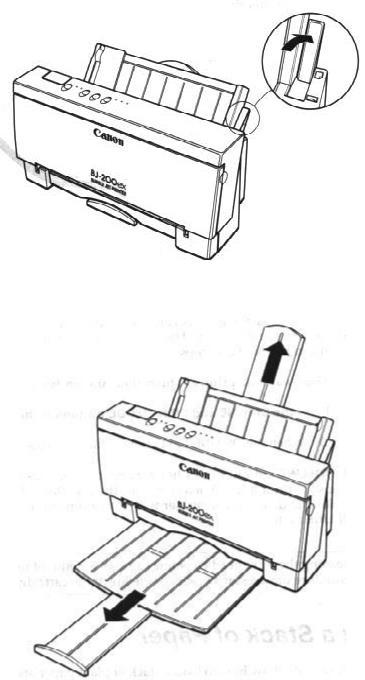
2.Pull the paper support up until it stops and pull out the paper output tray.
3.Fan the paper.
§For best results, fan the paper before loading it.
§Always fan a stack of paper along the edge that will feed into the printer first.
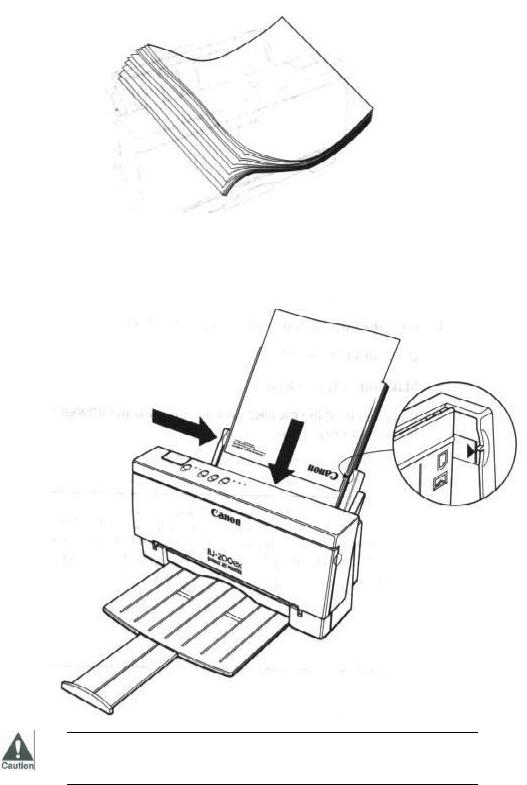
4.Slide the stack of paper into the sheet feeder until it stops.
§Align the edge of the paper with the right edge of the sheet feeder.
§Secure the stack with the paper guide.
Do not force the paper into the printer.
Printing a Test Pattern
To check that you have properly set up the printer, you can print one of the printer's test patterns. The test patterns are described in detail in the next chapter. For now, print Demo Print 1:
1.Press the POWER button to turn off the printer.
§Wait a few seconds.
2.Make sure the paper is loaded.
3.Press and hold the ON LINE button, and press the POWER button until the printer beeps twice.
§The two beeps are approximately three seconds apart.
The printer starts to print Demo Print 1:
4.To stop printing the Demo Print, press the ON LINE button for one second.
§The printer stops printing, ejects the page, and goes back on-line.
Installing a Printer Driver
Before you can print documents from your software applications, you must install the appropriate printer driver
on your computer. The printer driver takes the information from your application and translates it into a language the printer can understand.
If you are using Microsoft Windows 3.1 applications, install the Windows printer driver and Visual Guide as described in the next section.
If you are using MS-DOS applications, you must install a printer driver for each MS-DOS software application that you intend to use with the printer. See Chapter 4, Using the Printer With Your Software, for details.
Installing the Windows Printer Driver and Visual Guide
The Canon Windows Driver and Visual Guide diskettes contain a setup program called SETUP.EXE. This program automatically installs both the Canon BJ-200ex printer driver for Windows 3.1 and the Visual Guide. You can choose to install either the driver, the guide, or both.
Follow these steps:
1.Turn on your computer.
2.Make backup copies of the diskettes.
3.If you are not already in the Windows environment, type WIN and press ENTER. Make sure the Windows Control Panel is closed.
4.Insert the first diskette (Disk 1of 2) into the disk drive A (or your desired drive).
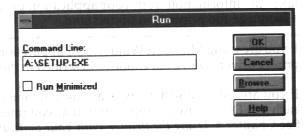
5.From the Program Manager, select the File menu and then choose the Run option.
6.In the Command Line prompt box, enter the path name that identifies the SETUP.EXE file on the Windows driver diskette and then click on OK. For example:
7.Now follow the instructions on the screen to install the Windows driver and the Visual Guide.
The SETUP program installs the BJ-200ex printer driver for Windows in the C:\WINDOWS\SYSTEM directory. If you choose to install the Visual Guide, the SETUP program creates an icon in the Program Manager. Whenever you need information about the BJ-200ex, you can open the icon and look up the information you need.
For faster printing operations in Windows, do not use the Windows Print Manager.
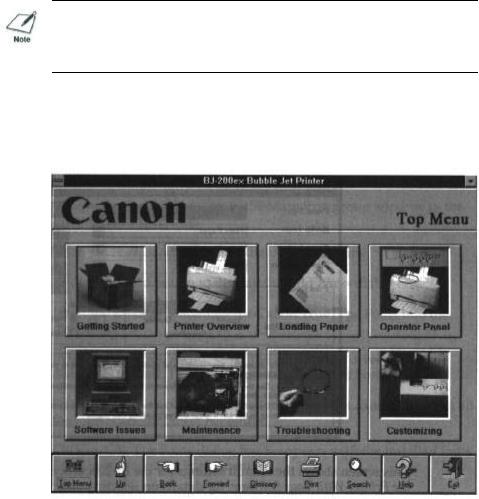
Using the Visual Guide
When the SETUP program is complete, you can start the Visual Guide and take a look at its features. Simply open the BJ-200ex icon in the Program Manager.
From now on, you can use the Visual Guide for all your documentation needs. The Visual Guide contains all the information included in this User's Manual. In addition:
§It shows you photographs as well as illustration of all the topics it covers.
§It includes demonstrations and simulations of procedures you actually perform.
§It includes technical information regarding printer command codes and ESCape sequences.
Using the Visual Guide, you can easily search for the topic you are interested in and you can move forward and backward through the guide with a click of your mouse.
If, for some reason, your computer and /or Visual Guide are not available, you can look up the information you need in the User's Manual.
Using the BJ-200ex Windows Driver
When you first install the Canon BJ-200ex driver for Windows, it's a good idea to run the Setup program and
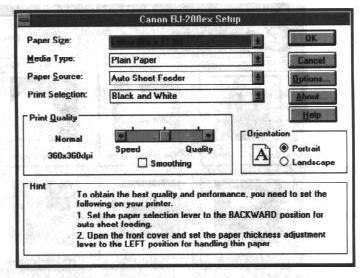
select the printer settings that you will normally use. Later, from within each of your software applications, you can select the printer settings that are unique to the current print job.
This screen shows the default settings for the BJ-200ex. see Chapter 4, Using the Printer With Your Software, for details on selecting other printer settings for the BJ-200ex printer driver for Windows.
Installing the Canon TrueType Fonts for Microsoft Windows 3.1
1.Make sure your computer is turned on.
2.Start Windows 3.1 by typing WIN and pressing ENTER at the MS-DOS prompt.
3.Choose the Control Panel from the Main icon group window in the Program Manager.
4.Open the Fonts icon. The Fonts dialog box appears.
5.Choose the Add button to display the Add Fonts dialog box.
6.Insert the diskette containing the Canon TrueType Fonts into the diskette drive.
7.In the Drives scroll menu, select the appropriate drive where the diskette is located. The fonts appear in the List of Fonts box.
8.Select the fonts by clicking on the fonts you want to add. To select all the fonts, click the Select All button.
9.Click on OK. The Fonts dialog box reappears with the installed fonts listed in the Installed Fonts menu.
10.To ensure the fonts appear in your application, click the TrueType button. The TrueType dialog box appears.
11.Make sure an X appears in the Enable TrueType Fonts box. Click on OK to exit the TrueType dialog box.
12.Click on Close to exit the Fonts dialog box.
Your installation is now complete.
If you would like to remove the installed fonts, please refer to the instructions that came with your TrueType fonts.
Loading...