


 Loading...
USER’S GUIDE
Read this guide before operating this equipment.
After you finish reading this guide, store it in a safe place for future reference.
Table of Contents
INTRODUCTION
Using this guide ................................... |
v |
Important safety instructions............. |
vi |
For your safety (Australia only) ....... |
viii |
Caution (New Zealand only) ............. |
viii |
Registering voice tags with one-touch/coded |
|
speed dialing numbers and names............ |
2-15 |
Adding voice tags to the one-touch/coded speed
dialing numbers ........................................ |
2-15 |
Modifying voice tags...................................... |
2-16 |
Deleting voice tags......................................... |
2-16 |
1 SETTING UP
Unpacking......................................... |
1-1 |
Removing the shipping materials..................... |
1-2 |
Assembling the fax .......................... |
1-3 |
Attaching components ..................................... |
1-3 |
Making connections......................... |
1-4 |
Connecting the telephone line, handset, and |
|
external devices ........................................... |
1-4 |
Connecting the AC power cord......................... |
1-5 |
Setting the language......................................... |
1-5 |
Loading paper................................... |
1-6 |
Paper guidelines............................................... |
1-6 |
Loading paper in the multi-purpose tray .......... |
1-7 |
Installing the BJ cartridge ............... |
1-8 |
Guidelines ........................................................ |
1-8 |
Installing the BJ cartridge in your fax............... |
1-9 |
Testing the fax................................................ |
1-10 |
2 PREPARING TO USE YOUR FAX
Main components of your fax ......... 2-1 Fax controls - the operation panel.. 2-2
Guidelines for entering |
|
numbers, letters, and symbols.... |
2-4 |
Correcting mistakes ......................................... |
2-5 |
Setting the TEL LINE TYPE ............. |
2-6 |
Dialing through a switchboard |
|
(PBX) .............................................. |
2-6 |
Registering the access type and the outside line |
|
access number ............................................ |
2-7 |
Registering sender information ...... |
2-8 |
Personalizing your fax ...................................... |
2-8 |
Setting the date and time ................................. |
2-8 |
Registering your fax/telephone number and |
|
name............................................................ |
2-9 |
Setting the summer time................................ |
2-10 |
Registering one-touch speed dialing |
|
numbers and names................... |
2-12 |
Registering coded speed dialing |
|
numbers and names................... |
2-14 |
Registering UCanTalk |
|
voice tags .................................... |
2-15 |
3 DOCUMENTS AND PAPER
Preparing documents....................... |
3-1 |
Types of documents you can scan................... |
3-1 |
Problem documents ........................................ |
3-1 |
Loading documents ......................... |
3-2 |
Problems with multipage documents .............. |
3-2 |
Paper requirements.......................... |
3-3 |
Printable area................................................... |
3-3 |
Loading paper.................................................. |
3-3 |
4 MAKING COPIES
Copying documents ......................... |
4-1 |
5 SENDING DOCUMENTS
Preparing to send a document........ |
5-1 |
Adjusting the quality of your documents ......... |
5-1 |
Sending methods............................................. |
5-2 |
Dialing methods............................................... |
5-2 |
Sending documents ......................... |
5-2 |
Direct sending.................................................. |
5-2 |
Memory sending.............................................. |
5-3 |
Manual sending ............................................... |
5-4 |
Canceling sending............................ |
5-5 |
Automatic dialing ............................. |
5-5 |
Sending a document using one-touch speed |
|
dialing or coded speed dialing numbers...... |
5-5 |
Sending a document using directory dialing.... |
5-6 |
Sending a document using UCanTalk .............. |
5-7 |
Special dialing .................................. |
5-8 |
Sending a document using caller history ......... |
5-8 |
Long-distance dialing ...................................... |
5-8 |
Redialing when the line is busy ...... |
5-9 |
Manual redialing .............................................. |
5-9 |
Automatic redialing.......................................... |
5-9 |
Delayed sending ............................. |
5-11 |
Sending other documents while the fax is set for |
|
delayed sending ........................................ |
5-12 |
Canceling delayed sending............................. |
5-12 |
Sequential broadcasting................ |
5-13 |
Sending a document to more than |
|
one location............................................... |
5-13 |
Documents stored in memory....... |
5-14 |
ii
Table of Contents
Printing a list of documents in memory ......... |
5-14 |
Printing a document in memory..................... |
5-14 |
Deleting a document from memory................ |
5-15 |
6 RECEIVING DOCUMENTS
Different ways to receive |
|
a document.................................... |
6-1 |
Setting the receive mode................. |
6-2 |
Receiving both documents and telephone calls |
|
automatically: Fax/Tel mode ........................ |
6-2 |
Receiving documents manually: |
|
MANUAL MODE........................................... |
6-4 |
Receiving documents with an answering machine: |
|
ANS.MACHINE MODE |
|
(FAX-B820/B822 only)................................. |
6-4 |
Other features................................... |
6-5 |
Saving ink ........................................................ |
6-5 |
Changing calling volume .................................. |
6-5 |
Receiving documents in memory while performing |
|
another task or when a problem occurs ...... |
6-5 |
Polling to receive documents ........................... |
6-5 |
Setting CALLER ID ........................... |
6-6 |
Canceling receiving ......................... |
6-8 |
Telstra FaxStream™ Duet |
|
(Australia only).............................. |
6-8 |
Setting the fax for network switch.................... |
6-8 |
Operation for network switch system............... |
6-8 |
Telecom FaxAbility |
|
(New Zealand only) ....................... |
6-9 |
Setting the fax for network switch.................... |
6-9 |
Operation for network switch system............... |
6-9 |
7 USING TAM MODE (FAX-B840 only)
Recording the outgoing message .. |
7-1 |
Types of messages that can be recorded ......... |
7-1 |
Recording the outgoing message..................... |
7-1 |
Setting TAM MODE........................... |
7-2 |
Setting the recording time for a telephone |
|
message ...................................................... |
7-3 |
Setting TAM MONITOR .................................... |
7-4 |
Setting TOLL SAVER ........................................ |
7-5 |
Recording voice memos.................. |
7-6 |
Deleting messages........................... |
7-7 |
Playing telephone messages .......... |
7-8 |
Remote control features .................. |
7-9 |
Registering the password for remote control... |
7-9 |
Using remote control ..................................... |
7-10 |
Forwarding telephone messages.. 7-12
Setting the forwarding number ...................... |
7-12 |
Setting the number of redial times................. |
7-13 |
Setting PIN ENTRY ........................................ |
7-14 |
When a forwarded call is |
|
received ....................................... |
7-15 |
8 SETTINGS AND ACTIVITY REPORTS
Selecting a menu .............................. |
8-1 |
Activity reports ................................. |
8-7 |
How to print a report ....................................... |
8-7 |
Activity report .................................................. |
8-8 |
One-touch speed dialing list ............................ |
8-8 |
Coded speed dialing list ................................... |
8-8 |
User’s data list ................................................. |
8-8 |
List of documents in memory.......................... |
8-8 |
TX (Transmission) report................................. |
8-8 |
RX (Reception) report...................................... |
8-8 |
Multi TX/RX (Transaction) report..................... |
8-8 |
9 SOLUTIONS TO COMMON PROBLEMS
Clearing jams .................................... |
9-1 |
Jams in the document tray .............................. |
9-1 |
Jams in the multi-purpose tray ........................ |
9-1 |
Periodic cleaning.............................. |
9-2 |
Cleaning the exterior of the fax ........................ |
9-2 |
Cleaning the interior of the fax ......................... |
9-2 |
Testing and cleaning the BJ cartridge print |
|
head ............................................................ |
9-4 |
Replacing the BJ cartridge ............................... |
9-5 |
Troubleshooting ............................... |
9-7 |
Paper feeding problems................................... |
9-7 |
Faxing problems .............................................. |
9-8 |
Copying problems.......................................... |
9-12 |
Telephone problems ...................................... |
9-12 |
Print quality problems ................................... |
9-13 |
General problems .......................................... |
9-13 |
LCD messages................................ |
9-14 |
In case of a power failure............... |
9-18 |
During a power failure ................................... |
9-18 |
Memory clear report ...................................... |
9-18 |
Specifications ............. |
S-1 |
Index............................. |
I-1 |
iii

Model Name
• H12414 (FAX-B840/B820/B822)
Copyright
Copyright © 2004 by Canon Inc. All rights reserved. No part of this publication may be reproduced, transmitted, transcribed, stored in a retrieval system, or translated into any language or computer language in any form or by any means, electronic, mechanical, magnetic, optical, chemical, manual, or otherwise, without the prior written permission of Canon Inc.
Trademarks
Canon, UCanTalk, and BJ are registered trademarks. UHQ is a trademark of Canon Inc.
All other product and brand names are registered trademarks, trademarks or service marks of their respective owners.
As an ENERGY STAR® Partner, Canon Inc. has determined that these products meet the ENERGY STAR® guidelines for energy efficiency.
iv

 Using this guide
This guide provides detailed information on how to set up, operate, maintain, and troubleshoot your fax.
Please read the list below to become familiar with the symbols, terms, and abbreviations used in this guide.
Cautions tell you how to avoid actions that could injure you or damage your fax. In order to use your fax safely, always observe these cautions.
Notes provide advice on using your fax more effectively, describe operating restrictions, and tell you how to avoid minor difficulties. Reading these is recommended to make the most of your fax and its functions.
(see p. xx) |
Indicates a page number that you can refer to for more information |
|
|
|
on the topic of the previous sentence or paragraph. |
default |
A setting that remains in effect unless you change it. |
|
document |
The original sheet(s) of paper you send, receive, or copy with your |
|
|
|
fax. |
menu |
A list of settings from which you select an item to set up or change. A |
|
|
|
menu has a title which appears on the LCD. |
|
and buttons |
Used to select an item in a menu. Press to select the next item, and |
|
|
press to select the previous item. |
transaction number |
When you send or receive a document, your fax automatically |
|
|
|
assigns the document a unique transaction number. A transaction |
|
|
number is a four-digit number that will help you keep track of |
|
|
documents you send and receive. |
TX/RX NO. |
TX/RX NO. is the abbreviation used for “transaction number.” |
|
TX |
Denotes Transmission. |
|
RX |
Denotes Reception. |
|
|
|
LCD display. The contents of the LCD display may vary depending |
|
TRANSMITTING OK |
|
|
on the current settings. |
|
|
|
|
In addition, this guide uses brackets to identify the buttons you press when performing different functions: [Stop].
This guide contains information for three Canon models. Please note that the illustrations of the fax in this guide may differ from your model. Instructions for specific models are labelled with the fax names.
v
 Important safety instructions
Read these safety instructions thoroughly before using your fax.
Except as specifically described in this guide, do not attempt to service the fax yourself. Never attempt to disassemble the fax: opening and removing its interior covers will expose you to dangerous voltages and other risks. For all service, contact your local authorized Canon dealer or the Canon help line.
■ Handling and maintenance
•Follow all warnings and instructions marked on the fax.
•Do not subject the fax to strong physical shock or vibration.
•Always unplug the fax before moving or cleaning it.
•To avoid paper jams, never unplug the power cord, open the printer cover, or remove paper from the multi-purpose tray while printing.
•When transporting the fax, leave the BJ cartridge installed in the cartridge holder and tape the cartridge holder to the right side of the fax. This will prevent ink spilling inside the fax.
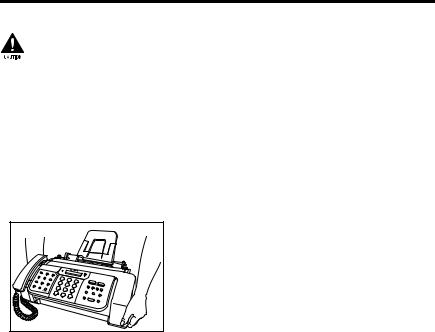
•Always lift the fax by its base as shown below. Never lift it by any of its attachments or covers.
•Do not push objects of any kind into the slots or openings on the fax as they may touch dangerous voltage points or short out parts. This could result in fire or electric shock.
•Do not allow small objects (such as pins, paper clips, or staples) to fall into the fax. If something does fall into the fax, unplug it immediately and contact your local authorized Canon dealer or the Canon help line.
•To avoid spillage in or around the fax, do not eat or drink near it. If you spill liquid or if any substance falls into the fax, unplug the fax immediately and contact your local authorized Canon dealer or the Canon help line.
•Keep the fax clean. Dust accumulation can prevent the fax from operating properly.
•Unplug the fax from the wall outlet and refer service to qualified personnel under the following conditions:
–When the power cord or plug is damaged or frayed.
–If liquid has spilled into the fax.
–If the fax has been exposed to rain or water.
–If the fax does not operate normally when you have followed the instructions in this guide. Adjust only those controls that are covered by the instructions in this guide. Improper adjustment of other controls may result in damage and may require extensive work by a qualified technician to restore the product to normal operation.
–If the fax has been dropped or the body has been damaged.
–If the fax exhibits a distinct change in performance, indicating a need for servicing.
vi

■ Location
•Place the fax on a flat, stable, vibration-free surface.
•Place the fax in a cool, dry, clean, well ventilated place.
–Make sure the area is free from dust.
–Make sure the location is not affected by extreme temperature changes, and always stays between 10° and 32.5°C.
–Make sure the area’s relative humidity is always between 20% and 85%.
•Keep the fax away from direct sunlight.
•Do not use the fax near water. Make sure that no wet or humid objects come into contact with the fax.
•Do not use or store the fax outdoors.
•Do not install the fax near devices that contain magnets or generate magnetic fields, such as speakers.
•Place the fax near a standard 200-240 V AC power outlet.
•To ensure reliable operation of the fax and to protect it from overheating, do not block the exhaust vent and never block or cover any openings on the fax by placing it on a bed, sofa, rug, or other similar surface. Do not place the fax in a cupboard or built-in installation, or near a radiator or other heat source unless proper ventilation is provided. Install the fax approximately 10 cm away from walls and other equipment. For the dimensions of the fax, see p. S-1.
•Do not stack boxes or furniture around the power outlet. Keep the area free so you can reach the outlet quickly. If you notice anything unusual (smoke, strange odors, noises) around the fax, unplug it immediately. Contact your local authorized Canon dealer or the Canon help line.
•Do not allow anything to rest on the power cord, and do not place the fax where the cord will be walked on. Make sure the cord is not knotted or kinked.
■ Power supply
•During electrical storms, disconnect the power cord from the power outlet. (Please note that any documents stored in the fax’s memory will be deleted when you unplug the fax.)
•Whenever you unplug the fax, wait at least five seconds before you plug it in again.
•If dust accumulates around the plug of the power cord when it is connected to a power outlet, unplug the fax and wipe the plug with a clean, dry cloth.
This product emits low level magnetic flux.
If you use a cardiac pacemaker and feel abnormalities, please move away from this product and consult your doctor.
vii

 For your safety (Australia only)
To ensure safe operation the three-pin plug supplied must be inserted only into a standard threepin power point which is effectively earthed through the normal household wiring.
Extension cords used with the equipment must be three-core and be correctly wired to provide connection to earth. Wrongly wired extension cords are a major cause of fatalities.
The power point shall be located near the equipment and shall be easily accessible.
The fact that the equipment operates satisfactorily does not imply that the power point is earthed and the installation is completely safe. For your safety, if in any doubt about the defective earthing of the power point, consult a qualified electrician.
 Caution (New Zealand only)
1.This equipment may not necessarily provide for the effective hand-over of a call to or from a telephone connected to the same line.
2.The operation of this equipment on the same line as telephone or other equipment with audible warning devices or automatic ring detectors will give rise to bell tinkle or noise and may cause false tripping of the ring detector. Should such problems occur, the user is not to contact Telecom Faults service.
3.Should this equipment become physically damaged, disconnect immediately from the Telecom connection and power source and contact your nearest service agent.
4.To relocate the equipment, please:
1)Disconnect the equipment from the Telecom connection.
2)Disconnect the equipment from the power source.
3)Reconnect the equipment to the power source.
4)Reconnect the equipment to the Telecom connection.
5.If the supply cord of this equipment is damaged, it must be replaced by the special cord (Parts NO.: HH2-1910).
6.Not all standard telephones will respond to incoming ringing when connected to the extension socket.
7.This device may be subject to bell tinkle, or mistakenly enter receive mode when calls are made from another device on the same line. If this occurs, the problem should not be referred to the Telecom Faults service.
8.Please note when you connect an extension phone to this device, if you use an extension phone which has features such as “last number redial,” redial memory numbers may be lost.
viii
1 SETTING UP
 Unpacking
As you unpack your fax, save the carton and packing material in case you want to move or ship the fax in the future.
Carefully remove all items from the box.
•It is best to have someone hold the box while you lift the fax and its protective packaging out of the carton.
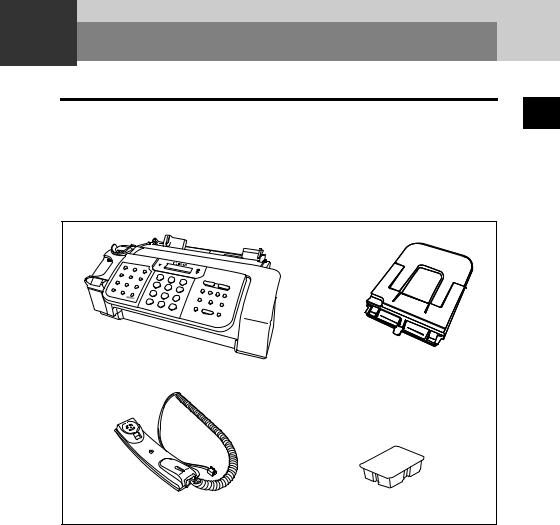
Make sure you have the following items:
Main unit |
Multi-purpose |
|
|
|
tray |
Handset |
BX-3 Black |
|
BJ cartridge |
You should also have the following:
•Power cord
•Telephone line cord
•Documentation
•Warranty*
•Destination labels
If any of these items are damaged or missing, contact your local authorized Canon dealer or the Canon help line immediately.
* This item is only included in some countries.
1
UP SETTING
1-1
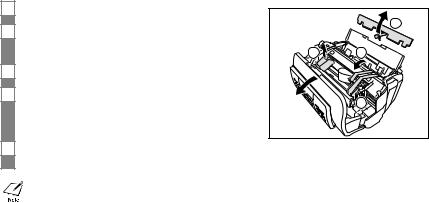
Removing the shipping materials______________
1
2
3
4
5
Remove the protective piece a .
Open the printer cover by gently pulling it towards you.
Open the document tray.
Remove the shipping tapes b and the protective pieces c.
Close the printer cover until it locks into place. Close the document tray.
|
1 |
3 |
2 |
|
3 |
The actual shipping materials may differ in shape, quantity, and position from the ones shown above.
1-2
 Assembling the fax
Attaching components_________________________
For user convenience, the destination labels provided with your fax should be fitted over the onetouch speed dialing buttons on the left of the operation panel.
1
UP SETTING
1Insert the tabs on the multipurpose tray into the slots on the fax.
1-3
 Making connections
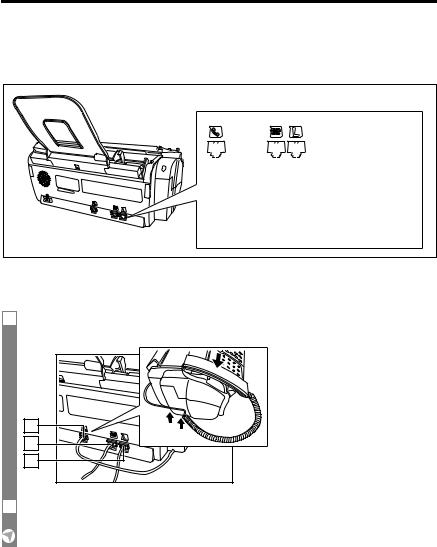
Connecting the telephone line, handset, and external devices _______________________________
There are three jacks on the back of the fax for connection of the following:
|
|
|
|
Handset |
Telephone line |
||
Extension phone (a telephone that you may wish to have placed away from the fax to use at a different location) or answering machine*.
Be sure to connect any external devices before using the fax.
*FAX-B820/B822 only.
1Connect the supplied telephone line cord to the  jack, then the other end to the telephone line jack on your wall.
2 |
3 |
1 |
2 Connect the handset to the  jack, and place it in its cradle.
1-4

3Connect an extension phone or an answering machine* to the  jack.
jack.
•You cannot use the extension phone while the fax is using the phone line.
•Due to the range of specifications, Canon cannot guarantee that all answering machines will be compatible with your fax.
•If you have connected an external device to your fax, be sure to select the correct receive mode (see Chapter 6).
•If the extension phone does not have its own power supply, any redial data in the extension phone memory may be lost after an extended fax transmission.
*FAX-B820/B822 only.
Connecting the AC power cord ________________
Plug the fax into a 200 - 240 volt AC 50/60 Hz outlet.
1Plug the power cord connector into the rear of the fax.
2Plug the other end of the power cord into a properly grounded AC power outlet.
There is no power switch on the fax. The power is on as long as the fax is plugged in.
Setting the language___________________________
You need to select the correct language for the LCD display and reports. See pp. 2-2, 2-3 for the buttons on the operation panel.
1Press [Start/Copy].
2Use [  ] or [
  ] to select the preferred language for the LCD display and reports, then press [Start/Copy].
Registration ends and the fax enters standby mode.
1
UP SETTING
1-5
 Loading paper
Paper guidelines _______________________________
•Be sure to load paper of the correct size, weight, and quantity recommended for your fax (see pp. 3-3, S-1).
•Store all paper wrapped and on a flat surface until ready to use. Keep opened packs in their original packaging, in a cool, dry location.
•Store paper at 18º-24ºC, 40%-60% relative humidity.
•To avoid paper jams and poor print quality, do not print on damp, curled, wrinkled, or torn paper.
•Use cut-sheet paper only, not paper that comes on a roll.
•Use only paper that has a thickness of between 0.09 and 0.13 mm. Thick paper may damage the BJ cartridge print head.
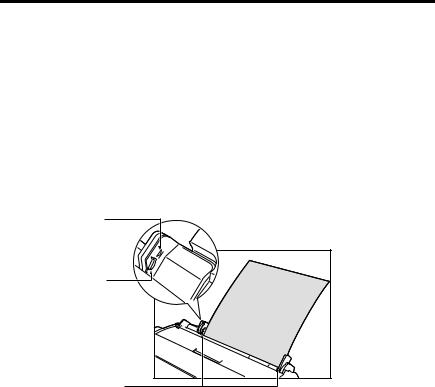
•Do not load paper beyond the paper limit mark ( ) on the paper guide. Doing so may cause problems. Also, make sure there are no gaps on either side of the paper stack.
Paper limit mark
Tab
No gaps here
•Let the paper run out before refilling the multi-purpose tray. Avoid mixing new stock with paper already loaded.
•Do not leave paper stacked in the multi-purpose tray for long periods of time since it may bend or curl and cause problems.
•Certain environmental conditions, such as extreme temperatures or humidity, can cause some paper to misfeed in the multi-purpose tray. If you have trouble, feed one sheet at a time.
•Depending on the density of the printed pages, the ink may need time to dry. Within two or three seconds, the ink becomes smudge-resistant. After drying for several minutes, the ink becomes water-resistant.
•If your printed page contains a large amount of graphics, the ink on the page may be damp due to the print density. Let the page dry for approx. 30 to 60 seconds. Then remove the page carefully without touching any surfaces.
•If paper curls after printing, remove it immediately; otherwise paper jams may occur.
•The platen (a roller inside the fax) may become inked if paper misfeeds. If this happens, clean inside the fax (see p. 9-2).
1-6
Loading paper in the multi-purpose tray ______
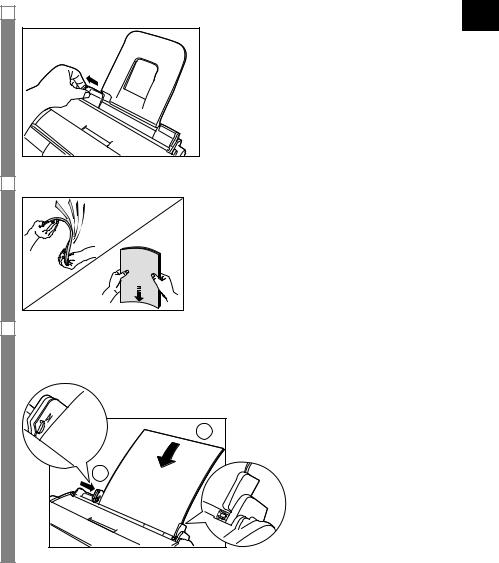
1 Squeeze, then slide the paper guide to the left. |
1 |
|
UP SETTING |
2 Fan a stack of paper, then tap the edge of the stack on a flat surface to even the stack.
3Insert the stack face up into the multi-purpose tray a, and align the right edge of the stack with the right side of the multi-purpose tray. Then slide the paper guide b snugly against the left edge of the stack.
Be careful not to press the paper guide strongly against the stack, or the paper will not be fed properly.
1 |
2 |
1-7
 Installing the BJ cartridge
The first time you set up your fax, you have to install the BJ cartridge before you can begin receiving and copying documents.
For information on replacing the BJ cartridge, see p. 9-5.
Guidelines ______________________________________
•Use only a Canon BX-3 Black BJ cartridge in your fax.
•Store BJ cartridges at room temperature.
•When the BJ cartridge print head is left exposed, it easily dries out and becomes unusable. To avoid this, follow these recommendations:
–Keep BJ cartridges in the packaging until you are ready to use them.
–Never remove the BJ cartridge unless you are going to replace it.
–Keep the cartridge holder in the home position (on the right side of the fax) when you are not using the fax.
The ink in the BJ cartridge is difficult to clean up if spilled. Follow the precautions below when handling the BJ cartridge.
–Carefully remove packaging from BJ cartridges.
–Do not attempt to disassemble or refill BJ cartridges.
–Do not shake or drop BJ cartridges.
•Replace BJ cartridges after one year of use, even if you have not been alerted to replace it.
If you need to unplug the fax, wait until it returns to standby mode (time and receive mode displayed on the LCD). Otherwise the cartridge holder may not be in its home position; causing the BJ cartridge to remain uncapped and dry out.
•Store BJ cartridges out of the reach of children. If anyone inadvertently ingests ink, consult a physician
immediately.
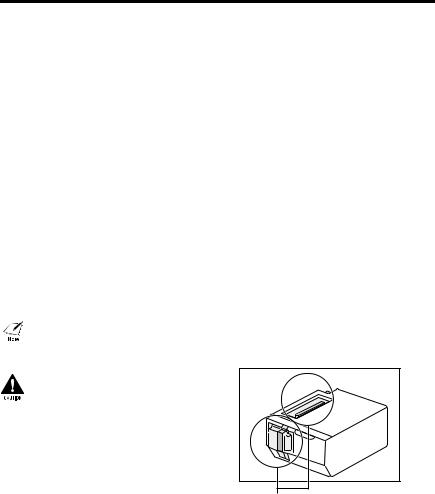
• Do not touch the metallic areas on the BJ cartridge.
Do not touch these metallic areas.
1-8
Installing the BJ cartridge in your fax_________
When a BJ cartridge is not installed in your fax, PUT IN CARTRIDGE is displayed on the LCD.
1Make sure the fax is plugged in.
2Load the paper in the multi-purpose tray.
3Open the printer cover by gently pulling it towards you (see p. 1-2).
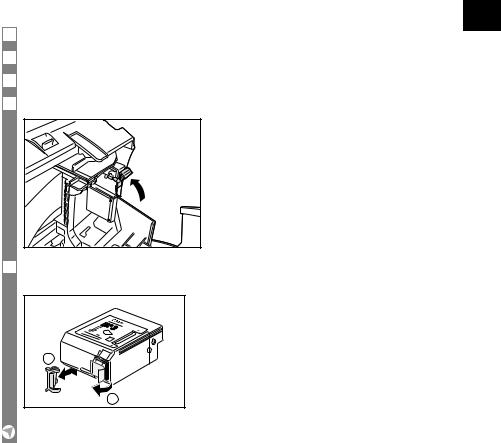
4Raise the cartridge lock lever on the cartridge holder.
5Remove the BJ cartridge from its package, then remove the orange protective cap aand tape b.
1
2
Discard the cap and tape. Never attempt to reattach them to the BJ cartridge print head.
1
UP SETTING
1-9

6Align the slot in the cartridge with the yellow post in the fax, and with the label facing outwards, insert the BJ cartridge into the cartridge holder. Lower the cartridge lock lever until you hear a click to lock the cartridge in place.
The yellow post (BJ cartridge guide) should be visible through the slot. The BJ cartridge tilts slightly to the left before lowering the cartridge lock lever.
7Close the printer cover.
If the AUTO TEST PRINT setting is set to ON:
The fax automatically prints a test page every time you insert a BJ cartridge.
You can turn off automatic test printing by changing the AUTO TEST PRINT setting. See SYSTEM SETTINGS, p. 8-5.
•Do not try to manually move or stop the cartridge holder.
•Do not touch the components shown below or any metal parts.
Ribbon |
Guide rail |
cable |
Round shaft Circuit board
Testing the fax _________________________________
After you have assembled the fax, loaded the paper, and installed the BJ cartridge, you can make sure the fax is printing properly by making several copies of a document (see p. 4-1).
If you have problems printing, see Chapter 9.
1-10

2 PREPARING TO USE YOUR FAX
 Main components of your fax
Multi-purpose tray
Document tray
Document guide
Handset
Operation panel
Printer cover
Cartridge holder
2
FAX YOUR USE TO PREPARING
2-1
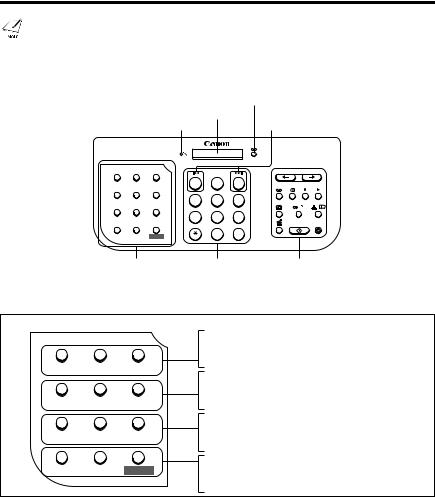
 Fax controls - the operation panel
The buttons on the operation panel may differ from the ones shown in this chapter.
|
|
|
|
|
|
|
TAM LED (see p. 7-2) (FAX-B840 only) |
|
|
|
Microphone |
|
LCD |
|
Rewind/Forward buttons (see p. 7-8) |
||
|
|
(see pp. 2-13, 7-1) |
|
|
||||
|
|
|
|
(FAX-B840 only) |
||||
|
|
|
|
|
|
|
|
|
|
|
|
|
|
|
FAX-B840 |
|
|
|
|
01 |
02 |
03 |
1 |
2 |
3 |
|
|
|
Report |
Cleaning Send Options |
|
||||
|
|
|
|
|
|
ABC |
DEF |
|
|
|
04 |
05 |
06 |
4 |
5 |
6 |
|
|
|
R |
Space |
Clear |
|
|||
|
|
|
|
|
GHI |
JKL |
MNO |
|
|
|
07 |
08 |
09 |
7 |
8 |
9 |
|
|
|
Polling |
Ink Saver Caller History |
|
||||
|
|
PQRS |
TUV |
WXYZ |
|
|||
|
|
Receive Mode Resolution |
Function |
|
0 |
# |
|
|
|
|
|
|
|
|
|||
|
One-touch speed |
Numeric buttons |
See next page for buttons on |
|||||
|
dialing/Special |
|
|
|
the operation panel. |
|||
|
function buttons |
|
|
|
|
|||
|
(see below) |
|
|
|
|
|
||
|
|
|
|
|
|
Report button (see p. 8-7) |
||
01 |
02 |
03 |
|
|
Cleaning button (see p. 9-4) |
|||
|
|
Send Options button (see pp. 5-3, 5-11) |
||||||
Report |
Cleaning Send Options |
|
||||||
|
|
|
|
|||||
04 |
05 |
06 |
R |
Space |
Clear |
07 |
08 |
09 |
Polling |
Ink Saver Caller History |
|
Receive Mode |
Resolution |
Function |
R button (see p. 2-6)
Space button (see p. 2-5)
Clear button (see p. 2-5)
Polling button (see p. 6-6) Ink Saver button (see p. 6-5)
Caller History button (see p. 5-8)
Receive Mode button (see p. 6-2) Resolution button (see pp. 4-1, 5-1) Function button (see p. 2-6)
The buttons on the left of the operation panel have the following two functions:
•One-touch speed dialing buttons (see p. 2-12)
•Special function buttons
When the [Function] button is pressed, the special function buttons (function marked under each button) can be used to perform various operations.
2-2
Scroll/Cursor buttons (see pp. 2-5, 6-5, 7-8, 8-1) TAM Mode button (see p. 7-2)
Delete button (see p. 7-7)
(FAX-B840 only)
Record button (see p. 7-1) Play button (see p. 7-8)
Hook button (see p. 5-4)
Redial/Pause button (see pp. 5-8, 5-9)
Coded Dial/Directory button (see pp. 5-5, 5-6) Stop button
Start/Copy button
UCanTalk button (see p. 5-7)
2
FAX YOUR USE TO PREPARING
2-3
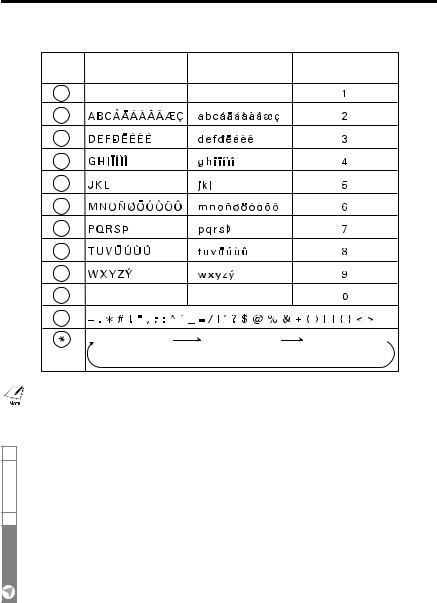
Guidelines for entering  numbers, letters, and symbols
When you come to a step that requires you to enter a name or number, see the table below to determine which numeric button to press for the letter you want.
Button |
Uppercase Letter |
Lowercase Letter |
Number Mode |
|
Mode (:A) |
Mode (:a) |
(:1) |
1 |
|
|
|
ABC |
|
|
|
2 |
|
|
|
DEF |
|
|
|
3 |
|
|
|
GHI |
|
|
|
4 |
|
|
|
JKL |
|
|
|
5 |
|
|
|
MNO |
|
|
|
6 |
|
|
|
PQRS |
|
|
|
7 |
|
|
|
TUV |
|
|
|
8 |
|
|
|
WXYZ |
|
|
|
9 |
|
|
|
0 |
|
|
|
# |
|
|
|
|
Uppercase letter |
Lowercase letter |
Number mode |
|
mode (:A) |
mode (:a) |
(:1) |
After 60 seconds of no operation panel input, the fax returns to standby mode and any unregistered changes are lost
■ Entering letters and numbers
1 Press [ ] to switch between the letter and number mode.
|
|
|
|
|
|
_ |
:A |
|
|
|
|
|
|
|
|
2Press the numeric button that contains the letter or number you want.
•Press repeatedly until the letter you want appears.
•If you are unsure which button to press, see the table above.
C |
:A |
|
|
2-4
3Continue entering other letters or numbers using the numeric buttons.
•If the next letter you want to enter is under a different numeric button, simply press that button until the letter you want appears.
-or-
If the next letter you want to enter is under the same numeric button you pressed in step 2, press [  ] to move the cursor to the right. Then press that same numeric button repeatedly until the letter you want appears.
•To enter a space, press [Space].
■Entering symbols
1 Press [#] repeatedly until the symbol you want appears.
|
|
|
|
|
|
# |
:1 |
|
|
|
|
|
|
|
|
2 If you want to enter another symbol, press [  ] to move the cursor to the right, then press
  [#] repeatedly until the symbol you want appears.
Correcting mistakes ___________________________
You can clear an entire entry by pressing [Clear]. Alternatively, follow the procedure below to correct individual letters:
1 Use [  ] or [
  ] to move the cursor under the incorrect letter.
CANEN :A
2 Use the numeric buttons to enter the correct letter over the incorrect letter.
CANON :A
3 When you have finished making corrections, press [Start/Copy] to register your new entry.
2
FAX YOUR USE TO PREPARING
2-5

 Setting the TEL LINE TYPE
Before using your fax, make sure it is set for the telephone line type of your telephone system. If you are unsure of your telephone line type, check with your local telephone company.
See pp. 2-2, 2-3 for the buttons on the operation panel.
1Press [Function].
Press [Start/Copy] twice.
DATE & TIME
2Use [  ] or [
  ] to select TEL LINE TYPE. Press [Start/Copy].
ROTARY PULSE
3Use [  ] or [
  ] to select the appropriate line type.
You can also select TOUCH TONE.
Press [Start/Copy].
4Press [Stop].
Setting ends and the fax returns to standby mode.
Dialing through a switchboard  (PBX)
(PBX)
A PBX (private branch exchange) is an on-site telephone switchboard.
•If your fax is connected through a switchboard, dial an outside line access number first. Then dial the rest of the number.
•If you want to dial with automatic dialing, you may have to insert a pause between the outside line number and the telephone number when you register the number for one-touch or coded speed dialing.
•When the fax is connected to a PBX or other telephone switching system, you can register the access type and outside access line number under the [R] button (see p.2-7). Once you have registered them, you simply need to press [R] before dialing a fax or telephone number.
2-6

Registering the access type and the outside line access number ____________________________
See pp. 2-2, 2-3 for the buttons on the operation panel.
1Press [Function].
2Press [Start/Copy] twice.
DATE & TIME
3Use [  ] or [
  ] to select R-KEY SETTING. Press [Start/Copy].
PSTN
4Use [  ] or [
  ] to select PBX. Press [Start/Copy].
HOOKING
5Use [  ] or [
  ] to select the access line type for the switching system.
You can select PREFIX or HOOKING.
Press [Start/Copy].
If you selected HOOKING, proceed to step 7.
6If you chose PREFIX in step 5:
Enter the outside line access number (up to 19 digits) using the numeric buttons and then press [Redial/Pause].
TEL= 123456P
Press [Start/Copy].
7Press [Stop].
Registration ends and the fax returns to standby mode.
2
FAX YOUR USE TO PREPARING
2-7
 Registering sender information
Personalizing your fax _________________________
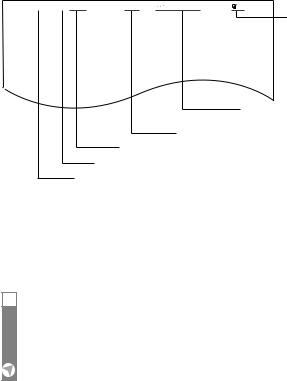
■ Identifying your documents
When sending a document, you can have your fax number and your name (known as your ID), and the sending date and time printed out by the receiving fax machine. This information is called your TTI (Transmit Terminal Identification) and appears at the top of the faxed document in small type.
By identifying the documents you send, the receiving party will be able to recognize your fax messages at a glance. The illustration below shows a sample document with the identifying information.
27/12/2003 10:12 FAX 123 4567 |
CANON |
CANON CANADA |
001 |
|||
|
|
|
|
|
|
|
The page number
THE SLEREXE COMPANY LIMITED
SAPORS LANE•BOOLE•DORSET•BH25 8ER
TELEPHONE BOOLE (945 13) 51617 – FAX 123456
Our Ref. 350/PJC/EAC
The name of the party who is receiving the document
Your name or company name
Your fax/telephone number
TELEPHONE # MARK (You can select TEL or FAX, see p. 8-2.)
The date and time you sent the document
The top line includes the name of the receiving party if you send the document using one-touch speed dialing or coded speed dialing and you registered the party’s name.
Setting the date and time______________________
The date and time appear on the LCD as well as on the documents you send.
1Press [Function].
Press [Start/Copy] three times.
20/12 |
2003 |
13:30 |
|
|
|
2-8

2Use the numeric buttons to enter the date and time using the day-month-year format (DD/MM/20YY).
•Set the time using the 24-hour clock system. Precede single digits with a zero. Example: 3:00 p.m. = 15:00
•To change the date format, see SYSTEM SETTINGS, p. 8-5.
Press [Start/Copy].
3Press [Stop].
Registration ends and the fax returns to standby mode.
Registering your fax/telephone number and name____________________________________________
This information appears at the top of each document you send.
1Press [Function].
Press [Start/Copy] twice.
DATE & TIME
2Use [  ] or [
  ] to select UNIT TELEPHONE #. Press [Start/Copy].
3Enter your fax number (up to 20 digits) using the numeric buttons.
You can enter a plus sign (+) or space to make your number easier to read. To enter a plus sign (+), press [#].
TEL= |
123 xxxx |
Press [Start/Copy] twice.
4 Enter your name (up to 16 letters) using the numeric buttons (see pp. 2-4, 2-5).
CANON : A
Press [Start/Copy].
5Press [Stop].
Registration ends and the fax returns to standby mode.
2
FAX YOUR USE TO PREPARING
2-9

Setting the summer time ______________________
Your fax supports the summer time system that shifts the clock time ahead or back according to the change in seasons. You can select if the time information in your fax changes to match your country’s summer time system, and also set the day and time when the summer time begins and ends.
1Press [Function].
Press [Start/Copy].
2Use [  ] or [
  ] to select SYSTEM SETTINGS. Press [Start/Copy].
3Use [  ] or [
  ] to select SUMMER TIME. Press [Start/Copy].
ON
4Use [  ] or [
  ] to select ON or OFF. Press [Start/Copy].
5• If you selected OFF in step 4, press [Stop] to return to standby mode.
• If you selected ON in step 4, use [  ] or [
  ] to select BEGIN DATE/TIME.
Press [Start/Copy] twice.
OCTOBER
6Use [  ] or [
  ] to select the month in which the summer time starts. Press [Start/Copy].
MONTH
7Use [  ] or [
  ] to select WEEK. Press [Start/Copy].
LAST WEEK
2-10

8Use [  ] or [
  ] to select the week in which the summer time starts.
Press [Start/Copy].
WEEK
9Use [  ] or [
  ] to select DAY.
Press [Start/Copy].
SUNDAY
10Use [  ] or [
  ] to select the day of the week on which the summer time starts.
Press [Start/Copy].
DAY
11Use [  ] or [
  ] to select TIME. Press [Start/Copy].
TIME 02:00
12Use the numeric buttons to enter the time at which the summer time will take effect. Press [Start/Copy].
TIME
13Press [Function].
14Use [  ] or [
  ] to select END DATE/TIME.
Press [Start/Copy] twice.
MARCH
15Set the month, week, the day of the week, and time when the summer time ends, as in steps 6 to 12.
16Press [Stop].
Setting ends and the fax returns to standby mode.
2
FAX YOUR USE TO PREPARING
2-11

Registering one-touch speed  dialing numbers and names
The quickest way to dial a fax number is to use one-touch speed dialing. This allows you to dial a number by pressing a single button. Before you can use one-touch speed dialing, you must register the receiving number with your fax.
You can also register the name of the party and a voice tag; the name appears on the printout of the one-touch speed dialing list.
1Press [Function].
2Use [  ] or [
  ] to select TEL REGISTRATION. Press [Start/Copy].
1-TOUCH SPD DIAL
3Press [Start/Copy].
01=
4Use [  ] or [
  ] to select the number of the one-touch speed dialing button (01-09) under which you want to register the number.
If a number is already registered under this one-touch speed dialing button, the number is displayed on the LCD.
5Enter the party’s number (up to 50 digits) using the numeric buttons.
03= |
2 50xxx_ |
Press [Start/Copy] to register the number.
6 Enter the party's name (up to 16 letters) using the numeric buttons (see pp. 2-4, 2-5).
CANON :A
Press [Start/Copy] to register the name.
To delete the name and number registered under the one-touch speed dialing button, press [Clear] and [Start/Copy] after you perform steps 1 to 4 above.
2-12
Loading...