


565 x 60 Refractor Telescope
Model 78-9565
STANDARD EQUIPMENT
∙Refractor Telescope Assembly
∙Equatorial Mount
∙Variable Height-Aluminum Tripod
∙Exclusive Penta Mirror Assembly
∙8mm, 12.5mm, 20mm focal length - Eyepieces.
∙Red Dot Finderscope
∙Accessory Tray
∙1.5x Erecting Lens
∙3x Barlow
∙Hardware Packet—(3) Tripod Bolts with Wing Nuts, (3) Short Accessory Tray Bolts with Wing Nuts, (3) Tripod Leg Lock Screws
 R
R
7
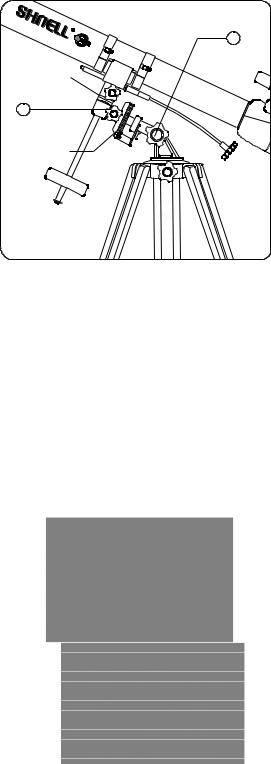
Declination Axis
4
Right Ascension
Scale
Fig. 1
TELESCOPE ASSEMBLY
1.Remove all components from the carton and identify all components. It is a good idea to lay all the parts out in front of you before assembly. READ THROUGH ASSEMBLY INSTRUCTION BEFORE YOU ASSEMBLE YOUR TELESCOPE. The only tool required in setting up your telescope is a slotted or Phillips blade screwdriver. Since your telescope is a precision optical system the parts require careful handling--particularly the telescope, eyepieces, and various accessory lenses.
2.Set-Up Tripod
∙Select one tripod leg. Loosen Tripod Leg Lock Screw (8) and extend the Tripod Leg Middle Section (12). For a moment, do not extend the leg fully...a shorter leg is less awkward to work with during set-up. Tighten the Tripod Leg lock Screw so that the Middle Section is securely in place. Repeat for the remaining two legs.
3.Attach Telescope and Finderscope
∙Locate the pre-assembled Telescope Main Tube (2) and Equatorial Mount. Note: Before assembling tripod legs to Equatorial Mount, make sure the Accessory Tray
Braces (10) face inward. Carefully remove Telescope Main Tube from Cradles. Position the mount between Tripod Leg as shown (fig. 2). Secure Equatorial Mount to Tripod Leg using tripod bolts. Repeat on the remaining two Tripod Legs. Once you have attached all Tripod Legs to the mount, securely tighten all wing nuts and place Telescope Main Tube back into
Cradles.
∙Remove plastic insert on bottom side of finderscope to allow battery to make connection with battery contact for power. Turn power switch on. See finderscope page.
∙Look through main telescope tube at low power and establish a well-defined stationary target. Looking through red dot finderscope, alternate tightening each adjustment wheel (at rear and left side of finderscope) until the red dot of
finderscope is precisely aligned and centered on the same |
Fig. 2 |
|
object being viewed in main telescope tube. See finderscope |
||
|
||
page. |
|
4.Attach Accessory Tray
Locate the Accessory Tray (11). Using the accessory tray bolts, wingnuts and washers connect the Accessory Tray to the Accessory Tray Braces (10). Start with one tripod leg and attach wingnuts. Wingnuts should be positioned beneath the accessory tray. Do not tighten wingnuts until all Accessory Tray Braces are attached, as some adjustments may be required.
5.Attach Control Cables, Counterweight and Eyepieces
Locate the Fine Adjustment Cables (14). Loosen the silver screws located at the end of the Fine Adjustment Cables and attach the Fine Adjustment Cables to the two silver posts found on the Equatorial Mount. The first post is located just above the Declination Lock Knob (3), the second post is located below the Right Ascension
Lock Knob (4).
6.Locate the Counterweight (6) and Counterweight Shaft (5). Loosen the thumbscrew located on the
Counterweight and slide the Counterweight onto the Counterweight Shaft, then and tighten thumbscrew to secure the Counterweight. Thread the Counterweight Shaft into the hole located directly below the Declination Lock Knob (3). Make sure that the shaft is securely locked into mount.
7.Insert Eyepiece (17) into focusing tube to begin viewing.
Your Bushnell Voyager Telescope is now ready to be used. To obtain the fullest enjoyment from your telescope, please refer to the additional information below.
HOW TO USE YOUR NEW TELESCOPE
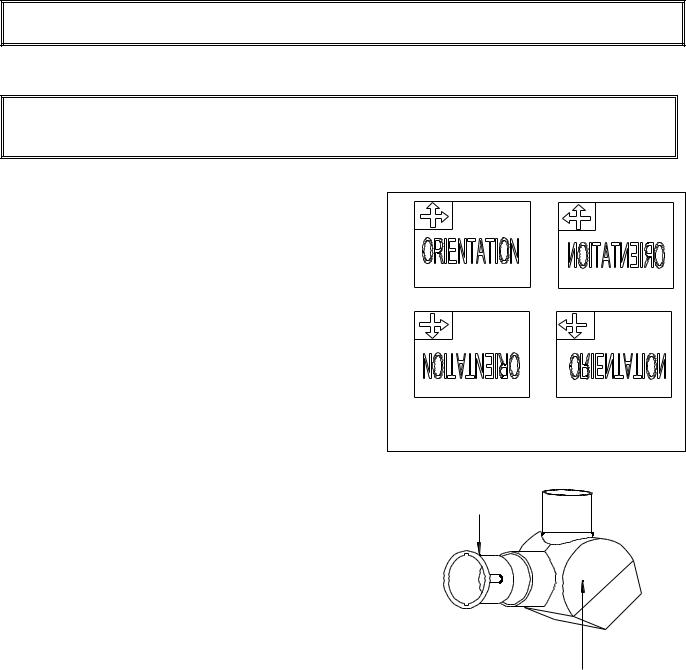
Astronomical telescopes are designed in such a way that the image you will see appear
UPSIDE DOWN and REVERSED, this is acceptable for viewing celestial bodies.
Using the Penta Mirror Assembly:
1.A Basic Description: Bushnell is proud to present the Exclusive Penta Mirror Technology. This Penta Mirror Assembly provides the benefit of a convenient 90 degree viewing angle commonly associated with diagonal mirrors. However, the Penta Mirror provides something that diagonal mirrors cannot provide--right to left correct views of the any object viewed through the telescope. Unlike traditional diagonal mirrors that provide backward images of objects seen on land and in the night sky, the Penta Mirror allows correct images to be viewed. The groundbreaking benefit of this technology is that when viewing and locating objects through the telescope, when you want to move to the left, you move it to the left intuitively instead of fumbling around the sky becoming increasingly frustrated that you can’t move the telescope the way your intuition tells you that you need to move it. Objects on land at great distances can be seen naturally (and readable) as if you were many times closer to the object. Objects in the sky appear as they appear in most star charts. For the first time ever, you will be able to see what you would expect resulting in excellent viewing satisfaction. In addition, the penta mirror has a special insert that is easily removed by backing out the eyepiece set screw and removing the insert to yield a 1.25” optical format receiver.
2.How-To-Use: Just like any traditional diagonal mirror, place the eyepieces directly into the rear of the Penta Mirror Assembly then place the Penta Mirror directly into the back of the telescope focusing tube, erecting lens or Barlow lens (See Intended Configuration Diagram).
Fully Correct Image |
Reversed Image |
Upside-Down Image |
Upside-Down & Reversed Ima |
Insert |
|
Penta Mirror
 Loading...