


 JDF-2S, JDF-4S
JDF-4D, JDF-4SB
SERVICE & REPAIR MANUAL
BUNN-O-MATIC CORPORATION
POST OFFICE BOX 3227
SPRINGFIELD, ILLINOIS 62708-3227
PHONE: (217) 529-6601 FAX: (217) 529-6644
To ensure you have the latest revision of the Operating Manual, or to view the Illustrated Parts Catalog, Programming Manual, or Service Manual, please visit the Bunn-O-Matic website, at www.bunn.com. This is absolutely FREE, and the quickest way to obtain the latest catalog and
manual updates. For Technical Service, contact Bunn-O-Matic Corporation at 1-800-286-6070.
49179.0000C 02/14 ©2013 Bunn-O-Matic Corporation
BUNN-O-MATIC COMMERCIAL PRODUCT WARRANTY
Bunn-O-Matic Corp. (“BUNN”) warrants equipment manufactured by it as follows:
1)Airpots, thermal carafes, decanters, GPR servers, iced tea/coffee dispensers, MCP/MCA pod brewers thermal servers and Thermofresh servers (mechanical and digital)- 1 year parts and 1 year labor.
2)All other equipment - 2 years parts and 1 year labor plus added warranties as specified below:
a)Electronic circuit and/or control boards - parts and labor for 3 years.
b)Compressors on refrigeration equipment - 5 years parts and 1 year labor.
c)Grinding burrs on coffee grinding equipment to grind coffee to meet original factory screen sieve analysis - parts and labor for 4 years or 40,000 pounds of coffee, whichever comes first.
These warranty periods run from the date of installation BUNN warrants that the equipment manufactured by it will be commercially free of defects in material and workmanship existing at the time of manufacture and appearing within the applicable warranty period. This warranty does not apply to any equipment, component or part that was not manufactured by BUNN or that, in BUNN’s judgment, has been affected by misuse, neglect, alteration, improper installation or operation, improper maintenance or repair, non periodic cleaning and descaling, equipment failures related to poor water quality, damage or casualty. In addition, the warranty does not apply to replacement of items subject to normal use including but not limited to user replaceable parts such as seals and gaskets. This warranty is conditioned on the Buyer 1) giving BUNN prompt notice of any claim to be made under this warranty by telephone at (217) 529-6601 or by writing to Post Office Box 3227, Springfield, Illinois 62708-3227; 2) if requested by BUNN, shipping the defective equipment prepaid to an authorized BUNN service location; and 3) receiving prior authorization from BUNN that the defective equipment is under warranty.
THE FOREGOING WARRANTY IS EXCLUSIVE AND IS IN LIEU OF ANY OTHER WARRANTY, WRITTEN OR ORAL, EXPRESS OR IMPLIED, INCLUDING, BUT NOT LIMITED TO, ANY IMPLIED WARRANTY OF EITHER MERCHANTABILITY OR FITNESS FOR A PARTICULAR PURPOSE. The agents, dealers or employees of BUNN are not authorized to make modifications to this warranty or to make additional warranties that are binding on BUNN. Accordingly, statements by such individuals, whether oral or written, do not constitute warranties and should not be relied upon.
If BUNN determines in its sole discretion that the equipment does not conform to the warranty, BUNN, at its exclusive option while the equipment is under warranty, shall either 1) provide at no charge replacement parts and/or labor (during the applicable parts and labor warranty periods specified above) to repair the defective components, provided that this repair is done by a BUNN Authorized Service Representative; or 2) shall replace the equipment or refund the purchase price for the equipment.
THE BUYER’S REMEDY AGAINST BUNN FOR THE BREACH OF ANY OBLIGATION ARISING OUT OF THE SALE OF THIS EQUIPMENT, WHETHER DERIVED FROM WARRANTY OR OTHERWISE, SHALL BE LIMITED, AT BUNN’S SOLE OPTION AS SPECIFIED HEREIN, TO REPAIR, REPLACEMENT OR REFUND.
In no event shall BUNN be liable for any other damage or loss, including, but not limited to, lost profits, lost sales, loss of use of equipment, claims of Buyer’s customers, cost of capital, cost of down time, cost of substitute equipment, facilities or services, or any other special, incidental or consequential damages.
392, A Partner You Can Count On, Air Infusion, AutoPOD, AXIOM, BrewLOGIC, BrewMETER, Brew Better Not Bitter, BrewWISE, BrewWIZARD, BUNN Espress, BUNN Family Gourmet, BUNN Gourmet, BUNN Pour-O-Matic, BUNN, BUNN with the stylized red line, BUNNlink, Bunn-OMatic, Bunn-O-Matic, BUNNserve, BUNNSERVE with the stylized wrench design, Cool Froth, DBC, Dr. Brew stylized Dr. design, Dual, Easy Pour, EasyClear, EasyGard, FlavorGard, Gourmet Ice, Gourmet Juice, High Intensity, iMIX, Infusion Series, Intellisteam, My Café, Phase Brew, PowerLogic, Quality Beverage Equipment Worldwide, Respect Earth, Respect Earth with the stylized leaf and coffee cherry design, Safety-Fresh, savemycoffee.com, Scale-Pro, Silver Series, Single, Smart Funnel, Smart Hopper, SmartWAVE, Soft Heat, SplashGard, The Mark of Quality in Beverage Equipment Worldwide, ThermoFresh, Titan, trifecta, Velocity Brew, Air Brew, Beverage Bar Creator, Beverage Profit Calculator, Brew better, not bitter., BUNNSource, Coffee At Its Best, Cyclonic Heating System, Daypart, Digital Brewer Control, Element, Milk Texturing Fusion, Nothing Brews Like a BUNN, Pouring Profits, Signature Series, Sure Tamp, Tea At Its Best, The Horizontal Red Line, Ultra are either trademarks or registered trademarks of Bunn-O-Matic Corporation. The commercial trifecta® brewer housing configuration is a trademark of Bunn-O-Matic Corporation.
2 |
49179 |
070913 |
|
INTRODUCTION
Safety first!
To avoid electrical shock, unplug dispenser from power source before servicing inside.
Basic Maintenance
In order to maintain proper machine operation, a Preventative Maintenance schedule must be performed on a regular basis.
The following procedures pretain to all versions in the JDF family of machines unless otherwise noted.
CONTENTS |
|
Warranty.................................................................................................................................... |
2 |
User Notices.............................................................................................................................. |
3 |
Site Preparation ........................................................................................................................ |
3 |
Preventive Maintenance |
|
Recommended Daily Cleaning ............................................................................................ |
4 |
Preventive Maintenance Schedule....................................................................................... |
5 |
Troubleshooting......................................................................................................................... |
6 |
Service..................................................................................................................................... |
12 |
Electrical Schematics............................................................................................................... |
50 |
USER NOTICES
All notices on this equipment are written for your protection. All notices are to be kept in good condition. Replace any unreadable or damaged labels.
SITE PREPARATION
A minimal clearance is required between the dispenser sides and the wall or another appliances.For optimum performance, do not allow warm air from surrounding machines blow on the JDF dispenser. Leave some space so the dispenser can be moved for cleaning.
3 |
49179 |
110613 |
|
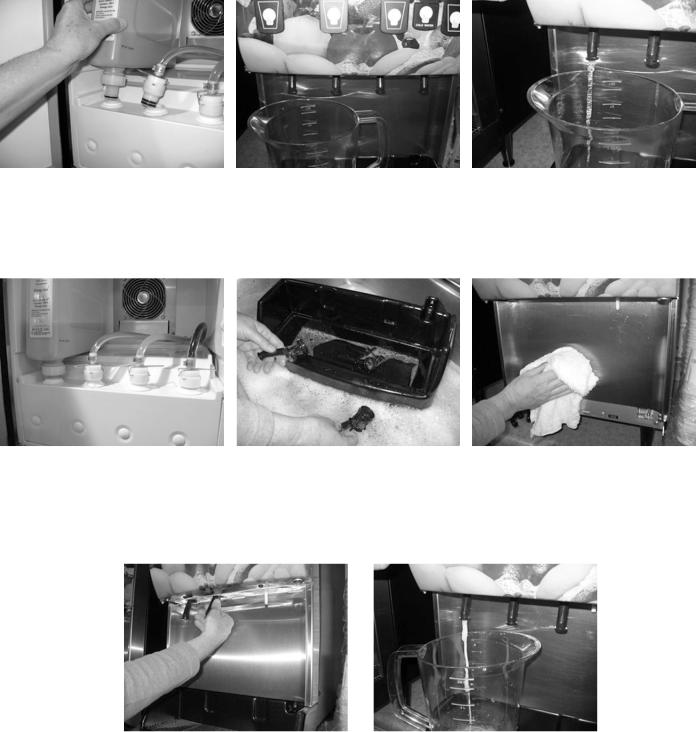
Recommended Daily Cleaning Instructions
The use of a damp cloth rinsed in any mild, non-abrasive, liquid detergent is recommended for cleaning all surfaces on Bunn-O-Matic equipment. Do NOT clean this equipment with a water jet device.
1.Open dispenser door. Lift up on product containers to disconnect them from the machine inlet.
2. Close door, place an empty con- 3. tainer under the dispense nozzles.
Dispense from each station until clear water flows from the dispense nozzle.
4.Open dispenser door and reconnect all product containers.
5.Remove dispense nozzles and drip tray. Wash all parts in warm soapy water.
6.With a warm/soapy cloth, wipe down interior of cabinet and splash panel area behind dispensing nozzles.
7.Replace drip tray and dispense nozzles.
8.Dispense from each station until finished product flows from the dispense nozzles.
4 |
49179 |
110613 |
|
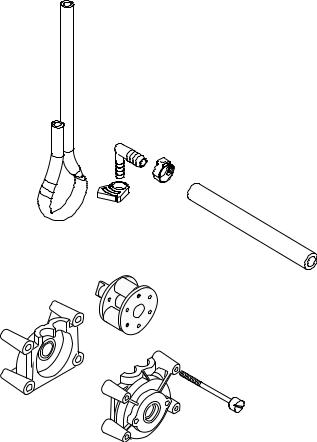
REQUIRED REGULAR MAINTENANCE:
When performing Daily-Weekly Cleaning procedures, inspect o-rings, seals, and bushings for signs of wear or damage and replace immediately.
Check and/or replace every 6 months or as required:
39690.0000 |
Pump Tube Replacement Kit (Includes items indented below) |
28755.1011 |
Tube, Norprene .25" ID x 17.0" lg |
32732.0000 |
Clamp .39"/.48" |
32656.0000 |
Fitting, Elbow .25" Barb x .38" Barb |
21275.0003 |
Clamp .57"/.70" |
34325.0032 |
Hose, Flex .38" ID x 5.25" lg |
5 |
49179 |
110613 |
|
TROUBLESHOOTING
A troubleshooting guide is provided to suggest probable causes and remedies for the most likely problems encountered. If the problem remains after exhausting the troubleshooting steps, contact the Bunn-O-Matic Technical Service Department.
•Inspection, testing, and repair of electrical equipment should be performed only by qualified service personnel.
•All electronic components have high voltage ac and low voltage dc potential on their terminals. Shorting of terminals or the application of external voltages may result in board failure.
•Intermittent operation of electronic circuit boards is unlikely. Board failure will normally be permanent. If an intermittent condition is encountered, the cause will likely be a switch contact or a loose connection at a terminal or crimp.
•Solenoid removal requires interrupting the water supply to the valve. Damage may result if solenoids are energized for more than ten minutes without a supply of water.
•The use of two wrenches is recommended whenever plumbing fittings are tightened or loosened. This will help to avoid twists and kinks in the tubing.
•Make certain that all plumbing connections are sealed and electrical connections tight and isolated.
•This unit is heated at all times. Keep away from combustibles.
WARNING – • Exercise extreme caution when servicing electrical equipment.
•Unplug the dispenser when servicing, except when electrical tests are specified.
•Follow recommended service procedures
•Replace all protective shields or safety notices
PROBLEM |
PROBABLE CAUSE |
REMEDY |
|
Cold Water Circulation |
1. |
Cabinet cooling fan. |
Replace fan (24vdc). |
Dispense stations not working. |
|
|
Note: Fan receives power when the |
Note: Cooling failure or excessive |
|
|
dispenser is powered. |
cabinet temperatures for more than 4 |
2. |
Bath recirculation pump. |
A) If not running, check refrigeration |
hours will result in dispense lockout |
|||
or no dispense. |
|
|
switch and wiring for proper conti- |
Note: Reset fault/timer by unplug- |
|
|
nuity. |
ging unit. |
|
|
B) Check for 120V or 230V AC at |
|
|
|
|
|
|
|
pump. Replace pump. |
|
3. |
Restricted water flow to cabinet |
Check for kinked hose. |
|
water coil and bath. |
|
|
6 |
49179 |
110613 |
|
TROUBLESHOOTING (Continued)
PROBLEM |
PROBABLE CAUSE |
REMEDY |
Refrigeration |
1. Compressor ON/OFF switch. |
Check for "ON" position or no continu- |
Dispense stations not working. |
|
ity - replace switch. |
Note: Cooling failure or excessive |
2. Dirty condenser filter or fins. |
Clean filter and fins or replace con- |
bath and cabinet temperatures for |
||
more than 4 hours will result in dis- |
|
denser filter. (Filter not supplied on |
pense lockout or no dispense. |
|
some machines). |
|
3. Condenser fan not running. |
A) Check for 120V or 230V AC. Re- |
|
|
place fan motor or check fan blades |
|
|
for obstructions. |
|
|
B) Check compressor LED on circuit |
|
|
board. If ON, relay coil should have |
|
|
power (120 or 230 VAC). |
|
4. Compressor relay not activating. |
Check compressor relay coil for 120 |
|
|
or 230vac. |
|
|
NOTE: Always check power with |
|
|
coil attached. If compressor LED is |
|
|
ON and no 120 or 230vac - replace |
|
|
board. If yes, 120 or 230vac - replace |
|
|
relay. |
|
|
Note: Relay contacts are normally |
|
|
open. |
|
5. Compressor not running. |
Check compressor thermal overload |
|
|
(N/C). If open check for dirty con- |
|
|
denser filter or adequate ventilation |
|
|
and space around machine. |
|
6. Compressor running and not |
Check refrigeration system for leaks |
|
cooling. |
and proper charge. |
Dispenser Locked Out |
1. Check Dispense Lockout switch. |
(A) Set switch to ON position. |
Dispense stations not working. |
||
|
|
(B) Check switch and harness for |
|
|
proper continuity. |
Cooling system failure. |
1. Refrigeration or cold water recir- |
|
culation system. |
Check all previous items that pretain to refrigeration or cold water recirculation
7 |
49179 |
110613 |
|
TROUBLESHOOTING (Continued)
PROBLEM |
PROBABLE CAUSE |
REMEDY |
Dispense station not working |
1. Dispense Lockout switch set to |
Place switch in ON position. |
|
OFF position. |
|
|
2. Dispense switch failed |
Check switch and harness for proper |
|
|
continuity. |
All stations dispense concentrate |
Main water supply |
Check for ON position. |
only |
|
|
|
Frozen bath |
A) Compressor relay/contacts short- |
|
|
ed - replace relay. |
|
|
B) Recirculating pump - replace or |
|
|
check for kinked flex line. |
|
Inlet water valve failed |
A) Check for 120V or 230V power |
|
|
when dispensing. If yes, replace |
|
|
valve. If no, check harness for proper |
|
|
continuity. Then replace circuit board |
|
|
if needed. |
8 |
49179 |
110613 |
|
TROUBLESHOOTING (Continued)
PROBLEM |
PROBABLE CAUSE |
REMEDY |
Dispense station |
Water solenoid |
Replace solenoid (24vdc) or check |
concentrate only |
|
wire connection between water valve |
|
|
and main control board. |
Dispense station |
Concentrate out |
Replace refill concentrate container |
water only |
|
or BIB |
|
Product pump not pumping |
Check for proper counterclockwise |
|
|
rotation of pump rollers. If coun- |
|
|
terclockwise, replace pump tubing. |
|
|
If clockwise, wire connection to |
|
|
pump is reversed. Switch wires on |
|
|
terminals. |
|
Pump not turning |
A) Check speed setting on circuit |
|
|
board and increase speed (turn |
|
|
clockwise) |
|
|
B) Check for d.c. power to pump |
|
|
motor. If yes, replace motor assy. If |
|
|
no, check harness for proper conti- |
|
|
nuity. Then replace circuit board if |
|
|
needed. |
9 |
49179 |
110613 |
|
TROUBLESHOOTING (Continued)
PROBLEM |
PROBABLE CAUSE |
REMEDY |
Water leak filling drip tray or around |
1. Initial fill/setup |
Some expansion normal. May fill |
dispense deck area |
|
drip tray during initial ice block |
|
|
formation |
|
2. Dispense deck |
Inspect or replace fittings clamps, |
|
|
o-rings, solenoids and quick discon- |
|
|
nect fittings. |
|
|
NOTE: Dispense deck area slopes |
|
|
to drain tube that leads to the drip |
|
|
tray. |
|
3. Water pressure greater than |
|
100psi |
Water leaking beneath machine |
1. Bath tank overflow. |
|
2. Condensation from cabinet cool- |
|
ing coil. |
Erratic spray during dispense |
Dispense nozzle mixer missing or |
|
broken |
Dispense nozzle dripping water |
Dispense solenoid. |
Install water pressure regulator and reduce to 50 psi.
A)Check all internal water connections.
B)Check internal plumbing connections.
Check for routing of condensation tube to water bath.
Replace mixer.
Replace dispense deck solenoid.
10 |
49179 |
110613 |
|
TROUBLESHOOTING (Continued)
PROBLEM |
PROBABLE CAUSE |
REMEDY |
Unit is not working |
1. Step-down transformer. |
Check for 120/24 or 230/24 vac. If no 24vac reading, replace step-down transformer.
|
2. Main control board. |
If 24 vac present and no LED’s lit, |
|
|
replace control board.. |
Difficulty brixing and/or weak bever- |
1. Product viscosity or too cold. |
Thorough thaw of product before use |
age |
|
(35° - 40°) |
|
2. Low water pressure. |
Maintain 20 psi or higher and a mini- |
|
|
mum flow rate of 1 fl oz/sec. |
|
3. High water pressure. |
Over 100 psi, install a pressure regu- |
|
|
lator and set to 50 psi. |
|
4. Dispense valve adjustment set- |
A) Perform 3 second water dispense |
|
ting. |
test. Factory setting is 1.0 oz/sec. |
|
|
Acceptable water flow rate is .-0.8 |
|
|
to 1.5 oz/sec depending on the mix |
|
|
ratio (4+1). |
|
|
B) Adjust water to proper mix ratio. |
|
|
Once water is set, adjust motor speed |
|
|
to achieve brix %. |
|
5. Brix ratio. |
Check for proper brix ratio per prod- |
|
|
uct using Total Dispense method and |
|
|
or refractometer method. |
Difficulty brixing and/or weak bever- |
1. Pump tubing. |
Inspect, clean, or replace tubing |
age |
|
and pump rotor/rollers for ease of |
|
|
rotation. |
|
2. Use of portable water pump. |
A) Follow plumbing requirements for |
|
|
pressure and flow rate. |
|
|
B) Source another portable pump |
|
|
or water supply that meets require- |
|
|
ments. |
Difficulty brixing bag-in-box |
Vacuum leak |
Inspect all lines and connections |
|
|
from bag-in-box connector to bottle |
|
|
adapter assembly. |
11 |
49179 |
110613 |
|
SERVICE
This section provides procedures for testing and replacing various major components used in this dispenser should service become necessary. Refer to Troubleshooting for assistance in determining the cause of any problem.
WARNING - Inspection, testing, and repair of electrical equipment should be performed only by qualified service personnel. The dispenser should be disconnected from the power source when servicing, except when electrical tests are required and the test procedure specifically states to connect the dispenser to the power source.
COMPONENT ACCESS
WARNING - Disconnect the dispenser from the power source before the removal of any panel or the replacement of any component.
All components are accessible by opening the door, removal of the door panels, dispenser top covers, hopper(s), hopper support plate, splash guard, splash panel w/drip tray, lower front access panel and rear access cover.
Refer to the contents listing for component location.
|
INDEX |
Access Panels................................................................................................................................... |
13 |
Dispense Platform Removal............................................................................................................. |
14 |
Ballast............................................................................................................................................... |
15 |
Cabinet Fan....................................................................................................................................... |
16 |
Compressor...................................................................................................................................... |
17 |
Compressor Switch.......................................................................................................................... |
23 |
Condenser Fan.................................................................................................................................. |
24 |
Control Board (Main)........................................................................................................................ |
25 |
Control Board (Portion Control Models)........................................................................................... |
26 |
Circulation Pump.............................................................................................................................. |
29 |
Dispense Platform Switch................................................................................................................ |
30 |
Dispense Pump................................................................................................................................ |
31 |
Dispense Motor................................................................................................................................ |
32 |
Dispense Valve................................................................................................................................. |
33 |
Dispense Switches........................................................................................................................... |
34 |
Cold Water Dispense Switch............................................................................................................. |
35 |
Dispense Membrane Switches.......................................................................................................... |
36 |
Cold Water Membrane Switch.......................................................................................................... |
37 |
EMI Filter.......................................................................................................................................... |
38 |
Lamp................................................................................................................................................ |
39 |
Lamp Holder..................................................................................................................................... |
39 |
LED Lamp......................................................................................................................................... |
40 |
Rectifier............................................................................................................................................ |
41 |
Relay................................................................................................................................................ |
42 |
Resistor............................................................................................................................................ |
43 |
Solenoid (Cold Water)...................................................................................................................... |
44 |
Solenoid (Inlet)................................................................................................................................. |
45 |
Temperature Probe........................................................................................................................... |
46 |
Temperature Sensor......................................................................................................................... |
47 |
Transformer...................................................................................................................................... |
48 |
Transformer-Lited Doors.................................................................................................................. |
49 |
Circuit Board Triac Map.................................................................................................................... |
50 |
Schematic Wiring Diagrams............................................................................................................. |
51 |
12 |
49179 |
012214 |
|

SERVICE(CONT.)
ACCESS PANELS
Location:
All access panels are similar through the whole JDF family (JDF-4S shown). Before removing panels, make sure power is OFF to the machine and water is disconnected accept where indicated in testing procedures. Retain all screws and other attaching hardware for re-assembly.
|
JDF-4S shown |
|
FIG. 1 ACCESS PANELS |
|
|
13 |
49179 |
110613 |
|
|
|
SERVICE(CONT.)
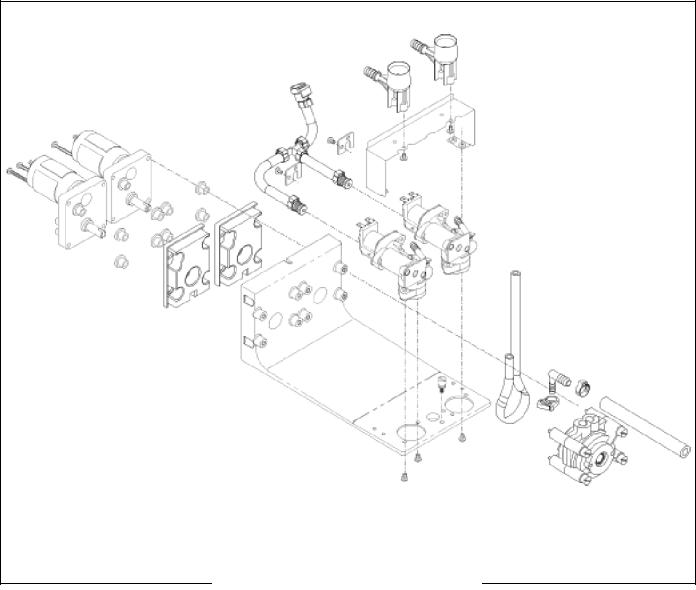
DISPENSE PLATFORM REMOVAL
1.Remove concentrate dispense tips by turning 1/4 turn to the left, then pull straight down.
2.Lift and remove product shelf to access dispense platform(s).
3.Remove front thumb screw holding dispense platform(s).
4.Disconnect 12 pin connector above dispense platform in rear.
5.Disconnect 3/8” water line at quick disconnect.
6.Remove dispense platform(s) by pulling forward.
JDF-2S shown
The JDF-4S uses 2 of the two head dispense platforms.
FIG. 2 DISPENSE PLATFORM REMOVAL
14 |
49179 |
110613 |
|
SERVICE (CONT.)
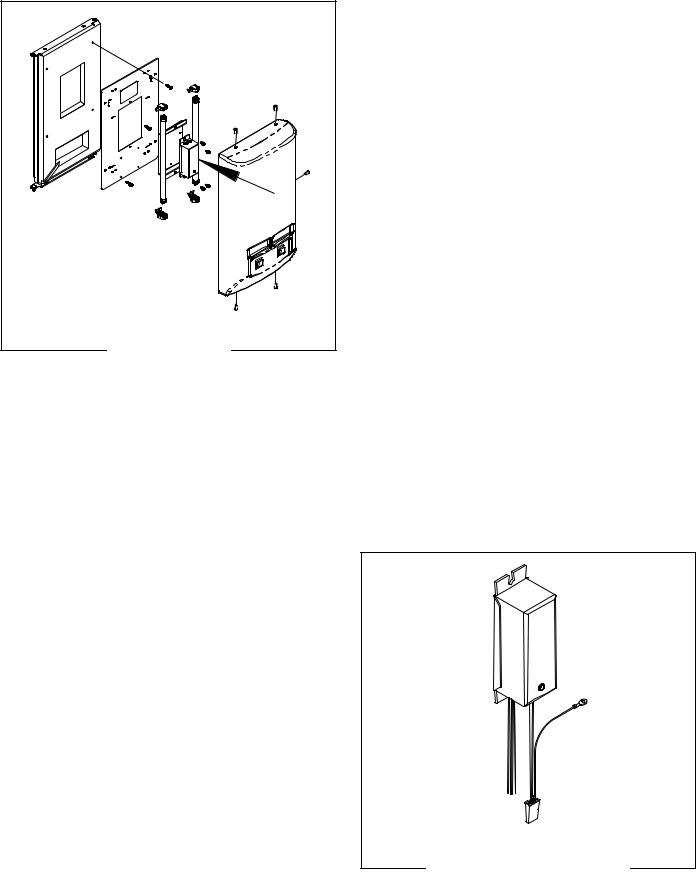
Ballast (JDF-2S,4S)
|
JDF-2S shown |
FIG. 3 BALLAST |
P1684.40 |
|
|
Location: |
|
The door lamp ballast is located inside the dispenser door mounted in the center of the door rear cover.
Test Procedure:
1.Disconnect the dispenser from the power source.
2.Disconnect a black and blue wire from one set of lamp sockets.
3.Connect an ohmmeter to the end of each wire.
4.Check for continuity between the two wires.
If continuity is present as described, the ballast is operating properly.
If continuity is not present as described, replace the ballast.
5.Check for continuity between the other pair of black and blue wires.
Removal and Replacement:
1.Disconnect the dispenser from the power source.
2.Remove door cover by taking out the 5 screws and unplug the dispense switch harness from the door harness. Set door cover and screws aside.
3.Disconnect the 3-pin connector from the ballasts to the door harness.
4.Remove fluorescent bulbs from the brackets. Pull off the four snap-in light sockets from the light panel.
5.Remove the wire to the ballast from the back of each bracket.
6.To disengage the ballast wire from the bracket, push a 1/16” allen wrench (or equivalent tool) into the front hole that lines up with the wire in the back. Pull the wire out.
7.Repeat for each bracket.
8.White jumper must remain in place on the back of the light socket.
9.Removescrewsfromeachballast.Removethegreen ground wire from the ballast bracket by removing the bracket’s bottom screw.
10.Install the single ballast (wires on the bottom) onto the ballast bracket using 2 of the screws previously removed.
11.Attach ballast wires to the back of bulb sockets by pushing wires into holes in back of socket.
Note: Attach black wires to the top sockets, and blue wires to the bottom sockets. Reference electrical schematic if needed.
12.Snap all 4 bulb sockets back onto light panel. Reinstall fluorescent bulbs.
13.Attach green ground wire to the bottom hole of the ballast bracket using 1 screw.
14.Plug in 3-pin connector into the door harness.
15.To replace door cover, re-connect the dispense switch harness to door harness. Fasten with 5 screws.
16.Reconnect power to the unit. Test operation.
P1219
FIG. 4 BALLAST TERMINALS
15 |
49179 |
110613 |
|
SERVICE (CONT.)
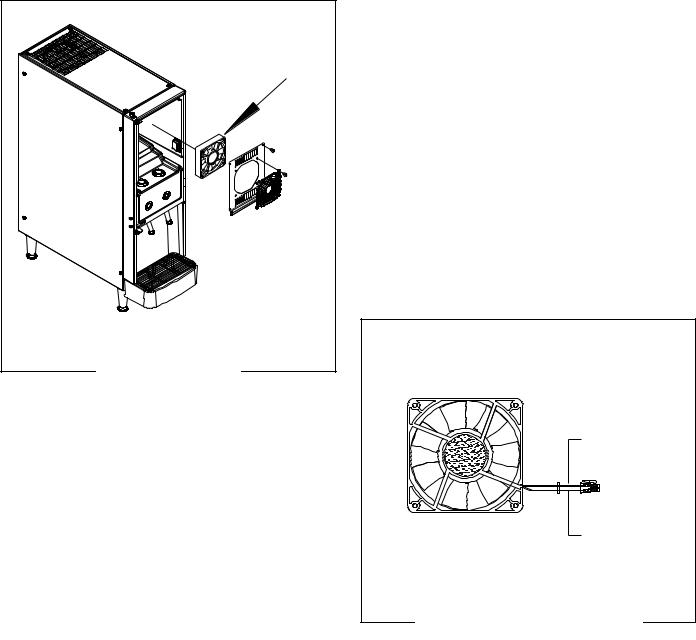
Cabinet Fan (all Models)
|
JDF-2S shown |
FIG. 5 CABINET FAN |
P1684.40 |
|
|
Location: |
|
The cabinet fan is located inside the dispenser cabinet mounted in the center behind the fan guard cover.
Test Procedure:
1.Disconnect the dispenser from the power source.
2.Remove the four screws attaching the fan and cover assembly.
3.Gently pull the cover forward and disconnect the 2-pin connector from the main wiring harness.
4.Check for continuity between the two wires on the
fan.
If continuity is present as described, the fan is operating properly.
If continuity is not present as described, replace the fan.
Removal and Replacement:
1.Disconnect the dispenser from the power source.
2.Remove the four screws attaching the fan and cover assembly.
3.Gently pull the cover forward and disconnect the 2-pin connector from the main wiring harness.
4.Removethefanfromthecoverassemblyanddiscard the old fan.
5.Install the new fan to the cover assembly using screws previously removed.
6.Reconnect the fan to the 2-pin connector on the main wiring harness.
7.Install the fan and cover assembly to the cabinet using screws previously removed.
8.Reconnect power to the dispenser.
RED |
2 |
1 |
BLK |
P1219 |
FIG. 6 CABINET FAN TERMINALS |
16 |
49179 |
110613 |
|
SERVICE (CONT.)
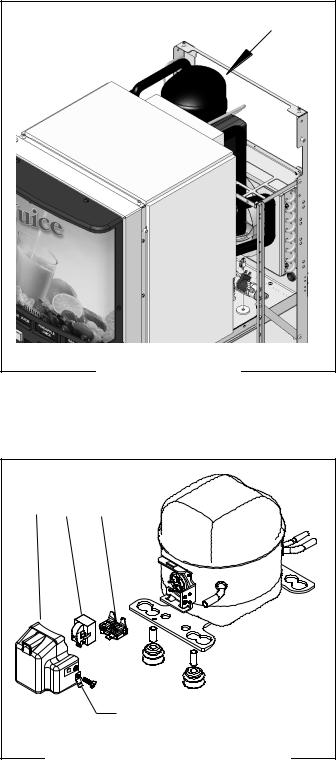
LG Compressor (JDF-2S,4S,4D)
JDF-4S shown
P1684.40
FIG. 7 COMPRESSOR
Location:
The compressor is located at the top of the dispenser frame.
1 |
2 |
3 |
|
|
|
GRN Wire |
P4298.20 |
|
FIG. 8 COMPRESSOR THERMAL |
|
|
|
OVERLOAD PROTECTOR LOCATION |
|
|
1.Compressor Terminal Cover
2.Compressor Relay
3.Thermal Overload Protector
Test Procedures:
Compressor Relay: Refer to FIG. 8
1.Disconnect the dispenser from the power source.
2.Remove compressor terminal cover retainer (1).
3.Connect a voltmeter across the white wire and the
blue/black wire. Connect the dispenser to the power source.
The indication must be:
(a)120 volts ac for two wire 120 volt models or
(b)230 volts ac for two wire 230 volt models.
5.Disconnect the dispenser from the power source. If voltage is present as described, proceed to the following test procedures.
If voltage is not present as described, refer to the Contactor and check the contactor.
6.Disconnect the white wire from the compressor relay.
7.Remove relay from the compressor.
8.Check for continuity across the terminal and the pin socket on the rear of the relay.
If continuity is present as described, the compressor start relay is operating properly.
If continuity is not present as described, replace relay.
Compressor:
1.Remove relay and yhermal overload protector.
2.Check for continuity across the bottom pin on the compressor and the left top pin on the compressor.
If continuity is present as described, the electrical part of the compressor is operating properly.
If continuity is not present as described, replace the compressor.
Thermal Overload Protector:
1. Check for continuity across the terminals on the thermal overload protector (3).
If continuity is present as described, the thermal overload protector is operating properly.
If continuity is not present as described, replace the thermal overload protector.
17 |
49179 |
110613 |
|

SERVICE (CONT.)
Compressor (Cont.)
Removal and Replacement:
Compressor Relay: Refer to FIG. 8
1.Remove the terminal cover (1)
2.Disconnect the white wire from the compressor relay.
3.Pull relay (2) off of the compressor pins and discard.
4.Push new relay onto the compressor pins.
5.Refer to Fig. 9 and reconnect the wires.
6.Reinstall terminal cover (1).
Compressor Thermal Overload Protector: Refer to FIG. 8
1.Remove terminal cover (1).
2.Disconnect the BLU/BLK wire of the harness from the thermal overload protector.
3.Remove relay (2).
4.Remove overload protector (3) and discard overload protector.
5.Install new overload protector (3) on to the compressor.
6.Install relay (2).
7.Refer to Fig. 10 and reconnect the thermal overload protector wires.
8.Reinstall terminal cover (1).
Compressor Assy:
NOTE: Before removal of any refrigeration component the refrigerant in the system must be reclaimed by a licensed refrigeration repair person.
NOTE: When replacing the compressor it is recommended that the dryer also be replaced.
1.Disconnect the tubes from the condenser and the accumulator.
2.Disconnect the compressor wiring harness from the dispenser main wiring harness.
3.Remove the four .25-20 keps nuts and washers securing the compressor to the chassis. Set nuts and washers aside for reassembly.
4.Disconnect and remove the transformer.
5.From the right side of the dispenser lift the compressor assembly over the four studs in the chassis and remove compressor.
WHI Wire
FIG. 9 RELAY TERMINALS
Plugs into Relay
BLU/BLK Wire
FIG. 10 THERMAL OVERLOAD PROTECTOR
TERMINALS
6.Install new compressor over the four studs in the dispenser chassis with the fill valve to the right side of the dispenser.
7.Secure compressor to the dispenser chassis using four .25-20 keps nuts and washers.
8.Reconnect tubes from the condenser and the accumulator to the compressor.
9.Reinstall transformer.
10.Evacuate the system.
11.Recharge 120V and 230V system with:
JDF-2S - 9 oz. Type R134A refrigerant.
Design Pressures: High 255 - Low 36 psi JDF-4S & 4D - 10 oz. Type R134A refrigerant.
Design Pressures: High 335 - Low 88 psi
NOTE: The charging of the system must be done by a licensed refrigeration repair person.
NOTE: Refer to Wiring Diagrams when reconnecting wires to Compressor, Thermal Overload Protector and Start Relay.
18 |
49179 |
110613 |
|
 Loading...