


User Manual - AirStation WHR-G54S
Wireless Cable/DSL Smart Router
|
|
|
www.buffalotech.com |
v2.0 |
|

|
Table of Contents |
Introduction . . . . . . . . . . . . . . . . . . . . |
. . . . . . . 5 |
Basic Setup . . . . . . . . . . . . . . . . |
. . . . . . 6 |
AOSS Setup . . . . . . . . . . . . . . . . . . . . |
. . . . . . . 12 |
Router Access Point Mode . . . . . . . . . . . . . . . . . |
. . . . . . . . . . 14 |
AirStation Configuration Tool . . . . . . . . . . . . . . |
. . . . . . . . . . 17 |
Home . . . . . . . . . . . . . . . . . . . . |
. . . . . . . 17 |
Port Mapping . . . . . . . . . . . . . . . . |
. . . . . . . . . . . 18 |
Firewall . . . . . . . . . . . . . . . . . . |
. . . . . . . . . 19 |
Windows(MSN)Messenger..... |
.............20 |
Encryption . . . . . . . . . . . . . . . . . |
. . . . . . . . . . 21 |
WirelessChannel...........................22
Firmware Update . . . . . . . . . . . . . . . . . . . . . . . . 23
InternetConnectionReset.....................24
AdvancedTab...........................25
WAN Configuration . . . . . . . . . . . . . . . . . . . . . . . . 26
WAN port . . . . . . . . . . . . . . . . . . 26
PPPoE. . . . . . . . . . . . . . . .27
LAN Configuration . . . . . . . . . . . . . . . . . . . . . . . 28
LAN Port . . . . . . . . . . . . . . . . . . . . . . . . 28
DHCP Server . . . . . . . . . . . . . . . . . . . . . 29
ManualAssignmentofIPAddress...30
Network Configuration. . . . . . . . . . . . . . . . . . . . . 31
Route information . . . . . . . . . . . . . . . . . . . . 31

Table of Contents
Address Translation . . . . . . . . . . . . . . . . 33 IP Filter . . . . . . . . . . . . . . . . . . . . . . 35 Intrusion Detector . . . . . . . . . . . . . . . . . 38 UPnP . . . . . . . . . . . . . . . . . . . . . . . . . . . 39
Wireless Configuration . . . . . . . . . . . . . . . . . . . . . . . . 40
AOSS. . . . . . . . . . . . . . . . . . . . . . . . . 40
802.11g . . . . . . . . . . . . . . . . . . . . . . 41
Basic . . . . . . . . . . . . . . . . . . . . . . 41
Security . . . . . . . . . . . . . . . . . 42
Repeater . . . . . . . . . . . . . . . . . . . . 43
MAC access limit . . . . . . . . . . . . . . . . . . . . . . . . 44 Admin Configuration . . . . . . . . . . . . . . . . . . . 45
Password . . . . . . . . . . . . . . . . . . . 46
Date/NTP . . . . . . . . . . . . . . 47 Syslog Transfer . . . . . . . . . . . . . 48 Save/Load Configuration . . . . . . . . . . . . 49 Initialize/Reboot...........................50
Firmware Update. . . . . . . . . . . . . . . . . . . . . . 51
Diagnostic. . . . . . . . . . . . . . . . . . . . . . 52 System Information. . . . . . . . . . . . . . . . . . . . . . 52 Log Info. . . . . . . . . . . . . . . . . . . . . . 53 Packets Info. . . . . . . . . . . . . . . . . . . . . . 54 Client Monitor. . . . . . . . . . . . . . . . . . . . . . 55

Table of Contents
Ping Test. . . . . . . . . . . . . . . . . . . . . . 56
Connectingtoanexistingnetwork......................57
Antenna. . . . . . . . . . . . . . . . . . . . . . 58
Specifications . . . . . . . . . . . . . . . . . . . . . . . . . 59
Troubleshooting . . . . . . . . . . . . . . . . . . . . . . . . 64
WDS Bridging . . . . . . . . . . . . . . . . . . . . . . . . 67
Glossary . . . . . . . . . . . . . . . . . . . . . . . . . . . .79
FCC Information . . . . . . . . . . . . . . . . . . . . . . . . 86
Warranty Information. . . . . . . . . . . . . . . . . . . . . 88
Contact Information (USA). . . . . . . . . . . . . . . . . . . . . 89
Contact Information (Europe). . . . . . . . . . . . . . . . . . . . . 90
GPL Information . . . . . . . . . . . . . . . . . . . . . 91

Introduction
Congratulations on your purchase! With both a wired LAN router and a 811g wireless access point, the AirStation WHR-G54S Cable/DSL Router is perfect for linking your wireless devices with a
wired network and each other.
System Requirements
•A high-speed (Broadband) Internet connection or existing local area connection.
•A computer with a network connection (wired or wireless) and a good web browser. The screenshots in this manual were taken with Firefox, but Netscape and Internet Explorer are also supported in versions 4.5 or later, and Safari 1.0 and later are supported with Macintosh OS X 10.2 and later.
AirStation WHR-G54S Package Contents
•WHR-G54S Base Station
•Antenna
•AC adapter and power cable
•CAT5 LAN cable
•Utility CD with Manual
•Quick Setup Guides
•Warranty Statement

Basic Setup
Begin by finding a good place to set up your router/access point. Some things to consider:
•You’ll need to be able to plug your internet connection into it, so it should go within reach of the LAN cable from your DSL or Cable modem. You’ll also want a power outlet nearby.
•Keep the access point as central in your work area as possible. Signal strength and speed fall off with distance.
•Higher is often better. For instance, set it up on the top shelf of a bookcase rather than the bottom one, if possible.
Screw the antenna into the top of your AirStation. For best performance, align the antenna to point straight up.

Getting Ready
Make note of the AirStation’s wired MAC address. The LAN or Wired MAC address is the default SSID (wireless network name) of the AirStation. You can find it on the bottom of the
AirStation.
You may also wish to contact your ISP to ask if other information, such as global IP address, subnet mask address, default gateway address, DNS server address, or PPPoE parameters, is necessary to access your internet connection. Write down any necessary information that your ISP requires for connection.
Buffalo recommends using a wired network connection, where your computer is physically connected to the AirStation with a CAT5 straight cable plugged into one of the four LAN ports, to initially set up your router. This type of setup will eliminate possible setup problems with the wireless adapter on the computer being used to configure the AirStation.
The computer used to configure the AirStation should be set to obtain an IP address automatically using a DHCP server. The WHR-G54S has a default LAN IP address of 192.168.11.1 and Subnet Mask of 255.255.255.0.

Connecting your AirStation
1.Power down the Cable or DSL modem and the computer which will be used to configure the AirStation router.
2.Plug the Cable or DSL’s LAN Ethernet cable into the AirStation’s WAN port. Initially, you may need to unplug this cable from your computer, hub or other router.
3.Plug the provided Ethernet cable into a LAN port on the AirStation and plug the other end into your computer’s Ethernet adapter (NIC). If you plan to initially configure the AirStation wirelessly (not recommended), you may skip this step.
4.Power on your cable or DSL modem and wait one full minute, then power on the AirStation router and wait one full minute, and finally, power on the computer which will be used to configure the AirStation. If the red DIAG light on the AirStation is lit or flashing after several minutes of being powered on, please consult Buffalo Technology Technical Support.
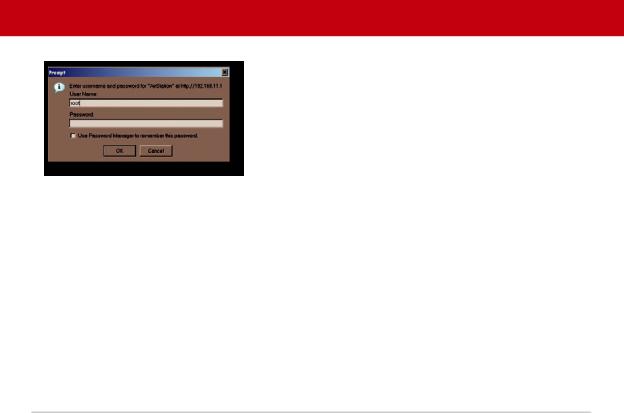
Log in to the Configuration Tool
Launch a web browser on the computer that you’re going to use to configure the AirStation.
Enter 192.168.11.1 into the URL field. Naturally, if you change your AirStation’s IP address, you’ll have to enter the new address instead.
A window will open, prompting you to enter a User ID and Password.
Enter root as the User name and leave the password field blank.

Detecting Your Broadband Connection
Your AirStation’s SmartRouter technology will determine the type of internet connection you have automatically, and ask you for any needed information. If your ISP assigns IPs automatically (most cable providers do), their DHCP server will give your router an IP address. If additional login information is required to connect to the internet, the wizard will ask for it. Enter any required login
information if asked. Contact your DSL provider for any missing login information.
If your DSL provider requires that PPPoE information be entered manually, see page
25.
10
Home
This is the opening page of your AirStation’s configuration tool. You can always get to it from within the configuration screens by clicking on Home. From here, you can configure port mapping for your internet games, turn on UPnP for Windows (MSN) Messenger, configure your Firewall, setup Encryption, choose your Wireless channel, update your AirStation’s firmware, and reset your Internet connection’s configuration. As you explore the configuration tool, you can
usually get context sensitive help by clicking on the Help link at the top right of the page.
To go to Advanced Settings (page 25), click on the Advanced tab. To get the system information you need to set up a wireless client that doesn’t support AOSS, click on the System Info tab. See page 17 for more on Home.
11

AOSS
AOSS (AirStation One-Touch Secure System) is a simple system for configuring your wireless network securely. If your router and your client device are connected and both support AOSS, then making a secure wireless connection is very easy.
Push the AOSS button on the top of your router and hold it in for a few seconds. The AOSS light will begin to flash amber. You now have two minutes to push the AOSS button on your client device and finish the connection.
If you have a standalone client device, it will probably have a little red button labled “AOSS” on it. Push the button! About 15 seconds later, you’ll have a secure network connection.
If your client device is a PC card, CardBus, or PCI adaptor, the AOSS button will probably be in its Client Manager Software. Check your client device’s user manual for instructions on where to push or click the AOSS button.
|
|
|
standalone |
PC card |
Client Manager |
client device |
|
Software |
|
|
|
After you’ve pressed both buttons, it will take about 15 seconds for the connection to complete. When it’s finished, the AOSS light witll glow a solid amber. You now have a secure network connection!
12

AOSS Notes
Some things to keep in mind
•Only one AOSS wireless client adapter can be configured with the AOSS router at a time. The buttons will need to be re-pressed to connect each additional AOSS wireless client adapter.
•It is not necessary to AOSS client devices that have already been configured via AOSS, unless significant changes have been made to the wireless network.
•Do not attempt to configure two separate AOSS networks at the same time, as it may cause undesired configurations.
•If an undesired client has connected via AOSS, it can be disconnected from within the WHR-G54S’s advanced configuration menus.
13

Router/Access Point Mode
This AirStation supports quickly changing the product from a wireless router to a conventional access point.
Put your Airstation into Access Point Mode by moving the switch on the bottom of your AirStation from AUTO to BRI. This changes the default IP address of the AirStation from 192.168.11.1 to 192.168.11.100, and DHCP, NAT, and the WAN port are disabled.
Access Point Mode might be desirable if you’re adding wireless capability to an existing network with a router. It is not suitable for most home configurations. If you plan to use the AirStation as an normal wireless router, make sure that this switch is in the normal (AUTO) position!
To set up your AirStation as a bridge or repeater, turn to page 43.
14

Manual Client Configuration
If your wireless client doesn’t support AOSS, you’ll have to configure it manually. From the Home page, click on the System Info tab.
15
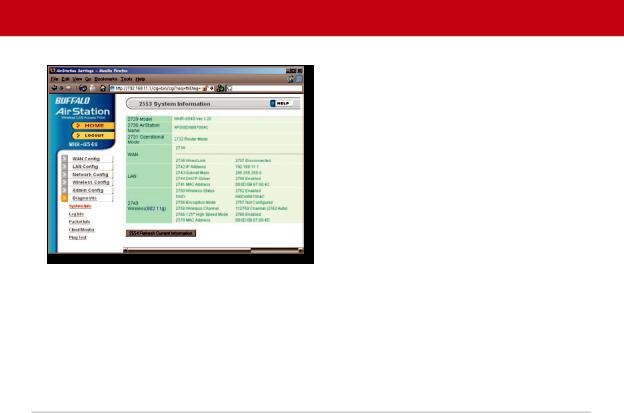
System Info
This page gives you all the information you might need to configure your non-AOSS wireless client. Probably you’ll just need the SSID, encryption type, and password. Consult your wireless client’s documentation for more information on configuring it if necessary.
You can get here from Home by clicking the System Info tab.
16
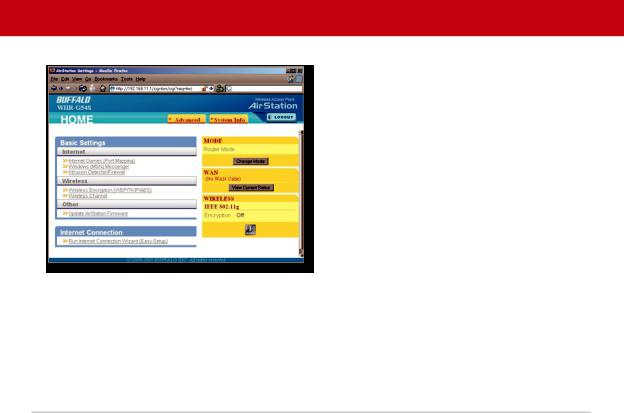
AirStation Configuration Tool (Home)
When you first open your AirStation Configuration Tool, it will take you to Home (see also page 11). From Home, you can configure port mapping for your internet games, set UPnP for Windows (MSN) Messenger, configure your firewall, setup encryption, choose your wireless channel, update your AirStation’s firmware, and reset your Internet Connection’s configuration. Clicking the Advanced tab gives you access to all of the AirStation’s configuration tools.
You can get back to Home from anywhere in the management tool by clicking on the Home button at the top left of the screen.
Let’s begin exploring advanced settings by clicking on Internet Games (Port Mapping).
17
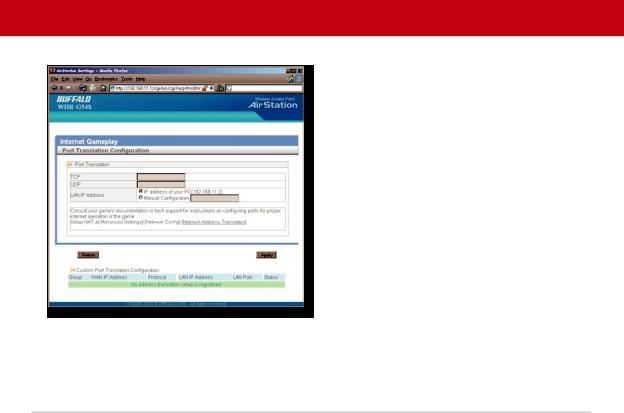
Internet Games (Port Mapping)
Select any ports that need to be opened for your internet games to function correctly. Consult your game’s documentation for more information on what ports need to be configured.
18
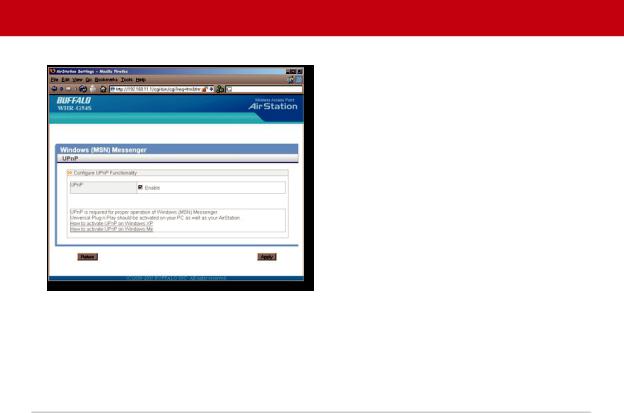
Windows (MSN) Messinger/UPnP
Windows (MSN) Messinger requires UPnP for proper operation. You may Enable UPnP here. UPnP may need to be configured on your PC as well.
If you need to configure UPnP on your PC, the links at the bottom of the page have instructions for doing so on Windows ME and XP computers.
Get to this page from Home by clicking on
Windows (MSN) Messinger.
19
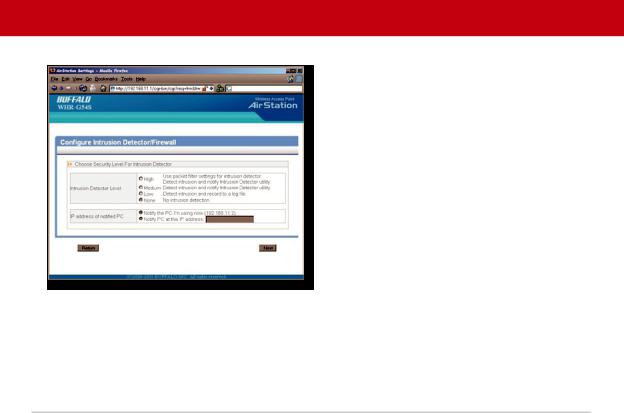
Firewall/Intrusion Detector
From this page, choose the level of firewall security you desire. You may also choose to have alerts sent to a different PC, if you like. Click Next when done to restart the router.
Get to this page from Home by clicking on
Firewall/Intrusion Detector.
20
Wireless Encryption
This page is available from Home by selecting Wireless Encryption. Here, you can manually select the type of wireless encryption you’d like to use. Your AirStation supports three different encryption schemes; choose the best one that all your clients support.
Virtually all wireless clients support WEP. It’s a lot better than nothing.
TKIP is much more secure than WEP, but slower.
AES is even more secure than TKIP, and the fastest of all. Highly recommended if all of your wireless clients support it.
21

Wireless Channel
This page is available from Home by selecting Wireless channel. With Auto Channel selected, your AirStation will choose the best channel available. Current channel will show the channel that your AirStation is currently using.
You may also select any channel from 1-11 manually. Channels 1, 6, and 11 are non-overlapping. If multiple channels are in use in an area, select a different channel for your AirStation, as far away from the other channels being used as possible.
22

Firmware Update
This page is available from Home by selecting Firmware update. Use
Browse to select your firmware update file, and then click on Apply. Firmware update may take several minutes to complete. Don’t power down your AirStation until the diag LED has gone out.
23
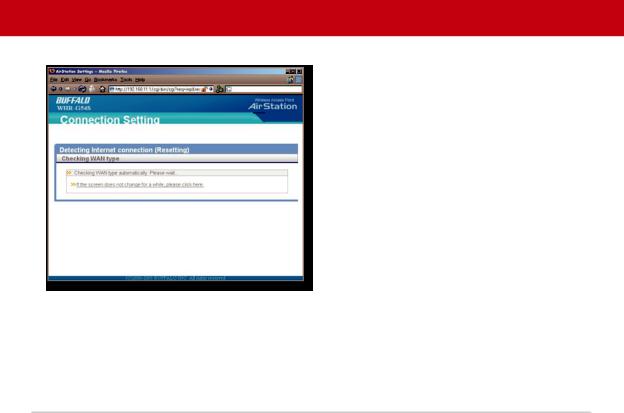
Internet Connection (Multisession Reset)
From Home, selecting the Internet Connection Wizard (Multisession Reset) tab will begin the Internet Connection Wizard.
The Internet Connection Wizard will only function correctly in simple networks, where your cable or DSL modem is plugged directly into your AirStation’s WAN port. If you have a complicated existing network that you’re adding the AirStation to, see page 56.
24
Advanced Settings
Advanced Settings lets you configure every element of your AirStation. Get to Advanced Settings from Home by clicking the Advanced Tab.
Click Help in the top right corner for more information about any of the pages in Advanced Settings.
To begin, click on WAN Config. The first page in WAN Config, WAN Port, will open.
25
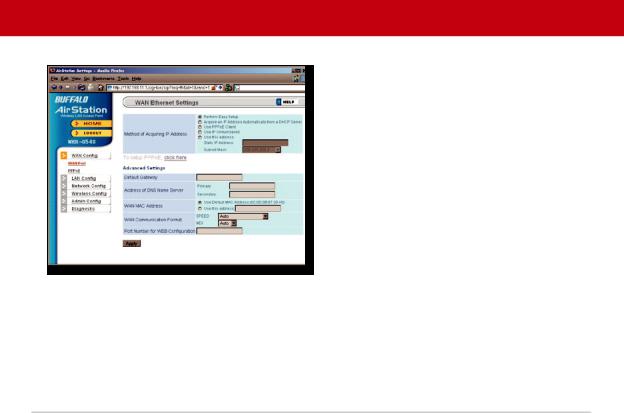
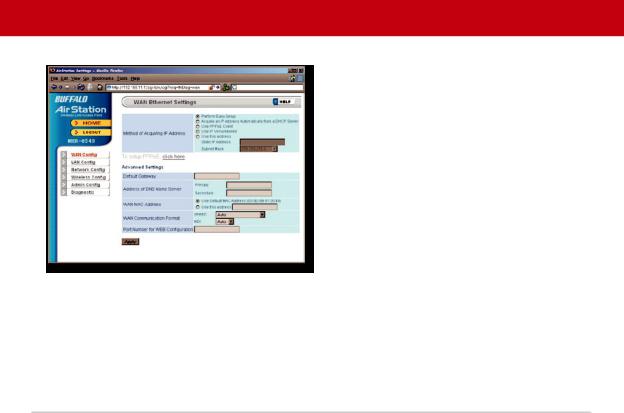
WAN Config (WAN Port)
Here, you may choose how the AirStation acquires an IP address. Normally, the internet connection wizard will set this for you if you have a cablemodem or DSL. If you’re not sure what to choose, perform
Easy Setup.
To setup PPPoE manually, click on click here and turn to page 27.
Also on this page, under Advanced Settings, you may manually set the Default Gateway, DNS server, WAN MAC address, WAN format, and WEB port number.
Click Apply when finished.
26
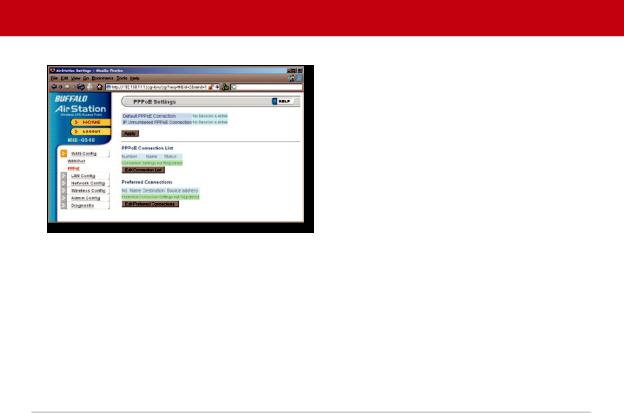
PPPoE
Many DSL connections require a PPPoE connection in order to log in to an internet connection. Normally, the Easy Detection Wizard will help you configure that, but you may manually configure one here. Consult your ISP for more information on correctly configuring your PPPoE connection.
To add a new PPPoE connection, click Edit Connection List. To choose your preferred connection, click on Edit Preferred Connection List.
27
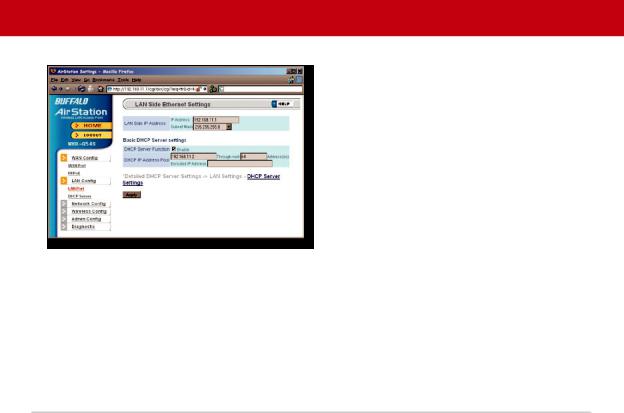
LAN Config (LAN Port)
Default for the LAN side IP address is
192.168.11.1. To add the AirStation to an existing LAN, specify a unique IPaddress, not used elsewhere in the network.
The default Subnet Mask is 255.255.255.0. To connect AirStation to an existing LAN, specify the Subnet Mask that the LAN uses.
If there’s more than one DHCP server on a network, disable all but one of them. To have DHCP assign addresses from a specific range, enter a begining address by
Assigned IP Address and give the number of addresses to assign in the Addresses box. To exclude specific addresses from being assigned by DHCP, specify them in the Excluded IP Address box. Multiple IP addresses may be specified by seperating them with a comma, e.g. 192.168.11.7,192.168.11.9. You can also specify an IP address range by start and end address connected by a dash, e.g. 192.168.11.15-192.168.11.21. The ‘,’ and ‘-’ can be used at the same time, e.g. 192.1 68.11.7,192.168.11.9,192.168.11.15-192.168.11.21, up to a total string length of 128 characters.
Click the Help link in the top right corner for more information.
28
 Loading...