


 Loading...
Personal Embroidery System Sistema de Bordado Personal
PE-150
“IMPORTANT SAFETY INSTRUCTIONS”
When using a embroidery machine, basic safety precautions should always be taken, including the following:
“Read all instructions before using.”
DANGER – To reduce the risk of electric shock.
1.The embroidery machine should never be left unattended while plugged in. Always unplug the embroidery machine from the electrical outlet immediately after using and before cleaning.
2.Always unplug before changing the light bulb. Replace bulb with same type rated 2.4 watts.
WARNING – To reduce the risk of burns, fire, electric shock, or injury to persons.
1.Do not allow this embroidery machine to be used as a toy. Close attention is necessary when the embroidery machine is used by or near children.
2.Use this embroidery machine only for its intended use as described in this manual. Use only accessories recommended by the manufacturer as contained in this manual.
3.Never operate this embroidery machine if it has a damaged cord or plug, if it is not working properly, if it has been dropped or damaged, or dropped into water. Return the embroidery machine to the nearest authorized dealer or service center for examination, repair, electrical or mechanical adjustment.
4.Never operate the embroidery machine with any air openings blocked. Keep ventilation openings of the embroidery machine and foot control free from the accumulation of lint, dust, and loose cloth.
5.Never drop or insert any object into any opening.
6.Do not use outdoors.
7.Do not operate where aerosol (spray) products are being used or where oxygen is being administered.
8.To disconnect, turn the main switch to the symbol “O” position which represents off, then remove plug from outlet.
9.Do not unplug by pulling on cord. To unplug, grasp the plug, not the cord.
10.Keep fingers away from all moving parts. Special care is required around the embroidery machine needle.
11.Always use the proper needle plate. The wrong plate can cause the needle to break.
12.Do not use bent needles.
13.Do not pull or push fabric while stitching. It may deflect the needle causing it to break.
14.Switch the embroidery machine to the symbol “O” position when making any adjustments in the needle area, such as threading needle, changing needle, threading bobbin, or changing presser foot, and the like.
15.Always unplug the embroidery machine from the electrical outlet when removing covers, lubricating, or when making any other user servicing adjustments mentioned in the instruction manual.
“SAVE THESE INSTRUCTIONS” “This embroidery machine is intended for
household use.”

FOR USERS IN THE UK, EIRE, MALTA
AND CYPRUS ONLY.
If your embroidery machine is fitted with a 3 pin non rewireable BS plug then please read the following.
IMPORTANT
If the available socket outlet is not suitable for the plug supplied with this equipment, it should be cut off and an appropriate three pin plug fitted. With alternative plugs an approved fuse must be fitted in the plug.
NOTE
The plug severed from the main lead must be destroyed as a plug with bare flexible cord is hazardous if engaged in a live socket outlet. In the event of replacing the plug fuse, use a fuse approved by ASTA to BS 1362, i.e. carrying the  mark, rating as marked on plug.
Always replace the fuse cover, never use plugs with the fuse cover omitted.
WARNING
DO NOT CONNECT EITHER WIRE TO THE EARTH TERMINAL WHICH IS MARKED WITH THE LETTER ‘E’, BY THE EARTH SYMBOL  OR COLOURED GREEN OR YELLOW.
The wires in this mains lead are coloured in accordance with the following code:
Blue |
Neutral |
Brown |
Live |
As the colours of the wiring in the main lead of this appliance may not correspond with the coloured markings identifying the terminals in your plug, proceed as follows.
The wire which is coloured blue must be connected to the terminal which is marked with the letter ‘N’ or coloured black or blue.
The wire which is coloured brown must be connected to the terminal which is marked with the letter ‘L’ or coloured red or brown.
IMPORTANT (In the United Kingdom)
Mains Supply (AC 230/240V ~ , 50 Hz only)
DO NOT cut off the mains plug from this equipment. If the plug fitted is not suitable for the power points in your home or the cable is too short to reach a power point, then obtain an appropriate safely approved extension lead or consult your dealer.
BE SURE to replace the fuse only with an identical approved type, as originally fitted, and to replace the fuse cover.
If nonetheless the mains plug is cut off ensure to remove the fuse and dispose of the plug immediately, to avoid a possible shock hazard by inadvertent connection to the mains supply.
CONGRATULATIONS ON CHOOSING
OUR COMPUTER EMBROIDERY MACHINE
Your machine is an advanced computerized home embroidery machine.
To fully enjoy all of its features, we suggest that you study this booklet.
PLEASE READ BEFORE USING YOUR EMBROIDERY MACHINE
For safe operation
1.Be sure to keep your eye on the needle while sewing. Do not touch the balance wheel, thread take-up, needle, or other moving parts.
2.Remember to turn off the power switch and unplug the cord when: c Operation is complete
c Replacing or removing the needle or any other parts c A power failure occurs during use
c Maintaining the machine
c Leaving the machine unattended.
3.Plug the machine directly into the wall. Do not use extension cords.
4.Always be sure to turn off the main power switch when inserting and removing the embroidery card. Do not touch the embroidery card inserted in the card slot while your machine turns on.
For a longer service life
1.When storing your embroidery machine, avoid direct sunlight and high humidity locations. Do not store your embroidery machine beside a space heater, iron, or other hot objects.
2.Use only neutral soaps or detergents to clean the case. Benzene, thinner, and scouring powders can damage the case and machine, and should never be used.
3.Do not drop or hit the machine.
4.Always consult the operation manual or use the “BASIC OPERATION” key when replacing or installing any assemblies; needle, or other parts to assure correct installation.
For repair or adjustment
In the event a malfunction occurs or adjustment is required, first follow the troubleshooting table in the back of the operation manual to inspect and adjust the machine yourself. If the problem persists, please consult your nearest authorized service center.
cPlease note that specifications and external appearance are subject to change for improvement without notice.
1

CONTENTS |
|
CHAPTER 1 |
|
MACHINE KNOWLEDGE ................ |
3 |
PRINCIPAL PARTS AND |
|
THEIR DESCRIPTION ........................... |
3 |
MAIN POWER SWITCH AND |
|
CONNECTORS ...................................... |
4 |
SELECTION KEYS................................. |
5 |
“START/STOP” BUTTON....................... |
5 |
ACCESSORIES...................................... |
6 |
OPTIONS ............................................... |
7 |
OPERATION (SELECTION KEYS) ........ |
8 |
HOW TO USE THE LANGUAGE |
|
SELECTION KEY ................................... |
11 |
How to clear the |
|
language selection............................ |
12 |
BOBBIN WINDING AND |
|
INSTALLATION ...................................... |
13 |
Setting the bobbin............................. |
15 |
UPPER THREADING ............................. |
16 |
Auto needle threading device ........... |
17 |
PREPARATION BEFORE |
|
EMBROIDERING ................................... |
18 |
Attaching stabilizer material.............. |
18 |
Embroidering different |
|
types of fabric ................................... |
18 |
Setting the fabric in the |
|
embroidery frame.............................. |
20 |
Fitting the embroidery frame |
|
to the machine .................................. |
22 |
Removing the embroidery frame ...... |
22 |
THREAD TENSION ADJUSTMENT....... |
23 |
ADJUSTING THE LCD |
|
SCREEN CONTRAST............................ |
24 |
If the LCD is hard to see when the power |
|
is turned on ....................................... |
24 |
CHANGING THE NEEDLE..................... |
25 |
CHAPTER 2 |
|
EMBROIDERING ............................. |
26 |
EMBROIDERY ....................................... |
26 |
Start embroidering ............................ |
28 |
Embroidering advice ......................... |
29 |
HOW TO SELECT PATTERNS.............. |
30 |
Selecting built-in embroidery |
|
patterns............................................. |
30 |
Selecting alphabetic characters........ |
31 |
Uppercase & lowercase.................... |
32 |
Changing the character size to one |
|
of three different sizes ...................... |
33 |
Correcting characters ....................... |
33 |
Checking the characters input .......... |
34 |
Changing the color of single |
|
characters ......................................... |
34 |
Selecting frame patterns................... |
35 |
Selecting one-point patterns ............. |
37 |
Displaying the embroidery time |
|
for one-point patterns........................ |
39 |
Displaying the color names for |
|
one-point patterns............................. |
39 |
Selecting patterns from a memory |
|
card................................................... |
40 |
MEMORY ............................................... |
41 |
Saving a pattern combination |
|
in memory ......................................... |
41 |
Retrieving a pattern which has |
|
been saved ....................................... |
42 |
CHANGING THE SETTINGS FOR THE |
|
SELECTED PATTERN........................... |
43 |
Moving the position (LAYOUT) ......... |
43 |
Changing the embroidery position .... |
44 |
Checking the embroidery area.......... |
44 |
Embroidering from a specific starting |
|
point .................................................. |
45 |
Changing the pattern direction.......... |
45 |
Mirror imazing patterns ..................... |
46 |
Changing the size of characters and |
|
frame patterns................................... |
47 |
Changing thread density of the stitch on |
|
characters and some frame patterns ... |
47 |
SEWING A BASIC EMBROIDERY |
|
PATTERN............................................... |
48 |
Embroidering multi-color patterns ..... |
48 |
Embroidering single color patterns ... |
48 |
Embroidering a single color pattern |
|
when “MULTI COLOR” is displayed... |
49 |
Embroidering characters that |
|
extend beyond one frame ................. |
50 |
EMBROIDERY APPLICATIONS ............ |
51 |
Combining a frame pattern |
|
with a design..................................... |
51 |
Embroidering appliques |
|
(using a frame pattern) ..................... |
52 |
Embroidering onto small |
|
pieces of fabric or onto corners ........ |
53 |
IF THREAD BREAKS DURING |
|
EMBROIDERING OR WHEN PARTLY |
|
COMPLETING A PATTERN................... |
54 |
If thread breaks during |
|
embroidering ..................................... |
55 |
Re-embroidering from |
|
the beginning .................................... |
56 |
MAINTENANCE ............................... |
57 |
CHANGING THE LIGHT BULB .............. |
57 |
CLEANING ............................................. |
58 |
ERROR MESSAGE ............................... |
59 |
TROUBLESHOOTING........................... |
62 |
PATTERNS ............................................ |
65 |
EMBROIDERING USING A |
|
SMALL FRAME (OPTIONAL) ............... |
67 |
EMBROIDERING USING A |
|
EXTRA-SMALL FRAME |
|
(OPTIONAL) .......................................... |
68 |
EMBROIDERING USING A |
|
LARGE FRAME (OPTIONAL) ............... |
69 |
Linking two or more embroidered |
|
patterns (using the 90˚ |
|
rotation feature) ................................ |
70 |
|
CONTENTS |
|
|
|
|
|
|
|
|
|
|
|
KNOWLEDGE |
MACHINE |
|
|
|
|
|
|
|
|
|
|
EMBROIDERING |
|
|
|
|
|
|
|
|
|
|
|
MAINTENANCE |
|
|
|
|
|
|
|
|
|
|
|
MESSAGE |
ERROR |
|
|
|
|
|
|
|
|
|
|
TROUBLESHOOTING |
|
|
|
|
|
|
|
PATTERNS |
|
|
|
|
|
|
|
|
|
|
(OPTIONAL) |
FRAME |
SMALL A USING |
EMBROIDERING |
|
|
|
|
|
|
|
|
(OPTIONAL) FRAME |
SMALL-EXTRA |
A USING |
EMBROIDERING |
|
|
|
|
(OPTIONAL) |
FRAME |
LARGE A USING |
EMBROIDERING |
|
|
|
|
2
MACHINE KNOWLEDGE |
CHAPTER 1 |
|
|
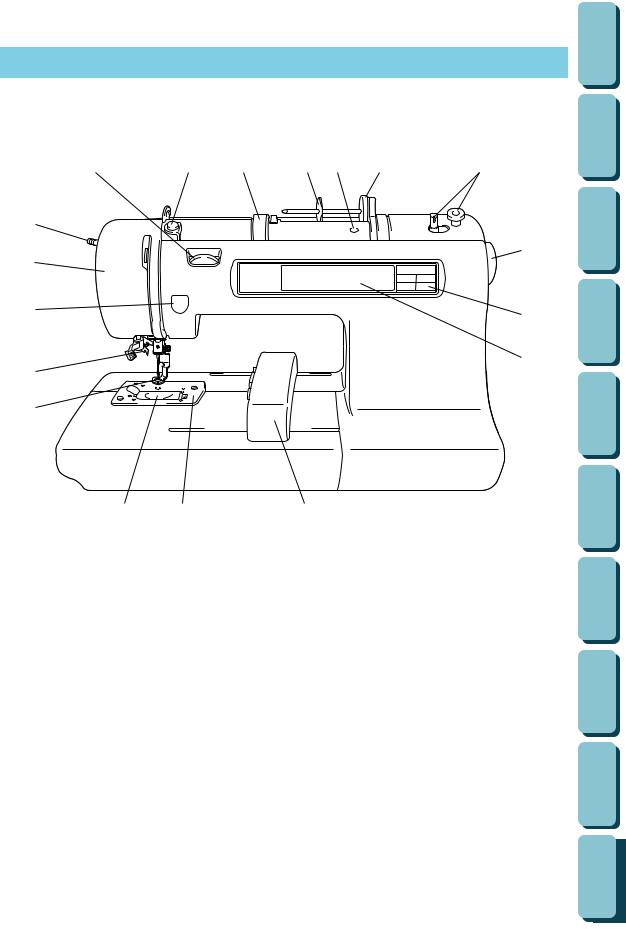
PRINCIPAL PARTS AND THEIR DESCRIPTION
|
|
|
|
|
|
|
|
|
|
|
|
|
|
|
|
|
|
|
|
|
|
|
|
3– Bobbin winding guide |
C– “START/STOP” BUTTON |
||||
4– Upper thread tension dial |
|
|
|
||
5– Face plate |
|
|
|
||
6– Presser foot lever |
|
|
|
||
7– Needle threader |
|
|
|
||
8– Presser foot |
|
|
|
||
9– Bobbin cover |
|
|
|
||
10– Needle plate |
|
|
|
||
11– Bobbin winding device |
|
|
|
||
12– Spool felt |
|
|
|
||
13– Balance wheel |
|
|
|
||
14– LCD (Liquid Crystal Display) |
|
|
|
||
15– Hole for extra spool pin |
|
|
|
||
16– Carriage (Embroidery arm) |
|
|
|
||
|
CONTENTS |
|
|
|
|
|
|
|
|
|
|
|
KNOWLEDGE |
MACHINE |
|
|
|
|
|
|
|
|
|
|
EMBROIDERING |
|
|
|
|
|
|
|
|
|
|
|
MAINTENANCE |
|
|
|
|
|
|
|
|
|
|
|
MESSAGE |
ERROR |
|
|
|
|
|
|
|
|
|
|
TROUBLESHOOTING |
|
|
|
|
|
|
|
PATTERNS |
|
|
|
|
|
|
|
|
|
|
(OPTIONAL) |
FRAME |
SMALL A USING |
EMBROIDERING |
|
|
|
|
|
|
|
|
(OPTIONAL) FRAME |
SMALL-EXTRA |
A USING |
EMBROIDERING |
|
|
|
|
(OPTIONAL) |
FRAME |
LARGE A USING |
EMBROIDERING |
|
|
|
|
3
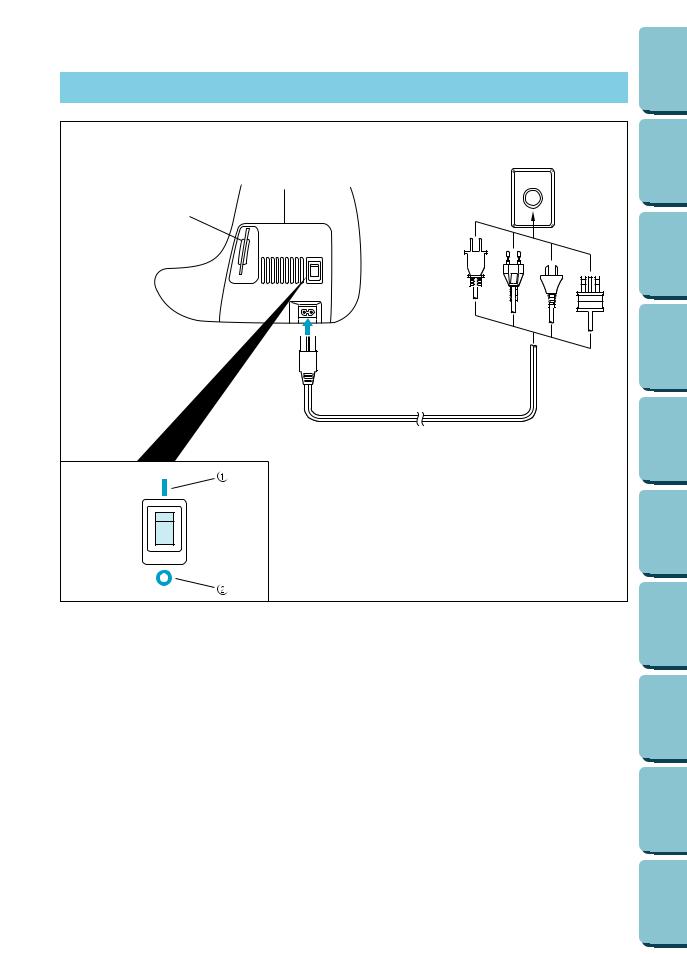
MAIN POWER SWITCH AND CONNECTORS |
|
CONTENTS |
|
|||
|
|
|
|
KNOWLEDGE |
MACHINE |
|
|
2 |
|
|
EMBROIDERING |
|
|
|
|
|
|
|
||
|
|
|
|
MAINTENANCE |
|
|
|
|
|
|
MESSAGE |
ERROR |
|
1 |
|
|
|
|
|
|
|
|
|
|
TROUBLESHOOTING |
|
|
1 Power switch |
CAUTION |
|
PATTERNS |
|
||
1 ON |
– When leaving the embroidery machine |
|
|
|||
2 OFF |
|
unattended, the main switch of the |
|
|
||
2 Memory card slot |
|
machine must be switched off and the |
|
|
|
|
|
|
plug removed from the socket-outlet. |
|
|
|
|
|
– When servicing the sewing machine, or |
(OPTIONAL) |
|
SMALL A USING |
EMBROIDERING |
|
|
|
when removing covers or changing lamps, |
FRAME |
|||
|
|
the machine must have the plug removed |
||||
|
|
from the socket-outlet. |
||||
|
– |
For U.S.A. only |
||||
|
|
This appliance has a polarized plug (one |
||||
|
|
|
|
|
|
|
|
|
blade wider than the other). To reduce the |
(OPTIONAL) FRAME |
|
|
|
|
|
risk of electric shock, this plug is intended |
SMALL-EXTRA |
|
EMBROIDERING |
|
|
|
to fit in a polarized outlet only one way. |
A USING |
|||
|
|
If the plug does not fit fully in the outlet, |
||||
|
|
contact a qualified electrician to install the |
||||
|
|
proper outlet. Do not modify the plug in |
||||
|
|
any way. |
||||
|
|
|
(OPTIONAL) |
FRAME |
LARGE A USING |
EMBROIDERING |
4 |
|
|
|
|
|
|
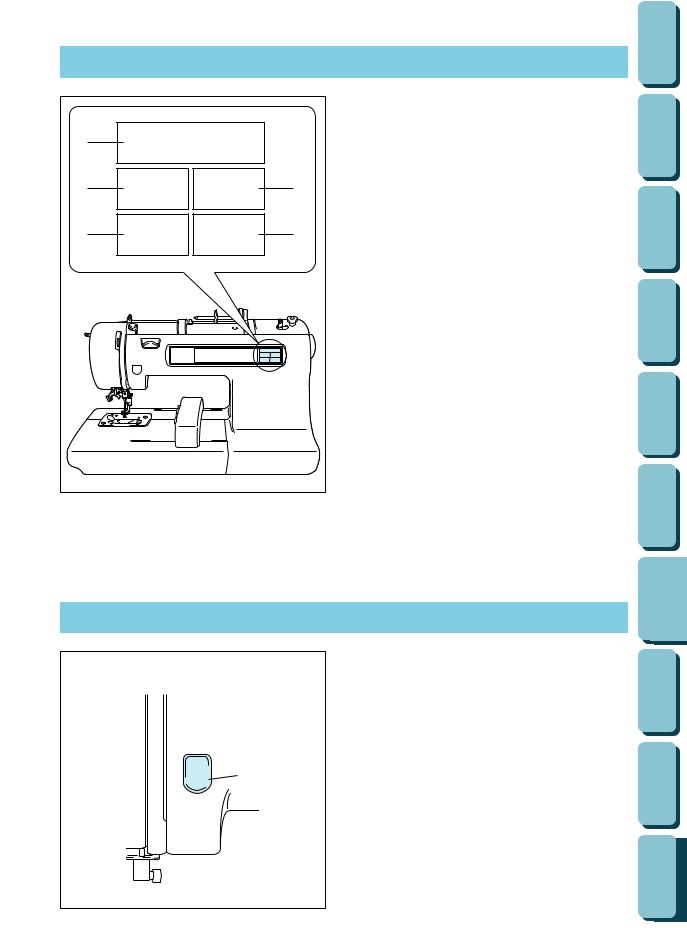
SELECTION KEYS |
|
|
|
|
|
1 |
“CHARACTERS & DESIGNS” KEY |
|
|
|
Use this key for embroidering characters and |
|
|
|
patterns. |
1 |
|
2 |
“CARD” KEY |
|
|
|
Use this key to select a memory card for |
|
|
|
embroidery patterns. |
2 |
3 |
3 |
“MEMORY” KEY |
|
Use this key for saving or retrieving pattern |
||
|
|
|
|
|
|
|
combinations in the machine. |
|
|
4 |
“BASIC OPERATION” KEY |
4 |
5 |
|
Use this key for more information on how to |
|
|
|
use this embroidery machine. |
|
|
5 |
“MODIFY & ADVISE” KEY |
|
|
|
Use this key when you have problems with |
|
|
|
embroidering. This is a useful key to remember. |
|
CONTENTS |
|
|
|
|
|
|
|
|
KNOWLEDGE |
MACHINE |
|
|
|
|
|
|
|
EMBROIDERING |
|
|
|
|
|
|
|
|
MAINTENANCE |
|
|
|
|
|
|
|
|
MESSAGE |
ERROR |
|
|
|
|
|
|
|
TROUBLESHOOTING |
|
|
|
|
“START/STOP” BUTTON
PATTERNS
1 |
Press this button to start the machine, and then press it once more to stop the machine.
*The machine will operate at low speed while the button is being pressed and then speed up when the button is released.
*When the machine stops, the needle will stop at its highest position.
*If “Raise the needle.” appears on the display, press the “START/STOP” button to stop the needle at its highest position.
1 “START/STOP” BUTTON
(OPTIONAL) |
FRAME |
SMALL A USING |
EMBROIDERING |
|
|
|
|
|
|
|
|
(OPTIONAL) FRAME |
SMALL-EXTRA |
A USING |
EMBROIDERING |
|
|
|
|
(OPTIONAL) |
FRAME |
LARGE A USING |
EMBROIDERING |
|
|
|
|
5
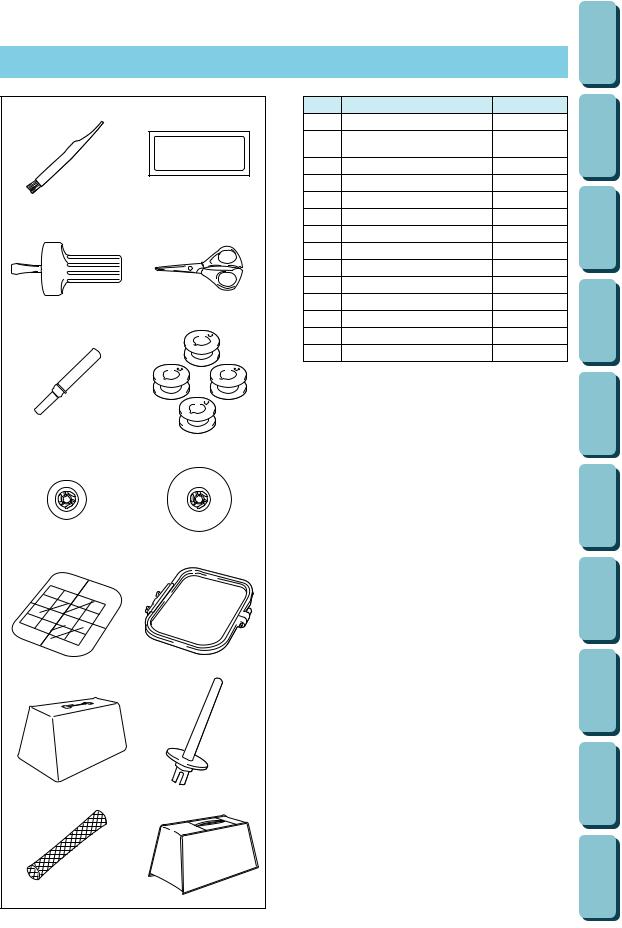
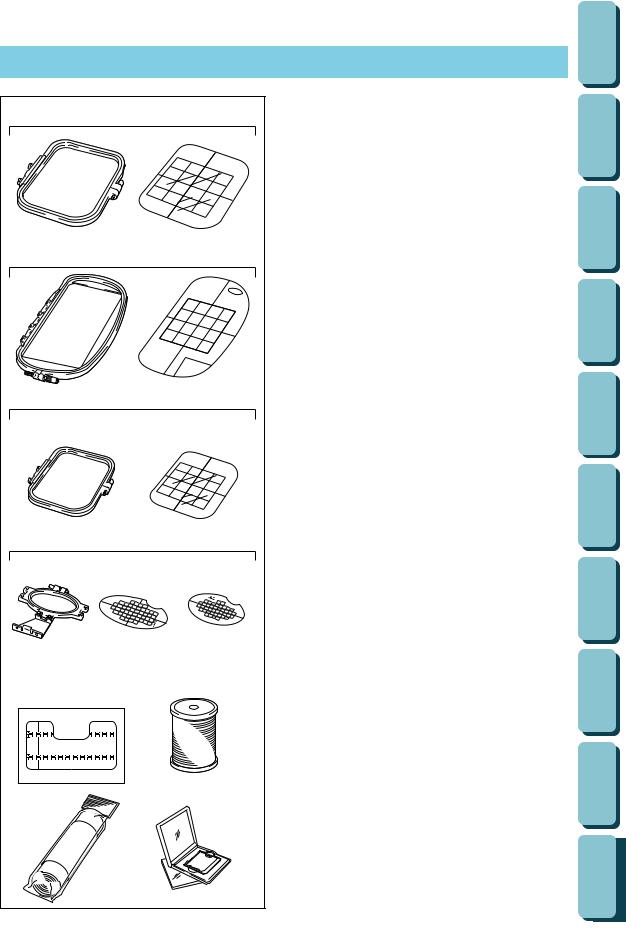
ACCESSORIES |
|
|
|
|
|
|
|
|
1 |
2 |
No. |
Parts Name |
|
|
Parts Code |
|
|
1 |
|
Cleaning brush |
|
XA4527-001 |
|
|||
|
|
2 |
|
Needle set |
|
|
X59535-001 |
|
|
|
|
75/11 3pcs., 90/14 1 pc. |
|
|
|||
|
|
|
|
|
|
|
||
|
|
3 |
|
Screwdriver |
|
|
X53666-001 |
|
|
|
4 |
|
Scissors |
|
|
184783-001 |
|
|
|
5 |
|
Seam ripper |
|
|
X54243-001 |
|
3 |
4 |
6 |
|
Bobbins (4 pcs) |
|
***** |
|
|
7 |
|
Spool cap (Small) |
|
130013-003 |
|
|||
|
|
8 |
|
Spool cap (Large) |
|
130012-003 |
|
|
|
|
9 |
|
Embroidery sheet (Regular) |
XA3728-001 |
|
||
|
|
10 |
|
Embroidery frame (Regular) |
X58739-003 |
|
||
|
|
11 |
|
Machine cover (soft type)* |
X59351-001 |
|
||
|
|
12 |
|
Extra spool pin** |
|
130920-051 |
|
|
5 |
6 |
13 |
|
Net*** |
|
|
127610-000 |
|
14 |
|
Machine cover**** |
|
XA0181-051 |
|
|||
|
|
|
|
|
||||
|
|
* |
When placing the machine cover on the |
|
||||
|
|
|
machine while the embroidery frame is still |
|
||||
|
|
|
attached, |
touch |
“CHARACTERS |
& |
||
|
|
|
DESIGNS” or “CARD” to return the |
|||||
|
|
|
embroidery arm to it’s storage position. An |
|
||||
7 |
8 |
|
alternate method to return the embroidery |
|
||||
|
arm to it’s storage position would be to turn |
|
||||||
|
|
|
|
|||||
|
|
|
the machine off and then turn it on again, |
|
||||
|
|
|
allow the arm to re-set itself and then turn off |
|
||||
|
|
|
the machine. |
|
|
|
|
|
|
|
|
A cover might not be provieded in some |
|
||||
|
|
|
countries. |
|
|
|
|
|
|
|
** |
An extra spool pin should be used for |
|
||||
|
|
|
decorative thread such as metallic thread. |
|
||||
9 |
10 |
*** |
If using special threads which wind quickly |
|
||||
|
off the thread spool, attach a net to the spool |
|
||||||
|
|
|
before using. |
|
|
|
|
|
|
|
**** |
In some countries, the No. 14 machine cover |
|
||||
|
|
|
is supplied as an accessory in place of the |
|
||||
|
|
|
No. 11 machine cover (soft type). |
|
||||
|
|
*****Distributed in sets of 10 when ordered |
|
|||||
|
|
|
separately. |
|
|
|
|
|
|
|
|
(Parts Code) |
|
|
|
|
|
11 |
12 |
|
USA and Canada: XA3811-051 |
|
|
|||
|
Other countries: XA3812-051 |
|
|
|||||
13 |
14 |
|
|
|
|
|
|
|
6 |
|
|
|
|
|
|
|
|
|
CONTENTS |
|
|
|
|
|
|
|
|
|
|
|
KNOWLEDGE |
MACHINE |
|
|
|
|
|
|
|
|
|
|
EMBROIDERING |
|
|
|
|
|
|
|
|
|
|
|
MAINTENANCE |
|
|
|
|
|
|
|
|
|
|
|
MESSAGE |
ERROR |
|
|
|
|
|
|
|
|
|
|
TROUBLESHOOTING |
|
|
|
|
|
|
|
PATTERNS |
|
|
|
|
|
|
|
|
|
|
(OPTIONAL) |
FRAME |
SMALL A USING |
EMBROIDERING |
|
|
|
|
|
|
|
|
(OPTIONAL) FRAME |
SMALL-EXTRA |
A USING |
EMBROIDERING |
|
|
|
|
(OPTIONAL) |
FRAME |
LARGE A USING |
EMBROIDERING |
|
|
|
|
OPTIONS |
|
1 |
|
2 |
|
3 |
|
4 |
|
5 |
6 |
7 |
8 |
No. |
Parts Name |
Parts Code |
|||
U.S.A. |
Others |
||||
|
|
|
|||
1 |
Embroidery set (Regular) |
SA417 |
XA3727-001 |
||
|
|
|
|
|
|
2 |
Embroidery set (Large) |
SA418 |
XA3733-001 |
||
|
|
|
|
|
|
3 |
Embroidery set (Small) |
SA416 |
XA3730-001 |
||
|
|
|
|
|
|
4 |
Embroidery set (Extra-small) |
SA415 |
XA3713-001 |
||
|
|
|
|
|
|
5 |
Brother poly 40 color thread set |
SA740 |
X80928-100 |
||
|
|
|
|
|
|
6 |
Brother poly #90 bobbin thread |
EBT-PE |
X80919-001 |
||
|
|
|
|
|
|
7 |
Backing material (Stabilizer material) |
SA517 |
X80914-001 |
||
|
|
|
|
|
|
|
Memory card |
|
|
||
|
|
|
|
|
|
|
|
No. 1 Alphabet |
SA298 |
X58317-001 |
|
|
|
|
|
|
|
|
|
No. 2 Flower |
SA299 |
X58321-001 |
|
|
|
|
|
|
|
|
|
No. 3 Dinosaur |
SA300 |
X58362-001 |
|
|
|
|
|
|
|
|
|
No. 6 Moskowitz’s World |
SA303 |
X58497-001 |
|
|
|
|
|
|
|
|
|
No. 7 Country Life |
SA304 |
X59322-001 |
|
|
|
|
|
|
|
|
|
No. 8 Holiday |
SA305 |
X59357-001 |
|
|
|
|
|
|
|
|
|
No. 9 Hobby Craft |
SA306 |
X59511-001 |
|
|
|
|
|
|
|
|
|
No. 10 Monogram emblem |
SA307 |
X59567-001 |
|
|
|
|
|
|
|
8 |
|
No. 11 Frame |
SA311 |
XA0257-001 |
|
|
|
|
|
||
|
No. 12 Transportation |
SA312 |
XA0275-001 |
||
|
|
||||
|
|
|
|
|
|
|
|
No. 13 Sports Emblem |
SA313 |
XA0517-001 |
|
|
|
|
|
|
|
|
|
No. 14 Large Floral |
SA314 |
XA1223-001 |
|
|
|
|
|
|
|
|
|
No. 15 Cute Kids |
SA315 |
XA1325-001 |
|
|
|
|
|
|
|
|
|
No. 16 Dogs & Cats |
SA316 |
XA1406-001 |
|
|
|
|
|
|
|
|
|
No. 17 Nintendo |
SA317 |
XA1434-001 |
|
|
|
|
|
|
|
|
|
No. 19 Marine |
SA319 |
XA2452-001 |
|
|
|
|
|
|
|
|
|
No. 20 Petite Designs |
SA320 |
XA2869-001 |
|
|
|
|
|
|
|
|
|
No. 21 Needlework |
SA321 |
XA2873-001 |
|
|
|
|
|
|
|
|
|
No. 25 Horse |
SA325 |
XA3791-001 |
|
|
|
|
|
|
|
WARNING
Embroidery Cards purchased in foreign countries may not work with your machine.
|
CONTENTS |
|
|
|
|
|
|
|
|
|
|
|
KNOWLEDGE |
MACHINE |
|
|
|
|
|
|
|
|
|
|
EMBROIDERING |
|
|
|
|
|
|
|
|
|
|
|
MAINTENANCE |
|
|
|
|
|
|
|
|
|
|
|
MESSAGE |
ERROR |
|
|
|
|
|
|
|
|
|
|
TROUBLESHOOTING |
|
|
|
|
|
|
|
PATTERNS |
|
|
|
|
|
|
|
|
|
|
(OPTIONAL) |
FRAME |
SMALL A USING |
EMBROIDERING |
|
|
|
|
|
|
|
|
(OPTIONAL) FRAME |
SMALL-EXTRA |
A USING |
EMBROIDERING |
|
|
|
|
(OPTIONAL) |
FRAME |
LARGE A USING |
EMBROIDERING |
|
|
|
|
7
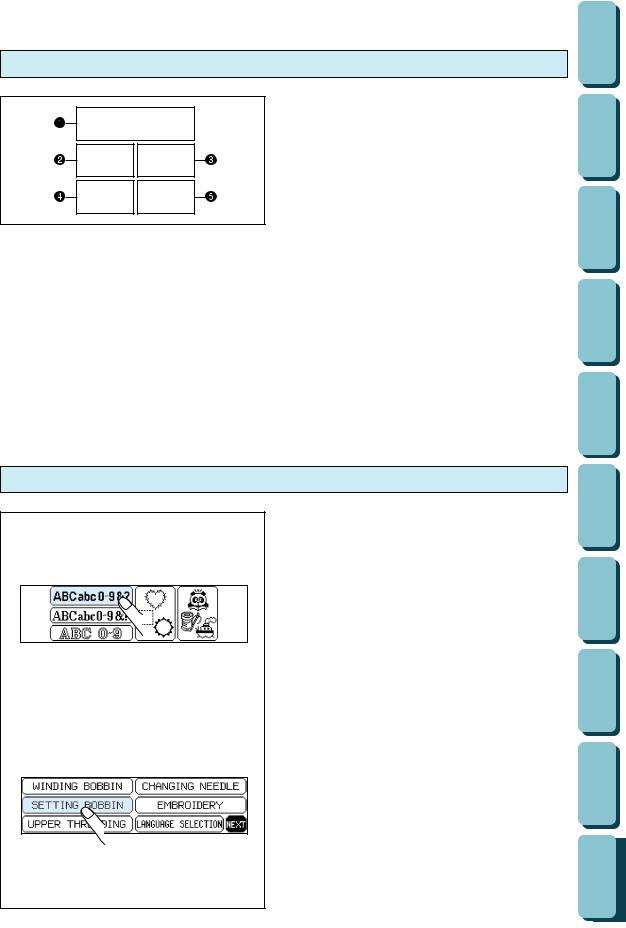
OPERATION (SELECTION KEYS)
Most of the instructions are in the machine’s memory. Messages on the LCD screen guide you through each operation.
CONTENTS
A B
1


1 “BASIC OPERATION” key
1.Press “BASIC OPERATION”.
2.Touch “NEXT”.
3.Touch “SWITCH FUNCTION”.
4.Touch “SELECTION KEY”.
|
|
KNOWLEDGE |
MACHINE |
|
|
|
|
|
|
|
|
|
|
|
|
|
|
|
|
|
|
EMBROIDERING |
|
|
|
|
|
|
|
|
|
|
|
|
|
|
MAINTENANCE |
|
|
|
|
|
|
|
|
|
|
|
|
|
|
MESSAGE |
ERROR |
|
|
|
|
|
|
|
|
|
|
|
|
|
TROUBLESHOOTING |
|
|
|
|
|
|
|
|
|
PATTERNS |
|
|
|
|
|
|
|
|
|
|
|
|
|
(OPTIONAL) |
FRAME |
SMALL A USING |
EMBROIDERING |
|
|
|
|
|
|
|
|
|
|
|
(OPTIONAL) FRAME |
SMALL-EXTRA |
A USING |
EMBROIDERING |
|
|
|
|
|
|
(OPTIONAL) |
FRAME |
LARGE A USING |
EMBROIDERING |
|
|
|
|
|
8
Using the selection keys
A. Selection keys
Select one of the five keys that explain the functions of the machine, and press that key. When you press the key, the LCD at the left will change to display the information that you requested.
1 “CHARACTERS & DESIGNS” KEY
2 “CARD” KEY
3 “MEMORY” KEY
4 “BASIC OPERATION” KEY
5 “MODIFY & ADVISE” KEY
Operation using the screen
B. LCD screen
A pattern or operation can be selected by gently touching the box on the screen which corresponds to the pattern or operation that you wish to select.
|
CONTENTS |
|
|
|
|
|
|
|
|
|
|
|
KNOWLEDGE |
MACHINE |
|
|
|
|
|
|
|
|
|
|
EMBROIDERING |
|
|
|
|
|
|
|
|
|
|
|
MAINTENANCE |
|
|
|
|
|
|
|
|
|
|
|
MESSAGE |
ERROR |
|
|
|
|
|
|
|
|
|
|
TROUBLESHOOTING |
|
|
|
|
|
|
|
PATTERNS |
|
|
|
|
|
|
|
|
|
|
(OPTIONAL) |
FRAME |
SMALL A USING |
EMBROIDERING |
|
|
|
|
|
|
|
|
(OPTIONAL) FRAME |
SMALL-EXTRA |
A USING |
EMBROIDERING |
|
|
|
|
(OPTIONAL) |
FRAME |
LARGE A USING |
EMBROIDERING |
|
|
|
|
9

Example: To find out how to wind a bobbin
1.Press “BASIC OPERATION”.
2.Touch “WINDING BOBBIN”.
The operation procedure for winding a bobbin will be displayed.
1 “BASIC OPERATION” key
|
CONTENTS |
|
|
|
|
|
|
|
|
KNOWLEDGE |
MACHINE |
|
|
|
|
|
|
|
EMBROIDERING |
|
|
|
|
|
|
|
|
MAINTENANCE |
|
|
|
|
|
|
|
|
MESSAGE |
ERROR |
|
|
|
10 |
Example: To find out the combination of fabric, needle and thread
1.Press “MODIFY & ADVISE”.
2.Touch “FABRIC AND THREAD AND NEEDLE”.
2 “MODIFY & ADVISE” key
|
TROUBLESHOOTING |
|
|
|
|
|
|
|
PATTERNS |
|
|
|
|
|
|
|
|
|
|
(OPTIONAL) |
FRAME |
SMALL A USING |
EMBROIDERING |
|
|
|
|
|
|
|
|
(OPTIONAL) FRAME |
SMALL-EXTRA |
A USING |
EMBROIDERING |
|
|
|
|
(OPTIONAL) |
FRAME |
LARGE A USING |
EMBROIDERING |
|
|
|
|
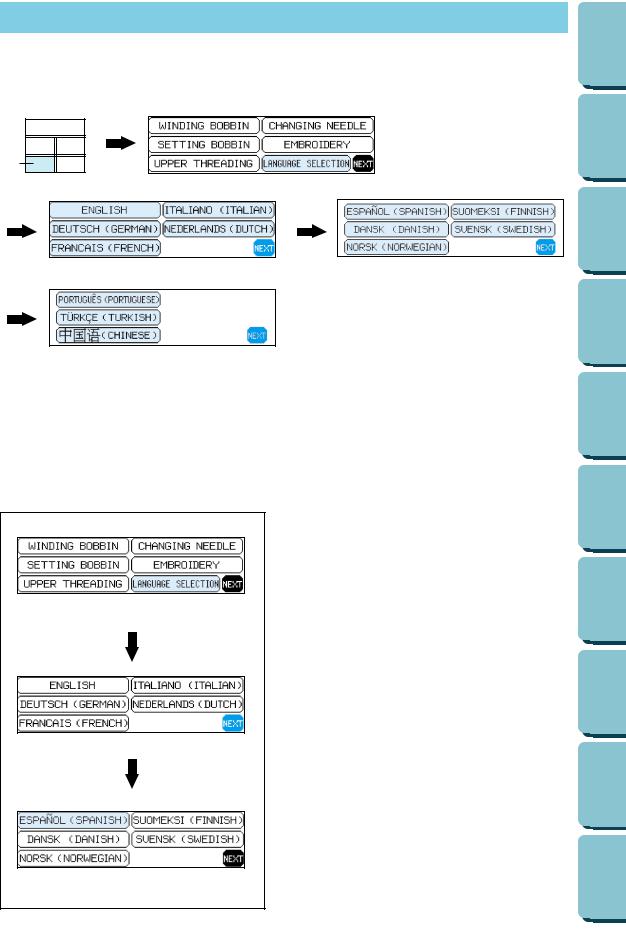
HOW TO USE THE LANGUAGE SELECTION KEY
You can use the “LANGUAGE SELECTION” key to easily change the display language for all the keys and messages on the LCD screen to the language you need.
CONTENTS
1 |
|
|
|
KNOWLEDGE |
MACHINE |
|
|
|
|
|
|
|
|
|
|
|
|
EMBROIDERING |
|
|
|
|
|
|
MAINTENANCE |
|
|
1. |
Press “BASIC OPERATION”. |
|
|
|
|
|
2. |
Touch “LANGUAGE SELECTION”. |
|
|
|
|
|
3. The language display screen will then appear. Touch the |
|
MESSAGE |
ERROR |
|
||
|
key which corresponds to the desired language. |
|
|
|||
* You can move to the next screen by touching “NEXT”. |
|
|
||||
1 “BASIC OPERATION” key |
|
|
|
|
||
|
Example:To change the display language to |
|
TROUBLESHOOTING |
|
||
|
|
Spanish |
|
|
||
|
1. |
Touch “LANGUAGE SELECTION”. |
|
|
||
|
|
|
|
|
||
|
2. |
Touch “NEXT”. |
|
|
|
|
|
3. |
Touch “ESPAÑOL (SPANISH)”. |
|
PATTERNS |
|
|
|
|
This will change the language setting to |
|
|
||
|
|
Spanish. |
|
|
||
|
4. |
The display will then return to the screen |
|
|
||
|
|
which was previously being displayed. |
|
|
||
|
|
|
|
|
|
|
|
|
|
(OPTIONAL) |
FRAME |
SMALL A USING |
EMBROIDERING |
|
NOTE |
(OPTIONAL) FRAME |
SMALL-EXTRA |
A USING |
EMBROIDERING |
|
|
* |
When the “LANGUAGE SELECTION” is used |
||||
|
|
to set the display language, error messages |
||||
|
|
will also be displayed in the language |
||||
|
|
|
|
|
|
|
|
|
selected. |
|
|
LARGE A USING |
EMBROIDERING |
|
* |
The display language can be selected from a |
(OPTIONAL) |
|
||
|
|
list of 13 languages (English, German, |
FRAME |
|||
|
|
French, Italian, Dutch, Spanish, Danish, |
||||
|
|
Norwegian, Finnish, Swedish, Portuguese, |
||||
|
|
Turkish and Chinese). |
||||
|
|
|
||||
|
|
11 |
|
|
|
|
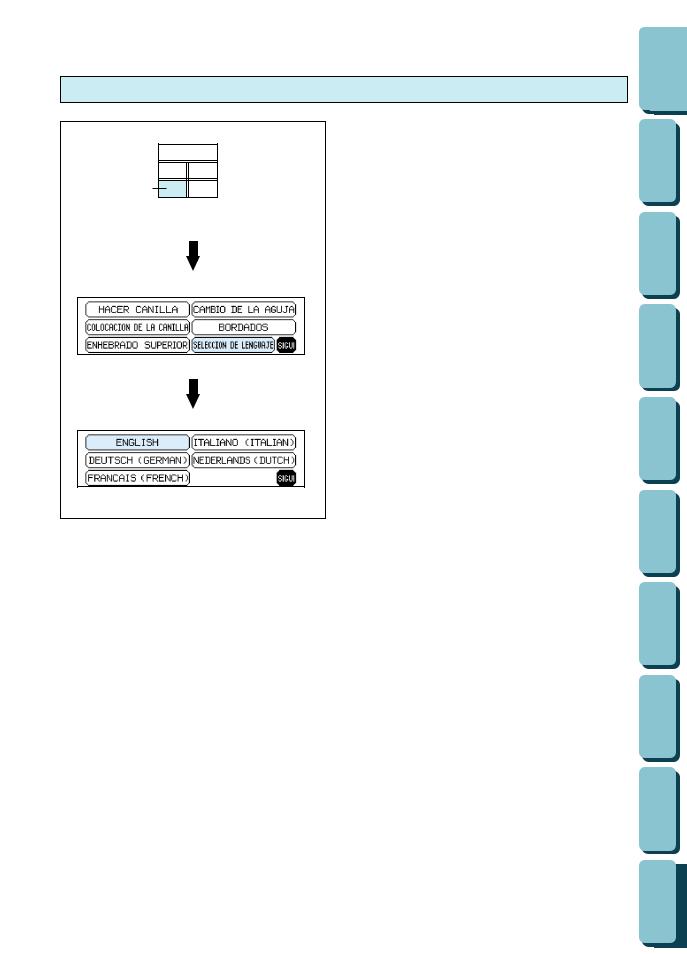
How to clear the language selection
CONTENTS
1 |
Example: To change the display language from Spanish back to English
1.Press “BASIC OPERATION”.
2.Touch “SELECCION DE LENGUAJE”.
3.Touch “ENGLISH”.
This will cancel the Spanish language setting and return all screen displays and error messages to the English language.
1 “BASIC OPERATION” key
CAUTION
cThis function can not be used as a translation function.
cIf the power supply is turned off, the current language setting will be retained and will not be cleared.
|
KNOWLEDGE |
MACHINE |
|
|
|
|
|
|
|
|
|
|
EMBROIDERING |
|
|
|
|
|
|
|
|
|
|
|
MAINTENANCE |
|
|
|
|
|
|
|
|
|
|
|
MESSAGE |
ERROR |
|
|
|
|
|
|
|
|
|
|
TROUBLESHOOTING |
|
|
|
|
|
|
|
PATTERNS |
|
|
|
|
|
|
|
|
|
|
(OPTIONAL) |
FRAME |
SMALL A USING |
EMBROIDERING |
|
|
|
|
|
|
|
|
(OPTIONAL) FRAME |
SMALL-EXTRA |
A USING |
EMBROIDERING |
|
|
|
|
(OPTIONAL) |
FRAME |
LARGE A USING |
EMBROIDERING |
|
|
|
|
12
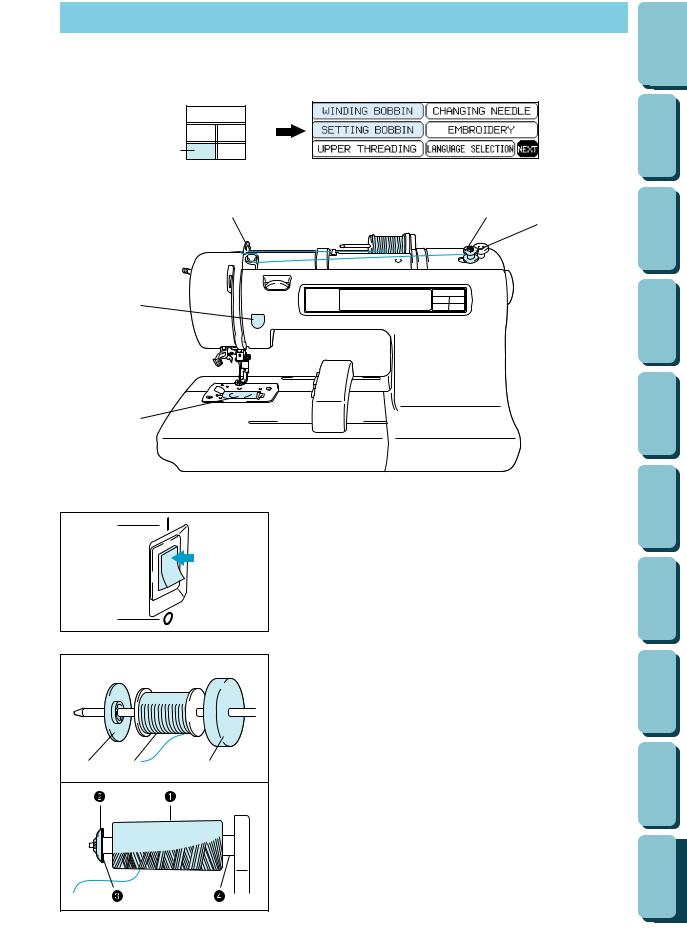
BOBBIN WINDING AND INSTALLATION
How to wind a bobbin and set the lower thread.
CONTENTS
|
|
1 |
|
1 “BASIC OPERATION” key |
|
|
|
3 |
|
6 |
|
|
7 |
|
|
1 |
|
|
2 |
|
1 |
2 |
3 |
4
5
2 
 1
1
1.Connect the machine to the power supply and turn on the main power.
1 ON
2 OFF
2.Set the thread spool. The thread end should come from the bottom front of the spool. The spool cap closest to the thread spool size should be used to hold the spool securely on the spool post.
*The spool cap should be pushed on as far as it will go.
1 Spool cap
2 Spool
3 Spool felt
NOTE
*If using a fine thread such as cross wound thread, remove the spool felt and slightly separate the spool cap from the thread on the spool before using.
1 Cross wound thread
2 Spool cap (small)
3 Separate slightly
4 No spool felt
|
KNOWLEDGE |
MACHINE |
|
|
|
|
|
|
|
|
|
|
EMBROIDERING |
|
|
|
|
|
|
|
|
|
|
|
MAINTENANCE |
|
|
|
|
|
|
|
|
|
|
|
MESSAGE |
ERROR |
|
|
|
|
|
|
|
|
|
|
TROUBLESHOOTING |
|
|
|
|
|
|
|
PATTERNS |
|
|
|
|
|
|
|
|
|
|
(OPTIONAL) |
FRAME |
SMALL A USING |
EMBROIDERING |
|
|
|
|
|
|
|
|
(OPTIONAL) FRAME |
SMALL-EXTRA |
A USING |
EMBROIDERING |
|
|
|
|
(OPTIONAL) |
FRAME |
LARGE A USING |
EMBROIDERING |
|
|
|
|
13
2
CONTENTS
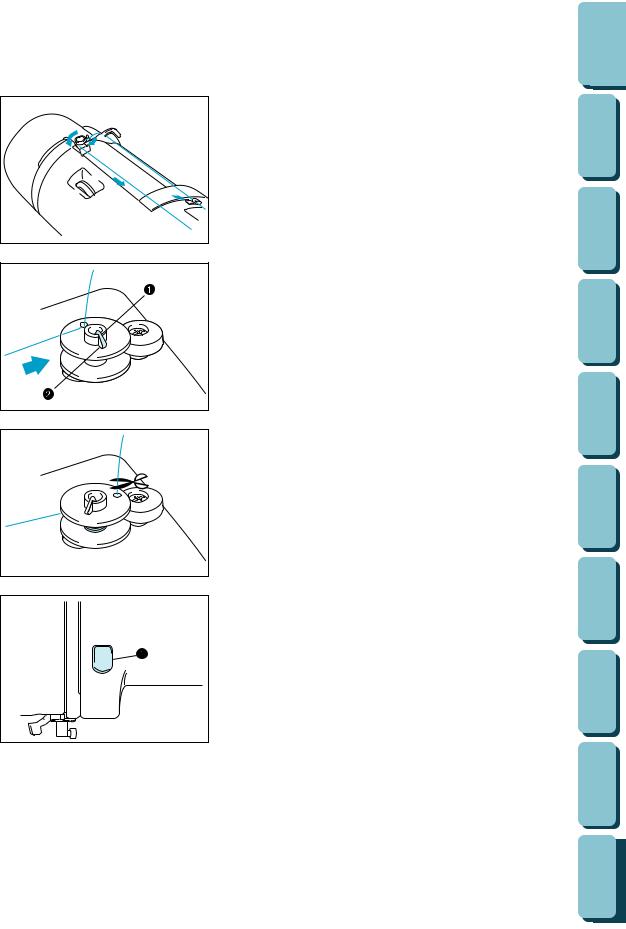
3. |
Guide the thread through the machine and the bobbin |
|
KNOWLEDGE |
MACHINE |
|
|
winding guide as marked with the dotted line. |
|
|
||
|
|
|
|
|
|
|
|
|
|
|
|
|
|
|
|
|
|
4. |
Guide the thread through the small hole in the side of the |
|
EMBROIDERING |
|
|
|
|
|
|
||
|
bobbin from the inside. Holding the thread end, push the |
|
|
|
|
|
|
MAINTENANCE |
|
||
|
bobbin winder shaft to right. |
|
|
||
|
|
|
|
|
|
* |
Match the groove of the bobbin with the spring on the shaft. |
|
|
|
|
1 |
Spring on the shaft |
|
|
|
|
2 |
Groove in the bobbin |
|
|
|
|
|
|
|
|
|
|
|
|
|
|
|
|
5. |
Holding the thread end, press the “START/STOP” button. |
|
MESSAGE |
ERROR |
|
|
|
|
|
||
|
Wind the thread a few times around the bobbin and press |
|
|
|
|
|
the “START/STOP” button again. |
|
|
|
|
|
Trim the excess thread from the top of the bobbin after the |
|
TROUBLESHOOTING |
|
|
|
|
|
|
|
|
|
machine stops. |
|
|
|
|
* |
It is important to trim the thread close to the spoolend. |
|
|
|
|
|
|
|
|
|
|
|
|
|
|
|
|
6. |
Press the “START/STOP” button. The machine will stop |
|
PATTERNS |
|
|
|
|
|
|
||
|
automatically when the bobbin is full. Press the |
|
|
|
|
|
“START/STOP” button to stop at any time or when the |
|
|
|
|
|
bobbin has stopped moving and the motor is still running. |
|
|
|
|
|
|
|
|
|
|
1 |
“START/STOP” button |
(OPTIONAL) |
FRAME |
SMALLAUSING |
EMBROIDERING |
|
|
|
|
||
7. |
Push the bobbin shaft to the left. Remove the bobbin and |
|
|
|
|
|
continue sewing. |
|
|
|
|
|
|
|
|
|
|
|
|
|
|
|
|
8. |
Set the bobbin into the shuttle as shown on page 15. |
(OPTIONAL)FRAME |
SMALL-EXTRA |
AUSING |
EMBROIDERING |
|
|
|
|
||
It’s a good idea to have several full bobbins on |
|
|
|
|
|
hand before start your project. |
|
|
|
|
|
|
|
|
|
|
|
|
|
|
|
|
|
|
|
(OPTIONAL) |
FRAME |
LARGE A USING |
EMBROIDERING |
|
|
|
|
|
|
14
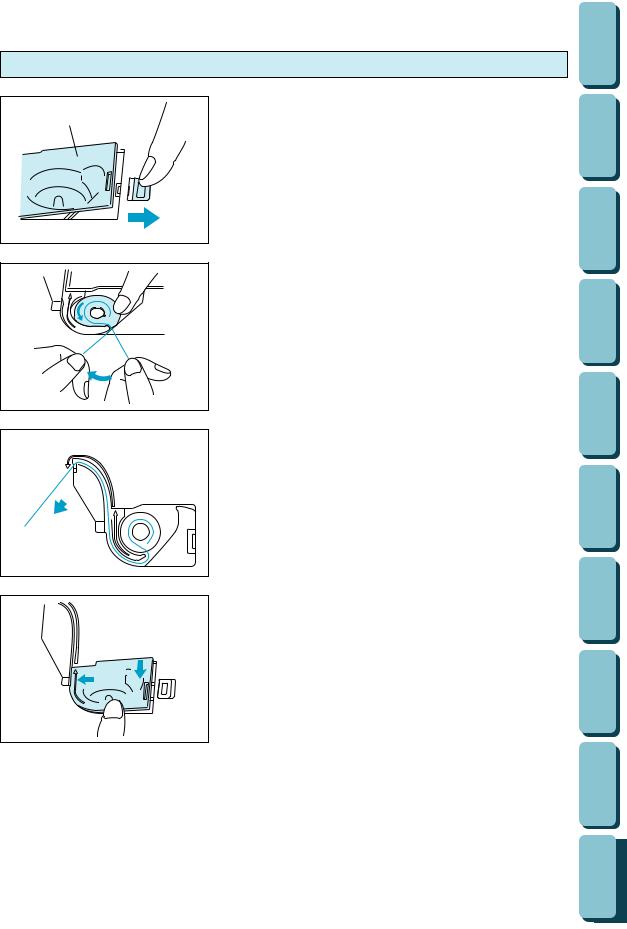
Setting the bobbin
The bobbin cover is located in front of the needle plate.
1
1.Slide open the bobbin cover by pushing the bobbin release button to the right.
1 Bobbin cover
2 Bobbin cover release button.
2.Insert the bobbin into the shuttle following the thread direction as noted in the etching under the bobbin cover.
*(Use a plastic bobbin as shown on page 6)
3.Guide the thread end around the finger through the channel toward the back, pulling the thread toward you which will cut off any excess.
|
CONTENTS |
|
|
|
|
|
|
|
|
KNOWLEDGE |
MACHINE |
|
|
|
|
|
|
|
EMBROIDERING |
|
|
|
|
|
|
|
|
MAINTENANCE |
|
|
|
|
|
|
|
|
MESSAGE |
ERROR |
|
|
|
|
|
|
|
TROUBLESHOOTING |
|
|
|
|
1
4. |
Close the bobbin cover by placing the left end in place and |
|
PATTERNS |
|
|
|
|
|
|
||
|
pressing down lightly on the right end to snap in place. |
|
|
|
|
|
|
|
|
|
|
|
|
|
|
|
|
|
|
(OPTIONAL) |
FRAME |
SMALL A USING |
EMBROIDERING |
|
|
|
|
|
|
|
|
|
|
|
|
* |
There is no need to pull up the lower (bobbin) thread, it is |
(OPTIONAL)FRAME |
SMALL-EXTRA |
AUSING |
EMBROIDERING |
|
|
|
|
||
|
done automatically. |
|
|
|
|
|
Embroidery can begin without pulling out the lower thread. |
|
|
|
|
|
|
|
|
|
|
|
|
|
|
|
|
|
|
(OPTIONAL) |
FRAME |
LARGE A USING |
EMBROIDERING |
|
|
|
|
|
|
15
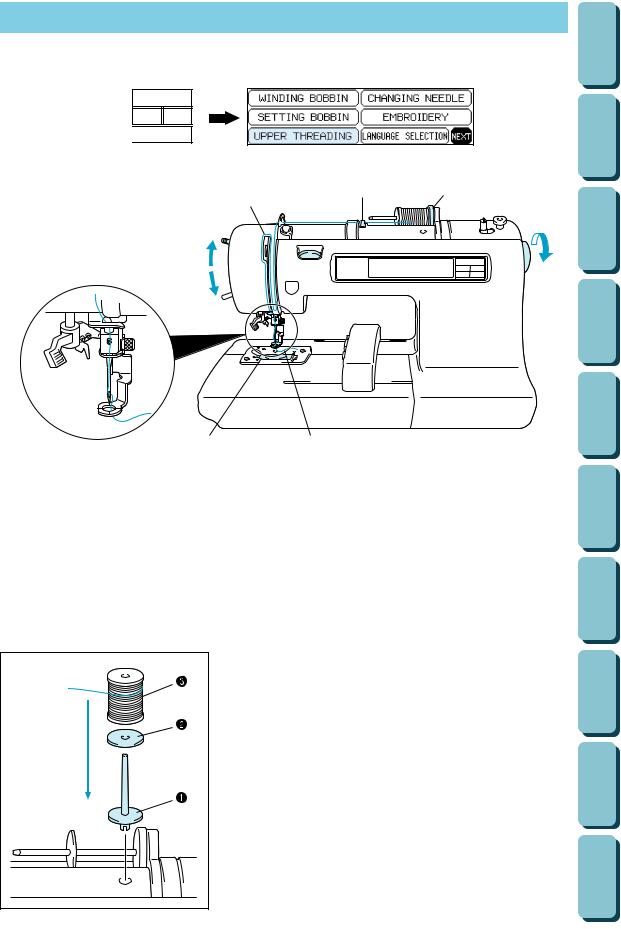
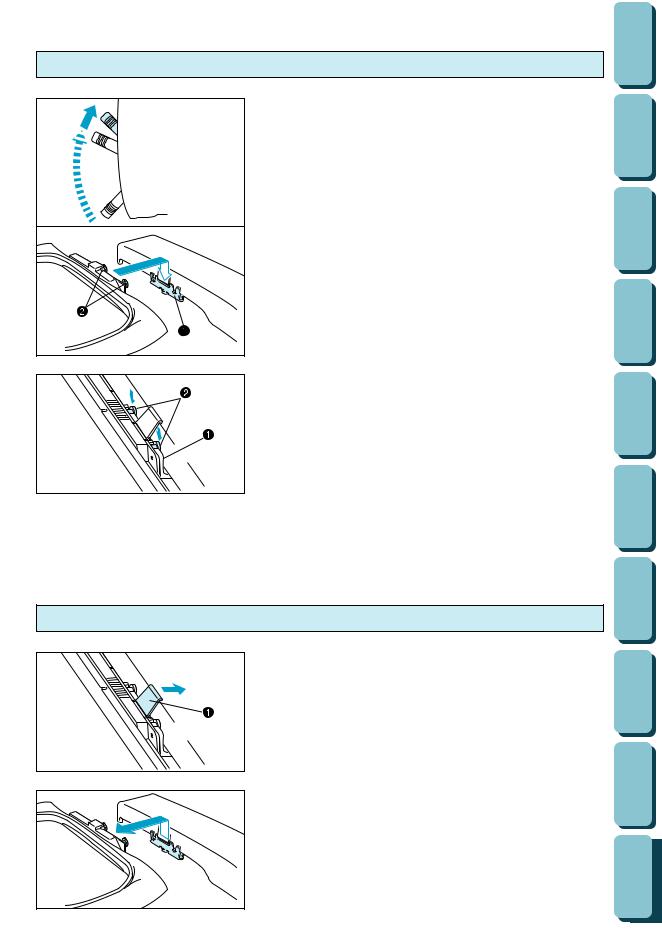
UPPER THREADING
Thread according to the number and arrow marks on the machine.
1


1 “BASIC OPERATION” key
1
2
4
** 5
5. Thread the needle using the auto needle |
before removing the upper thread to prevent |
threading device (See page 17) or manually. |
damage to the thread tension system. |
USING THE EXTRA SPOOL PIN AND NET
Extra spool pin
|
CONTENTS |
|
|
|
|
|
|
|
|
KNOWLEDGE |
MACHINE |
|
|
|
|
|
|
|
EMBROIDERING |
|
|
|
|
|
|
|
|
MAINTENANCE |
|
|
|
|
|
|
|
|
MESSAGE |
ERROR |
|
|
|
|
|
|
|
TROUBLESHOOTING |
|
|
|
|
|
PATTERNS |
|
|
|
|
16 |
Use when embroidering with metallic thread.
1.Insert the extra spool pin into the hole on the top of the machine.
2.Install the spool felt and the thread spool in that order, and
then thread the upper thread.
*Do not thread the thread onto bracket (A).
*When sewing using the metallic thread, set thread tension control dial (B) to the “0” position.
*When setting the thread spool, set it so that the thread winds off from the front of the spool.
*If using metallic thread, we recommend that you use a 90/14 home sewing machine needle.
1Insert the extra spool pin into the hole on the top of the machine
2 Spool felt
3 Thread spool
NOTE
This method keeps the thread from twisting as it comes off the spool pin.
(OPTIONAL) |
FRAME |
SMALL A USING |
EMBROIDERING |
|
|
|
|
|
|
|
|
(OPTIONAL) FRAME |
SMALL-EXTRA |
A USING |
EMBROIDERING |
|
|
|
|
(OPTIONAL) |
FRAME |
LARGE A USING |
EMBROIDERING |
|
|
|
|
|
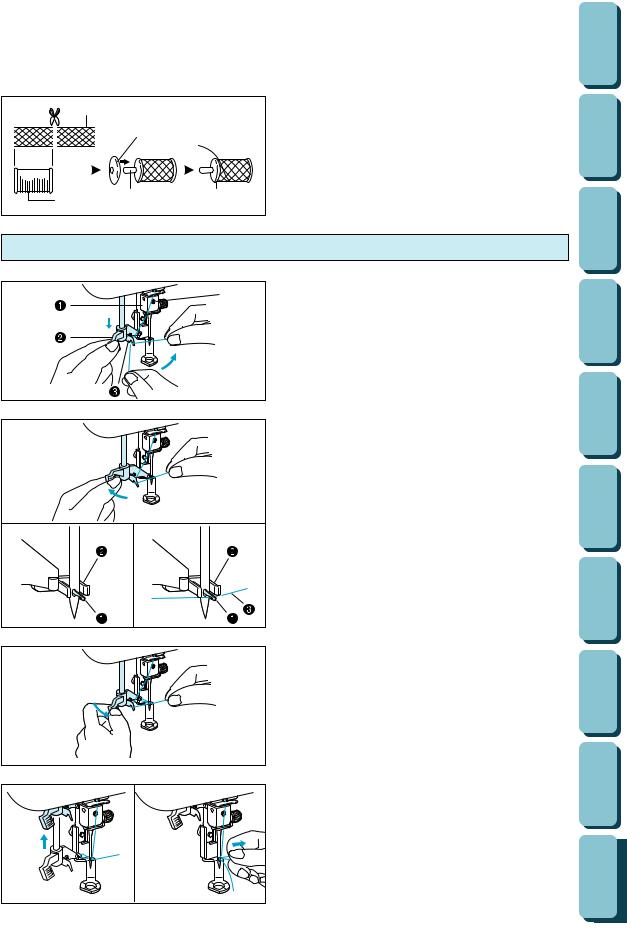
1 |
|
Net |
|
|
|
If using special threads which wind quickly off the |
||
|
|
|
||
|
4 |
|
thread spool, attach a net to the spool before using. |
|
|
|
* |
Cut the net to match the size of the spool. |
|
|
|
|
||
|
|
|
1 |
Net |
|
|
|
2 |
Thread spool |
2 |
3 |
4 |
3 |
Spool pin |
|
|
4 |
Spool cap |
|
|
|
|
||
Auto needle threading device
thread through the wire loop thread 6 (number “6”) and gently pull the thread
you.
presser foot.
needle threader lever until it stops. thread into the guide and pull it
the right.
thread guide threader lever
threading device cannot be used needle is lowered.
needle threader lever toward the back. be sure that the hook has passed through the eye of the needle and route the
thread under the metal guides and the hook. * Pull the thread toward you and check that it is
being held by the thread hook.
1 Hook
2 Metal guides
3 Thread correctly under the metal guides and the hook.
holding the thread, pull the lever forward.
thread from the needle threader
thread through the needle eye of the machine.
|
CONTENTS |
|
|
|
|
|
|
|
|
|
|
|
KNOWLEDGE |
MACHINE |
|
|
|
|
|
|
|
|
|
|
EMBROIDERING |
|
|
|
|
|
|
|
|
|
|
|
MAINTENANCE |
|
|
|
|
|
|
|
|
|
|
|
MESSAGE |
ERROR |
|
|
|
|
|
|
|
|
|
|
TROUBLESHOOTING |
|
|
|
|
|
|
|
PATTERNS |
|
|
|
|
|
|
|
|
|
|
(OPTIONAL) |
FRAME |
SMALL A USING |
EMBROIDERING |
|
|
|
|
|
|
|
|
(OPTIONAL) FRAME |
SMALL-EXTRA |
A USING |
EMBROIDERING |
|
|
|
|
(OPTIONAL) |
FRAME |
LARGE A USING |
EMBROIDERING |
|
|
|
|
17
PREPARATION BEFORE EMBROIDERING
Be sure to turn off the power before carrying out the following.
1


1 “BASIC
Attaching stabilizer material
Attach a stabilizer material to the reverse side of the area of fabric to be embroidered.
It is not necessary to attach a stabilizer material to fabric which is already sufficiently stiff. For thin, knit and stretch fabric which may move in the frame, attach the fabric to a non-woven stabilizer material before embroidering.
The stabilizer material should be framed along with the fabric for the best results.
There are many types of non-woven stabilizers available on the market. The goal of the stabilizer is to prevent stretch or movement of the fabric. Best results for stretch, knit or light weight fabrics will be obtained by using a light weight nonwoven iron-on stabilizer.
1 Embroidery frame
2 Fabric
3 Non-woven stabilizer material
|
CONTENTS |
|
|
|
|
|
|
|
|
KNOWLEDGE |
MACHINE |
|
|
|
|
|
|
|
EMBROIDERING |
|
|
|
|
|
|
|
|
MAINTENANCE |
|
|
|
|
|
|
|
|
MESSAGE |
ERROR |
|
|
|
|
|
|
|
TROUBLESHOOTING |
|
|
|
|
Embroidering different types of fabric
From normal fabrics to thick fabrics
It’s a good idea to place a piece of stabilizer fabric under (not within) the frame holding the fabric being embroidered.
|
PATTERNS |
|
|
|
|
|
|
|
|
|
|
(OPTIONAL) |
FRAME |
SMALL A USING |
EMBROIDERING |
|
|
|
|
|
|
|
|
(OPTIONAL) FRAME |
SMALL-EXTRA |
A USING |
EMBROIDERING |
|
|
|
|
(OPTIONAL) |
FRAME |
LARGE A USING |
EMBROIDERING |
|
|
|
|
18
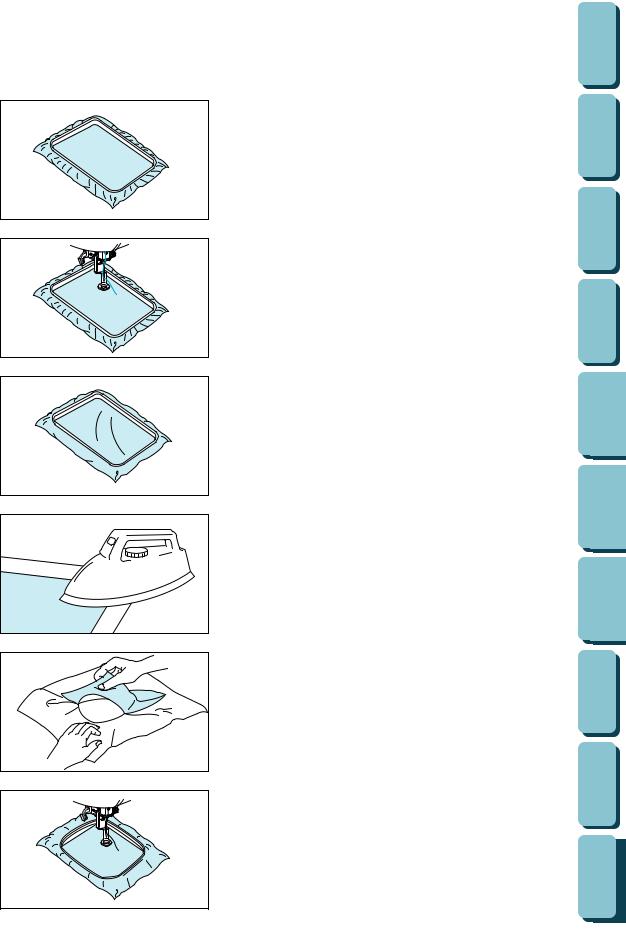
Thin fabrics such as organza or cotton batiste.
After selecting your fabric, place a piece of stabilizer fabric within the frame beneath the fabric being embroidered.
We also recommend using a spray-on stabilizer first, allow it to dry or iron to dry then use a non-woven stabilizer with it in the frame.
|
CONTENTS |
|
|
|
|
|
|
|
|
KNOWLEDGE |
MACHINE |
|
|
|
|
|
|
|
EMBROIDERING |
|
|
|
|
|
|
|
|
MAINTENANCE |
|
|
|
|
Stretchable fabrics such as jerseys
ERROR
MESSAGE
Adhere a piece of iron-on stabilizer material which is slightly larger than the frame onto the fabric to be embroidered, and then stretch it over the frame area.
*SA517 (X80914-001)
PATTERNS TROUBLESHOOTING
A stabilizer material that can be torn away without affecting the embroidering is ideal.
Use the smallest frame possible that can still accommodate the pattern being embroidered, as this will give better results.
(OPTIONAL) |
FRAME |
SMALL A USING |
EMBROIDERING |
|
|
|
|
|
|
|
|
(OPTIONAL) FRAME |
SMALL-EXTRA |
A USING |
EMBROIDERING |
|
|
|
|
(OPTIONAL) |
FRAME |
LARGE A USING |
EMBROIDERING |
|
|
|
|
19
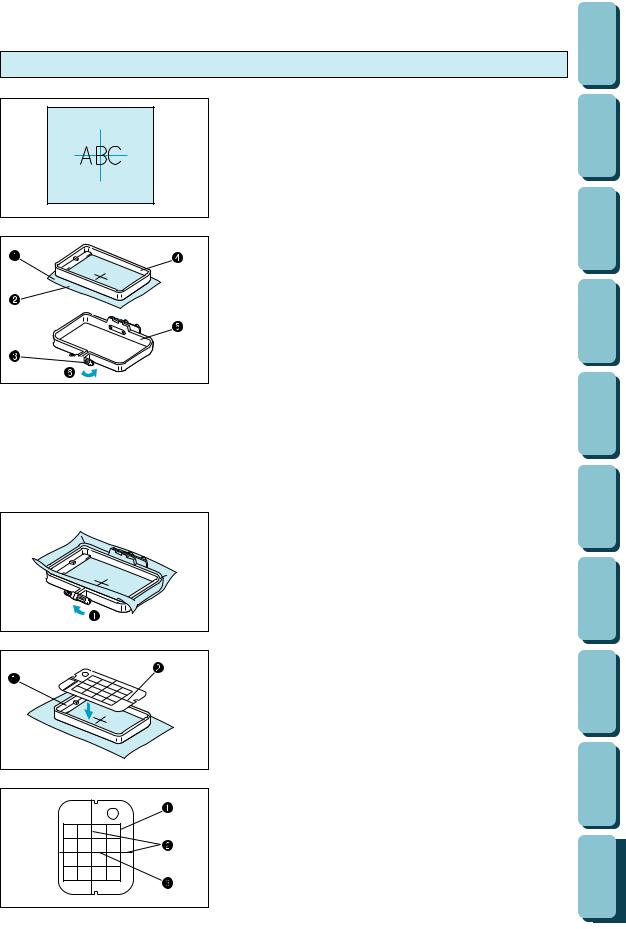
Setting the fabric in the embroidery frame
a mark on the fabric with chalk or marking pencil the center of the area to be embroidered.
Loosen the adjusting screw of the outer frame, place the fabric on top of the outer frame with the right side of the fabric up, and then place the inner frame into the outer frame to clamp the fabric.
Make sure that the ƒ marks of the outer and inner frames are aligned.
Fabric
Right side surface for embroidering Adjusting screw
Inner frame Outer frame
6 Loosen
|
CONTENTS |
|
|
|
|
|
|
|
|
KNOWLEDGE |
MACHINE |
|
|
|
|
|
|
|
EMBROIDERING |
|
|
|
|
|
|
|
|
MAINTENANCE |
|
|
|
|
|
|
|
|
MESSAGE |
ERROR |
|
|
|
Firmly tighten the adjusting screw, and then temporarily remove the fabric and the inner frame from the outer frame.
Tighten
Place the embroidery sheet on top of the inner frame so that the center crosshairs on the embroidery sheet and the mark on the fabric are aligned.
Inner frame
Vertical + horizontal crosshair lines
Area available for embroidering
Vertical + horizontal crosshair lines
Center of the crosshairs and the pattern
|
TROUBLESHOOTING |
|
|
|
|
|
|
|
PATTERNS |
|
|
|
|
|
|
|
|
|
|
(OPTIONAL) |
FRAME |
SMALL A USING |
EMBROIDERING |
|
|
|
|
|
|
|
|
(OPTIONAL) FRAME |
SMALL-EXTRA |
A USING |
EMBROIDERING |
|
|
|
|
(OPTIONAL) |
FRAME |
LARGE A USING |
EMBROIDERING |
|
|
|
|
20
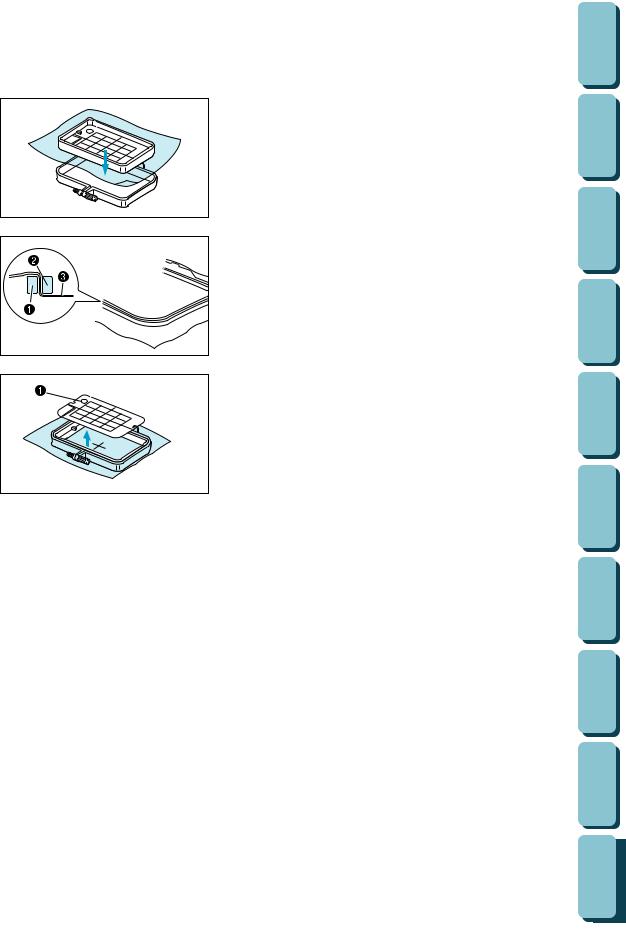
Insert the fabric and inner frame back into the outer frame while ensuring that the mark on the fabric does not slip out of position.
Correct setting
Clamp securely so that the edges of the outer frame and inner frame are even.
Outer frame
Inner frame
Fabric
Check to be sure that the center of the design is in the correct location based on the crosshairs of the embroidery sheet.
Remove the embroidery sheet using the finger hole to pull up.
Finger hole for lifting
|
CONTENTS |
|
|
|
|
|
|
|
|
|
|
|
KNOWLEDGE |
MACHINE |
|
|
|
|
|
|
|
|
|
|
EMBROIDERING |
|
|
|
|
|
|
|
|
|
|
|
MAINTENANCE |
|
|
|
|
|
|
|
|
|
|
|
MESSAGE |
ERROR |
|
|
|
|
|
|
|
|
|
|
TROUBLESHOOTING |
|
|
|
|
|
|
|
PATTERNS |
|
|
|
|
|
|
|
|
|
|
(OPTIONAL) |
FRAME |
SMALL A USING |
EMBROIDERING |
|
|
|
|
|
|
|
|
(OPTIONAL) FRAME |
SMALL-EXTRA |
A USING |
EMBROIDERING |
|
|
|
|
(OPTIONAL) |
FRAME |
LARGE A USING |
EMBROIDERING |
|
|
|
|
21
Fitting the embroidery frame to the machine
1.Raise the presser foot to its highest position. Then pass the embroidery frame under the presser foot with the mounting pins on the right side and the fabric right side up.
1 Frame holder
2 Pins
Align the two pins on the embroidery frame with the frame holder, and then insert the frame into the frame holder until a click is heard.
Be sure to insert both pins. If only the forward or the back pin is inserted, the pattern may not turn out correctly.
Frame holder
Pins
|
CONTENTS |
|
|
|
|
|
|
|
|
KNOWLEDGE |
MACHINE |
|
|
|
|
|
|
|
EMBROIDERING |
|
|
|
|
|
|
|
|
MAINTENANCE |
|
|
|
|
|
|
|
|
MESSAGE |
ERROR |
|
|
|
|
|
|
|
TROUBLESHOOTING |
|
|
|
|
Removing the embroidery frame
the release lever to the right and remove the embroidery by pulling up.
Release lever
|
PATTERNS |
|
|
|
|
|
|
|
|
|
|
(OPTIONAL) |
FRAME |
SMALL A USING |
EMBROIDERING |
|
|
|
|
|
|
|
|
(OPTIONAL) FRAME |
SMALL-EXTRA |
A USING |
EMBROIDERING |
|
|
|
|
(OPTIONAL) |
FRAME |
LARGE A USING |
EMBROIDERING |
|
|
|
|
22
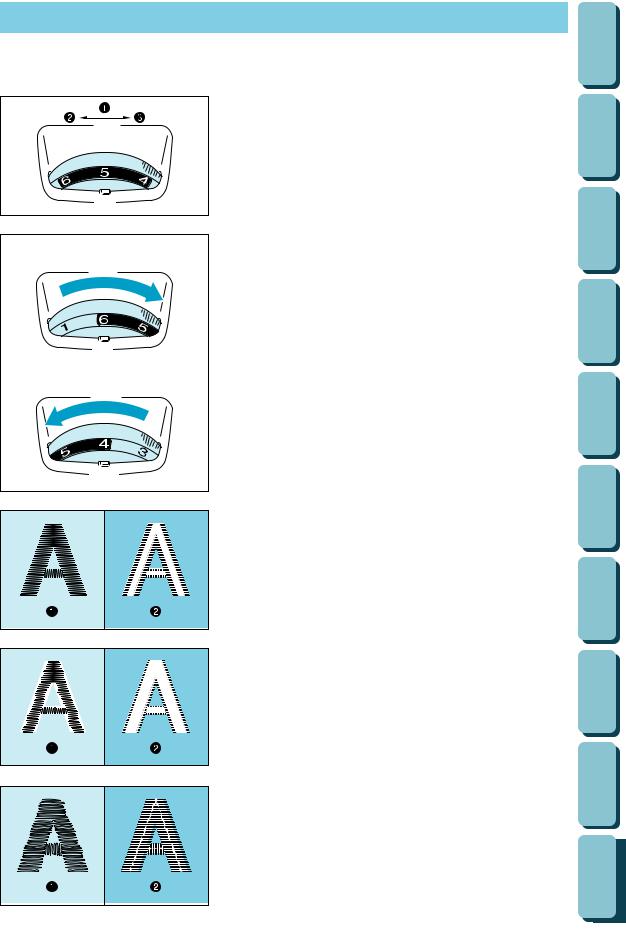
THREAD TENSION ADJUSTMENT
Use this procedure when changing the thread tension.
Upper thread tension dial
Upper thread tension setting
Weak (Decrease thread tension)
Strong (Increase thread tension)
To tighten the upper thread tension, adjust the dial to the right.
A To loosen the upper thread tension, adjust the dial to the left.
The standard position is between “4” and “6”. However, a sewing test should always be done to check for the proper thread tension.
Thread tension may need to be adjusted with the use of different thread, fabric or stabilizer fabric.
B
Correct thread tension
Adjust so that the lower thread stitch width on the reverse surface of the fabric is about one-third of the total width.
Correct tension is important because too much or too little tension cause poor quality embroidery or your fabric to pucker.
Top surface of fabric
Reverse side of fabric
upper thread tension is too strong
lower thread will be visible on top surface of the fabric. Decrease the upper thread tension.
Top surface of the fabric
Reverse side of the fabric
|
CONTENTS |
|
|
|
|
|
|
|
|
KNOWLEDGE |
MACHINE |
|
|
|
|
|
|
|
EMBROIDERING |
|
|
|
|
|
|
|
|
MAINTENANCE |
|
|
|
|
|
|
|
|
MESSAGE |
ERROR |
|
|
|
|
|
|
|
TROUBLESHOOTING |
|
|
|
|
|
PATTERNS |
|
|
|
|
|
|
|
(OPTIONAL) |
FRAME |
EMBROIDERING SMALL A USING |
|
|
|
upper thread tension is too weak
upper thread will be loose. Increase the upper thread tension.
Top surface of fabric
Reverse side of fabric
(OPTIONAL) FRAME |
SMALL-EXTRA |
A USING |
EMBROIDERING |
|
|
|
|
(OPTIONAL) |
FRAME |
LARGE A USING |
EMBROIDERING |
|
|
|
|
23
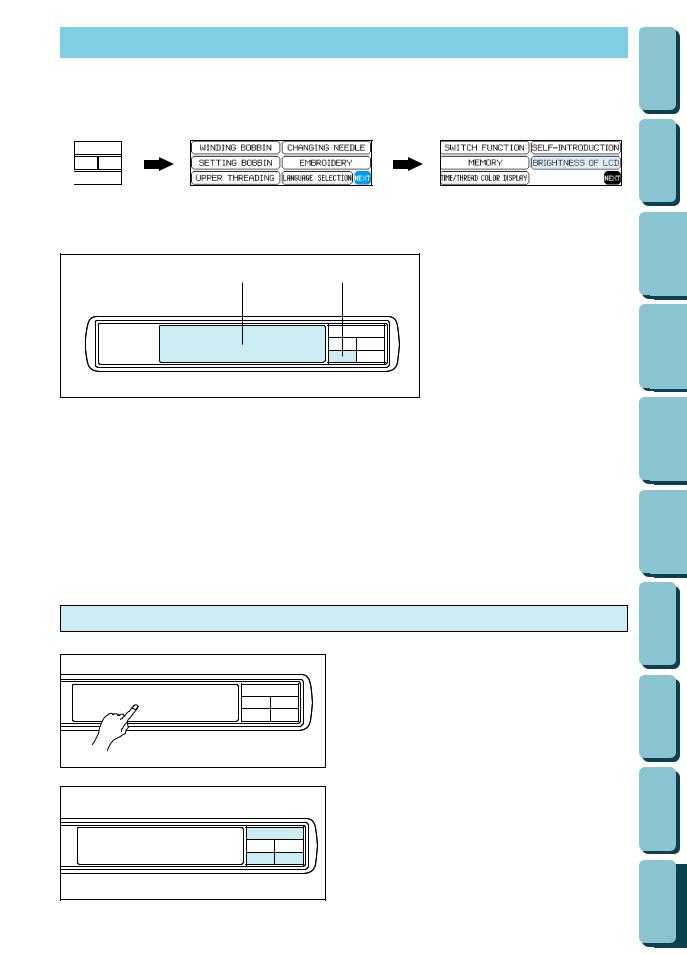
ADJUSTING THE LCD SCREEN CONTRAST
To adjust the brightness of the LCD screen
1


|
CONTENTS |
|
|
|
|
|
|
|
|
KNOWLEDGE |
MACHINE |
|
|
|
key
2 1
1.Press “BASIC OPERATION”.
2.Touch “NEXT”, “BRIGHTNESS OF LCD” and “NEXT”.
MAINTENANCE EMBROIDERING
|
|
|
|
|
|
|
|
|
|
|
|
|
|
|
|
|
|
|
|
|
|
|
|
|
|
|
|
|
|
|
|
1 |
2 |
3 |
|
||||
|
|
|
|
|
|
|
|
To adjust the contrast of the LCD screen
1 “Dull” Touch this key to make contrast less (lighter).
2“Sharp” Touch this key to make contrast greater (darker).
3Touch “END” to return to the screen which was previously being displayed.
*If the contrast is adjusted too far, the display screen becomes invisible. Reset it by turning the power switch off and then on again.
ERROR
TROUBLESHOOTING MESSAGE
If the LCD is hard to see when the power is turned on
1. While touching the LCD (anywhere is OK), turn the power off and then back on again.
2. Touch any one of the lower two selection keys (BASIC OPERATION, MODIFY & ADVISE). The LCD will become darker each time one of these keys is touched. If you would like to make the LCD lighter, touch the upper selection key (CHARACTERS & DESIGNS).
3. After you have finished adjusting, turn the power off and back on again once more.
|
PATTERNS |
|
|
|
|
|
|
|
|
|
|
(OPTIONAL) |
FRAME |
SMALL A USING |
EMBROIDERING |
|
|
|
|
|
|
|
|
(OPTIONAL) FRAME |
SMALL-EXTRA |
A USING |
EMBROIDERING |
|
|
|
|
(OPTIONAL) |
FRAME |
LARGE A USING |
EMBROIDERING |
|
|
|
|
24
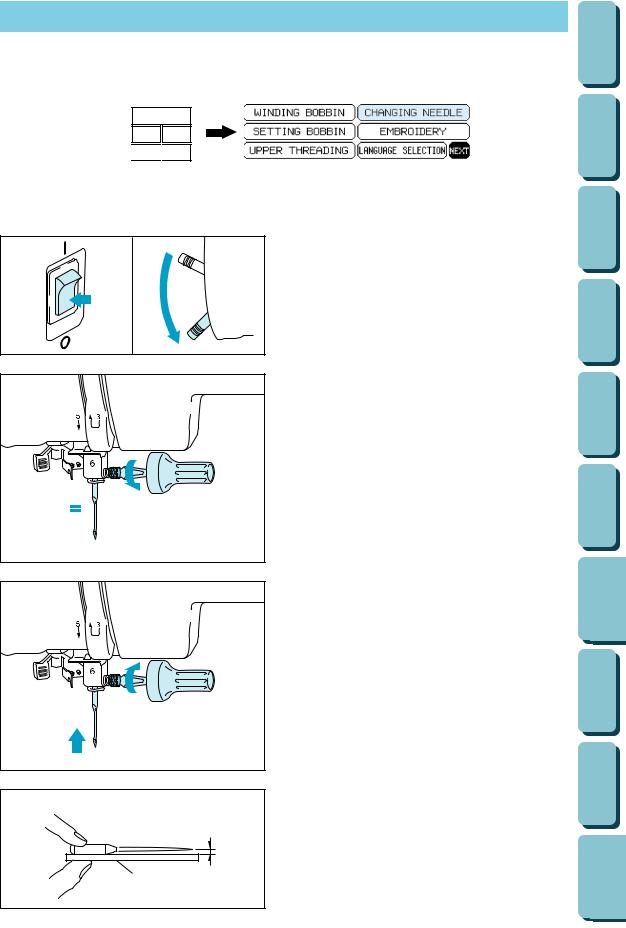
CHANGING THE NEEDLE
Set the needle securely.
1


1 “BASIC
1
2
3 
4
1
2
|
|
|
CONTENTS |
|
|
|
|
|
|
|
|
|
|
|
MACHINE KNOWLEDGE |
|
|
|
|
|
|
|
|
|
|
|
|
|
|
|
|
1. |
Turn the power switch off and lower the |
EMBROIDERING |
|
|
|||
|
presser foot lever. |
|
|
|
Turn the balance wheel to raise the needle to |
|
|
|
its highest position. |
|
|
|
MAINTENANCE |
||
|
|
|
|
2. |
Loosen the needle screw with a screwdriver. |
|
|
|
|||
|
|||
3. |
Slide the needle out. |
ERROR MESSAGE |
|
|
|
|
|
|
|
|
|
|
|
|
|
|
|
|
TROUBLESHOOTING |
4. |
Insert the new needle into the needle shaft as |
PATTERNS |
|
|
|||
far up as it will go with the flat side of the needle facing away from you. Secure it by firmly tightening the screw with a screwdriver.
5. Turn the power switch on.
|
(OPTIONAL) |
FRAME |
SMALL A USING |
EMBROIDERING |
|
|
|
|
|
|
|
|
|
|
Checking for a bent needle |
(OPTIONAL)FRAME |
SMALL-EXTRA |
AUSING |
EMBROIDERING |
|
|
|
|
|
Place the needle on a flat surface and check |
|
|
|
|
whether the space is parallel or not. |
|
|
|
|
Flat surface |
(OPTIONAL) |
FRAME |
LARGEAUSING |
EMBROIDERING |
(Needle-plate, glass, ruler etc.)
If the space is not parallel then the needle is bent and should be thrown away to prevent damage to your project or the machine.
25

EMBROIDERING
EMBROIDERY
1


1 “BASIC OPERATION” key
6
3 
2
|
CHAPTER 2 |
|
CONTENTS |
|
|
|
|
|
|
||
|
|
|
KNOWLEDGE |
MACHINE |
|
1 |
5 |
|
EMBROIDERING |
|
|
|
|
|
MAINTENANCE |
|
|
|
|
|
MESSAGE |
ERROR |
|
|
4 |
|
TROUBLESHOOTING |
|
|
|
|
|
|
|
|
|
|
|
PATTERNS |
|
|
1. |
Thread the upper thread following the |
(OPTIONAL) |
FRAME |
SMALLAUSING |
EMBROIDERING |
|
solidline and numerical sequence marked on |
||||
|
|
|
|
|
|
|
your machine. |
|
|
|
|
|
Be sure to attach the spool felt as shown in |
|
|
|
|
|
the illustration. |
|
|
|
|
1 |
Spool felt (See page 16 – 17) |
(OPTIONAL)FRAME |
SMALL-EXTRA |
|
EMBROIDERING |
|
Thread the lower (bobbin) thread. (See page |
AUSING |
|||
|
|
|
|
|
|
|
|
(OPTIONAL) |
FRAME |
LARGE A USING |
EMBROIDERING |
26

3.Place the fabric in the embroidery frame and then attach the frame to the machine.
(See page 20 – 22)
1 Carriage (embroidery arm)
2 Embroidery frame
NOTE
Do not push down the carriage too hard as you attach the hoop. Use caution so as not to move the carriage sideways.
*It is easier to move the embroidery frame under the presser foot if the presser foot lever is raised higher than its normal “up” position.
1 Normal presser foot lever “up” position
2 Presser foot lever pushed up
3 Presser foot lever down position
4.Turn on the power. The light will shine when the power is turned on.
|
CONTENTS |
|
|
|
|
|
|
|
|
KNOWLEDGE |
MACHINE |
|
|
|
|
|
|
|
EMBROIDERING |
|
|
|
|
|
|
|
|
MAINTENANCE |
|
|
|
|
|
MESSAGE |
ERROR |
 5. Select a pattern.
6.Lower the presser foot lever and press the “START/STOP” button to start the machine.
1 “START/STOP” button
|
TROUBLESHOOTING |
|
|
|
|
|
|
|
PATTERNS |
|
|
|
|
|
|
|
|
|
|
(OPTIONAL) |
FRAME |
SMALL A USING |
EMBROIDERING |
|
|
|
|
|
|
|
|
(OPTIONAL) FRAME |
SMALL-EXTRA |
A USING |
EMBROIDERING |
|
|
|
|
(OPTIONAL) |
FRAME |
LARGE A USING |
EMBROIDERING |
|
|
|
|
27
Loading...