Brother PC 8500 User Manual
®
“IMPORTANT SAFETY INSTRUCTIONS”
When using this machine, basic safety precautions should always be taken, including the following:
“Read all instructions before using.” DANGER – To reduce the risk of electric shock.
1.The machine should never be left unattended while plugged in. Always unplug the machine from the electrical outlet immediately after using and before cleaning.
2.Always unplug before changing the light bulb. Replace bulb with same type rated 12V 5 watts.
WARNING – To reduce the risk of burns, fire, electric shock, or injury to persons.
1.Do not allow this machine to be used as a toy. Close attention is necessary when the machine is used by or near children.
2.Use this machine only for its intended use as described in this manual. Use only accessories recommended by the manufacturer as contained in this manual.
3.Never operate this machine if it has a damaged cord or plug, if it is not working properly, if it has been dropped or damaged, or dropped into water. Return the machine to the nearest authorized dealer or service center for examination, repair, electrical or mechanical adjustment.
4.Never operate the machine with any air openings blocked. Keep ventilation openings of the machine and foot control free from the accumulation of lint, dust, and loose cloth.
5.Never drop or insert any object into any opening.
6.Do not use outdoors.
7.Do not operate where aerosol (spray) products are being used or where oxygen is being administered.
8.To disconnect, turn the main switch to the symbol “O” position which represents off, then remove plug from outlet.
9.Do not unplug by pulling on cord. To unplug, grasp the plug, not the cord.
10.Keep fingers away from all moving parts. Special care is required around the machine needle.
11.Always use the proper needle plate. The wrong plate can cause the needle to break.
12.Do not use bent needles.
13.Do not pull or push fabric while stitching. It may deflect the needle causing it to break.
14.Switch the machine to the symbol “O” position when making any adjustments in the needle area, such as threading needle, changing needle, threading bobbin, or changing presser foot, and the like.
15.Always unplug the machine from the electrical outlet when removing covers, lubricating, or when making any other user servicing adjustments mentioned in the instruction manual.
16.This sewing machine is not intended for use by young children or infirm persons without supervision.
17.Young children should be supervised to ensure that they do not play with this machine.
“SAVE THESE INSTRUCTIONS”
“This machine is intended for household use.”
FOR USERS IN THE UK, EIRE, MALTA
AND CYPRUS ONLY.
If this machine is fitted with a three-pin non-rewireable BS plug then please read the following.
IMPORTANT
If the available socket outlet is not suitable for the plug supplied with this equipment, it should be cut off and an appropriate three-pin plug fitted. With alternative plugs an approved fuse must be fitted in the plug.
NOTE
The plug served from the main lead must be destroyed as a plug with bared flexible cords is hazardous if engaged in a live socket outlet. In the event of replacing the plug fuse, use a fuse approved by ASTA to BS 1362, i.e. carrying the  mark, rating as marked on plug.
Always replace the fuse cover, never use plugs with the fuse cover omitted.
WARNING
DO NOT CONNECT EITHER WIRE TO THE EARTH TERMINAL WHICH IS MARKED WITH THE LETTER ‘E’, BY THE EARTH SYMBOL  OR COLOURED GREEN OR YELLOW.
The wires in this main lead are coloured in accordance with the following code:
Blue Neutral
Brown Live
As the colours of the wiring in the main lead of this appliance may not correspond with the coloured markings identifying the terminals in your plug, proceed as follows.
The wire which is coloured blue must be connected to the terminal which is marked with the letter ‘N’ or coloured black or blue.
The wire which is coloured brown must be connected to the terminal which is marked with the letter ‘L’ or coloured red or brown.
CONGRATULATIONS ON CHOOSING
OUR MACHINE
Your machine is the most advanced computerized home use this machine available. To fully enjoy all the features incorporated we suggest that you study this booklet.
PLEASE READ BEFORE USING THIS MACHINE
For safe operation
1.Be sure to keep your eye on the needle while sewing. Do not touch the pulley, thread take-up, needle, or other moving parts.
2.Remember to turn off the power switch and unplug the cord when: c Operation is completed
c Replacing or removing the needle or any other parts c A power failure occurs during use
c Maintaining the machine
c Leaving the machine unattended.
3.Do not store anything on the foot controller.
4.Plug the machine directly into the wall. Do not use extension cords.
For a longer service life
1.When storing this machine, avoid direct sunlight and high humidity locations. Do not store the machine beside a space heater, iron, or other hot objects.
2.Use only neutral soaps or detergents to clean the case. Benzene, thinner, and scouring powders can damage the case and machine, and should never be used.
3.Do not drop or hit the machine.
4.Always consult the operation manual when replacing or installing any assemblies, the presser feet, needle, or other parts to assure correct installation.
For repair or adjustment
In the event a malfunction occurs or adjustment is required, first follow the troubleshooting table in the back of the operation manual to inspect and adjust the machine yourself. If the problem persists, please consult your nearest authorized Brother service center.
1
CONTENTS
CHAPTER 1
SETTING UP
__________________________5
PRINCIPAL PARTS _______________________5 OTHER INCLUDED ACCESSORIES __________7 OPTIONS _______________________________8 POWER SUPPLY _________________________9 SELECTION KEYS _______________________10
Screen messages guide you through each operation____________________________10
OPERATION BUTTONS___________________11 Using the operation buttons _____________11 USING THE SCREEN KEYS _______________12
Examples of the keys on LCD ___________12
About the screen______________________12
If the LCD is hard to see when the power is turned on____________________________13
Adjusting the brightness of the LCD _______13
HOW TO USE THE LANGUAGE SELECTION KEY___________________________________14
How to clear the language selection_______15
BOBBIN WINDING / BOBBIN THREAD
SETTING ______________________________16
Winding the bobbin and setting the bobbin thread ______________________________16
Setting the bobbin_____________________18
UPPER THREADING _____________________19
Thread according to number and arrow
marks on machine ____________________19
Auto-threading device__________________20
Using the extra spool pin and the net ______21
START/STOP ___________________________22
“START/STOP” button _________________22 Foot controller________________________22 Mounting and Using the Knee Lifter _______23
STITCH WIDTH AND STITCH LENGTH ______24
Stitch width __________________________24 Stitch length _________________________25
Quick adjustment reference chart for stitch width and stitch length _________________27
THREAD TENSION ______________________29
Correct tension _______________________29 Loosen tension by touching “ ” (Weak)___29 Tighten tension by touching “ ” (Strong) __30 Except “UTILITY STITCH” ______________30
CHANGING THE PRESSER FOOT __________31
Change the presser foot according to
the LCD message _____________________31
Installing embroidery foot “Q” ____________31 Changing the embroidery foot ___________32 Feed dog adjustment __________________33
CHANGING THE NEEDLE _________________34 Setting the needle securely _____________34
Checking needle ______________________34 MACHINE OPERATION KEYS______________35
CHAPTER 2
1. SEWING
_________________________36
TRIAL SEWING _________________________36
Sewing by using “UTILITY STITCH”_______36
Up Setting
AUTOMATIC REINFORCEMENT STITCHING _38
Cancelling automatic reinforcement stitching_____________________________38
AUTOMATIC THREAD CUTTING ___________39
Cancelling programmed automatic thread cutting ______________________________39
Sewing curves _______________________43 Sewing thick fabric ____________________44 Sewing thin fabric _____________________44
2. UTILITY STITCHES
_________________________45
STRAIGHT STITCHES ____________________45
For reinforcement stretching on stretch
fabric _______________________________46 Changing the stitch length ______________46 Changing the needle position ____________46
ADAPTER FOR LOW SHANK ATTACHMENTS 47
Included accessories __________________47
Installation of walking foot_______________47
ZIGZAG STITCHES ______________________48 Overcasting (using a zigzag stitch)________48 Applique (using a zigzag stitch) __________48
Patchwork (for crazy quilt) ______________48
OVERCASTING _________________________49
When using  ,
,  or
or  stitches ________49 When using
  ,
,  or
or  stitches ________49
OVERCASTING (When using the side cutter) __50
BLIND HEM STITCHES ___________________52
Adjusting the needle drop position ________53 BUTTONHOLE STITCHES_________________54
Order of one cycle ____________________56
Sewing stretch fabrics__________________56
Buttons that do not fit into the guide plate (Odd-shaped buttons)__________________57
Changing the stitch length ______________57
Changing the stitch width _______________57
BAR TACKING __________________________58 Thick fabrics _________________________59 Changing the bar tack stitch length _______59 Changing the bar tack stitch width ________59 DARNING ______________________________60 Changing the length of the darning stitch ___61 Changing the bar tack stitch width ________61 Darning stitch cycle____________________61 TAPE ATTACHING _______________________62
EYELET STITCH ________________________63
Size of eyelet (Actual size) ______________63 BUTTON SEWING _______________________64 Attaching buttons with four holes _________65
Attaching a shank to the button __________65
BASTING ______________________________66
ZIPPER INSERTION (CENTERED
AND SIDE APPLICATION) _________________67
Centered application___________________67 Side application ______________________68 DART SEAM ____________________________70 GATHERING____________________________71
Pulling out the bobbin thread ____________72 PINTUCK ______________________________73
2
FLAT FELL SEAM _______________________75
Finished flat fell seam __________________76 APPLIQUES ____________________________77 Sewing the applique around corners ______77 APPLIQUE QUILTS ______________________78
SCALLOP STITCH _______________________79
SMOCKING STITCH______________________80 PATCHWORK STITCH____________________81 FAGOTING _____________________________82 DECORATIVE STITCHING ________________83 Decorative stitching ___________________83 Shell tacking _________________________83 HEM-STITCH (HEIRLOOM STITCH) _________84
“” hem-stitching ____________________84
“” hem-stitching ____________________85 LATERAL SEWING (STRAIGHT/ZIGZAG)_____86
3.CHARACTERS AND DECORATIVE STITCHES
_________________________88
CHARACTER SEWING ___________________88
Combinations of characters _____________89
DECORATIVE STITCHES _________________90 DECORATIVE STITCHES (7 mm) ___________91
SATIN STITCHES________________________92
CROSS STITCHING ______________________93
CHARACTER AND
DECORATIVE STITCH ADJUSTMENT _______94
Changing the pattern size (Actual size) ____94
Single/repeat sewing __________________94
Elongation___________________________95
Changing the stitch length and
the stitch width _______________________96
Customize patterns by combining satin
stitches using the “ ” and “ ” keys ____97
Changing Mirror Image [Left and Right (the
“ |
” key), and Top and Bottom (the “ |
” |
key)] _______________________________99
Confirming entry of combined
stitch patterns _______________________100 Saving combined stitch patterns_________100
SEWING ______________________________102
Sewing attractive finishes ______________102 Using a pattern sheet _________________102 Sewing ____________________________103
ADJUSTING STITCH PATTERNS __________105
4. EMBROIDERING
________________________106
PREPARATION BEFORE SEWING _________106
Attaching embroidery foot “Q”___________106 Fitting embroidery unit ________________107
Removing the embroidery unit __________108 Placing the embroidery unit into its case __108 Initializing the embroidery unit __________109 SELECTING AND SEWING PATTERNS _____110
Selecting alphabetical characters ________110 Selecting one-point patterns ____________111
Selecting frame patterns_______________112 Selecting floral alphabets ______________113 Selecting patterns from a memory card ___114 MEMORY _____________________________116
Saving a pattern combination in memory __116
Up Setting
EMBROIDERING _______________________117 Embroidering attractive finishes _________117
Setting the fabric into the embroidery frame______________________________117
Fitting the embroidery frame to
the embroidery unit ___________________119
Embroidering _______________________120
Embroidering a single color pattern
when “MULTI COLOR” is displayed ______122
Changing the stitch density for characters
and some frame patterns ______________122 MOVING THE LOCATION (LAYOUT) _______123 Moving the embroidery location _________124
Checking the embroidering area_________124 Embroidering from a specific starting point_125
Changing the pattern direction __________125 Reversing patterns ___________________126 Using the “IMAGE” key ________________126
Changing the size of characters, frame patterns and pattern __________________127
ADJUSTMENTS DURING THE EMBROIDERY PROCESS ____________________________129
If the thread breaks during embroidering __129
Continuing a pattern after the power
has been momentarily turned off ________129 When sewing again from the beginning.......130
EMBROIDERY APPLICATIONS____________131
Linking characters____________________131
Embroidering appliques
(using a frame pattern) ________________132
Embroidering onto small pieces
of fabric or onto corners _______________134
5. EDITING EMBROIDERY PATTERNS
________________________135
EMBROIDERY EDITING CAPABILITIES _____135 Explanation of the Editing Functions _____135
HOW TO EDIT _________________________136
Character Editing ____________________137
One-point Editing ____________________143 Border Pattern Editing ________________145
Editing Patterns on Embroidery Cards
(sold separately) _____________________146 Editing Combinations _________________147
SAVING A PATTERN COMBINATION TO MEMORY _____________________________151
Let's Sew __________________________153
CORRECTING EDITED PATTERNS ________154
Correcting another stitch pattern during
editing _____________________________154 Correcting stitch patterns after editing ____155
6. RETRIEVING
________________________156
RETRIEVING CHARACTERS AND
PATTERNS ____________________________156
RETRIEVING AN EMBROIDERY PATTERN __157 RETRIEVING AN EDITED PATTERN _______158 DELETING A STORED PATTERN __________159
3
Up Setting
7.MY CUSTOM STITCHTM
(Function for making own stitch Designs)
________________________160
MAKING THE ILLUSTRATION _____________160 GENERATING THE DATA ________________162 EDITING AN EXISTING “ ” ________164
Moving a point ______________________164
Moving part or all of a pattern ___________165
Inserting new points __________________165
Once you have finished editing__________166
STORING THE “ |
” WHICH YOU HAVE |
ENTERED _____________________________167 |
|
RETRIEVING A “ |
” ______________168 |
MAINTENANCE
________________________169
CLEANING ____________________________169
Cleaning the screen __________________169 Cleaning the machine surface __________169
Cleaning the shuttle __________________169
CHANGING THE LIGHT BULB_____________171
RELATED CHART OF SEWING FABRICS, THREAD AND NEEDLE __________________172
ERROR MESSAGES
________________________173
Warning messages ___________________173 Instruction messages _________________178 Alarms_____________________________179
TROUBLESHOOTING
________________________180
USING THE “OPERATION GUIDE” KEY _____180
Trouble with threads and stitches ________181
Mechanical trouble ___________________182
SEWING CHART
________________________183
PATTERNS
(PROGRAMMED IN MACHINE)
________________________186
Utility stitches _______________________186 Character sewing ____________________186 Character embroidering chart ___________190 Frame pattern embroidering chart _______190
PATTERNS (MEMORY CARD)
________________________191
One point mark embroidery pattern ______191
*MY CUSTOM STITCHTM is under application for a registered trademark in the United States of America.
4
SETTING UP |
|
|
CHAPTER 1 |
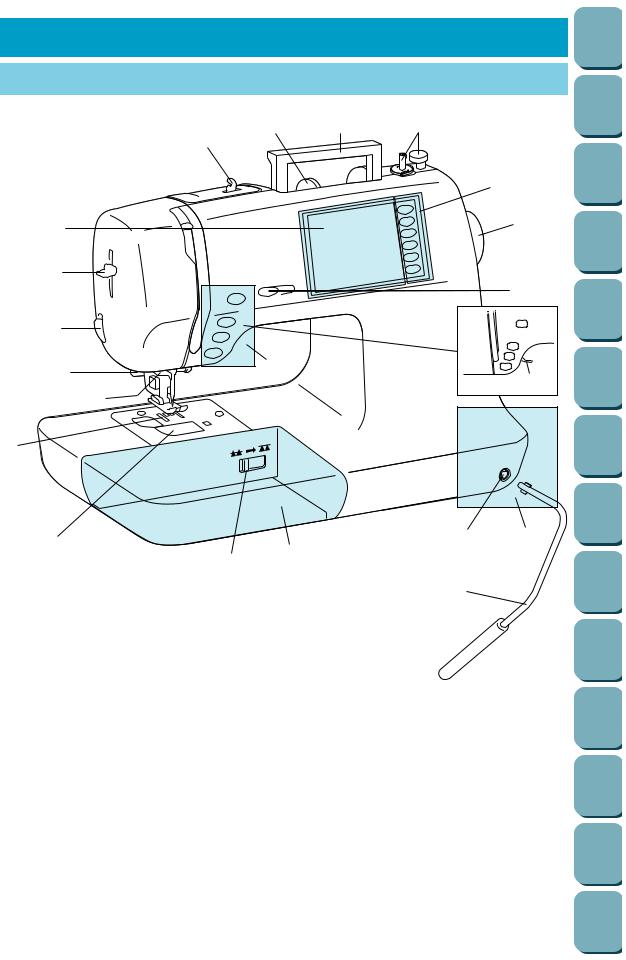
PRINCIPAL PARTS |
|
|
|
|
2 |
1 |
12 |
|
3 |
|
|
|
|
|
C |
D |
|
|
13 |
|
|
|
|
4 |
|
|
14 |
|
|
|
|
5 |
|
|
|
6 |
E |
|
15 |
7 |
|
|
|
|
|
|
8 
9
10 |
|
16 |
A |
11 |
B |
|
|
|
|
||
|
17 |
|
|
|
|
|
1– Handle 2– Spool cap
3– Thread guide for bobbin winding 4– Needle threader lever
5– Thread cutter 6– Buttonhole lever 7– Needle threader 8– Presser foot
9– Feed dog 10– Bobbin cover
11– Feed dog adjustment lever 12– Bobbin winder device
13– Balance wheel
14– Speed range control lever 15– Presser foot lever
16– Knee Lifter Mounting Slot 17– Knee Lifter
A–Main power switch and connectors B–Accessory compartment C–Selection keys (Refer to page 10) D–L.C.D. (Liquid Crystal Display) E–Operation buttons (Refer to page 11)
Up Setting
5
1 |
|
|
|
|
|
3 |
|
2 |
|
|
|
|
|
4 |
|
I |
|
II |
1 |
|
|
|
J |
2 |
|
|
|
1 |
|
|
|
III |
|
|
|
2 |
A |
|
1 |
|
|
|
9 |
3 |
|
|
|
4 |
|
|
0 |
|
|
|
|
5 |
|
|
|
6 |
|
7 |
8 |
6 |
|
|
|
Up Setting
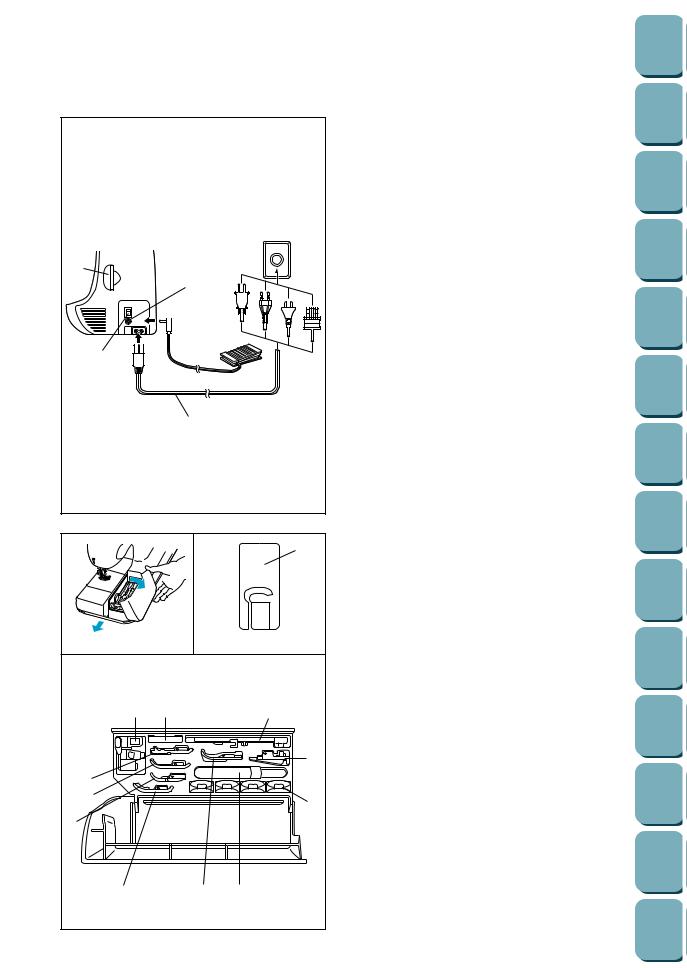
A. MAIN POWER SWITCH AND CONNECTORS
1 Card slot
Slot for memory card insertion.
2Main power switch
Use to turn on/off the main power.
3Controller jack
Insert for foot controller operation.
4Power cord
Use to connect machine to power supply.
CAUTION
–When leaving the machine unattended, the main switch of the machine must be switched off or the plug must be removed from the socket-outlet.
–When servicing the machine, or when removing covers or changing bulbs, the machine or the electrical set must be unplugged.
–For U.S.A. only
This appliance has a polarized plug (one blade wider than the other). To reduce the risk of electric shock, this plug is intended to fit in a polarized outlet only one way.
If the plug does not fit fully in the outlet, reverse the plug. If it still does not fit, contact a qualified electrician to install the proper outlet. Do not modify the plug in any way.
B. FLAT BED ATTACHMENT WITH ACCESSORY COMPARTMENT
ITilt the lid of the accessory compartment toward you to open.
II Each presser foot has a symbol. 1 Presser foot symbol
IIIACCESSORY LIST
The location of each accessory is shown in figure
III.
No. |
Part Name |
Part Code |
1 |
Buttonhole foot “A” |
X57789-101 |
|
|
|
2 |
Embroidery foot “Q” |
XA5891-101 |
|
|
|
3 |
Overcasting foot “G” |
X51162-001 |
|
|
|
4 |
Monogramming foot “N” |
X53840-301 |
|
|
|
5 |
Zipper foot “I” |
X59370-051 |
|
|
|
6 |
Zigzag foot “J” |
137748-101 |
|
|
|
7 |
Blind stitch foot “R” |
X56409-001 |
|
|
|
8 |
Seam ripper |
X54243-001 |
|
|
|
9 |
Button fitting foot “M” |
130489-001 |
|
|
|
0 |
Bobbin |
136492-101 |
|
|
|
A |
Needle set |
X58358-001 |
*Always use the plastic bobbin which is supplied with machine or in accessory compartment.
*Always use BROTHER accessories recommended for this machine.
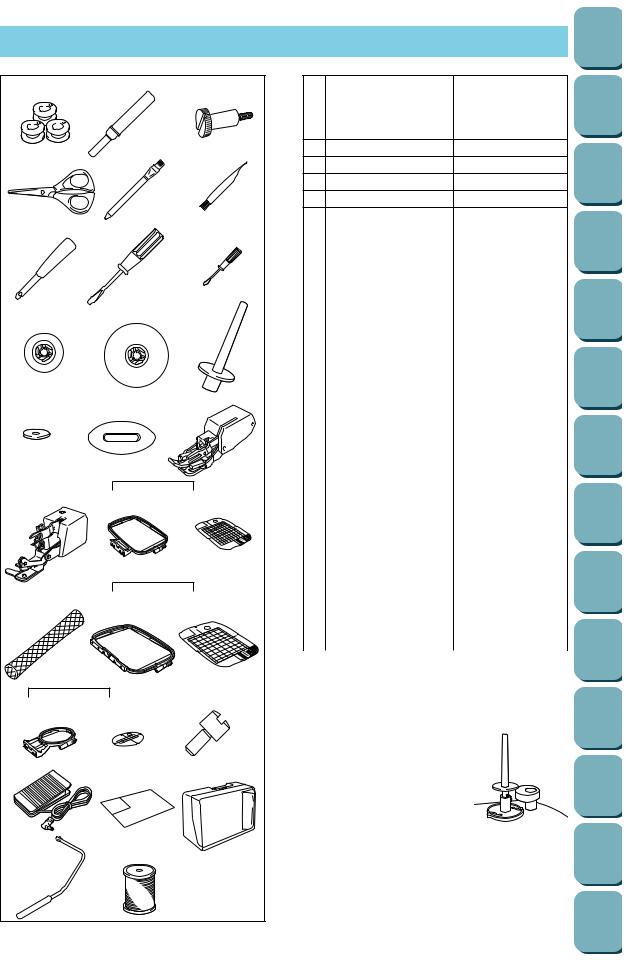
OTHER INCLUDED ACCESSORIES
1 |
2 |
3 |
4 |
5 |
6 |
7 |
8 |
9 |
10 |
11 |
12 |
13 |
14 |
15 |
|
17 |
|
16 |
18 |
19 |
|
21 |
|
20 |
22 |
23 |
24 |
|
|
25 |
26 |
27 |
28 |
29 |
30 |
31 |
32 |
|
No. Part Name |
Part Code |
|||
U.S.A. |
Others |
|||
|
|
|||
1 |
Bobbin (3) |
136492-101 |
||
|
|
|
|
|
2 |
Seam ripper |
X54243-001 |
||
3Screw
4Scissors
5Chalk pen
6Cleaning brush
7 |
Eyelet punch |
135793-001 |
|
|
|
|
|
8 |
Screwdriver (Large) |
X55467-051 |
|
|
|
|
|
9 |
Screwdriver (Small) |
X55468-051 |
|
|
|
|
|
10 |
Spool cap (Small) |
130013-003 |
|
|
|
|
|
11 |
Spool cap (Large) |
130012-003 |
|
|
|
|
|
12 |
Extra spool pin* |
XA3336-051 |
|
|
|
|
|
13 |
Spool felt |
X57045-001 |
|
|
|
|
|
14 |
Disc-shaped screwdriver |
XA2005-051 |
|
|
|
|
|
15 |
Walking foot* |
X81064-001 |
|
|
|
|
|
16 |
Side cutter |
X80943-001 |
|
|
|
|
|
17 |
Embroidery set (Regular) |
SA422 |
X80903-002 |
|
|
|
|
18 |
Embroidery frame (Regular) |
XA2171-101 |
|
|
|
|
|
19 |
Embroidery sheet (Regular) |
XA2212-001 |
|
|
|
|
|
20 |
Net* |
127610-000 |
|
|
|
|
|
21 |
Embroidery set (Large) |
SA423 |
X80902-002 |
|
|
|
|
22 |
Embroidery frame (Large) |
XA2168-201 |
|
|
|
|
|
23 |
Embroidery sheet (Large) |
XA2209-001 |
|
|
|
|
|
24 |
Embroidery set (Small) |
SA421 |
X80904-102 |
|
|
|
|
25 |
Embroidery frame (Small) |
XA2174-101 |
|
|
|
|
|
26 |
Embroidery sheet (Small) |
XA2215-101 |
|
|
|
|
|
27 |
Screw* |
XA4813-051 |
|
|
|
|
|
28 |
Foot controller |
234522-001 |
|
|
|
|
|
29 |
Pattern Sheet |
XA4595-001 |
|
|
|
|
|
30 |
Hard case |
XA1821-106 |
|
|
|
|
|
31 |
Knee Lifter |
XA6941-001 |
|
|
|
|
|
32 |
Embroidery bobbin thread |
SA-BTS |
X81164-001 |
|
|
|
|
*Use the same screw when installing both the side cutter and the walking foot.
*If using special threads which wind quickly off the thread spool, place a net on the spool before using.
*If using the walking foot, please refer to the explanatory sheet which is inserted in the instruction
book.
* The extra spool pin which is provided as an accessory
should be attached to the  end of the bobbin winder
shaft during use.
Note (For U.S.A. only)
Foot controller: Model J2
This foot controller can be used for this machine model PC-8500.
Up Setting
7
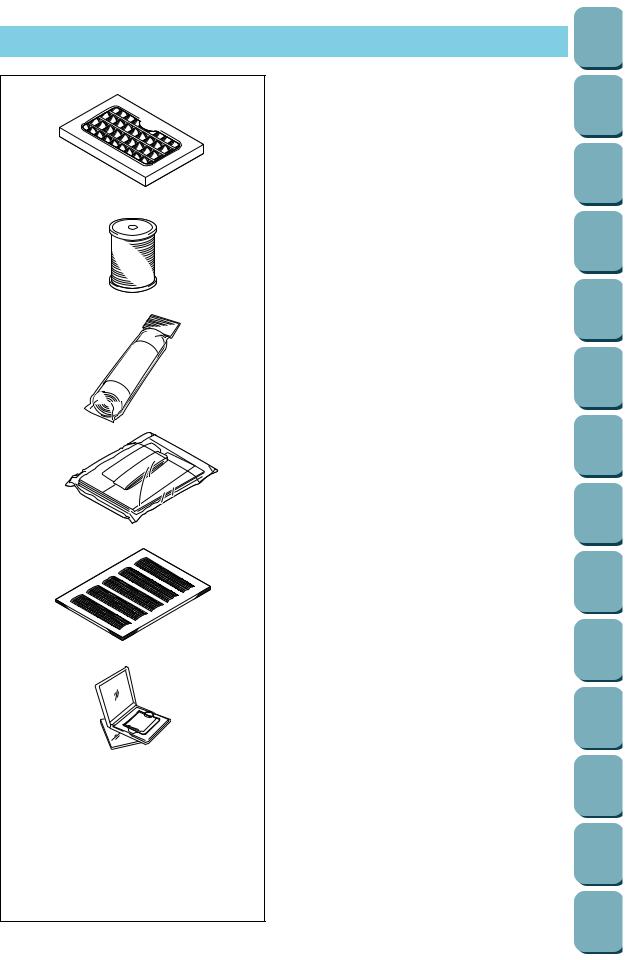
OPTIONS
1
2
3
4
5
6
Up Setting
No. |
Part Name |
Part Code |
|||
U.S.A. |
Others |
||||
|
|
|
|||
1 |
Brother poly 40 color thread set |
SA740 |
X80928-100 |
||
|
|
|
|
|
|
2 |
Brother poly #60 bobbin thread |
SA-BTS |
X81164-001 |
||
|
|
|
|
|
|
3 |
Backing material (Stabilizer material) |
SA519 |
X81185-001 |
||
|
|
|
|
|
|
4 |
Country bag |
SA152 |
X80922-002 |
||
|
|
|
|
|
|
5 |
Grid sheet set |
SA500 |
X80948-001 |
||
|
|
|
|
|
|
|
Memory card* |
|
|
||
|
|
|
|
|
|
|
|
No. 1 Alphabet |
SA298 |
X58317-001 |
|
|
|
|
|
|
|
|
|
No. 2 Flower |
SA299 |
X58321-001 |
|
|
|
|
|
|
|
|
|
No. 3 Dinosaur |
SA300 |
X58362-001 |
|
|
|
|
|
|
|
|
|
No. 6 Moskowitz’s World |
SA303 |
X58497-001 |
|
|
|
|
|
|
|
|
|
No. 7 Country Life |
SA304 |
X59322-001 |
|
|
|
|
|
|
|
|
|
No. 8 Holiday |
SA305 |
X59357-001 |
|
|
|
|
|
|
|
6 |
|
No. 9 Hobby Craft |
SA306 |
X59511-001 |
|
|
|
|
|
|
|
|
|
No. 10 Monogram Emblem |
SA307 |
X59567-001 |
|
|
|
|
|
|
|
|
|
No. 11 Frame |
SA311 |
XA0257-001 |
|
|
|
|
|
|
|
|
|
No. 12 Transportation |
SA312 |
XA0275-001 |
|
|
|
|
|
|
|
|
|
No. 13 Sports Emblem |
SA313 |
XA0517-001 |
|
|
|
|
|
|
|
|
|
No. 14 Large Floral |
SA314 |
XA1223-001 |
|
|
|
|
|
|
|
|
|
No. 15 Cute Kids |
SA315 |
XA1325001 |
|
|
|
|
|
|
|
|
|
No. 16 Dogs & Cats |
SA316 |
XA1406-001 |
|
|
|
|
|
|
|
|
|
No. 17 Nintendo |
SA317 |
XA1434-001 |
|
|
|
|
|
|
|
|
|
No. 19 Marine |
SA319 |
XA2452-001 |
|
|
|
|
|
|
|
|
|
No. 20 Petite Designs |
SA320 |
XA2869-001 |
|
|
|
|
|
|
|
|
|
No. 21 Needlework |
SA321 |
XA2873-001 |
|
|
|
|
|
|
|
|
|
No. 26 Snoopy |
SA326 |
XA3826001 |
|
|
|
|
|
|
|
|
|
No. 27 Birds |
SA327 |
XA4289001 |
|
|
|
|
|
|
|
|
|
No. 28 Christmas |
SA328 |
XA4502001 |
|
|
|
|
|
|
|
|
|
No. 29 Lace |
SA329 |
XA4664001 |
|
|
|
|
|
|
|
|
|
No. 30 Wildlife animals |
SA330 |
XA4771001 |
|
|
|
|
|
|
|
|
|
No. 31 Large flower II |
SA331 |
XA5037001 |
|
|
|
|
|
|
|
|
|
No. 32 Musical instrument |
SA332 |
XA5386001 |
|
|
|
|
|
|
|
|
|
No. 33 Trees |
SA333 |
XA5567001 |
|
|
|
|
|
|
|
|
|
No. 35 Cats & dogs II |
SA335 |
XA5629001 |
|
|
|
|
|
|
|
|
|
No. 36 Fruits & vegetables |
SA336 |
XA5659001 |
|
|
|
|
|
|
|
|
|
No. 37 Applique alphabet |
SA337 |
XA5753001 |
|
|
|
|
|
|
|
|
|
No. 38 Angel |
SA338 |
XA5781001 |
|
|
|
|
|
|
|
|
|
No. 39 Doll face |
SA339 |
XA5978001 |
|
|
|
|
|
|
|
|
|
No. 40 Sports 3 |
SA340 |
XA6111001 |
|
|
|
|
|
|
|
*This unit cannot be used in conjunction with the memory card S-1.
WARNING
–Embroidery Card purchased in foreign countries may not work with your machine.
8
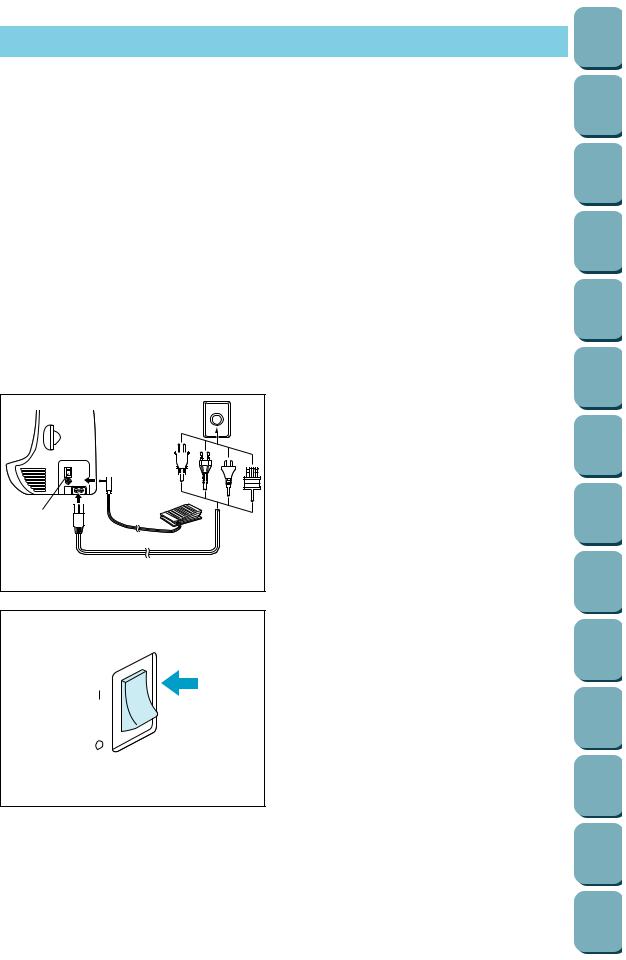
POWER SUPPLY
WARNING
–When leaving the machine unattended or when it is not being used, turn off the main power switch of the machine or remove the plug from the wall outlet.
CAUTION
–Do not use this sewing machine with extension cords or multi-plug adaptors, otherwise a fire or an electric shock may occur.
–Do not remove the plug from the wall outlet with wet hands, otherwise an electric shock may occur.
–When unplugging the power cord, turn off the main power switch of the machine, then grasp the plug and pull to unplug the cord. Pulling on the cord may damage it or cause a fire or an electric shock.
–Do not allow the power cord to be cut, damaged, modified, forcefully bent, pulled, twisted or bundled. In addition, do not place heavy objects on the cord or subject it to heat, otherwise the cord may be damaged or a fire or an electric shock may occur.
If the power cord or plug are damaged, contact your nearest authorized Brother dealer or service center.
–If the machine is not to be used for a long period of time, unplug the power cord, otherwise a fire may occur.
1.Insert the plug into a wall outlet.
1 Main power switch
2. Set the main power switch to “I ”.
3. To turn off the machine, set the main power switch to “O ”.
1
Up Setting
9
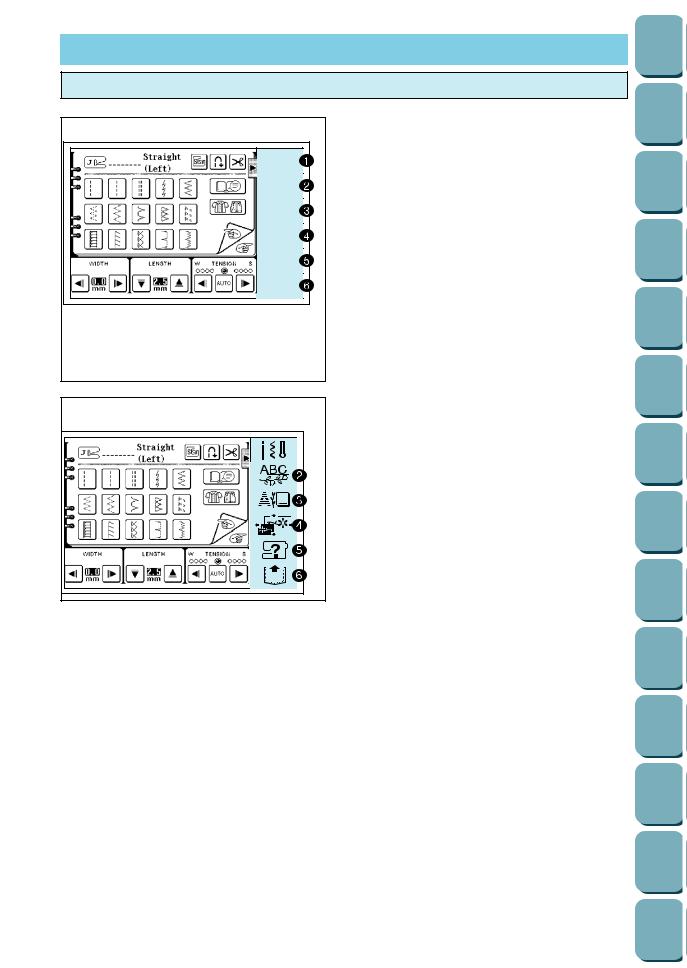
SELECTION KEYS
Screen messages guide you through each operation
UTILITY |
STITCH |
CHARACTER |
DECORATIVE |
STITCH |
EMBROIDERY |
EMBROIDERY |
EDIT |
OPERATION |
GUIDE |
MEMORY |
RECALL |
1 |
C. SELECTION KEYS
*Depending on the country of destination, the selection keys may be displayed by means of characters or by illustrations.
1“UTILITY STITCH” KEY
Use this key when you sew utility stitches such as straight stitches, buttonholes, etc.
2“CHARACTER/DECORATIVE STITCH” KEY
Use this key to sew alphabetical characters and other decorative stitches.
3“EMBROIDERY” KEY
Use this key when using a memory card and when embroidering pre-programmed patterns. When you insert or remove the memory card from the machine, the main power switch should always be turned off.
4“EMBROIDERY EDIT” KEY
Use this key for embroidering patterns which are combinations of other patterns.
5“OPERATION GUIDE” KEY
Use this key if you would like information on how to use machine functions such as upper threading, bobbin winding and bobbin thread setting.
6“MEMORY RECALL” KEY
Use this key to retrieve combined patterns which have been saved in memory.
Up Setting
10
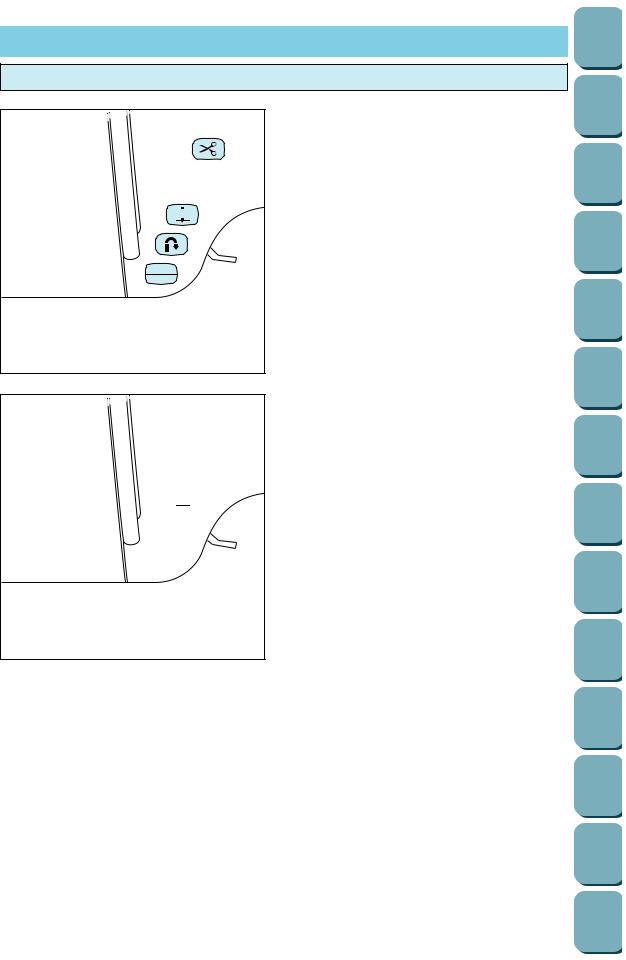
OPERATION BUTTONS
Using the operation buttons
|
1 |
|
2 |
|
3 |
STARTSTOP |
4 |
 1
1
 2
2
 3
3  4
4
D. OPERATION BUTTONS
1“THREAD CUTTER” BUTTON
When you press this button, both upper bobbin threads are cut automatically.
2“NEEDLE POSITION” BUTTON
Press to change the needle position from to down or from down to up.
3“REVERSE STITCH” BUTTON
The reverse stitch button is used to secure and end stitching with a reverse stitch or reinforcement stitch. The reverse stitch function stitches backward. The reinforcement stitch function stitches three times in the same position. (See page 38 for full instructions.)
4“START/STOP” BUTTON
The button illuminates green when the machine is ready to be started and while sewing or embroidering. If starting is not possible, it illuminates red. In addition, it illuminates orange when the bobbin thread is being wound onto the bobbin (when the bobbin winder shaft is to the right).
*Sewing continues at low speed while the button is pressed.
*The needle will drop to its lowest position when the machine is stopped.
Up Setting
11
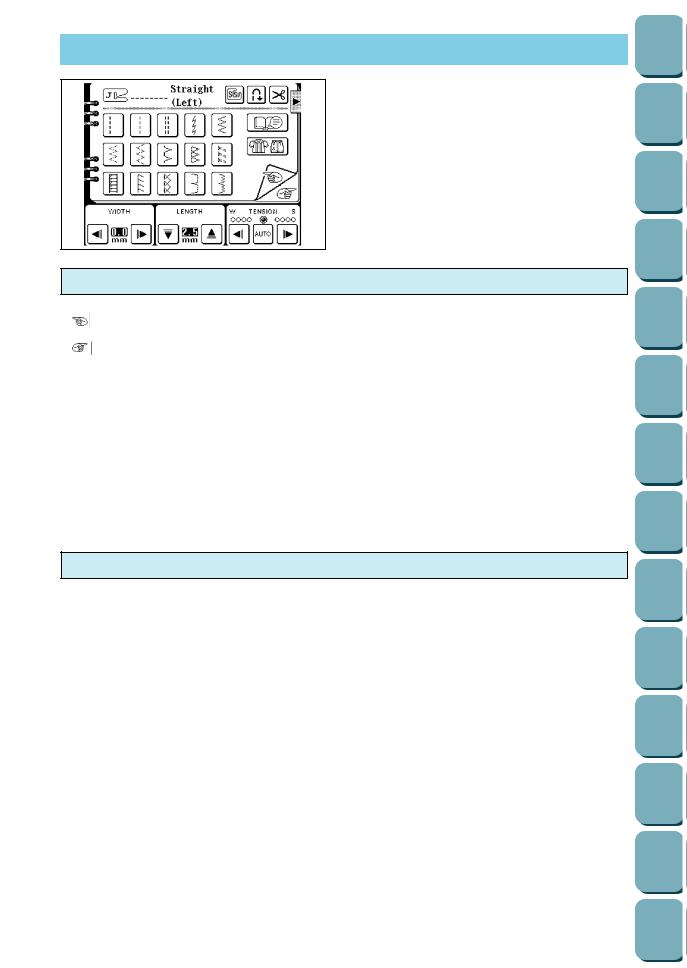
USING THE SCREEN KEYS
Touch a key on the screen with your finger to select the pattern which appears inside the key or to start the function or operation indicated inside the key.
CAUTION
Be sure to touch the key with your finger only. Never use a pointed instrument such as a sharp pencil or a screwdriver or a hard object to touch the key.
Furthermore, do not press down too hard on the screen, otherwise problems may result.
Examples of the keys on LCD
“”:
Touch this key to return to the previous page.
“”:
Touch this key to move to the next page. “CHECK”:
If an error message appears, touch this to return to the original screen. “CLOSE”:
If another screen is being displayed over the top of an advice screen, for example, touch this key to remove the topmost screen.
“RETURN”:
Touch this key to return to the previous screen. “END”:
Touch this key to stop using the function. “CONFIRM”:
Touch this key to start a function working.
About the screen
NOTES
–All or parts of the screen may become darker or lighter at times because of changes in the ambient temperature around the screen. This is normal and is not the sign of a malfunction. Adjust the screen if it is difficult to read.
–The screen may be dark, immediately after the power is turned on. This is a feature of the light which illuminates the screen, and is not the sign of a malfunction. The screen will return to its normal level of brightness after approximately 10 minutes.
Up Setting
12
Up Setting
If the LCD is hard to see when the power is turned on
UTILITY |
STITCH |
CHARACTER |
DECORATIVE |
STITCH |
EMBROIDERY |
EMBROIDERY |
EDIT |
OPERATION |
GUIDE |
MEMORY |
RECALL |
UTILITY |
STITCH |
CHARACTER |
DECORATIVE |
STITCH |
EMBROIDERY |
EMBROIDERY |
EDIT |
OPERATION |
GUIDE |
MEMORY |
RECALL |
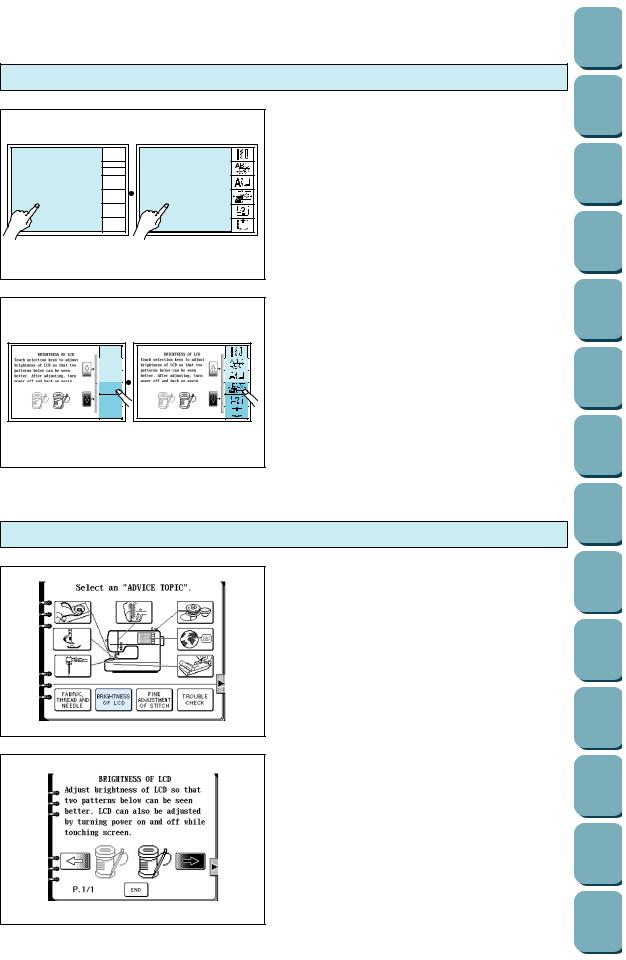
1.While touching the LCD (anywhere is OK), turn the power off and then back on again.
*The START/STOP button will not illuminate at this time.
2.Touch any one of the lower three selection keys (EMBROIDERY EDIT, OPERATION GUIDE or MEMORY RECALL). The LCD will become darker each time one of these keys is touched. If you would like to make the LCD lighter, touch any one of the upper three selection keys (UTILITY STITCH, CHARACTER/DECORATIVE STITCH or EMBROIDERY).
3.After you have finished adjusting, turn the power off and back on again once more.
Adjusting the brightness of the LCD.
1. Touch the “OPERATION GUIDE” key.
2. Touch the “BRIGHTNESS OF LCD” key.
1 Touch this key to make contrast less (lighter). 2 Touch this key to make contrast greater
(darker).
3 Touch this key to return to the screen which was previously being displayed.
1 |
2 |
3
13
HOW TO USE THE LANGUAGE SELECTION KEY
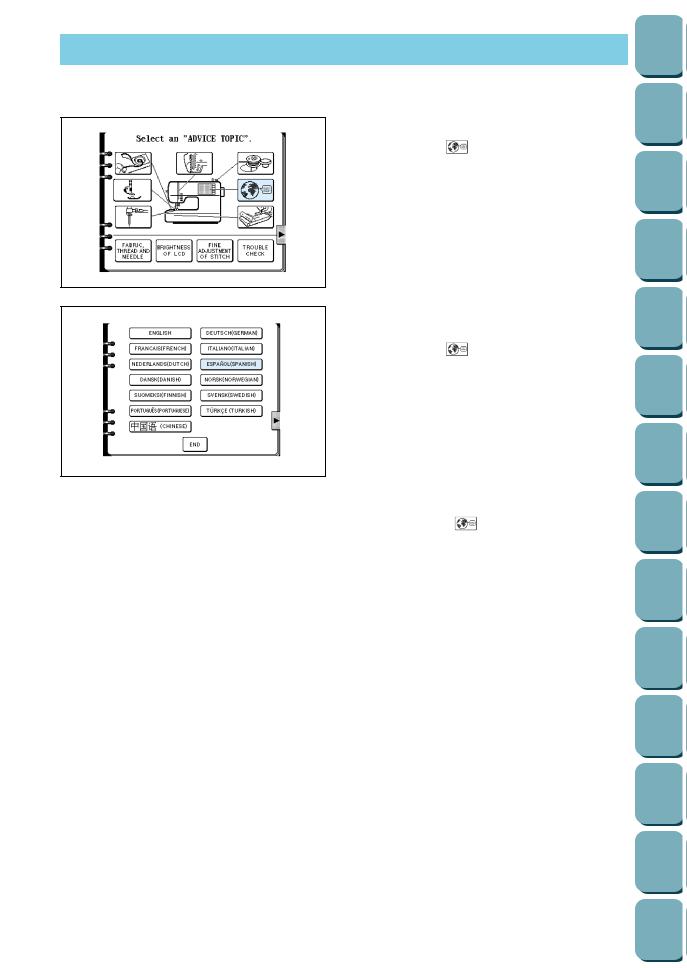
You can use the “  ” key to easily change the display language for all the keys and messages on the LCD screen to the language you need.
1. Touch the “OPERATION GUIDE” key.
2. Touch the “ |
” key. |
3. The language display screen will then appear. Touch the key which corresponds to the desired language.
Example: To change the display language to
|
Spanish |
|
1. |
Touch the “ |
” key. |
2. |
Touch “ESPAÑOL (SPANISH). |
|
|
This will change the language setting to |
|
|
Spanish. |
|
3. |
The display will then return to the screen |
|
|
which was previously being displayed. |
|
Note |
|
|
* |
When the “ |
” key is used to set the |
|
display language, error messages will also be |
|
|
displayed in the language selected. |
|
* |
The display language can be selected from a |
|
|
list of 13 languages (English, German, |
|
|
French, Italian, Dutch, Spanish, Danish, |
|
|
Norwegian, Finnish, Swedish, Portuguese, |
|
|
Turkish and Chinese). |
|
Up Setting
14
Up Setting
How to clear the language selection
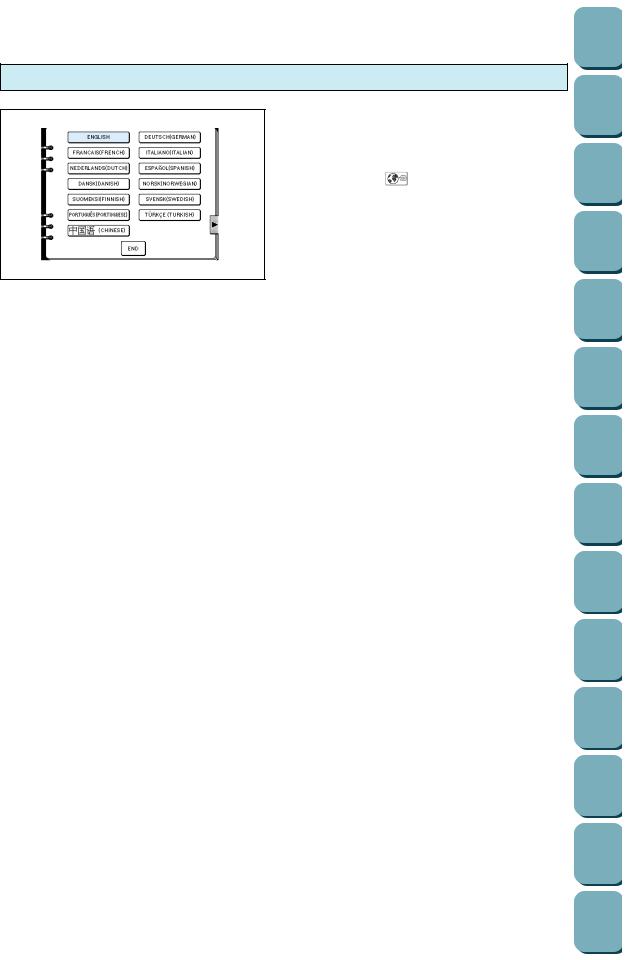
Example: To change the display language from Spanish back to English
1. |
Touch the “OPERATION GUIDE” key. |
|
2. |
Touch the “ |
” key. |
3. |
Touch the “ENGLISH” key. |
|
|
This will cancel the Spanish language setting |
|
|
and return all screen displays and error |
|
|
messages to the English language. |
|
CAUTION
– This function should not be used as a translation function.
– If the power supply is turned off, the current language setting will be retained and will not be cleared.
15
BOBBIN WINDING / BOBBIN THREAD SETTING
Winding the bobbin and setting the bobbin thread
3 2
4, 8
5
6
7
9 |
1 |
3 |
|
|
|
1 |
2 |
|
|
|
3 |
|
1 |
2
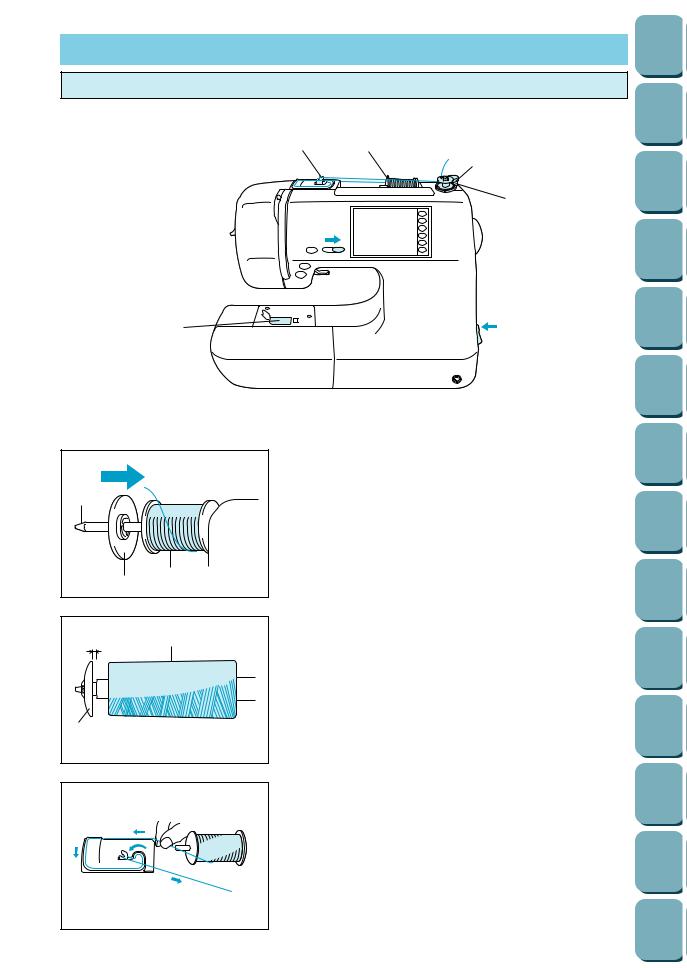
1.Connect the machine to the power supply and turn on the main power.
2.Place the spool of thread on the spool pin. The thread end should come from the bottom front of the spool. The spool cap closest to the thread spool size should be used to hold the spool securely on the spool pin.
1 Spool cap
2 Spool
3 Spool pin
*The spool cap should be pushed on as far as it will go.
Note
If using a fine thread such as cross wound thread, slightly separate the spool cap (small) from the spool of thread before using it.
1 Cross wound thread
2 Spool cap (small)
3 Gap
16 |
3.Steady the spool thread in your right hand, take the end of the thread in your left hand, and pass it through the guides in the order shown by the numbers.
Up Setting
Up Setting
2 |
1 |
1 |
2 |
1 |
2 |
3 |
1 |
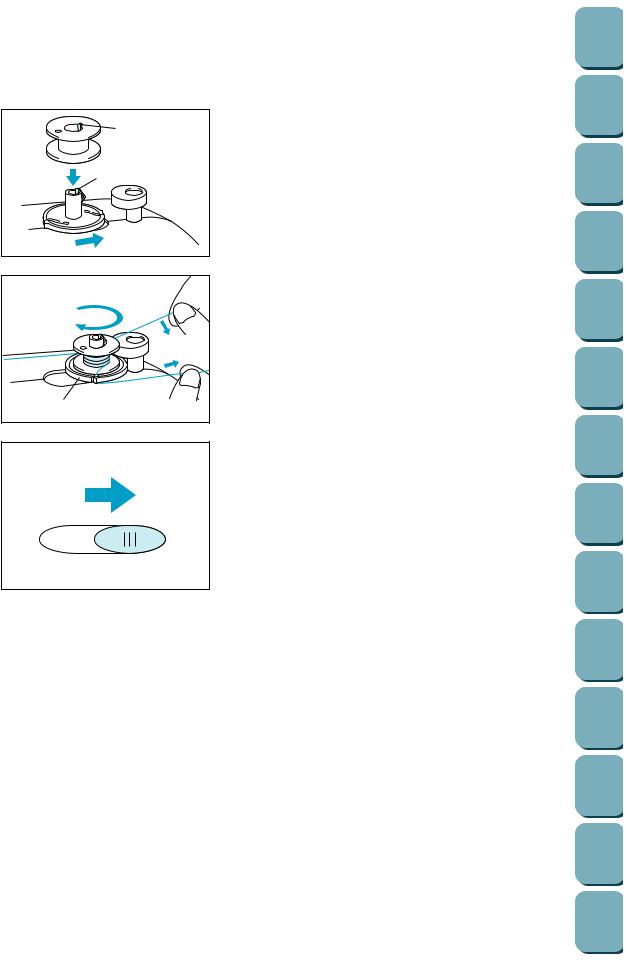
4.Align the groove in the bobbin with the spring on the shaft and place the bobbin on the bobbin winder shaft. Then, push the bobbin winder shaft to the right.
1 Spring on the shaft
2 Groove of the bobbin
5.Wind the thread clockwise around the bobbin four or five times, pass the end of the thread through the slit in the bobbin winder seat, and then pull the thread in the direction shown in the illustration. Use the cutter to cut the thread.
1 Bobbin winder seat
6.Slide the speed range control lever to its maximum (as far to the right as possible).
7.Press the “START/STOP” button. The machine will stop automatically when the bobbin is full.
8.After the bobbin has stopped moving, press the “START/STOP” button to stop the machine.
9.Cut the thread, slide the bobbin winder shaft to the left and remove the bobbin.
17
Up Setting
Setting the bobbin
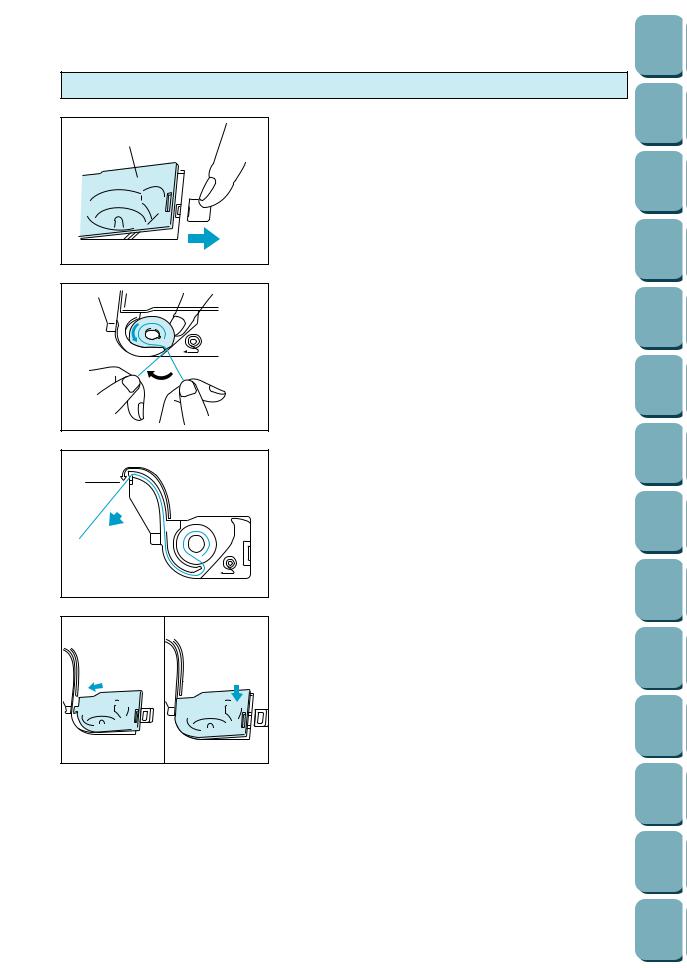
1. Slide open the bobbin cover.
1
1 Bobbin cover
2 Bobbin cover release button
 2
2
2.Insert the bobbin into the shuttle with the thread direction as noted in the diagram.
1 |
3.Guide the thread end through the slit, then pull the thread toward you to cut off any excess thread.
1 Built-in thread cutter
1 |
2 |
|
4.Close the bobbin cover by placing the left end in place and pressing down lightly on the right end so that it snaps into place.
*Sewing can begin without pulling out the bobbin thread.
18
UPPER THREADING
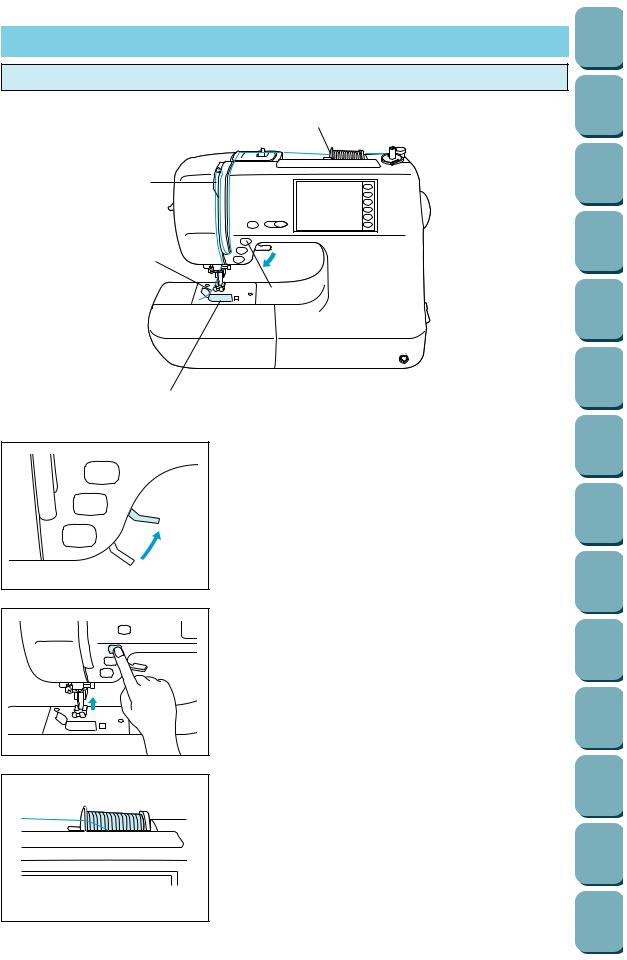
Thread according to number and arrow marks on machine.
3
4

 1
1
6
5 2
*
1.Raise the presser foot lever. (If the presser foot is not raised, the upper thread cannot be threaded.)
2. Press the “NEEDLE POSITION” button to raise the needle to the up position.
3.Set the thread spool. The thread end should come from the bottom front of the spool. The spool cap closest to the thread spool size should be used to hold the spool securely
on the spool post.
Up Setting
19
Up Setting
Insert the thread firmly to the bottom of the guide. 1
2
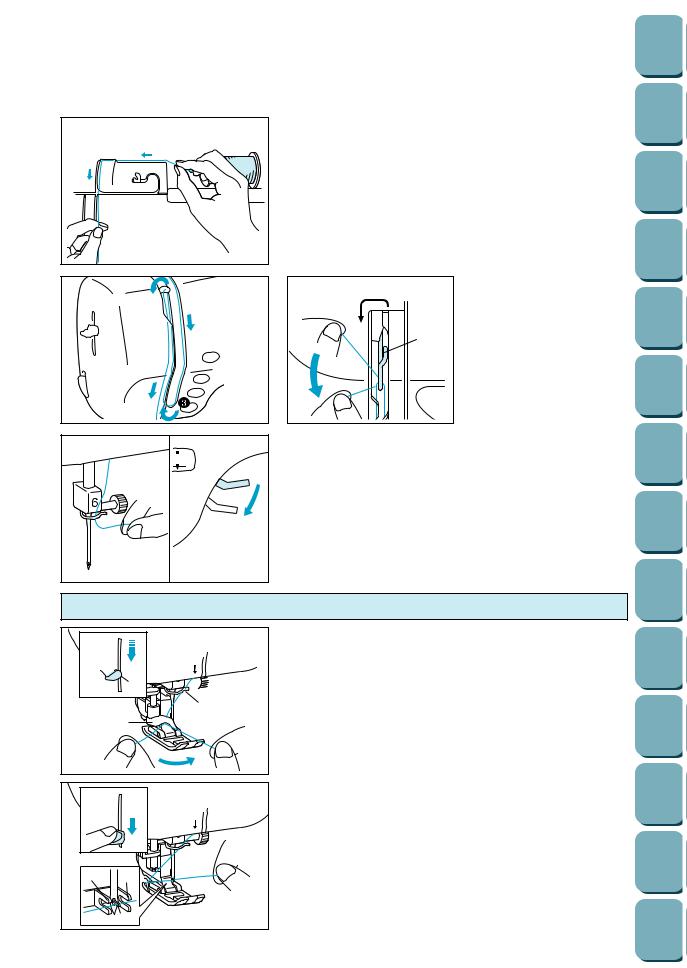
4.Steady the spool thread in your right hand, take the end of the thread in your left hand, and keep it taut while passing it through the guides in the order shown by the numbers.
Note
Incorrect threading may cause damage.
|
Threading the take-up lever |
1 Thread take-up lever |
|
|
|
4 |
4 |
|
|
1 |
|
5 |
|
|
5.Lower the presser foot.
6.Thread the needle manually or using the auto-threading
device.
*You do not need to pull the bobbin thread up before you
start sewing.
7. Pass the thread underneath the presser foot and pull it out from the rear of the machine by about 5 cm.
Note
Always raise the presser foot before removing the upper thread from the machine or damage may occur to the auto thread tension unit.
Auto-threading device
 1
1 

3
2
5
1 1 
2
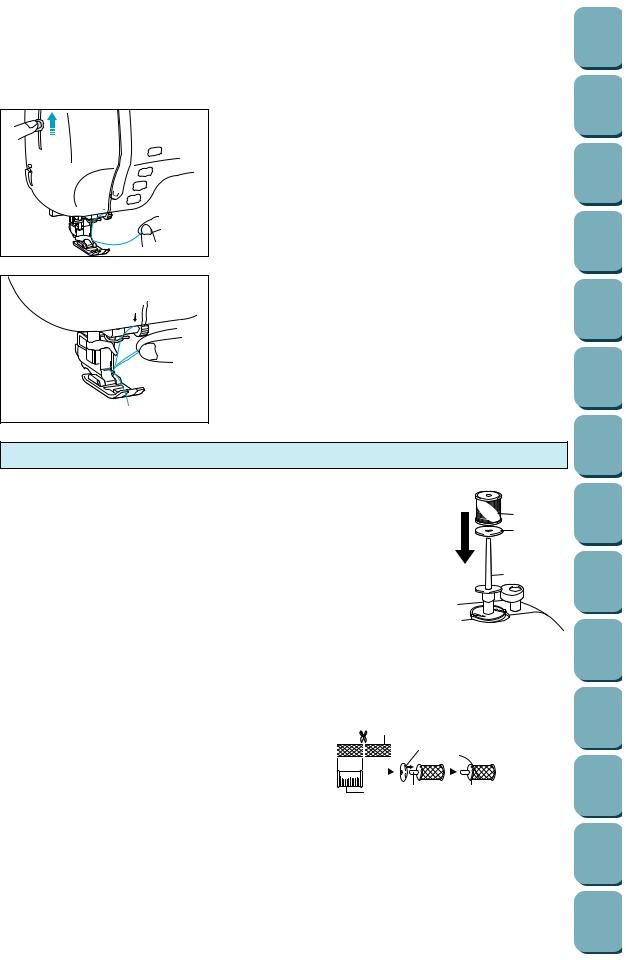
1.Guide the thread through the wire loop and gently pull the thread towards you.
1 Needle threader lever
2 Guide (Large hook)
3 Wire loop
*Lowering the presser foot will engage the automatic tension and will allow you to grip the thread as you proceed.
2.Lower the needle threader lever all the way down using your left index finger. Check that the thread is held by the guide (large hook) and that the hook on the needle threader has passed through the eye of the needle.
1 Second set of hooks
2 Third hook
3.As you lower the needle threader lever drape the thread to the left and the large hook will catch the thread. When the needle threader lever is in the lowest position, drape the thread across the eye of the needle.
20
Up Setting
*Rotating your right hand slightly to check that the thread is engaged.
4.While gently holding the thread, raise the needle threader lever.
 3
3
5
5.Pull the thread towards the rear to finish the upper threading.
6.Pass the thread underneath the presser foot and pull it out from the rear of the machine by about 5 cm (1-15/16”).
Using the extra spool pin and the net
Extra spool pin
Use when embroidering with metallic thread.
1.Insert the extra spool pin into the end of the bobbin winder shaft.
2.Install the spool felt and the thread spool in that order, and then thread the upper thread.
1 Insert the extra spool pin into the end of the bobbin winder shaft 2 Spool felt
3 Thread spool
*When setting the thread spool, set it so that the thread winds off from the front of the spool.
*If using metallic thread, we recommend that you use a 90/14 home sewing
machine needle.
Note
This method keeps the thread from twisting as it comes off the spool pin.
3
2
1
Net
If using special threads which wind quickly off the thread spool, attach a net to the spool before using.
*Cut the net to match the size of the spool.
1 |
Net |
|
1 |
|
2 |
Thread spool |
|
4 |
|
3 |
Spool pin |
|
|
|
4 |
Spool cap |
|
|
|
|
|
2 |
3 |
4 |
|
|
|
|
Needle |
Thread (cotton) |
|
|
65/9 |
#30, 50, 60 |
|
|
75/11 |
#30 |
|
|
90/14 |
#30 |
|
|
100/16 |
#20 |
|
|
Note
The auto-threading device cannot be used with the combinations shown at left.
Transparent nylon thread can be used regardless of the chart providing needle used in 90/14 to 100/16.
21
START/STOP
“START/STOP” button
Foot controller
1
2
Up Setting
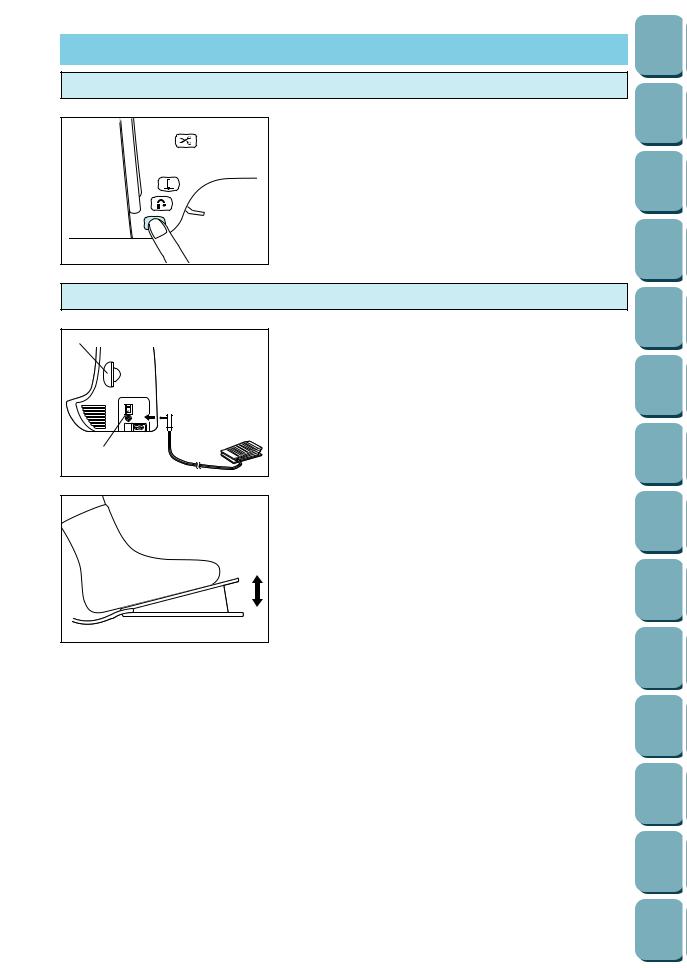
1Place the fabric under the presser foot, lower the presser foot, and then press the “START/STOP” button. This machine starts sewing.
*Hold down the “START/STOP” button to sew at a slow speed.
2. Press the “START/STOP” button to stop this machine.
Note
Do not allow fabric pieces and dust to collect in the foot controller. Doing so could cause a fire or an electric shock.
1.With this machine turned off, insert the foot controller plug into its jack on this machine.
1 Foot controller
2 Foot controller jack
2.Turn on this machine, then slowly depress the foot controller to start sewing.
*The speed set using the speed range control lever is the foot controller’s maximum sewing speed.
3. Release the foot controller to stop this machine.
*When the foot controller is being used, the “START/STOP” button has no effect on the sewing.
Note (For U.S.A. only)
Foot controller: Model J2
This foot controller can be used for this machine model PC8500.
22
Up Setting
Mounting and Using the Knee Lifter
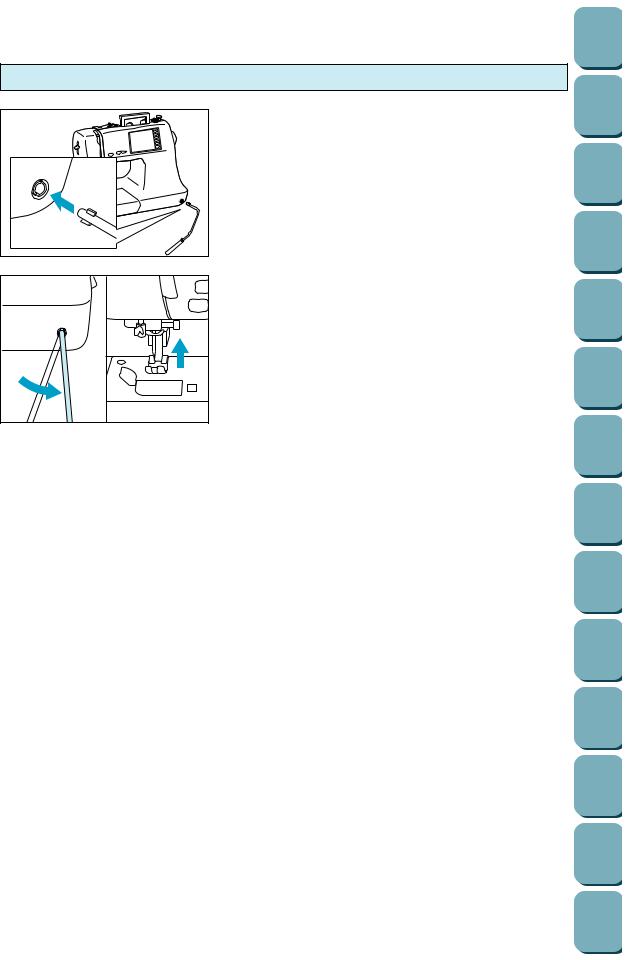
Align the knee lifter with the mounting slot and insert.
Use your knee to raise the knee lifter to the right in order to free both your hands for other tasks.
23
STITCH WIDTH AND STITCH LENGTH
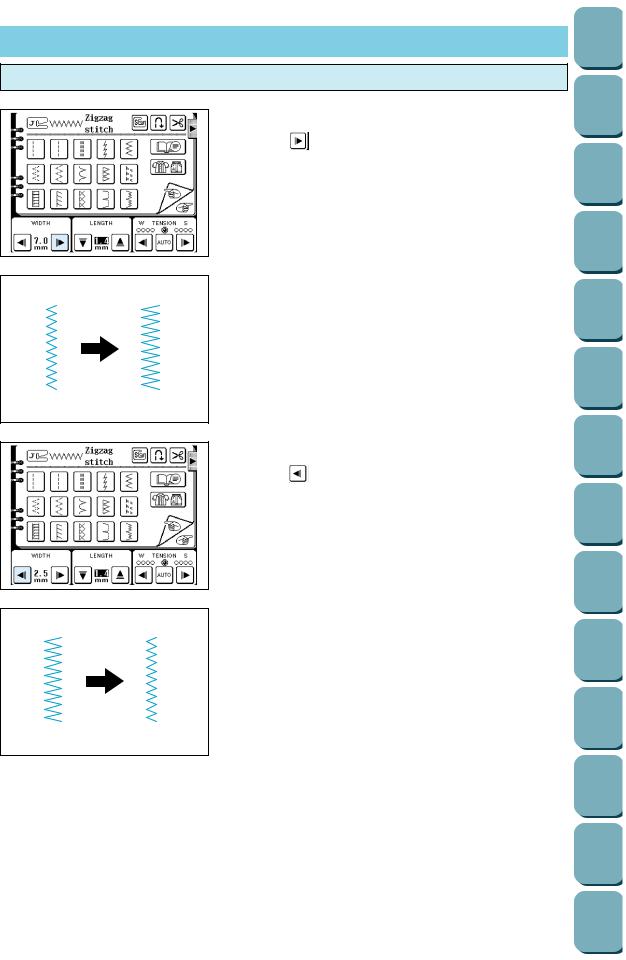
Stitch width
Increasing the stitch width
Touch the “ ” stitch width setting key.
The stitch width setting value will increase each time you touch the key.
Decreasing the stitch width
Touch the “ ” stitch width setting key.
The stitch width setting value will decrease each time you touch the key.
Up Setting
24
Up Setting
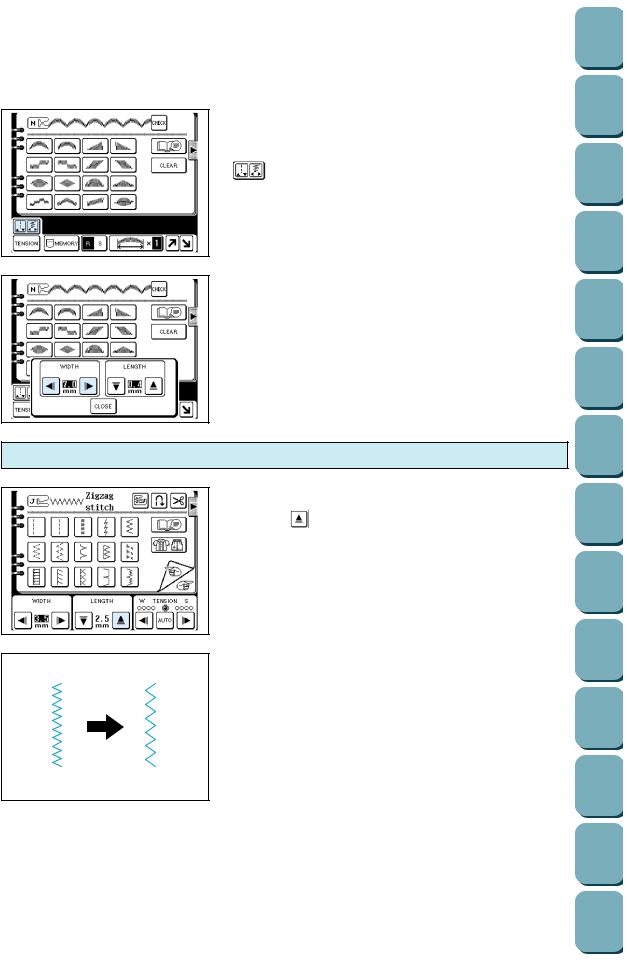
Sewing characters and patterns using satin stitches
Touch the “CHARACTER/DECORATIVE STITCH” key from the selection keys in the right side of the machine. Touch
“” key on the LCD screen.
*If you touch the “CLOSE” key, the display will return to the previous screen.
Stitch length
Increasing the stitch length
Touch the “ ” stitch length setting key.
The stitch length setting value will increase each time you touch the key.
25
Up Setting
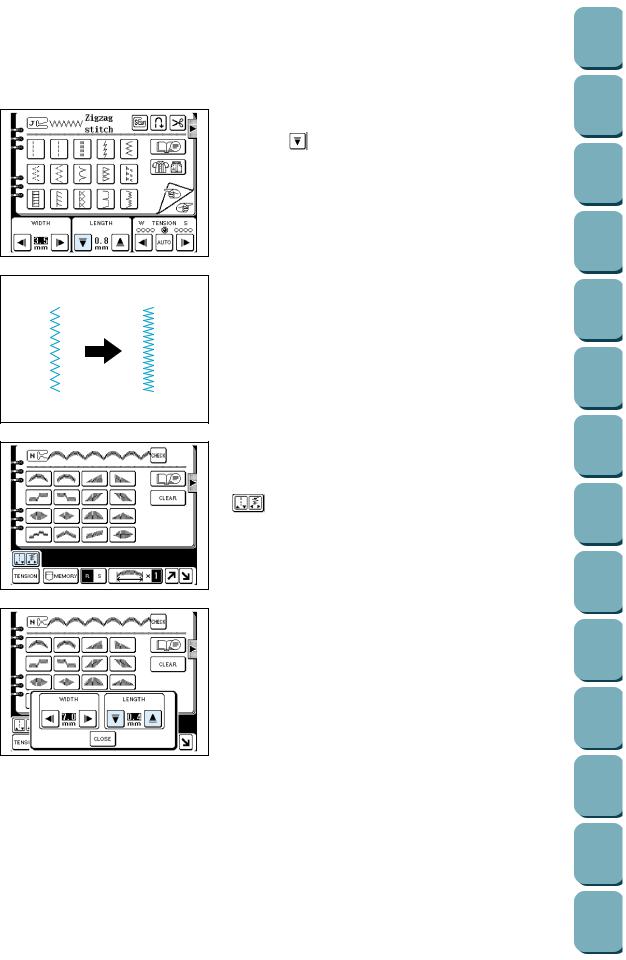
Decreasing the stitch length
Touch the “ ” stitch length setting key.
The stitch length setting value will decrease each time you touch the key.
*When sewing straight stitches, if the fabric thickness is less than 1 mm, the stitch length is automatically changed to 4.0 mm at the sewing start to prevent gathering, even if you set the length to 5.0 mm.
Sewing characters and patterns using satin stitches
Press the “CHARACTER/DECORATIVE STITCH” key from the selection keys on the right side of the machine. Touch the
“” key to adjust.
*If you touch the “CLOSE” key, the display will return to the previous screen.
26
Up Setting
Quick adjustment reference chart for stitch width and stitch length
STITCH |
|
Stitch width |
[mm (inch.)] |
Stitch length |
[mm (inch.)] |
STITCH |
|
Stitch width |
[mm (inch.)] |
Stitch length |
[mm (inch.)] |
|
Auto. |
Manual |
Auto. |
Manual |
|
Auto. |
Manual |
Auto. |
Manual |
||
|
|
|
|
||||||||
Straight |
|
[0.0 |
0.0–7.0 |
2.5 |
0.2–5.0 |
|
|
|
|
|
|
(Left) |
|
(0.0)] |
(0–1/4) |
(3/32) |
(1/64–3/16) |
|
|
|
|
|
|
|
|
|
|
|
|
|
|
7.0 |
3.0–7.0 |
0.5 |
0.3 |
Straight |
|
– |
– |
2.5 |
0.2–5.0 |
|
|
||||
(Middle) |
|
(3/32) |
(1/64–3/16) |
|
|
(1/4) |
(1/8–1/4) |
(1/32) |
(1/64 |
||
|
|
|
|
|
|||||||
|
|
|
|
|
|
|
|
|
|
|
|
|
|
[0.0 |
0.0–7.0 |
2.5 |
1.5–2.5 |
|
|
|
|
|
|
|
|
(0.0)] |
(0–1/4) |
(3/32) |
(1/16–3/32) |
|
|
|
|
|
|
Stretch stitch |
|
|
|
|
|
|
|
|
|
|
|
|
1.0 |
1.0–3.0 |
2.5 |
1.0–4.0 |
|
|
|
|
|
|
|
|
|
|
|
|
|
|
|
||||
|
|
(1/16) |
(1/16–1/8) |
(3/32) |
(1/16–3/16) |
|
|
7.0 |
2.5–7.0 |
2.0 |
0.4–2.5 |
|
|
|
|
|
|
Darning |
|
||||
Zigzag |
|
3.5 |
0.0–7.0 |
1.4 |
0.0–4.0 |
|
(1/4) |
(3/32–1/4) |
(1/16) |
(1/64–1/16) |
|
|
|
|
|||||||||
|
|
|
|
|
|
|
|||||
|
(1/8) |
(0–1/4) |
(1/16) |
(0–3/16) |
|
|
|
|
|
|
|
|
|
|
|
|
|
|
|
||||
|
|
|
|
|
|
|
|
|
|
|
|
|
|
5.0 |
1.5–7.0 |
1.0 |
0.2–4.0 |
Bar tack |
|
2.0 |
1.0–3.0 |
0.4 |
0.3–1.0 |
|
|
(3/16) |
(1/16–1/4) |
(1/16) |
(1/64–1/16) |
|
(1/16) |
(1/16–1/8) |
(1/64) |
(1/64–1/16) |
|
Elastic zigzag |
|
|
|
||||||||
|
|
|
|
|
|
|
|
|
|
|
|
|
5.0 |
1.5–7.0 |
1.0 |
0.2–4.0 |
Tape attaching |
|
4.0 |
0.0–7.0 |
1.0 |
0.2–4.0 |
|
|
|
|
|||||||||
|
|
(3/16) |
(1/16–1/4) |
(1/16) |
(1/64–1/16) |
|
(3/16) |
(0.0–1/4) |
(1/16) |
(1/61–3/16) |
|
|
|
|
|
||||||||
|
|
|
|
|
|
|
|
|
|
|
|
|
|
3.5 |
2.5–5.0 |
2.0 |
1.0–4.0 |
Eyelet |
|
7.0 |
7.0 6.0 5.0 |
7.0 |
7.0 6.0 5.0 |
|
|
(1/8) |
(3/32–3/16) |
(1/16) |
(1/16–3/16) |
|
(1/4) |
(1/4–3/16) |
(1/4) |
(1/4–3/16) |
|
|
|
|
|
||||||||
|
|
|
|
|
|
|
|
|
|
|
|
|
|
5.0 |
2.5–5.0 |
2.5 |
1.0–4.0 |
Button sewing |
|
3.5 |
2.5–4.5 |
– |
– |
|
|
(3/16) |
(3/32–3/16) |
(3/32) |
(1/16–3/16) |
|
(1/8) |
(3/32–3/16) |
|||
|
|
|
|
|
|
||||||
|
|
|
|
|
|
|
|
|
|
|
|
|
|
5.0 |
0.0–7.0 |
2.5 |
0.5–3.0 |
Basting |
|
0.0 |
0.0–7.0 |
20 |
5–30 |
|
|
(3/16) |
(0.0–1/4) |
(3/32) |
(1/32–1/8) |
|
(0.0) |
(0–1/4) |
(13/16) |
(3/16–1-3/16) |
|
Overcasting |
|
|
|
||||||||
|
|
|
|
|
|
|
|
|
|
|
|
|
5.0 |
3.5–5.0 |
2.5 |
1.0–4.0 |
|
|
3.5 |
2.5–5.0 |
2.5 |
1.6–2.5 |
|
|
|
|
|
||||||||
|
|
(3/16) |
(1/8–3/16) |
(3/32) |
(1/16–3/16) |
|
|
(1/8) |
(3/32–3/16) |
(3/32) |
(1/16–3/32) |
|
|
|
|
|
|
Applique |
|
|
|
|
|
|
|
5.0 |
0.0–7.0 |
2.5 |
0.5–3.0 |
|
1.5 |
0.5–3.5 |
1.4 |
0.8–4.0 |
|
|
|
|
|
||||||||
|
|
(3/16) |
(0.0–1/4) |
(3/32) |
(1/32–1/8) |
|
|
(1/16) |
(1/32–1/8) |
(1/64) |
(1/16–3/16) |
|
|
|
|
|
|
|
|
|
|
|
|
|
|
4.0 |
0.0–7.0 |
4.0 |
1.0–4.0 |
Scallop |
|
5.0 |
2.5–7.0 |
0.4 |
0.1–1.0 |
|
|
(3/16) |
(0.0–1/4) |
(3/16) |
(1/16–3/16) |
|
(3/16) |
(3/32–1/4) |
(1/64) |
(1/64–1/16) |
|
|
|
|
|
||||||||
|
|
|
|
|
|
|
|
|
|
|
|
|
|
|
|
|
|
Smocking stitch |
|
5.0 |
1.5–7.0 |
1.6 |
0.2–4.0 |
|
|
0.0 |
+3 – –3 |
2.0 |
1.0–3.5 |
|
(3/16) |
(1/16–1/4) |
(1/16) |
(1/64–1/16) |
|
Blind hem stitch |
|
|
|
||||||||
|
|
|
|
|
|
|
|||||
|
(0.0) |
|
(1/16) |
(1/16–1/8) |
|
|
5.0 |
2.5–7.0 |
2.5 |
1.0–2.5 |
|
|
|
|
|
|
|||||||
|
|
|
|
|
|
|
|
||||
|
|
|
|
|
|
|
|
(3/16) |
(3/32–1/4) |
(3/32) |
(1/16–3/32) |
|
|
|
|
|
|
|
|
|
|
|
|
|
|
5.0 |
3.0–5.0 |
0.4 |
0.2–1.0 |
Patchwork stitch |
|
4.0 |
0.0–7.0 |
1.2 |
0.2–4.0 |
|
|
(3/16) |
(1/8–3/16) |
(1/64) |
(1/64–1/16) |
|
(1/16) |
(0.0–1/4) |
(1/16) |
(1/64–1/16) |
|
|
|
|
|
|
|
|
|
|
|
|
|
|
|
5.0 |
3.0–5.0 |
0.4 |
0.2–1.0 |
|
|
5.0 |
0.0–7.0 |
1.2 |
0.2–4.0 |
|
|
(3/16) |
(1/8–3/16) |
(1/64) |
(1/64–1/16) |
|
|
(3/16) |
(0.0–1/4) |
(1/16) |
(1/64–1/16) |
|
|
|
|
|
|
|
|
|
|
|
|
|
|
5.0 |
3.0–5.0 |
0.4 |
0.2–1.0 |
|
|
5.0 |
0.0–7.0 |
2.5 |
2.5–3.0 |
|
|
(3/16) |
(1/8–3/10) |
(1/64) |
(1/64–1/10) |
|
|
(3/16) |
(0.0–1/4) |
(3/32) |
(3/32–1/8) |
|
|
|
|
|
|
Fagoting |
|
|
|
|
|
Buttonhole |
|
5.0 |
3.0–5.0 |
0.4 |
0.2–1.0 |
|
5.0 |
2.5–7.0 |
2.5 |
1.0–2.5 |
|
|
|
|
|||||||||
|
|
(3/16) |
(1/8–3/16) |
(1/64) |
(1/64–1/16) |
|
|
(3/16) |
(3/32–1/4) |
(3/32) |
(1/16–3/32) |
|
|
|
|
|
|
|
|
|
|
|
|
|
|
6.0 |
3.0–6.0 |
1.0 |
0.5–2.0 |
|
|
|
|
|
|
|
|
(1/4) |
(1/8–1/4) |
(1/16) |
(1/32–1/16) |
|
|
|
|
|
|
|
|
|
|
|
|
|
|
|
|
|
|
|
|
6.0 |
3.0–6.0 |
1.5 |
1.0–3.0 |
|
|
|
|
|
|
|
|
(1/4) |
(1/8–1/4) |
(1/16) |
(1/16–1/8) |
|
|
|
|
|
|
|
|
|
|
|
|
|
|
|
|
|
|
|
|
5.0 |
0.0–6.0 |
2.0 |
0.2–5.0 |
|
|
|
|
|
|
|
|
(3/16) |
(0.0–1/4) |
(1/10) |
(1/64–3/16) |
|
|
|
|
|
|
|
|
|
|
|
|
|
|
|
|
|
|
27
 Loading...