


 Loading...
2460
USER´S GUIDEI MODE D´EMPLOII
•Read this User’s Guide before you start using your P-touch.
•Keep this User’s Guide in a handy place for future reference.
•Lisez attentivement ce guide avant d’utiliser le P-touch pour la première fois.
•Conservez ce guide dans un lieu sûr en vue de référence ultérieure.
www.p-touch.com

USER’S GUIDE

Introduction
Thank you for purchasing this P-touch!
With your new P-touch, select from a variety of character styles, sizes and frames to design practical custom labels for any need. In addition, the selection of pre-formatted label types allows you to quickly and easily label patch panels, cables, connectors and other components.
With this P-touch, you can print legible, long-lasting labels in no time. The quality and performance of this P-touch make it an extremely practical machine in the plant or in the field.
Although this P-touch is easy to use, we suggest that you read this User’s Guide carefully before starting, and then keep this manual nearby for future reference.
|
Declaration of Conformity |
We |
BROTHER INDUSTRIES, LTD. |
|
1-1-1, Kawagishi, Mizuho-ku, |
|
Nagoya 467-8562, Japan |
declare that the Labelling System PT-2460 conforms with the following normative documents:
EMC: |
EN 55022:1998 Class B |
|
EN 55024:1998 |
|
EN 61000-3-2:1995 |
|
EN 61000-3-3:1995 |
and follows the provisions of the Electromagnetic Compatibility Directive 89/336/EEC (as amended by 91/263/EEC and 92/31/EEC). The AC adapter also conforms with EN 60950 and follows the provisions of the Low Voltage Directive 73/23/EEC.
Issued by: BROTHER INDUSTRIES, LTD. P & H company Development DIV.

CONTENTS |
|
1. Getting Started .............................................................. |
1 |
General Description ...................................................................... |
1 |
Top view & bottom view ............................................................................... |
1 |
Keyboard & LCD display ............................................................................. |
2 |
General Precautions ...................................................................... |
3 |
Batteries & Tape Cassettes ............................................................. |
4 |
Installing batteries and a tape cassette ......................................................... |
4 |
Cleaning ........................................................................................ |
7 |
Cleaning the print head, rollers and tape cutter .......................................... |
7 |
Optional AC Adapter ..................................................................... |
8 |
Connecting the AC adapter ........................................................................... |
8 |
Turning the P-touch On/Off .......................................................... |
8 |
2. Label Type Modes .......................................................... |
9 |
Selecting a Label Type Mode ......................................................... |
9 |
Normal and Vertical Modes ........................................................... |
9 |
Rotate Mode and Rotate & Repeat Mode ..................................... |
10 |
Flag Mode .................................................................................... |
11 |
Port & Panel Modes ..................................................................... |
12 |
3. Basic Functions ............................................................ |
14 |
Performing Basic Operations ....................................................... |
14 |
Choosing functions, parameters, settings and groups ................................ |
14 |
Choosing the default setting ....................................................................... |
14 |
Confirming a choice .................................................................................... |
14 |
Cancelling a choice .................................................................................... |
14 |
Inputting Label Data .................................................................... |
15 |
Entering and editing text ............................................................................. |
15 |
Entering an accented character .................................................................. |
17 |
Entering a bar code .................................................................................... |
18 |
Entering a symbol ....................................................................................... |
20 |
Formatting the Label .................................................................... |
23 |
Specifying a label length ............................................................................. |
23 |
Specifying a margin size ............................................................................. |
23 |
Framing the text .......................................................................................... |
24 |
i

Specifying the character size ...................................................................... |
25 |
Specifying the character width ................................................................... |
26 |
Specifying the character style ..................................................................... |
27 |
Using the pre-formatted Auto Format templates ........................................ |
29 |
Printing Labels ............................................................................. |
30 |
Previewing the label layout ........................................................................ |
30 |
Feeding tape ............................................................................................... |
30 |
Printing a label ........................................................................................... |
30 |
Using special printing functions ................................................................. |
31 |
Storing and Recalling Files ........................................................... |
35 |
Storing label text ......................................................................................... |
35 |
Recalling text that has been stored ............................................................. |
36 |
Deleting text that has been stored ............................................................... |
36 |
4. Machine Adjustments .................................................. |
37 |
Selecting how tape is fed and cut ................................................................ |
37 |
Adjusting the display contrast ..................................................................... |
37 |
Setting the Auto Reduction function ............................................................ |
38 |
Calibrating the label length ........................................................................ |
38 |
Specifying if the PERSONAL symbol category is continually updated ..... |
39 |
Displaying version information .................................................................. |
39 |
5. Appendix ..................................................................... |
40 |
Troubleshooting ........................................................................... |
40 |
Error Message List ........................................................................ |
41 |
Machine Specifications ................................................................ |
45 |
Hardware .................................................................................................... |
45 |
Software ...................................................................................................... |
45 |
Accessories .................................................................................. |
46 |
Index ........................................................................................... |
51 |
ii
1 Getting Started
General Description
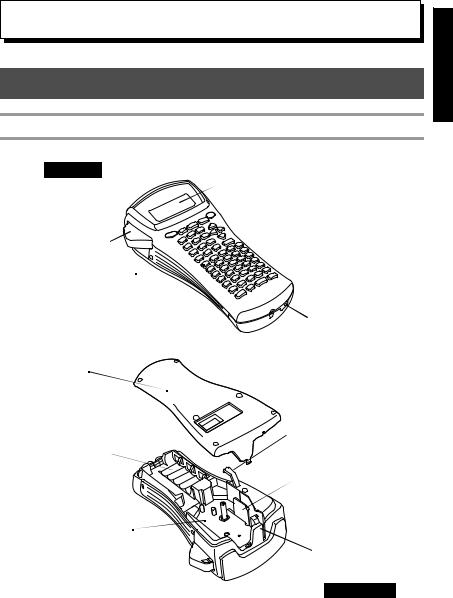
Top view & bottom view
Top view
 Display
Tape cutter button 
Keyboard 
AC adapter connector
Back cover
Cassette release lever
Battery compartment
Print head
Tape cassette compartment
 Tape exit slot
Bottom view
Getting Started
1
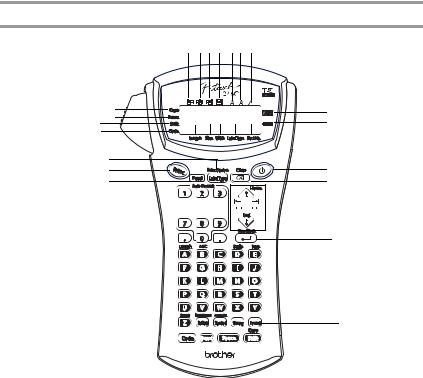
Keyboard & LCD display
1 234 56 7
|
E |
|
|
8 |
|
|
F |
D CB A |
0 |
||
G |
9 |
||||
|
|
|
|||
H |
|
|
|
|
|
Q |
|
|
|
||
P |
|
|
I |
||
O |
|
|
J |
||
N 


 K
K
L
M
1 Left text alignment (page 28)
2 Centre text alignment (page 28)
3 Right text alignment (page 28)
4Justified text alignment (page 28)
5 Bold text style (page 27)
6 Outline text style (page 27)
7 Italic text style (page 27)
8 Frame (page 24)
9 Low battery (page 5)
0 Block number (page 16) A Label Type setting (page 9) B Width setting (page 26)
C Size setting (pages 25 & 26) D Length setting (page 23)
E Caps mode (page 15) F Insert mode (page 16) G Shift mode (page 15) H Code mode (page 15) I Power key (page 8)
JBackspace key (pages 14 & 17)
K Arrow keys (page 14)
L Return key (pages 14 & 16) M Global format key (page 25) N Number keys (page 29)
O Feed key (page 30) P Print key (page 30) Q Label Type (page 9)
2

General Precautions |
|
|
|||
|
Started |
||||
|
|
|
|
||
● Use only Brother TZ tapes with this machine. Do not use tapes that do not |
|||||
|
|||||
have the |
|
mark. |
Getting |
||
|
|||||
● Do not pull on the tape being fed from the P-touch, otherwise the tape cassette may |
|||||
|
|||||
be damaged. |
|
|
|
||
● Avoid using the machine in extremely dusty places. Keep it out of both direct |
|
||||
|
|||||
sunlight and rain. |
|
||||
● Do not expose the machine to extremely high temperatures or high humidity. |
|
||||
Never leave it on the dashboard or in the back of your car. |
|
||||
● Do not store tape cassettes where they would be exposed to direct sunlight, high |
|
||||
humidity or dust. |
|
||||
● Do not leave any rubber or vinyl on the machine for an extended period of time, |
|
||||
otherwise the machine may be stained. |
|
||||
● Do not clean the machine with alcohol or other organic solvents. Only use a soft, dry cloth. |
|
||||
● Do not put any foreign objects into or heavy objects on the machine. |
|
||||
● To avoid injuries, do not touch the cutter’s edge. |
|
||||
● Use only the AC adapter designed exclusively for this machine. Use of any other |
|
||||
adapter will void the warranty. |
|
||||
● Do not try to disassemble the AC adapter. |
|
||||
● When the machine is not to be used for a long period of time, disconnect the AC adapter, |
|
||||
and remove the batteries to prevent them from leaking and damaging the machine. |
|
||||
● Use six AA alkaline or rechargeable (Ni-Cd or Ni-MH) batteries. |
|
||||
● Never try to disassemble the P-touch. |
|
||||
3
Batteries & Tape Cassettes
This machine has been designed to allow you to change the batteries and tape cassettes quickly and easily. With batteries installed, this compact and portable machine can be used anywhere. TZ tape cassettes are available for this machine in a wide variety of types, colours and sizes, enabling you to make distinctive colour-coded and stylized labels.
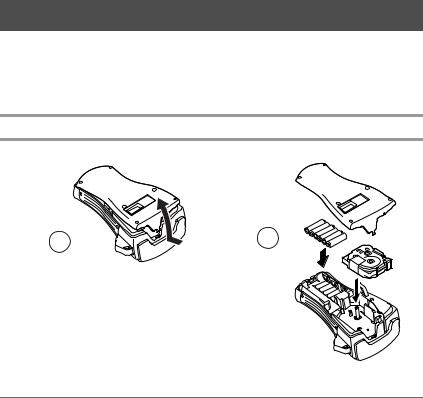
Installing batteries and a tape cassette
1 |
2 |
Notes on batteries
This P-touch requires six AA-size batteries. Rechargeable (Ni-Cd or Ni-MH) batteries can be used instead of six alkaline batteries.
The rechargeable batteries cannot be recharged by leaving them in the P-touch with the AC adapter connected. Instead, recharge the batteries by using a battery charger designed specifically for the type of batteries used. For more details on the rechargeable batteries, refer to the instructions provided with them.
Do not use any of the following, otherwise battery leakage or damage may occur.
•Manganese batteries
•A combination of new and used batteries
•A combination of batteries of different types (alkaline, Ni-Cd and Ni-MH), different manufacturers or different models
•A combination of recharged and uncharged batteries
4
Make sure that the batteries are inserted so that their poles point in the correct direction. |
|
||
|
With batteries installed, the P-touch determines the remaining battery charge during |
Started |
|
|
printing and feeding. If a low battery charge is detected, the low battery indicator ()) |
||
|
|
||
|
comes on. When this occurs, be sure to replace the batteries. The low battery indicator |
|
|
|
may not come on in some operating conditions. |
Getting |
|
|
Before replacing the batteries, make sure that the P-touch is turned off. In addition, when |
||
|
|||
|
replacing the batteries, insert the new ones within five minutes of removing the old ones, |
|
|
|
otherwise the text shown in the display and any text stored in the memory will be lost. |
|
|
If you do not intend to use this P-touch for an extended period of time, remove the |
|
||
|
batteries. When the power is disconnected, all text shown in the display and stored in the |
|
|
|
memory will be lost. |
|
|
Since the enclosed batteries begin discharging from the time that the unit is shipped from |
|
||
|
the factory, their life span may not meet specifications, depending on when the unit is |
|
|
|
put into use. |
|
|
Notes on tape cassettes
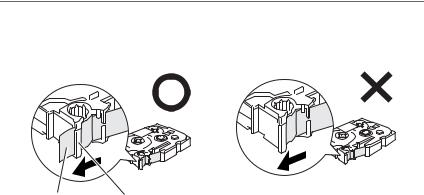
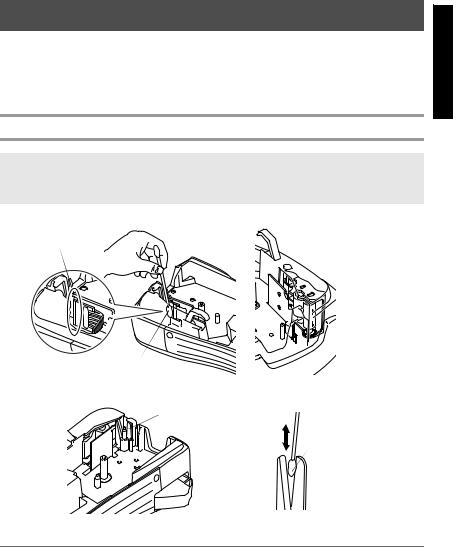
Before installing the tape cassette, make sure that the end of the tape feeds under the tape guides. If the tape cassette to be installed has an ink ribbon and the ink ribbon is loose, use your finger to wind the toothed wheel in the direction of the arrow on the cassette until there is no slack in the ribbon.
End of the tape |
Tape guides |
When inserting the tape cassette, make sure that the inner ribbon does not catch on the corner of the metal guide.
After installing a tape cassette, press fonce to remove any slack in the tape, and then press in on the tape cutter button to cut off the excess tape.
Always cut off the tape before removing it from the machine. If the tape is pulled on before being cut off, the tape cassette may be damaged.
5
Strong Adhesive Tape
For textured, rough, or slipping surface, we recommend using Strong Adhesive Tape.
Although the instruction sheet included with the Strong Adhesive Tape cassette recommends cutting the tape with scissors, the tape cutter that this P-touch is equipped with is able to cut Strong Adhesive Tape.
Flexible ID Tape
For applications that require more flexible labels, such as around sharp bends and cylindrical objects, we recommend using Flexible ID Tape.
Labels made with Flexible ID Tape are not designed for use as electrical insulation.
When wrapping labels around cylindrical objects, the diameter of the object should be at least 3 mm, otherwise the label should be wrapped as a flag and the FLAG Label Type mode should be used. In addition, the overlapping ends of the label or the label flag should be at least 5 mm.
The label may peel off cylindrical objects if the object is bent after the label is affixed.
Overlap > 5 mm
Diameter > 3 mm
Overlap > 5 mm
Diameter > 3 mm
Flag > 5 mm 
6
Cleaning
Occasionally, certain parts of the P-touch may need to be cleaned. Dust or dirt may become attached to the P-touch’s print head and rollers, particularly when the unit is used outdoors or in a very dusty environment. With use, the tape cutter may become covered with adhesive, making it difficult to cut the tape.
Cleaning the print head, rollers and tape cutter
Before cleaning the print head and rollers, press oto turn off the P-touch, and then remove the batteries and disconnect the optional AC adapter.
Be extremely careful not to touch the cutter blades with your fingers.
Print head

 Dry Cotton swab
Dry Cotton swab
Tape cutter blades
Tape cutter blades
Dry cotton swab
Getting Started
Notes on cleaning the print head & rollers
If a blank horizontal streak appears through the label text, clean the machine’s print head.
The print head can be cleaned more easily if the optional print head cleaning cassette (TZ-CL4) is used.
7
Notes on cleaning the tape cutter
If the tape cannot be cut correctly, clean the tape cutter blades.
Optional AC Adapter
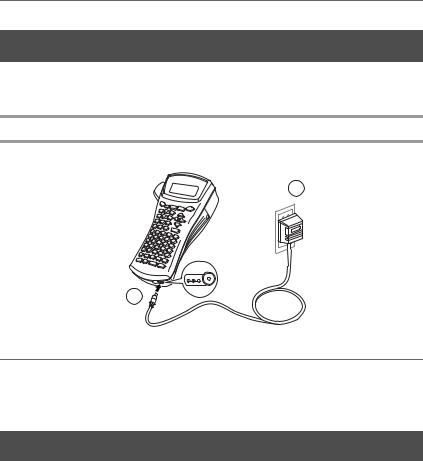
When printing a large number of labels or labels that contain a large amount of text, it may be useful to connect the P-touch to a standard electrical outlet using the optional AC adapter.
Connecting the AC adapter
2
DC IN 9.5V
1
Notes on the AC adapter
Only use the AC adapter designed exclusively for this machine.
Disconnect the AC adapter if you do not intend to use this P-touch for an extended period of time. When the power is disconnected, all text shown in the display and stored in the memory will be lost.
Turning the P-touch On/Off
Press oto turn on or turn off the P-touch.
If batteries are installed or the P-touch has remained plugged in using the AC adapter, the previous session’s text is displayed when the P-touch is turned on again. This feature allows you to stop work on a label, turn off the machine, and return to it later without having to re-enter the text.
Regardless of whether the P-touch is being operated from batteries or the AC adapter, the machine will automatically turn off if no key is pressed or no operation is performed for 5 minutes.
8

2 Label Type Modes
Selecting a Label Type Mode
Pressing aallows you to select one of the two regular modes for designing and printing your own custom labels, or any of the five special modes available for printing labels preformatted for identifying patch panels, cables, connectors and other components.
1Press a.
2Press uor d(or continue pressing a) until the desired mode is displayed. (For details on each Label Type mode, refer to the sections below.)
3Press nto apply the selected Label Type mode.
•If NORMAL or VERTICAL was selected, continue entering the label text as described in chapter 3, Basic Functions.
•If ROTATE, R & REP., PORT, PANEL, or FLAG was selected, continue with the following steps.
4Press l or runtil the desired parameter is displayed.
5Press uor duntil the desired setting is displayed (or use the number keys to type in the desired setting).
6Press nto apply the selected settings.
7Type the text for each label in a separate text block.
8Print the labels.
•To print a single copy of each label, press p.
•To print multiple copies or several copies while increasing certain characters, or to print using any other special printing function, press g, then aand choose your options. (For details, refer to Using special printing functions on page 31.)
Normal and Vertical Modes
Labels printed using the Normal and Vertical Label Type modes can be formatted and printed to fit any need.
NORMAL
ABCDE
VERTICAL
A B C D E
Label Type Modes
9
After selecting the Label Type mode NORMAL or VERTICAL, the label text can be entered, formatted, printed and cut as usual. With the Normal Label Type mode, the entered text is printed horizontally along the label. With the Vertical Label Type mode, the entered text is printed vertically along the label.
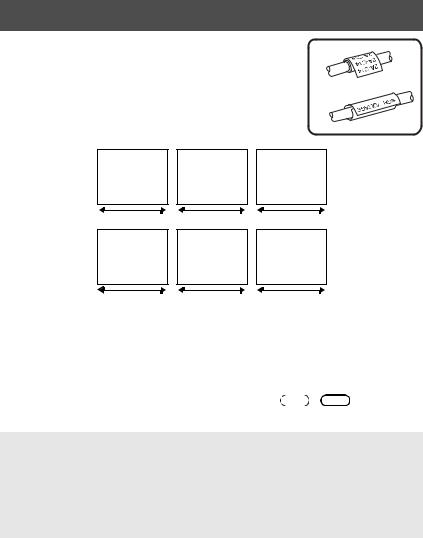
Rotate Mode and Rotate & Repeat Mode
Labels printed using these Label Type modes can be wrapped around cables and wires to mark them. With both of these modes, the text is rotated 90° counterclockwise and each text block printed on a separate label as shown below. With the Rotate & Repeat mode, the text is printed repeatedly along the length of the label so that it can easily be read from any angle.
Rotate
 Block length
 Block length
 Block length
Rotate
&
Repeat
Block length
 Block length
 Block length
After selecting the ROTATE or R & REP. Label Type mode, specify the length of each label and a frame style if desired.
● BL. LEN. (block length): 20 to 200 mm Default: 30 mm
● FRAME: |
OFF, |
1 |
, |
2 |
, 3 , 4 |
|
Default: OFF |
||||
A single block of text can contain a maximum of 7 text lines, and with the R & REP. Label Type mode, only the text lines that fit within the label are printed.
For labels to be attached to cables and wires, we recommend using Flexible ID Tape. When wrapping Flexible ID Tape around cylindrical objects, the diameter of the object should be at least 3 mm, otherwise the FLAG Label Type mode should be used. In addition, the overlapping ends of the label or the flag length should be at least 5 mm.
10
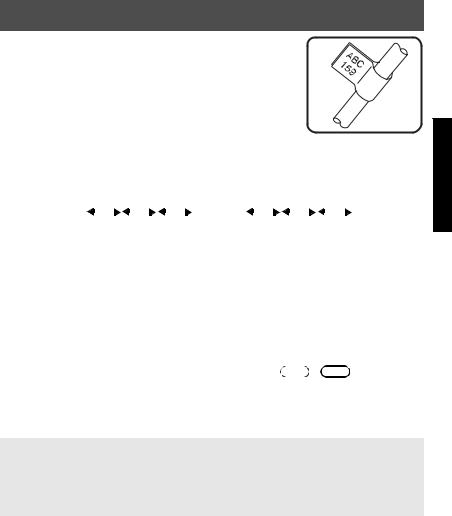
Flag Mode
Labels printed using this Label Type mode can be wrapped around cable or wire with the ends stuck together to form a flag. With the FLAG Label Type mode, each block of text is printed at both ends of separate labels. The length of the unprinted part of this label is equal to the circumference of the cable or wire. In addition, the text can be printed horizontally or rotated 90°.
ROTATE |
|
|
|
|
|
|
|
|
|
ROTATE |
|
|
|
|
|
|
|
|
|
|
|
|
|
|
|
|
|
|
|
|
|
|
|
|
|
|
|
||
set to |
|
|
|
|
|
|
|
|
|
set to |
|
|
|
|
|
|
|
|
|
OFF |
|
|
|
|
|
|
|
|
|
ON |
|
|
|
|
|
|
|
|
|
|
|
|
|
|
|
|
|
|
|
|
|
|
|
|
|
|
|
|
|
|
|
|
|
|
|
|
|
|
|
|
|
|
|
|
|
|
|
|
|
|
Flag |
Flag |
Flag |
|
Flag |
Flag |
Flag |
||||||||||||
|
length |
diameter |
length |
|
length |
diameter |
length |
||||||||||||
After selecting the FLAG Label Type mode, specify the length and diameter of the flag, a frame style if desired, and whether or not to rotate the text.
● FLAG (flag diameter): 0 to 100 mm Default: 7 mm
● FLAG LEN (flag length): 10 to 200 mm Default: 30 mm
● |
FRAME: |
OFF, |
1 |
, |
2 |
, 3 , 4 |
|
|
Default: OFF |
||||
● |
ROTATE: |
OFF, ON |
|
|
|
|
|
|
Default: OFF |
||||
A single block of text can contain a maximum of 7 text lines.
For labels to be attached to cables and wires, we recommend using Flexible ID Tape. To wrap Flexible ID Tape around cylindrical objects, use the FLAG Label Type mode when the diameter of the object is less than 3 mm. In addition, the flag length should be at least 5 mm.
Label Type Modes
11
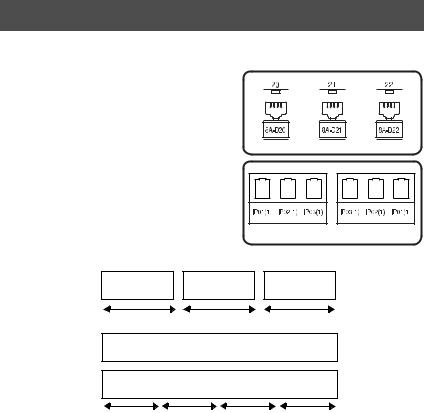
Port & Panel Modes
Labels printed using these Label Type modes can be used to identify various components or panels.
With the Port Label Type mode, each block of the text is printed on a separate label, making these labels useful for identifying different components or ports that are not equally spaced.
With the Panel Label Type mode, all blocks of the text are evenly spaced on a single label, making this label useful for a row of equally spaced switches, fuses or connectors on a patch panel. In addition, the text blocks can be printed in the order that they were typed in or in the opposite order.
IN ORDER |
REVERSE |
Port
Block length |
Block length |
Block length |
Panel (PRINTset to
IN ORDER)
Panel (PRINT set to REVERSE)
Block length Block length Block length |
Block length |
After selecting the PORT or PANEL Label Type mode, specify the length of each text block or label, and select a frame style if desired. For the PANEL Label Type mode, select whether the text blocks are printed in the order that they were typed in or in the reverse order.
12
● BL. LEN. (block length): * For the PORT Label Type mode: 20 to 200 mm
Default: 30 mm
* For the PANEL Label Type mode: 6 to 200 mm
Default: 30 mm
● FRAME: |
* For the PORT Label Type mode: |
||||||||||||||||||
|
OFF, 1 |
|
|
|
, 2 |
|
|
|
, 3 |
, 4 |
|||||||||
|
|
|
|
|
|
|
|||||||||||||
|
|
|
|
|
|
|
|
|
|
|
|
|
|
|
|
|
|
||
|
Default: OFF |
|
|
|
|
|
|
|
|
|
|||||||||
|
* For the PANEL Label Type mode: |
||||||||||||||||||
|
OFF, 1 |
|
|
, 2 |
|
|
|
, 3 |
|
|
|
|
, |
||||||
|
|
|
|
|
|
|
|
||||||||||||
|
4 |
|
|
|
|
, 5 |
|
|
|
|
, 6 |
|
|
, |
|
|
|
||
|
7 |
|
|
|
, 8 |
|
|
|
|
, 9 |
|
|
|
|
|
|
|
||
|
Default: OFF |
|
|
|
|
|
|
|
|
|
|||||||||
● PRINT (print order): |
IN ORDER, REVERSE |
|
|
|
|
|
|||||||||||||
|
Default: IN ORDER |
|
|
|
|
|
|
|
|
|
|||||||||
For these types of labels, we recommend using Strong Adhesive Tape.
The PRINT parameter is only available with the PANEL Label Type mode.
Using the Numbering function with the PANEL Label Type mode makes it easy to create a single label of multiple blocks containing ascending characters, which can be used, for example, to label patch panels as shown above. Simply type in one block of text, and then use the Numbering function to print several copies of the text block on a single label while automatically increasing certain characters in each block. (For details on the Numbering function, refer to Printing multiple copies with incremental characters on page 31.)
Label Type Modes
13
3 Basic Functions
Performing Basic Operations
Choosing functions, parameters, settings and groups
●If “WX” appears, press l to select the previous item or r to select the next item.
●If “ ST ” appears, press u to select the previous item or dto select the next item.
Choosing the default setting
● To select the default setting of a function or parameter, press e.
Confirming a choice
●To select an item from a list, to apply a selected setting, or to answer “yes”, press n.
Cancelling a choice
●To quit a function and return to the previous display without changing the text, or to answer “no”, press b.
14

Inputting Label Data
Entering and editing text
Entering characters
●To type a lowercase letter, a number, a comma or a period, simply press the key for that character.
●To type an uppercase letter, press hto enter Shift mode, and then press the applicable letter.
●To type uppercase letters continuously, press g, then h to enter Caps mode, and then type.
To exit Shift mode without typing a letter, press h.
To exit Caps mode, press g, then h.
To type a lowercase letter in Caps mode, press h, then the applicable letter.
Entering spaces
● To add a blank space to the text, press e.
Moving the cursor
Move the cursor in order to review and edit the text, or you can select the various functions and settings.
●To move the cursor left, right, up or down, press l, r, u or d.
●To move the cursor to the beginning of the current line of text, press g, then l.
●To move the cursor to the end of the current line of text, press g, then r.
●To move the cursor to the beginning of the entered text, press g, then u.
●To move the cursor to the end of the entered text, press g, then d.
To move the cursor several characters or lines at once, hold down l, r, uor d.
Basic Functions
15
Adding a new line of text
●To end the current line of text and start a new one, press n. “ 
 ” appears at the end of the line.
The number of text lines that can be printed depends on the width of the tape.
Tape Width |
Maximum Number of |
|
Lines That Can Be Printed |
||
|
||
|
|
|
6 mm |
2 |
|
|
|
|
9 mm |
2 |
|
|
|
|
12 mm |
3 |
|
|
|
|
18 mm |
5 |
|
|
|
|
24 mm |
7 |
|
|
|
The line number on the display indicates the line number of the text block.
Adding a new text block
●To create a new text block so that one section of the text can have a different number of lines than another, press g, then n. “  ” appears at the end of the block.
For example, text entered as shown below, will be printed as follows.
R


 R2:456


 R1:ABC_
---- -- 1 NORMAL 2
A single label can only contain a maximum of fifty text blocks.
The number of the block that the cursor is in is indicated at the bottom of the display.All texts blocks have the same formatting features.
While trying to print a large amount of data at one time, some outputted labels may be blank. For example, when printing 50 records, the maximum number of characters that can be printed at one time is limited to approximately 200.
Inserting text
●To insert the text that you type at the cursor’s current position, make sure that the Insert indicator is displayed. Otherwise, press ito enter Insert mode.
●To replace the text at the cursor’s current position instead of inserting it, press i to exit Insert mode.
16

Deleting text
●To remove characters to the left of the cursor’s current position, press buntil all of the characters that you wish to delete are removed.
●To delete all of the text:
1 Press g, then b.
2Press uor dto select either TEXT ONLY (to erase just the text) or TEXT&FORMAT (to erase all of the text and return all formatting functions to their default settings).
3Press n.
Entering an accented character
There are various accented characters available with the Accent function.
The following accented characters are available.
Letter |
|
|
Accented Characters |
|
|
Letter |
|
|
Accented Characters |
|
|
||||||||
0 |
1 |
|
2 |
3 |
4 |
|
5 |
6 |
0 |
1 |
|
2 |
3 |
4 |
|
5 |
6 |
||
|
|
|
|
|
|
||||||||||||||
|
|
|
|
|
|
|
|
|
|
|
|
|
|
|
|
|
|
||
A |
Ä |
Á |
À |
 |
à |
Å |
Æ |
a |
ä |
á |
|
à |
â |
ã |
|
å |
æ |
||
|
|
|
|
|
|
|
|
|
|
|
|
|
|
|
|
|
|
|
|
C |
Ç |
|
|
|
|
|
|
|
|
c |
ç |
|
|
|
|
|
|
|
|
|
|
|
|
|
|
|
|
|
|
|
|
|
|
|
|
|
|
|
|
E |
Ë |
É |
|
È |
Ê |
|
|
|
|
e |
ë |
é |
|
è |
ê |
|
|
|
|
|
|
|
|
|
|
|
|
|
|
|
|
|
|
|
|
|
|
|
|
I |
Ï |
Í |
|
Ì |
Î |
|
|
|
|
i |
ï |
í |
|
ì |
î |
|
|
|
|
|
|
|
|
|
|
|
|
|
|
|
|
|
|
|
|
|
|
|
|
N |
Ñ |
|
|
|
|
|
|
|
|
n |
ñ |
|
|
|
|
|
|
|
|
|
|
|
|
|
|
|
|
|
|
|
|
|
|
|
|
||||
O |
Ö |
Ó |
Ò |
Ô |
Õ |
Ø |
Π|
o |
ö |
ó |
ò |
ô |
õ |
ø |
œ |
||||
|
|
|
|
|
|
|
|
|
|
|
|
|
|
|
|
|
|
|
|
U |
Ü |
Ú |
|
Ù |
Û |
|
|
|
|
u |
ü |
ú |
|
ù |
û |
|
|
|
|
|
|
|
|
|
|
|
|
|
|
|
|
|
|
|
|
|
|
|
|
|
|
|
|
|
|
|
|
|
|
y |
ÿ |
|
|
|
|
|
|
|
|
|
|
|
|
|
|
|
|
|
|
|
|
|
|
|
|
|
|
|
|
1Press g, then s. The message “ACCENT a-y/A-U?” appears.
2Press the key of the letter in the desired accented character until the desired character is selected.
3Add the accented character(s) to the text.
•To add a single accented character or the last one in a series, skip to step 5.
•To add a series of accented characters to the text, press g, then n.
4For each additional accented character, repeat steps 2and 3.
5Press n.
Basic Functions
17

To type in an uppercase accented character, press h (or press g, then hto enter Caps mode) before pressing the letter key.
An accented character can also be selected by typing in the corresponding code from the table above. For example, typing “A2”, then pressing nadds “À” to the text.
Entering a bar code
The Bar Code function allows bar codes to be printed as part of labels.
Since this machine is not specifically designed for special bar code label-making, some bar code readers may not be able to read the labels.
Bar code readers may not be able to read bar codes printed with certain ink colours on certain label tape colours. For best results, print barcode labels in black on white tape.
In addition, the various bar code parameters enable you to create more customized bar codes.
Parameter |
Settings |
|
|
|
|
PROTOCOL |
CODE 39, I-2/5, EAN13, EAN8, UPC-A, |
|
UPC-E, CODABAR, EAN128, CODE128 |
||
|
||
|
|
|
WIDTH |
MEDIUM, SMALL, LARGE |
|
(bar width) |
||
|
||
|
|
|
UNDER# |
ON, OFF |
|
(numbers printed below bar code) |
||
|
||
|
|
|
CHECK DIGIT |
OFF, ON |
|
|
|
The CHECK DIGIT parameter is only available with the CODE 39, I-2/5 and CODABAR protocols.
Setting bar code parameters
1Press g, then c.
2Press l or runtil the parameter that you wish to change is displayed.
3Press uor duntil the desired setting is displayed.
4Repeat steps 2 and 3 until all parameters are set as you wish.
5Press n.
18

Entering bar code data
1Press c.
2Type in the new bar code data or edit the old data.
3Press nto add the bar code to the text.
To add special characters to the bar code data (only with protocols CODE39, CODABAR, EAN128 or CODE128), position the cursor below the character
immediately to the right of where you wish to add the special character, and then press s. Press uor duntil the desired special character is displayed, and then press nto add the character to the data. (Refer to the tables below for a list of the
special characters that are available.)
To change the data or WIDTH or UNDER# parameter settings of a bar code that has
already been added to the text, position the cursor below the bar code mark ( 


 ), and then press g, then c.
The following special characters can only be added to bar codes created using protocol
CODE39 or CODABAR.
CODE39
Symbol |
Character |
Symbol |
Character |
|
|
|
|
0 |
– |
4 |
/ |
|
|
|
|
1 |
. |
5 |
+ |
|
|
|
|
2 |
(SPACE) |
6 |
% |
|
|
|
|
3 |
$ |
|
|
|
|
|
|
CODABAR
Symbol |
Character |
Symbol |
Character |
|
|
|
|
0 |
– |
3 |
/ |
|
|
|
|
1 |
$ |
4 |
. |
|
|
|
|
2 |
: |
5 |
+ |
|
|
|
|
Basic Functions
19
The following special characters can only be added to bar codes created using protocols
EAN128 and CODE128.
Symbol |
Character |
Symbol |
Character |
Symbol |
Character |
Symbol |
Character |
0 |
(SPACE) |
18 |
< |
36 |
BEL |
54 |
EM |
1 |
! |
19 |
= |
37 |
BS |
55 |
SUB |
2 |
” |
20 |
> |
38 |
HT |
56 |
ESC |
3 |
# |
21 |
? |
39 |
LF |
57 |
{ |
4 |
$ |
22 |
@ |
40 |
VT |
58 |
FS |
5 |
% |
23 |
[ |
41 |
FF |
59 |
| |
6 |
& |
24 |
\ |
42 |
CR |
60 |
GS |
7 |
’ |
25 |
] |
43 |
SO |
61 |
} |
8 |
( |
26 |
^ |
44 |
SI |
62 |
RS |
9 |
) |
27 |
_ |
45 |
DLE |
63 |
|
10 |
* |
28 |
NUL |
46 |
DC1 |
64 |
US |
11 |
+ |
29 |
|
47 |
DC2 |
65 |
DEL |
12 |
, |
30 |
SOH |
48 |
DC3 |
66 |
FNC3 |
13 |
– |
31 |
STX |
49 |
DC4 |
67 |
FNC2 |
14 |
. |
32 |
ETX |
50 |
NAK |
68 |
FNC4 |
15 |
/ |
33 |
EOT |
51 |
SYN |
69 |
FNC1 |
16 |
: |
34 |
ENQ |
52 |
ETB |
|
|
17 |
; |
35 |
ACK |
53 |
CAN |
|
|
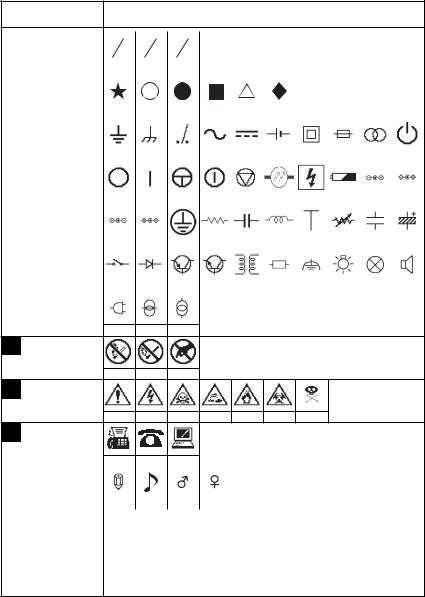
Entering a symbol
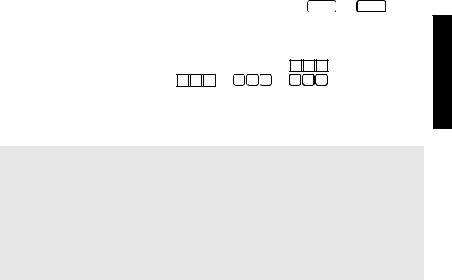
There are 147 symbols and pictures available with the Symbol function.
1Press s. The last category used is displayed.
2Press uor dto select the desired category.
3Press l or runtil the desired symbol is selected.
4Add the symbol(s) to the text.
•To add a single symbol or the last one in a series, skip to step 6.
•To add a series of symbols to the text, press g, then n.
20

5For each additional symbol, repeat steps 2 through 4.
6Press n.
A symbol can also be selected by typing in the corresponding code from the table below. For example, typing “A02”, then pressing nadds “?” to the text.
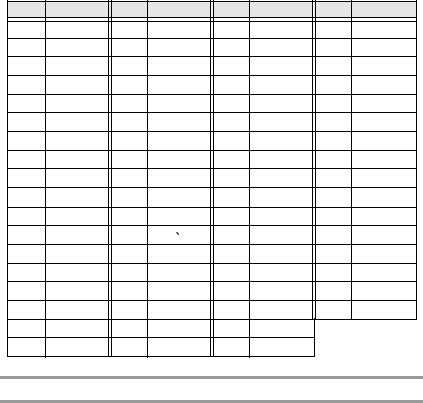
The following symbols are available.
Category |
|
|
|
|
Symbols |
|
|
|
|
|
A |
|
|
|
|
|
|
|
|
|
|
PUNCTUATION |
00 |
01 |
02 |
03 |
04 |
05 |
06 |
07 |
08 |
09 |
|
|
|
|
|
|
|
|
|
|
|
|
10 |
11 |
12 |
13 |
14 |
15 |
16 |
17 |
|
|
B |
|
|
|
® |
© |
™ |
|
|
|
|
BUSINESS |
|
|
|
|
|
|
|
|
|
Functions |
C MATHEMATICS |
00 |
01 |
02 |
03 |
04 |
05 |
|
|
|
|
|
|
|
|
|
||||||
|
00 |
01 |
02 |
03 |
04 |
05 |
06 |
|
|
Basic |
|
|
|
|
|||||||
D |
|
|
|
|
|
|
|
|
|
|
BRACKET |
|
|
|
|
|
|
|
|
|
|
E |
00 |
01 |
02 |
03 |
04 |
05 |
06 |
07 |
|
|
|
|
|
|
|
|
|
|
|
|
|
ARROW |
|
|
|
|
|
|
|
|
|
|
|
00 |
01 |
02 |
03 |
04 |
05 |
06 |
07 |
08 |
09 |
F |
|
|
|
|
|
|
|
|
|
|
UNIT |
|
|
|
|
|
|
|
|
|
|
|
00 |
01 |
02 |
03 |
04 |
05 |
06 |
07 |
08 |
|
G |
|
|
|
|
|
|
|
|
|
|
INTERNATIONAL |
00 |
01 |
02 |
03 |
04 |
05 |
06 |
07 |
08 |
09 |
CHARACTERS |
|
|
|
|
|
|
|
|
|
|
|
10 |
11 |
12 |
13 |
14 |
|
|
|
|
|
|
|
|
|
|
|
|
|
|
|
21 |
Category |
Symbols |
|
|
H |
NUMBER |
1 |
2 |
1 |
3 |
1 |
4 |
0 |
1 |
2 |
1 |
2 |
|
|
|
|
|
|
|
|
|
|
|
||||||
|
|
|
|
|
|
|
|
|
|
|
|
|
|
|
|
|
|
|
|
|
|
|
|
|
|
|
|||
|
|
00 |
01 |
02 |
03 |
04 |
05 |
06 |
07 |
|
|
|||
I |
PICTOGRAPH |
|
|
|
|
|
|
|
|
|
|
|
|
|
|
|
|
|
|
|
|
|
|
|
|
|
|
|
|
|
|
|
|
|
|
|
|
|
|
|
|
|||
|
|
00 |
01 |
02 |
03 |
04 |
05 |
|
|
|
|
|||
J |
|
|
|
|
|
|
|
|
|
|
|
|
|
|
|
|
|
|
|
|
|
|
|
|
|
|
|
|
|
|
|
00 |
01 |
02 |
03 |
04 |
05 |
06 |
07 |
08 |
09 |
|||
|
ELECTRICAL / |
|
|
|
|
|
|
|
|
|
|
|
|
|
|
10 |
11 |
12 |
13 |
14 |
15 |
16 |
17 |
18 |
19 |
||||
|
ELECTRONIC |
|||||||||||||
|
|
|
|
|
|
|
|
|
|
|
|
|
|
|
|
|
|
|
|
|
|
|
|
|
|
|
|||
|
|
20 |
21 |
22 |
23 |
24 |
25 |
26 |
27 |
28 |
29 |
|||
|
|
|
|
|
|
|
|
|
|
|
|
|||
|
|
30 |
31 |
32 |
33 |
34 |
35 |
36 |
37 |
38 |
39 |
|||
40 41 42
K
PROHIBITION
00 01 02
L
WARNING
00 |
01 |
02 |
03 |
04 |
05 |
06 |
M
COMMUNICATIONS
00 |
01 |
02 |
N |
OTHERS |
|
|
|
|
|
|
|
|
|
|
|
|
|
|
|
|
|
|
|
|
|
|
|
|
|
00 |
01 |
02 |
03 |
|
Z |
|
|
|
|
|
|
|
|
|
PERSONAL |
*A maximum of 16 most recently selected symbols are |
||||
|
|
automatically saved in the PERSONAL symbol category. |
|||||
|
|
CATEGORY |
|||||
22
Once the PERSONAL symbol category becomes full, newly selected symbols will overwrite older ones unless the Symbol Save function is set to OFF. (Refer to
Specifying if the PERSONAL symbol category is continually updated on page 39.)
Formatting the Label
Specifying a label length
The length of the label can be specified as follows.
1Press g, then A.
2Press l or runtil LENGTH is displayed.
3Press uor duntil the desired label length is displayed (or use the number keys to type in the desired setting).
4Press n.
6 to 999 mm
Specifying a margin size
The size of the margins for the left and right sides of the text can be specified.
1 Press g, then A.
2 Press l or runtil MARGIN is displayed. |
|
|
|
|
|
|
|
|
3 Press uor duntil the desired margin |
|
|
|
|
|
|
||
2 to 99 mm |
2 to 99 mm |
|||||||
setting is displayed (or use the number keys to |
|
|
|
|
|
|
|
|
margine type in the desired setting). |
|
|
|
|
|
|
|
|
4 Press n. |
|
|
|
|
|
|
|
|
Basic Functions
23

Framing the text
1Press g, then B.
2Press uor duntil the desired frame setting is displayed.
3Press n. The selected setting is applied to the entire text. The following frame styles are available.
Frame |
Sample |
Frame |
Sample |
|
Setting |
Setting |
|||
|
|
|||
|
|
|
|
|
1 |
|
8 |
|
|
|
|
|
|
|
2 |
|
9 |
|
|
|
|
|
|
|
3 |
|
10 |
|
|
|
|
|
|
|
4 |
|
11 |
|
|
|
|
|
|
|
5 |
|
12 |
|
|
|
|
|
|
|
6 |
|
13 |
|
|
|
|
|
|
|
7 |
|
14 |
|
|
|
|
|
|
24

Specifying the character size
The character size can be specified for all text in the label or only for the text in the line that the cursor is in.
With the default character size setting AUTO, the largest possible text size is automatically selected depending on the width of the installed tape and the number of lines in the text.
Formatting the character size of all text
1Press t.
2Press l or runtil G. SIZE is displayed.
3Press uor duntil the desired character size setting is displayed.
4Press n. The selected setting is applied to the entire text.
Formatting the character size of a line
1Move the cursor to the line of text whose size you wish to change.
2Press g, then E.
3Press uor duntil the desired character size setting is displayed.
4Press n. The selected setting is only applied to the text line that the cursor is positioned in.
Since the text sizes that can be printed depends on the width of the tape, the following table shows the maximum text size that can be used with each tape width.
Tape Width |
Maximum Text Size |
|
|
6 mm |
12 points (3 mm) |
|
|
9 mm |
18 points (4 mm) |
|
|
12 mm |
24 points (6 mm) |
|
|
18 mm |
36 points (9 mm) |
|
|
24 mm |
48 points (12 mm) |
|
|
With the AUTO setting selected and the text in a block consisting of just one line of only uppercase letters (and no accented letters), the text is printed slightly larger than the maximum possible for the tape width.
Basic Functions
25
Loading...