


 Loading...
Owner’s Manual
®

FCC NOTICE
This equipment has been tested and found to comply with the limits for a Class B digital device, pursuant to Part 15 of the FCC Rules. These limits are designed to provide reasonable protection against harmful interference in a residential installation. This equipment generates, uses and can radiate radio frequency energy and, if not installed and used in accordance with the instructions, may cause harmful interference to radio communications. However, there is no guarantee that interference will not occur in a particular installation. If this equipment does cause harmful interference to radio or television reception, which can be determined by turning the equipment off and on, the user is encouraged to try to correct the interference by one or more of the following measures:
-Reorient or relocate the receiving antenna.
-Increase the separation between equipment and receiver.
-Connect the equipment into an outlet on a circuit different from that to which the receiver is connected.
-Consult the dealer or an experienced radio/TV technician for help.
This equipment has been certified to comply with FCC standards, which are applied to the U.S.A. only.
Changes or modifications not expressly approved by Brother Industries, Ltd. could void the user’s authority to operate the equipment.
Statement
Under the terms of an agreement with Xyron, Inc., the purchase or other acquisition of this product confers no right or license to use the product in the Retroreflective Field.
- 0 -

Brother Cool Laminator LX-900/LX-910D
Fax-Back System
Brother Customer Service has installed an easy-to-use Fax-Back System, so you can get instant answers to common technical questions and product information for all Brother products. This system is available 24 hours a day, 7 days a week. You can use the system to send faxes to any fax machine, not just the one from which you are calling.
If you can’t resolve a difficulty with your laminator using this manual, call our Fax-Back System, and follow the voice prompts to receive faxed instructions about using the system and an index of Fax-Back subjects.
USA: |
1-800-521-2846 |
Brother on the World Wide Web
You can find more information about Brother products, from product specification sheets to Frequently Asked Questions (FAQs), on the World Wide Web. Visit us at
http://www.brother.com
For Customer Service
USA: |
1-877-BROTHER (276-8437) (voice) |
|
1-901-379-1210 (fax) |
Corporate Headquarters
Brother International Corporation
100 Somerset Corporate Boulevard
Bridgewater, NJ 08807-0911 USA
Service Center Locations
If you need a local service center, please call 1-800-284-HELP (4357) to locate the authorized service center near you. Note: Be sure to call the Service Center before your visit. Service Centers do not provide operational assistance.
- 1 -

Ordering Accessories and Supplies (in the USA)
For best quality results use only genuine Brother accessories, available at most Brother retailers. If you cannot find the accessory you need and you have a Visa, MasterCard, Discover, or American Express credit card, you can order accessories directly from Brother. (In the USA, you can visit us online for a complete selection of Brother accessories and supplies available for purchase.)
USA: 1-888-879-3232 (voice) 1-800-947-1445 (fax) http://www.brothermall.com
Description Model Number
Double-side Laminate |
|
9” wide film cartridge (20m/65.6ft. long) |
LC-D9 |
9” wide refill roll (20m/65.6ft. long) |
LC-D9R |
4.8” wide film cartridge (20m/65.6ft. long) |
LC-D5 |
4.8” wide refill roll (20m/65.6ft. long) |
LC-D5R |
Adhesive Back Laminate |
|
9” wide film cartridge (20m/65.6ft. long) |
LC-A9 |
9” wide refill roll (20m/65.6ft. long) |
LC-A9R |
4.8” wide film cartridge (20m/65.6ft. long) |
LC-A5 |
4.8” wide refill roll (20m/65.6ft. long) |
LC-A5R |
Magnetic Back Laminate |
|
9” wide film cartridge (4m/13.1ft. long) |
LC-M9 |
9” wide refill roll (10m/32.8ft. long) |
LC-M9R |
4.8” wide film cartridge (4m/13.1ft. long) |
LC-M5 |
4.8” wide refill roll (10m/32.8ft. long) |
LC-M5R |
Other Accessories |
|
Replacement Ceramic Side Cutters (2 blades) |
SC-2 |
Replacement Corner Cutter Tray |
CC-1 |
- 2 -
Table of Contents |
|
Getting started ........................................................................................................................................................ |
4 |
Features .................................................................................................................................................................. |
4 |
Precautions ............................................................................................................................................................. |
5 |
Package list............................................................................................................................................................. |
6 |
Part names.............................................................................................................................................................. |
7 |
Outside of the machine...................................................................................................................................... |
7 |
Inside of the machine......................................................................................................................................... |
7 |
Control Panel...................................................................................................................................................... |
8 |
Film Cartridge..................................................................................................................................................... |
8 |
Setup ....................................................................................................................................................................... |
9 |
Installing the film cartridge................................................................................................................................. |
9 |
Turning the machine on/off.............................................................................................................................. |
10 |
About film rolls ...................................................................................................................................................... |
12 |
Film-supply maintenance................................................................................................................................. |
12 |
Replacing the film cartridge ................................................................................................................................. |
13 |
Installing/replacing the film roll in the cartridge................................................................................................... |
16 |
Document Size ..................................................................................................................................................... |
19 |
The Auto Sheet Feeder ................................................................................................................................... |
19 |
The Auto Cross Cutting System...................................................................................................................... |
19 |
Operating the machine ......................................................................................................................................... |
20 |
How to define the cutting position (creating borders)......................................................................................... |
22 |
Auto Cut Mode – Border.................................................................................................................................. |
22 |
Auto Cut Mode – No Border............................................................................................................................ |
22 |
Auto Cut Mode – Off ........................................................................................................................................ |
22 |
Manual feeding and manual cutting .................................................................................................................... |
23 |
Corner cutting ....................................................................................................................................................... |
24 |
Corner cutter dust box ..................................................................................................................................... |
25 |
Regular maintenance and troubleshooting................................................................................................................ |
26 |
Regular maintenance....................................................................................................................................... |
26 |
Paper jams ....................................................................................................................................................... |
26 |
Replacing the side cutter units ........................................................................................................................ |
29 |
Replacing the corner cutter tray...................................................................................................................... |
31 |
Troubleshooting .................................................................................................................................................... |
32 |
Specifications........................................................................................................................................................ |
33 |
Index...................................................................................................................................................................... |
34 |
Appendix (About PrintMaster Gold Software).............................................................................. |
36 |
Getting Started...................................................................................................................................................... |
38 |
Viewing/Printing PrintMaster Gold user's manual .............................................................................................. |
41 |
The World of PrintMaster Gold ............................................................................................................................ |
42 |
THE HUB SCREEN ......................................................................................................................................... |
42 |
The workspace................................................................................................................................................. |
43 |
- 3 -

Getting started
Thank you for purchasing a Brother Cool Laminator. This machine has been designed to be easy to use, but can be utilized to its fullest potential by taking some time to read this owner’s manual.
Features
∙Depending upon the type of film used, this machine turns a variety of documents into professional, selfadhesive stickers, dual-sided, coated lamination sheets, magnetic signs etc.
∙In addition to output from computers and word processors, you can laminate hand-written sheets, clippings from magazines, photographs or any other type of document.
∙Your documents are perfectly coated to protect them from water, dust, tearing, yellowing, and to create a professional, high quality finish.
∙No heat is required. The unique cold pressure method and specially formulated adhesives make the operation safe, easy and fast.
∙You can start laminating immediately after turning the power on (no warm-up time is necessary).
∙Heat sensitive items, such as thermal paper and photographs can be used safely.
∙This machine has an auto sheet feeder and auto cross cutting mechanism. Automatic width and length detection ensures that the built-in mechanism sizes your finished documents precisely.
∙Film is easily installed and replaced.
∙Supports widths of up to 8.5" US Letter (A4 - 210mm) size.
- 4 -

Precautions
To avoid personal injury or damage to the machine, please pay close attention to the CAUTION and WARNING notices in this manual. They are there for your safety, as well as to point out actions that might cause damage to your machine.
WARNING:
-Do not attempt to repair or disassemble this equipment yourself. The warranty will be voided if this machine is not repaired by authorized service personnel.
-Do not touch the blades inside of the machine.
-Use only the AC adapter that was supplied with the machine. Using the wrong AC adapter may damage the machine and will void the warranty.
CAUTION:
-Do not pull the power cord. To disconnect it, always grasp the plug itself.
-Do not place the machine under direct exposure to sunlight and other sources of heat, excessive moisture, or dust.
-If any liquid is spilled onto the machine, unplug the machine from its power source and consult with authorized service personnel.
-Unplug the machine during a lightning storm.
-Do not place heavy objects on the machine.
-Keep the back and sides of the machine clear of obstructions to prevent overheating.
-Use only a soft, dry cloth to clean the machine (do not use chemicals, solvents, or detergents)
-To avoid electrical interference, do not place the machine close to a radio receiver or television.
-Do not turn the machine off while operating except in the event of a malfunction.
-Turn the machine off in the event of a malfunction.
-If you use adhesive back laminate film, do not attach the laminated output to one’s skin, or the sensitive surface of objects.
-The laminated documents are not easily digested. Great care should be taken to prevent accidental ingestion by infants or the elderly.
-The laminated film contains the UV resistance materials. However, the color of the documents may fade if the documents are printed with liquid type ink.
Solid type ink is recommended to prevent the document from fading.
-The laminated document may be wrinkled or damaged if it is placed under a heavy object.
-Do not put or locate the magnetic back laminate output close to the floppy disks or music tapes. The data on the disks or tapes will be damaged.
-Brother can not be held liable for loses or damage of items used in the laminator machine.
-Under the terms of an agreement with Xyron, Inc., the purchase or other acquisition of this product confers no right or license to use the product in the Retroreflective Field.
IMPORTANT OPERATIONAL PRECAUTIONS:
-Select Cut Mode Off when laminating sensitive or irregularly shaped documents.
-Do not insert your precious and valuable items into the machine.
- 5 -
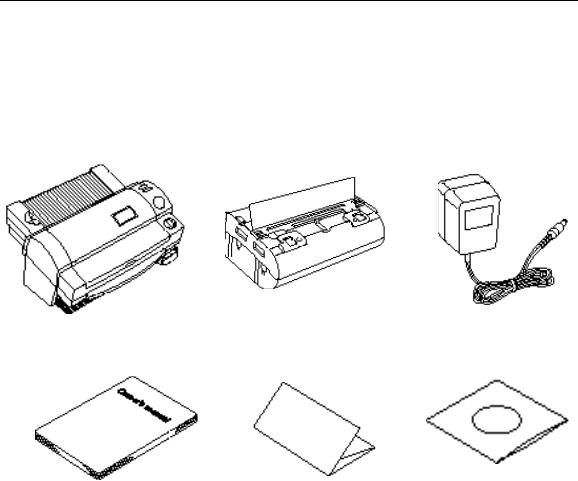
Package list
1 Machine |
1 |
2 Film cartridge |
1 (Double side laminate type) |
3 AC adapter |
1 |
4 Owner’s manual |
1 |
5 Compatible accessory list |
1 |
6 Supplemental PC software (CD-ROM) |
1 |
1 |
2 |
3 |
4 |
5 |
6 |
- 6 -
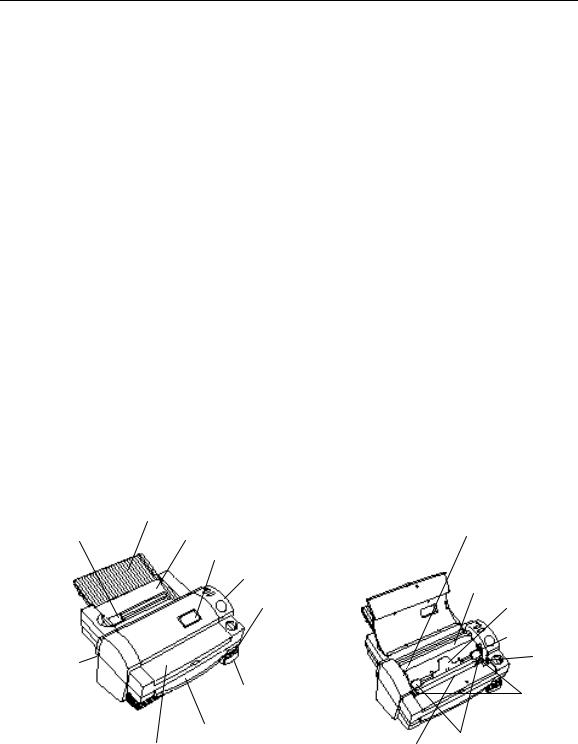
Part names
Outside of the machine
DC connector |
Located on the left, backside of the machine. Aperture for the AC |
Top cover |
adapter. |
For replacing the film cartridge and cutter units. |
|
Viewing window |
Located on the top cover. Allows you to make sure that the |
Document tray |
correct type of film cartridge is loaded into the machine. |
Where documents to be laminated are placed. |
|
Document supporter |
Supports the document for insertion. |
Document guide |
Aligns the left edge of the paper for proper document insertion. |
Control panel |
Power switch and function button area. |
Document output |
Location where the document exits the machine. |
Corner cutter slot |
Allows you to trim the corners of your document after laminating. |
|
Corners of a document are automatically trimmed after insertion |
Corner cutter tray |
into the corner cutter slot. |
The corner of your laminated document is placed on this tray to |
|
Corner cutter dust box |
position it into the corner cutter slot. |
Collects trimmings from the corner cutter. |
|
AC adapter |
Plugs into an electrical outlet and the DC connector on the |
|
machine. |
Inside of the machine
Film cartridge |
Contains the roll film. The label on the cartridge identifies the film |
|
type. |
|
You can use 9.0 inch (A4) or 4.8 inch (A6) width LC cartridges |
Roller release lever |
with this machine. |
Releases the roller. |
|
Roller holder lock button |
Locks the roller holder. |
Roller holder |
Holds the roller unit. |
Side cutter arm |
Arm for the side (vertical) cutter unit. |
Side cutter units |
Blades for side (vertical) cutting. |
Top/bottom cutter units |
Blades for top/bottom (horizontal) cutting. |
Roller |
Feeds the document into the unit. |
Document supporter |
|
||
Document guide |
Document tray |
Side cutter arm |
|
|
|||
|
Viewing window |
|
|
|
Control Panel |
|
|
|
|
Film cartridge |
|
|
Corner cutter slot |
Roller holder |
|
|
|
||
|
|
Roller release |
|
|
|
lever |
|
DC connector |
|
Roller |
|
|
|
||
|
Corner cutter dust box |
Side cutter |
|
|
|
unit |
|
|
Document output |
Roller holder |
|
Top cover |
Top/bottom cutter unit |
||
lock button |
|||
- 7 -
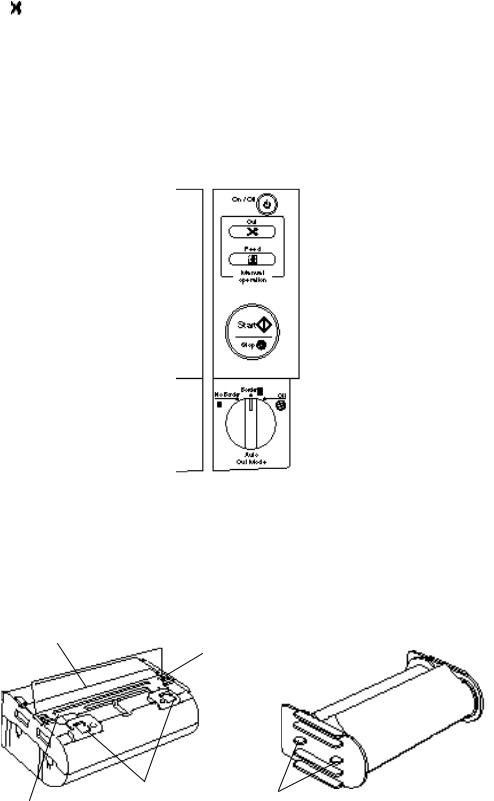
Control Panel
POWER SWITCH On/Off |
Turns the machine on/off. |
(cut button) |
Cuts the document in the current position. |
Feed |
Use to feed the document manually. |
Start/Stop |
Use this button to start or stop an operation. |
|
The green LED indicates that the machine has power, and is |
|
turned on. |
||||||
Auto Cut Mode selector switch |
|||||||
- Border |
The machine will cut the film with about a 0.18” (4.5mm) margin |
||||||
|
from each edge of the document. |
||||||
- No Border |
- Leaves an extra margin of laminate. |
||||||
The machine will cut the film with a margin that is approximately |
|||||||
|
0.06” (1.5mm) from each edge of the document. |
||||||
-Off |
- Trims the laminate close to the document. |
||||||
Turns the cutting mode off. |
|||||||
|
|
|
|
|
|
Power switch |
|
|
|
|
|
|
|
||
|
|
|
|
|
|
Cut button |
|
|
|
|
|
|
|
||
|
|
|
|
|
|
Feed button |
|
|
|
|
|
|
|
||
|
|
|
|
|
|
Start/Stop button |
|
|
|
|
|
|
|
||
|
|
|
|
|
|
Auto Cut Mode |
|
|
|
|
|
|
|
||
|
|
|
|
|
|
Selector switch |
|
Film Cartridge |
|
|
|
|
|
|
|
Cutting line |
Cuts the excess film on this line to install the cartridge properly. |
||||||
Shutter |
Lifts the shutter upward to open the film cartridge cover. |
||||||
Shutter button |
Locks the film cartridge cover and returns the shutter to original |
||||||
|
position. |
||||||
Film slit |
The top edge of film appears from this film slit. |
||||||
|
|
|
|
|
|
|
|
Cutting line |
|
|
|
|
Optional Film Refills |
|
|
Film slit |
|
|
|
|
|
|
|
|
|
|
|||||
|
|
Plastic side holder |
|
||||
|
Shutter button |
|
|
|
|||
|
Projection |
|
|||||
Shutter |
|
|
|||||
|
|
|
|
|
|
|
|
- 8 - |
|
|
|
|
|
||
|
|
|
|
|
|
||
Setup
Installing the film cartridge
(1) Open the top cover.
(2) Push the roller release lever (green color) and lift the roller holder upwards.
(3) Carefully install the film cartridge, square end down.
Match the arrow symbol to install new cartridge.
Note
- Make sure that the shutter of the cartridge is closed when installing the cartridge.
- Check the position of the top edge of the film before installing the cartridge. It should be aligned with the cutting line of the cartridge. If necessary, cut away any excess film.
- Make sure that the film is on the lower roller and that the top edge of the film is placed under the side cutter units.
- 9 -
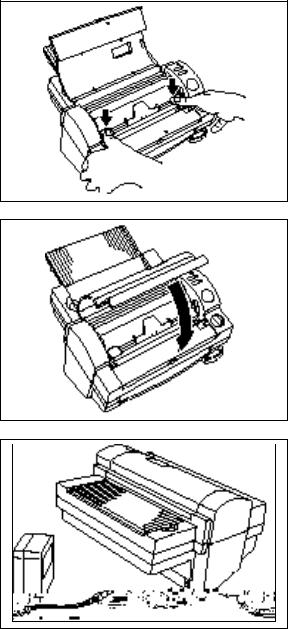
(4)Return the roller holder to the original position and press the roller holder lock buttons (purple color) as illustrated. You will hear the roller holder click into place. Press the roller holder further to secure the roller unit.
(5) Close the top cover.
Turning the machine on/off
(1)Connect the plug of the AC adapter into the DC connector.
(2) Plug the AC adapter into an electrical outlet.
- 10 -
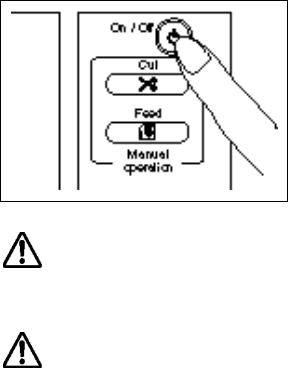
(3)Press the power switch on the control panel to turn it on. The green Start button will light up. If the machine does not respond, check the connection of the AC adapter.
Press the power switch again to turn the machine off.
WARNING:
Do not plug your machine into an electrical outlet until it has been completely assembled.
Do not try to disassemble or repair this equipment yourself. Service should be performed by authorized personnel only. Warranties will be voided if the unit is repaired by unauthorized technicians.
Never touch the surface of the blades when installing the film cartridge.
CAUTION:
Do not turn the machine off during the laminating process.
The machine should be turned off during operation only in the event of a malfunction.
- 11 -

About film rolls
There are a variety of different roll film types that have been designed to meet your needs.
This machine supports 9.0 inch (A4) or 4.8 inch (A6) width cartridges.
Use only Brother authorized film cartridges or film refills. The above mark appears on all packages of authorized film cartridges or film refills that are compatible with the machine. Brother cannot be held responsible for any problem arising from the use of unauthorized supplies.
Depending upon the type of film used, this machine turns a variety of documents into professional, selfadhesive stickers and double-sided, coated lamination sheets etc. Please refer to the compatible accessory list packaged with this machine for details.
This machine is supplied with a Double Side Lamination Film Cartridge. For other types of film rolls, please contact your local Brother dealer.
Film-supply maintenance
The colored tapes appear when the film supply begins to run out. Please replace the film roll as soon as you notice these tapes.
If the colored tapes appear, replace the film immediately. Please refer to ‘Replacing the film cartridge’ page 11 or ‘Installing/replacing the film roll in the cartridge’ page 13 to replace the films.
A standard film roll produces about 30 US letter (A4) size sheets. Please refer to the compatible accessory list for other supply information.
Note
The colored tapes can be peeled off.
- 12 -
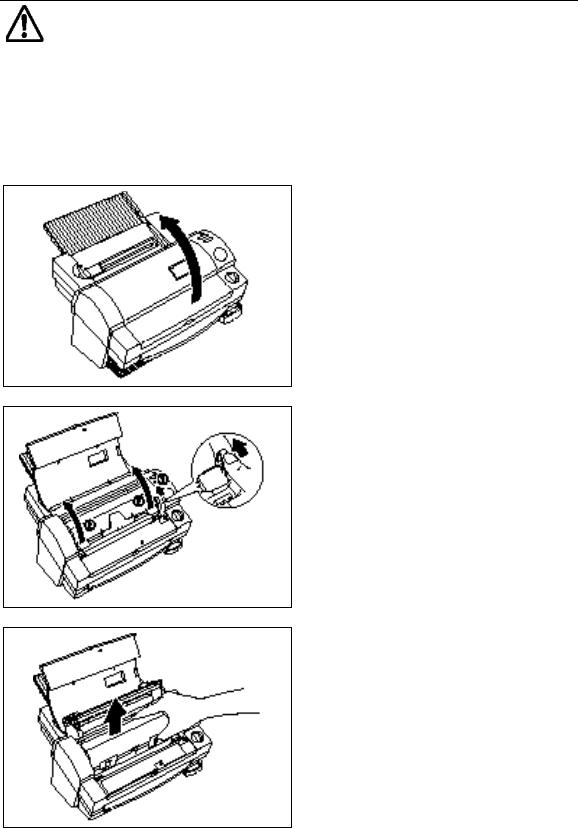
Replacing the film cartridge
WARNING:
Never touch the surface of the blades when installing/replacing the film cartridge.
(1) Turn the power off and open the top cover.
(2) Push the roller release lever (green color) and lift the roller holder upwards.
(3) Remove the film cartridge carefully.
- 13 -
Loading...