


 Loading...
G U I D E |
|
|
E R ’ S |
FAX-817 Series |
|
S |
||
FAX-827 Series |
||
U |
||
FAX-837MC Series |
||
|
®

If you need to call Customer Service
Please complete the following information for future reference:
Model Number: FAX-817, FAX-827, FAX-837MC
Serial Number:*
Date of Purchase:
Place of Purchase:
*The serial number is on the bottom of the unit. Retain this User’s Guide with your sales receipt as a permanent record of your purchase, in the event of theft, fire or warranty service.
This User’s Guide is for the following models. FAX-817 is FAX-817 and FAX-817S FAX-827 is FAX-827 and FAX-827S
FAX-837MC is FAX-837MC and FAX-837MCS
©1996-2006 Brother Industries, Ltd.

THIS EQUIPMENT IS DESIGNED TO WORK WITH A TWO WIRE ANALOGUE PSTN LINE FITTED WITH THE APPROPRIATE CONNECTOR.
APPROVAL INFORMATION
Brother advises that this product may not function correctly in a country other than where it was originally purchased, and does not offer any warranty in the event that this product is used on public telecommunication lines in another country.
Compilation and Publication Notice
Under the supervision of Brother Industries Ltd., this manual has been compiled and published, covering the latest product descriptions and specifications.
The contents of this manual and the specifications of this product are subject to change without notice.
Brother reserves the right to make changes without notice in the specifications and materials contained herein and shall not be responsible for any damages (including consequential) caused by reliance on the materials presented, including but not limited to typographical and other errors relating to the publication.
i
Safety precautions
To use the fax machine safely
Please refer to these instructions for later reference and before attempting any maintenance.
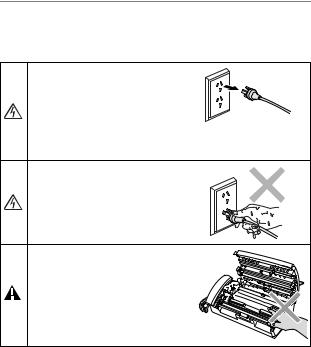
 WARNING
There are high voltage electrodes inside the fax machine. Before you clean the fax machine, make sure you have unplugged the telephone line cord first and then the
power cord from the electrical socket.
Do not handle the plug with wet hands. Doing this might cause an electrical shock.
After you have just used the fax machine, some internal parts are extremely HOT! Please be careful.
 WARNING
■Use caution when installing or modifying telephone lines. Never touch telephone wires or terminals that are not insulated unless the telephone line has been disconnected at the wall socket.
Never install telephone wiring during a lightning storm. Never install a telephone socket in a wet location.
■This product must be installed near an electrical socket that is easily accessible. In case of emergencies, you must disconnect the power cord from the electrical socket in order to shut off power completely.
ii
IMPORTANT SAFETY INSTRUCTION
When using your telephone equipment, basic safety precautions should always be followed to reduce the risk of fire, electric shock and injury to persons, including the following:
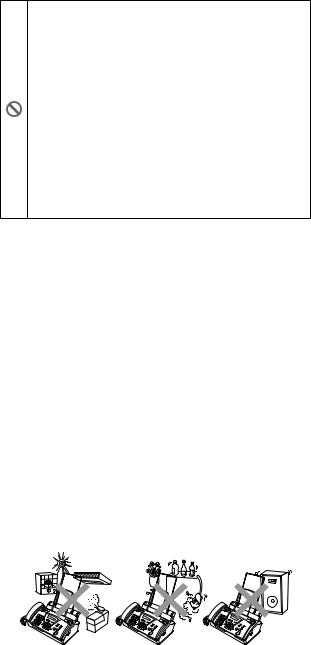
1. Do not use this product near water, for example, near a bath tub, wash bowl, kitchen sink or washing machine, in a wet basement or near a swimming pool.
2.Avoid using this product (other than a cordless type) during an electrical storm. There may be a remote risk of electric shock from lightning.
3.Do not use this product to report a gas leak in the vicinity of the leak.
4.Use only the power cord provided with the fax machine. SAVE THESE INSTRUCTIONS
Choosing a location
Place the fax machine on a flat, stable surface that is free of vibration and shocks, such as a desk. Put the fax machine near a telephone socket and a standard, grounded electrical socket. Choose a location where the temperature remains between 10°C - 35°C.
 Caution
■Avoid placing the fax machine in a high-traffic area.
■Do not place near heaters, air conditioners, water, chemicals, or refrigerators.
■Do not expose the fax machine to direct sunlight, excessive heat, moisture, or dust.
■Do not connect the fax machine to electrical sockets controlled by wall switches or automatic timers.
■Disruption of power can wipe out information in the fax machine’s memory.
■Do not connect the fax machine to electrical sockets on the same circuit as large appliances or other equipment that might disrupt the power supply.
■Avoid interference sources, such as speakers or the base units of cordless phones.
iii
iv

Quick Reference Guide
Sending faxes
Automatic transmission
1 Insert the document face down in the ADF (up to 10 pages).
2 Enter the fax number you want to call.
3 Press Fax Start.
Receiving faxes
Select Receive Mode
1 For FAX-817/827, press
Receive Mode to select
FAX ONLY, FAX/TEL,
TAD:ANSWER MACH. or MANUAL.
For FAX-837MC, press
Receive Mode to select
FAX ONLY, FAX/TEL, or
MANUAL.
Press  to select
MC:MSG CTR.
If you select FAX/TEL, make sure you set Ring Delay and F/T Ring Time. (See Setting the Ring Delay on page 5-2 and
Setting the F/T Ring Time (FAX/TEL mode only) on page 5-3.)
6 Press ▲ or ▼ to select if you set ANTI JUNK to ON
(or OFF) and press Menu/Set. (Not available in Australia and New Zealand)
7 Press Stop/Exit.
Storing Speed-Dial numbers
1 Press Menu/Set, 6, 2.
2 Using the dial pad, enter a two-digit Speed-Dial location number (00-99 for FAX-827/837MC or 01-60 for FAX-817), and then press Menu/Set.
3 Enter a number (up to 20 digits), and then press
Menu/Set.
4 Enter a name (up to 15 characters) or leave it blank, and then press
Menu/Set.
5 Press ▲ or ▼ to select the type of number and press
Menu/Set.
6 Press ▲ or ▼ to select if you set ANTI JUNK (Not available in Australia and New Zealand) to ON (or OFF) and press
Menu/Set.
Storing numbers |
7 Press Stop/Exit. |
Storing One-Touch Dial |
|
numbers
1 Press Menu/Set, 6, 1.
2 Press a One-Touch key where you want to store a number.
3 Enter a number (up to 20 digits), and then press
Menu/Set.
4 Enter a name up to 15 characters (or leave it blank), and then press
Menu/Set.
5 Press ▲ or ▼ to select the type of number and press
Menu/Set.
Dialling operations
One-Touch Dialling
1 Insert the document face down in the ADF.
2 Press the One-Touch key of the number you want to call.
3 Press Fax Start.
v

Speed-Dialling
1 Insert the document face down in the ADF.
2 Press Search/Mute, then press # and the two-digit Speed-Dial number.
3 Press Fax Start.
Using Search
1 |
Insert the document face |
2 |
down in the ADF. |
Press Search/Mute and |
|
|
use the dial pad to enter |
|
the first letter of the name |
3 |
you are looking for. |
Press ▲ or ▲ to search |
|
4 |
the memory. |
Press Fax Start, when the |
|
|
LCD shows the name you |
|
want to call. |
Making copies
Making a single copy
1 Insert the document face down in the ADF.
2 Press Copy/Reports twice.
Sorting multiple copies
1 Insert the document face down in the ADF.
2 Press Copy/Reports.
3 Enter the number of copies you want (up to 99).
4 Press Menu/Set.
5 Press ▲ or ▼ to select SORT, and then press
Copy/Reports.
Message Centre (FAX-837MC only)
Turning ON Message Centre Mode
1 Record the Outgoing Message (MSG CTR OGM).
2 Press  until it lights.
Recording OGM
1 Press Menu/Set, 8, 4.
2 Press ▲ or ▼ to select
MSG CTR OGM, and then press Menu/Set.
3 Press ▲ or ▼ to reach
RECORD MSG, and then press Menu/Set.
4 Pick up the handset to record a message.
5 Replace the handset.
Playing a Voice Message
1 Press Play/Record.
2 Use  (RWD) to repeat a message.
Use 
 (FWD) to skip a message.
3 Press Stop/Exit.
Printing a Fax Message
1 Press Play/Record.
2 After voice messages have played, press 1.
Erasing Messages
To erase voice messages individually
1 Press Play/Record.
2 Press Erase after the two short beeps.
3 Press 1.
4 Press Stop/Exit.
To erase messages all at once
1 Press Erase.
2 Press ▲ or ▼ to select
ERASE ALL VOICE?,
ERASE ALL DOC?, ERASE ALL MSG.?, and then press Menu/Set.
3 Press 1.
4 Press Stop/Exit.
vi

Table of Contents
1 |
Introduction ........................................................... |
1-1 |
|
Using this Guide ............................................................. |
1-1 |
|
Finding information .................................................... |
1-1 |
|
Symbols used in this Guide ....................................... |
1-1 |
|
Part names ................................................................ |
1-2 |
|
FAX-817/827 control panel overview .............................. |
1-3 |
|
FAX-837MC control panel overview ............................... |
1-5 |
|
Fax tones and handshake ......................................... |
1-7 |
|
ECM (Error Correction Mode).................................... |
1-7 |
|
Connections.................................................................... |
1-8 |
|
Connecting an external telephone ............................. |
1-8 |
|
Connecting an external telephone answering device |
|
|
(TAD)....................................................................... |
1-8 |
|
Multi-Line connections (PABX) ................................ |
1-10 |
2 |
Paper ...................................................................... |
2-1 |
|
About paper .................................................................... |
2-1 |
|
Handling and using plain paper ................................. |
2-1 |
|
How to load paper...................................................... |
2-2 |
3 |
On-Screen Programming ...................................... |
3-1 |
|
|
|
|
User-friendly programming ............................................. |
3-1 |
|
Menu table ................................................................. |
3-1 |
|
Memory Storage (FAX-837MC only) ......................... |
3-1 |
|
Navigation keys .............................................................. |
3-2 |
4 |
Initial Setup ............................................................ |
4-1 |
|
|
|
|
Getting started ................................................................ |
4-1 |
|
Setting the Date and Time ......................................... |
4-1 |
|
Setting the Station ID................................................. |
4-2 |
|
Setting the Beeper Volume........................................ |
4-4 |
|
Setting the Speaker Volume ...................................... |
4-4 |
|
Setting the Ring Volume............................................ |
4-4 |
|
Setting PABX (Australia and New Zealand only)....... |
4-5 |
|
Setting Tone or Pulse dialling mode |
|
|
(Not available for New Zealand).............................. |
4-5 |
|
Melody Settings (FAX-837MC only) ............................... |
4-6 |
|
Setting the Ring Pattern............................................. |
4-6 |
|
Setting the Music on Hold.......................................... |
4-6 |
|
Setting the Melody Alarm........................................... |
4-6 |
5 |
Setup Receive........................................................ |
5-1 |
|
Basic receiving operations.............................................. |
5-1 |
|
Choosing the Receive Mode...................................... |
5-1 |
|
Setting the Ring Delay .............................................. |
5-2 |
|
Setting the F/T Ring Time (FAX/TEL mode only) ...... |
5-3 |
|
Recording the Fax/Tel Outgoing Announcement |
|
|
(FAX/TEL OGM) (FAX-837MC only)....................... |
5-3 |
vii
Fax Detect ................................................................. |
5-4 |
Printing a reduced incoming fax (Auto Reduction) .... |
5-4 |
Reception into memory.............................................. |
5-5 |
Receiving a fax at the end of a conversation............. |
5-5 |
Advanced receiving operations....................................... |
5-6 |
Operation from extension telephones........................ |
5-6 |
For FAX/TEL mode only ............................................ |
5-6 |
Remote Call Transfer................................................. |
5-6 |
Changing the remote codes ...................................... |
5-7 |
Printing a fax from the memory (FAX-817/827) ......... |
5-8 |
Polling ........................................................................ |
5-8 |
Sequential Polling ...................................................... |
5-9 |
Telephone Services ...................................................... |
5-10 |
Caller ID (Caller IDentification) |
|
(Not available for some countries) ........................ |
5-10 |
Advantages of Caller ID........................................... |
5-10 |
How Does the Caller ID Work?................................ |
5-11 |
Selecting a Caller ID from the Memory |
|
for Call Reply......................................................... |
5-12 |
Telephone Service for Australia |
|
(Telstra® FaxStream® Duet®) ..................................... |
5-14 |
Distinctive Ringing (Telstra® FaxStream® Duet®) .... |
5-14 |
Telephone Service for New Zealand ............................ |
5-16 |
FaxAbility ................................................................. |
5-16 |
Telephone Service for Some Countries........................ |
5-18 |
Distinctive Ringing |
|
(For Singapore and Hong Kong) ........................... |
5-18 |
6 Setup Send............................................................. |
6-1 |
|
|
How to dial ...................................................................... |
6-1 |
Manual dialling........................................................... |
6-1 |
One-Touch dialling..................................................... |
6-1 |
Speed-dialling ............................................................ |
6-1 |
Search ....................................................................... |
6-1 |
Fax Redial.................................................................. |
6-2 |
How to fax....................................................................... |
6-2 |
Automatic transmission.............................................. |
6-2 |
Manual transmission.................................................. |
6-3 |
Sending a fax at the end of a conversation ............... |
6-3 |
Basic sending operations................................................ |
6-3 |
Sending faxes using multiple settings........................ |
6-3 |
Contrast ..................................................................... |
6-4 |
Fax resolution ............................................................ |
6-4 |
Multiple Resolution Transmission .............................. |
6-5 |
Cancelling a fax in progress ...................................... |
6-5 |
Cancelling a scheduled job........................................ |
6-5 |
Advanced sending operations ........................................ |
6-6 |
Composing the electronic Cover Page |
|
(FAX-827/837MC only) ........................................... |
6-6 |
Broadcasting.............................................................. |
6-8 |
Overseas Mode ......................................................... |
6-8 |
Call Reservation (FAX-827/837MC only)................... |
6-9 |
Delayed Fax............................................................. |
6-10 |
viii
Setting up Polled Transmit (Standard)..................... |
6-11 |
Setup for Polling Transmit with Secure Code .......... |
6-11 |
Secure Polling.......................................................... |
6-12 |
Memory Transmission ............................................. |
6-12 |
Out of Memory message ......................................... |
6-13 |
Interrupting Delayed Fax and Polled Transmit |
|
jobs........................................................................ |
6-13 |
TX Lock System....................................................... |
6-13 |
7 Quick-Dial numbers and dialling options............ |
7-1 |
|
|
Storing numbers for easy dialling ................................... |
7-1 |
Storing One-Touch Dial numbers/Storing Junk |
|
Fax/Call numbers ................................................... |
7-1 |
Storing Speed-Dial numbers/Storing Junk Fax/Call |
|
numbers .................................................................. |
7-2 |
Changing One-Touch and Speed-Dial numbers........ |
7-3 |
Setting up Groups for Broadcasting........................... |
7-4 |
Dialling options ............................................................... |
7-5 |
Manual dialling........................................................... |
7-5 |
On Hook dialling ........................................................ |
7-5 |
One-Touch dialling..................................................... |
7-6 |
Speed-Dialling ........................................................... |
7-6 |
Search ....................................................................... |
7-7 |
Pause......................................................................... |
7-7 |
Mute........................................................................... |
7-7 |
Answering Calls with the Speaker Phone |
|
(FAX-837MC only) .................................................. |
7-7 |
Redial (Telephone) .................................................... |
7-8 |
Redial (Fax) ............................................................... |
7-8 |
Tone or Pulse ............................................................ |
7-8 |
8 Remote Fax Options (FAX-817/827 only) ............ |
8-1 |
|
|
Fax Forwarding............................................................... |
8-1 |
Setting up Fax Forwarding......................................... |
8-1 |
Setting Fax Storage ........................................................ |
8-2 |
Turning off Remote Fax Options................................ |
8-2 |
Setting your remote access code ................................... |
8-2 |
Remote Retrieval ............................................................ |
8-3 |
Using your remote access code ................................ |
8-3 |
Remote commands.................................................... |
8-4 |
Retrieving fax messages ........................................... |
8-5 |
Changing your Fax Forwarding number .................... |
8-5 |
9 Message Centre (FAX-837MC only) ..................... |
9-1 |
|
|
Message Centre Mode ................................................... |
9-1 |
Setting Up Message Centre....................................... |
9-1 |
Setting up voice store ................................................ |
9-1 |
Setting Fax Forward/Fax Storage.............................. |
9-2 |
Recording the Message Centre’s Outgoing Message |
|
(TAD MESSAGE) ................................................... |
9-3 |
Activating Message Centre Mode.............................. |
9-4 |
Message Indicator ..................................................... |
9-4 |
Playing Voice Messages............................................ |
9-5 |
ix
Printing a Fax Message ............................................. |
9-5 |
Backup Printing Option .............................................. |
9-5 |
Erasing Messages ..................................................... |
9-6 |
Setting the maximum time for incoming messages .... |
9-6 |
Setting the Toll Saver ................................................ |
9-7 |
ICM Recording Monitor ............................................. |
9-7 |
Recording a Conversation ......................................... |
9-7 |
Remote Retrieval ............................................................ |
9-8 |
Using the Remote Access Code................................ |
9-8 |
Setting your Remote Access Code............................ |
9-8 |
Remote commands.................................................... |
9-9 |
Retrieving the Memory Status List........................... |
9-10 |
Retrieving Fax Messages ........................................ |
9-10 |
Changing the Fax Forwarding Number.................... |
9-11 |
10 Printing reports ................................................... |
10-1 |
|
|
FAX settings and activity .............................................. |
10-1 |
Customizing the Transmission Verification |
|
Report ................................................................... |
10-1 |
Setting the Journal Period ....................................... |
10-1 |
Printing reports ........................................................ |
10-2 |
How to print a report ................................................ |
10-2 |
11 Making copies...................................................... |
11-1 |
|
|
Using the fax machine as a copier................................ |
11-1 |
Copy operations............................................................ |
11-1 |
Making a single copy ............................................... |
11-1 |
Copy options: Single or Multiple copies, Sort/Stack, |
|
Reduce/Enlarge .................................................... |
11-2 |
Legal limitations ............................................................ |
11-3 |
12 Important information ......................................... |
12-1 |
|
|
Important safety instructions for Ausralia...................... |
12-1 |
Important Information for New Zealand ........................ |
12-2 |
Important Safety Instructions .................................. |
12-2 |
Important Information for Some Countries.................... |
12-5 |
Important Safety Instructions ................................... |
12-5 |
Trademarks................................................................... |
12-7 |
Shipment of the fax machine ........................................ |
12-7 |
13 Troubleshooting and routine maintenance....... |
13-1 |
Troubleshooting ............................................................ |
13-1 |
Error messages ....................................................... |
13-1 |
Compatibility ............................................................ |
13-4 |
Document Jam or Paper Jam .................................. |
13-4 |
If you are having difficulty with the fax machine ...... |
13-6 |
Routine maintenance.................................................... |
13-8 |
Cleaning the print head............................................ |
13-8 |
Cleaning the scanner............................................... |
13-9 |
Changing the ribbon ................................................ |
13-9 |
G Glossary ................................................................ |
G-1 |
x
S |
Specifications ....................................................... |
S-1 |
|
General ........................................................................... |
S-1 |
|
Copy ............................................................................... |
S-1 |
|
Fax.................................................................................. |
S-2 |
I |
Index ........................................................................ |
I-1 |
A |
Accessory List...................................................... |
A-1 |
|
|
|
xi

1 Introduction
Using this Guide
Thank you for buying a Brother fax machine. This fax machine is simple to use, with LCD screen instructions to guide you through programming it. You can make the most of the fax machine by reading this Guide.
Finding information
All the chapter headings and subheadings are listed in the Table of Contents. You will be able to find information about a specific feature or operation by checking the Index at the back of this Guide.
Symbols used in this Guide
Throughout this Guide you’ll see special symbols alerting you to important warnings, notes and actions. To make things clearer and to help you press the correct keys, we used special fonts and added some of the messages that will appear in the LCD.
Bold |
Bold typeface identifies specific keys on the fax |
|
machine control panel. |
Italics |
Italicized typeface emphasizes an important |
|
point or refers you to a related topic. |
Courier New Courier New typeface identifies the messages on the LCD of the fax machine.
Warnings inform you what to do to avoid possible personal injury.
 Electrical Hazards alert you to possible electrical shock.
Cautions specify procedures you must follow or avoid to prevent possible damage to the fax machine.
Notes tell you how you should respond to a situation that may arise or give tips about how the current operation works with other features.
Improper Setup alerts you to devices and operations that are not compatible with the fax machine.
1 - 1 Introduction
Part names
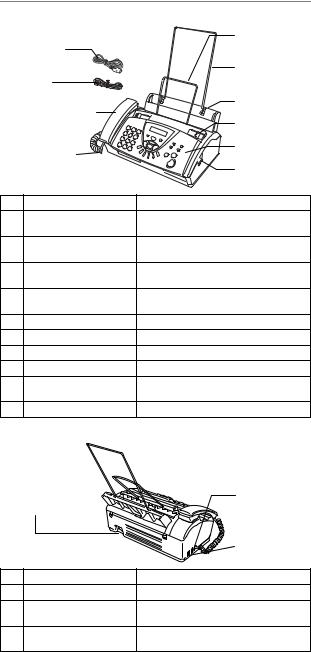
■ Front view
1 Power Cord |
5 Document |
||
(Example for |
Support |
||
Australia) |
6 Paper Wire |
||
2 Telephone |
|||
Extension |
|||
Line Cord |
|||
|
|||
|
|
7 Paper Tray |
|
3 Telephone Handset |
|
||
|
|
8 Paper Guides |
|
4 Handset Curled |
9 Control Panel |
||
|
|||
Cord |
|
10 Cover Open |
|
|
|
||
|
|
Lever |
|
No. Name |
Description |
||
1 |
Power Cord |
Use to connect the fax machine to the |
|
|
|
electrical socket. |
|
2 |
Telephone Line Cord |
Connect the fax machine to a telephone |
|
|
|
wall socket. |
|
3 |
Telephone Handset |
Use when receiving or making voice |
|
|
|
calls. |
|
4 |
Handset Curled Cord |
Use to connect the handset to the fax |
|
|
|
machine. |
|
5 |
Document Support |
Supports the document in the ADF. |
|
6 |
Paper Wire Extension |
Supports the paper in the paper tray. |
|
7 |
Paper Tray |
Load paper here. |
|
8 |
Paper Guides |
Press and slide to fit the document width. |
|
9 |
Control Panel |
Use the keys and display to control the |
|
|
|
fax machine. |
|
10 |
Cover Open Lever |
To open the top cover, lift this lever. |
|
■ Back view |
|
||
11 AC Power |
13 External |
||
Telephone Line |
|||
Connector |
|||
Socket |
|||
|
|
||
|
|
12 Telephone |
|
|
|
Line Socket |
|
No. Name |
Description |
||
11 |
AC Power Connector |
Plug in the power cord here. |
|
12 |
Telephone Line Socket |
Plug in the telephone line here. |
|
|
(LINE) |
|
|
13 |
External Telephone Line |
Plug in the telephone line of an external |
|
|
Socket (EXT.) |
telephone here. |
|
Introduction 1 - 2
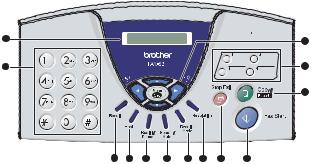
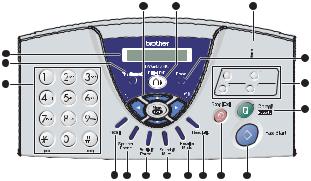
FAX-817/827 control panel overview
(FAX-827 panel is the same as FAX-817)
1 |
13 |
2 |
12 |
|
11 |
3 |
4 |
5 |
6 |
7 |
8 |
9 |
10 |
1LCD (Liquid Crystal Display)
Displays messages on the screen to help you set up and use your fax machine.
2Dial Pad
Use these keys to dial telephone and fax numbers and as a keyboard for entering information into the fax machine.
The # key lets you temporarily switch the dialling type during a telephone call from "PULSE" to "TONE" (not available in New Zealand).
3Recall
Use this key to gain access to an outside line (for Australia and New Zealand only) and/or to recall the operator or transfer a call to another extension when it is connected to a PABX.
4Hook
Lets you dial telephone and fax numbers without lifting the handset.
5Redial/Pause
Redials the last number you called. It also inserts a pause in Quick-Dial numbers.
6Search/Mute
Lets you look up numbers stored in the dialling memory, lets you put calls on hold and lets you dial stored numbers by pressing # and a two-digit number.
7Receive Mode
Use to select how your fax machine will handle incoming calls.
8Resolution
Adjusts the resolution when you send a fax or make a copy.
9Stop/Exit
Stops a fax, cancels an operation or exits from the menu.
:Fax Start
Starts an operation, such as sending a fax.
1 - 3 Introduction
ACopy/Reports
With document in the ADF: Makes a copy.
Without document in the ADF: Lets you access the Reports menu.
BOne-Touch Keys
These keys give you instant access to previously stored Quick-Dial numbers.
CNavigation Keys: Menu/Set
The same key is used for menu and set operations.
Lets you access the menu to program and store your settings in the fax machine.


 or
or 


Press to scroll forward or backward to see a menu selection.
—OR—
You can press these keys to adjust the beeper, ring or speaker volume.
 or
or 
Press to scroll through the menus and options.
You can also use these keys to do a numerical search for stored numbers.
Introduction 1 - 4
FAX-837MC control panel overview
17 |
16 |
15 |
1 |
|
14 |
2 |
|
|
|
|
|
3 |
|
13 |
|
|
12 |
4 |
5 |
6 |
7 |
8 |
9 |
10 |
11 |
1LCD (Liquid Crystal Display)
Displays messages on the screen to help you set up and operate your fax machine.
2Play/Record
Lets you listen to voice messages and print fax messages stored in memory. This also lets you record telephone calls.
3Dial Pad
Use these keys to dial telephone and fax numbers and as a keyboard for entering information into the fax machine.
# key lets you switch the dialling type during a telephone call from "PULSE" to "TONE" (not available in New Zealand).
4Recall
Use this key to gain access to an outside line (for Australia and New Zealand only) and/or to recall the operator or transfer a call to another extension when it is connected to a PABX.
5Speaker Phone
Lets you speak to another party without lifting the handset.
6Redial/Pause
Redials the last number you called. It also inserts a pause in Quick-Dial numbers.
7Search/Mute
Lets you look up numbers stored in the dialling memory, lets you put calls on hold and lets you dial stored numbers by pressing # and a two-digit number.
8Receive Mode
Use to select how your fax machine will handle incoming calls.
9Resolution
Adjusts the resolution when you send a fax or make a copy.
:Stop/Exit
Stops a fax, cancels an operation or exits from the menu.
AFax Start
Starts an operation, such as sending a fax.
1 - 5 Introduction

BCopy/Reports
With a document in the ADF: Makes a copy.
Without a document in the ADF: Lets you access the Reports menu.
COne-Touch Dial Keys
These keys give you instant access to previously stored Quick-Dial numbers.
DErase
Lets you delete voice messages, all fax messages or all messages.
E  (Microphone)
Picks up your voice when you speak to another party using Speaker Phone.
F  Digital TAD
Lets you activate Message Centre. Also, notifies you that you have voice or fax messages in the memory.
GNavigation Keys: Menu/Set
The same key is used for menu and set operation. Lets you access the menu to program and store your settings in the fax machine.


 or
or 


Press to scroll forward or backward to see a menu selection.
—OR—
You can press these keys to adjust ring or speaker volume.
 or
or 
Press to scroll through the menus and options.
You can also use these keys to do a numerical search for stored numbers.
Introduction 1 - 6

Fax tones and handshake
When someone is sending a fax, the fax machine sends fax calling tones (CNG tones). These are quiet, intermittent beeps every 4-seconds. You’ll hear them after you dial and press Fax Start and they will continue for about 60 seconds after dialling. During that time, the sending machine must begin the “handshake” with the receiving machine.
Each time you use automatic procedures to send a fax, you are sending CNG tones over the phone line. You’ll soon learn to listen for these quiet beeps each time you answer a phone on your fax line, so you will know if you are receiving a fax message.
The receiving fax responds with fax receiving tones, which are loud, chirping sounds. A receiving fax chirps for about 40 seconds over the phone line, and the LCD shows RECEIVE.
If the fax machine is set to the FAX ONLY mode, it will answer every call automatically with fax receiving tones. If the other person hangs up, the fax machine will continue to send the “chirps” for about 40 seconds, and the LCD continues to show RECEIVE. To cancel the receiving, press Stop/Exit.
The fax ‘handshake’ is the time in which the sending machine’s CNG tones and the receiving machines “chirps” overlap. This must be for at least 2 to 4 seconds, so the fax machines can understand how each is sending and receiving the fax. The handshake cannot begin until the call is answered, and the CNG tones only last for about 60 seconds after the number is dialled. So it is important for the receiving machine to answer the call in as few rings as possible.
When you have an external Telephone Answering Device (TAD) on your fax line, your TAD will decide the number of rings before the call is answered.
Pay special attention to the directions for connecting a TAD in this chapter. (See Connecting an external telephone answering device (TAD) on page 1-8.)
ECM (Error Correction Mode)
The Error Correction Mode (ECM) is a way for the fax machine to check a fax transmission while it is in progress. ECM transmissions are only possible between machines that both have this feature. If they do, you may send and receive fax messages that are continuously being checked by the fax machine.
The fax machine must have enough memory for this feature to work.
1 - 7 Introduction
Connections
Connecting an external telephone
You can connect a separate telephone as shown in the diagram below.
.
Extension
Telephone
External
Telephone
(Example for Australia)
Whenever this phone (or TAD) is in use, the LCD shows EXT. TEL IN USE and, if the fax handset is lifted, an alarm sounds.
To disconnect the call on the external phone and switch to the fax, lift the handset and press Hook (FAX-817/827 only) or
Speaker Phone (FAX-837MC only).
Connecting an external telephone answering device (TAD)
Sequence
You may choose to connect an answering device. However, when you have an external TAD on the same telephone line as the fax machine, the TAD answers all calls and the fax machine “listens” for fax calling (CNG) tones. If it hears them, the fax machine takes over the call and receives the fax. If it doesn’t hear CNG tones, the fax machine lets the TAD continue playing your outgoing message so your caller can leave you a voice message.
The TAD must answer within four rings (the recommended setting is two rings). The fax machine cannot hear CNG tones until the TAD has answered the call, and with four rings there are only 8 to 10 seconds of CNG tones left for the fax “handshake”. Make sure you carefully follow the instructions in this manual for recording your outgoing message. We do not recommend using the toll saver feature on your external answering machine if it exceeds four rings.
If you do not receive all your faxes, you must reset the setting on your external TAD to four rings or less.
Introduction 1 - 8

 Do not connect a TAD elsewhere on the same phone line.
TAD
TAD
(Example for Australia)
Connections
The external TAD must be connected as shown above.
1 Set your external TAD to one or two rings. (The fax machine’s Ring Delay setting does not apply.)
2
3
4
Record the outgoing message on your external TAD.
Set the TAD to answer calls.
For FAX-817/827, set the Receive Mode to
TAD:ANSWER MACH..
For FAX-837MC, set the Receive Mode to MC:MSG CTR. (See Choosing the Receive Mode on page 5-1.)
Recording outgoing message (OGM) on an external TAD
Timing is important in recording this message. The message sets up the ways to handle both manual and automatic fax reception.
1 Record 5 seconds of silence at the beginning of your message. (This allows the fax machine time to listen for the fax CNG tones of automatic transmissions before they stop.)
2 Limit your speaking to 20 seconds.
We recommend beginning your OGM with an initial 5-second silence because the fax machine cannot hear fax tones over a resonant or loud voice. You may try omitting this pause, but if the fax machine has trouble receiving, then you must re-record the OGM to include it.
1 - 9 Introduction

Multi-Line connections (PABX)
Most offices use a central telephone system. While it is often relatively simple to connect the fax machine to a key system or a PABX (Private Automatic Branch Exchange), we suggest that you contact the company that installed your telephone system and ask them to connect the fax machine for you. We recommended all our fax machines be connected to a discreet line. Although same fax machines will work with a particular PABX, we cannot guarantee that the unit will operate properly.
If the fax machine is to be connected to a multi-line system, ask your installer to connect the unit to the last line on the system. This prevents the unit from being activated each time a telephone call is received.
If you are installing the fax machine to work with a PABX
1 It is not guaranteed that the unit will operate correctly under all circumstances with a PABX. Any cases of difficulty should be reported first to the company that handles your PABX.
2 If all incoming calls will be answered by a switchboard operator, it is recommended that the Receive Mode be set to MANUAL. All incoming calls should initially be regarded as telephone calls.
Introduction 1 - 10

2 Paper
About paper
Handling and using plain paper
Store paper in its original packaging, and keep it sealed. Keep the paper flat and away from moisture, direct sunlight and heat.
Paper specifications for the paper tray
Size: |
A4 |
Weight: |
64 to 90 g/m2 |
Thickness: |
0.08 to 0.12 mm |
Capacity: |
up to 30 sheets |
The fax machine can only scan an image 208 mm wide, regardless of how wide the paper is.
Do not use cardboard, newspaper, or fabric.
Do not use paper:
■that is extremely shiny or highly textured
■that was previously printed by a printer
■that cannot be arranged uniformly when stacked
■that is made with a short grain
■that is curled, wrinkled, folded, ripped, stapled, paperclipped, pasted, or taped
2 - 1 Paper
How to load paper
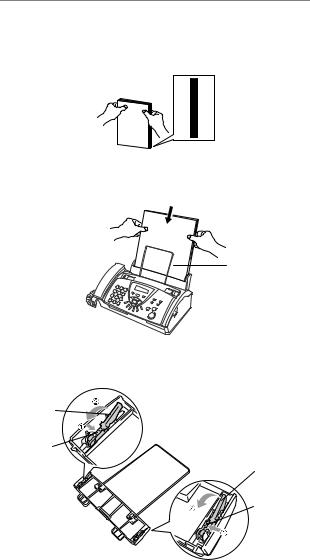
To load paper
Before you add paper, remove all of the paper from the paper tray.
1 Fan the stack of paper well to avoid paper jams and mis-feeds.
Tap the stack of paper so the edges are even.
2 Gently insert the paper.
The side to be printed on must be face down.
ide |
|
S |
rint |
|
P |
Paper
When you use letter size paper, remove paper guides as shown in the illustration.
paper guide
click
paper guide
click
Back side of the paper tray
1 Press the small click of the paper tray.
2 Press the paper guide to the direction of the arrow.
Paper 2 - 2

3 On-Screen Programming
User-friendly programming
The fax machine is designed to be easy to use with LCD on-screen programming using the navigation keys. User-friendly programming helps you take full advantage of all the menu selections the fax machine has to offer.
Since your programming is done on the LCD, we have created step-by-step on-screen instructions to help you program the fax machine. All you need to do is follow the instructions as they guide you through the menu selections and programming options.
Menu table
You can probably program the fax machine without the User’s Guide if you use the Menu table that begins on page 3-3. These pages will help you understand the menu selections and options that are found in the fax machine programs.
You can program the fax machine by pressing Menu/Set, followed by the menu numbers.
For example to set RESOLUTION to FINE:
Press Menu/Set, 3, 4 and ▲ or ▼ to select FINE. Press Menu/Set.
Memory Storage (FAX-837MC only)
Your machine is equipped with an internal battery that will keep the date and time information for up to about 15 hours.
3 - 1 On-Screen Programming
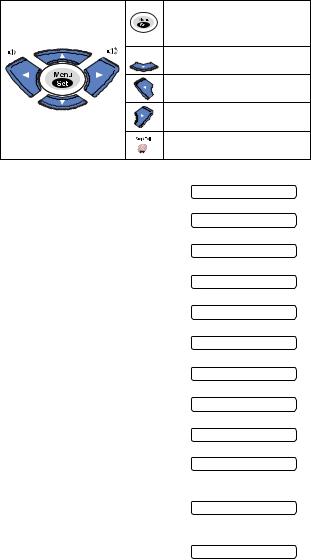
Navigation keys
Access the menu
Go to the next menu level
Accept an option
 Scroll through the current
  menu level
Go back to the previous menu level
Go forward to the next menu level
Exit the menu
You can access the menu mode by pressing Menu/Set.
When you enter the menu, the LCD |
SELECT ↑ ↓ & SET |
|
scrolls. |
||
|
||
Press 1 for Initial Setup |
1.INITIAL SETUP |
|
—OR— |
||
|
||
Press 2 for Setup Receive menu |
2.SETUP RECEIVE |
|
—OR— |
||
|
||
Press 3 for Setup Send menu |
3.SETUP SEND |
|
—OR— |
||
|
||
Press 4 for Cancel Job menu |
4.CANCEL JOB |
|
—OR— |
||
|
||
Press 5 for Interrupt menu |
5.INTERRUPT |
|
—OR— |
||
|
||
Press 6 for Set Quick-Dial menu |
6.SET QUICK-DIAL |
|
—OR— |
||
|
||
Press 7 for Setup Reports menu |
7.REPORT SETTING |
|
—OR— |
||
|
||
Press 8 for Remote Fax Opt menu |
8.REMOTE FAX OPT |
|
(FAX-817/827 only) |
||
|
||
Press 8 for Setup TAD menu |
8.SETUP MSG CTR |
|
(FAX-837MC only) |
||
|
||
—OR— |
|
|
Press 9 for Setup Melody menu |
9.SETUP MELODY |
|
(FAX-837MC only) |
||
|
||
—OR— |
|
|
Press 0 for Miscellaneous menu |
0.MISCELLANEOUS |
|
|
You can scroll more quickly through each menu level by pressing the arrow key (▲ or ▼) for the direction you want. Select an option by pressing Menu/Set when that option appears on the LCD.
Then the LCD shows the next menu level.
Press ▲ or ▼ to scroll to your next menu selection.
Press Menu/Set. When you finish setting an option, the LCD shows ACCEPTED.
On-Screen Programming 3 - 2

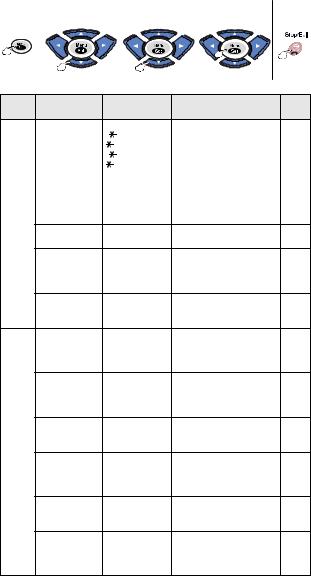
Press the Menu numbers. |
|
|
|
||
(ex. Press 1, 2 for Date/Time) |
|
|
|
||
|
—OR— |
|
|
|
|
|
|
|
|
|
to |
|
to select |
to select |
to accept |
exit |
|
Main |
Menu |
Options |
|
Descriptions |
Page |
Menu |
Selections |
|
|||
|
|
|
|
||
|
1. TONE/PULSE |
TONE |
Selects the dialling mode. |
4-5 |
|
|
(not |
PULSE |
|
|
|
|
available in |
|
|
|
|
|
New |
|
|
|
|
|
Zealand) |
|
|
|
|
|
2. DATE/TIME |
— |
Puts the date and time on |
4-1 |
|
|
|
|
the LCD and in the |
|
|
SETUP |
|
|
headings of faxes you |
|
|
|
|
send. |
|
|
|
|
|
|
|
|
|
|
3. STATION |
— |
Program your name, fax |
4-2 |
|
INITIAL. |
ID |
|
number to appear on |
|
|
|
|
each page you fax. |
|
||
|
|
|
|
||
|
4. BEEPER |
OFF |
Adjust the volume level of |
4-4 |
|
|
|
LOW |
the beeps that sound |
|
|
1 |
|
HIGH |
when you press a key, an |
|
|
|
|
error occurs or a |
|
||
|
|
|
|
||
|
|
|
document is sent or |
|
|
|
|
|
received. |
|
|
|
5. PBX |
ON |
Turn on if PABX (Private |
4-5 |
|
|
(Australia |
OFF |
Automatic Branch |
|
|
|
and New |
|
Exchange) is connected |
|
|
|
Zealand |
|
to your machine. |
|
|
|
only) |
|
|
|
|
|
1. RING |
FAX-817/827 |
Sets the number of rings |
5-2 |
|
|
DELAY |
02-10 |
before your fax machine |
|
|
|
|
(example for |
answers in FAX/TEL, |
|
|
RECEIVE |
|
Australia) |
FAX ONLY or TAD |
|
|
|
|
set Toll Saver feature. |
|
||
|
|
FAX-837MC |
(Message Centre for |
9-7 |
|
|
|
RING DELAY |
FAX-837MC) mode. |
|
|
|
|
On FAX-837MC, you can |
|
||
|
|
TOLL SAVER |
|
||
|
|
|
|
|
|
.SETUP |
2. F/T RING |
20-55(20) |
Sets the time for |
5-3 |
|
TIME |
(for New |
“FAX/TEL pseudo-ring” |
|
||
|
Zealand) |
in FAX/TEL (F/T) Mode. |
|
||
2 |
|
20-70(20) |
|
|
|
|
|
|
|
|
|
|
3. FAX |
ON |
Receive fax messages |
5-4 |
|
|
DETECT |
SEMI |
without pressing the |
|
|
|
|
OFF |
Fax Start key. |
|
|
 The factory setting (option) is shown in bold.
3 - 3 On-Screen Programming
Press the Menu numbers. |
|
|
|
|||
(ex. Press 1, 2 for Date/Time) |
|
|
|
|||
|
—OR— |
|
|
|
|
|
|
|
|
|
|
|
to |
|
to select |
|
to select |
to accept |
exit |
|
Main |
Menu |
|
Options |
Descriptions |
Page |
|
Menu |
Selections |
|
||||
|
|
|
|
|
||
|
4. REMOTE |
ON |
|
You can answer calls at |
5-6 |
|
|
CODE |
( |
51, #51, |
an external or extension |
|
|
|
|
81) |
phone and use codes to |
|
||
|
|
( |
91, #91, |
turn the fax machine on |
|
|
|
|
81 for New |
or off. You can also |
|
||
|
|
Zealand) |
transfer a voice call from |
|
||
RECEIVESETUP (Continued) |
|
OFF |
your cordless phone to |
|
||
|
|
|
your fax machine. You |
|
||
|
|
|
|
can personalize these |
|
|
|
|
|
|
codes. |
|
|
|
5. AUTO |
ON |
|
Reduces size of incoming |
5-4 |
|
|
REDUCTION |
OFF |
faxes. |
|
|
|
2. |
6. MEM. |
ON |
|
Automatically stores any |
5-5 |
|
RECEIVE |
OFF |
incoming faxes in its |
|
|||
|
|
|||||
|
|
|
|
memory if it runs out of |
|
|
|
|
|
|
paper. |
|
|
|
7. POLLING |
STANDARD |
Sets up your fax machine |
5-8 |
||
|
RX |
SECURE |
to poll another fax |
|
||
|
|
TIMER |
machine. |
|
|
|
|
1. COVERPG |
NEXT FAX ONLY |
Automatically sends a |
6-6 |
||
|
SETUP |
ON |
|
programmable cover |
|
|
|
(FAX-827/ |
OFF |
page or prints a sample |
|
||
|
837MC only) |
PRINT SAMPLE |
coverpage. |
|
||
|
2. COVERPAGE |
— |
|
Program a customized |
6-6 |
|
|
NOTE |
|
|
message for fax cover |
|
|
|
(FAX-827/ |
|
|
page. |
|
|
|
837MC only) |
|
|
|
|
|
SEND |
3. CONTRAST |
AUTO |
Change the lightness or |
6-4 |
||
|
LIGHT |
darkness of a fax you are |
|
|||
SETUP3. |
|
DARK |
sending. |
|
|
|
|
S.FINE |
page. |
|
6-4 |
||
|
4. RESOLUTION STANDARD |
Allows you to change |
||||
|
|
FINE |
resolutions page by |
|
||
|
|
PHOTO |
|
|
|
|
|
5. OVERSEAS |
ON |
|
If you are having difficulty |
6-8 |
|
|
MODE |
OFF |
sending faxes overseas, |
|
||
|
|
|
|
set this to on. |
|
|
|
6. CALL |
ON |
|
You can send a fax, then |
6-9 |
|
|
RESERVE |
OFF |
speak or print a sample |
|
||
|
(FAX-827/ |
PRINT SAMPLE call back message. |
|
|||
|
837MC only) |
|
|
|
|
|
 The factory setting (option) is shown in bold.
On-Screen Programming 3 - 4

Press the Menu numbers. |
|
|
|
|||
(ex. Press 1, 2 for Date/Time) |
|
|
|
|||
|
—OR— |
|
|
|
|
|
|
|
|
|
|
to |
|
|
to select |
to select |
to accept |
exit |
||
Main |
Menu |
Options |
Descriptions |
Page |
||
Menu |
Selections |
|||||
|
|
|
|
|||
|
7. DELAYED |
— |
Set the time of day in 24 |
6-10 |
||
|
FAX |
|
hour format that the |
|
||
SETUP.SEND (Continued) |
|
|
delayed faxes will be |
|
||
|
|
sent. |
|
|
||
8. POLLED TX |
STANDARD |
Set up your fax machine |
6-11 |
|||
|
|
SECURE |
with a document to be |
|
||
|
|
|
retrieved by another fax |
|
||
|
|
|
machine. |
|
|
|
3 |
9. MEMORY TX |
NEXT FAX ONLY |
You can send faxes from |
6-12 |
||
|
||||||
|
|
ON |
memory. |
|
|
|
|
|
OFF |
|
|
|
|
JOB |
— |
— |
Cancel a delayed fax or |
6-5 |
||
|
|
polling job. |
|
|||
4.CANCEL |
|
|
|
|
|
|
INTERRUPT5. |
— |
— |
Send a fax now, even if |
6-13 |
||
|
|
you have your fax |
|
|||
|
|
|
machine set to send a fax |
|
||
|
|
|
later, or if you have it set |
|
||
|
|
|
for Polling. |
|
||
-DIAL |
1. ONE-TOUCH |
— |
Stores One-Touch Dial |
7-1 |
||
DIAL |
|
numbers, so you can dial |
|
|||
|
|
by pressing one key. |
|
|||
QUICK |
2. SPEED-DIAL |
— |
Stores Speed-Dial |
7-2 |
||
|
||||||
|
|
|
numbers, so you can dial |
|
||
6.SET |
|
|
by pressing a few keys. |
|
||
3. SETUP |
— |
Sets up a Group number |
7-4 |
|||
GROUPS |
|
for broadcasting. |
|
|||
SETTING |
1. XMIT |
ON |
Initial setup for |
10-1 |
||
PERIOD |
EVERY 6 HOURS |
period. |
|
|
||
|
REPORT |
OFF |
Transmission Verification |
|
||
|
2. JOURNAL |
EVERY 30 FAXES |
Report and Fax Journal |
10-1 |
||
REPORT |
|
EVERY 12 HOURS |
|
|
|
|
|
EVERY 7 DAYS |
|
|
|
||
|
|
EVERY 24 HOURS |
|
|
|
|
|
|
EVERY 2 DAYS |
|
|
|
|
7. |
|
OFF |
|
|
|
|
|
|
|
|
|
||
 The factory setting (option) is shown in bold.
3 - 5 On-Screen Programming
Loading...