


OWNER’S MANUAL
FAX 355MC FAX 375MC
®

If You Need to Call Customer Service
Please complete the following information for future reference:
Model Number: FAX 355MC, FAX 375MC (Circle your model number)
Serial Number:*
Date of Purchase:
Place of Purchase:
*The serial number is on the back of the unit. Retain this Owner’s Manual with your sales receipt as a permanent record of your purchase, in the event of a theft, fire or warranty service.
FAX 355MC is Available in CANADA Only
©1996 –1999 Brother Industries, Ltd.

i
BrotherNumbers
Fax-Back System
Brother Customer Service has installed an easy-to-use Fax-Back System, so you can get instant answers to common technical questions and product information for all Brother products. This system is available 24 hours a day, 7 days a week. You can use the system to send faxes to any fax machine, not just the one from which you are calling.
If you can’t resolve a difficulty with your fax machine using this manual, call our Fax-Back System, and follow the voice prompts to receive faxed instructions about using the system and an index of Fax-Back subjects.
USA: |
1-800-521-2846 |
From within Canada: |
1-800-681-9838 |
The Brother Fax-Back System number (USA Only) has been preprogrammed on One Touch key 01 .
Brother on the World Wide Web
You can find more information about Brother products, from product specification sheets to Frequently Asked Questions (FAQs), on the World Wide Web. Visit us at
http://www.brother.com
Brother Bulletin Board
Brother’s Bulletin Board Numbers are
USA: 1-888-298-3616
From within Canada: 1-514-685-2040
For Customer Service
USA: |
1-800-284-4329 (voice) |
|
|
1-908-575-8790 |
(fax) |
From within Canada: |
1-800-853-6660 |
(voice) |
|
1-514-685-4898 |
(fax) |
From within Montreal: |
1-514-685-6464 |
(voice) |

ii
Ordering Accessories and Supplies
For best quality results use only genuine Brother accessories, available at most Brother retailers. If you cannot find the accessory you need and you have a Visa, MasterCard, Discover, or American Express credit card, you can order accessories directly from Brother. (In the USA, you can visit us online for a complete selection of Brother accessories and supplies available for purchase.
USA: |
1-888-879-3232 (voice) |
|
|
1-800-947-1445 (fax) |
|
|
http://www.brothermall.com |
|
From within Canada: |
1-800-668-2768 (voice) |
|
|
|
|
Description |
|
Item |
98´ Therma Plus Paper “Feels like plain paper” |
6890 |
|
(2 rolls per box) |
|
|
|
|
|
|
|
|
98´ Therma Plus Paper “Feels like plain paper” |
6840 |
|
(4 rolls per box) |
|
|
|
|
|
|
|
|
Original Document Catch Tray |
|
CT-70 |
|
|
|
Documment support |
|
UF6820-000 |
|
|
|
Telephone Line Cord |
|
UG1570001 (USA) |
|
UG3565001 (CANADA) |
|
|
|
|
|
|
|
Telephone Handset |
|
UF6857008 |
|
|
|
Handset Curled Cord |
|
UG3543003 |
|
|
|
Owner’s Manual for FAX 355MC/375MC |
UF0839001 |
|
|
|
|
Optional Multi-Function Link® /Missing Link® |
|
|
software on floppy disks for Windows® 3.1x and |
PCI-1 |
|
Windows® 95/98 |
|
|

iii
Notice – Disclaimer of Warranties
(For USA and Canada)
BROTHER’S LICENSOR(S), AND THEIR DIRECTORS, OFFICERS, EMPLOYEES OR AGENTS (COLLECTIVELY BROTHER’S LICENSOR) MAKE NO WARRANTIES, EXPRESS OR IMPLIED, INCLUDING WITHOUT LIMITATION THE IMPLIED WARRANTIES OF MERCHANTABILITY AND FITNESS FOR A PARTICULAR PURPOSE, REGARDING THE SOFTWARE. BROTHER’S LICENSOR(S) DOES NOT WARRANT, GUARANTEE OR MAKE ANY REPRESENTATIONS REGARDING THE USE OR THE RESULTS OF THE USE OF THE SOFTWARE IN TERMS OF ITS CORRECTNESS, ACCURACY, RELIABILITY, CURRENTNESS OR OTHERWISE. THE ENTIRE RISK AS TO THE RESULTS AND PERFORMANCE OF THE SOFTWARE IS ASSUMED BY YOU. THE EXCLUSION OF IMPLIED WARRANTIES IS NOT PERMITTED BY SOME STATES IN THE USA AND SOME PROVINCES IN CANADA. THE ABOVE EXCLUSION MAY NOT APPLY TO YOU.
IN NO EVENT WILL BROTHER’S LICENSOR(S) BE LIABLE TO YOU FOR ANY CONSEQUENTIAL, INCIDENTAL OR INDIRECT DAMAGES (INCLUDING DAMAGES FOR LOSS OF BUSINESS PROFITS, BUSINESS INTERRUPTION, LOSS OF BUSINESS INFORMATION, AND THE LIKE) ARISING OUT OF THE USE OR INABILITY TO USE THE SOFTWARE EVEN IF BROTHER’S LICENSOR HAS BEEN ADVISED OF THE POSSIBILITY OF SUCH DAMAGES. BECAUSE SOME STATES IN THE USA AND SOME PROVINCES IN CANADA DO NOT ALLOW THE EXCLUSION OR LIMITATION OF LIABILITY FOR CONSEQUENTIAL OR INCIDENTAL DAMAGES, THE ABOVE LIMITATIONS MAY NOT APPLY TO YOU. IN ANY EVENT BROTHER’S LICENSOR’S LIABILITY TO YOU FOR ACTUAL DAMAGES FROM ANY CAUSE WHATSOEVER, AND REGARDLESS OF THE FORM OF THE ACTION (WHETHER IN CONTRACT, TORT (INCLUDING NEGLIGENCE), PRODUCT LIABILITY OR OTHERWISE), WILL BE LIMITED TO $50.

iv
BROTHER FACSIMILE 90 DAY REPLACEMENT WARRANTY
A LIMITED WARRANTY
(For USA Only)
This warranty gives you certain rights and you may also have other rights that may vary from state to state.
This warranty is given only to the end-use purchaser of the accompanying product (referred to in this warranty as “this Product”).
What is covered: Brother warrants to you for the Warranty Period that there are no defects in the materials, workmanship or Year 2000 compliance of this Product. The “Warranty Period” is 90 days from the date you purchased this product.
What is NOT covered: This warranty is VOID — that is, this Product has no warranty — if: (1) you did not purchase this Product from an authorized Brother reseller within the United States, (2) this Product has been serviced, modified or tampered with by anyone other than an Authorized Service Representative of Brother, (3) the serial number has been modified, defaced or removed from this Product, (4) this Product has been abused or damaged, or (5) non Brother®-brand or non Brother approved parts, supplies, or other accessories have been used with this Product.
What to do if you think your Product is defective:
Call our Customer Service Hotline at 1-800- 284-4329, or if you suspect a defect in materials or workmanship in this Product, you can report it to a Brother Authorized Service Center. During the Warranty Period, supply Brother’s representative with a copy of your dated bill of sale showing that this Product was purchased within the United States. For the name of your Brother Authorized Service Center, call 1-800-521- 2846. After contacting the Brother Authorized Service Center, you may be required to deliver or send the Product properly packaged, freight prepaid, to the Authorized Service Center together with a photocopy of your bill of sale.
What Brother will do: Brother (or its Authorized Service Center) will evaluate your report of a possible defect to determine whether a defect exists, and if it does exist, Brother (or its Authorized Service Center) will repair or (at Brother’s option) replace the Product with a product that performs the same functions and performs as well as the original Product. Brother reserves the right to supply refurbished or remanufactured replacement products provided that the replacement products conform to the manufacturer’s specifications for new products. The repaired or replacement product will be returned to you at no cost.
Exchange Service:
Exchange service will expedite, in most instances by the next business day, the exchange of your non working Product with a supply refurbished or remanufactured product that conform to the manufacturer’s specifications for new products. The supply refurbished or remanufactured Product you receive will be covered by the balance of the limited warranty period remaining on the original Product, plus an additional thirty (30) days. You will keep the replacement Product that is sent to you and must return (or be billed up to the cost of a new product) your original non working product, which shall become the property of Brother. You must call Brother Customer Service and if the representative cannot correct the product’s malfunction over the telephone and you elect the exchange service, you must provide information pertaining to this Product and you must also provide a valid major credit card number. Your credit card will be charged up to the cost of a new Product if:
(i) you do not return your original Product to Brother within five (5) business days; (ii) the malfunctions of your original Product are not covered by the limited warranty; (iii) the proper packaging instructions are not followed and has caused damage to the product; or (iv) the warranty period on your original

v
BROTHER FACSIMILE 90 DAY REPLACEMENT WARRANTY
A LIMITED WARRANTY
(For USA Only)
Product has expired or has not been sufficiently validated with a copy of the proof of purchase (bill of sale). The Brother Customer Service Representative will ship the exchange Product with return instructions and prepaid return airbill. Follow the return instructions. You must return the original Product in the same shipping carton in which the exchanged Product was received and include a copy of proof of purchase (bill of sale). Retain your original accessory items and a copy of the return airbill, signed by the courier.
Limitations:
Repair or replacement as described above is your sole and exclusive (that is, your only) remedy if this Product is defective. Brother is not responsible for damage to or loss of any equipment, media, programs or data related to the use of this Product. Except for that repair or replacement, Brother shall not be liable for any direct, indirect, incidental or consequential damages or specific relief. Because some states do not allow the exclusion or limitation of consequential or incidental damages, the above limitation may not apply to you.
THIS WARRANTY IS GIVEN IN LIEU OF ALL OTHER WARRANTIES, WRITTEN OR ORAL, WHETHER EXPRESSED BY AFFIRMATION, PROMISE, DESCRIPTION, DRAWING, MODEL OR SAMPLE. ANY AND ALL WARRANTIES OTHER THAN THIS ONE, WHETHER EXPRESS OR IMPLIED, INCLUDING IMPLIED WARRAN TIES OF MERCHANTABILITY AND FITNESS FOR A PARTICULAR PURPOSE, ARE HEREBY DISCLAIMED.
This Limited Warranty is the only warranty that Brother is giving for this Product. It is the final expression and the exclusive and only statement of Brother’s obligations to you. It replaces all other agreements and under-standings that you may have with Brother or its representatives.
This Limited Warranty (and Brother’s obligation to you) may not be changed in any way unless you and Brother sign the same piece of paper in which we (1) refer to this Product and your bill of sale date,
(2)describe the change to this warranty and
(3)agree to make that change.
Product Support: Toll-free customer service and technical support is available for hardware operational assistance at 1-800-284- 4329. At any time, free technical support in the form of Frequently Asked Questions, troubleshooting tips and service center locator is available through our fax back system at 1-800-521-2846 or Brother’s Internet Web Site (www.brother.com).
BROTHER INTERNATIONAL CORPORATION 100 SOMERSET CORPORATE BLVD. BRIDGEWATER, NEW JERSEY 08807-0911
Please record your model and serial number and your date and location of Purchase below for your records. Keep this information with your proof of purchase (bill of sale) in case your Product is lost, stolen or requires service.
Model # ______________________________
Serial # _______________________________
Date of purchase: ______________________
Store where purchased: _________________
Location of store: ______________________
Important: We recommend that you keep all original packing materials, in the event that you ship this product.

vi
BROTHER MULTIFUNCTION CENTER/FACSIMILE MACHINE
LIMITED WARRANTY
(For Canada Only)
Pursuant to this limited warranty of 1 year from the date of purchase for labour and parts, Brother International Corporation (Canada) Ltd. (“Brother”), or its Authorized Service Centers, will repair this MFC/Facsimile machine free of charge if defective in material or workmanship. This Limited Warranty does not include cleaning, consumables (including, without limitation, print cartridges, print head, toner and drum) or damage caused by accident, neglect, misuse or improper installation or operation, any damage caused from service, maintenance, modifications, or tampering by anyone other than a Brother Authorized Service Representative, or from the use of supplies or consumable items that are non-Brother products. Operation of the MFC/Facsimile machine in excess of the specifications or with the Serial Number or Rating Label removed shall be deemed abuse and all repairs thereafter shall be the sole liability of the end-user/purchaser. In order to obtain warranty service, the MFC/Facsimile machine must be delivered or shipped freight prepaid by the end user/purchaser to a “Brother” Authorized Service Center, together with your Proof of Purchase in the form of a Sales Receipt.
For laser products: Failure to remove the Toner Cartridge (and Toner Drum Unit on
applicable |
models) during shipping |
will cause severe damage to the |
MFC/Facsimile and |
will VOID |
the Warranty. (Refer to |
your Operation Manual for proper |
packaging.) |
For ink-jet products: Do not remove the ink cartridges during shipping. Damage to your print head resulting from packing without the ink cartridges will VOID your warranty. (Refer to your Operation Manual for proper packaging.)
BROTHER DISCLAIMS ALL OTHER WARRANTIES EXPRESSED OR IMPLIED INCLUDING, WITHOUT LIMITATION, ANY IMPLIED WARRANTIES OF MERCHANTABILITY OR FITNESS FOR A PARTICULAR PURPOSE, EXCEPT TO THE EXTENT THAT ANY WARRANTIES IMPLIED BY LAW CANNOT BE VALIDLY WAIVED.
No oral or written information, advice or representation provided by Brother, its Authorized Service Centers, Distributors, Dealers, Agents or employees, shall create
another warranty or modify this warranty. |
This warranty |
states |
Brother’s entire |
liability |
and your exclusive remedy against Brother |
for any failure |
of the |
MFC/Facsimile |
machine |
to operate properly. |
|
|
|
|
Neither Brother nor anyone else involved |
in the development, production, or delivery of |
|||
this MFC/Facsimile machine shall be |
liable for any |
indirect, incidental, special, |
||
consequential, exemplary, or punitive damages, including lost profits, arising from the use of or inability to use the product, even if advised by the end user/purchaser of the possibility of such damages. Since some Provinces do not allow the above limitation of liability, such limitation may not apply to you.
This Limited Warranty gives you |
specific legal rights and you may also have other |
rights which vary from Providence |
to Providence. |
Warranty Service is available at Brother Authorized Service Centers throughout Canada. For Technical Support or for the name and location of your nearest Authorized Service Center call 1-800-853-6660. Within Montreal, please call 685-6464. Internet support: support@brother.ca or browse
Brother’s Web Site: www.brother.com
Brother International |
Corporation |
(Canada) Ltd. |
1 Rue Hôtel de Ville |
|
|
Dollard-Des-Ormeaux, |
QC H9B |
3H6 |

vii
Year 2000 Compliant
Brother is addressing the Year 2000 related issues for all Brother fax machines and multi-function centers. Our focus is to ensure that our bundled third party software will continue to properly process date/time data after January 1, 2000.
Brother fax machines and multi-function centers will function properly after January 1, 2000, provided that all non-Brother hardware, software and firmware used by our customers in connection or combination with Brother fax machines, and bundled software, accurately exchange date data with the Brother products.
Please continue to check our Web page for updates at http://www.brother.com . All remedies will be provided to individual customers via software patches through software download or from Brother Customer Service.

viii
1Introduction
2Set Up and
Connections
Table of Contents
Using This Manual ...................................................................................................... |
1 |
Finding Information .................................................................................................... |
1 |
Test Sheet Procedures (for USA only) ..................................................................... |
2 |
About Fax Machines ................................................................................................... |
2 |
Fax Tones and Handshake ........................................................................................... |
2 |
ECM (Error Correction Mode) ................................................................................... |
3 |
Control Panel Overview ............................................................................................. |
4 |
FAX 355MC and FAX 375MC ................................................................................... |
4 |
Caution ........................................................................................................................... |
5 |
Packing List ................................................................................................................... |
6 |
Choosing a Location .................................................................................................... |
7 |
Assembly ........................................................................................................................ |
7 |
Load the recording paper ............................................................................................ |
7 |
About Brother Paper ............................................................................................. |
9 |
Connect the handset .................................................................................................... |
9 |
Connect the power cord ............................................................................................ |
10 |
Connect the telephone line ........................................................................................ |
10 |
Attach the document support .................................................................................... |
10 |
Special Line Considerations ..................................................................................... |
11 |
Roll Over Phone Lines ....................................................................................... |
11 |
Two-Line Phone System ..................................................................................... |
11 |
Converting Telephone Wall Outlets .................................................................... |
11 |
Installing fax machine, External Two-Line TAD, and Two-Line Telephone ...... |
12 |
Multi-Line Connections (PBX) ................................................................................ |
13 |
If you are installing the fax machine to work with a PBX: ............................ |
14 |
Custom Features on Your Phone Line ....................................................................... |
14 |
Connecting an External Telephone Answering Device (TAD) ................................. |
14 |
Sequence ............................................................................................................. |
14 |
Connections ........................................................................................................ |
15 |
Outgoing Message (OGM) ................................................................................. |
16 |
Connecting an External Telephone ........................................................................... |
16 |
T A B L E O F C O N T E N T S |
ix |
|
|
|
|
3On-Screen Programming
4Initial Setup
5Setup Receive
6Setup Send
User-Friendly Programming ................................................................................... |
17 |
Function Mode .......................................................................................................... |
17 |
Alternating Displays ................................................................................................. |
18 |
Function Selection Table ........................................................................................... |
19 |
Getting Started ........................................................................................................... |
23 |
Setting Dialing Mode (Tone/Pulse) .......................................................................... |
23 |
Setting Date and Time ............................................................................................... |
23 |
Setting Station ID ...................................................................................................... |
24 |
Entering Text ...................................................................................................... |
25 |
Inserting Spaces ............................................................................................. |
25 |
Making Corrections ....................................................................................... |
25 |
Repeating Letters ........................................................................................... |
25 |
Special Characters and Symbols .................................................................... |
25 |
Setting Up Your Area Code (For USA Only) ............................................................ |
26 |
Setting Beeper Volume .............................................................................................. |
27 |
Setting the Handset Volume ...................................................................................... |
27 |
Setting Volume Amplify ..................................................................................... |
28 |
Setting the Speaker Volume ...................................................................................... |
28 |
Setting the Ring Volume ........................................................................................... |
29 |
Memory Storage ....................................................................................................... |
29 |
Basic Receiving Operations ..................................................................................... |
31 |
Select Answer Mode ................................................................................................. |
31 |
To select or change your Answer Mode ......................................................... |
32 |
Setting Ring Delay .................................................................................................... |
33 |
Setting F/T Ring Time .............................................................................................. |
33 |
Record FAX/TEL Outgoing Announcement (F/T OGM) ......................................... |
34 |
Easy Receive ............................................................................................................. |
34 |
Advanced Receiving Operations ............................................................................ |
35 |
Operation from Extension Telephone ....................................................................... |
35 |
For FAX/TEL Mode Only .................................................................................. |
35 |
Changing Remote Codes .................................................................................... |
35 |
To change Remote Codes ............................................................................... |
36 |
Polling ....................................................................................................................... |
36 |
Setting Up Polling Receive ................................................................................. |
36 |
Setting Up Sequential Polling Receive ............................................................... |
37 |
Canceling a Scheduled Job ....................................................................................... |
37 |
Setting Multi-Function Link® Mode (With Multi-Function Link® option) .............. |
38 |
Before You Begin ........................................................................................................ |
39 |
ADF (Automatic Document Feeder) ........................................................................ |
40 |
Resolution ................................................................................................................. |
40 |
x |
T A B L E O F C O N T E N T S |
|
|
7Setup Auto Dial
Numbers
8Telephone Operation
9Message Center
Contrast ..................................................................................................................... |
40 |
Manual Transmission ................................................................................................ |
41 |
Automatic Transmission ........................................................................................... |
41 |
Manual and Automatic Fax Redial ........................................................................... |
41 |
Advanced Sending Operations ............................................................................... |
42 |
Overseas Mode ......................................................................................................... |
42 |
Quick Scan Fax Transmission ................................................................................... |
42 |
Delayed FAX ............................................................................................................ |
43 |
Broadcasting ............................................................................................................. |
43 |
Next-Fax Reservation ............................................................................................... |
44 |
Multiple Resolution Transmission ............................................................................ |
44 |
Setting Up Polling Transmit ..................................................................................... |
45 |
Canceling a Scheduled Job ....................................................................................... |
45 |
Interrupting Delayed Fax and Polling Transmit Jobs ............................................... |
46 |
Storing Numbers for Easy Dialing ........................................................................ |
47 |
Storing One Touch Dial Numbers ............................................................................. |
47 |
Access Codes and Credit Card Numbers .................................................................. |
48 |
Storing Speed Dial Numbers .................................................................................... |
49 |
Changing One Touch and Speed Dial Numbers ....................................................... |
50 |
Setting Up Groups for Broadcasting ......................................................................... |
51 |
Dialing Options .......................................................................................................... |
53 |
Manual Dialing ......................................................................................................... |
53 |
One Touch Dialing .................................................................................................... |
54 |
Speed Dialing ............................................................................................................ |
54 |
Hold .......................................................................................................................... |
54 |
Pause ......................................................................................................................... |
54 |
Tone/Pulse ................................................................................................................. |
55 |
Searching Telephone Index ....................................................................................... |
55 |
Answering Calls with the Speaker Phone ................................................................. |
55 |
Message Center Mode .............................................................................................. |
57 |
Flexible Memory Settings (Message Storage) .......................................................... |
57 |
Setting Up Message Center ....................................................................................... |
58 |
Setting Message Storage ........................................................................................... |
58 |
Recording Message Center Outgoing Message ........................................................ |
59 |
Listening to Outgoing Message (OGM) ............................................................. |
59 |
Erasing Outgoing Message (OGM) .................................................................... |
59 |
Activating Message Center Mode ............................................................................. |
60 |
Message Indicator ..................................................................................................... |
60 |
Playing Voice Messages and Memos ........................................................................ |
60 |
Printing a Fax Message ............................................................................................. |
61 |
T A B L E O F C O N T E N T S |
xi |
|
|
|
|
10Telephone Services
11Making Copies
12Printing Reports
13Important Information
Backup Printing Option ............................................................................................ |
61 |
Erasing Messages ...................................................................................................... |
61 |
To erase voice messages individually ............................................................ |
62 |
To erase messages all at once ......................................................................... |
62 |
Setting Maximum Time for Incoming Messages ...................................................... |
62 |
Setting Toll Saver ...................................................................................................... |
63 |
ICM Recording Monitor ........................................................................................... |
63 |
Recording a Memo .................................................................................................... |
63 |
Recording a Conversation ......................................................................................... |
64 |
Fax Forwarding/Paging ............................................................................................. |
64 |
Programming a Fax Forwarding Number ........................................................... |
64 |
Programming Paging Number ............................................................................ |
65 |
Remote Retrieval ....................................................................................................... |
66 |
Using Remote Retrieval Access Code ...................................................................... |
66 |
Changing Remote Retrieval Access Code ................................................................ |
66 |
Remote Control Commands...................................................................................... |
67 |
Retrieving Memory Status List ................................................................................. |
68 |
Retrieving Fax Messages .......................................................................................... |
68 |
Changing Fax Forwarding Number .......................................................................... |
69 |
Custom Features ........................................................................................................ |
71 |
Distinctive Ring ........................................................................................................ |
71 |
Registering the Distinctive Ring Pattern ............................................................ |
72 |
Caller ID ................................................................................................................... |
73 |
Caller ID Log ...................................................................................................... |
73 |
Printing the Caller ID Log .................................................................................. |
73 |
Viewing the Caller ID Log ................................................................................. |
74 |
Returning a Call from the Log............................................................................ |
75 |
Registering a Caller ID Number ......................................................................... |
76 |
Copy Functions .......................................................................................................... |
77 |
Multiple Copies .................................................................................................. |
77 |
FAX Settings ............................................................................................................... |
79 |
To Print a Report ....................................................................................................... |
80 |
Transmission Verification (Xmit) Report .................................................................. |
80 |
Using the Trans. Verify Key ...................................................................................... |
80 |
Standard Telephone and FCC Notices .................................................................. |
81 |
These notices are in effect on models sold and used in the |
|
United States only. ................................................................................................. |
81 |
Federal Communications Commission Compliance Notice |
|
(For USA Only) ............................................................................................... |
83 |
xii |
T A B L E O F C O N T E N T S |
|
|
|
|
Industry Canada Compliance Statement (For Canada Only) |
............................. 83 |
||
|
|
Important Safety Instructions .................................................................................... |
84 |
||
|
|
Compilation and Publication Notice .................................................................. |
86 |
||
|
|
Trademarks ......................................................................................................... |
|
|
86 |
Troubleshooting |
Troubleshooting ......................................................................................................... |
|
|
87 |
|
and Maintenance |
|
|
|
|
|
14 |
|
Fax-Back System ...................................................................................................... |
|
|
87 |
|
|
Brother on the World Wide Web ............................................................................... |
87 |
||
|
|
Brother Bulletin Board .............................................................................................. |
87 |
||
|
|
Error Messages ......................................................................................................... |
|
|
88 |
|
|
Recording Paper Jam |
................................................................................................ |
91 |
|
|
|
If You Are Having Difficulty with Your Fax Machine .............................................. |
92 |
||
|
|
Printing or Receiving Faxes ................................................................................ |
92 |
||
|
|
Condensed Print and Horizontal Streaks; |
|
||
|
|
Top and Bottom ........................................................of Sentences Cut Off |
92 |
||
|
|
Enabling/Disabling ........................................Anti-Curl Check Sheet (ACS) |
92 |
||
|
|
Vertical Black Lines ...........................................................When Receiving |
92 |
||
|
|
Phone Line or Connections ................................................................................ |
92 |
||
|
|
Fax Machine Does ...............................................Not Answer When Called |
92 |
||
|
|
No Dial Tone on .........................................................................the Handset |
93 |
||
|
|
Sending Faxes ..................................................................................................... |
|
|
93 |
|
|
Poor Transmitting ..............................................................................Quality |
93 |
||
|
|
Dialing Does Not ..................................................................................Work |
93 |
||
|
|
Vertical Black Lines ..............................................................When Sending |
93 |
||
|
|
Handling Incoming ....................................................................................Calls |
93 |
||
|
|
Double Ring in ...................................................................FAX/TEL Mode |
93 |
||
|
|
Transferring a Call .........................................................to the Fax Machine |
94 |
||
|
|
Fax Machine “Hears” ....................................................Voice as CNG Tone |
94 |
||
|
|
Transmission Verification ..................................Report Prints “Result: NG” |
94 |
||
|
|
Custom Features .................................................................on a Single Line |
94 |
||
15 |
|
For Customer Service ............................................................................................... |
|
94 |
|
|
|
|
|
|
|
Multi-Function |
Multi-Function Link |
® |
(option) |
95 |
|
® |
|
............................................................................... |
|||
Link (option) |
|
|
|
|
|
Specifications |
|
|
|
|
|
16 |
Specifications .............................................................................................................. |
|
|
97 |
|
|
|
Glossary ....................................................................................................................... |
|
|
99 |
Index ........................................................................................................................... |
103 |

1
1Introduction
UsingThis Manual
Thank you for purchasing a Brother fax machine. This fax machine has been designed to be simple to use, with LCD screen prompts to guide you through functions. However, you can use your fax machine to its fullest potential by taking a few minutes to read this manual.
Additionally, your fax machine has a Help Key. Press Help/Q.Scan to print a list of basic operational steps and functions.
Finding Information
All chapter headings and subheadings are listed in the Table of Contents. You will be able to find information about a specific feature or function by checking the Index at the back of this manual. Also, throughout this manual, you’ll see special symbols alerting you to important information, crossreferences, and warnings. Illustrations of some screen displays also help you choose the correct key-presses.

2 |
C H A P T E R O N E |
|
|
Test Sheet Procedures (for USA only)
See
Setting
Station ID
p. 24
After programming your Station ID, please fill out the TEST SHEET included with your fax machine and fax it to Brother’s Automated Fax Response System as your first transmission. This will verify that your fax machine is properly installed.
When this document is received a confirmation sheet will be sent back to your machine. To get a response, be sure to set up your Station ID.
USA 1-908-685-9283 (fax)
About Fax Machines
If you’re a first-time fax machine user, fax operation might seem a little mysterious. You’ll soon get used to the unusual fax tones on your phone line, and be able to send and receive faxes easily.
Fax Tones and Handshake
When someone is sending a fax, the fax machine sends fax calling tones, (CNG tones) — soft, intermittent beeps at 4-second intervals. You’ll hear them when you dial and press Start , and they continue for about 40 seconds after dialing. During that time, the sending machine must begin the “handshake” with the receiving machine. Each time you use automatic procedures to send a fax, you are sending CNG tones over the phone line. You’ll soon learn to listen for these soft beeps each time you answer a phone on your fax line, so you know if you are receiving a fax message.
The receiving fax responds with fax receiving tones — loud, chirping sounds. A receiving fax chirps for about 40 seconds over the phone line, and the screen displays RECEIVE. If your fax machine is set to the FAX ONLY Mode, it will answer every call automatically with fax receiving tones. Even if the other party hangs up, your fax machine continues to send the “chirps” for about 40 seconds, and the screen continues to display RECEIVE. To cancel the receiving mode, press Stop .

I N T R O D U C T I O N |
3 |
|
|
|
|
When your fax machine answers in FAX/TEL Mode, the fax machine listens for CNG tones and then responds with receiving tones.
The fax “handshake” is the time in which the sending machine’s CNG tones and the receiving machines “chirps” overlap. This must be for at least 2 to 4 seconds, so the machines can understand how each is sending and receiving the fax. The handshake cannot begin until the call is answered, and the CNG tones only last for about 40 seconds after the number is dialed. Therefore, it’s important for the receiving machine to answer the call in as few rings as possible.
When you have an external telephone answering device (TAD) on your fax line, your TAD will determine the number of rings before the call is answered. Pay special attention to the directions in the Installation chapter for connecting a TAD to your fax machine.
ECM (Error Correction Mode)
The Error Correction Mode (ECM) is a way for the fax machine to check the integrity of a fax transmission while it is in progress. ECM transmissions are possible only between machines that both have the ECM feature. If they do, you may send and receive fax messages that are continuously checked for their integrity.
Sufficient memory must be available in your fax machine for this feature to work.
4 |
C H A P T E R O N E |
|
|
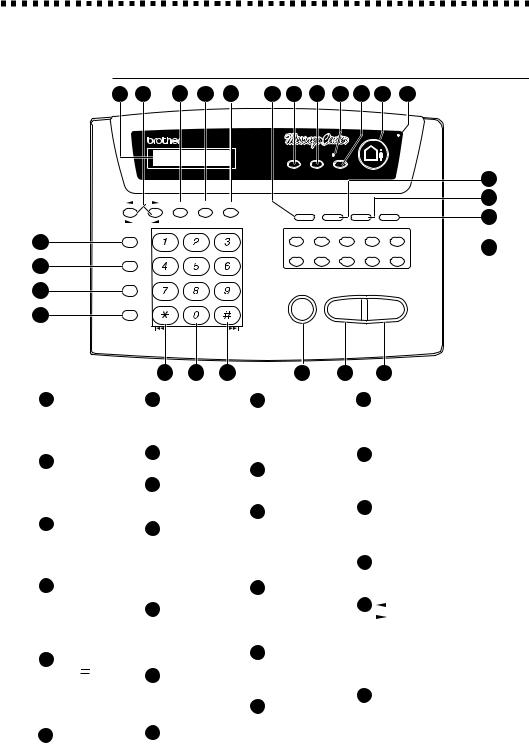
Control Panel Overview
FAX 355MC and FAX 375MC
25 |
24 |
23 |
22 |
21 |
20 |
19 |
18 |
17 |
16 |
15 |
14 |
|
|
|
FAX 375MC |
|
|
|
|
|
|
|
|
|
|
|
Record |
Erase |
Play |
|
|
|
|
|
|
|
|
|
|
MC ON/OFF |
|
|
|
Set |
Mode |
Resolution |
Function Trans.Verify |
Tel-index |
Help/Q.Scan |
||
|
|
|
|
|
|||||
L |
Volume |
H |
|
|
|
|
|
|
|
Hold/Caller ID |
|
A BC |
DE F |
01 |
02 |
03 |
04 |
05 |
|
|
|
|
|||||||
1 |
|
|
|
|
|
|
|
|
|
Redial / Pause |
GH I |
J KL |
MNO |
06 |
07 |
08 |
09 |
10 |
|
|
|
|
|
|
|||||
|
|
|
|
|
|
|
|
||
2
13
12
11
 10
10
Speed Dial
3
Speaker Phone
4
1Hold/Caller ID
Lets you put calls on hold. Also, lets you view or print the Caller ID list.
2Redial / Pause
Re-dials the last number called. Also inserts a pause in autodial numbers.
3Speed Dial
Lets you dial stored phone numbers by pressing a two-digit number.
4Speaker Phone
Lets you speak to the person at the other end and dial telephone numbers without lifting the handset.
5RWD ( ) FWD (
 )
)
Use to repeat or skip to the next voice message during playback.
6Dial Pad
Dials phone and fax numbers, and can be used as a keyboard for entering information into the fax machine.
PQRS |
TUV |
WXYZ |
|
|
|
|
Stop |
Copy |
Start |
RWD |
|
FWD |
|
|
5 6 5
7Stop
Stops a fax, cancels an operation or exits from function mode.
8Copy
Makes a copy.
9Start
Starts an operation, such as sending a fax.
10One Touch Dial Keys
These ten keys give you instant access to previously stored phone numbers.
11Help/Q. Scan
Prints a quick reference Help List. Also, lets you take advantage of memory transmission.
12Tel-index
Lets you look up numbers stored in the dialing memory.
13Trans. Verify
Lets you print the Transmission Verification Report for your last transmission.
7 |
8 |
|
9 |
|
14 Microphone |
|
20 |
Function |
|
Picks up your voice |
|
|
Lets you access the |
|
when you speak to |
|
|
function and |
|
another party using |
|
|
programming mode. |
|
speakerphone. |
|
21 |
Resolution |
|
|
|
|||
15 MC ON/OFF |
|
|
Sets the resolution when |
|
Lets you activate the |
|
you send a fax or make a |
||
Message Center. |
|
|
copy. |
|
16 Play |
|
22 |
Mode |
|
|
|
Use to select how fax |
||
Lets you listen to |
|
|
||
voice messages and |
|
|
machine will handle |
|
outgoing messages, |
|
|
incoming calls. |
|
and print fax messages |
23 Set |
|||
stored in memory. |
|
|
Stores a function setting |
|
|
|
|
||
17 Message Indicator |
|
|
into the fax machine. |
|
Light |
|
24 |
(Left Arrow) |
|
Notifies you that you |
||||
|
(Right Arrow) |
|||
have voice or fax |
|
|
||
|
|
Volume |
||
messages in the memory. |
|
|||
|
Moves the LCD cursor |
|||
|
|
|
||
18 Erase |
|
|
to the left or right. |
|
Lets you delete voice |
|
Adjusts speaker, ring |
||
messages, fax messages |
|
and handset volume. |
||
or all messages. |
|
25 |
Liquid Crystal Display |
|
19 Record |
|
|||
|
|
Displays messages to |
||
Lets you record an |
|
|
help you set up and |
|
Outgoing Message |
|
|
operate your fax machine. |
|
(OGM), memos and telephone calls, and store information for Message Center features.

2Set Up and 5
Connections
Caution
1Never install telephone wiring during a lightning storm.
2We recommend that this product be used with a surge protection device to protect the product against lightning storms.
3Never install a telephone jack in a wet location unless the jack is specifically designed for a wet location.
4Never touch telephone wires or terminals that are not insulated unless the telephone line has been disconnected at the network interface.
5Use caution when installing or modifying telephone lines.
6Avoid using a telephone (other than a cordless type) during an electrical storm. There may be a remote risk of electric shock from lightning.
7Do not use the telephone to report a gas leak in the vicinity of the leak.
8For PLUGGABLE EQUIPMENT, the socket-outlet should be installed near the equipment and should be easily accessible.
6 |
C H A P T E R T W O |
|
|
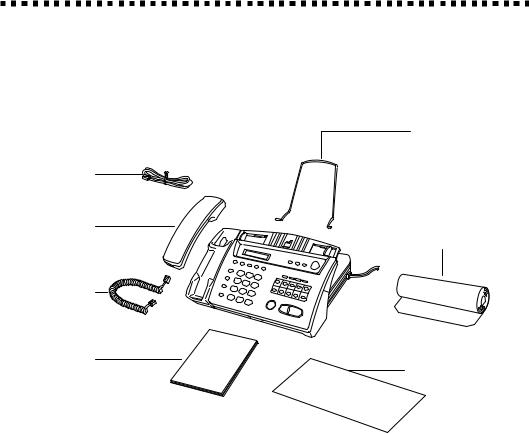
Packing List
Make sure you have the following items:
Telephone
Line Cord
Telephone
Handset
Handset
Curled Cord
Owner’s
Manual
Document Support
One Starter Roll of Brother Therma PLUS Recording Paper
(LETTER up to 25 pages, A4 up to 24 pages)
Brother
StartCard
NOTICE: If an item is missing, call Brother Customer Service at 1-800-284-4329 (USA), 1-800-853-6660 (from within Canada) or 1-514-685-6464 (from within Montreal). See Ordering Accessories and Supplies on page ii for the correct item numbers.
Whenever you transport the fax machine, use the packing materials that came with your machine. If you do not pack the fax machine correctly, you may void your warranty.
S E T U P A N D C O N N E C T I O N S |
7 |
|
|
|
|
Choosing a Location
Place your fax machine on a flat, stable surface, such as a desk. Select a place that is free of vibration and shocks. Locate the fax machine near a telephone jack and a standard, grounded power outlet.
Avoid placing your machine in a high-traffic area. Do not place near heaters, air conditioners, water, chemicals or refrigerators. Do not expose the fax machine to direct sunlight, excessive heat, moisture or dust. Do not connect your machine to electrical outlets controlled by wall switches or automatic timers. Disruption of power can wipe out information in the unit’s memory. Do not connect your machine to electrical outlets on the same circuit as large appliances or other equipment that might disrupt the power supply. Avoid interference sources, such as speakers or the base units of cordless phones.
Assembly
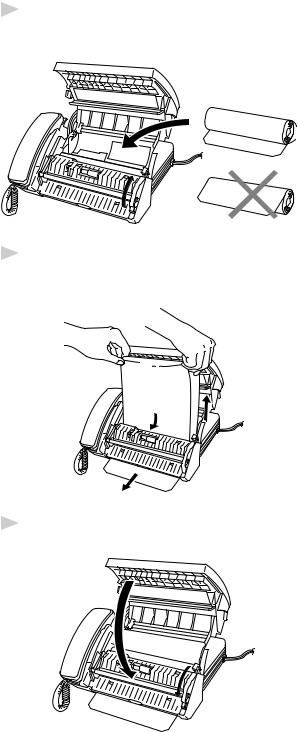
Load the recording paper
1Open the cover by placing your finger in the groove under the cover and lifting up.
2Pull up the blue release lever so you can remove the three protective sheets (initial set up) or any paper remaining in the machine from the last roll.
8 |
C H A P T E R T W O |
|
|
3Unwrap the new recording paper roll and insert it into the paper bin, with the paper feeding from the bottom of the roll.
Limited to
2.76 inches (70 mm)
4Raise the paper enough to pass it over the  until it feeds out the front of the machine. Make sure there is no slack.
5 Pull down the blue lever and close the cover.
S E T U P A N D C O N N E C T I O N S |
9 |
|
|
|
|
About Brother Paper
For the best print quality, use Brother Therma Plus Paper, Item Numbers 6890 (two 98’ rolls) or 6840 (four 98’ rolls). Therma Plus paper is thicker, like plain paper, and produces the best print quality.
The recording paper roll size for your fax machine is limited to a diameter of 2.76 inches (70 mm). You can use a 164’ roll of thinner thermal paper as long as it meets these requirements.
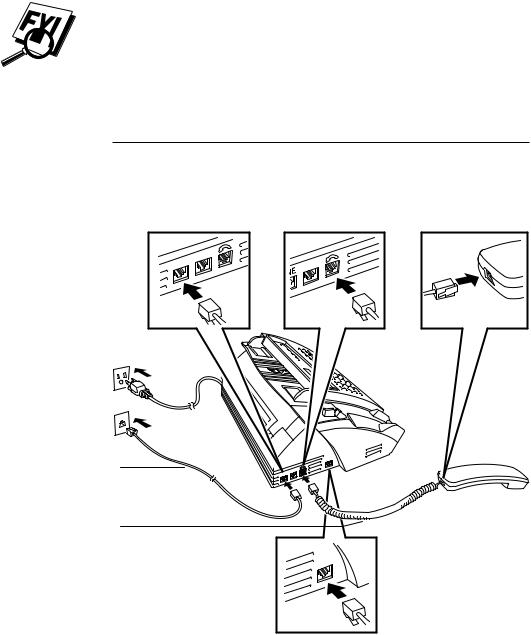
Connect the handset
Connect the curled handset cord to the bottom of the handset and the side of the fax machine.
EXT |
. |
|
LINE
EXT |
. |
|
Telephone
Line Cord
Handset
Curled Cord
PC |
I/F |
EXT |
. |
LINE
PC |
I/F |
10 |
C H A P T E R T W O |
|
|
Connect the power cord
When you connect the power, the screen displays 01/01 00:00 FAX.
NOTICE:
1)This fax must be grounded using a three-prong plug.
2)Since the fax machine is grounded through the power outlet, you can protect yourself from potentially hazardous electrical conditions on the telephone network by keeping the power to your machine on when you connect it to a telephone line. Similarly, you can protect yourself when you want to move your machine, by disconnecting the telephone line first, and then the power cord.
3)Lightning and power surges can damage this product! We recommend that you use a quality surge protection device on the AC power line as well as on the telephone line, or unplug the telephone line and electrical cords during a lightning storm.
Connect the telephone line
Connect one end of the telephone line cord to the jack labeled LINE on the left side of the fax machine. Connect the other end to a modular wall jack.
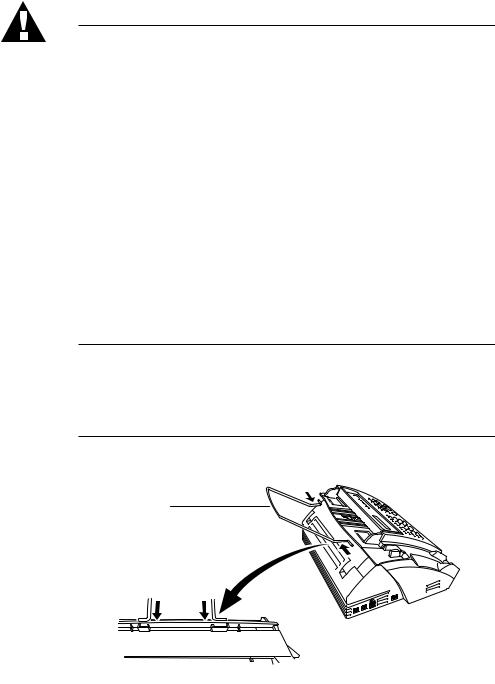
Attach the document support
Attach the document support as shown in the illustration below.
Document
Support
PC I/F
EXT |
. |
LINE

S E T U P A N D C O N N E C T I O N S |
11 |
|
|
|
|
Special Line Considerations
Roll Over Phone Lines
A roll over phone system is a group of two or more separate telephone lines that pass incoming calls to each other if they are busy. The calls are usually passed down or “rolled over” to the next available phone line in a preset order.
Your fax machine can work in a roll over system as long as it is the last number in the sequence, so the call cannot roll away. Do not put the
fax machine on any of the other numbers; when the other lines are busy and a second fax call is received, the fax call is transferred to a line that does not have a fax machine. Your fax machine will work best on a dedicated line.
Two-Line Phone System
A two-line phone system is nothing more than two separate phone numbers on the same wall outlet. The two phone numbers can be on separate jacks (RJ11) or combined into one jack (RJ14). Your fax machine must be plugged into an RJ11 jack. RJ11 and RJ14 jacks may be equal in size and appearance and both may contain four wires (black, red, green, yellow). To test the type of jack, plug in a two-line phone and see if it can access both lines. If it can, you must separate the line for your fax machine.
Converting Telephone Wall Outlets
There are three ways to convert to an RJ11 receptacle. The first two ways may require assistance from the telephone company. You can change the wall outlets from one RJ14 jack to two RJ11 jacks. Or, you can have an RJ11 wall outlet installed and slave or jump one of the phone numbers to it.

12 |
C H A P T E R T W O |
|
|
The third way is the easiest: Buy a triplex adapter. You can plug a triplex adapter into an RJ14 outlet. It separates the wires into two separate RJ11 jacks (Line 1, Line 2) and a third RJ14 jack (Lines 1 and 2). If your fax machine is on Line 1, plug the fax machine into L1 of the triplex adapter. If your fax machine is on Line 2, plug it into L2 of the triplex adapter.
Triplex Adapter
RJ14
RJ11
RJ14
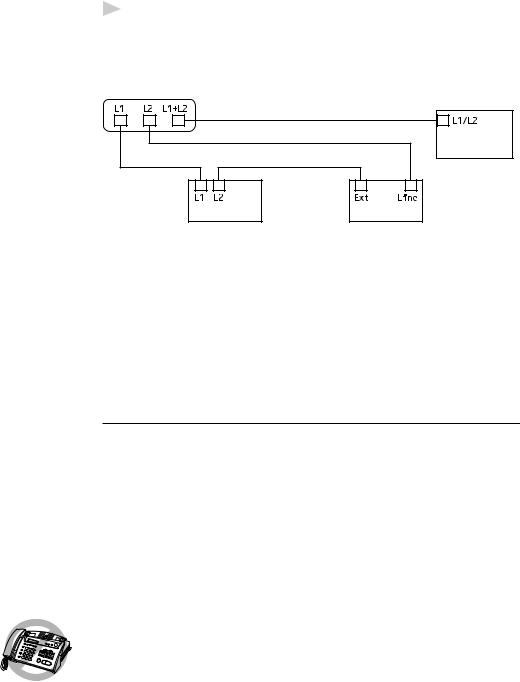
Installing fax machine, External Two-Line TAD, and Two-Line Telephone
When you are installing an external two-line telephone answering device (TAD) and a two-line telephone, your fax machine must be isolated on one line at both the wall jack and at the TAD. The most common connection is to put the fax machine on Line 2, which is our assumption in the following steps. The back of the two-line TAD must have two telephone jacks: one labeled L1 or L1/L2, and the other labeled L2. You will need at least three telephone line cords, the one that came with your fax machine and two for your external two-line TAD. You will need a fourth line cord if you add a two-line telephone.
1Place the two-line TAD and the two-line telephone next to your fax machine.
2Plug one end of the telephone line cord for your fax machine into the L2 jack of the triplex adapter. Plug the other end into the LINE jack on the left side of the fax machine.
3Plug one end of the first telephone line cord for your TAD into the L1 jack of the triplex adapter. Plug the other end into the L1 or L1/L2 jack of the two-line TAD.
S E T U P A N D C O N N E C T I O N S |
13 |
|
|
|
|
4Plug one end of the second telephone line cord for your TAD into the L2 jack of the two-line TAD. Plug the other end into the EXT. jack on the left side of the fax machine.
Triplex Adapter
Two Line Phone
See
Easy Receive
p. 34
Two Line External TAD |
Fax Machine |
You can keep two-line telephones on other wall outlets as always. There are two ways to add a two-line telephone to the fax machine’s wall outlet. You can plug the telephone line cord from the two-line telephone into the L1+L2 jack of the triplex adapter. Or, you can plug the two-line telephone into the TEL jack of the two-line TAD.
Multi-Line Connections (PBX)
Most offices use a central telephone system. While it is often relatively simple to connect the fax machine to a key system or a PBX (Private Branch Exchange), we suggest that you contact the company that installed your telephone system and ask them to connect the fax machine for you. It is advisable to have a separate line for the fax machine. You can then leave the fax machine in FAX ONLY Mode to receive faxes any time of day or night.
If the fax machine is to be connected to a multi-line system, ask your installer to connect the unit to the last line on the system. This prevents the unit from being activated each time a telephone call is received.
As with all fax units, this machine must be connected to a two wire system. If your line has more than two wires, proper connection of the fax machine cannot be made.

14 |
C H A P T E R T W O |
|
|
If you are installing the fax machine to work with a PBX:
1It is not guaranteed that the unit will operate correctly under all circumstances with a PBX. Any cases of difficulty should be reported first to the company that handles your PBX.
2If all incoming calls will be answered by a switchboard operator, it is recommended that the Answer Mode be set to MANUAL. All incoming calls should initially be regarded as telephone calls.
3The unit may be used with either pulse or tone dialing telephone service.
Custom Features on Your Phone Line
If you have telephone services (offered by your telephone company) on your phone line, please see Telephone Services, chapter 10.
Connecting an External
Telephone Answering Device (TAD)
Sequence
You might choose to connect an additional answering system. When you have an external TAD on the same telephone line as the fax machine, the TAD answers all calls. The fax machine “listens” for fax calling (CNG) tones. If it hears them, the fax machine takes over the call and receives the fax. If it doesn’t hear CNG tones, the fax machine lets the TAD continue playing your outgoing message so your caller can leave you a voice message.
The TAD must answer within four rings (the recommended setting is two rings). The fax machine cannot hear CNG tones until the TAD has answered the call, and with four rings there are only 8–10 seconds of CNG tones left for the fax “handshake.” Make sure you carefully follow instructions in this manual for recording your outgoing message. We do not recommend using the toll saver feature on your external TAD if it exceeds 4 rings.

S E T U P A N D C O N N E C T I O N S |
15 |
|
|
|
|
Do not connect a TAD elsewhere on the same phone line—your fax machine and TAD will both try to control the line.
PC I/F
EXT |
. |
LINE
You may connect an external TAD to a separate wall jack only if you subscribe to your telephone company’s Distinctive Ring Service, have registered the distinctive ring pattern on your fax machine and use that number as a fax number and set your fax machine’s Answer mode to
MANUAL.
Connections
The external TAD must be plugged into the left side of the fax machine, into the jack labeled EXT. Your fax machine cannot work properly if you plug the TAD into a wall jack.
1Plug the telephone line cord from the wall jack into the left side of the fax machine, in the jack labeled LINE.
2Plug the telephone line cord from your TAD into the left side of the fax machine, in the jack labeled EXT. (Make sure this cord is connected to the TAD at the TAD’s telephone line jack, and not its telephone set jack.)
3Set your external TAD to four rings or less. (The fax machine’s Ring Delay setting does not apply).
4Record the outgoing message (see next page).
5Set the TAD to answer calls.
6 Set Message Storage ( Function , 8 , 1 ) to VOICE:EXT.
7 Set the Answer Mode to MC:MSG CTR.

16 |
C H A P T E R T W O |
|
|
Outgoing Message (OGM)
Timing is important in recording this message. The message sets up the ways to handle both manual and automatic fax reception.
1Record 5 seconds of silence at the beginning of your message. (This allows your fax machine time to listen for the fax CNG tones of automatic transmissions before they stop.)
2Limit your speaking to 20 seconds.
3End your 20-second message by giving your Fax Receive Code for people sending manual faxes. For example:
“After the beep, leave a message or send a fax by pressing  5 1 and Start.”
We recommend beginning your OGM with an initial 5-second silence because the fax machine cannot hear fax tones over a resonant or loud voice. You may try omitting this pause, but if your fax machine has trouble receiving, then you must rerecord the OGM to include it.
Connecting an External Telephone
Your fax machine is equipped with a handset that you can use as a regular phone. However, you can also connect a separate telephone (or telephone answering device) directly to your fax machine.
Connect the modular plug on the telephone’s line cord to the jack labeled EXT. on the left side of the fax machine.
Whenever this phone (or TAD) is in use, the screen displays EXT. TEL IN USE, and, if the fax machine handset is lifted, an alarm sounds. To disconnect the call on the external phone and switch to the fax machine,
press Speaker Phone .
 Loading...