


ADS2000
Table of contents
 Loading...
HTML
file:///C|/Documents%20and%20Settings/mcampbell.AM/My%20Documents/ADS2000solutions/index.html[3/11/2013 10:23:20 AM]
Version 0
USA
©2012 Brother Industries, Ltd. All rights reserved.
USER’S GUIDE
file:///C|/Documents%20and%20Settings/mcampbell.AM/My%20Documents/ADS2000solutions/index-1.html[3/11/2013 10:23:24 AM]
USER’S GUIDE
General Information
1 General Information
2 Before Scanning
3 Scan From Your Computer
4 Scan Using the Scan Key
on the Control Panel of the
Machine
5 Managing the Machine
from Your Computer
6 Routine Maintenance
7 Troubleshooting
A Specifications
B Appendix
Index
USER’S GUIDE
ADS-2000
Version 0
USA
©2012 Brother Industries, Ltd. All rights reserved.
cover1
file:///C|/Documents%20and%20Settings/mcampbell.AM/My%20Documents/ADS2000solutions/cover1d.html[3/11/2013 10:23:24 AM]
USER’S GUIDE
ADS-2000
Version 0
USA

General Information
file:///C|/Documents%20and%20Settings/mcampbell.AM/My%20Documents/ADS2000solutions/intro1.html[3/11/2013 10:23:25 AM]
General Information
User's Guides and where to find them?
Which manual ? What's in it? Where is it ?
Product Safety Guide Read this Guide first. Please read the Safety
Instructions before you set up your machine. See this
Guide for trademarks and legal limitations.
Printed / In the box
Quick Setup Guide Follow the instructions for setting up your machine
and installing the drivers and software for the
operating system and connection type you are using.
Printed / In the box
User’s Guide Learn the Scan operations and security features,
learn how to perform routine maintenance, and see
troubleshooting tips.
HTML file / DVD-ROM
Page Top
General Information
file:///C|/Documents%20and%20Settings/mcampbell.AM/My%20Documents/ADS2000solutions/chapter1.html[3/11/2013 10:23:25 AM]
1 General Information
Using the Documentation
Thank you for buying a Brother machine! Reading the documentation will help you make the most of your machine.
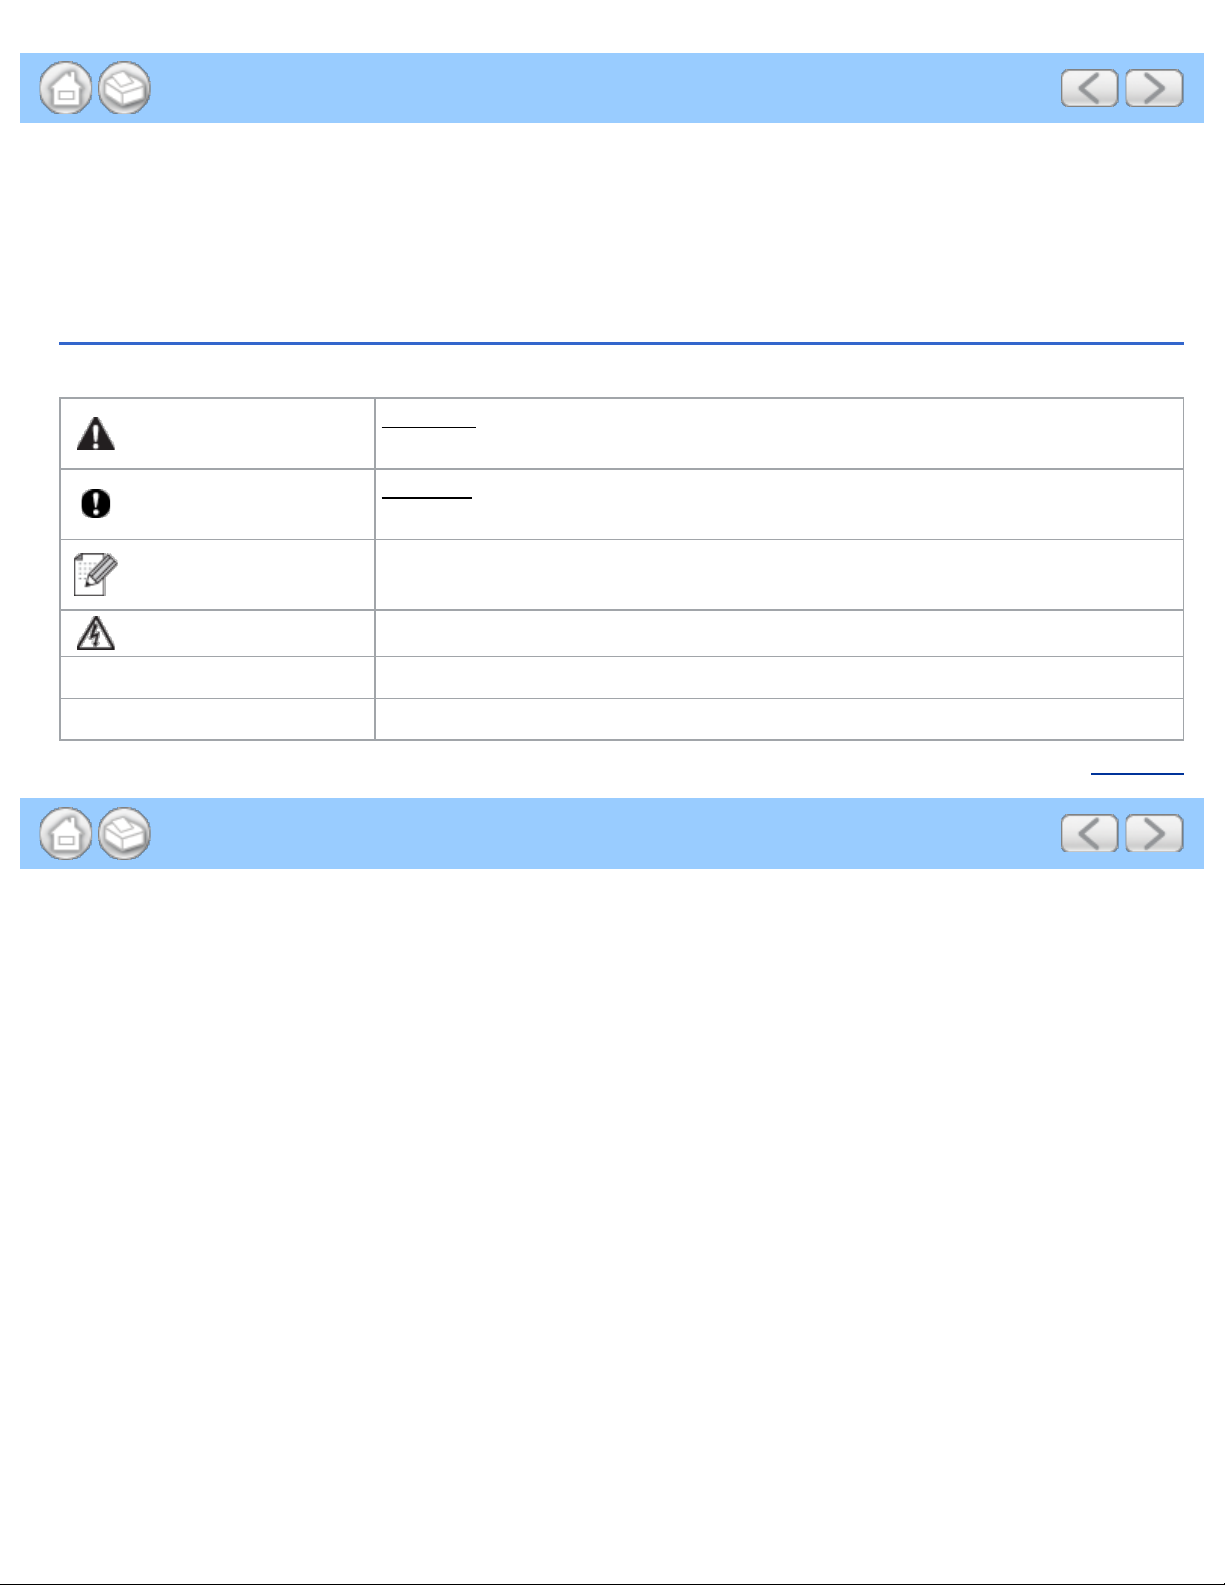
Symbols and Conventions Used in the Documentation
The following symbols and conventions are used throughout the documentation.
CAUTION
CAUTION
indicates a potentially hazardous situation which, if not avoided, may
result in minor or moderate injuries.
Important
Important
indicates a potentially hazardous situation which, if not avoided, may
result in damage to property or loss of product functionality.
Note
Notes tell you how you should respond to a situation that may arise or give tips
about how the operation works with other features.
Electrical Hazard icons alert you to possible electrical shock.
Bold Bold style identifies keys on the machine control panel or computer screen.
Italics Italicized style emphasizes an important point or refers you to a related topic.
Page Top

Before Scanning
file:///C|/Documents%20and%20Settings/mcampbell.AM/My%20Documents/ADS2000solutions/chapter2.html[3/11/2013 10:23:26 AM]
2 Before Scanning
Before Scanning
Before using the Scan to PC key, the Scan to USB key or attempting any other scanning operation, confirm the
following:
• Make sure you have installed the Brother software (MFL-Pro Suite) by following the steps in the Quick Setup
Guide.
• Make sure that the interface cable is physically secure.
Page Top
Scan From Your Computer
file:///C|/Documents%20and%20Settings/mcampbell.AM/My%20Documents/ADS2000solutions/chapter3.html[3/11/2013 10:23:27 AM]
3 Scan From Your Computer
Change the User Interface of ControlCenter4 (Windows
®
)
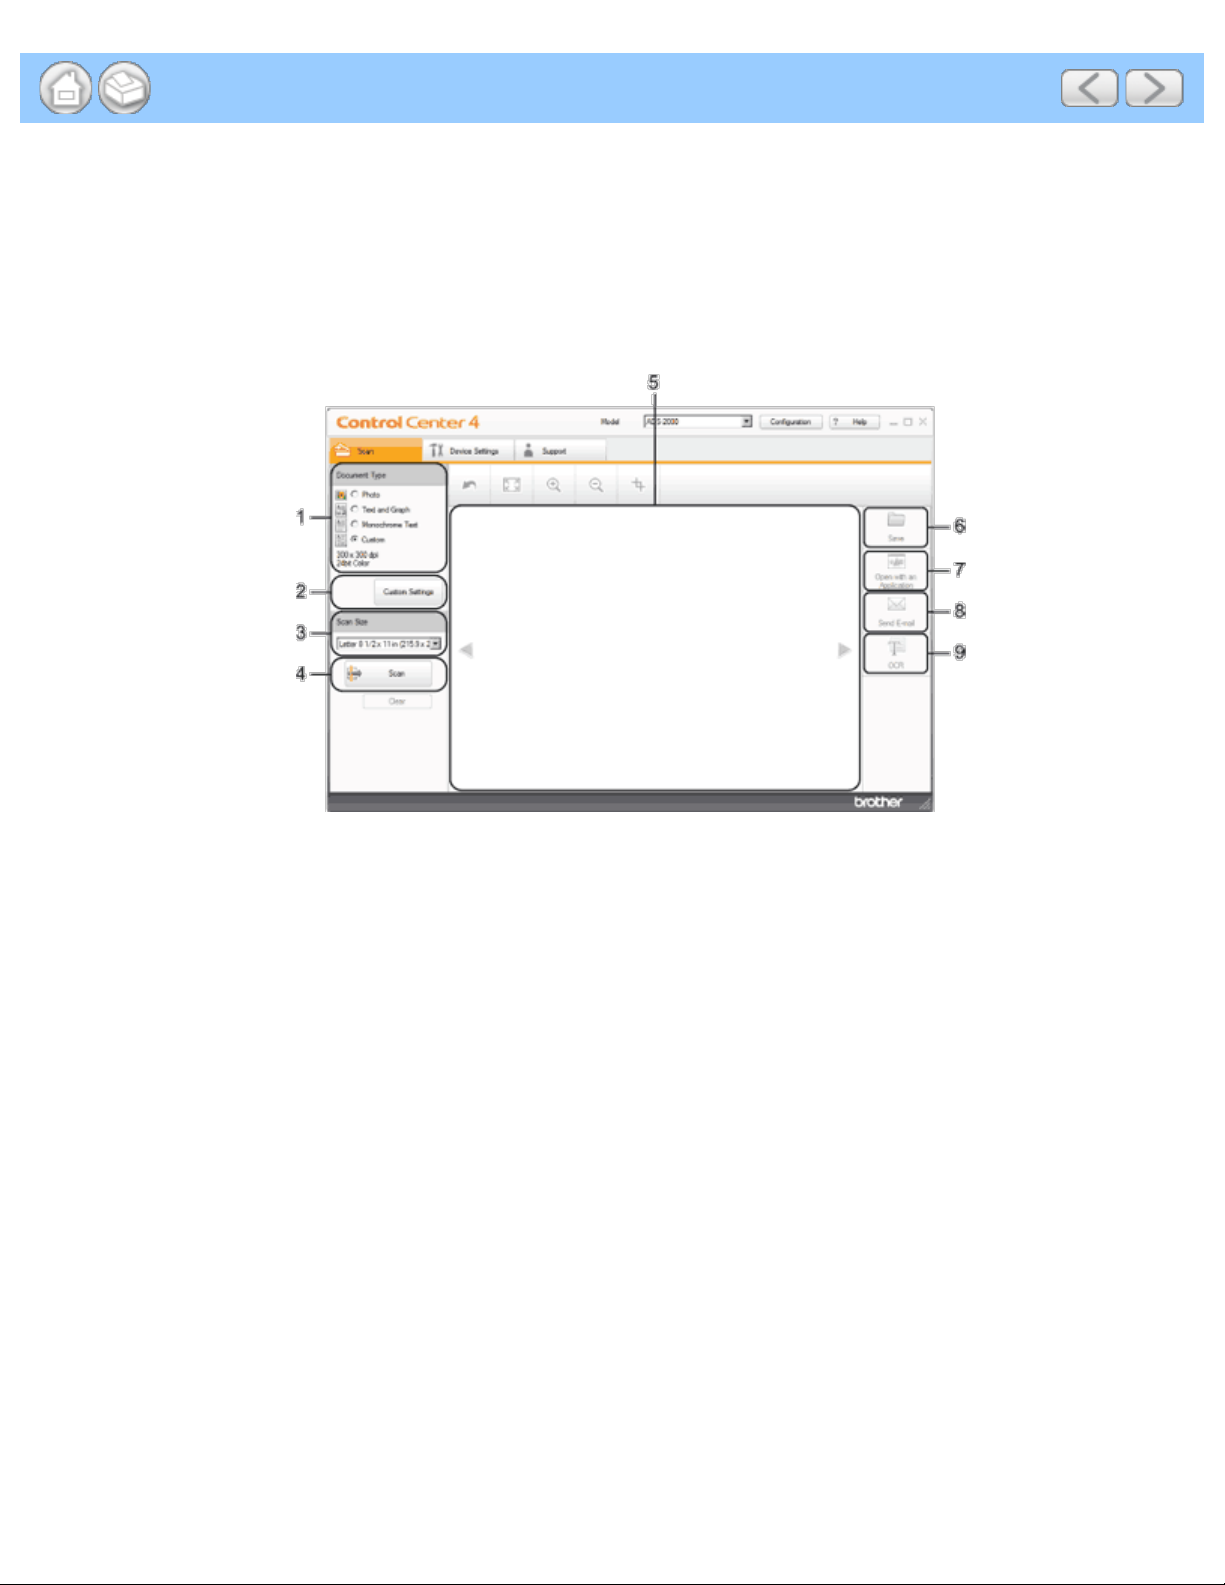
ControlCenter4 has two operation modes: Home Mode and Advanced Mode. You can change the mode at any time.
• Home Mode
Lets you access your machine's main functions easily. You can intuitively use the functions without any settings.
1. Document Type option
Lets you select a document type.
2. Custom Settings button
Lets you configure scan settings.
3. Scan Size drop -down list
Lets you select a scan size.
4. Scan button
Lets you start scanning.
5. Image viewer
Displays a scanned image.
6. Save button
Lets you save a scanned image to a folder on your hard disk in one of the file types shown in the file
attachment list.
7. Open with an Application button
Lets you scan an image directly into your graphics application for image editing.
8. Send E-mail button
Lets you scan a document to your default E-mail application.
9. OCR button
Lets you scan a document and convert it to text.
• Advanced Mode

Scan From Your Computer
file:///C|/Documents%20and%20Settings/mcampbell.AM/My%20Documents/ADS2000solutions/chapter3.html[3/11/2013 10:23:27 AM]
Gives you more control over the details of your machine's functions. You can also customize one-button scan
actions as you like.
1. Image button
Lets you scan a document directly into any graphic viewer/editor application.
2. OCR button
Lets you scan a document and convert it to text.
3. E-mail button
Lets you scan a document to your default E-mail application.
4. File button
Lets you save a scanned image to a folder on your hard disk in one of the file types shown in the file
attachment list.
To change the operation mode, perform the following steps.
1
Click the (ControlCenter4) icon in the task tray and then select Open from the menu.
The ControlCenter4 window will appear.
Note
You can also start ControlCenter4 by doing one of the following:
•
(Windows
®
XP, Windows Vista
®
)
Double- click the
(ControlCenter4) icon in the task tray.

Scan From Your Computer
file:///C|/Documents%20and%20Settings/mcampbell.AM/My%20Documents/ADS2000solutions/chapter3.html[3/11/2013 10:23:27 AM]
• Click ControlCenter4 located in Start/All Programs/Brother/ADS-XXXX (where XXXX is your model
name).
2
Click Configuration and then select Mode Select .
3
Select Home Mode or Advanced Mode in the mode dialog box.
Page Top
Scan Using the Scan Key on the Control Panel of the Machine
file:///C|/Documents%20and%20Settings/mcampbell.AM/My%20Documents/ADS2000solutions/chapter4.html[3/11/2013 10:23:28 AM]
4 Scan Using the Scan Key on the Control Panel of the Machine
Scan Using the Scan Key on the Control Panel of the Machine (Windows
®
)
• Scan to PDF
• Scan Photos and Graphics
• Scan to E-mail attachment
• Scan to an Editable Text File (OCR)
• Change the Feature Assigned to the Scan to PC Key to set the Default Scan-to Action
• Save Scanned Documents to a USB Flash Memory Drive
• Save Scanned Documents on Mobile Devices
Scan to PDF
You can scan and save documents as PDF files using the Scan to Image feature.
1
Click the (ControlCenter4) icon in the task tray and then select Open from the menu.
The ControlCenter4 window will appear.
Note
You can also start ControlCenter4 by doing one of the following:
•
(Windows
®
XP, Windows Vista
®
)
Double- click the
(ControlCenter4) icon in the task tray.
• Click ControlCenter4 located in Start/All Programs/Brother/ADS-XXXX (where XXXX is your model
name).
2
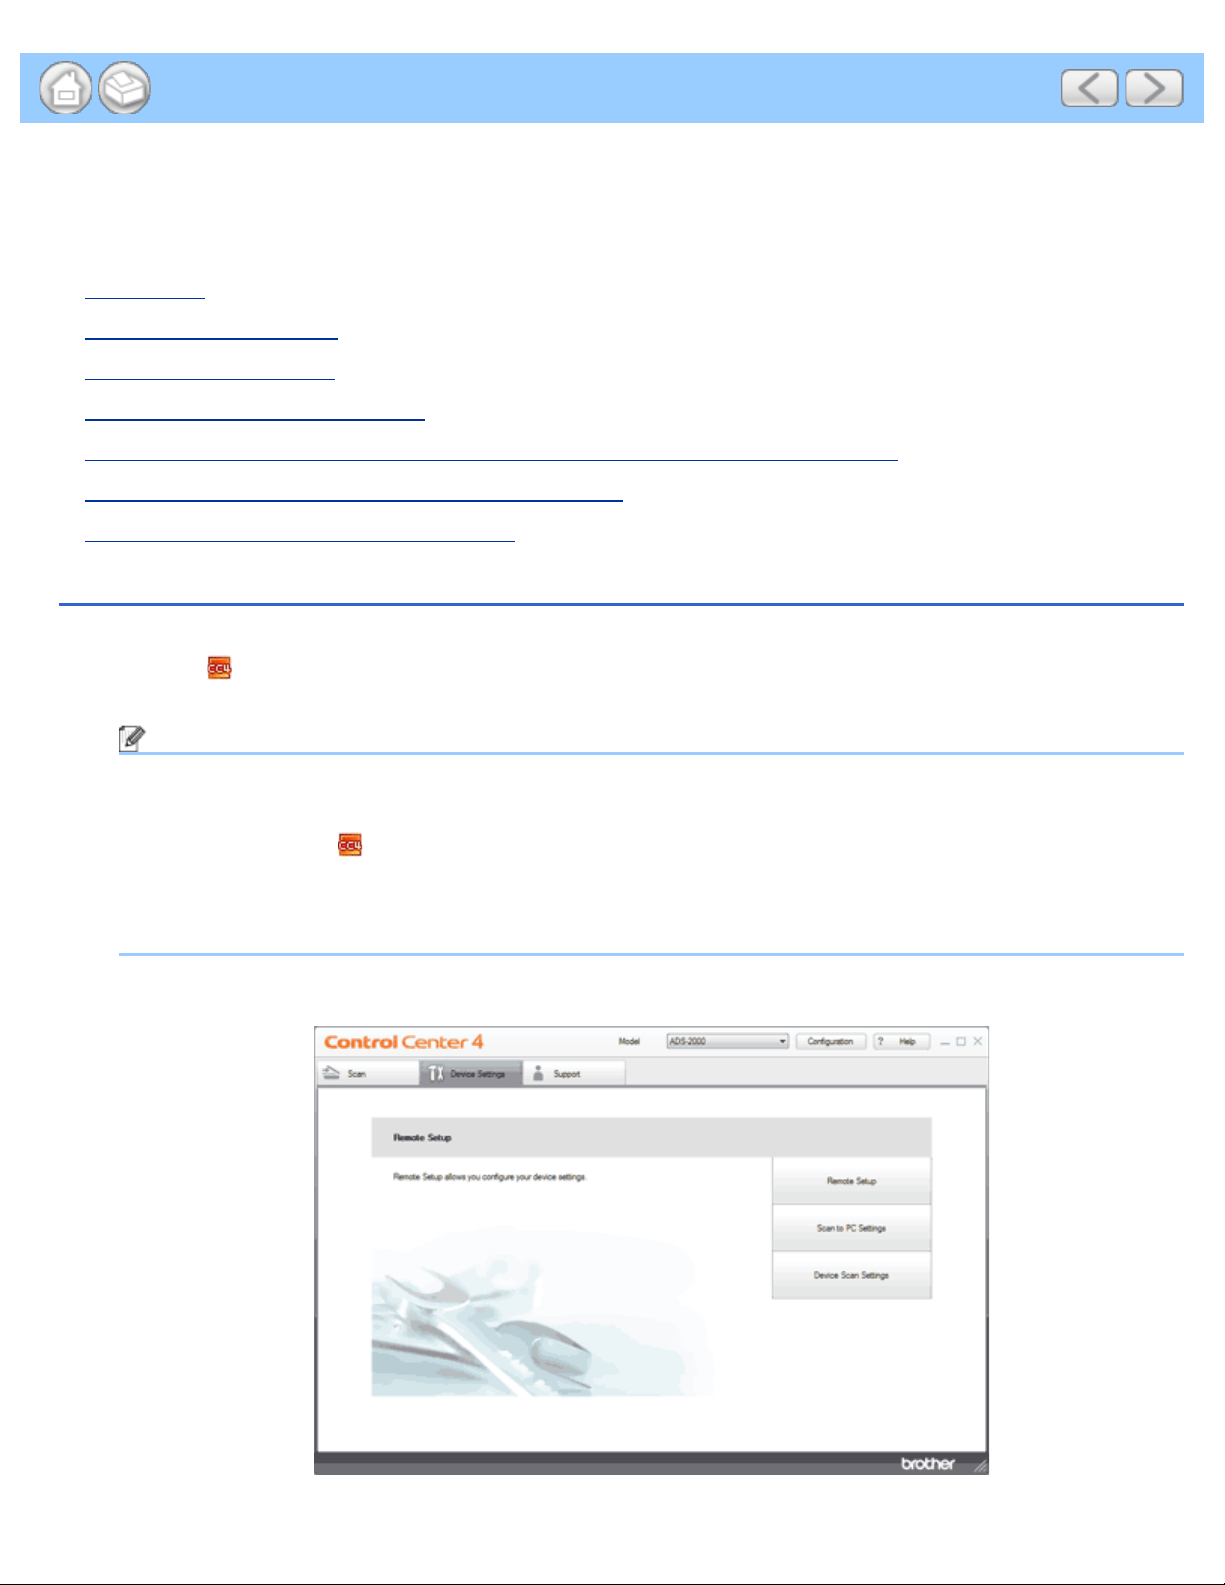
Click the Device Settings tab (the example below uses Home Mode).

Scan Using the Scan Key on the Control Panel of the Machine
file:///C|/Documents%20and%20Settings/mcampbell.AM/My%20Documents/ADS2000solutions/chapter4.html[3/11/2013 10:23:28 AM]
3
Click the Scan to PC Settings button. The Remote Setup window will appear.
4
Select Image from the drop-down list.
5
Click the OK button to close the Remote Setup window.
6
Click the Device Scan Settings button on the Device Settings tab. The Device Scan Settings dialog box will
appear.
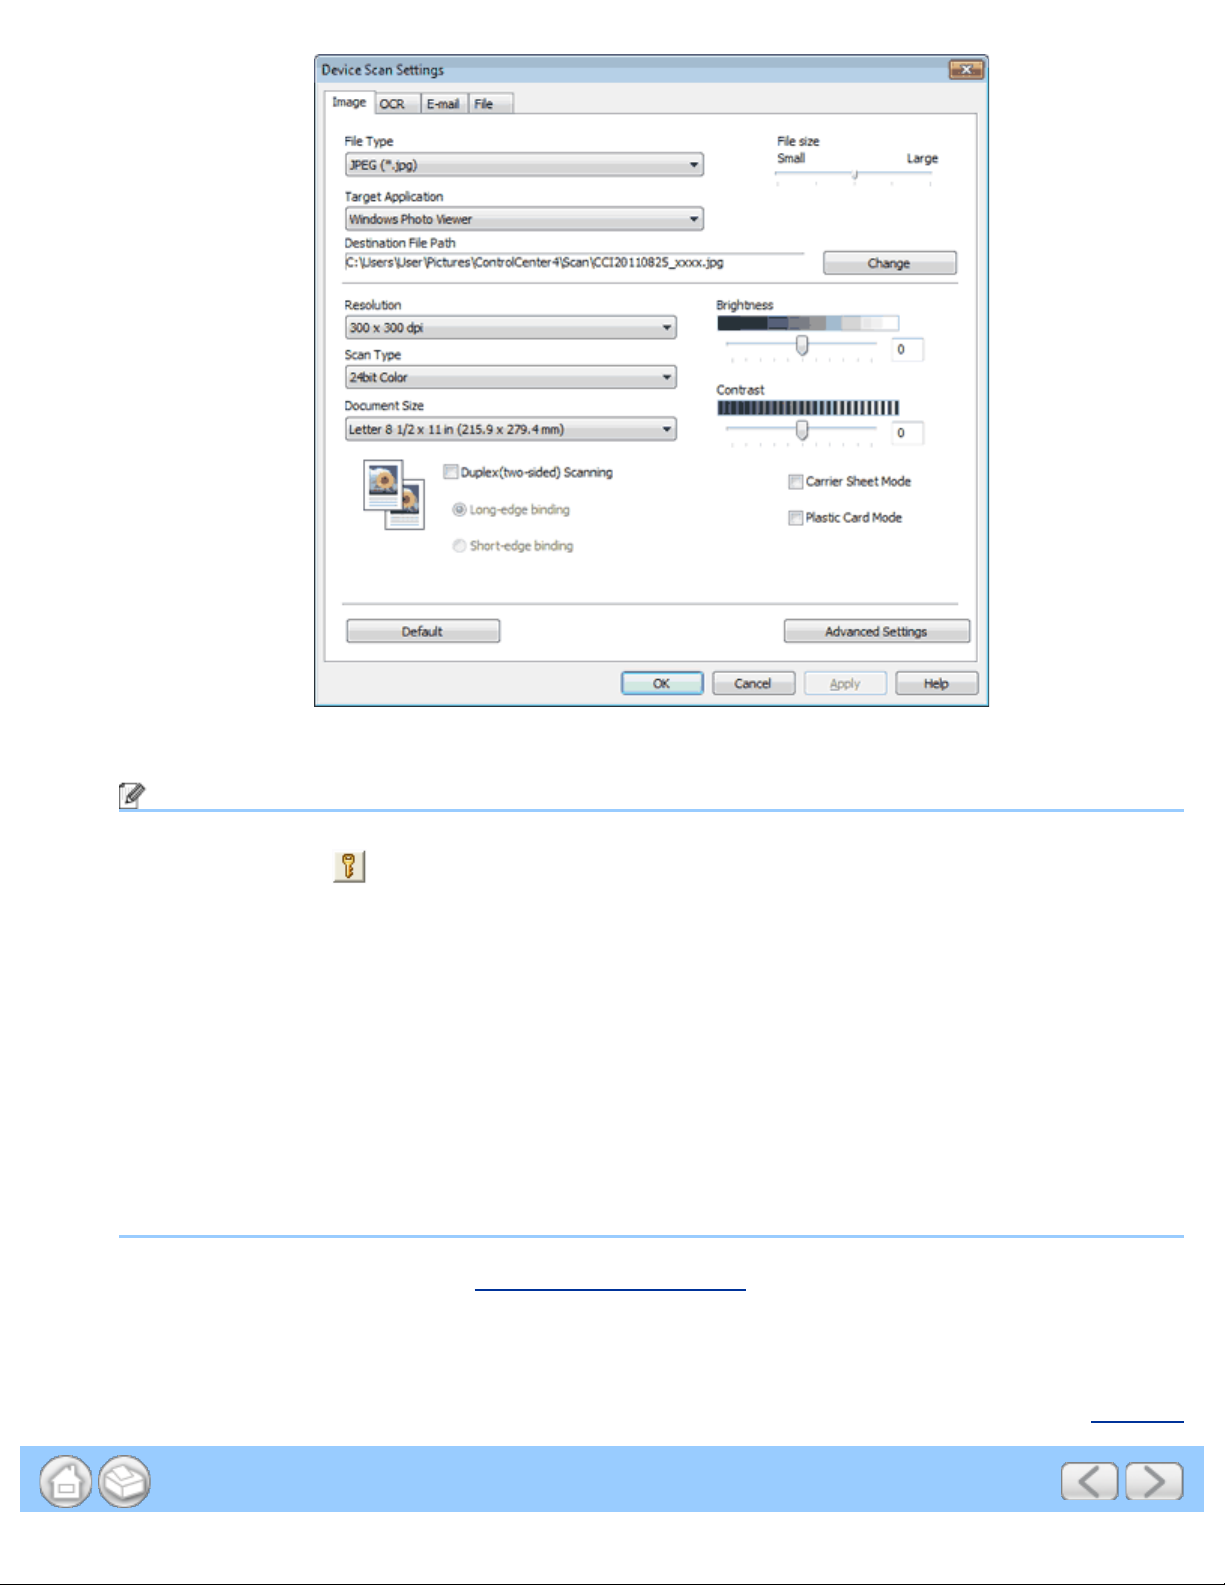
7
Click the Image tab.
Scan Using the Scan Key on the Control Panel of the Machine
file:///C|/Documents%20and%20Settings/mcampbell.AM/My%20Documents/ADS2000solutions/chapter4.html[3/11/2013 10:23:28 AM]
8
Select PDF from the File Type drop-down list.
Note
•
To save the document as a password-protected PDF, select Secure PDF (*.pdf) from the File Type drop-
down list, click the
(Set PDF Password) button, and enter the password.
• Searchable PDF is a file format that includes the text data layer over a scanned image. This layer allows
you to search the text on the image data. The OCR language setting must be set to match the language
you want to make the searchable PDF for.
• To save the document as a searchable PDF, select Searchable PDF (*.pdf) from the File Type drop-down
list.
• To save the document as a searchable PDF, Nuance™ PaperPort™12SE must be installed on your
computer.
• Several file types such as TIFF, TIFF Multi-Page, PDF, Secure PDF and JPEG support file size
compression. Select Uncompressed or Compressed to adjust the file size for TIFF or TIFF Multi-Page. For
PDF, Secure PDF and JPEG, use the slider to adjust the file size.
9
Change other settings if needed (see Change Scan to PC Settings).
10
Load your document.
11
Press Scan to PC. The machine starts scanning.
Page Top

Scan Using the Scan Key on the Control Panel of the Machine
file:///C|/Documents%20and%20Settings/mcampbell.AM/My%20Documents/ADS2000solutions/chapter4.html[3/11/2013 10:23:28 AM]
Managing the Machine from Your Computer
file:///C|/Documents%20and%20Settings/mcampbell.AM/My%20Documents/ADS2000solutions/chapter5.html[3/11/2013 10:23:28 AM]
5 Managing the Machine from Your Computer
Monitor the Status of the Machine from Your Computer (Windows
®
)
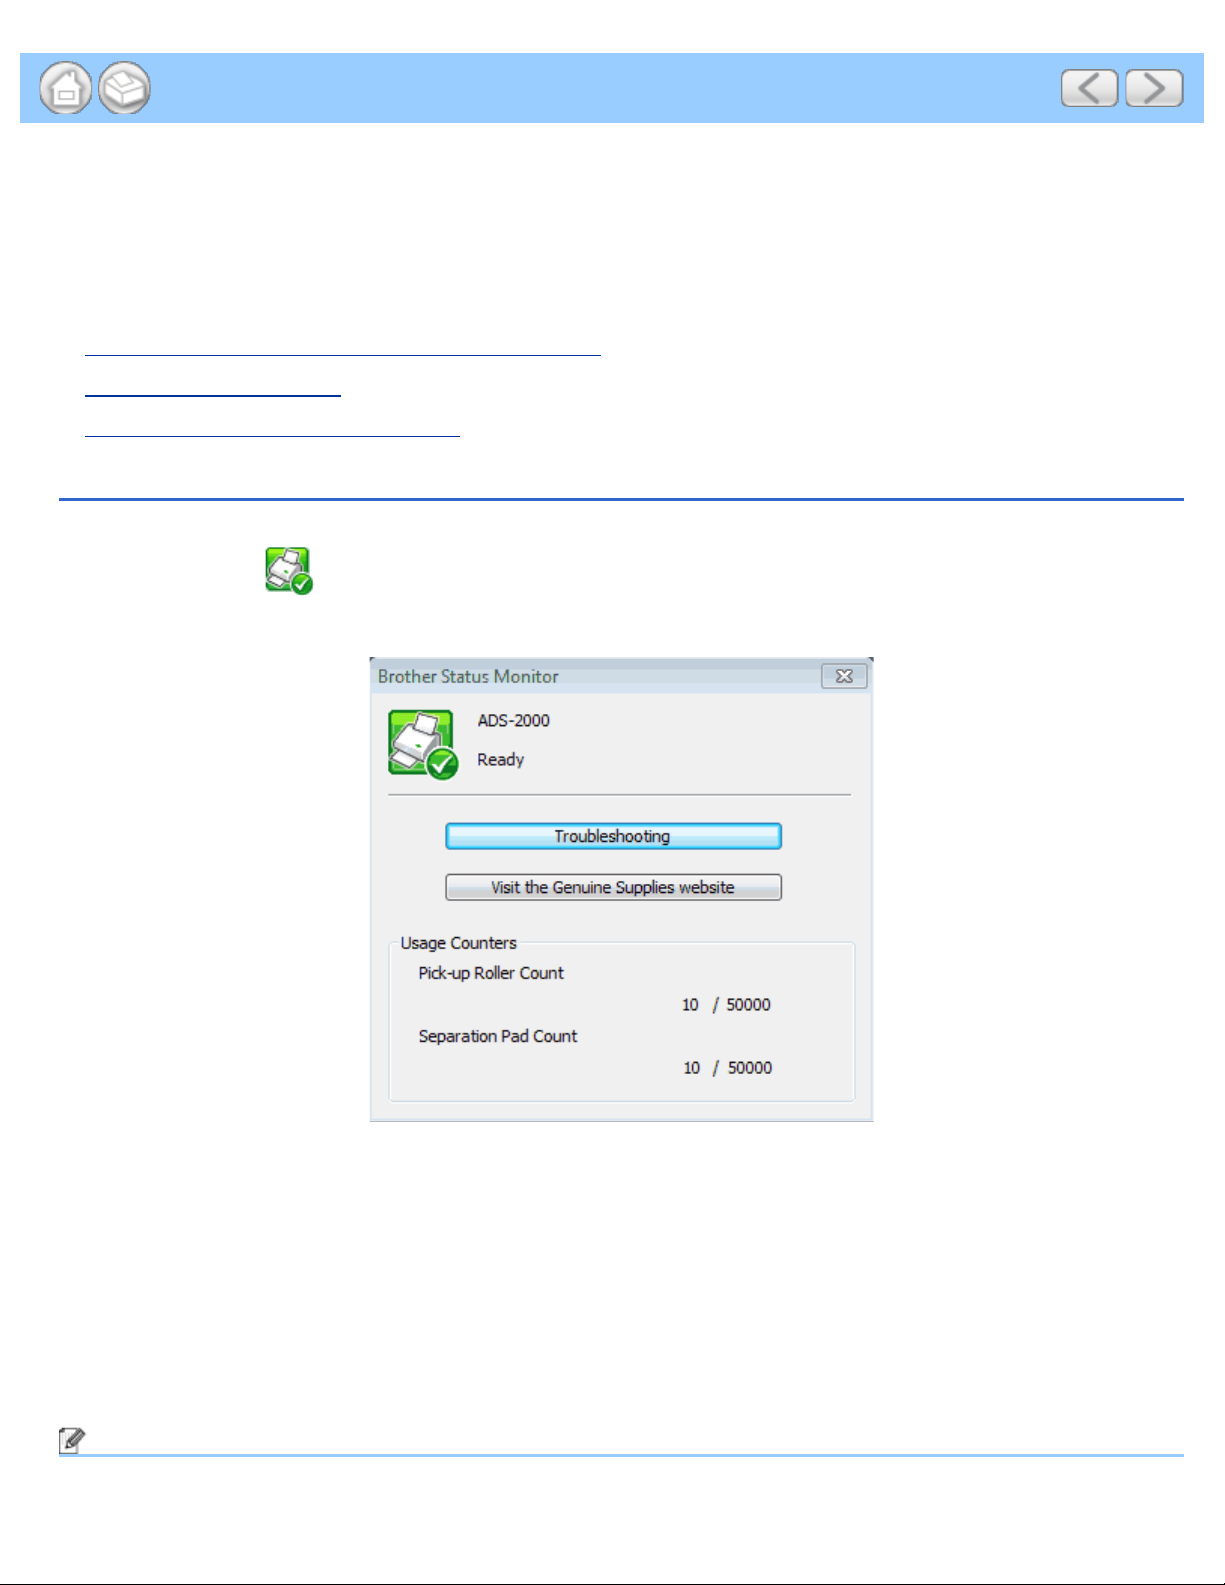
The Status Monitor utility is a configurable software tool for monitoring the status of one or more devices, allowing you
to get immediate notification of error messages such as document jam.
• Monitor the Status of the Machine from Your Computer
• Turn Off the Status Monitor
• What are the Status Monitor Indicators?
Monitor the Status of the Machine from Your Computer
Do one of the following:
1.
Double- click the
icon in the task tray.
2. Select Status Monitor located in Start/All Programs/Brother/ADS-XXXX on your computer.
• Troubleshooting
Lets you access the troubleshooting web site by clicking the Troubleshooting button.
• Visit the Genuine Supplies website
Lets you access the Brother genuine supplies web site by clicking the Visit the Genuine Supplies website button.
• Pick-up Roller Count
Displays the Pick-up Roller replacement cycle.
• Separation Pad Count
Displays the Separation Pad replacement cycle.
Note
For more information about using the Status Monitor software, right-click the Brother Status Monitor icon and

Managing the Machine from Your Computer
file:///C|/Documents%20and%20Settings/mcampbell.AM/My%20Documents/ADS2000solutions/chapter5.html[3/11/2013 10:23:28 AM]
select Help.
Page Top
Routine Maintenance
file:///C|/Documents%20and%20Settings/mcampbell.AM/My%20Documents/ADS2000solutions/chapter6.html[3/11/2013 10:23:29 AM]
6 Routine Maintenance
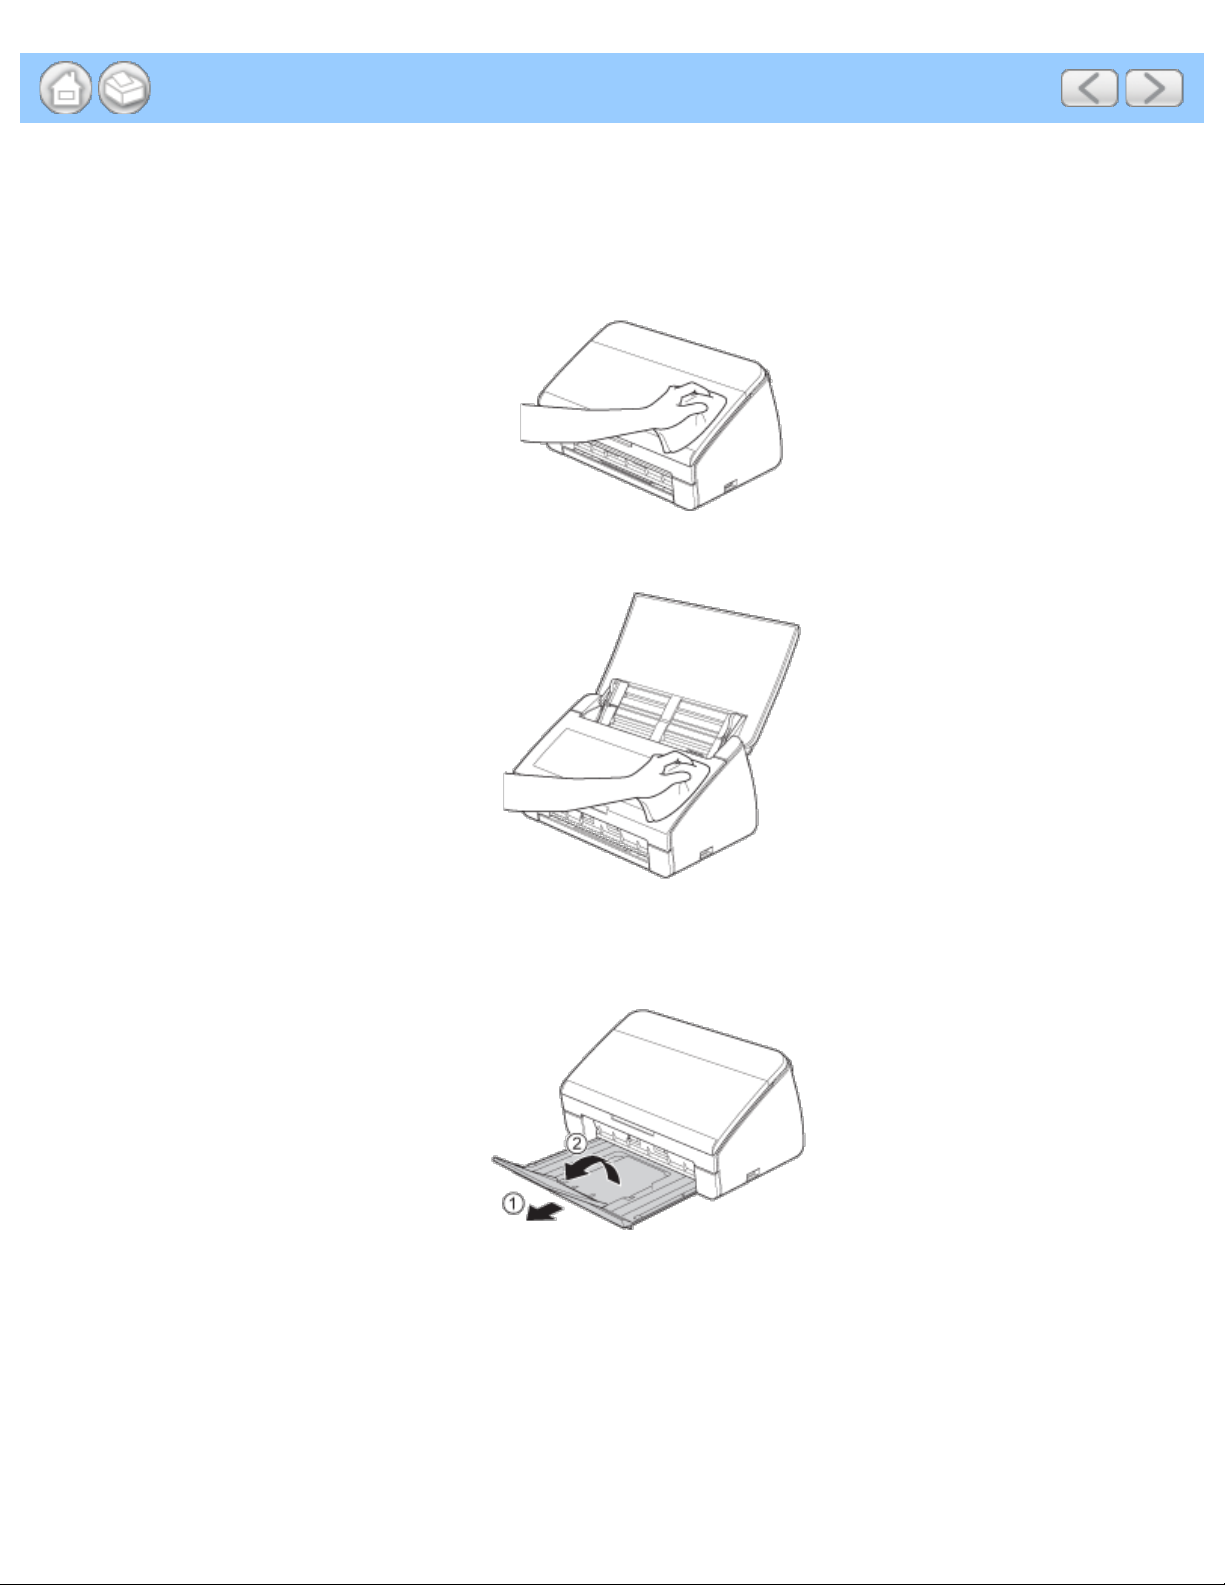
Clean the Outside of the Machine
1
Wipe the outside of the machine with a dry, soft, and lint-free cloth to remove dust.
2
Open the Top Cover. Wipe the Control Panel with a dry, soft, and lint -free cloth to remove dust.
3
Close the Top Cover.
4
Pull the Output Tray (1) out and unfold the Document Stopper (2).
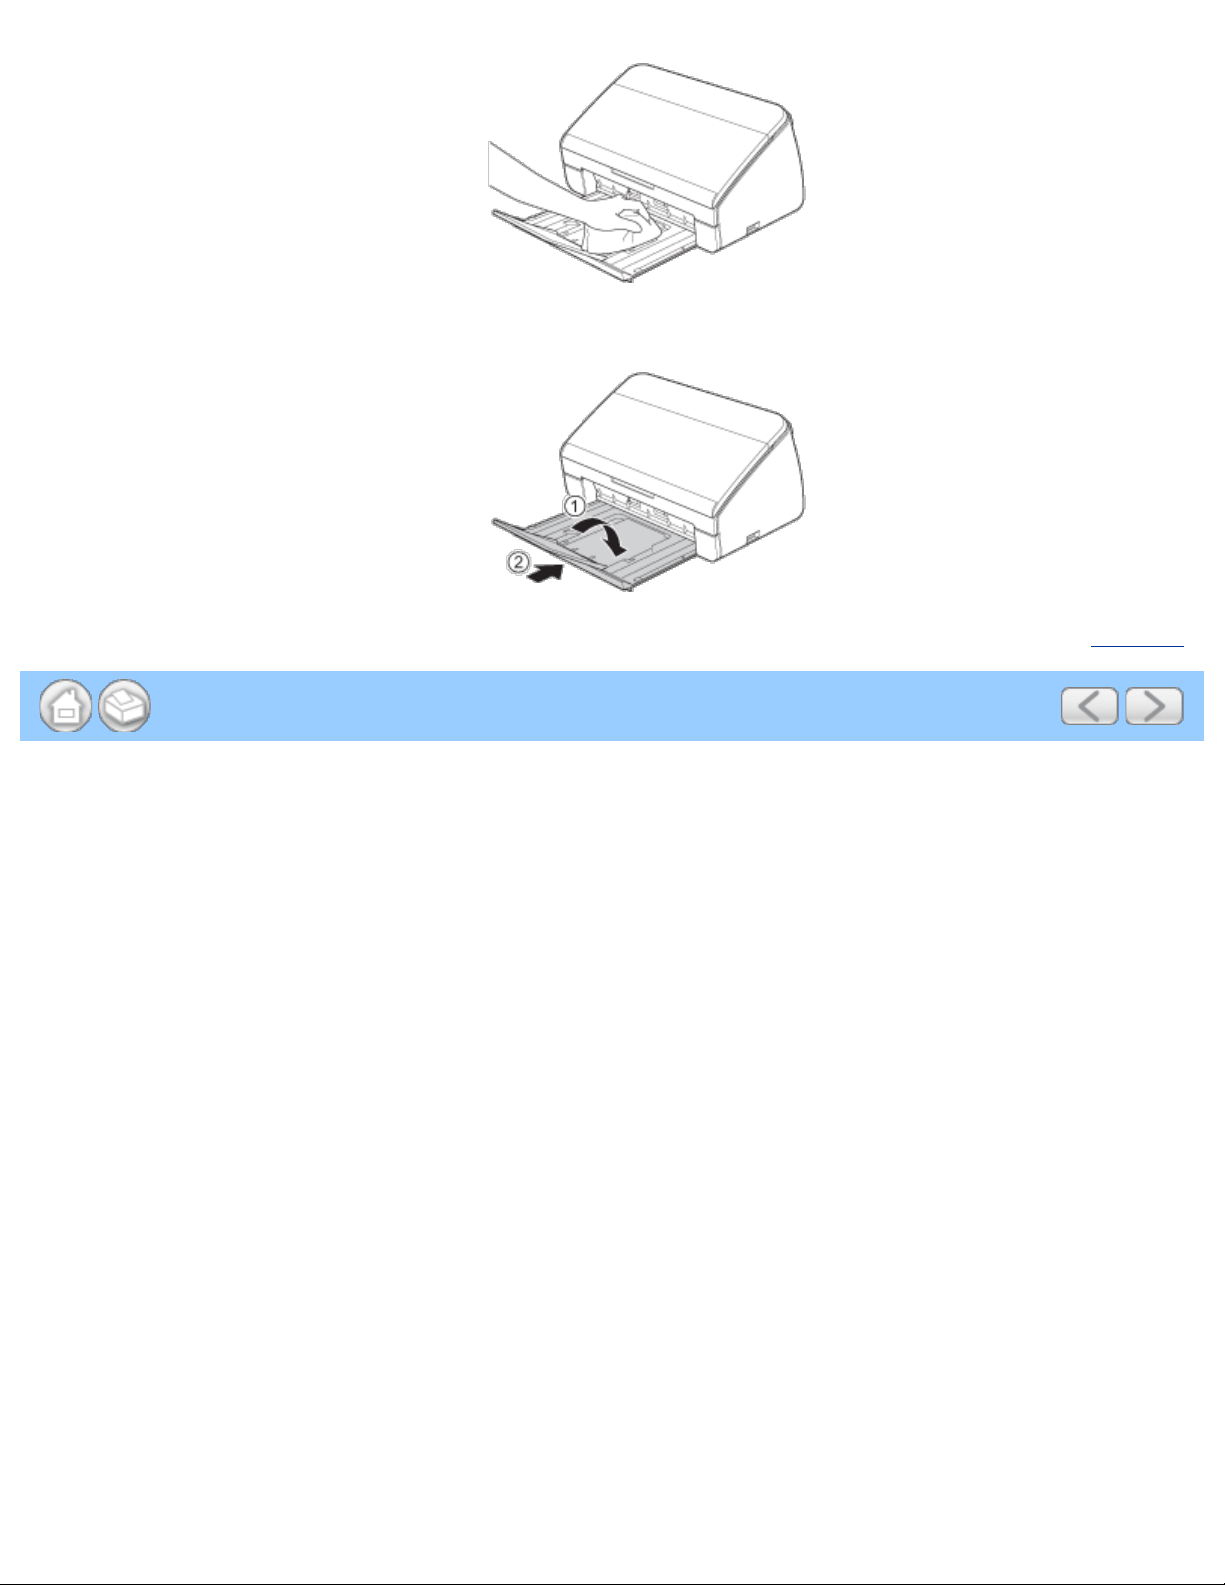
5
Wipe the inside of the Output Tray with a dry, soft, and lint-free cloth to remove dust.
Routine Maintenance
file:///C|/Documents%20and%20Settings/mcampbell.AM/My%20Documents/ADS2000solutions/chapter6.html[3/11/2013 10:23:29 AM]
6
Fold the Document Stopper and firmly insert the Output Tray into the machine.
Page Top

Troubleshooting
file:///C|/Documents%20and%20Settings/mcampbell.AM/My%20Documents/ADS2000solutions/chapter7.html[3/11/2013 10:23:30 AM]
7 Troubleshooting
Identifying Your Problem
First, check the following:
• The AC power cord is connected properly and the machine is turned on.
• All of the protective parts have been removed.
• The Front Cover, Separation Pad Cover and Pick-up Roller Cover are completely closed.
• The interface cable is securely connected to the machine and the computer.
• The correct driver for the machine has been installed.
• The computer is connected to the correct port on the machine.
Machine does not scan:
If you did not solve your problem with the above checks, identify your problem and then go to the page suggested
below.
• Machine’s LEDs are blinking
See LED Indications
.
• Status Monitor Error Message appears
See Error Messages in the Status Monitor
.
• Other scanning difficulties
See Scanning Difficulties
.
Other difficulties:
• Software difficulties
See Software Difficulties
.
• Other difficulties
See Other Difficulties
.
Page Top
Specifications
file:///C|/Documents%20and%20Settings/mcampbell.AM/My%20Documents/ADS2000solutions/appendix11.html[3/11/2013 10:23:30 AM]
A Specifications
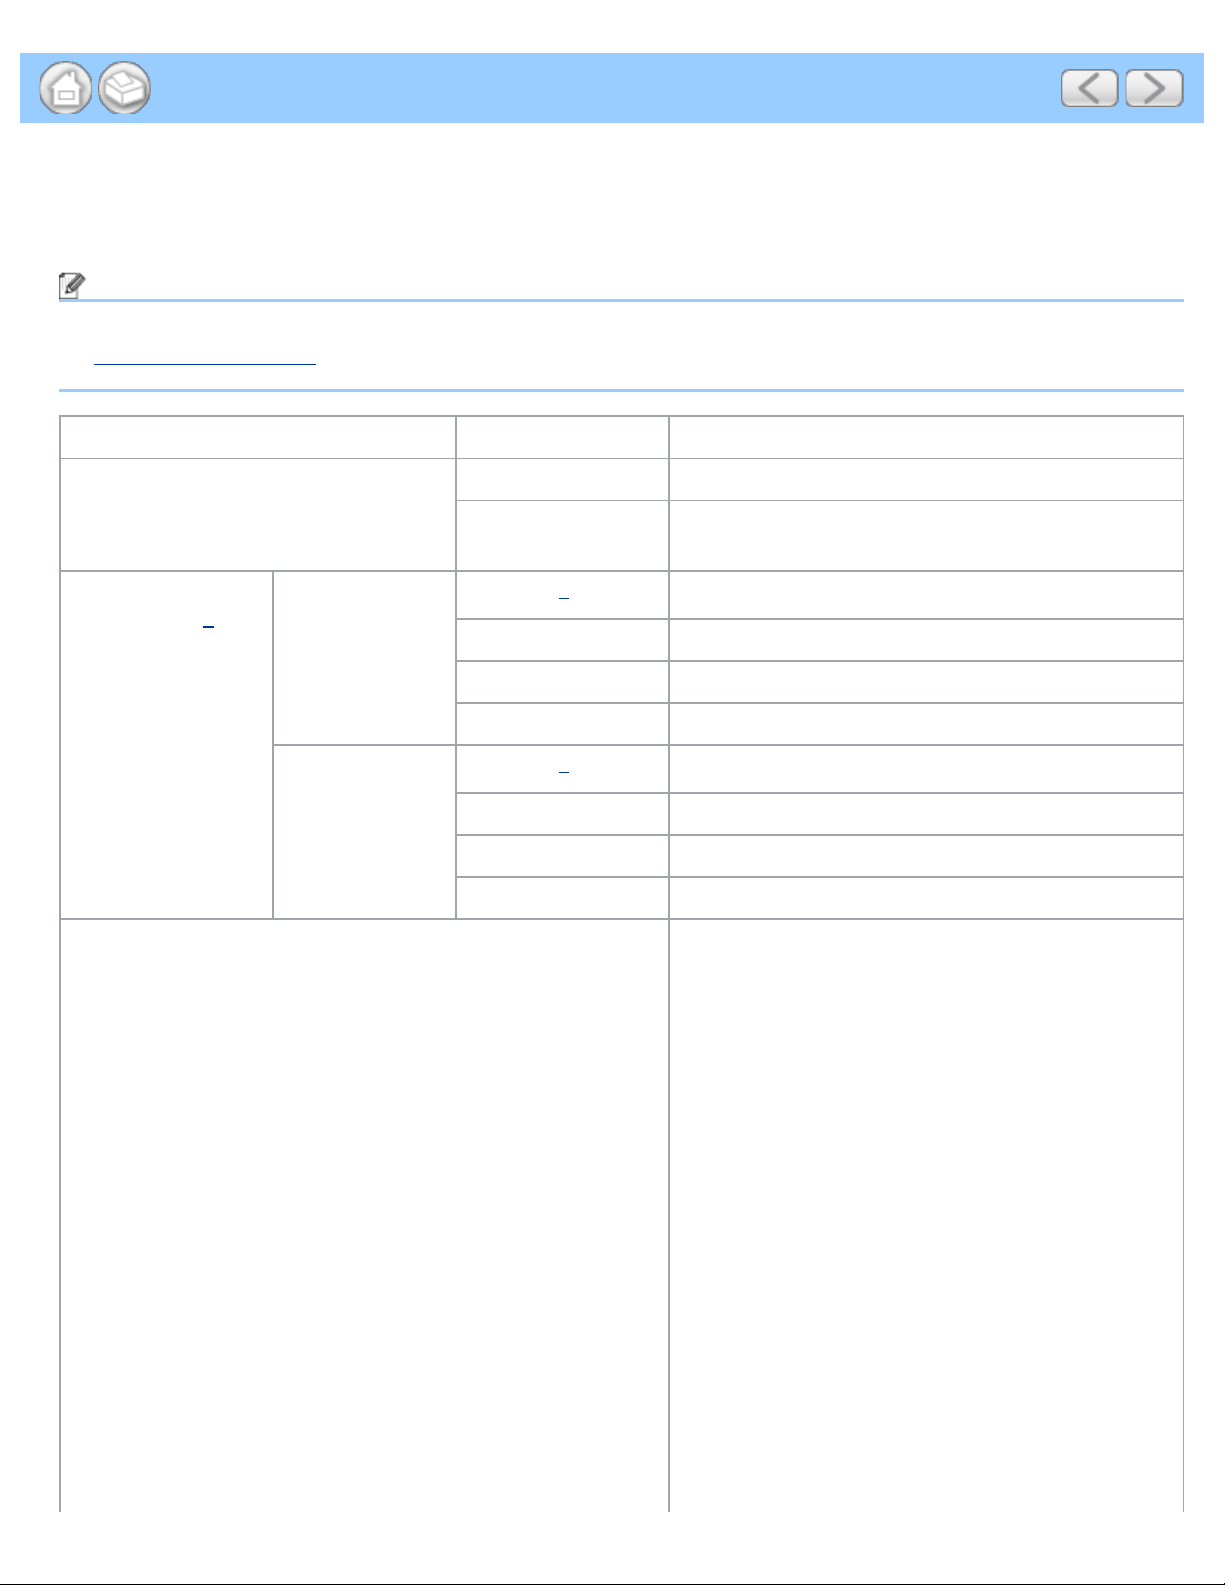
General
Note
This chapter provides a summary of the machine’s specifications. For additional specifications, visit
http://www.brother.com/
for details.
Memory Capacity Standard 256 MB
Power Source USA 100 - 120 V AC 50/60 Hz
Latin American
Countries
220 - 240 V AC 50/60 Hz
Power
Consumption
1
USA/Canada
Scanning
2
Approx. 18 W
Ready Approx. 7 W
Sleep Approx. 1.5 W
Power Down Approx. 0.25 W
Latin American
Countries
Scanning
2
Approx. 18 W
Ready Approx. 7 W
Sleep Approx. 1.5 W
Power Down Approx. 0.3 W
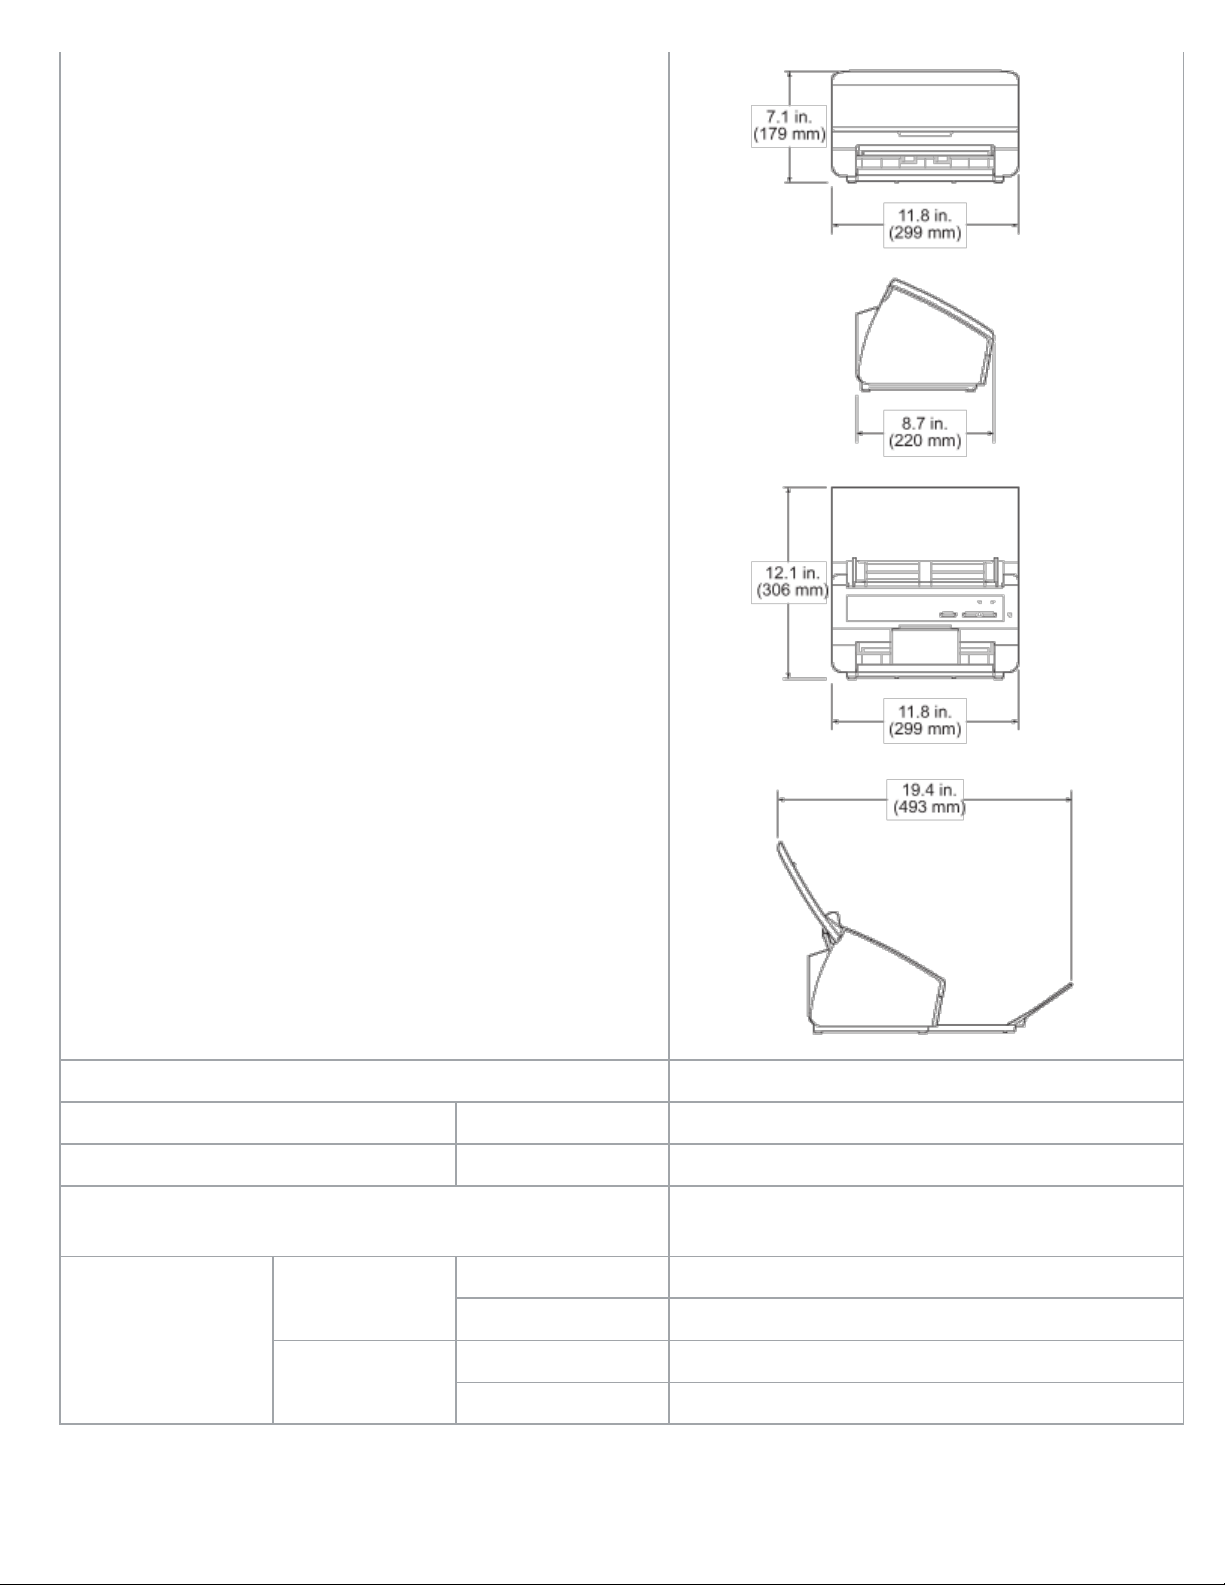
Dimensions
Specifications
file:///C|/Documents%20and%20Settings/mcampbell.AM/My%20Documents/ADS2000solutions/appendix11.html[3/11/2013 10:23:30 AM]
Weights Approx. 7.3 lb (3.3 kg)
Temperature Operating 41 to 95 °F (5 to 35 °C)
Humidity Operating 20 to 80 %
ADF (automatic document feeder)
Up to 50 pages (Paper: 20 lb (80 g/m
2
) Letter or A4
size, or less than 0.2 in. (5 mm))
Document Size Multiple Paper Width 2.0 in. to 8.5 in. (51 mm to 215.9 mm)
Length 2.76 in. to 11.7 in. (70 mm to 297 mm)
Single Paper Width 2.0 in. to 8.5 in. (51 mm to 215.9 mm)
Length 2.76 in. to 34.0 in. (70 mm to 863 mm)
1
Measured when the machine is connected to your computer.
2
When 2- sided (duplex) scanning.

Specifications
file:///C|/Documents%20and%20Settings/mcampbell.AM/My%20Documents/ADS2000solutions/appendix11.html[3/11/2013 10:23:30 AM]
Page Top

Appendix
file:///C|/Documents%20and%20Settings/mcampbell.AM/My%20Documents/ADS2000solutions/appendix12.html[3/11/2013 10:23:31 AM]
B Appendix
Brother Numbers
Important
For technical help, you must call the country where you bought the machine. Calls must be made from within that
country.
• Register Your Product
• FAQs (frequently asked questions)
• For Customer Service
Register Your Product
By registering your product with Brother International Corporation, you will be recorded as the original owner of the
product. Your registration with Brother:
• may serve as confirmation of the purchase date of your product should you lose your receipt;
• may support an insurance claim by you in the event of product loss covered by insurance; and,
• will help us notify you of enhancements to your product and special offers.
Please complete and fax the Brother Warranty Registration And Test Sheet or, for your convenience and most efficient
way to register your new product, register on-line at
http://www.brother.com/registration/
Page Top

index
file:///C|/Documents%20and%20Settings/mcampbell.AM/My%20Documents/ADS2000solutions/keyindex.html[3/11/2013 10:23:32 AM]
Index
B
Brother
Brother numbers
Brother Numbers
Customer Service For Customer Service
FAQs (frequently asked questions) FAQs (frequently asked questions)
product support For Customer Service
Solutions Center FAQs (frequently asked questions)
C
ControlCenter2
Macintosh
Scan Using ControlCenter2 (Macintosh)
Scan Using the Scan Key on the Control
Panel of the Machine (Macintosh)
Change Scan to PC Key Settings (Macintosh)
Change Scan to USB Key Settings
(Windows
®
and Macintosh)
Monitor the Status of the Machine from Your
Computer (Macintosh)
ControlCenter4
Windows
®
Change the User Interface of ControlCenter4
(Windows
®
)
Scan Using ControlCenter4 Home Mode
(Windows
®
)
Scan Using ControlCenter4 Advanced Mode
(Windows
®
)
Scan Using the Scan Key on the Control
Panel of the Machine (Windows
®
)
Change Scan to PC Key Settings (Windows
®
)
Change Scan to USB Key Settings
(Windows
®
and Macintosh)
D
Drivers
Macintosh

index
file:///C|/Documents%20and%20Settings/mcampbell.AM/My%20Documents/ADS2000solutions/keyindex.html[3/11/2013 10:23:32 AM]
ICA Scan Using Apple Image Capture
(ICA Driver - Mac OS X 10.6.x, 10.7.x)
TWAIN Scan Using Presto! PageManager or TWAIN
Applications (Macintosh)
Windows
®
TWAIN Scan Using Nuance™ PaperPort™12SE or
Other Windows
®
Applications
WIA Scan Using Nuance™ PaperPort™12SE or
Other Windows
®
Applications
N
Nuance™ PaperPort™12SE (Windows
®
)
Scan Using Nuance™ PaperPort™12SE or
Other Windows
®
Applications
P
Presto! PageManager (Macintosh) Scan Using Presto! PageManager or TWAIN
Applications (Macintosh)
R
Remote Setup Change Scan to USB Key Settings
(Windows
®
and Macintosh)
Set Up the Brother Machine from Your
Computer
Replace the Separation Pad
Replace the Pick-up Roller
S
Scan
Macintosh
ICA compliant
Scan Using Apple Image Capture
(ICA Driver - Mac OS X 10.6.x, 10.7.x)
Presto! PageManager Scan Using Presto! PageManager or TWAIN
Applications (Macintosh)
TWAIN compliant Scan Using Presto! PageManager or TWAIN
Applications (Macintosh)
Scan key
PC
Scan Using the Scan Key on the Control
Panel of the Machine (Windows
®
)
Change Scan to PC Key Settings (Windows
®
)
Scan Using the Scan Key on the Control

index
file:///C|/Documents%20and%20Settings/mcampbell.AM/My%20Documents/ADS2000solutions/keyindex.html[3/11/2013 10:23:32 AM]
Panel of the Machine (Macintosh)
Change Scan to PC Key Settings (Macintosh)
USB Save Scanned Documents to a USB Flash
Memory Drive
Save Scanned Documents on Mobile Devices
Save Scanned Documents to a USB Flash
Memory Drive
Save Scanned Documents on Mobile Devices
Change Scan to USB Key Settings
(Windows
®
and Macintosh)
Windows
®
Nuance™ PaperPort™12SE Scan Using Nuance™ PaperPort™12SE
TWAIN Compliant Scan Using Nuance™ PaperPort™12SE or
Other Windows
®
Applications
WIA Compliant Scan Using Nuance™ PaperPort™12SE or
Other Windows
®
Applications
Status Monitor
Macintosh
Monitor the Status of the Machine from Your
Computer (Macintosh)
Windows
®
Monitor the Status of the Machine from Your
Computer (Windows
®
)
About This Machine
file:///C|/Documents%20and%20Settings/mcampbell.AM/My%20Documents/ADS2000solutions/chapter1_2.html[3/11/2013 10:23:32 AM]
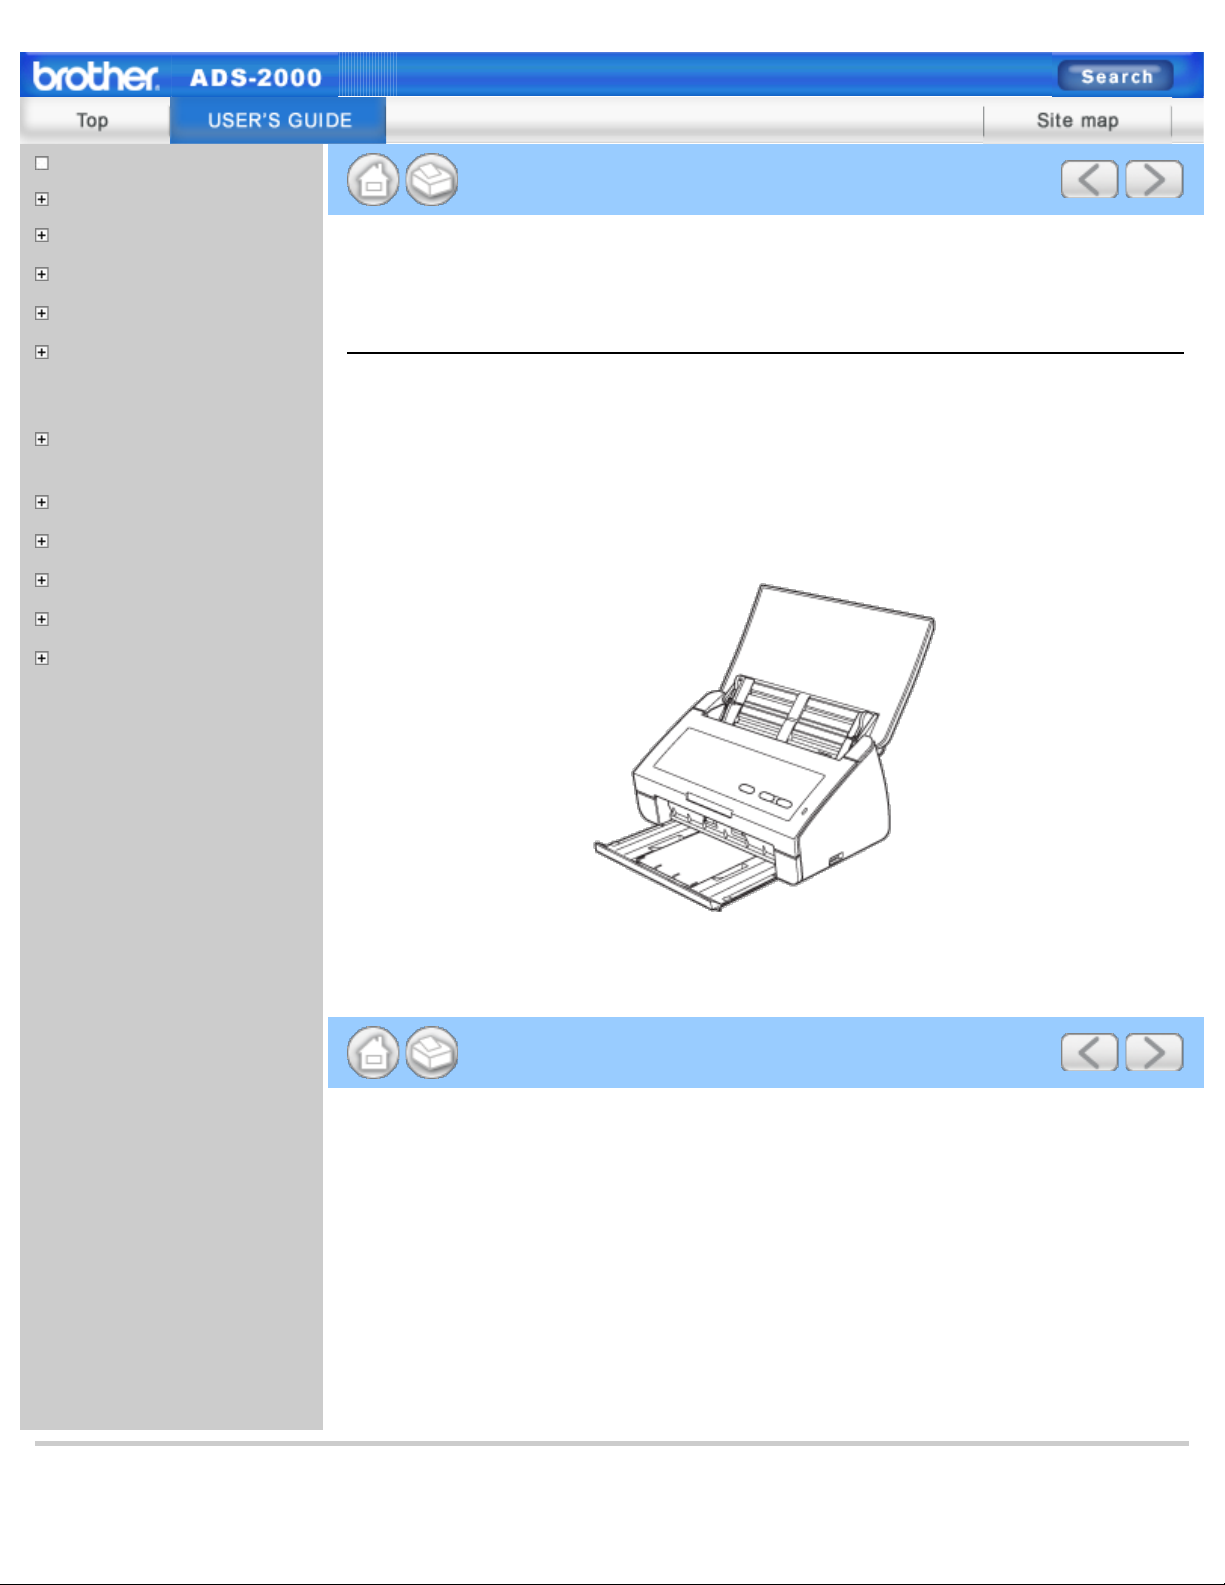
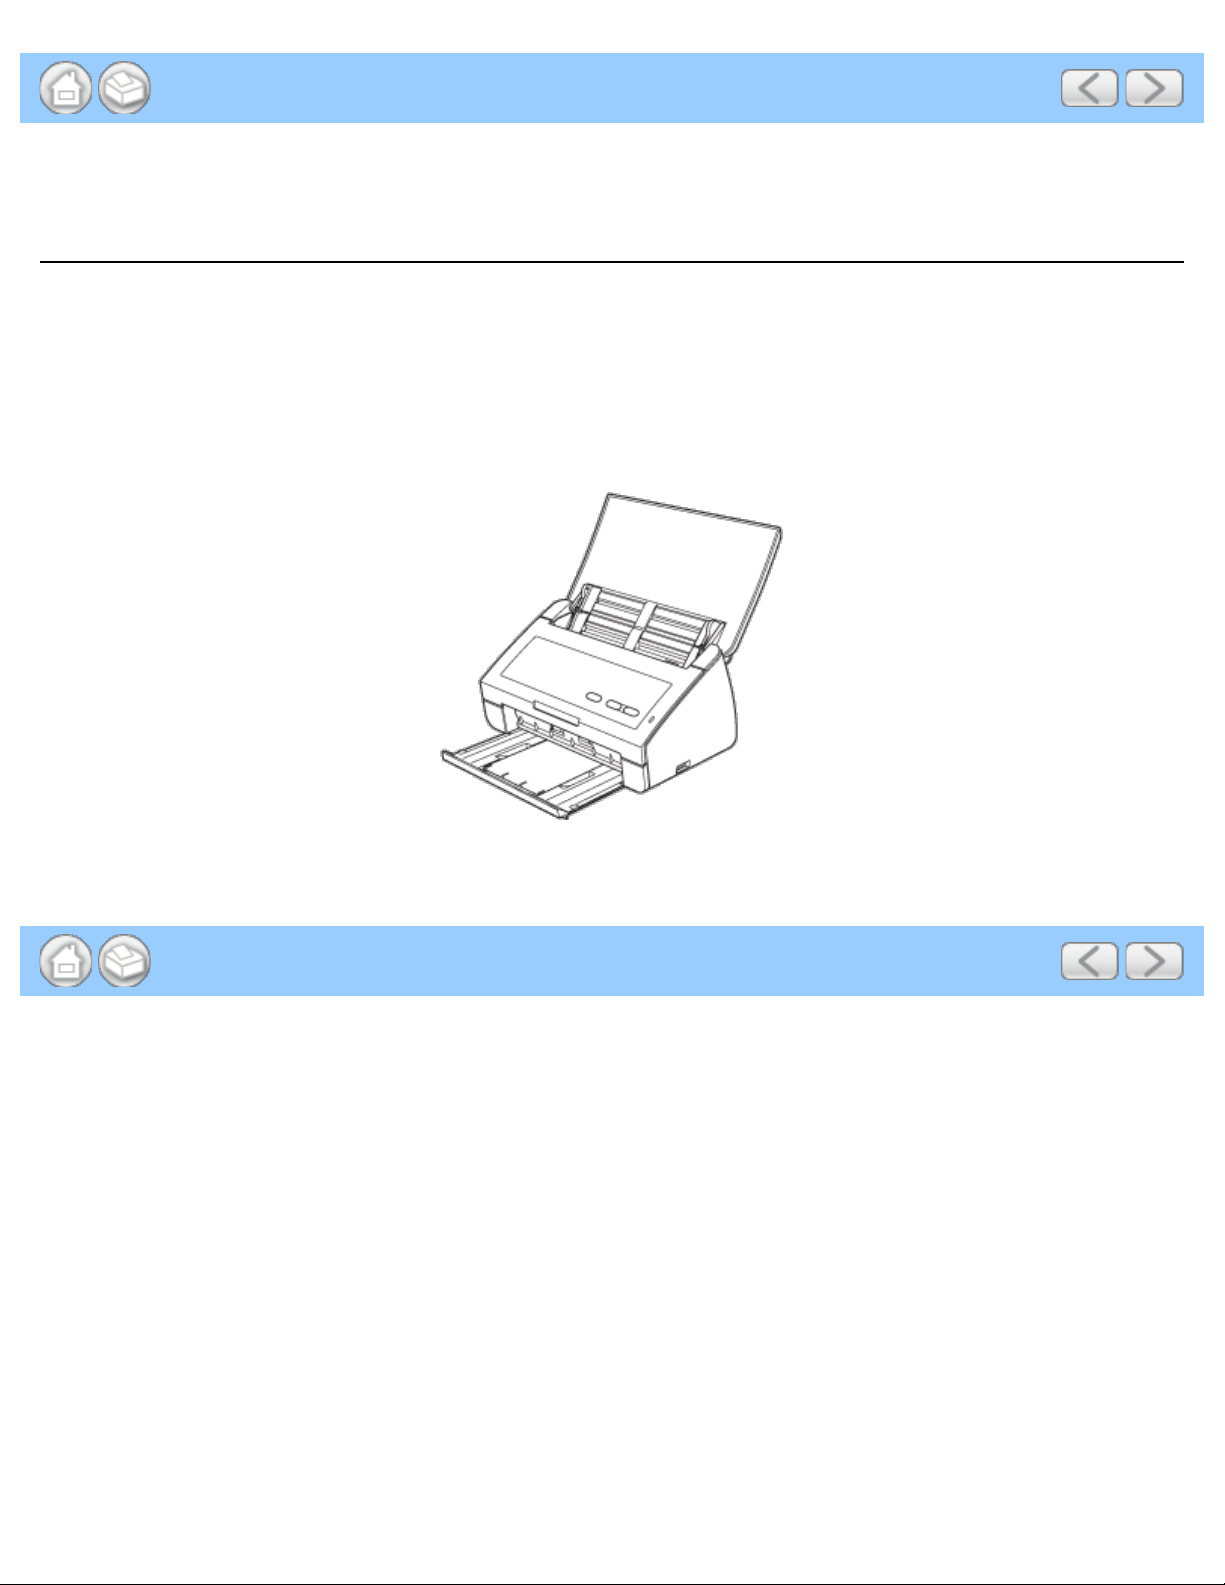
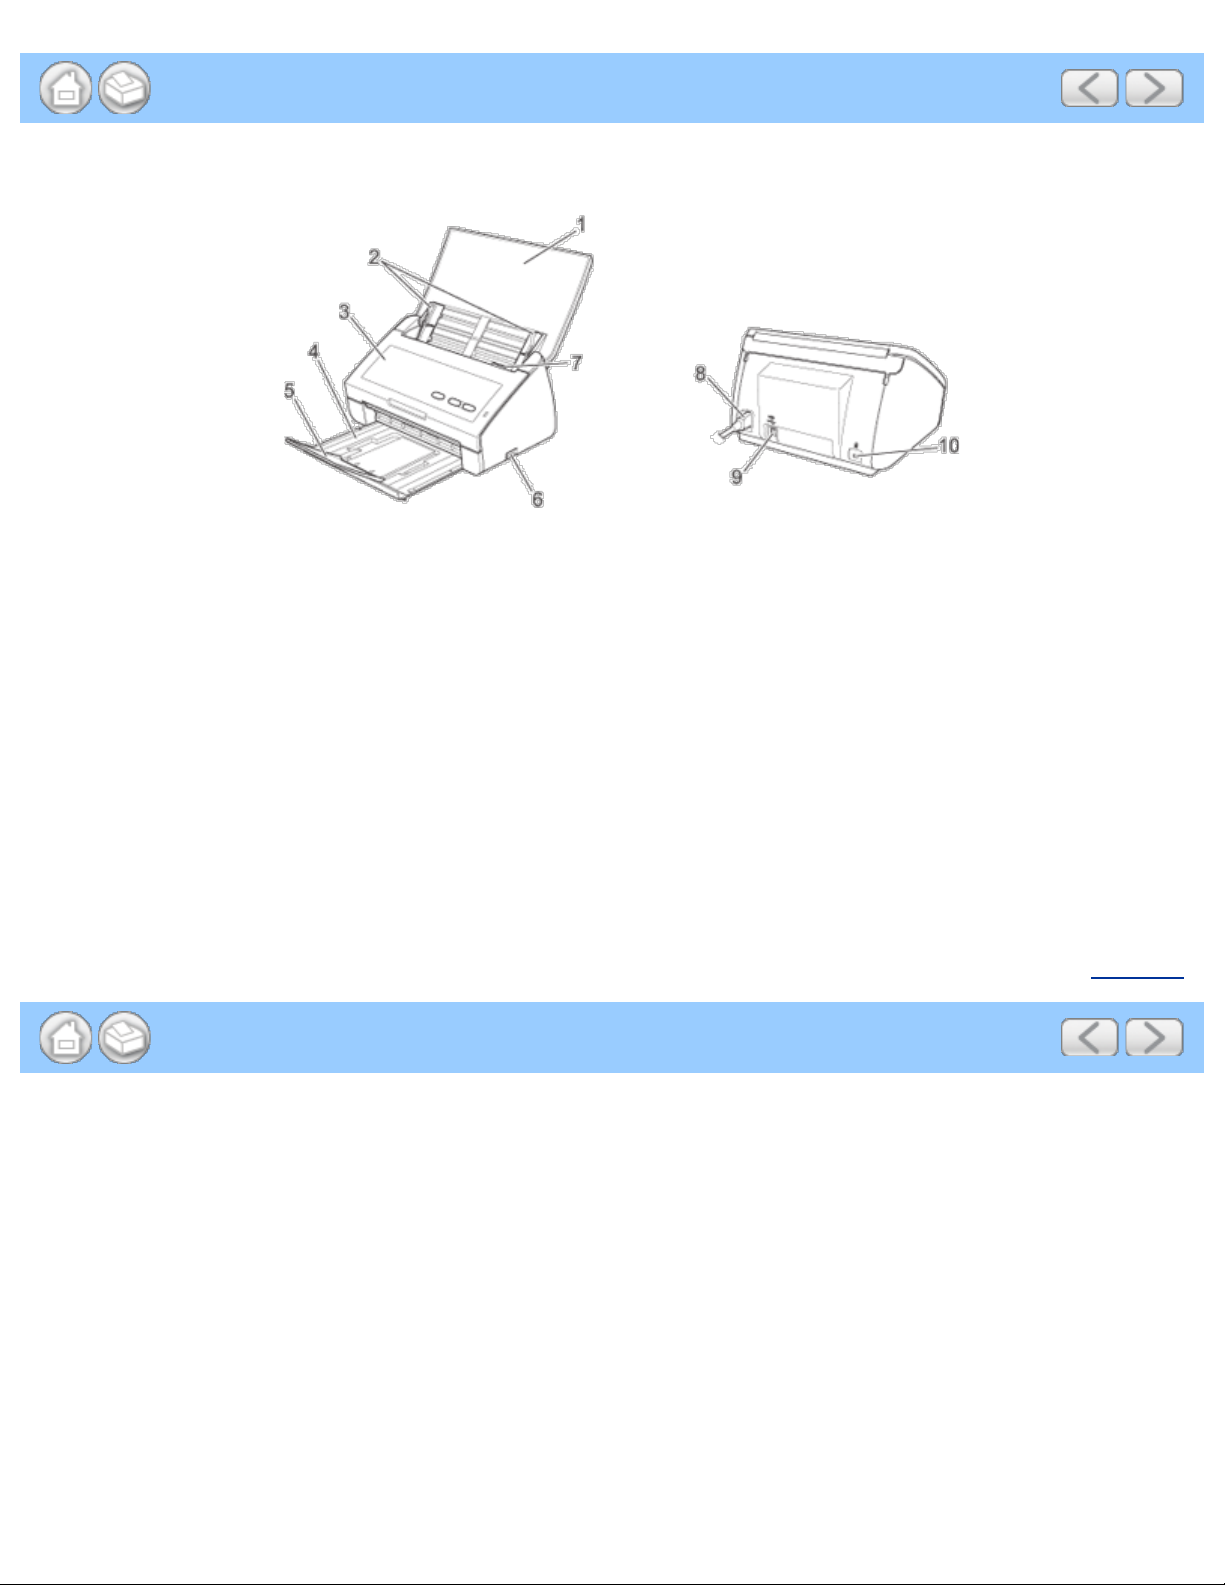
About This Machine
1. Top Cover
The machine is turned on by opening the Top Cover.
2. Document Guides
3. Front Cover
4. Output Tray
5. Document Stopper
6. USB Direct Interface
7. Cover Release Lever
8. AC Power Connector
9. USB Connector
10. Kensington Security Slot
Page Top

Loading Receipts and Other Thin Documents
file:///C|/Documents%20and%20Settings/mcampbell.AM/My%20Documents/ADS2000solutions/chapter1_5_7.html[3/11/2013 10:23:33 AM]
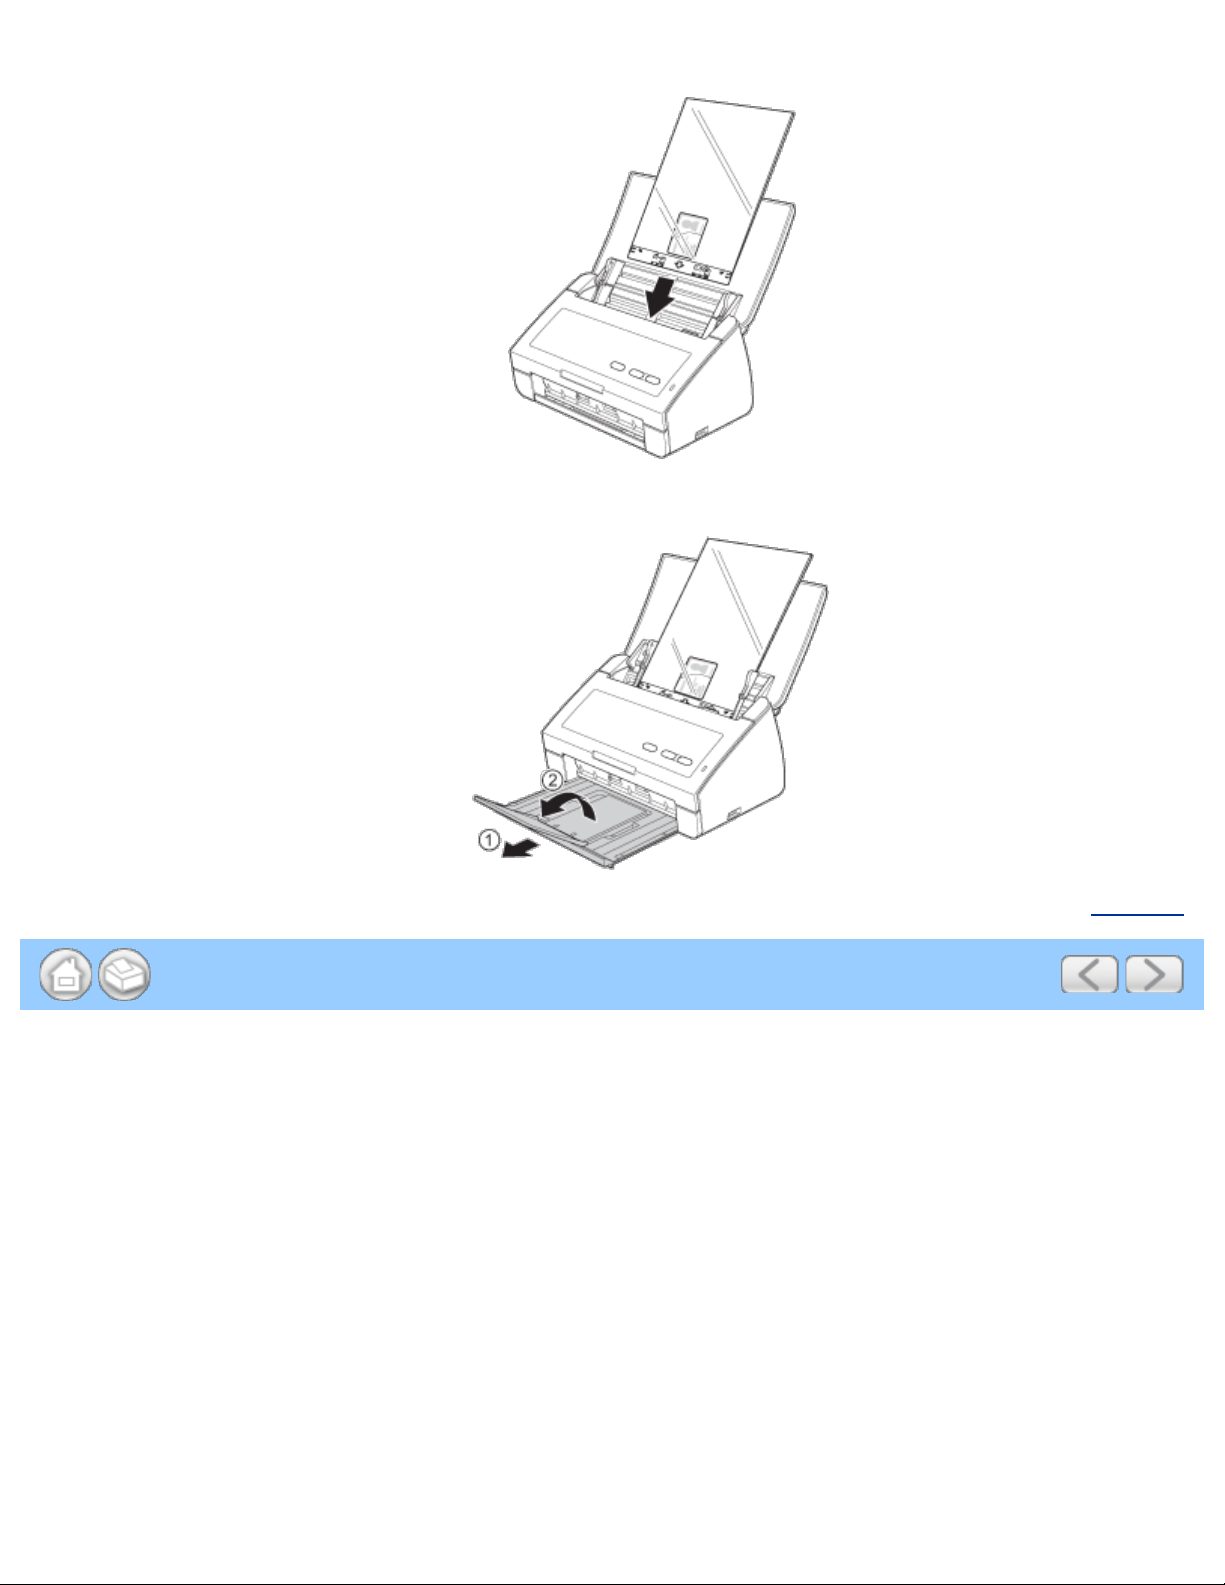
Loading Receipts and Other Thin Documents
Make sure documents with ink or correction fluid are completely dry.
1
Open the Top Cover (1).
2
Insert the document into the Carrier Sheet.
Note
Set the document in the center of the Carrier Sheet and align the top of the document with the top of the
Carrier Sheet.
3
Adjust the Document Guides (1) to fit the width of the Carrier Sheet.
4
Place the Carrier Sheet in the document feeder between the Guides until you feel it touch the inside of the
Loading Receipts and Other Thin Documents
file:///C|/Documents%20and%20Settings/mcampbell.AM/My%20Documents/ADS2000solutions/chapter1_5_7.html[3/11/2013 10:23:33 AM]
machine.
5
Pull the Output Tray out of the machine and then unfold the Document Stopper.
Page Top

Scanning Methods
file:///C|/Documents%20and%20Settings/mcampbell.AM/My%20Documents/ADS2000solutions/chapter2_2.html[3/11/2013 10:23:34 AM]
Scanning Methods
There are two ways to scan using your Brother machine.
• Scan to PC
• Scan to USB
Scan to PC
The Scan to PC feature lets you scan your document and save the scanned image into your computer. Before using
the Scan to PC feature, you must install MFL-Pro Suite from the supplied DVD-ROM and the machine must be
connected to the computer.
There are 2 ways to initiate the scan when scanning to your computer:
• Initiate the scan from your computer (see Scan From Your Computer
)
• Configure the scan settings from your computer and then initiate the scan with the Scan to PC key on your machine
(see Scan Using the Scan Key on the Control Panel of the Machine
)
The Scan to PC feature provides four scanning modes:
• Scan to Image
Lets you scan an image directly into a graphics application for image editing.
• Scan to OCR
Lets you scan a document and convert it to text. This text can be edited using your favorite word processing
software.
• Scan to E-mail
Lets you scan a document to your default E-mail application, so you can send the scanned job as an attachment.
• Scan to File
Lets you scan an image and save it to a folder on your hard disk in one of the file types shown in the file attachment
list.
Page Top

Scan to USB
file:///C|/Documents%20and%20Settings/mcampbell.AM/My%20Documents/ADS2000solutions/chapter2_2_2.html[3/11/2013 10:23:34 AM]
Scan to USB
The Scan to USB feature lets you scan your document and save the scanned image into a USB device. You can start
scanning using the Scan to USB feature by pressing the Scan to USB key. Before scanning, you can configure the
settings from your computer. To configure the settings, you must install MFL-Pro Suite from the supplied DVD-ROM
and the machine must be connected to the computer. The Remote Setup application helps you configure the settings
(see Save Scanned Documents to a USB Flash Memory Drive
and Save Scanned Documents on Mobile Devices for
Windows
®
, or Save Scanned Documents to a USB Flash Memory Drive and Save Scanned Documents on Mobile
Devices for Macintosh).
Page Top
Loading...