


Brother 681B-UG

CAUTION
WHEN CHANGING NEEDLE, BOBBIN OR LIGHT BULB, OR WHEN SEWING MACHINE IS NOT IN USE, IT IS RECOMMENDED THAT ELECTRICAL SUPPLY IS DISCONNECTED TO AVOID ELECTRICAL HAZARDS.
CONTENTS
1. Knowing Your Sewing
Machine . . . . . . . . . . . . . . . . . . . . . . .2
PRINCIPAL PARTS . . . . . . . . . . . . . . . . . . 2 ACCESSORIES . . . . . . . . . . . . . . . . . . . . . . 4 OPERATING YOUR SEWING
MACHINE . . . . . . . . . . . . . . . . . . . . . . . . . . 5 Connecting plug. . . . . . . . . . . . . . . . .5 Controlling sewing speed. . . . . . . . . .5 UPPER (NEEDLE) THREAD. . . . . . . . . . . .6 LOWER (BOBBIN) THREAD. . . . . . . . . . . 7 How to wind bobbin. . . . . . . . . . . . . 7 How to remove bobbin case . . . . . . . 8
How to thread and insert
bobbin case . . . . . . . . . . . . . . . . . . . . 8 How to pull up lower thread . . . . . . . 9 NEEDLE . . . . . . . . . . . . . . . . . . . . . . . . . . . . 9 How to change the needle . . . . . . . . .9 How to check the needle . . . . . . . . . .9
RELATIVE CHART OF SEWING MATERIAL, NEEDLE AND THREAD. . . .10 EXTENSION TABLE . . . . . . . . . . . . . . . . . .10 SEW-LIGHT. . . . . . . . . . . . . . . . . . . . . . . . . 11 PRESSER FOOT . . . . . . . . . . . . . . . . . . . . . 11 VARIOUS CONTROLS . . . . . . . . . . . . . . . .12
Stitch length . . . . . . . . . . . . . . . . . . . .12 Zigzag width . . . . . . . . . . . . . . . . . . . 12 Pressure adjuster . . . . . . . . . . . . . . . . 13 Feed dog . . . . . . . . . . . . . . . . . . . . . . 14 Reverse stitch . . . . . . . . . . . . . . . . . . 14
THREAD TENSIONS . . . . . . . . . . . . . . . . . 15 Upper thread tension. . . . . . . . . . . . . 15 Lower thread tension. . . . . . . . . . . . . 15
2. Straight Stitching . . . . . . . . . . . . . .17
How to start sewing. . . . . . . . . . . . . . . . . 17 How to change sewing direction. . . . . . . 17 How to finish your sewing
project . . . . . . . . . . . . . . . . . . . . . . . . . . . 18 How to remove final sewing
from machine . . . . . . . . . . . . . . . . . . . . . 18 How to guide and support material. . . . . 18
3. Zigzag Stitching . . . . . . . . . . . . . . .19
Simple zigzag stitch . . . . . . . . . . . . . . . . .19 Satin stitch . . . . . . . . . . . . . . . . . . . . . . . .19 Decorative stitches . . . . . . . . . . . . . . . . . 20
4. Using Built-in Patterns . . . . . . . .21
Triple stretch stitch . . . . . . . . . . . . . . . . . 21 Blind stitch . . . . . . . . . . . . . . . . . . . . . . . 22 Shell stitch . . . . . . . . . . . . . . . . . . . . . . . 22
5. Various Other Stitches. . . . . . . . .23
Buttonholes . . . . . . . . . . . . . . . . . . . . . . . 23 Mending . . . . . . . . . . . . . . . . . . . . . . . . . 24 Attaching lace . . . . . . . . . . . . . . . . . . . . . 24 Appliquéing . . . . . . . . . . . . . . . . . . . . . . .25 Cording. . . . . . . . . . . . . . . . . . . . . . . . . . 25 Monogramming . . . . . . . . . . . . . . . . . . . .26 Embroidering . . . . . . . . . . . . . . . . . . . . . 27 Button sewing . . . . . . . . . . . . . . . . . . . . . 28 Darning . . . . . . . . . . . . . . . . . . . . . . . . . . 29 Cloth guide . . . . . . . . . . . . . . . . . . . . . . . 29 Narrow Hemming . . . . . . . . . . . . . . . . . . 30 Zipper insertion . . . . . . . . . . . . . . . . . . . 31
6. Maintenance and Care of
Your Machine . . . . . . . . . . . . . . . . . 32
CLEANING . . . . . . . . . . . . . . . . . . . . . . 32 Removing shuttle hook . . . . . . . . . . . 32 Cleaning shuttle race . . . . . . . . . . . . .33 Cleaning feed dog . . . . . . . . . . . . . . . 33
OILING . . . . . . . . . . . . . . . . . . . . . . . . . .33 CHECK LIST FOR BETTER SEWING . . .
. . . . . . . . . . . . . . . . . . . . . . . . . . . . . . . . . 34
-1-
1. Knowing Your Sewing Machine
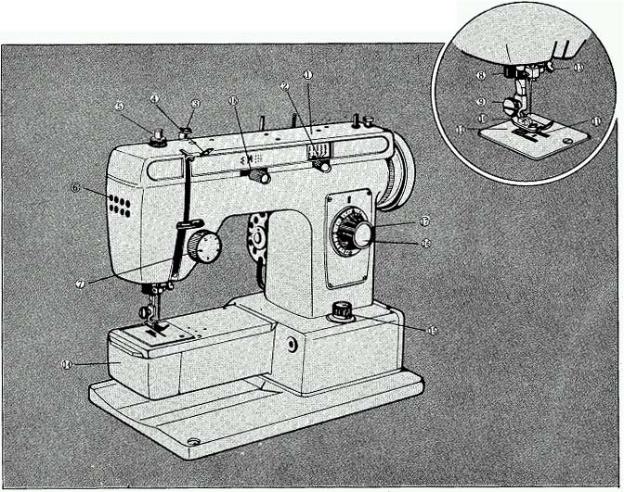
Principal Parts
1. |
Top Cover |
13. |
Needle Clamp Screw |
2. |
Zigzag Width Lever |
14. |
Shuttle Race cover |
|
(See page 12) |
15. |
Drop Feed Knob (See page 14) |
3. |
Upper Thread Guide and Bobbin Winder |
16. |
Reverse Sewing Button (See page 14) |
|
Tension Disc |
17. |
Stitch Length Dial |
4. |
Front Thread Guide |
|
By turning this dial, you can control the |
5. |
Pressure Adjuster (See page 13) |
|
length of the stitch. |
6. |
Face Plate |
|
The higher the number, the longer |
7. |
Thread Tension Dial (See page 15) |
|
the stitch (See page 12) |
8. |
Thread Cutter |
18. |
Blind Stitch & Stretch Stitch Lever |
9. |
Presser Foot Screw |
19. |
Spool Pins |
10. |
Presser Foot (Zigzag) |
20. |
Bobbin Winder Device |
11. |
Feed Dog (See page 14) |
21. |
Balance Wheel |
12. |
Needle Plate |
22. |
Stop Motion Knob |
-2-
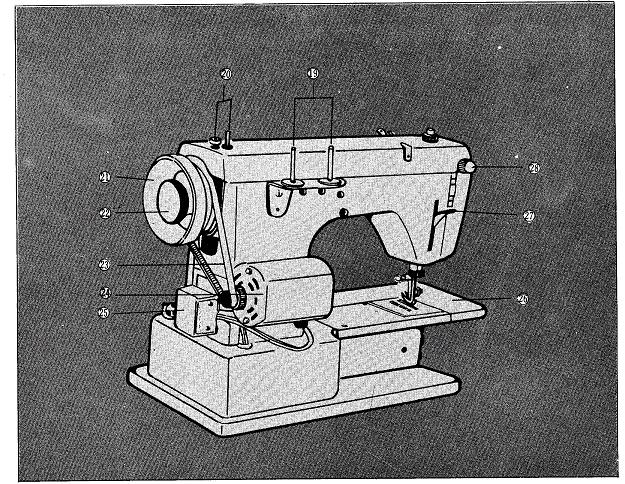
23.Motor Belt
24.Motor
25.3-pin Socket
26.Extension table
27.Presser Foot Lifter
When the presser foot is at the highest position, the tension on the upper thread is released.
28.Sew-light Switch
Turn this knob in any direction to switch light on and off.
-3-

Accessories
1.Needles
Single Needle No.14 (3 pcs.)
2.Straight Stitch Foot
3.Narrow Hemmer foot
4.Zipper Foot
5.Buttonhole Foot
6.Button Sewing Foot
7.Seam Ripper
8.Bobbin (3 pcs.)
9.Cloth Guide with Screw
10.Screw Drivers (Large & Small)
11.Oiler
-4-
Operating Your Sewing Machine
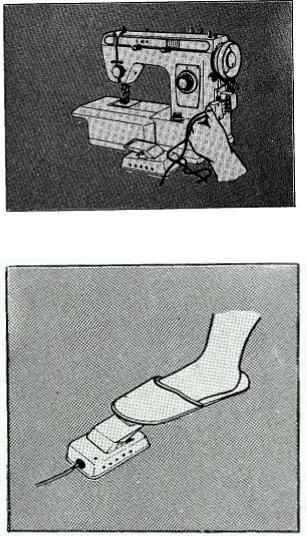
CONNECTING PLUGS
1. First connect three-prong plug in socket.
2. Then connect electric supply plug into wall.
CAUTION
When changing needle, bobbin or light bulb, or when sewing machine is not use, it is recommended that electrical supply plug
is disconnected to avoid electrical hazards.
Place foot on control pedal as shown in illustration at left.
When foot controller is pushed down lightly, machine will run at a low speed.
When pressure on foot is increased, sewing machine will pick up speed.
When foot controller is released the sewing machine will stop.
NOTE:Care should be taken that nothing is placed on foot controller when sewing machine is not in use.
-5-
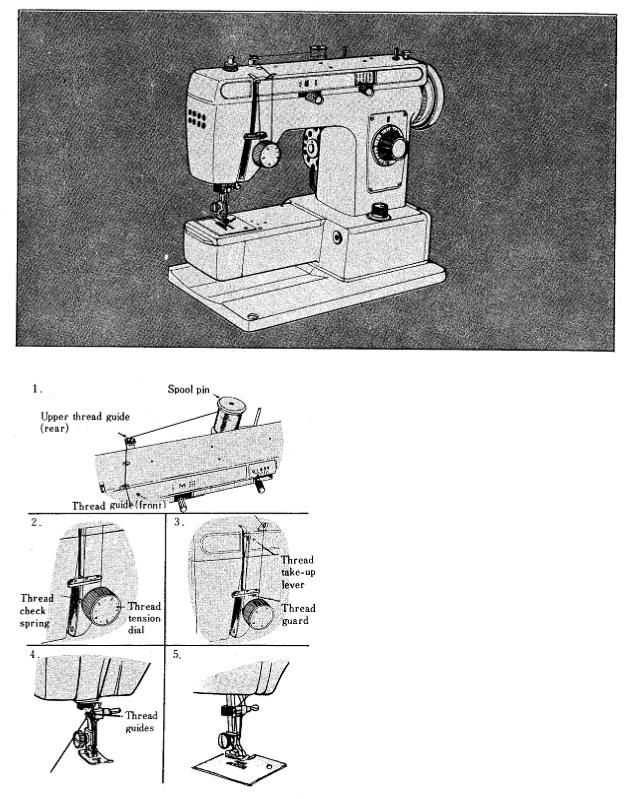
Upper (Needle) Thread
Before threading, make sure to raise presser foot and take-up lever to the highest position. Then place spool of thread on the spool.
1. Pass thread through the upper thread guide, (rear) and thread guide (front).
2. Now bring thread down and up through thread tension dial from right to left so that thread picks up thread check spring.
3. Pass thread into the eyelet of the thread take-up lever from right to left. And bring down again and pass through the thread guard.
4. Bring down and pass through the thread guides.
5. Thread needle from left to right and draw the thread out about 15 cm (6 inches).
NOTE: If the threading order is not correct, thread breakage, stitch skipping, wrinkling of fabric will occur.
-6-
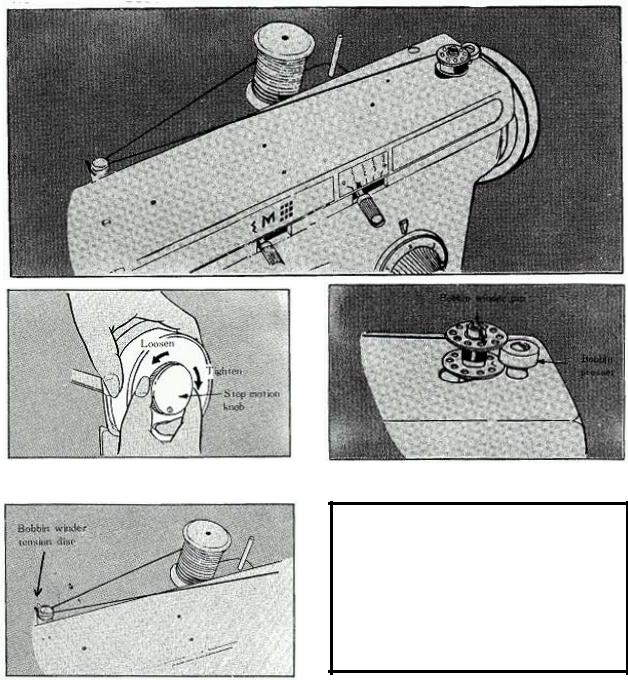
Lower (Bobbin) Thread
HOW TO WIND BOBBIN
1.Loosen stop motion knob by turning it toward you.
3.Place thread spool on the spool pin and take thread through bobbin winder tension disc.
2.Place an empty bobbin on the bobbin winder pin.
4.Wind the thread a few times around the bobbin clockwise and push the bobbin toward bobbin presser. Start the machine gently.
5.Bobbin stops winding when full.
6.Push the bobbin to the left and remove it. Tighten stop motion knob securely.
-7-
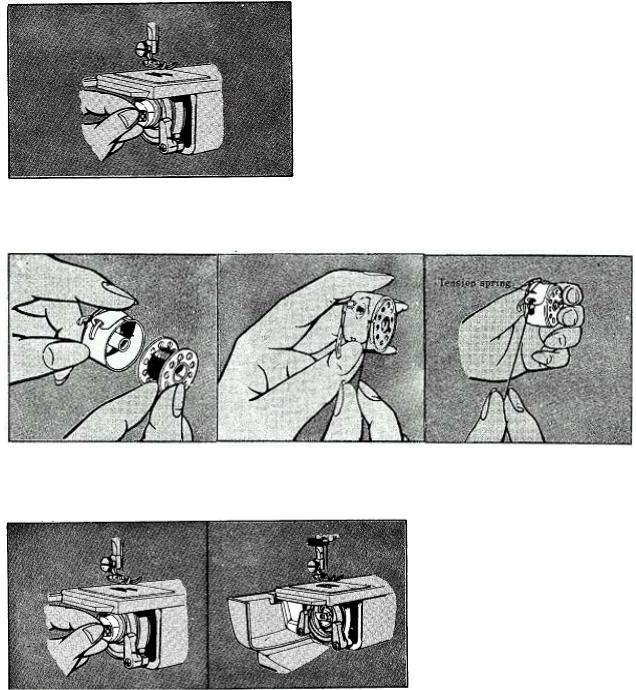
HOW TO REMOVE BOBBIN CASE
1. Raise needle to its highest position.
2. Open the shuttle cover.
3. Pull and open the latch of bobbin case.
4. Pull out bobbin case from the shuttle.
HOW TO THREAD AND INSERT BOBBIN CASE
1.Unwind about 8 cm (3- inches) of thread from the bobbin. Insert wound bobbin into
4.Holding case latch with the metal finger of case pointing up, fit it into the notch at the top of the shuttle race.
2.Pull trailing thread into the slot case.
5.Release latch and push case to the right making sure the case is in the proper position. Close the Shuttle Cover.
3.Pull thread to the left under the tension spring until thread enters into delivery eye.
NOTE: The thread drawn out of the case is to be left hanging below the race. Leave about 15 cm ( 6 inches ) hanging.
-8-
HOW TO PULL UP LOWER THREAD
1.Raise needle and presser foot to the highest point. With left hand, hold the end of upper thread and with right hand, turn balance wheel toward you until the needle moves down and up again to its highest position.
2.Now upper thread catches the lower thread in a loop. Pull upper thread toward you so that lower thread will come up in a large loop from the presser foot.
3.Pull both threads under the toes of presser foot and place them to the rear leaving about 10 cm ( 4- inches).
Needle
HOW TO CHANGE THE NEEDLE
1. Raise needle to its highest position.
2. Loosen needle clamp screw and remove old needle.
3. Insert new needle up into needle clamp hole as far as it will go against the needle stop. Make sure the flat side of needle faces toward the right side and the long groove toward left.
4. Tighten needle clamp screw securely.
HOW TO CHECK THE NEEDLE
For smooth sewing, needle must be straight and sharp.
To check if the needle is bent, place the flat side of the needle down on slide plate as shown in illustration.
-9-
Relative Chart of Sewing Material, Needle and Thread
|
|
|
|
|
|
|
SEWING MATERIAL |
NEEDLES |
THREAD SIZES |
|
|
SIZES |
||
|
|
|
|
|
|
|
|
|
|
|
|
|
|
Cotton: 80~120 |
|
VERY THIN |
Fine tricot, Fine Lace, Thin linen, Silk, |
9 |
Synthetic |
|
Tulle, Chiffon |
Fine Mercerized |
||
|
|
|
||
|
|
|
|
Cotton |
|
|
Organdy, Jersey, Voile, Taffeta, |
|
Cotton: 60~80 |
|
LIGHT |
|
Silk: “A” |
|
|
Synthetics, Silk |
11 |
||
|
WEIGHT |
Synthetic |
||
|
Batiste |
|
||
|
|
|
Mercerized 50 |
|
|
|
|
|
|
|
|
Cotton, Gingham, Poplin, Percale, |
|
Cotton: 50~60 |
|
MEDIUM |
Pique, Satin, |
14 |
Silk: “A” |
|
Velvet, Lightweight wool, Fine |
Synthetic |
||
|
|
|
||
|
|
corduroy, Suitings. |
|
Mercerized 50~60 |
|
|
|
|
Cotton: 40~50 |
|
HEAVY |
Denim, Gabardine, Tweed, Corduroy |
16 |
Mercerized Heavy |
|
|
|
|
Duty |
|
|
|
|
Cotton: 30~40 |
|
VERY HEAVY |
Canvas, Overcoatings, Upholstery |
18 |
Mercerized Heavy |
|
|
|
|
Duty |
|
|
|
|
|
|
|
|
|
|
NOTE:The same size thread should be used for upper and lower threads.
Extension Table
This sewing machine has an extension table which converts it into a flat-bed machine.
To insert the extension table:
1.Slide the extension to the right as shown in illustration.
2.To remove extension table, just pull it to the left.
-10-
 Loading...