


3500PSI
Pressure Washer Owner’s Manual
Questions? Help is just a moment away!
Contact the Local Snapper Service Center
Web: www.snapper.com or www.briggsandstratton.com
Model No. 1662-0 (3500 PSI Pressure Washer) Manual No. 190667GS Revision 1 (01/17/2002)
Snapper 3500 PSI Pressure Washer
TABLE OF CONTENTS
Safety Rules. . . . . . . . . . . . . . . . . . . . . . . . . . . . . . . . . . 2-3
Know Your Pressure Washer . . . . . . . . . . . . . . . . . . . . . . 4
Assembly. . . . . . . . . . . . . . . . . . . . . . . . . . . . . . . . . . . . 5-7
Operation . . . . . . . . . . . . . . . . . . . . . . . . . . . . . . . . . . 8-10
Product Specifications. . . . . . . . . . . . . . . . . . . . . . . . . . . 11
Maintenance . . . . . . . . . . . . . . . . . . . . . . . . . . . . . . . 11-13
Storage . . . . . . . . . . . . . . . . . . . . . . . . . . . . . . . . . . . . . . 13
Notes. . . . . . . . . . . . . . . . . . . . . . . . . . . . . . . . 14, 22 & 23
Troubleshooting . . . . . . . . . . . . . . . . . . . . . . . . . . . . . . . 15
Replacement Parts. . . . . . . . . . . . . . . . . . . . . . . . . . . 16-21
Warranty . . . . . . . . . . . . . . . . . . . . . . . . . . . . . . . Last Page
EQUIPMENT
DESCRIPTION
Read this manual carefully and become familiar with your pressure washer. Know its applications, its limitations and any hazards involved.
Every effort has been made to ensure that information in this manual is accurate and current. However, Snapper reserves the right to change, alter or otherwise improve the product and this document at any time without prior notice.
 WARNING
The engine exhaust from this product contains chemicals known to the State of California to cause cancer, birth defects, or other reproductive harm.
In the State of California a spark arrester is required by law (Section 4442 of the California Public Resources Code). Other states may have similar laws. Federal laws apply on federal lands. If you equip the muffler with a spark arrester, it must be maintained in effective working order.
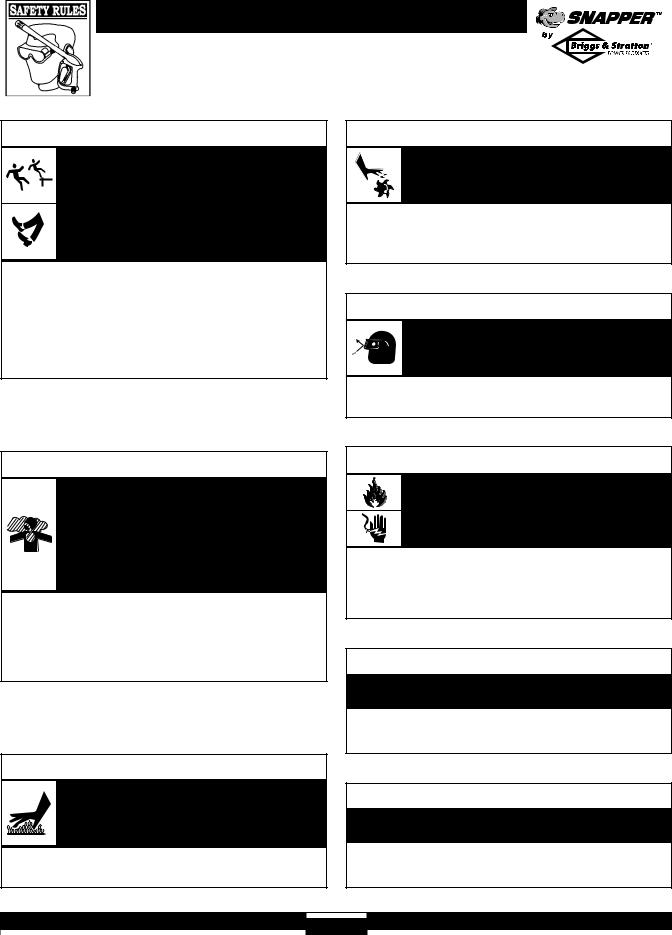
SAFETY RULES
The safety alert symbol ( ) is used with a signal word (DANGER, CAUTION, WARNING), a pictorial and/or a safety message to alert you to hazards. DANGER indicates a hazard which, if not avoided, will result in death or serious injury. WARNING indicates a hazard which, if not avoided, could result in death or serious injury. CAUTION indicates a hazard which, if not avoided, might result in minor or moderate injury. CAUTION, when used without the alert symbol, indicates a situation that could result in equipment damage. Follow safety messages to avoid or reduce the risk of injury or death.
 WARNING
Gasoline and its vapors are extremely flammable and explosive.
Fire or explosion can cause severe burns or death.
WHEN ADDING FUEL
•Turn pressure washer OFF and let it cool at least 2 minutes before removing gas cap.
•Fill fuel tank outdoors.
•Do not overfill tank. Allow space for fuel expansion.
•Keep gasoline away from sparks, open flames, pilot lights, heat, and other ignition sources.
•Do not light a cigarette or smoke.
WHEN OPERATING EQUIPMENT
•Do not tip engine or equipment at angle which causes gasoline to spill.
•Do not spray flammable liquids.
WHEN TRANSPORTING OR REPAIRING EQUIPMENT
•Transport/repair with fuel tank EMPTY or with fuel shutoff valve OFF.
WHEN STORING GASOLINE OR EQUIPMENT WITH FUEL IN TANK
•Store away from furnaces, stoves, water heaters, clothes dryers or other appliances that have pilot light or other ignition source because they can ignite gasoline vapors.
 WARNING
Spray contact with electrical wiring can result in electrocution.
•Keep water spray away from electric wiring or fatal electric shock may result.
 WARNING
The high pressure stream of water that this equipment produces can pierce skin and its underlying tissues, leading to serious injury and possible amputation.
•Never aim the spray gun at people, animals or plants.
•Do not allow CHILDREN to operate the pressure washer.
•Never repair high pressure hose. Replace it.
2
Snapper 3500 PSI Pressure Washer
 WARNING
The high pressure spray could also cause you to fall if you are too close to the cleaning surface.
Pressure in a running washer builds as you climb. When you press the trigger, the recoil from the initial spray could cause you to fall.
 Use of pressure washer can create puddles and
  slippery surfaces.
•Keep spray nozzle between 8 to 24 inches away from cleaning surface.
•Be extremely careful if you must use the pressure washer from a ladder, scaffolding or any other relatively unstable location.
•The cleaning area should have adequate slopes and drainage to reduce the possibility of a fall due to slippery surfaces.
•Operate this unit on a stable surface.
 WARNING
Starter and other rotating parts can entangle hands, hair, clothing, or accessories.
•Do not wear loose clothing, jewelry or anything that may be caught in the starter or other rotating parts.
•Tie up long hair and remove jewelry.
 WARNING
High pressure spray can cause paint chips or other particles to become airborne.
•Always wear eye protection when you use this equipment or when you are in the vicinity where the equipment is in use.
 DANGER
Running engine gives off carbon monoxide, an odorless, colorless, poison gas.
Some chemicals or detergents may be harmful if inhaled or ingested, causing severe nausea, fainting or poisoning.
Breathing carbon monoxide will cause nausea, fainting or death.
•Operate pressure washer ONLY outdoors.
•Use a respirator or mask whenever there is a chance that vapors may be inhaled.
•Read all instructions with mask so you are certain the mask will provide the necessary protection against inhaling harmful vapors.
 WARNING
Running engines produce heat. Temperature of muffler and nearby areas can reach or exceed 150°F (65°C).
Severe burns can occur on contact.
•Do not touch hot surfaces.
•Allow equipment to cool before touching.
 WARNING
Unintentional sparking can result in fire or electric shock.
WHEN ADJUSTING OR MAKING REPAIRS TO YOUR PRESSURE WASHER
•Disconnect the spark plug wire from the spark plug and place the wire where it cannot contact spark plug.
 CAUTION
Excessively high or low operating speeds increase risk of injury and damage to pressure washer.
•Do not tamper with governed speed.
•Do not operate the pressure washer above the rated pressure.
CAUTION
High pressure spray may damage fragile items including glass.
•Do not point spray gun at glass when in the jet spray mode.
•Never aim the spray gun at plants.
3
Snapper 3500 PSI Pressure Washer
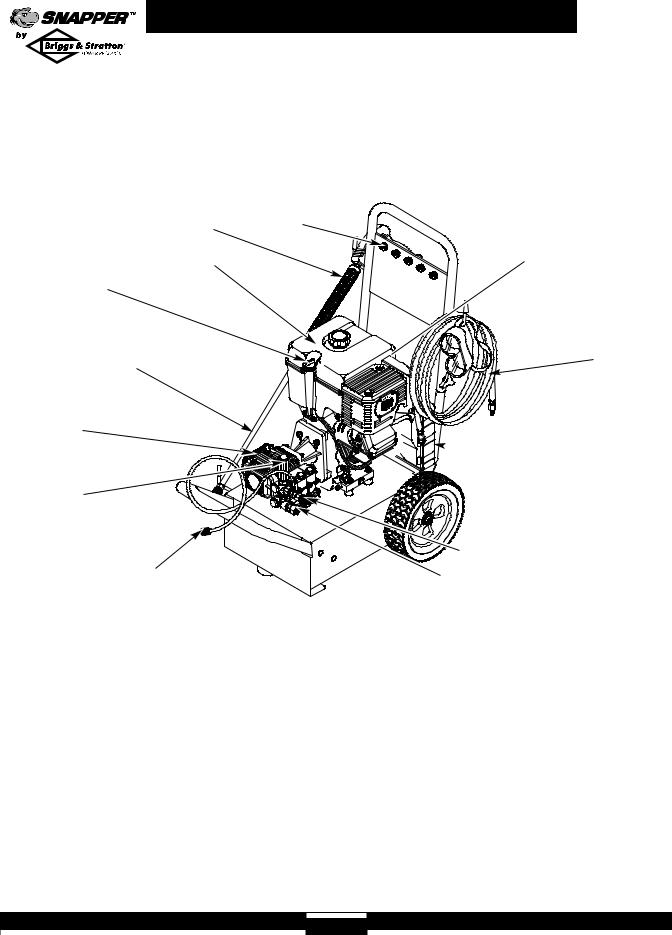
KNOW YOUR PRESSURE WASHER
Read this owner’s manual and safety rules before operating your high pressure washer.
Compare the illustrations with your high pressure washer to familiarize yourself with the locations of various controls and adjustments. Save this manual for future reference.
Spray Gun |
Spray Nozzles |
|
|
Fuel Tank |
|
Oil Fill Cap/Dipstick
Nozzle Extension with
Quick Connect
Pump equipped with
Automatic Cool Down System
Pressure
Control Knob
Chemical Injection Siphon/Filter
Air Filter — Protects engine by filtering dust and debris out of intake air.
Automatic Cool Down System — Cycles water through pump when water reaches 140°-145°F. Warm water will discharge from pump onto ground. This system prevents internal pump damage.
Chemical Injection Siphon/Filter — Use to siphon detergent or other pressure washer chemicals into the low pressure stream.
Choke Lever — Prepares a cold engine for starting.
Fuel Valve — Used to turn fuel on and off to engine.
Gas Tank — Fill tank with regular unleaded gasoline. Always leave room for fuel expansion.
High Pressure Hose — Connect one end to the water pump and the other end to the spray gun.
High Pressure Outlet with Quick Connect — To connect high pressure hose.
Rocker Switch
Throttle Lever
Choke Lever
Fuel Valve
Recoil Starter (on front of engine)
High Pressure Hose
 Air Filter
High Pressure Outlet with Quick Connect
Water Inlet
Nozzle Extension with Quick Connect — Allows you to switch between four different spray nozzles.
Oil Fill Cap/Dipstick — Fill engine with oil here.
Pressure Control Knob — Varies the pressure of the high pressure spray.
Pump — Develops high pressure.
Recoil Starter — Use for starting the engine manually.
Rocker Switch - Set this switch to "On" before using recoil starter. Set switch to "Off" to switch off engine.
Spray Gun — Controls the application of water onto cleaning surface with trigger device. Includes safety latch.
Spray Nozzles — Chemical injection, 0°, 15°, 25°, and 40°: for various cleaning applications.
Throttle Lever—Sets engine in starting mode for recoil starter. Operate normally in fast speed.
Water Inlet — Connect garden hose here.
4
Snapper 3500 PSI Pressure Washer
IMPORTANT: Read entire owner’s manual before you PREPARING PRESSURE attempt to assemble or operate your new pressure washer.
REMOVE PRESSURE
WASHER FROM
CARTON
•Remove all accessories and parts bag included with pressure washer.
•Slice two corners at the end of carton from top to bottom so the panel can be folded down flat, then remove all packing material.
•Roll pressure washer out of carton.
Carton Contents
Items in the carton include:
•Main unit
•High pressure hose
•Handle
•Pump oil dipstick (hanging on pump)
•(2) bottles of engine oil
•Safety goggles
•Spray gun with quick connect fitting
•Nozzle extension with quick connect fitting
•Accessory bag (includes the following):
•Owner’s registration card
•Nozzle cleaning kit
•Bag containing 5 multi–colored quick connect nozzles
•O–Ring maintenance kit
•Owner’s manual
•Engine manual
•Handle hardware, including one carriage bolt, one “L” bolt and 2 plastic knobs
If any of the above parts are missing or damaged, contact the local Snapper service center.
WASHER FOR USE
If you have any problems with the assembly of your pressure washer or if parts are missing or damaged, contact the local Snapper service center.
To prepare your pressure washer for operation, you will need to perform these tasks:
•Fill out and send in the registration card.
•Attach the handle to the main unit.
•Add oil to the engine.
•Add fuel to the fuel tank.
•Connect the high pressure hose to the spray gun and the pump.
•Connect the water supply to the pump.
•Connect nozzle extension to spray gun.
•Select and install desired nozzle.
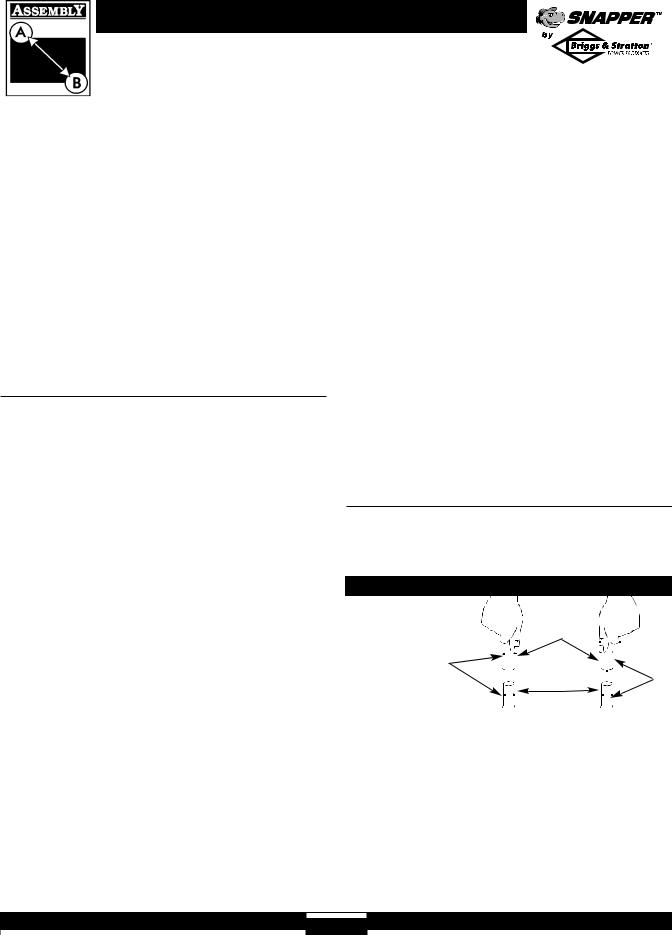
Attach Handle to the Pressure Washer
•Place the handle onto the handle supports already connected to the main unit. Make sure the holes in the handle align with the holes on the handle supports. (Figure 1)
Figure 1 — Attach the Handle to the Base
Make sure the |
|
|
Handle |
||||
holes on the |
|
|
|
|
|
|
|
|
|
|
|
|
|
|
|
handle are |
|
|
|
|
|
|
|
aligned with the |
|
|
|
|
|
|
|
holes on the |
|
|
Handle |
|
|
|
|
handle supports |
|
|
|
|
|
|
|
|
|
|
|||||
|
|
Supports |
|
|
|
|
|
|
|
|
|
|
|
|
|
|
|
|
|
|
|
|
|
NOTE: It may be necessary to move the handle supports from side to side in order to align the handle so it will slide over the handle supports.
•Insert the carriage bolt through the hole on the left side of the handle (viewing from rear of unit) and attach the plastic knob (Figure 2). Tighten the knob by hand.
5

Snapper 3500 PSI Pressure Washer
Figure 2 — Secure Handle |
•Insert the “L” bolt through the hole on the right side of the handle (viewing from rear of unit) and attach the plastic knob (Figure 2). Tighten the knob by hand. If not installed, add the vinyl cap to the “L” bolt.
•Insert the multi–colored nozzles in the spaces provided in the handle.
• Install the oil dipstick.
NOTE: The pump is pre-lubricated and sealed, requiring no additional lubrication for the life of the pump.
Add Engine Oil
IMPORTANT: Any attempt to crank or start the engine before it has been properly serviced with the recommended oil may result in an engine failure.
•Place pressure washer on a level surface.
•Refer to the engine owners manual to add recommended oil to engine.
NOTE: Check oil often during engine break–in. Refer to engine owner’s manual for recommendations.
Install Oil Dipstick on Pump
CAUTION! You MUST remove the pump’s shipping cap and install the oil dipstick. Failure to do so will void the warranty and damage the pump.
Add Gasoline
 WARNING! Never fill fuel tank indoors. Never fill fuel tank when engine is running or hot. Allow unit to cool for two minutes before refueling. Do Not light a cigarette or smoke when filling the fuel
To install the oil dipstick:
•Make sure your unit is on a level surface.
•Remove and discard the shipping cap located on the pump (Figure 3).
tank.
 WARNING! Do Not overfill the fuel tank. Always allow room for fuel expansion.
|
• |
Use regular UNLEADED gasoline with the pressure |
||
Figure 3 — Install Oil Dipstick onto the Pump |
washer engine. Do Not use premium gasoline. Do Not |
|||
|
|
|||
Remove shipping cap and |
Shipping Cap |
mix oil with gasoline. |
|
|
|
|
|
||
install oil dipstick here. |
• |
Clean area around fuel fill cap, remove cap. |
|
|
|
• |
Slowly add "UNLEADED" regular gasoline to fuel tank. |
||
|
|
Use a funnel to prevent spillage. Slowly fill tank to about |
||
|
|
1.5" below the bottom of the filler neck (Figure 4). |
||
|
|
Figure 4 — Typical Fuel Expansion Space |
|
|
|
|
SpaceAir |
Tank |
|
|
|
|
|
|
|
|
1.5” |
|
Fuel |
|
|
|
|
|
|
• |
Install fuel cap and wipe up any spilled gasoline. |
||
Pump Oil |
|
|
|
|
Dipstick |
|
|
|
|
|
6 |
|
|
|
Snapper 3500 PSI Pressure Washer
Connect Hose and Water Supply to Pump
IMPORTANT: You must assemble the nozzle extension to the spray gun and attach all hoses before you start the engine. Starting engine without all hoses connected and water supplied will damage the pump.
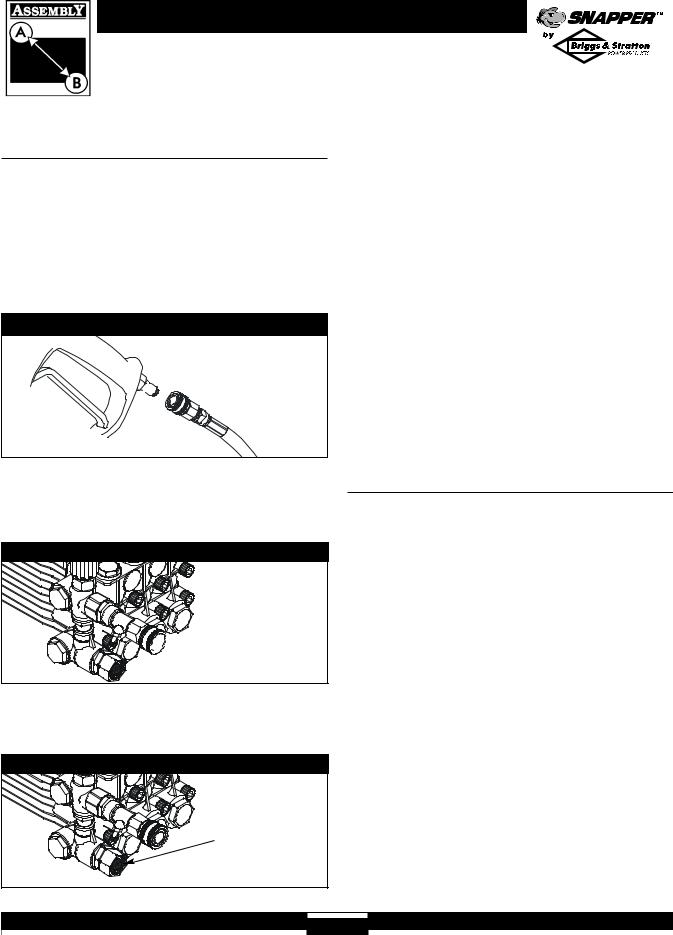
•Uncoil high pressure hose and attach quick connect end of hose to the base of the spray gun (Figure 5). Pull down on the collar of the quick connect, slide onto the spray gun and let go of collar. Tug on hose to be sure of a tight connection.
Figure 5 — Connect High Pressure Hose to Spray Gun
Connect high pressure hose 
 here.
here.
•Similarly, attach the other end of the high pressure hose to the high pressure outlet on the pump (Figure 6). Pull down on the collar of the quick connect, slide onto the pump and let go of collar. Pull on hose to be sure of a tight connection.
Figure 6 — Connect High Pressure Hose to Pump


 Connect high pressure hose here
•Before you connect your garden hose to the water inlet, inspect the inlet screen (Figure 7). Clean the screen if it contains debris, replace if damaged. DO NOT RUN THE PRESSURE WASHER IF THE SCREEN IS DAMAGED.
Figure 7 — Connect the Garden Hose to Water Inlet
Inspect inlet screen,
Do Not use if damaged, clean if dirty.
•Run water through your garden hose for 30 seconds to clean out any debris. Turn off water.
IMPORTANT: Do Not siphon standing water for the water supply. Use ONLY cold water (less than 100°F).
•Connect the garden hose to the water inlet. Tighten by hand (Figure 7).
CAUTION! There MUST be at least ten feet of unrestricted garden hose between the pressure washer inlet and any flow shut off device, such as a ‘Y’ shut-off connector or other convenience-type water shut-off valve. Damage to pressure washer resulting from disregarding this warning will not be covered by the warranty.
•Turn ON the water.
•Squeeze the trigger on the spray gun until you have a steady stream of water. This purges the pump of air and impurities.
 CAUTION! Before starting the pressure washer, be sure you are wearing adequate eye protection.
Checklist Before Starting Engine
Review the unit’s assembly to confirm you have performed all of the following:
•Make sure the handle is secure.
•Check for properly tightened hose connections.
•Check to make sure that there are no kinks, cuts, or damage to the high pressure hose.
•Check that oil has been added to the proper level in the engine crankcase.
•Add the proper gasoline to fuel tank.
•Provide a proper water supply (not to exceed 100°F) at a minimum flow of 3.9 gallons per minute.
•Be sure to read “Safety Rules” and “How To Use Your Pressure Washer” before using the pressure washer.
7
Snapper 3500 PSI Pressure Washer
HOW TO USE YOUR PRESSURE WASHER
If you have any problems operating your pressure washer, please contact the local Snapper service center.
How to Start Your Engine
The best way to start your pressure washer for the first time is to follow these instructions step–by–step. This starting information also applies if have let the pressure washer sit idle for at least a day.
•Place the pressure washer in an area close enough to an outside water source that can flow at a rate of
3.9 gallons per minute or more.
•Make sure the unit is in a level position.
•Check that the high pressure hose is connected to the spray gun and to the pump. See “Preparing Pressure Washer for Use” on page 5.
•Connect the garden hose to the water inlet on the pressure washer pump and turn on the water.
CAUTION! Do Not run the pump without the water supply connected and turned on. You must follow this caution or the pump will be damaged.
•Squeeze the trigger on the spray gun to relieve the air pressure caused by turning ON the water. Water will discharge from the spray gun in a thin stream. Hold the trigger until a steady stream of water appears. This will make it easier to pull start the engine. Release the trigger.
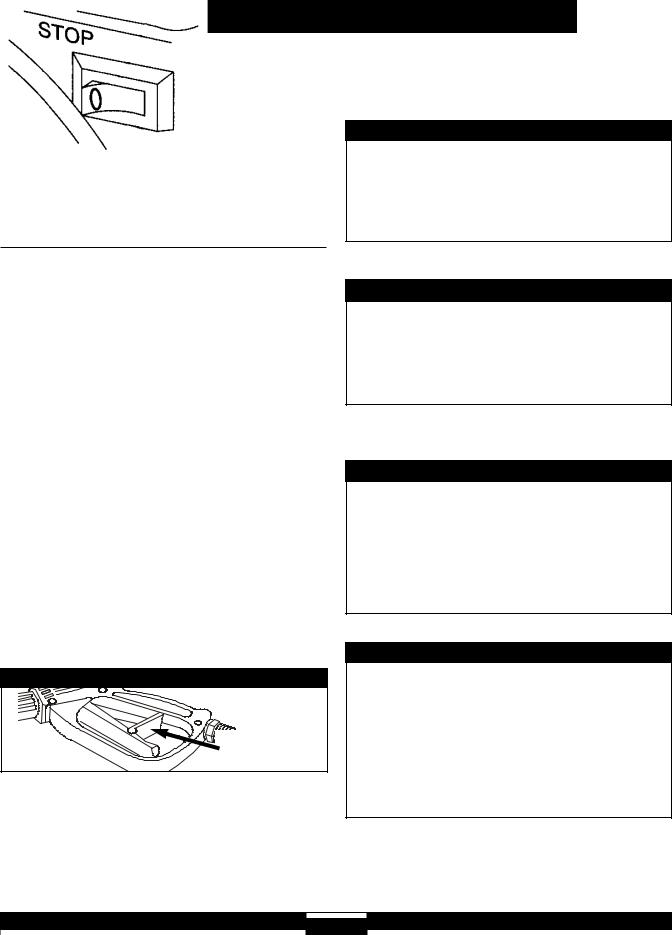
•Apply the safety latch to the spray gun trigger (Figure 8).
Figure 8 — Spray Gun with Safety Latch Engaged
Safety Latch
• Move the fuel valve to the “On” position (Figure 9).
Figure 9 — Fuel Valve
•Move the throttle lever to the “Fast” position, shown on engine as a rabbit (Figure 10).
Figure 10 — Throttle Positions
•To start a cold engine, move the choke lever to the “Choke” position. To restart a warm engine, leave the choke lever in the “Run” position (Figure 11).
Figure 11 — Choke Positions
•Set the rocker switch to the “On” position (Figure 12).
Figure 12 — Stop Switch
•Grasp starter grip and pull slowly until you feel some resistance. Then pull cord out with rapid full arm stroke. Let rope return slowly. Do Not let rope “snap back” against starter.
8
 Loading...