


Bosch Nexxt™ Premium
Platinum™ Gas Dryer
Model / Modèle / Modelo: WTMC 652SUC
en |
Operating, Care and Installation Instructions |
|
|
||
fr |
Seche-linge: Notice d’utilsation, de maintenance et d’installation |
|
es |
Secador: Operacíon, cuidado y instrucciones para la instalación |
|

Table of Contents
Definitions . . . . . . . . . . . . . . . . . . . . . . . . . . . . . . .. .. .. .. .. .. .. .. .. .. 3.. .. .. ..
IMPORTANT SAFETY INSTRUCTIONS. . . . . . . . . . . . . . . . . . . . . . . . . . . . . .4 . . .
|
|
|
|||||||||||||||||||||||||||||||||||||||||||
INSTALLATION INSTRUCTION. . . . . . . . . . . . . . . . . . . . . . . . . . . . . . . .6 . . . . |
|||||||||||||||||||||||||||||||||||||||||||||
*0.+!1 0&+* |
|
|
|
|
|
|
|
|
|
|
|
|
|
|
|
|
|
|
|
|
|
|
|
|
6 |
|
|
|
|||||||||||||||||
*#+.) 0&+* |
|
+* ".*&*$ |
2 /0" |
!&/,+/ ( |
|
|
|
|
|
|
|
|
|
|
|
|
|
|
|
|
|
|
|
|
|
|
|
|
|
|
|
6 |
|
||||||||||||
"#+." &*/0 ((&*$ 0%" !.4". |
|
|
|
|
|
|
|
|
|
|
|
|
|
|
|
|
|
|
|
|
|
|
|
|
|
|
|
|
|
|
|
6 |
|
|
|
||||||||||
(" |
0.& |
( |
+**" 0&+* |
|
|
|
|
|
|
|
|
|
|
|
|
|
|
|
|
|
|
|
|
|
|
|
|
|
|
|
|
|
|
|
|
|
|
|
|
|
|
|
|||
/ |
+**" |
0&+* |
|
|
|
|
|
|
|
|
|
|
|
|
|
|
|
|
|
|
|
|
|
|
|
|
|
|
|
|
|
|
|
|
|
|
|
|
|
|
|
|
|||
3% 1/0 |
&. |
|
+**" |
0&+* |
|
|
|
|
|
|
|
|
|
|
|
|
|
|
|
|
|
|
|
|
|
|
|
|
|
|
|
|
|
|
|
|
|
|
|
|
|
|
|||
A |
"//+.&"/ |
|
|
|
|
|
|
|
|
|
|
|
|
|
|
|
|
|
|
|
|
|
|
|
|
|
|
|
|
|
|
|
|
|
|
|
|
|
|
|
|||||
*/0 (( 0&+* |
5 |
/0", 4 /0", |
|
|
|
|
|
|
|
|
|
|
|
|
|
|
|
|
|
|
|
|
|
|
|
|
|
|
|
|
|
|
|
|
|
|
|
|
|||||||
%" ' (&/0 "#+." 1/&*$ 0%" |
!.4". |
|
|
|
|
|
|
|
|
|
|
|
|
|
|
|
|
|
|
|
|
|
|
|
|
|
|
|
|||||||||||||||||
.", .&*$ 0+ 0. */,+.0 0%" !.4". 5 /0", 4 /0", |
|
|
|
|
|
|
|||||||||||||||||||||||||||||||||||||||
OPERATING INSTRUCTIONS. . . . . . . . . . . . . . . . . . . . . . . . . . . . . . . .13. . . . |
|||||||||||||||||||||||||||||||||||||||||||||
+1. *"2 !.4". |
|
|
|
|
|
|
|
|
|
|
|
|
|
|
|
|
|
|
|
|
|
|
|
|
|
|
|
|
|
|
|
|
|||||||||||||
*"( |
|
|
|
|
|
|
|
|
|
|
|
|
|
|
|
|
|
|
|
|
|
|
|
|
|
|
|
|
|
|
|
|
|
|
|
|
|
|
|
|
|
|
|
||
Summary of instructions. . . . . . . . . . . . . . . . . . . . . . . . . . . . . . .. .. .. ..15.. . . . .
Safety information. . . . |
. . . . |
. . . . . . . . . . |
. . . . . |
. . . . . . |
. |
.. .. .. .. .. .. |
16.. .. .. .. . |
|||||||||||||||||||||||||||||||||
"#+." /2&0 %&*$ +* 0%" |
!.4". |
|
|
|
|
|
|
|
|
|
|
|
|
|
|
|
|
|
|
|
|
|
|
|
|
|
|
|
|
|
|
|
6 |
|
|
|
||||
/&*$ 0%" !.4" . |
|
|
|
|
|
|
|
|
|
|
|
|
|
|
|
|
|
|
|
|
|
|
|
|
|
|
|
|
|
|
|
|
6 |
|
|
|
|
|||
.+0" 0&*$ 0%" !.4". |
|
|
|
|
|
|
|
|
|
|
|
|
|
|
|
|
|
|
|
|
|
|
|
|
|
|
|
|
|
|
|
6 |
|
|
|
|||||
Protection of the environment. . . . . . . . . . . . . . . . . . . . . . . . . . . . . . . .16. . . .
Before using the dryer for the first. .time. . . . . . . . . . . . . . . . . . . . . . . . . . . . . 17. Temporary disconnection of the dryer. . . . . . . . . . . . . . . . . . . . . . . . . . . . . . 17. . .
Laundry . . . . . . . . . . . . . . . . |
. . . . . . . . . . . . . . |
.. .. .. .. |
.. .. .. .. .. .. ..17.. .. .. .. . |
|||||||||||||||||||||||||||||||||||||||||
!"*0& |
0&+* |
+# 0"30&("/ |
|
|
|
|
|
|
|
|
|
|
|
|
|
|
|
|
|
|
|
|
|
|
|
|
|
|
|
|
|
|
|
|
|
7 |
|
|
|
|||||
.4&*$ |
|
0&,/ |
|
|
|
|
|
|
|
|
|
|
|
|
|
|
|
|
|
|
|
|
|
|
|
|
|
|
|
|
|
|
|
|
|
|
|
|
|
7 |
|
|
|
|
Program selection. . . . . . . . . . . |
. . . . . . . . . . . . . . . |
. . . . .. .. |
.. .. .. .. 18.. .. .. .. . |
|||||||||||||||||||||||||||||||||||||||||
A10+) 0& ,.+$. )/ |
|
|
|
|
|
|
|
|
|
|
|
|
|
|
|
|
|
|
|
|
|
|
|
|
|
|
|
|
|
|
|
|
|
|
|
|
|
|
||||||
&3 ,.+$. )/ |
|
|
|
|
|
|
|
|
|
|
|
|
|
|
|
|
|
|
|
|
|
|
|
|
|
|
|
|
|
|
|
|
|
|
|
|||||||||
," & ( |
,.+$. )/ |
|
|
|
|
|
|
|
|
|
|
|
|
|
|
|
|
|
|
|
|
|
|
|
|
|
|
|
|
|
|
|
|
|
|
|
|
|
|
|
||||
&)" |
,.+$. )/ |
|
|
|
|
|
|
|
|
|
|
|
|
|
|
|
|
|
|
|
|
|
|
|
|
|
|
|
|
|
|
|
|
|
|
|
|
|
|
|
|
|||
A!!&0&+* ( +,0&+*/ |
|
|
|
|
|
|
|
|
|
|
|
|
|
|
|
|
|
|
|
|
|
|
|
|
|
|
|
|
|
|
|
|
|
|
|
|
||||||||
,0&+*/ |
|
|
|
|
|
|
|
|
|
|
|
|
|
|
|
|
|
|
|
|
|
|
|
|
|
|
|
|
|
|
|
|
|
|
|
|
|
|
|
|
|
|
|
|
*!& 0+. +# ,.+$. ) |
/"-1"* " |
|
|
|
|
|
|
|
|
|
|
|
|
|
|
|
|
|
|
|
|
|
|
|
|
|
|
|
|
|
|
|
|
|
|
|||||||||
Program selection table. . . . . . . . . |
. . . . . . . . . . . . . . |
. . . . . . . |
.. |
.. |
.. |
..21.. . . . . |
||||||||||||||||||||||||||||||||||||||
Operation . . . . . . . . . . . . . . . |
. . . . . . . . . . . . . . |
. .. .. .. .. .. .. |
.. .. .. ..22.. .. .. .. .. |
|||||||||||||||||||||||||||||||||||||||||
/&*$ 0%" !.4" . |
|
|
|
|
|
|
|
|
|
|
|
|
|
|
|
|
|
|
|
|
|
|
|
|
|
|
|
|
|
|
|
|
|
|
|
|
||||||||
/&*$ 0%" !.4". |
. ' |
|
|
|
|
|
|
|
|
|
|
|
|
|
|
|
|
|
|
|
|
|
|
|
|
|
|
|
|
|
|
|
|
|
|
|
|
|
||||||
Cleaning and care. . . . . . . . . . . |
. . . . . . . . . . . . . . . |
. . . . .. .. |
.. .. .. .. 25.. .. .. .. . |
|||||||||||||||||||||||||||||||||||||||||
(" *&*$ 0%" !.4". |
|
|
|
|
|
|
|
|
|
|
|
|
|
|
|
|
|
|
|
|
|
|
|
|
|
|
|
|
|
|
|
|
|
|||||||||||
(" *&*$ 0%" (&*0 #&(0". |
|
|
|
|
|
|
|
|
|
|
|
|
|
|
|
|
|
|
|
|
|
|
|
|
|
|
|
|
|
|
|
|
|
|||||||||||
(" *&*$ 0%" "3% 1/0 !1 0 |
|
|
|
|
|
|
|
|
|
|
|
|
|
|
|
|
|
|
|
|
|
|
|
|
|
|
|
|
||||||||||||||||
(" *&*$ 0%" )+&/01." /"*/+. |
|
|
|
|
|
|
|
|
|
|
|
|
|
|
|
|
|
|
|
|
|
|
|
|
|
|
|
|
|
|
||||||||||||||
(" *&*$ 0%" " .&*$ /%&"(! |
|
|
|
|
|
|
|
|
|
|
|
|
|
|
|
|
|
|
|
|
|
|
|
|
|
|
|
|
|
|
|
|
|
|
||||||||||
% *$&*$ 0%" (&$%0 1( |
|
|
|
|
|
6 |
|
|
|
|||||||||||||||||||||||||||||||||||
Troubleshooting . . . . . . . . . . . . . . . . . . . . . . . . . . . . . . .. .. .. .. .. .. .. 26.. .. .. .. .. |
||||||||||||||||||||||||||||||||||||||||||||
*! A |
|
|
|
|
|
|
|
|
|
|
|
|
|
|
7 |
|
|
|
||||||||||||||||||||||||||
STATEMENT |
OF |
WARRANTIES |
BOSCH |
CLOTHES |
DRYERS. . . . . . . . |
. . . . . . . |
. . . . . . 28. . |
|||||||||||||||||||||||||||||||||||||
3 (1/&+*/ |
|
|
|
|
|
|
|
|
|
|
|
|
|
|
|
|
|
|
|
|
|
|
|
|
|
|
|
|
|
|
|
|
|
|
|
|
|
|
|
|
|
|||
2
Congratulations |
on |
having selected |
Each dryer which leaves our factory |
|||||||||
a Bosch clothes dryer, the choice |
hasof undergone a |
thorough |
|
|
|
|
||||||
|
Definitions |
|||||||||||
those |
that |
demand |
exceptional |
performance test and is in full |
||||||||
performance |
from their clothes |
working condition. If you have any |
||||||||||
dryer. |
|
|
|
|
questions |
especially concerning |
|
|
|
|||
|
|
|
|
|
WARNING |
|||||||
This |
dryer |
complies |
with |
installation |
of the |
dryer |
- |
our |
||||
ANSI |
Z21.5.1/ |
CGA |
7.1>2002 |
customer |
service |
team |
will |
be |
|
|
|
|
happy to |
advise |
you. |
|
|
|
|
|
|||||
Clothes Dryers |
Vol. |
I. |
|
|
|
|
|
|||||
|
|
|
|
|
|
|
|
|||||
A distinctive |
feature of your dryer |
Further |
information |
and a |
selection |
|||||||
is |
our |
products |
can be |
found on |
||||||||
low |
energy |
consumption. |
of |
|||||||||
our |
web |
site: |
|
|
|
|||||||
|
|
|
|
|
|
|
|
|||||
An |
easy |
operation philosophy, |
www.boschappliances.com |
|
||||||||
a variety |
of |
customized drying |
Information |
|
|
|
|
|||||
|
|
|
|
|
|
|
|
|
||||
programs and a solid touch and feel |
|
|
|
|
|
|
|
|||||
make this appliance a user>friendly |
Please read and follow these |
|||||||||||
assistant |
in |
your |
household. |
operating |
and installation |
|
||||||
The |
Bosch |
dryer |
|
instructions |
and |
all |
other |
|
||||
offers the following |
|
|
|
enclosed with |
the dryer. |
|||||||
standard |
features: |
|
information |
|||||||||
|
|
|
|
|
|
|
|
|
||||
-High efficiency precision drying system
-Large 6.25 cu.ft. (177 l) stainless steel drum with
a capacity up to 17.6 lbs (8 kg)
-Large port hole (18"/457 mm), door lock with automatic drum stop function
- Exceptionally quiet operation - Sensor controlled auto cycles
-Timed cycles from 10 to 150 minutes
-Short program for ½ load (25 minutes)
CAUTION
CAUTION - This indicates that injuries or significant damage may occur as a result of non observance of this warning.
CAUTION
CAUTION - This indicates that minor injuries or damage may occur as a result of non observance of this warning.
iThis symbol is used to draw th user's attention to something in particular.
WARNING: |
For |
your safety |
the |
information |
in this manual must be followed to |
minimi |
|
the risk |
of |
fire |
or explosion |
or |
to prevent |
property damage personal injury or |
death. |
|
|
|
|
|
|||
Do |
not |
store |
or use gasoline or other flammable vapors and liquids in the vicinity |
||||
or any |
other |
appliance. |
|
|
|
|
|
WHAT TO DOIF YOU SMELL GAS
Do not try to light any appliance.
Do not touch any electrical switch. Do not use any phone in your building.
Clear the room building or area of all occupants.
Immediately call your gas supplier from a neighbor s phone. Follow the gas supplier s instructions.
If you cannot reach your gas supplier call the fire department.
Installation and service must be performed by a qualified installer service agency the gas supplier.
3

IMPORTANT |
SAFETY |
|
INSTRUCTIONS |
|
|
|
|
|
|
|
|
|
|||||||||||||||||||||||||||||||||
1. |
Read |
all |
instructions |
before |
|
|
materials |
can |
ignite |
when |
|
|
|
an extension cord or an |
|
|
|||||||||||||||||||||||||||||
|
using the dryer. Bosch dryers |
|
heated. |
|
|
|
|
|
|
|
|
|
|
|
|
|
adapter |
to |
connect |
|
the |
dryer |
to |
||||||||||||||||||||||
|
are |
|
provided |
with |
Operating, |
|
11. |
Clean lint screen before or after |
|
the |
electrical |
|
power |
|
supply. |
|
|
||||||||||||||||||||||||||||
|
Care |
and |
Installation |
|
|
|
|
|
each |
load. |
|
|
|
|
|
|
|
|
|
21. |
The |
dryer |
|
must |
only |
be used |
fo |
||||||||||||||||||
|
Instructions. |
|
|
|
|
|
|
|
|
12. |
Keep |
area |
around |
the |
exhaust |
|
its |
intended |
purpose. |
|
|
|
|||||||||||||||||||||||
|
|
|
|
|
|
|
|
|
|
|
|
|
|
|
22. |
Always |
check |
pockets |
and |
|
|
||||||||||||||||||||||||
2. |
Do |
|
not |
dry |
articles that |
have |
|
opening |
and |
adjacent |
|
|
|
|
|
|
|||||||||||||||||||||||||||||
|
|
|
|
|
|
|
remove |
any |
objects. |
|
Cigarette |
|
|||||||||||||||||||||||||||||||||
|
been |
previously |
cleaned, |
|
|
|
surrounding |
areas |
free |
from |
the |
|
|
|
|||||||||||||||||||||||||||||||
|
|
|
|
|
lighters |
are |
particularly |
|
|
|
|||||||||||||||||||||||||||||||||||
|
washed, |
soaked, or |
spotted |
|
|
accumulation of |
lint, |
dust |
and |
|
|
|
|
||||||||||||||||||||||||||||||||
|
|
|
|
hazardous. |
|
|
|
|
|
|
|
|
|
|
|||||||||||||||||||||||||||||||
|
with |
gasoline, |
dry |
cleaning |
|
|
dirt. |
An |
obstructed |
port |
might |
|
|
|
|
|
|
|
|
|
|
|
|||||||||||||||||||||||
|
|
|
23. |
Do |
not |
operate |
until worn |
out |
|||||||||||||||||||||||||||||||||||||
|
solvents, |
other |
flammable, |
or |
|
|
reduce |
the |
airflow |
and |
cause |
|
power cords and/or loose plugs |
||||||||||||||||||||||||||||||||
|
explosive |
substances |
as they |
|
over |
heating. |
|
|
|
|
|
|
|
|
|
||||||||||||||||||||||||||||||
|
|
|
|
|
|
|
|
|
|
|
are |
replaced. |
|
|
|
|
|
|
|
|
|||||||||||||||||||||||||
|
give |
off |
vapors |
that |
could ignite13. |
The interior of the machine and24. |
Do not operate the dryer if any |
||||||||||||||||||||||||||||||||||||||
|
or |
explode. |
|
|
|
|
|
|
|
|
|
exhaust |
|
duct |
should |
be |
|
|
|
|
guards |
and/or |
panels have |
|
|
||||||||||||||||||||
3. |
Do |
|
not |
allow |
children |
to |
play |
on |
cleaned |
|
periodically |
by |
qualified |
|
been |
removed. |
|
|
|
|
|
|
|
||||||||||||||||||||||
|
|
25. |
Do |
not |
operate |
the |
|
dryer if |
any |
||||||||||||||||||||||||||||||||||||
|
or |
with |
the |
appliance. |
Close |
|
|
service |
personnel. |
|
|
|
|
|
|
|
|||||||||||||||||||||||||||||
|
|
|
|
|
|
|
|
|
|
parts are missing or broken. |
|
||||||||||||||||||||||||||||||||||
|
supervision |
of |
children |
is |
|
|
14. |
Removing |
any |
panel |
or |
|
cover, |
|
|
||||||||||||||||||||||||||||||
|
|
|
|
26. |
Do |
not |
bypass |
any |
|
safety |
|
|
|||||||||||||||||||||||||||||||||
|
necessary |
when |
the |
appliance |
|
including |
the |
light |
cover, |
may |
|
devices. |
|
|
|
|
|
|
|
|
|
|
|
||||||||||||||||||||||
|
is |
used |
near |
children. |
|
|
|
|
expose |
|
live |
electrical |
circuits. |
|
|
|
|
|
|
|
|
|
|
|
|
|
|||||||||||||||||||
|
|
|
|
|
|
|
27. |
Do |
not |
use |
a |
plastic or |
|
|
|||||||||||||||||||||||||||||||
4. |
When |
children |
become |
old |
|
|
Always |
unplug the |
dryer |
from |
|
|
|||||||||||||||||||||||||||||||||
|
|
|
non3metal flexible duct with this |
||||||||||||||||||||||||||||||||||||||||||
|
enough |
to |
operate |
the |
|
|
|
|
the electrical |
supply |
before |
|
|
|
|||||||||||||||||||||||||||||||
|
|
|
|
|
|
|
|
dryer. |
Plastic |
or |
non3metal |
|
|
||||||||||||||||||||||||||||||||
|
appliance, it is the legal |
|
|
|
attempting |
any |
service. |
|
|
|
|
|
flexible duct are a potential fire |
||||||||||||||||||||||||||||||||
|
responsibility |
of |
the parents |
or |
15. |
Store all laundry chemicals and |
|
hazard. |
|
|
|
|
|
|
|
|
|
|
|
|
|||||||||||||||||||||||||
|
legal guardians to ensure that |
|
aids in a cool dry |
place |
|
|
28. |
Do |
not |
operate |
this |
dryer until |
|||||||||||||||||||||||||||||||||
|
they |
are |
instructed |
in |
safe |
|
|
according |
to |
the manu3 |
|
|
|
|
you are sure that the dryer |
|
|
||||||||||||||||||||||||||||
|
practices |
by |
qualified |
persons. |
|
facturer's |
instructions. |
|
|
|
|
|
has been |
installed |
according |
|
|
||||||||||||||||||||||||||||
|
|
Make sure children cannot |
|
|
|
to the |
INSTALLATION |
|
|
|
|
||||||||||||||||||||||||||||||||||
5. |
Do |
|
not |
reach |
into |
the |
appliance |
|
|
|
|
|
|
|
|||||||||||||||||||||||||||||||
|
reach |
them. |
|
|
|
|
|
|
|
|
|
INSTRUCTIONS |
and |
|
that |
|
|
||||||||||||||||||||||||||||
|
if the |
drum |
is |
rotating. |
|
|
16. |
To reduce the risk of fire, |
|
|
|
|
|
||||||||||||||||||||||||||||||||
|
|
|
|
|
installation |
|
and |
grounding are |
|
||||||||||||||||||||||||||||||||||||
6. |
Do |
|
not |
install |
or |
store |
this |
|
|
clothes, |
|
cleaning rags, |
mop |
|
|
in compliance |
with |
all |
local |
|
|
||||||||||||||||||||||||
|
|
|
heads |
and |
the |
like |
which |
have |
|
|
|
||||||||||||||||||||||||||||||||||
|
appliance |
where |
it |
will |
be |
|
|
|
regulations |
|
and/or |
other |
|
|
|
||||||||||||||||||||||||||||||
|
|
|
traces |
of |
any |
flammable |
|
|
|
|
|
|
|
|
|||||||||||||||||||||||||||||||
|
exposed |
to |
the |
weather. |
|
|
|
|
|
|
|
applicable |
|
regulations |
and |
|
|
||||||||||||||||||||||||||||
|
|
|
|
substance, |
such |
as |
vegetable |
|
|
|
|
||||||||||||||||||||||||||||||||||
|
|
|
|
|
requirements. |
|
|
|
|
|
|
|
|
|
|||||||||||||||||||||||||||||||
|
|
|
|
|
|
|
|
|
|
|
|
|
|
|
|
|
|
|
|
|
|
|
|
|
|
||||||||||||||||||||
7. |
Do |
|
not |
tamper |
with |
the |
|
|
|
oil, cooking |
oil, |
petroleum |
|
|
|
|
|
|
|
|
|
|
|
|
|||||||||||||||||||||
|
|
|
|
|
|
29. |
Failure |
|
to |
|
install, |
maintain |
|
|
|||||||||||||||||||||||||||||||
|
controls. |
|
|
|
|
|
|
|
|
|
|
|
based |
oils |
|
or |
distillates, |
waxes, |
|
|
|
|
|||||||||||||||||||||||
8. |
Do |
|
not |
repair |
or replace |
any |
|
fats, |
etc., |
must |
not |
be |
placed |
|
and/or |
|
operate |
the |
dryer |
|
|
||||||||||||||||||||||||
|
|
|
according |
|
to |
|
the manufac3 |
|
|
||||||||||||||||||||||||||||||||||||
|
|
in the |
dryer. |
These |
items |
may |
|
|
|
|
|
||||||||||||||||||||||||||||||||||
|
part |
of |
the |
appliance or |
attempt |
|
turer's |
|
instructions |
may |
result |
|
|||||||||||||||||||||||||||||||||
|
contain |
|
some |
flammable |
|
|
|
|
|
|
|||||||||||||||||||||||||||||||||||
|
any |
service |
unless |
specifically |
|
|
|
|
|
|
in injury |
and/or |
damage. |
|
|
||||||||||||||||||||||||||||||
|
|
substance(s) |
even |
after |
|
|
|
|
|
|
|
||||||||||||||||||||||||||||||||||
|
recommended |
in |
the |
|
|
|
|
|
|
|
|
|
30. BEFORE |
THE |
APPLIANCE |
IS |
|||||||||||||||||||||||||||||
|
|
|
|
|
|
washing. |
|
|
|
|
|
|
|
|
|
|
|
||||||||||||||||||||||||||||
|
user3maintenance |
instructions |
|
17. |
Combustible |
materials, |
|
|
|
|
|
REMOVED |
FROM |
SERVICE |
|
||||||||||||||||||||||||||||||
|
|
|
|
|
|
|
OR |
DISCARDED, |
REMOVE |
|
|
||||||||||||||||||||||||||||||||||
|
or |
in |
published |
user |
repair |
|
|
gasoline, |
and |
other |
flammable |
|
|
|
|||||||||||||||||||||||||||||||
|
|
|
|
THE |
DOOR |
|
TO |
THE |
DRYING |
||||||||||||||||||||||||||||||||||||
|
instructions that |
you |
|
|
|
|
|
vapors |
and |
liquids |
must |
not |
be |
|
|
||||||||||||||||||||||||||||||
|
|
|
|
|
|
|
COMPARTMENT. |
|
|
|
|
|
|
||||||||||||||||||||||||||||||||
|
understand |
and |
have |
the |
skills |
|
stored |
near |
the |
dryer. |
|
|
|
|
|
|
|
|
|
|
|
||||||||||||||||||||||||
|
|
|
|
|
|
31. |
To |
avoid |
|
floor |
damage |
and |
|
|
|||||||||||||||||||||||||||||||
|
to |
carry |
out. |
|
|
|
|
|
|
|
18. |
Do not |
place |
items |
exposed |
to |
|
|
|
||||||||||||||||||||||||||
|
|
|
|
|
|
|
|
|
mold |
growth, |
do |
not let spills |
o |
||||||||||||||||||||||||||||||||
9. |
Do |
|
not |
use |
fabric |
softeners |
or |
|
cooking |
oils |
in |
your |
dryer. |
Items |
|||||||||||||||||||||||||||||||
|
|
splashout |
|
cause |
standing |
|
|
||||||||||||||||||||||||||||||||||||||
|
products |
to |
eliminate |
static |
|
|
contaminated |
with |
cooking |
oils |
|
|
|
|
|||||||||||||||||||||||||||||||
|
|
|
|
water |
around |
or |
under |
the |
|
|
|||||||||||||||||||||||||||||||||||
|
unless |
recommended |
by |
the |
|
|
may |
contribute |
to |
a |
chemical |
|
|
|
|||||||||||||||||||||||||||||||
|
|
|
|
appliance. |
|
|
|
|
|
|
|
|
|
|
|
||||||||||||||||||||||||||||||
|
fabric |
manufacturer. |
|
|
|
|
|
reaction |
that |
could cause |
|
|
|
|
|
|
|
|
|
|
|
|
|
|
|||||||||||||||||||||
|
|
|
|
|
|
|
|
32. |
No |
other |
|
fuel3burning |
|
|
|
||||||||||||||||||||||||||||||
10. |
Do |
|
not |
use |
heat |
to |
dry |
articles |
a load |
to |
catch |
fire. |
|
|
|
|
|
|
|
|
|
||||||||||||||||||||||||
|
|
|
|
|
|
|
appliances |
|
shall |
be |
|
installed |
in |
|
|||||||||||||||||||||||||||||||
|
containing |
foam |
rubber |
or |
|
19. |
Do not |
climb |
or sit |
on |
top |
of |
|
|
|
|
|||||||||||||||||||||||||||||
|
|
|
the |
same |
|
closet |
as |
|
the dryer. |
|
|||||||||||||||||||||||||||||||||||
|
similarly |
textured |
rubber3like |
|
|
the dryer. |
|
|
|
|
|
|
|
|
|
|
|
|
|
|
|||||||||||||||||||||||||
|
|
|
|
|
|
|
|
|
|
|
|
|
|
|
|
|
|
|
|
|
|
|
|
|
|
|
|
|
|||||||||||||||||
|
materials. |
Foam |
rubber |
|
|
|
20. |
To reduce the risk of fire or |
|
|
|
|
|
|
|
|
|
|
|
|
|
|
|
|
|||||||||||||||||||||
|
|
|
|
|
|
|
|
|
|
|
|
|
|
|
|
electrical |
shock, |
DO |
NOT |
use |
|
|
|
|
|
|
|
|
|
|
|
|
|
|
|
|
|||||||||
4

Notes:
A
B
The |
IMPORTANT |
|
|
|
GROUNDING |
|
|
|
|
|
|
|
|
WARNING |
|
|
|||||||||||||||
|
|
|
|
|
|
|
|
|
|
|
|||||||||||||||||||||
|
|
|
INSTRUCTIONS |
|
|
|
|
|
|
|
|||||||||||||||||||||
SAFEGUARDS |
and |
|
|
|
|
|
|
|
|
|
|
|
|
|
|
|
|
|
|||||||||||||
|
|
|
This |
appliance |
must |
be grounded. |
|
Improper connection |
of |
the |
|
||||||||||||||||||||
WARNINGS |
presented |
in |
|
|
|
||||||||||||||||||||||||||
|
|
equipment |
grounding |
conductor |
|
||||||||||||||||||||||||||
this |
manual |
do |
not |
cover |
|
In |
the |
event |
of |
malfunction or |
|
|
|
|
|
||||||||||||||||
all |
|
|
|
|
|
|
|
|
|
|
|
|
|
can result |
in |
a risk |
of |
electric |
|
||||||||||||
possible conditions |
that |
|
breakdown, |
grounding |
will |
reduce |
|
|
|
||||||||||||||||||||||
|
|
|
shock. |
|
|
|
|
|
|
||||||||||||||||||||||
may |
occur. |
|
|
|
|
|
|
the risk of electric shock by |
|
|
|
|
|
|
|
|
|
|
|||||||||||||
|
|
|
|
|
|
|
|
|
|
|
|
|
|
|
|
|
|
||||||||||||||
Common |
sense, |
caution |
|
providing a |
path |
of |
least |
resistance |
|
Check |
with a |
qualified |
electrician |
||||||||||||||||||
and |
care |
must |
be |
|
|
|
for the electric current. This |
|
|
|
|
or service person if you are in |
|||||||||||||||||||
exercised |
when |
installing, |
|
appliance is equipped with a cord |
|
doubt |
as |
to whether the dryer is |
|||||||||||||||||||||||
maintaining |
or |
operating |
|
having |
an |
equipment5grounding |
|
|
|
|
properly grounded. |
|
|
|
|||||||||||||||||
the |
dryer. |
|
|
|
|
|
|
|
conductor and |
a |
grounding plug. |
|
|
DO NOT modify the plug |
|||||||||||||||||
|
|
|
|
|
|
|
|
|
|
The plug must be plugged into an |
|
||||||||||||||||||||
Always |
contact |
|
your |
|
|
|
provided with the appliance 6 |
||||||||||||||||||||||||
dealer, |
distributor, |
service |
|
appropriate |
outlet |
that |
is |
properly |
|
|
if it will |
not |
fit |
the outlet |
have |
||||||||||||||||
|
installed |
and grounded |
in |
|
|
|
|
|
|||||||||||||||||||||||
agent |
or |
the |
manufacturer |
|
|
|
|
|
|
a proper outlet installed by |
|||||||||||||||||||||
|
|
|
|
|
|
|
|
|
|
|
|
|
|
|
|||||||||||||||||
about |
any |
|
problems |
or |
|
accordance |
with |
all |
local |
codes |
and a qualified |
electrician |
or |
|
|
||||||||||||||||
conditions that you do not |
|
ordinances. |
|
|
|
|
|
|
|
|
|
|
exchange the cord with an |
||||||||||||||||||
understand. |
|
|
|
|
|
|
For |
Massachusetts |
Installations: |
|
|
|
|
appropriate |
one rated for the |
||||||||||||||||
|
|
|
|
|
|
|
|
|
|
|
|
bydryer. |
|
|
|
|
|
|
|||||||||||||
|
|
|
|
|
|
|
|
|
|
1. |
Installation |
must |
be |
performed |
|
|
|
|
|
|
|
|
|||||||||
|
|
|
|
|
|
|
|
|
|
a |
licensed |
plumber |
or |
gas |
fitter |
|
|
licen5 |
THESE |
|
|
|
|||||||||
|
|
|
|
|
|
|
|
|
|
sed by the state, province or |
|
|
|
KEEP |
|
|
|
||||||||||||||
|
|
|
|
|
|
|
|
|
|
|
region |
|
|
|
|
|
|
||||||||||||||
|
|
|
|
|
|
|
|
|
|
where |
this |
appliance is being |
instal5INSTRUCTIONS |
FOR |
|||||||||||||||||
|
|
|
|
|
|
|
|
|
|
led. |
|
|
|
|
|
|
|
|
|
|
|
FUTURE |
REFERENCE. |
||||||||
|
|
|
|
|
|
|
|
|
|
2. |
|
Shut-off |
valve |
must |
be |
|
a |
•T" |
of |
change of |
ownership, |
||||||||||
|
|
|
|
|
|
|
|
|
|
handle |
gas |
cock. |
|
|
|
|
|
|
In case |
||||||||||||
|
|
|
|
|
|
|
|
|
|
|
|
|
|
|
|
manual should be conveyed with |
|||||||||||||||
|
|
|
|
|
|
|
|
|
|
|
|
|
|
|
|
|
|
|
|
|
|
|
|||||||||
|
|
|
|
|
|
|
|
|
|
3. |
|
Flexible |
gas |
connector |
must |
|
|
not |
|
|
|
|
|
|
|
|
|||||
|
|
|
|
|
|
|
|
|
|
|
|
|
|
|
|
|
|
|
|
|
|
|
the dryer. |
|
|
|
|
|
|||
|
|
|
|
|
|
|
|
|
|
be |
|
longer |
than 36 |
inches. |
|
|
|
|
|
|
|
|
|
|
|
|
|||||
|
|
|
|
|
|
|
|
|
|
|
|
|
|
|
|
|
|
|
|
|
|
|
|
|
|
|
|
|
|
|
|
SAVE THESE INSTRUCTIONS!
5

INSTALLATION |
INSTRUCTIONS |
||||||||
Introduction |
|
|
|
Information |
|
|
|
||
Read these |
installation instructions |
|
concerning |
waste |
|||||
completely and carefully. They will |
|
disposal |
|
|
|
||||
save you time and effort and help to |
|
|
|
||||||
ensure optimum |
dryer performance. |
|
Disposal of the |
packaging |
|||||
Be sure |
to |
observe |
all listed |
|
WARNING! |
|
|||
warnings |
and cautions. |
|
|
||||||
|
|
|
|
|
|||||
These installation |
instructions are |
|
Keep children away |
from |
|
||||
|
|
|
|
|
|||||
intended |
for |
use |
by |
qualified |
|
shipping carton |
and |
packaging |
|
|
|
|
|
|
|||||
installers. |
In |
addition |
to these |
|
components. Danger |
of |
|
||
|
|
|
|
|
|||||
instructions |
the dryer |
must be |
|
suffocation from |
plastic foil and |
||||
|
|
|
|
|
|||||
installed: |
|
|
|
|
|
folding cartons. |
|
|
|
|
|
|
|
|
|
|
|
|
|
Before |
installing |
|||
the dryer |
||||
Unpacking |
the appliance |
|||
|
|
|
|
|
|
CAUTION |
|
|
|
|
|
|
|
|
The dryer |
is very heavy. Do |
not |
||
lift it by yourself. Do not lift |
|
the |
||
appliance |
by projecting |
|
|
|
components (e.g. door) ? due |
|
to |
||
risk of breakage. |
|
|
||
|
|
|
|
|
- In theU.S.A., |
in accordance |
All packaging |
materials |
are |
|
with the National |
Electric Code, environmentally |
friendly |
and can be |
||
ANSI/NFPA70 |
? |
latest |
reused. Please dispose |
of |
|
edition/State |
and |
Municipal |
packaging in |
an environmentally |
|
codes and/or |
local codes. |
friendly manner. |
|
||
CAUTION
Remove the appliance packaging carefully to prevent damage to the surfaces.
- |
In Canada, |
in |
accordance |
with |
Please |
ask your dealer or |
inquire at |
|
|
|
|
||||||||||
|
|
|
|
|
|
|
|
|
Check the dryer for transportation |
||||||||||||
|
the Canadian |
Electric Code |
your local authority about current |
|
damage. Do not connect a dryer |
||||||||||||||||
|
C22.1 |
? |
latest edition/Provincial |
means |
of |
disposal. |
|
|
|
|
which is visibly damaged. If in |
||||||||||
|
and Municipal |
codes and/or |
Disposal of |
the |
appliance |
|
|
|
doubt, contact your |
dealer. |
|||||||||||
|
local |
codes. |
|
|
|
|
|
|
|
|
|
|
|
||||||||
|
|
|
|
|
|
|
|
|
|
|
|
|
Supplied |
components |
|
|
|||||
The gas installation must conform |
WARNING! |
|
|
|
|
||||||||||||||||
|
|
|
CAUTION |
|
|
||||||||||||||||
with local codes, or in absence of |
|
|
|
|
|
|
|
|
|
|
|
|
|||||||||
If appliance is no longer |
usable, |
|
|
|
|
||||||||||||||||
local codes, |
with |
the National |
Fuel |
|
|
|
|
|
|
||||||||||||
|
After removing the |
packaging, |
|
||||||||||||||||||
Gas |
Code, |
ANSI |
Z223.1/NFPA |
54 |
pull out |
main plug, cut |
off |
power |
|
||||||||||||
cord |
and |
discard |
with main |
plug. |
|
immediately remove |
any |
objects |
|
||||||||||||
or the CAN/CSA>B149.1, |
|
|
|
||||||||||||||||||
|
|
|
|
|
|
|
|
|
|
from the |
drum. |
|
|
|
|||||||
Installation |
Codes. |
|
|
|
To prevent children from locking |
|
|
|
|
||||||||||||
|
|
|
|
|
|
|
|
|
|||||||||||||
|
|
|
|
The dryer |
is delivered as |
a complet |
|||||||||||||||
Note: |
|
|
|
|
|
|
themselves |
in |
the |
appliance, |
|
|
|
||||||||
|
|
|
|
|
|
remove |
the door. |
|
|
|
|
|
unit. The operating instructions and |
||||||||
This |
gas |
dryer |
has |
been UL |
and |
|
|
|
|
|
|||||||||||
C-UL listed |
for |
safe |
operation |
up |
to |
|
|
|
|
|
|
|
|
supplied accessories |
can |
be found |
|||||
|
|
|
|
|
|
|
|
Old appliances are not worthless |
|
in the drum. |
|
|
|
||||||||
a height of 7,700 ft. without any |
rubbish! Valuable raw materials can |
|
|
|
|
||||||||||||||||
modifications |
to |
components for |
be reclaimed |
from |
environmentally |
|
|
|
|
|
|
||||||||||
natural gas. |
|
|
|
|
|
friendly |
recycling. |
|
|
|
|
|
|
|
|
|
|
||||
|
|
|
|
|
|
|
|
Please ask your dealer or inquire |
at |
|
|
|
|
||||||||
|
|
|
|
|
|
|
|
your local authority about current |
|
|
|
|
|
|
|||||||
|
|
|
|
|
|
|
|
means |
of |
disposal. |
|
|
|
|
|
|
|
|
|
||
6
Installation location |
|
|
WARNING! |
|
|
|
|
|
|
|||||
|
|
|
|
|
|
|
|
|
|
|||||
WARNING! |
|
|
|
|
||||||||||
|
If i*/0a((ed i* a ga.age, 0he |
d.ye. - |
De,e*di*g +* 0he (+ca0i+* +f |
|||||||||||
|
|
|
|
)1/0 be i*/0a((ed +* |
a |
|
|
0he exha1/0 |
ai. c+**ec0i+*, |
a* |
||||
D+ |
*+0 i*/0a(( 0he |
d.ye.: |
|
|
||||||||||
/1b/0a*0ia( ,(a0f+.) a0 (ea/0 18 |
addi0i+*a( |
)i*i)1) di/0a*ce |
+f |
|||||||||||
|
|
|
|
|||||||||||
- |
+10d++./, |
|
|
i*che/ ab+ve 0he f(++. 0+ .ed1ce |
5½ i*ch (14 c)) )1/0 be |
|
||||||||
- |
i* a* e*vi.+*)e*0 wi0h d.i,,i*g |
0he (i'(ih++d +f ig*i0i*g |
|
|
,.+vided +* 0hi/ /ide f+. |
|
||||||||
f(a))ab(e |
va,+./ a*d |
be |
|
|
,i,e//b.ac'e0/ (/ee ,age 9). |
|
||||||||
|
wa0e., |
|
|
(+ca0ed +. |
,.+0ec0ed |
/+ i0 |
ca**+0 - |
Di/0a*ce/ |
ab+ve 0he |
i*dica0ed |
||||
|
|
|
|
|||||||||||
- |
*ea. f(a))ab(e |
)a0e.ia(/, |
be da)aged by a )+vi*g |
vehic(e |
)i*i)1) |
di)e*/i+*/ |
.ed1ce |
|
||||||
- |
i* .++)/ which |
a.e a0 .i/' +f |
|
|
|
|
|
0he .i/' |
+f |
)+(d f+.)a0i+* |
|
|||
|
|
|
|
|
behi*d 0he |
a,,(ia*ce. |
|
|
||||||
|
f.+/0, |
|
|
|
|
|
|
|
|
|
||||
|
|
|
|
|
|
|
|
|
|
|
|
|
||
-i* .++)/ which )ay c+*0ai* ga/ +. +0he. f1e(/,
-i* c1,b+a.d/ wi0h (+c'ab(e
d++./ +. i* a(c+ve/.
-wi0h +0he. f1e(8b1.*i*g a,,(ia*ce i* 0he /a)e c(+/e0.
The i*/0a((a0i+* .++) )1/0 be we(( ve*0i(a0ed, +0he.wi/e 0he d.ye. wi(( +,e.a0e be(+w +,0i)1) ,e.f+.)a*ce.
D+ *+0 +,e.a0e 0he d.ye. a0 |
|
|
|
|
|
|
|
|
|
|
|
|
|
|
|
|
|
|
||||||||
0e),e.a01.e/ ab+ve 104°F (40°C) |
|
|
|
|
|
|
|
|
|
|
|
|
|
|
|
|
|
|
||||||||
|
|
|
|
|
|
|
|
|
|
|
|
|
|
|
|
|
|
|||||||||
a*d be(+w 41°F (5°C). L+w |
|
|
|
|
|
m n n |
t |
|
|
|
|
|
|
|
||||||||||||
0e),e.a01.e/ |
affec0 |
0he |
a10+)a0ic |
|
|
0 |
|
!! |
1 |
|
& |
|
|
|
|
|
|
|||||||||
,.+g.a) |
/e-1e*ce |
a*d |
)ay |
|
|
|
1 |
0 |
!! |
|
|
|
|
|
|
|
|
|||||||||
,.+(+*g |
0he |
d.yi*g |
0i)e/. |
|
|
|
|
|
|
|
|
|
|
|
|
|
|
|||||||||
|
|
|
|
|
4 |
!! |
|
) ' |
|
|
|
|
|
|
|
|
||||||||||
|
|
|
|
|
|
|
|
|
|
|
|
|
|
|
|
|
|
|
|
|||||||
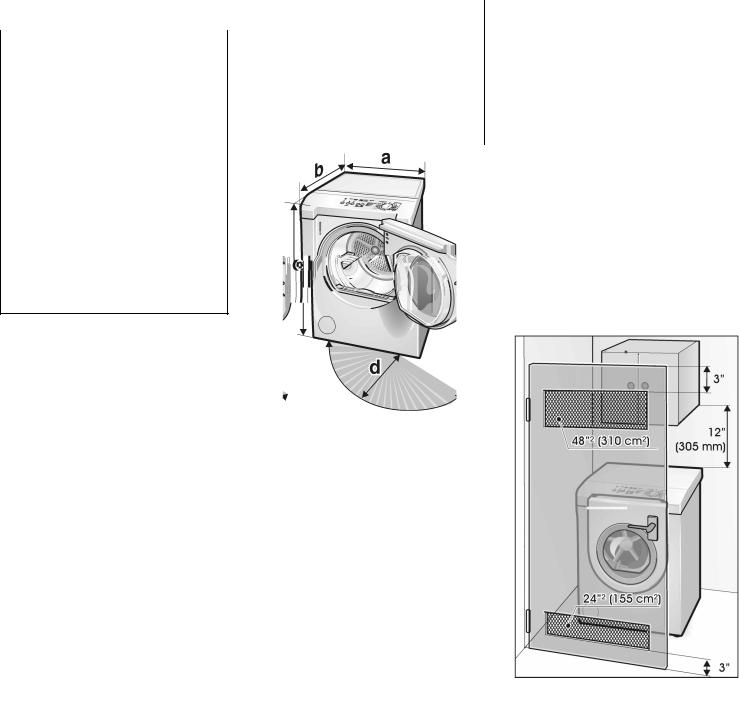
The |
i*/0a((a0i+* /1.face f+. |
0he |
d.ye. |
$" |
|
|
|
|
|
|
||||||||||||||||
|
|
|
|
|
|
|
|
|
|
|
||||||||||||||||
|
1 |
00 |
!! |
14 |
|
& |
|
|
|
|
|
|
||||||||||||||
)1/0 |
be c(ea*, (eve( a*d fi.). |
D+ |
|
|
|
|
|
|
|
|
||||||||||||||||
" |
|
1 0 1 0* |
4 |
|
|
|
|
|
|
|
|
|||||||||||||||
*+0 |
i*/0a(( 0he a,,(ia*ce |
+* |
ca.,e0/! |
|
|
|
|
|
|
|
||||||||||||||||
C+),e*/a0e |
f+. |
1*eve* |
f(++./ |
wi0h |
If |
i*/0a((i*g |
0he |
d.ye. i* a |
c(+/e0, |
|
|
|
|
|
|
|||||||||||
0he |
heigh08adj1/0ab(e |
fee0. |
|
|
+b/e.ve |
0he |
)i*i)1) |
di/0a*ce/ |
|
|
|
|
|
|
||||||||||||
I*/0a(( 0he d.ye. |
a*d |
(eve( /ide |
|
acc+.di*g 0+ 0he f+((+wi*g 0ab(e: |
|
|
|
|
|
|
||||||||||||||||
|
|
|
|
|
|
|
|
|
|
|
|
|
|
|
|
|
|
|||||||||
0+ /ide a*d f.+*0 0+ bac'. |
|
|
Mi*i)1) |
I*/0a((a0i+* C(ea.a*ce/ |
|
|
|
|
|
|
||||||||||||||||
U/e a b1bb(e (eve(. Neve. .e)+ve |
|
|
|
|
|
|
|
|
|
|
|
|
|
|
|
|
|
|||||||||
|
|
|
|
|
t |
|
|
|
|
|
|
|
|
|
||||||||||||
0he |
heigh08adj1/0ab(e |
fee0! |
|
|
|
|
|
|
|
|
|
|
|
|
|
|
|
|
||||||||
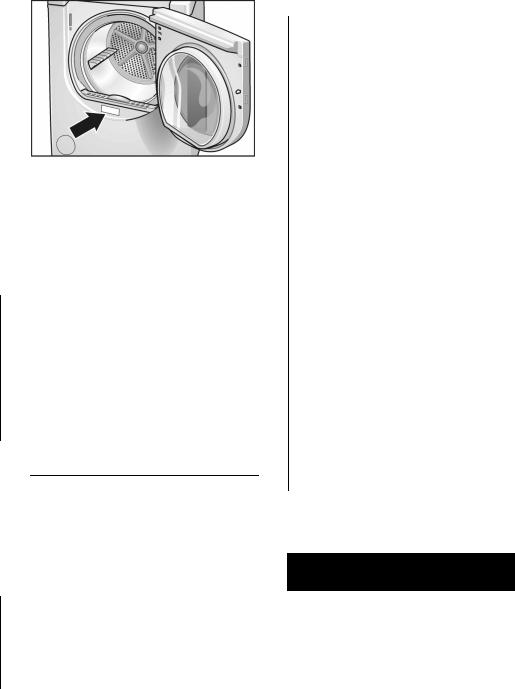
The |
/ize |
+f |
0he |
i*/0a((a0i+* |
a.ea |
& |
|
|
|
0 |
|
!! |
|
|
The |
d.ye. |
d++. |
i/ de(ive.ed wi0h |
|
|||||||
|
|
|
|
|
|
|
|
|
|
|
|
|||||||||||||||
de,e*d/ |
+* |
0he |
di)e*/i+*/ |
+f |
0he |
#$ |
|
|
|
1 |
!! |
|
||||||||||||||
|
|
|
hi*ge/ +* |
0he .igh0. |
If .e-1i.ed, |
0he |
||||||||||||||||||||
d.ye.. E*/1.e 0ha0 0he.e i/ ade-1a0e% |
|
|
|
|
|
|
|
|
|
|||||||||||||||||
|
|
|
0 |
|
!! |
|
|
d++. |
hi*ge/ ca* |
be |
/wi0ched 0+ |
0he |
||||||||||||||
.++) f+. 0he /wive( .a*ge +f 0he |
|
|
|
|
|
|
|
|
|
|
|
|
|
|
|
|
|
|||||||||
|
& #& |
'# |
) |
& |
&+$ $" |
" |
( "' " (ef0 |
/ide. |
|
|
|
|
||||||||||||||
d++.! |
|
|
|
|
|
|
|
|
|
|
|
|
||||||||||||||
|
|
|
|
|
|
|
|
|
|
) |
#) |
|
|
|
|
|
|
|
|
|
|
|
|
|
|
|
Electrical |
connection |
You |
will |
find |
the rating plate on the |
|
|
connection |
|
|
||||||||||||||||||||||||
inside of the |
front |
panel. |
|
|
|
|
as |
|
|
|||||||||||||||||||||||||
ROUND N |
N TRUCT ON |
|
|
|
|
|
WARN N |
|
|
|||||||||||||||||||||||||
|
|
|
|
|
|
|
|
|
|
|
||||||||||||||||||||||||
This |
appliance |
must be |
grounded. |
|
|
|
|
|
|
|
|
|
|
|
||||||||||||||||||||
|
|
|
|
|
|
|
|
|
|
|
|
|
|
|
|
|
|
|
|
|
||||||||||||||
|
|
|
|
|
|
|
|
|
|
Explosion |
hazard! |
|
|
|
|
|||||||||||||||||||
In the event of a malfunction or |
|
|
|
|
|
|
|
|
|
|
|
|
|
|
||||||||||||||||||||
|
|
|
|
|
|
|
|
|
|
|
|
|
|
|
|
|
|
|
|
|
||||||||||||||
breakdown, |
|
grounding |
will |
|
reduce |
|
|
|
|
|
|
|
|
|
|
Use a new AGA or CSA |
|
|||||||||||||||||
the risk of electrical shock by |
|
|
|
|
|
|
|
|
|
|
approved |
gas supply line. |
|
|||||||||||||||||||||
providing |
a |
|
path of |
least |
|
resistance |
|
|
|
|
|
|
|
|
|
|
Install |
a |
shutAoff |
valve. |
|
|
||||||||||||
for |
the |
electric |
current. |
|
|
|
|
|
|
|
|
|
|
|
|
|
|
Securely |
tighten all |
gas |
|
|||||||||||||
This appliance |
features |
a |
|
cord with |
|
|
|
|
|
|
|
|
|
|
connections. |
|
|
|
|
|
||||||||||||||
an |
equipmentAgrounding |
conductor |
|
|
|
|
|
|
|
|
|
|
Have a qualified person make |
|
||||||||||||||||||||
and a grounding plug. The plug |
|
|
|
|
|
|
|
|
|
|
sure gas pressure does not |
|
||||||||||||||||||||||
must |
be |
plugged into |
an |
|
|
Connection |
specifications |
as |
well |
|
exceed 14 in. W.C./ 3.49 kPa/ |
|
||||||||||||||||||||||
appropriate outlet which has been |
|
0.506 |
psig. |
(Natural |
Gas). |
|
||||||||||||||||||||||||||||
as the electrical requirements are |
|
|
||||||||||||||||||||||||||||||||
properly |
installed |
and |
grounded in |
stipulated on |
the appliance |
|
|
|
Example |
of |
a qualified |
person |
|
|||||||||||||||||||||
accordance |
|
with |
all |
local |
|
|
|
nameplate. |
|
|
|
|
|
|
|
include: |
|
|
|
|
|
|
|
|||||||||||
regulations |
and |
ordinances. |
|
|
|
|
|
|
|
|
|
|
|
|
|
|
|
|
|
|
|
|
||||||||||||
|
|
Make sure |
that: |
|
|
|
|
|
- |
licensed |
heating |
personnel, |
|
|||||||||||||||||||||
|
|
|
|
|
|
|
|
|
|
|
|
|
|
|
|
|
|
|
|
|||||||||||||||
|
|
|
|
|
|
|
|
|
|
|
|
|
|
|
|
|
|
|
- |
authorized |
gas |
supplier |
|
|||||||||||
WARN N |
|
|
|
|
|
|
|
|
|
|
|
|
|
|
||||||||||||||||||||
|
|
- |
the |
power |
cord |
plug |
fits |
into |
the |
personnel, |
|
|
|
|
|
|||||||||||||||||||
|
|
|
|
|
|
|
|
|
|
|
|
|
|
|
socket. |
|
|
|
|
|
|
- |
authorized |
service |
personnel. |
|
||||||||
Improper |
connection |
of |
|
the |
|
|
|
|
|
|
|
|
||||||||||||||||||||||
|
|
- |
the |
power |
cord |
is acceptable |
|
Failure to |
do can result in |
|
||||||||||||||||||||||||
equipment |
|
grounding |
conductor |
|
|
|
||||||||||||||||||||||||||||
|
|
|
explosion |
or |
fire. |
|
|
|
|
|||||||||||||||||||||||||
|
|
|
for use |
in |
this |
application. |
|
|
|
|
|
|||||||||||||||||||||||
may |
result |
in |
electric |
shock. |
|
|
|
|
|
|
|
|||||||||||||||||||||||
|
|
|
|
|
|
|
|
|
|
|
|
|
|
|||||||||||||||||||||
|
|
|
|
|
|
|
|
|
|
|
Risk |
of |
death or |
injury! |
|
|||||||||||||||||||
Have |
the |
|
appliance checked by |
- |
the |
grounding system |
is |
|
|
|
|
|||||||||||||||||||||||
|
|
|
|
All gas line connections must |
be |
|||||||||||||||||||||||||||||
a qualified |
|
electrician |
or |
|
service |
|
properly |
installed. |
|
|
|
|
||||||||||||||||||||||
technician |
|
if |
you are |
in |
doubt as |
|
|
|
|
|
|
|
|
|
|
tested for leaks prior to |
|
|||||||||||||||||
|
The |
power |
cord may be |
replaced |
by |
|
|
|
operation. |
Apply |
|
|||||||||||||||||||||||
to |
whether |
the |
dryer |
has |
been |
an |
electrician |
only. |
|
|
|
|
|
appliance |
|
|||||||||||||||||||
properly grounded. |
|
|
|
|
|
|
|
|
|
|
|
soapy water to gas line |
|
|||||||||||||||||||||
|
|
|
|
|
|
Replacement |
power |
cords |
are |
|
|
|||||||||||||||||||||||
|
|
|
|
|
|
|
|
|
|
|
|
|
|
|
connections |
and |
check |
for |
|
|||||||||||||||
Do |
not |
modify |
the |
plug |
provided |
|
|
|||||||||||||||||||||||||||
available |
from |
Customer Service. |
|
|
||||||||||||||||||||||||||||||
|
formation |
of |
new |
bubbles. |
|
|||||||||||||||||||||||||||||
with |
the |
appliance |
- |
if |
it |
will not |
fit in |
|
|
|
|
|
|
|
|
|
||||||||||||||||||
|
|
|
|
|
|
|
|
Bubbles |
indicate |
leak! |
|
|
||||||||||||||||||||||
Volt |
Hertz |
Ampere |
Watt |
|
|
|
|
|||||||||||||||||||||||||||
the |
outlet, |
have |
a |
proper |
outlet |
|
|
|
||||||||||||||||||||||||||
|
|
|
|
|
|
|
|
|
|
|
|
|||||||||||||||||||||||
|
When |
installing the gas |
supply to |
|||||||||||||||||||||||||||||||
installed |
by |
|
a |
qualified |
electrician or 110-120 |
60 |
|
9 |
1080 |
|
|
|||||||||||||||||||||||
exchange the cord with an |
|
|
|
|
|
|
|
|
|
|
the gas dryer inlet pipe, do not |
|||||||||||||||||||||||
|
|
|
|
|
|
|
|
|
||||||||||||||||||||||||||
appropriate |
|
one |
rated |
for |
the dryer. |
|
|
|
|
|
|
|
|
|
exceed |
310 |
lbf in |
(35 |
Nm). |
|||||||||||||||
WARN N |
|
||
|
|
||
The dryer must only be |
|
||
connected to |
an |
individual |
|
branch circuit |
via |
a socket which |
|
has been properly installed and |
|||
grounded. |
|
|
|
|
|
|
|
The household electrical voltage must correspond to the voltage specification on the dryer (rating plate).
WARN N
Never use an |
open |
flame to |
test |
|
for |
gas leaks. |
|
|
|
|
|
|
|
|
as |
type |
|
|
|
This |
dryer when equipped for use |
|||
with |
NATURAL |
GAS |
will employ an |
|
orifice size 46 and have a gas outl pressure of 3.5 in. W.C.
Your dryer must have the correct valve for the type of gas in your home. Valve information is located on the rating plate behind the door below the port hole.
If the ratingAplate information |
does |
not agree with the type of |
gas |
available, contact your dealer or our costumer service team
(see page 27).
8
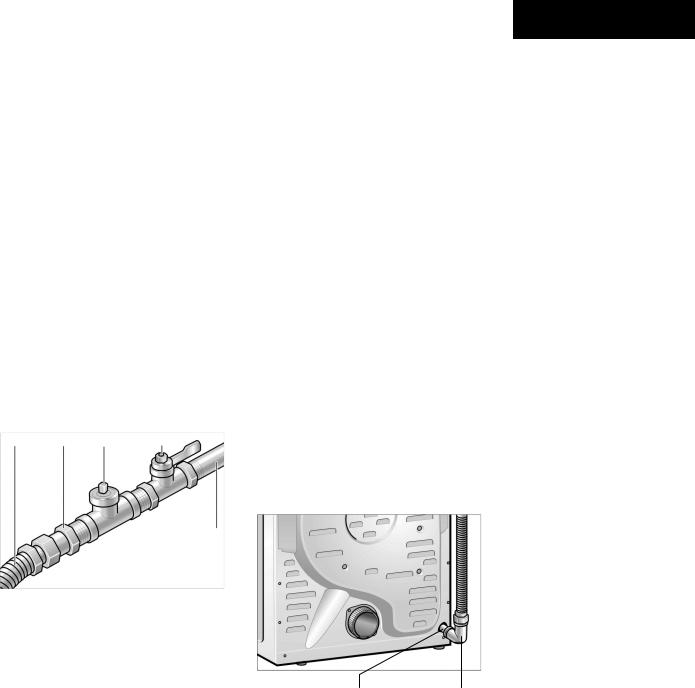
Gas |
supply |
line |
|
|
|
Dryer |
gas |
pipe |
|
|
|
|
|
||||||
1/2" I.D. pipe |
is |
recommended. |
The gas |
pipe that |
comes out |
||||||||||||||
through |
the |
rear of the dryer has |
|||||||||||||||||
3/8" approved |
|
|
|
|
|||||||||||||||
tubing |
is |
acceptable |
a 3/ " male |
pipe |
thread. |
|
|
|
|||||||||||
for lengths under 20 ft |
(6.1 m) if |
8 |
|
|
|
|
|
|
|
|
|
||||||||
Connection |
of |
the |
dryer |
||||||||||||||||
local codes and gas supplier |
|
|
|
|
|
|
|
|
|
|
|||||||||
permit. |
|
|
|
|
|
|
CAUTION |
|
|
|
|||||||||
Must |
include1/ " NPT |
plugged |
|
|
|||||||||||||||
|
|
|
|
8 |
|
|
|
|
|
|
|
|
|
|
|
|
|
||
tapping, |
immediately |
upstream of |
Connection |
must be |
made by |
|
|
||||||||||||
the |
|
gas |
connection. |
|
|
|
|
||||||||||||
|
|
|
a qualified |
technician. |
|
|
|
|
|||||||||||
|
|
|
|
|
|
|
|
|
|
|
|
|
|||||||
A |
shut |
off |
valve |
must |
be included: |
The |
dryer |
must be |
disconnected |
|
|
||||||||
- |
USA: |
|
|
|
|
|
from the gas supply piping |
|
|
||||||||||
|
An |
individual |
manual |
shut@off |
system |
during |
testing pressure. |
|
|
||||||||||
|
valve must |
be installed within |
|
|
|
|
|
|
|
|
|
|
|||||||
|
6 ft (1.8 m) of the dryer in |
|
|
|
|
|
|
|
|
|
|
||||||||
|
accordance |
with |
the |
National |
|
|
|
|
|
|
|
|
|
|
|||||
|
Fuel |
Gas Code, |
ANSI Z223.1. |
|
|
|
|
|
|
|
|
|
|
||||||
|
|
|
|
|
|
|
|
|
|
|
|||||||||
- |
Canada: |
|
|
|
|
|
WARNING |
|
|
|
|||||||||
|
An |
individual |
manual |
shut@off |
|
||||||||||||||
|
valve must |
be installed in |
Do |
not |
use copper |
pipes and |
|
|
|||||||||||
|
accordance |
with |
the |
B149, |
|
||||||||||||||
|
tubing |
if connected |
to |
natural |
|
|
|||||||||||||
|
Installation |
Codes, CAN/CSA |
|
||||||||||||||||
|
gas. |
|
|
|
|
|
|
|
|
|
|||||||||
|
B149.1 |
and |
CAN/CSA B149.2. |
|
|
|
|
|
|
|
|
|
|||||||
|
|
|
|
|
|
|
|
|
|
|
|||||||||
|
The connection may be different, |
||||||||||||||||||
|
It is recommended that an |
||||||||||||||||||
|
individual |
manual |
shut@off valve |
according to the supply |
line type, |
||||||||||||||
|
be installed within 6 ft (1.8 m) |
size and |
location. |
|
|
|
|
|
|||||||||||
|
of |
|
|
|
|
|
|
|
|
|
|||||||||
|
the |
dryer. |
|
|
|
|
|
|
|
|
|
|
|
|
|
|
|||
5 |
|
|
4 |
|
3 |
|
2 |
|
|
|
|
|
|
|
|
|
|
|
|
1
1
1 |
' 1/2 |
NPT gas |
supply line |
|
|
|
2 |
' |
Gas |
shut&off |
valve |
|
|
3 |
' 1/8 |
NPT plugged tapping |
|
|
||
4 |
' 3/8 |
pipe to flare adapter fitting |
|
|
||
5 |
' |
3/8 |
flexible gas connector to the dryer |
1 |
2 |
|
The shut@off valve should be easy reach for opening and closing.
Note:
The dryer must be checked for
proper operation whenever the gas 1 ' gas pipe3/8 male pipe thread connections have been broken.
Exhaust air connection
WARNING!
9
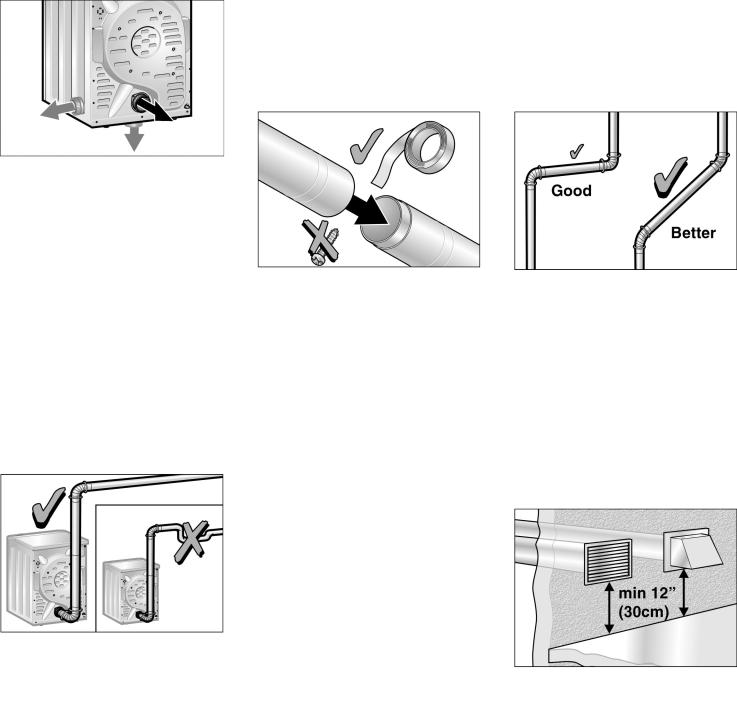
DO NOT assemble the ductwork |
More than two ° 0turns are not |
with screws or fasteners that |
recommended. For best |
extend into the duct. They will serveperformance, |
separate all turns by |
||
as an accumulation point |
for lint. |
at least 4 ft. of straight duct, |
|
Joints should be secured |
with |
including distance between last turn |
|
aluminum tape. |
|
and exhaust |
hood. |
2 |
1 |
3
1 ! Exhaust air outlet on the rear of the appliance (standard)
2 ! Exhaust air outlet on the side (optional)
3 ! Exhaust air outlet on the underside of the appliance (optional)
Special |
exhaust |
air |
connections |
|
|
|
|
|
|
|
|
|
|
|
|
|
|
|
|
|
|
|
|
|
|
|
|
|
|
|
|
||||||
must |
be |
obtained from |
our |
|
|
All |
joints |
should |
be |
|
tight |
|
to |
avoid |
|
|
|
|
|
|
|
|
|
|
|||||||||||||
customer |
service |
for |
either |
|
|
leaks. |
The male |
end |
of |
each |
duct Exhaust |
vent |
hood |
|
|
||||||||||||||||||||||
connection |
type |
(see page 11). |
|
|
section |
|
must point |
|
away |
from |
the |
The |
exhaust |
duct |
must |
end |
with an |
||||||||||||||||||||
- |
Side |
air exhaust |
|
|
|
|
dryer. |
|
|
|
|
|
|
|
|
|
|
|
|
|
approved |
exhaust |
vent |
hood |
with |
||||||||||||
|
|
|
|
|
|
|
|
|
|
|
|
|
|
|
|
|
|
|
|
||||||||||||||||||
|
|
|
|
|
|
|
|
|
|
|
|
|
|
|
|
|
|
|
|
swing out |
damper(s). DO NOTuse |
||||||||||||||||
- |
ottom |
air |
exhaust |
|
|
|
Whether |
connecting |
|
to an |
existing |
||||||||||||||||||||||||||
|
|
|
venting |
|
system |
or |
a |
new |
venting |
an |
exhaust |
vent |
hood |
with |
|
||||||||||||||||||||||
|
|
|
|
|
|
|
|
|
|
|
|
|
|
||||||||||||||||||||||||
A qualified |
technician should |
|
|
system, |
make |
sure |
|
that |
all |
ducting magnetic |
latches. |
|
|
|
|
||||||||||||||||||||||
change |
the |
exhaust |
air |
outlet to |
theis |
clean |
and free |
of |
lint. |
|
|
|
|
To |
avoid |
exhaust |
restriction, |
the |
|||||||||||||||||||
optional |
connection |
location. |
|
|
|
|
|
|
|
|
|
|
|
|
|
|
|
|
|
|
|||||||||||||||||
|
|
The |
maximum |
permitted |
length |
|
for |
outlet must |
be |
a |
minimum |
of |
|||||||||||||||||||||||||
|
|
|
|
|
|
|
|
|
|
|
|
|
|||||||||||||||||||||||||
Ductwork |
|
|
|
|
|
|
|
|
both |
rigid |
and |
flexible metal |
duct |
12 inches |
(30 |
cm) |
|
above ground |
|||||||||||||||||||
|
|
|
|
|
|
|
|
is |
|
|
|
|
|
|
|
|
|
||||||||||||||||||||
|
|
|
|
|
|
|
|
|
|
|
|
shown |
in |
the |
table |
|
below. |
|
|
|
level or any other obstructing |
||||||||||||||||
|
|
|
|
|
|
|
|
|
|
|
|
|
|
|
|
|
|
|
|
|
|
|
|
|
|
|
|
surface. |
|
|
|
|
|
|
|
|
|
|
|
|
|
|
|
|
|
|
|
|
|
Number |
of |
Rigid |
Duct |
|
|
Flexible |
Duct |
|
|
|
|
|
|
|
|
||||||||||
|
|
|
|
|
|
|
|
|
|
|
|
|
|
|
|
|
|
|
|
|
|
|
|
||||||||||||||
|
|
|
|
|
|
|
|
|
|
|
90° |
Turns |
|
|
|
|
|
|
|
|
|
|
|
|
|
|
|
|
|
|
|
|
|
|
|||
|
|
|
|
|
|
|
|
|
|
|
|
or |
Elbows |
|
|
|
|
|
|
|
|
|
|
|
|
|
|
|
|
|
|
|
|
|
|||
|
|
|
|
|
|
|
|
|
|
|
|
|
|
|
|
|
|
|
|
|
|
|
|
|
|
|
|
|
|
|
|
|
|
|
|
|
|
|
|
|
|
|
|
|
|
|
|
|
|
|
0 |
|
|
|
66 ft. |
|
|
|
|
45 |
ft. |
|
|
|
|
|
|
|
|
|
|
|
|
|
|
|
|
|
|
|
|
|
|
|
|
|
|
|
|
|
|
|
(2011 |
cm) |
|
|
(1372 |
cm) |
|
|
|
|
|
|
|
|
|
|
|
|
|||
|
|
|
|
|
|
|
|
|
|
|
|
|
1 |
|
|
|
56 ft. |
|
|
|
|
36 |
ft. |
|
|
|
|
|
|
|
|
|
|
|
|
|
|
|
|
|
|
|
|
|
|
|
|
|
|
|
|
|
|
|
(1707 |
cm) |
|
|
(1097 |
cm) |
|
|
|
|
|
|
|
|
|
|
|
|
|||
|
|
|
|
|
|
|
|
|
|
|
|
|
2 |
|
|
|
48 ft. |
|
|
|
|
29 |
ft. |
|
|
|
|
|
|
|
|
|
|
|
|
|
|
To |
ensure |
optimum |
performance, |
|
|
|
|
|
|
(1463 |
cm) |
|
|
(884 |
cm) |
|
|
|
|
|
|
|
|
|
|
|
|
||||||||||
the |
ducting |
system |
of |
the dryer |
|
|
3 |
|
|
|
39 ft. |
|
|
|
|
22 |
ft. |
|
|
|
|
|
|
|
|
|
|
|
|
|
|||||||
should |
|
be |
as |
short |
as |
possible |
with |
|
|
|
|
|
|
|
|
|
|
Required |
parts |
|
|
|
|
|
|||||||||||||
|
|
|
|
|
(1189 |
cm) |
|
|
(671 |
cm) |
|
|
|
|
|
|
|
||||||||||||||||||||
a minimum |
number |
of |
elbows. |
|
|
|
|
|
|
|
|
|
|
|
|
|
|
|
|
|
|
|
|
|
|||||||||||||
|
|
|
|
|
|
|
|
|
|
|
|
|
|
|
|
|
|
The |
parts |
required |
|
for |
the exhaust |
||||||||||||||
Your dryer |
will |
work |
best when |
the |
4 |
|
|
|
30 ft. |
|
|
|
|
16 |
ft. |
|
|
|
|
||||||||||||||||||
|
|
|
|
|
|
|
|
|
|
air |
system |
(elbows, |
lines, exhaust |
||||||||||||||||||||||||
venting |
system |
has |
as |
few air |
flow |
|
|
|
|
(914 cm) |
|
|
|
(488 |
cm) |
|
|
||||||||||||||||||||
|
|
|
|
|
|
|
|
|
air |
outlets) |
are |
not |
included |
in |
|||||||||||||||||||||||
|
|
|
|
|
|
|
|
|
|
|
|
|
|
|
|||||||||||||||||||||||
restrictions |
as |
possible. |
Exhaust |
|
|
Note: |
|
|
|
|
|
|
|
|
|
|
|
|
|
||||||||||||||||||
|
|
|
|
|
|
|
|
|
|
|
|
|
|
|
standard |
delivery |
of |
the |
dryer. |
||||||||||||||||||
ducting |
which |
is |
longer |
than |
|
|
|
|
|
|
|
|
|
|
|
|
|
|
|
||||||||||||||||||
|
|
Side |
and |
bottom |
exhaust |
|
|
|
|
|
|
|
|
|
|
|
|
|
|
||||||||||||||||||
recommended |
may extend drying |
|
|
|
|
|
|
|
|
|
|
|
|
|
|
|
|||||||||||||||||||||
|
installations have a 0° turn inside |
|
|
|
|
|
|
|
|
|
|
||||||||||||||||||||||||||
|
|
|
|
|
|
|
|
|
|
|
|
|
|
|
|
|
|
|
|
|
|
||||||||||||||||
time, |
cause |
lint |
to |
accumulate |
and the |
dryer. |
To |
determine |
maximum |
|
|
|
|
|
|
|
|
|
|
||||||||||||||||||
affect |
dryer |
performance |
and dryer |
|
exhaust |
length, |
add |
|
one |
0° turn |
to |
|
|
|
|
|
|
|
|
|
|||||||||||||||||
life. |
|
|
|
|
|
|
|
|
|
|
|
the |
chart. |
|
|
|
|
|
|
|
|
|
|
|
|
|
|
|
|
|
|
|
|
|
|||
|
|
|
|
|
|
|
|
|
|
|
|
|
|
|
|
|
|
|
|
|
|
|
|
|
|
|
|
|
|
|
|
|
|||||
Four5inch |
(approx. 100 |
mm) |
|
|
|
|
|
|
|
|
|
|
|
|
|
|
|
|
|
|
|
|
|
|
|
|
|
|
|
|
|||||||
diameter ducting should be used. |
|
|
|
|
|
|
|
|
|
|
|
|
|
|
|
|
|
|
|
|
|
|
|
|
|
|
|
||||||||||
Use either rigid metal or flexible |
|
|
|
|
|
|
|
|
|
|
|
|
|
|
|
|
|
|
|
|
|
|
|
|
|
|
|
||||||||||
metal ducting material. DO NOT |
|
|
|
|
|
|
|
|
|
|
|
|
|
|
|
|
|
|
|
|
|
|
|
|
|
|
|
||||||||||
use |
plastic |
or |
non5metal duct with |
|
|
|
|
|
|
|
|
|
|
|
|
|
|
|
|
|
|
|
|
|
|
|
|
|
|||||||||
this |
dryer. |
|
|
|
|
|
|
|
|
|
|
|
|
|
|
|
|
|
|
|
|
|
|
|
|
|
|
|
|
|
|
|
|
|
|||
10
Accessories
LP - Gas Kit |
Mobile home kit |
The parts required for the exhaust air system can be obtained from customer service or your local dealer. Please follow the installation instructions supplied by the appropriate manufacturer!
Side exhaust kit
|
|
|
|
|
|
part no.WTZ |
1275 |
||
|
|
|
|
|
|
Note: |
|
|
|
|
|
|
|
|
|
Please check with the Authority |
|||
|
|
|
|
|
|
Having Jurisdiction in your area to |
|||
|
|
|
|
|
|
verify if a gas dryer can be installed |
|||
|
|
|
|
|
|
in your mobile home. Once that has |
|||
|
|
|
|
|
|
been verified, installation of the |
|||
|
|
|
|
|
|
dryer shall conform to the |
|||
|
|
|
|
|
|
Manufactured |
Home Construction |
||
part |
no.WTZ |
1280 |
|
|
|
and Safety Standard, Title 24 CFR, |
|||
The |
parts required for |
the LP |
Part 3280 {formerly the Federal |
||||||
Standard for |
Mobile Home |
||||||||
version can |
be obtained from |
your |
|||||||
local |
dealer. |
Please follow the |
|
|
Construction |
and Safety, Title 24, |
|||
|
|
HUD (Part |
280)}, and/or Standard |
||||||
installation instructions |
supplied |
|
by |
||||||
|
CAN/CSA>Z240 MH. |
||||||||
the |
appropriate manufacturer! |
|
|
||||||
|
|
|
|
|
|||||
|
|
|
|
|
|
|
|
|
Note: |
|
|
|
|
|
|
Please use |
mobile home |
kit |
number |
|||
part |
no.WTZ 1265 |
|
|
|
|
|
|
checked for properWTZ |
1275 for means to |
secure the |
||||||||||||
|
|
|
Dryer |
must |
be |
|||||||||||||||||
Note: |
|
|
|
|
|
|
operation |
whenever the |
gas |
dryer |
to |
the |
structure. |
|
|
|||||||
|
|
|
|
|
|
|
|
|
|
|
|
|
|
|
|
|||||||
The |
maximum |
permitted number |
of connections |
have been |
broken |
See |
page 9 |
•Exhaust |
Air |
|
|
|||||||||||
90° |
|
elbows |
(including |
this |
side |
Left |
hinge |
kit |
|
|
|
Connection" |
for the |
exhaust |
duct |
|||||||
exhaust |
kit) |
is |
four! |
|
|
|
|
|
|
installation |
instructions. |
|
|
|||||||||
|
|
|
|
|
|
|
|
|
|
|
|
|||||||||||
|
|
|
|
|
|
|
|
|
holepart no.WTZ 126S |
|
|
|
|
|||||||||
i |
|
Special |
tool |
for |
cutting |
the |
|
|
The exhaust duct must be securely |
|||||||||||||
|
|
|
|
|||||||||||||||||||
|
|
in prepared side panel is |
The door catch can be |
reversed |
if fastened |
to |
a noncombustible |
|||||||||||||||
|
|
required. |
Contact |
local |
dealer! necessary. |
The |
door |
is |
hinged on portion of the mobile home |
|
||||||||||||
Bottom |
exhaust kit |
|
|
|
the right |
at |
the |
factory. |
|
structure and must not terminate |
||||||||||||
|
|
|
|
|
|
|
|
|
Pedestal |
Mounting |
Kit |
|
beneath the |
mobile |
home. |
|
||||||
|
|
|
|
|
|
|
|
|
|
|
||||||||||||
|
|
|
|
|
|
|
|
|
|
|
|
|
|
|
|
|
||||||
part no.WTZ 1295S
If mounting the dryer on the pedestal follow the instructions supplied with the pedestal.
part no.WTZ 1270 Note:
The maximum permitted number of 90° elbows (including this side exhaust kit) is four!
An opening to the outside must be
provided |
during |
installation. |
Insure |
|
||
that |
the |
free area |
of the |
opening |
fo |
|
the |
introduction |
of |
outside |
air is |
not |
|
less than twice the area of the dry exhaust outlet or use at least a 5 inch diameter exhaust or at least a 25 2insquare exhaust duct for the opening.
11
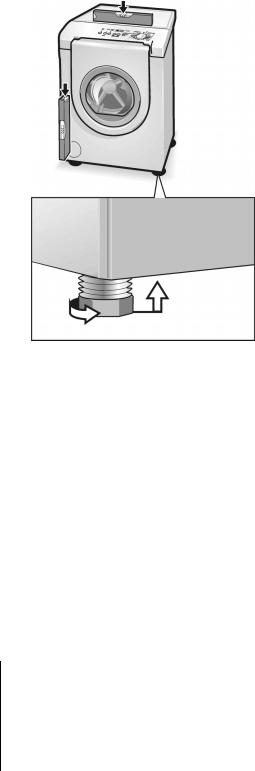
Installation ( step by step
1.Unpack the dryer.
2.Remove all objects from the drum.
3.Check the dryer for visible damage.
4.Position the dryer near the installation location.
5.If required, have customer
service |
change |
the door hinges |
to the |
left (see |
page 7). |
6.If required, have customer service install the exhaust air outlet on the dryer (see page 9).
Switch the dryer to •Extra Dry" and then press the Start button.
After 3-5 minutes press the Stop button and open the door.
6.If the interior of the dryer feels warm, the dryer has been connected properly.
Switch the dryer to •Off".
7.If the dryer does not work, switch the dryer to •Off". Look in the troubleshooting section (page 26) of the OPERATING INSTRUCTIONS and find the fault.
7. |
Have |
the gas |
supply connected |
|
|
Preparing |
to |
transport |
||
|
by an |
qualified |
technician (see |
|
|
the dryer |
( |
step |
||
|
page |
8). |
|
The dryer should be level |
with |
|||||
|
|
by step |
|
|
|
|||||
8. |
Install |
exhaust |
duct, |
|
|
|
||||
all four feet firmly on the |
|
1. |
Close |
the |
shut>off valve. |
|||||
|
if necessary. |
|
ground. The dryer must not |
|||||||
|
Follow |
the installation |
wobble. If the dryer is not |
level |
2. |
Rotate |
the |
programm selector |
||
|
instructions |
supplied by |
the |
|
|
or if |
it |
does wobble, |
the |
feet |
|
to •OFF". |
|
|
|
|
|
|
||||||||||||
|
appropriate |
manufacturer! |
|
|
|
|
must |
be |
adjusted. |
Adjust |
the |
3. |
Pull |
out |
the |
power |
supply |
plug |
||||||||||||
|
|
|
|
|
|
|
|
|
|
|
|
height>adjustable |
feet |
until |
the |
|||||||||||||||
|
|
|
|
|
|
|
|
|
|
|
|
|
or |
|
|
|
|
|
|
|
|
|||||||||
i |
If space is |
very restricted, |
it |
is |
dryer |
does not rock and is level, |
turn |
off |
the |
circuit |
breaker. |
|
||||||||||||||||||
|
recommended |
to fit the |
initial |
|
|
both |
front>to>back |
and |
|
4. |
Disconnect |
gas |
supply |
|
|
|||||||||||||||
|
|
|
side>to>side. |
|
|
|
|
|
|
|
||||||||||||||||||||
|
parts |
of the |
exhaust |
duct |
to |
|
the |
|
|
|
|
|
5. |
Disconnect |
the |
exhaust duct |
||||||||||||||
|
|
|
|
|
|
|
|
|
|
|
||||||||||||||||||||
|
dryer |
before |
the dryer |
is |
moved 11. |
|
|
|
|
|
|
|
|
|
||||||||||||||||
|
Connect |
the |
exhaust |
duct |
to |
|
from |
the |
exhaust air |
outlet |
on |
|||||||||||||||||||
|
to its |
final |
installation |
location. |
|
the exhaust |
air |
outlet |
on |
the |
|
|||||||||||||||||||
|
|
|
the |
dryer. |
|
|
|
|
|
|
||||||||||||||||||||
|
|
|
|
|
|
|
|
|
|
|
|
|
|
|
|
|
|
|
||||||||||||
|
|
|
|
|
|
|
|
|
|
|
|
dryer. |
|
|
|
|
|
|
|
|
|
|
|
|
|
|
|
|||
9. Move |
the dryer to its |
final |
|
|
|
|
|
|
|
|
|
|
6. |
Place any |
accessories |
in the |
||||||||||||||
|
|
|
|
|
|
|
|
|
|
|
||||||||||||||||||||
|
|
|
|
|
|
|
|
|
|
|
12. |
Insert |
plug |
into |
the wall |
|
||||||||||||||
|
location and |
align. |
|
|
|
|
|
|
|
|
drum. |
|
|
|
|
|
|
|
||||||||||||
|
|
|
|
|
|
|
|
|
|
|
|
receptacle. |
|
|
|
|
|
|
|
|
|
|
|
|
|
|
||||
|
|
|
|
|
|
|
|
|
|
|
|
|
|
|
|
|
|
7. |
Close the door and secure with |
|||||||||||
|
|
|
|
|
|
|
|
|
|
|
|
|
|
|
|
|
|
|
|
|
||||||||||
|
CAUTION |
|
|
|
|
|
Check |
list |
before |
|
|
adhesive |
tape. |
|
|
|
|
|||||||||||||
|
|
|
|
|
|
|
8. |
Screw the |
height>adjustable |
|
||||||||||||||||||||
|
|
|
|
|
|
|
|
|
|
|
|
|
||||||||||||||||||
|
|
|
|
|
|
|
|
|
|
|
|
|
||||||||||||||||||
Do not slide dryer across |
the |
|
|
using |
the |
|
dryer |
|
|
|
feet of the dryer into the |
|
||||||||||||||||||
floor if |
height>adjustable |
feet |
|
|
|
1. |
Check that |
|
steps |
1-12 have |
|
housing |
to |
prevent |
them from |
|||||||||||||||
have been extended. |
Feet |
and/or |
|
|
being damaged |
during |
|
|
||||||||||||||||||||||
|
been |
implemented |
properly. |
|
|
|
||||||||||||||||||||||||
dryer base may |
be |
damaged if |
|
|
|
transportation. |
|
|
|
|
|
|||||||||||||||||||
|
2. |
Ensure that |
the |
dryer |
is |
|
|
|
|
|
|
|
||||||||||||||||||
dryer is |
slid |
across |
floor |
with |
|
|
|
|
|
|
|
|
|
|
|
|
||||||||||||||
|
|
connected to the power supply. |
|
|
|
|
|
|
|
|
|
|
||||||||||||||||||
height>adjustable |
feet |
extended. |
|
|
|
|
|
|
|
|
|
|
|
|
||||||||||||||||
|
|
|
|
|
|
|
|
|
|
|
|
|
|
|
|
|
|
|
|
|
||||||||||
|
|
|
|
|
|
|
|
|
|
|
3. |
Open |
the |
shutoff>valve. |
|
|
|
|
|
|
|
|
|
|
|
|||||
10. Position and |
then |
level |
the |
|
|
|
|
|
|
|
|
|
|
|
|
|||||||||||||||
|
4. |
Read |
the |
operating instructions |
|
|
|
|
|
|
|
|
|
|
||||||||||||||||
|
|
|
|
|
|
|
|
|
|
|
|
|
|
|
|
|
|
|
|
|
||||||||||
dryer.
to understand how your dryer operates.
5. Conduct an appliance test:
Check that the drum is empty.
Close the dryer door.
12
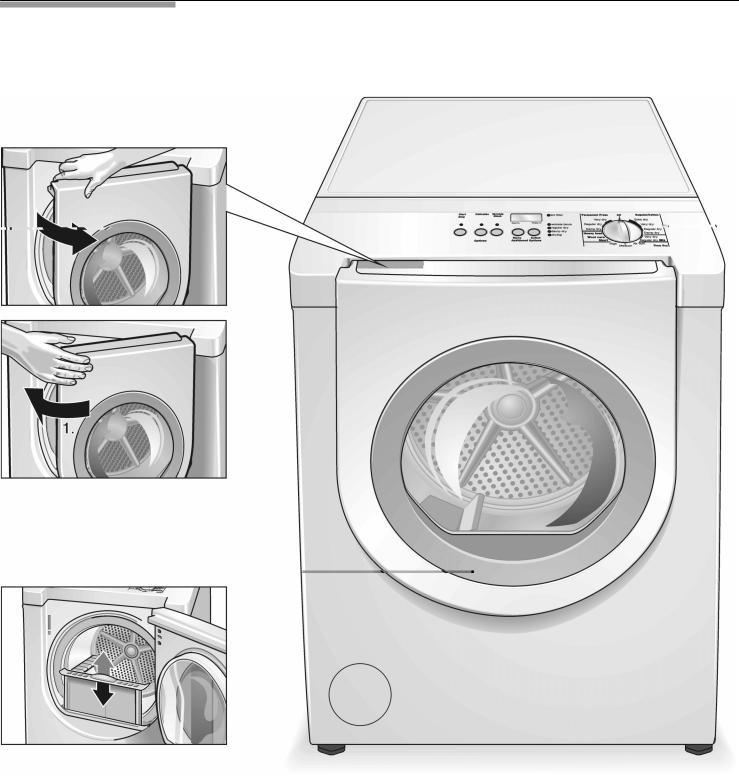
OPERATING INSTRUCTIONS
Your new dryer
Open the door...(colored marking)
....and close the door.
Lint filter
13

Panel
Start/Stop button
Starts, interrupts and ends the drying process.
Buttons for Options(in addition to the program if required). See page 20.
c
Press for temperature.sensitive textiles (e.g. acrylic fibers). The temperature of the drying process is reduced, the drying time is
extended |
correspondingly. |
||
d d |
k ck |
||
Extends |
the |
"Wrinkle |
Block" function |
to 3 hours |
(standard |
1 hour). |
|
Display
Indicates the settings of the additional options and the estimated remaining time of programs.
Indicator light (LED)
Serves as a reminder to clean the lint filter.
Program selector
Selects a program. See page 1 .
Can be rotated in both directions.
To switch off the dryer, rotate the program selector to "Off".
Indicator lights (LED)
Indicate the current moisture state of the drying process.
Buttons for additional options
See page 1 .
Selects one of the additional options.
c
Changes the settings of the additional options.
14

Selecting a program Using the dryer rack
Summary of instructions
CAUTION
Before using your dryer read and
follow all installation |
and operat |
|
ing instructions |
|
Change the settings of |
|
|
|
Preparing the |
|
additional options |
dryer |
||
iCheck the lint filter The filter should be cleaned before and after every drying process
Choose an option...
...and start the dryer. Switch off the dryer
15

Safety information
WARNING
Always follow the IMPORTANT SAF TY INSTRU TIONS
(see page 4).
WARNING
Protection of the
o not use a dryer which is visiblyenvironment damaged. If in doubt, contact your
dealer.
Using |
the |
dryer |
To save energy, money and time, |
||||||||||
osch recommends the |
following: |
||||||||||||
o not leave children unsupervised - |
Drain |
|
the laundry |
thoroughly! |
|||||||||
near |
the |
dryer. |
|
|
|
efore drying, spin the laundry |
|||||||
Keep |
pets away |
from |
the dryer. |
|
thoroughly |
in |
the |
washing |
|||||
|
machine. |
Use |
the |
highest |
|||||||||
efore closing the door, check |
the |
||||||||||||
possible spin |
speed |
for the type |
|||||||||||
contents |
of the |
drum. |
|
|
|||||||||
|
|
of laundry! Higher spin speeds |
|||||||||||
|
|
|
|
|
|
||||||||
Remove all objects from pockets. |
reduce the drying time and the |
||||||||||||
Lighters |
are particularly |
hazardous. |
energy |
consumption. |
|
||||||||
Risk |
of |
explosion! |
|
- |
Use |
optimum |
load! |
||||||
|
|
|
|
|
|||||||||
|
|
|
|
|
|
Use |
maximum |
recommended |
|||||
|
|
|
|
|
|
loads. However, do not exceed |
|||||||
|
|
|
|
|
|
loads. |
|
|
|
|
|
||
Protecting |
the |
dryer |
- |
Clean |
filter! |
|
|
|
|||||
|
|
|
|
|
|
lean the filter before and after |
|||||||
|
|
|
|
|
|
each |
drying process |
|
|||||
|
|
|
|
|
|
(see page 25). |
|
|
|
||||
|
|
|
|
|
- |
Ventilate |
the |
room! |
|
||||
|
|
|
|
|
|
uring the drying process |
|||||||
|
|
|
|
|
|
provide |
an adequate |
supply |
|||||
|
|
|
|
|
|
of fresh |
air. |
|
|
|
|||
- Do clean and inspect the exhaust system on a regular basis!
lockages may extend drying time.

Before |
|
using |
|
Temporary |
|
|
|
|
Laundry |
|
|
|
||||||||||||||||
the |
|
dryer |
|
for |
|
disconnection |
|
|
Identification |
|
|
|||||||||||||||||
the |
|
first |
time |
|
of |
the |
dryer |
|
|
of fabrics |
|
|
|
|
||||||||||||||
Before |
you |
use |
the |
dryer |
for the |
firstOperate |
your |
dryer only |
when |
you |
|
Observe |
the |
treatment symbols |
on |
|||||||||||||
time: |
|
|
|
|
|
|
|
|
|
are at |
home. |
If |
you |
intend going |
|
the textile labels. They provide |
|
|||||||||||
|
|
|
|
|
|
|
|
|
on |
|
|
|
|
|
|
|
|
|||||||||||
|
|
|
|
|
|
|
|
|
|
vacation |
|
or are |
not |
using |
your |
|
|
valuable information as well as |
|
|||||||||
1. Read |
these |
operating |
|
|
|
dryer |
|
|
|
|
|
|
|
|
||||||||||||||
|
|
for an |
extended |
period |
of |
|
|
|
limitations |
about |
the drying |
|
||||||||||||||||
|
|
|
|
|
|
|
|
|
|
|
|
|
|
|||||||||||||||
instructions |
carefully. |
|
|
|
time, you |
|
|
|
|
|
|
|
|
|||||||||||||||
|
|
|
should: |
|
|
|
|
|
|
|
|
|
process. |
|
|
|
|
|
|
|||||||||
2. Check |
that |
the supply |
voltage |
|
|
|
|
|
|
|
|
|
|
|
|
|
|
|
||||||||||
|
|
|
|
|
|
|
|
|
Do |
not |
dry |
the |
following |
textiles in |
||||||||||||||
corresponds |
with |
the voltage |
1. Turn |
off the |
circuit |
breaker. |
|
|
||||||||||||||||||||
|
|
the |
dryer: |
|
|
|
|
|
|
|||||||||||||||||||
specifications |
on |
the |
rating |
|
2. Close |
the |
shutBoff valve. |
|
|
|
|
|
|
|
|
|||||||||||||
|
|
|
|
|
|
|
|
|
|
|
|
|||||||||||||||||
plate |
of |
the |
dryer, see |
picture |
|
|
|
|
|
|
|
|
|
|
|
|||||||||||||
3. Pull |
out the |
power |
supply |
plug - |
AirBtight |
textiles |
|
|
||||||||||||||||||||
page |
27. |
|
|
|
|
|
|
|
|
|||||||||||||||||||
|
|
|
|
|
|
if possible. |
|
|
|
|
|
|
|
|
(e.g. rubberized) |
|
|
|||||||||||
3. Check |
that |
the gas |
type |
|
|
|
|
|
|
|
|
|
|
|
|
|
|
|
|
|
||||||||
|
4. Clean |
the |
lint filter. |
|
|
|
- |
Delicate |
fabrics (silk, |
synthetic |
||||||||||||||||||
corresponds |
with |
specifications |
|
|
|
|||||||||||||||||||||||
|
|
|
|
|
|
|
|
|
|
|
curtains) |
|
|
|
|
|
||||||||||||
on |
the |
rating |
plate |
of |
the |
dryer, |
|
|
|
|
|
|
|
|
|
|
|
|
|
|
|
|||||||
|
|
|
|
|
|
|
|
|
|
|
|
|
|
|
|
|
|
|||||||||||
see |
picture |
page |
27. |
|
|
|
|
|
|
|
|
|
|
|
|
i |
Dry woolen or woolBrich textiles |
|||||||||||
4. Have |
a |
qualified |
person make |
|
|
|
|
|
|
|
|
|
|
|
with |
dryer |
rack only! |
|
|
|||||||||
sure gas pressure does not |
|
|
|
|
|
|
|
|
|
|
|
|
|
|
|
|
|
|
|
|
||||||||
|
|
|
|
|
|
|
|
|
|
|
i |
Use |
the |
time |
program •Air |
fluff" |
||||||||||||
exceed 14 in. WC/ |
3.49 kPa |
/ |
|
|
|
|
|
|
|
|
|
|
||||||||||||||||
|
|
|
|
|
|
|
|
|
|
|
||||||||||||||||||
0.506 |
psig |
(Natural |
Gas). |
|
|
|
|
|
|
|
|
|
|
|
|
to dry articles containing foam |
||||||||||||
5. Remove |
all |
objects |
from the |
|
|
|
|
|
|
|
|
|
|
|
rubber |
or |
similarly textured |
|
||||||||||
|
|
|
|
|
|
|
|
|
|
|
rubberBlike |
materials. |
|
|
||||||||||||||
drum. |
|
|
|
|
|
|
|
|
|
|
|
|
|
|
|
|
|
|
|
|
|
|||||||
|
|
|
|
|
|
|
|
|
|
|
|
|
|
|
|
|
|
|
|
|
|
|
|
|
|
|
||
6. Check |
the |
dryer |
for |
visible |
|
|
|
|
|
|
|
|
|
|
|
Drying |
tips |
|
|
|
||||||||
damage. If |
damages |
found |
|
|
|
|
|
|
|
|
|
|
|
|
|
|
||||||||||||
contact |
your |
dealer. |
|
|
|
|
|
|
|
|
|
|
|
|
|
In |
principle, the following applies to |
|||||||||||
|
|
|
|
|
|
|
|
|
|
|
|
|
|
|
|
|
|
|
|
|||||||||
7. Wipe |
the inside of |
the |
drum |
|
|
|
|
|
|
|
|
|
|
all |
drying |
programs: |
|
|
||||||||||
with |
a |
damp |
cloth. |
|
|
|
|
|
|
|
|
|
|
|
|
- |
To |
ensure |
a |
uniform |
drying |
|
||||||
|
|
|
|
|
|
|
|
|
|
|
|
|
|
|
|
|
|
|
|
|||||||||
8. Conduct |
an |
appliance test, |
see |
|
|
|
|
|
|
|
|
|
|
|
result, |
sort |
the laundry |
|
||||||||||
page |
12. |
|
|
|
|
|
|
|
|
|
|
|
|
|
|
|
|
|
|
|||||||||
|
|
|
|
|
|
|
|
|
|
|
|
|
|
|
|
|
according to fabric type and |
|||||||||||
|
|
|
|
|
|
|
|
|
|
|
|
|
|
|
|
|
|
|
|
|
||||||||
9. If the |
dryer |
does |
not |
work, |
|
|
|
|
|
|
|
|
|
|
|
|
drying |
program. |
|
|
||||||||
switch |
the |
dryer |
to |
•Off". |
|
|
|
|
|
|
|
|
|
|
- |
Fasten |
zippers, hooks |
and |
|
|||||||||
Look |
in |
the |
troubleshooting |
|
|
|
|
|
|
|
|
|
|
|
||||||||||||||
|
|
|
|
|
|
|
|
|
|
|
|
eyes. |
Fasten |
loose belts, |
|
|||||||||||||
section |
(page |
26) |
of the |
|
|
|
|
|
|
|
|
|
|
|
|
|
||||||||||||
|
|
|
|
|
|
|
|
|
|
|
|
apron strings, |
etc.. |
|
|
|||||||||||||
operating instructions |
and find |
|
|
|
|
|
|
|
|
|
|
|
|
|
||||||||||||||
|
|
|
|
|
|
|
|
|
- |
Do |
not |
overdry easyBcare |
|
|||||||||||||||
the |
fault. |
|
|
|
|
|
|
|
|
|
|
|
|
|
|
|
|
|||||||||||
|
|
|
|
|
|
|
|
|
|
|
|
|
|
|
|
|
laundry C risk of wrinkling! |
|
||||||||||
|
|
|
|
|
|
|
|
|
|
|
|
|
|
|
|
|
|
|
|
|
|
|||||||
|
|
|
|
|
|
|
|
|
|
|
|
|
|
|
|
|
|
|
|
|
Leave |
laundry |
to dry |
in the |
air. |
|||
Mix programs |
Time programs |
Program selection
For opt&mum !ry&n$ r"sults your !ry"r o##"rs s"v"r l pro$r m $roupsn! !!&t&on l opt&ons.
"l" t t%" r"qu&r"! !ry&n$ pro$r m #rom t%" pro$r m t l" or!&n$ to t%" "x mpl"s (s"" p $" 21).
Automatic programs
%"r" r" m&x pro$r ms (V"ry !ry, &m" pro$r ms run t sp" &"$ul r !ry) #or m&x"! lo !s t"mp"r tur"s
!#"r"nt typ"s o# # r& s.
%"r" r" utom t& pro$r ms #or |
|
|
|
||
i |
I# you %oos" n |
Autom t& or |
|||
!#"r"nt typ"s |
o# t"xt&l"s |
||||
|
M&x pro$r m t%" |
!&spl y s%ows - |
|||
( "$ul r/Cotton, |
"rm n"nt r"ss, |
|
|||
|
|
|
|||
M&x). |
t%" "st&m t"! t&m" r"m &n&n$ |
|
&mm"!& t"ly. |
||
|
||
Regular/Cotton |
|
M"!&um #or t"mp"r tur" s"ns&t&v" t"xt&l"s
Special programs
i
Permanent Press
%" pro$r m s"qu"n " o#utom t& pro$r ms &s ontroll"! v& s"nsors. %" !ur t&on o# t%"
pro$r m !"p"n!s on t%" m" sur"! !"$r"" o# mo&stur" &n t%" l un!ryn! on t%" s"l" t"! !"$r"" o# !ryn"ss (".$. D mp !ry or Extr !ry).
%" |
pro$r ms H" vy lo !, |
Wool |
r" |
n! %ort r" m !" |
#or sp" & l |
ppl& |
t&on s"s. |
|
%" |
!ur t&on o# t%" Wool |
r"7 |
ro$r m must " !just"! |
v& t%" |
|
"l" |
t7Button. |
|
oss& l" "tt&n$s: 0:0082:30 % &n 10 m&n. st"ps.
iDry wool"n or wool7r& % t"xt&l"s w&t% !ry"r r k only!
I# you %oos" pro$r m w&t% v r& l" t&m" (t&m" pro$r ms, wool r") t%" !&spl y st rts to #l s%. ou % v" to s"t t%" t&m".
18
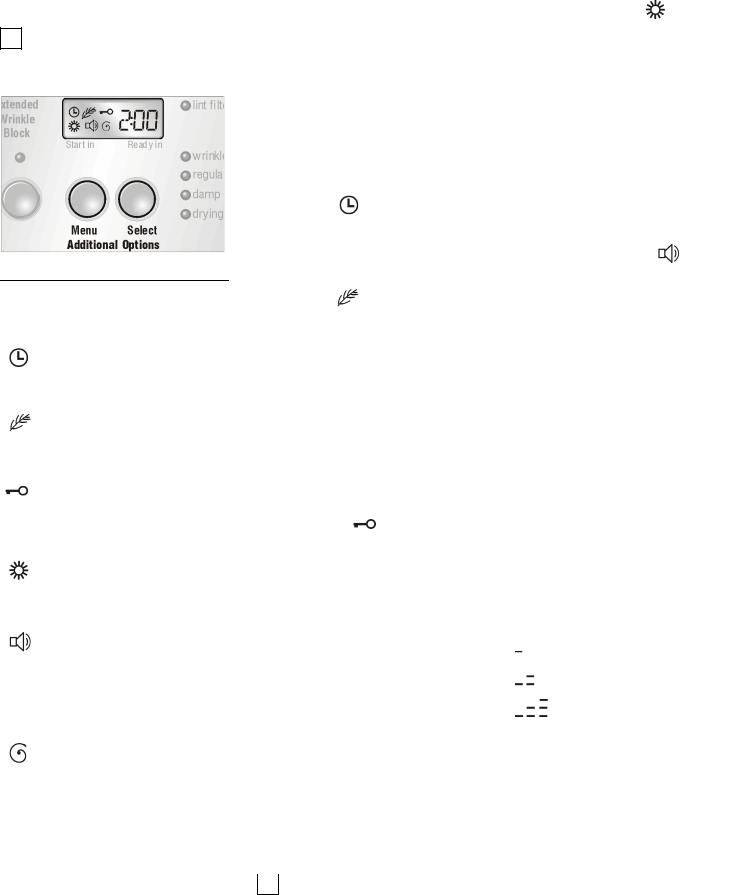
A a
iefore setting additional options, choose a program with program selector!
Sym Function |
|
|
|
Possible |
||
bol |
|
|
|
|
setting |
|
|
|
|
|
|
||
Sets |
the |
delay |
0-12 |
h |
||
start |
time |
of |
the |
(0.5 h |
steps) |
|
dryer |
|
|
|
|
|
|
(Start |
in .. hours!) |
|
||||
Extra |
care |
|
On/Off |
|
||
(more |
gentle |
than |
|
|
||
•Delicates") |
|
|
|
|||
Child6proof |
lock |
On/Off |
|
|||
(only |
effective |
|
|
|
||
while |
the |
|
|
|
|
|
program |
is |
|
|
|
||
running) |
|
|
|
|
|
|
Precision |
setting |
0, 1, |
2, 3 |
|||
of the |
desired |
|
|
|||
degree |
of |
|
|
|
|
|
dryness |
|
|
|
|
|
|
These settings can |
now be |
D |
|
|
changed with the |
•Select" button. |
|||
|
|
|||
|
|
The residual moisture can be |
||
Press the button to jump to the next |
|
|||
possible setting. |
|
individually |
reduced in 3 steps. |
|
i |
Pressing the |
•Menu" button |
1, |
|||
|
|
|||||
|
|
|
|
|
|
|
|
again, |
saves |
the previously |
|
i |
|
|
settings. |
|
|
|
||
|
If |
you |
don't |
press any button |
for |
|
|
10 seconds the settings are |
|
|
|||
|
saves |
automatically. |
|
|
||
S a |
D a |
|
|
|
||
2, : 3programs are lengthened
If you have chosen the steps 1 to 3 of the additional option
•Degree of dryness" |
the |
|
symbol is displayed. |
||
0 is |
standard setting |
- symbol |
is |
not displayed. |
|
i |
If you have chosen the |
|
|
|
additional option |
•Start Delay" |
V a |
|
the symbol is |
displayed. |
|
|
|
||
Your dryer outputs different signals.
E a |
|
a |
|
|
|
|
|
|
|
|
|
|
|||
|
|
|
|
|
|
Signal |
Type |
|
omment |
||||||
i |
If |
you |
have |
chosen the |
|
|
|
||||||||
|
|
|
|
|
|
|
|||||||||
|
|
Start |
Short tone |
|
Adjustable |
||||||||||
|
additional |
option •Extra |
care" |
|
|
||||||||||
|
|
|
|
|
|
||||||||||
|
the |
•Delicates" |
indicator |
light |
|
|
|
|
|||||||
|
|
|
|
|
|
|
|||||||||
|
illuminates. |
|
|
|
|
Damp dry |
Sequence |
of |
Adjustable |
||||||
|
Pressing |
the |
•Delicates" |
button |
|
|
medium |
|
volume |
||||||
|
|
|
length tones |
|
|
||||||||||
|
cancels |
the |
additional option |
|
|
|
|
||||||||
|
|
|
|
|
|
|
|||||||||
|
•Extra |
care". |
|
|
|
|
End |
Sequence |
of |
Adjustable |
|||||
|
|
|
|
|
|
|
|
|
|
|
short tones |
volume |
|||
i |
If |
you |
have |
chosen the |
|
|
Mal6 |
Sequence |
of |
Adjustable |
|||||
|
additional |
option •Extra |
care" |
|
|||||||||||
|
|
operation |
long tones |
|
volume |
||||||||||
|
the |
symbol is |
displayed. |
|
|
||||||||||
|
|
Warning of |
Sequence |
of |
Maximum |
||||||||||
|
|
|
|
|
|
|
|
|
|
||||||
Sa |
|
a |
|
|
|
|
mal6 |
long tones |
|
volume |
|||||
|
|
|
|
|
function |
|
|
|
|
||||||
This additional option allows you |
to |
|
|
|
|
||||||||||
You can |
change the |
volume of the |
|||||||||||||
lock your settings to prevent |
|
||||||||||||||
unintended |
use |
of |
the dryer. |
|
adjustable |
signals: |
|
|
|
||||||
Volume |
of |
the |
Off, |
|
end |
signal |
and |
continuous, |
|
the |
damp |
dry |
maximum |
|
signal |
|
|
|
|
Coordinates |
the |
400 |
||
remaining |
time |
600 |
||
display |
to |
the |
00 |
|
spin |
speed |
at |
1000 |
|
which |
the |
|
1200 |
|
laundry |
was |
|
||
previously |
spun |
|
||
in the |
washing |
|
||
machine |
|
|
||
|
|
|
|
|
Select the option to be changed with the •Menu" button. Press the button to jump to the next option on the display. The active symbol starts flashing.
The current active option setting is displayed on the right.
To |
start the dryer |
|
Press and hold the •Select" |
|||
when the Safety |
|
|||||
guard is |
active: |
|
button. |
|||
|
Press |
and |
hold |
the •Start/Stop" |
off |
|
|
button |
for |
4 seconds. |
increasingly |
||
To unlock this additional option |
||||||
|
||||||
when the |
dryer is |
running: |
maximum |
|||
Press and hold the •Start/Stop" S S  button for 4 seconds.
|
|
|
|
|
To optimize the remaining time |
||||
i |
When |
the |
dryer is running and display, the spin speed at which the |
||||||
|
the •Safety |
guard" is active, thelaundry |
was previously spun in the |
||||||
|
dryer |
can |
be |
stopped by |
washing |
machine |
can be |
entered. |
|
|
pressing the |
•Start/Stop" |
|
|
|
|
|
||
|
i |
The 2symbol |
is only |
displayed |
|||||
|
button |
for |
4 |
seconds. |
|||||
|
|
for |
adjustment. |
|
|||||
|
|
|
|
|
|
|
|||
iIf you have chosen the additional option •Safety guard" the symbol is displayed.
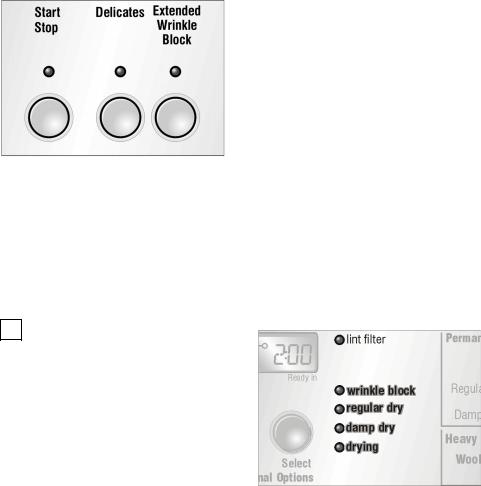
Options |
|
|
|
|
|
Indicator |
of |
program |
||||||
|
|
|
|
|
|
|
sequence |
|
|
|
||||
|
|
|
|
|
|
|
The dryer uses an electronic |
|||||||
|
|
|
|
|
|
|
scanning system for all programs |
|||||||
|
|
|
|
|
|
|
except the time programs and the |
|||||||
|
|
|
|
|
|
|
special |
•Wool |
Care" |
program. |
||||
|
|
|
|
|
|
|
A moisture sensor continuously |
|||||||
|
|
|
|
|
|
|
checks the moisture in the laundry. |
|||||||
|
|
|
|
|
|
|
Drying |
ends |
|
automatically |
as soon |
|||
|
|
|
|
|
|
|
as the selected degree of dryness |
|||||||
Delicates |
|
|
|
|
|
|
has been reached. |
|
|
|||||
|
|
|
|
|
|
The drum continues to rotate at |
||||||||
|
|
|
|
|
|
|
||||||||
Press the •Delicates" |
button |
for |
specific |
intervals |
for |
one |
hour to |
|||||||
temperature |
sensitive |
textiles. |
|
prevent |
creasing. |
|
|
|
||||||
Observe |
the |
care information |
or |
The current state of the process |
||||||||||
symbols |
on |
the |
textiles. |
The |
|
|||||||||
|
and the level reached during the |
|||||||||||||
temperature |
of |
the drying |
process |
|||||||||||
is |
|
|
|
|
|
|
||||||||
reduced, |
the |
drying |
time |
is |
|
program sequence is indicated |
||||||||
|
via indicator |
lights |
(drying, |
damp |
||||||||||
extended. |
|
|
|
|
|
|
||||||||
|
|
|
|
|
|
dry, regular |
dry, |
wrinkle |
block). |
|||||
|
|
|
|
|
|
|
||||||||
iFor extreme temperature sensitive textiles
(e.g. camisoles, paints) press the •Delicates" buttonand set additional optionExtra care (see Page 19)to reduce the temperature of the drying process another time.
Extended Wrinkle |
Block |
|
|
|
|
|
|
|
|||
To prevent the laundry from |
|
|
|
|
|
|
|||||
i |
If the |
indicator light |
•wrinkle |
||||||||
creasing, |
the dryer |
drum |
rotates at |
||||||||
|
|||||||||||
specific |
intervals |
following |
the |
|
block" |
illuminates |
when |
the |
|||
|
program selector |
is |
in |
|
|||||||
drying program. |
Standard |
setting |
|
|
|||||||
|
Off-Position - turn |
off |
the |
||||||||
for this |
function |
is |
1 hour. |
|
|||||||
|
circuit |
breaker and |
call |
for |
|||||||
If the •Extended Wrinkle Block" |
|
||||||||||
|
customer service! |
|
|
|
|||||||
button is pressed, this function is |
|
|
|
|
|||||||
|
|
|
|
|
|
||||||
extended |
to 3 |
hours. |
|
|
|
|
|
|
|
||
The laundry remains loose and fluffy until it is removed. The laundry should be removed at the latest after this time has elapsed.
20
Program |
|
selection |
|
table |
|
|
|
|
|
|
|
|
|
|
|
|
|
|
|
|
||||||||||||||||||
|
|
|
|
|
|
|
|
|
|
|
|
|
|
|
|
|
|
|
|
|
|
|
|
|
|
|
|
|
|
|
|
|
||||||
Automatic |
programs |
|
|
|
|
|
|
|
|
|
|
|
|
|
|
|
|
|
|
|
|
|
|
|
|
|
|
|
|
|
|
|
||||||
|
|
|
|
|
|
|
|
|
|
|
|
|
|
|
|
|
|
|
|
|
|
|||||||||||||||||
For Cottons and coloreds made |
of |
cotton |
or |
linen. |
|
|
|
|
|
|
|
|
|
|
|
|
|
|
•Regular/Cottons" |
|
|
|||||||||||||||||
Press |
•Delicates |
button for |
temperature2sensitive |
textiles. |
|
|
|
|
|
|
|
|
|
|
|
|
|
|
|
|
|
|
||||||||||||||||
|
|
|
|
|
|
|
|
|
|
|
|
|
|
|
|
|
|
|
|
|
|
|
|
|
|
|
|
|
|
|
|
|
|
|
|
|
||
|
|
|
|
|
|
|
|
|
|
|
|
|
|
|
|
|
|
|
|
|
|
For |
laundry, |
|
|
|
|
|
|
|
|
|
|
|
|
|
||
Bed |
linen |
and |
table |
linen, |
towels |
|
|
|
|
|
|
|
|
|
|
|
|
|
|
|
|
|
|
|
|
|
|
|
|
|
|
|||||||
|
|
|
|
|
|
|
|
|
|
|
|
|
|
|
|
|
|
|
|
|
|
which is to be ironed |
|
|
|
Damp |
dry |
|
|
|
||||||||
Bed |
linen |
and |
table |
linen, towels, T2shirts, sports shirts, overalls |
|
|
|
|
|
|
||||||||||||||||||||||||||||
|
|
|
|
|
|
|
|
|
|
|
|
|
|
|
|
|
||||||||||||||||||||||
|
|
|
|
|
|
|
|
|
|
|
|
|
|
|
|
|
|
|
|
|
||||||||||||||||||
T2shirts, sports shirts, dresses, trousers, |
overalls, |
underwear |
|
|
|
|
|
|
|
|
|
|
|
|
|
|
|
|
|
|
||||||||||||||||||
|
|
|
|
|
|
|
|
|
|
|
|
|
|
|
|
|
|
|
|
|
|
|
|
|
||||||||||||||
Terry |
|
towels, |
kitchen |
towels, |
hand |
towels, |
bed |
linen, |
underwear, |
|
cottonwhich |
is |
not |
to |
|
be |
ironed |
|
|
Regular |
dry |
|
|
|
||||||||||||||
socks |
|
|
|
|
|
|
|
|
|
|
|
|
|
|
|
|
|
|
|
|
|
|
|
|
|
|
|
|
|
|
|
|
|
|
|
|
||
|
|
|
|
|
|
|
|
|
|
|
|
|
|
|
|
|||||||||||||||||||||||
Terry |
|
towels, |
kitchen |
towels, |
hand |
towels, |
bed |
linen, |
underwear, |
|
cottonwhich is not to be ironed, thick |
Very dry |
|
|
|
|||||||||||||||||||||||
socks |
|
|
|
|
|
|
|
|
|
|
|
|
|
|
|
|
|
|
|
multi2ply |
|
|
|
|
|
|
|
|
|
|
|
|
|
|
||||
|
|
|
|
|
|
|
|
|
|
|
|
|
|
|
|
|
|
|
|
|
|
|||||||||||||||||
Terry |
|
bathrobes |
|
and |
terry |
bed linen |
|
|
|
|
|
|
|
|
which is particularly thick or |
|
Extra |
dry |
|
|
|
|||||||||||||||||
|
|
|
|
|
|
|
|
|
|
|
|
|
|
|
|
|
|
|
|
|
|
multi2ply |
|
|
|
|
|
|
|
|
|
|
|
|
|
|
||
|
|
|
|
|
|
|
|
|
|
|
|
|||||||||||||||||||||||||||
Easy2care drip2dry laundry made |
of synthetic and blended fabric, |
cotton |
e.g. polyester |
|
|
|
|
•Permanent |
Press" |
|
|
|||||||||||||||||||||||||||
Press |
the |
•Delicates |
button |
for |
very |
temperature2sensitive textiles. |
|
|
|
|
|
|
|
|
|
|
|
|
|
|
|
|
|
|||||||||||||||
|
|
|
|
|
|
|
|
|
|
|
|
|
|
|
|
|
|
|
|
|
|
|
|
|
|
|
|
|
|
|
|
|
|
|
|
|
||
|
|
|
|
|
|
|
|
|
|
|
|
|
|
|
|
|
|
|
|
|
|
For |
laundry, |
|
|
|
|
|
|
|
|
|
|
|
|
|
||
|
|
|
|
|
|
|
|
|
|
|
|
|
|
|
|
|||||||||||||||||||||||
Trousers, dresses, skirts, shirts, blouses, leggings, sports clothing |
|
withich |
is |
not |
to |
|
be |
or |
only |
lightlyDamp |
dry |
|
|
|
||||||||||||||||||||||||
synthetic2rich |
fibers, |
lingerie |
|
|
|
|
|
|
|
|
|
|
|
|
ironed |
|
|
|
|
|
|
|
|
|
|
|
|
|
|
|
||||||||
|
|
|
|
|
|
|
|
|
|
|
|
|
|
|
|
|
|
|
|
|
|
|
||||||||||||||||
Shirts, |
blouses, |
|
sports |
clothing |
|
|
|
|
|
|
|
|
|
|
which is not to be ironed |
|
|
Regular |
dry |
|
|
|
||||||||||||||||
|
|
|
|
|
|
|
|
|
|
|
|
|
|
|
|
|||||||||||||||||||||||
Bed |
linen |
and |
table |
linen, |
track |
suits, |
|
anoraks, |
blankets |
|
which is not to be ironed, thick Very dry |
|
|
|
||||||||||||||||||||||||
|
|
|
|
|
|
|
|
|
|
|
|
|
|
|
|
|
|
|
|
|
|
multi2ply |
|
|
|
|
|
|
|
|
|
|
|
|
|
|
||
|
|
|
|
|
|
|
|
|
|
|
|
|
|
|
|
|
|
|
|
|
|
|
|
|
|
|
|
|
|
|
|
|
|
|||||
Mix |
programs |
|
|
|
|
|
|
|
|
|
|
|
|
|
|
|
|
|
|
|
|
|
|
|
|
|
|
|
•Mix" |
|
|
|
|
|||||
|
|
|
|
|
|
|
|
|
|
|
|
|
|
|
|
|
|
|
|
|
|
|
|
|
|
|
|
|
|
|
|
|
|
|
|
|
||
|
|
|
|
|
|
|
|
|
|
|
|
|
|
|
|
|
|
|
|
|
|
For |
laundry, |
|
|
|
|
|
|
|
|
|
|
|
|
|
||
|
|
|
|
|
|
|
|
|
|
|
|
|
|
|
|
|
|
|||||||||||||||||||||
Mixed |
loads |
regular, |
cotton, |
permanent |
press |
|
|
|
|
which is not to be ironed |
|
|
Regular |
Dry |
|
|
|
|||||||||||||||||||||
|
|
|
|
|
|
|
|
|
|
|
|
|
|
|
|
|
|
|
|
|
|
|
|
|
|
|
||||||||||||
|
|
|
|
|
|
|
|
|
|
|
|
|
|
|
|
|
|
|
|
|
|
which is not to be ironed, thick Very Dry |
|
|
|
|||||||||||||
|
|
|
|
|
|
|
|
|
|
|
|
|
|
|
|
|
|
|
|
|
|
multi2ply |
|
|
|
|
|
|
|
|
|
|
|
|
|
|
||
|
|
|
|
|
|
|
|
|
|
|
|
|
|
|
|
|
|
|
|
|
|
|
|
|
|
|
|
|
|
|
|
|
|
|
|
|||
Specials |
|
|
|
|
|
|
|
|
|
|
|
|
|
|
|
|
|
|
|
|
|
|
|
|
|
|
|
|
|
|
|
|
|
|
|
|||
|
|
|
|
|
|
|
|
|
|
|
|
|
|
|
|
|
|
|
|
|
|
|
|
|||||||||||||||
Heavy |
fabrics, |
heavyweight |
towels, |
bedspreads |
|
|
|
|
|
|
|
|
|
|
|
|
|
|
|
Heavy |
Load |
|
|
|||||||||||||||
|
|
|
|
|
|
|
|
|
|
|
|
|
|
|
|
|
||||||||||||||||||||||
To dry washable woolen textiles |
e.g. sweaters, woolen pullover, |
skirts |
|
|
|
|
|
|
|
|
|
|
Wool |
Care+ required |
drying |
time |
||||||||||||||||||||||
|
|
|
|
|
|
|
|
|
|
|
|
|
|
|
||||||||||||||||||||||||
Small loads, loads that need a |
short |
drying |
time, |
e.g. sports shirts, |
work2out |
clothes |
cotton, |
syntheticShort |
|
|
|
|
|
|||||||||||||||||||||||||
|
|
|
|
|
|
|
|
|
|
|
|
|
|
|
|
|
|
|
|
|
|
|
|
|
|
|
|
|
|
|
|
|
|
|||||
Time |
programs |
|
|
|
|
|
|
|
|
|
|
|
|
|
|
|
|
|
|
|
|
|
|
|
|
|
|
|
|
|
|
|
|
|||||
|
|
|
|
|
|
|
|
|
|
|
|
|
|
|
|
|
||||||||||||||||||||||
Pre2dried |
textiles |
with |
low |
moisture |
content, |
individual |
small items, |
e.g. |
bath |
towels, |
bathing |
suits, |
dish cloths. |
|
|
|
||||||||||||||||||||||
For |
|
smallest |
loading |
condition |
from |
0.22 lb-0.44 lb i.e. one small towel , |
for |
this |
a |
time dry |
program |
should |
|
|
|
|||||||||||||||||||||||
be selected. Press the |
•Delicates |
button |
for |
temperature2sensitive |
textiles. |
|
|
|
|
|
|
|
|
|
|
|
|
|
|
|
||||||||||||||||||
- |
Cottons |
and |
|
colored |
garments |
|
made |
of |
cotton |
or |
linen. |
|
|
|
|
|
|
|
|
|
|
|
|
High + required drying time |
||||||||||||||
- |
Temperature2sensitive |
textiles. |
|
|
|
|
|
|
|
|
|
|
|
|
|
|
|
|
|
|
|
|
|
Medium + |
required |
drying |
time |
|||||||||||
|
|
|
|
|
|
|
|
|
|
|
|
|||||||||||||||||||||||||||
Freshening |
or |
airing |
little worn items of clothing and drying of |
extreme |
sensitive |
textiles. |
|
|
|
Air fluff + required time |
|
|||||||||||||||||||||||||||
For |
|
all textile |
types |
inclusive foam rubber e.g. pillows, stuffed |
toys , |
plastic |
e.g. |
shower |
curtains, |
table |
clothes , |
|
|
|||||||||||||||||||||||||
rubber |
e.g. |
backed |
rugs , |
sheer |
nylon, |
polypropylene. |
|
|
|
|
|
|
|
|
|
|
|
|
|
|
|
|
|
|
|
|||||||||||||
|
|
|
|
|
|
|
|
|
|
|
|
|
|
|
|
|
|
|
|
|
|
|
|
|
|
|
|
|
|
|
|
|
|
|
|
|
|
|
21

Op ration
Using th ry r
1. Open the door.
2.Check lint filter.
The filter should be cleaned after and before every drying process. Cleaning the filter reduces the drying time and saves energy.
i |
Lint filter |
indicator flashes |
for |
i |
If you |
have |
chosen |
a time |
|
||
|
5 seconds |
- •Check lint |
filter"! |
|
program don't forget |
to |
select |
||||
|
|
|
|
|
a time. |
Otherwise |
the |
|
|
|
|
|
|
|
|
|
•Start/Stop" |
indicator |
light |
will |
|||
|
|
|
|
|
not flash and the dryer will not |
||||||
|
|
|
|
|
start. |
|
|
|
|
|
|
|
|
|
|
|
|
|
|
|
|
|
|
|
|
|
|
i |
If the |
door |
has |
not |
been |
closed |
|
|
|
|
|
|
properly, the |
dryer will not |
start. |
||||
4.Select •Additional Options" on the display.
More detailed |
information on |
||
the |
individual |
additional |
options |
can |
be found |
on page |
19. |
5.If required, select •Option" by pressing the button.
The •Options" are explained on page 20.
iThe estimated remaining time will be updated.
8. Press the •tart/Stop" button. The •Start/Stop" indicator light illuminates.
i The program starts with an acoustic signal (if set).
If an automatic program has been selected, the indicator lights indicate the progress of the program sequence.
iAt the end of the program sequence amp ry an acoustic signal is emitted (if set).
3. Rotate |
program selector to |
the |
|
||
desired |
program. |
|
i |
Observe |
drying symbols of the |
Select |
the program which |
|
|
laundry |
manufacturer. |
|
corresponds to |
the |
laundry in |
|
If drying woolen clothing and |
|||||||||
|
the |
dryer from |
the |
program |
|
shoes, see the information on |
|
|
||||||
|
|
|
||||||||||||
|
selection table (see page 21). |
|
page |
78 |
and |
page 23. |
|
|
||||||
|
Ensure |
that there |
is only |
laundry in |
||||||||||
|
The |
dryer light |
turns on |
inside |
||||||||||
|
the |
drum. |
|
|
|
the |
drum. |
Check |
that all |
items are |
||||
|
|
|
|
completely |
in |
the |
drum. |
|
|
|
||||
|
|
|
|
|
|
|
|
|
||||||
i |
The |
estimated |
remaining |
time |
|
|
|
|||||||
7. Close |
the |
door. |
|
|
|
|||||||||
|
will |
be indicated. |
|
|
|
|
|
|||||||
|
|
|
The |
•Start/Stop" |
indicator |
light |
||||||||
|
|
|
|
|
|
|||||||||
|
|
|
|
|
|
starts |
flashing. |
|
|
|
|
|||
i |
At program |
end |
an acoustic |
||
|
signal |
is emitted |
(if |
set) and the |
|
|
LED |
•wrinkle |
block" |
illuminates. |
|
iWhen the drying process is complete (program or selected time program ended), the drum rotates at specific intervals. This prevent the laundry from creasing (see •Extended
Wrinkle Block", page 20).
22
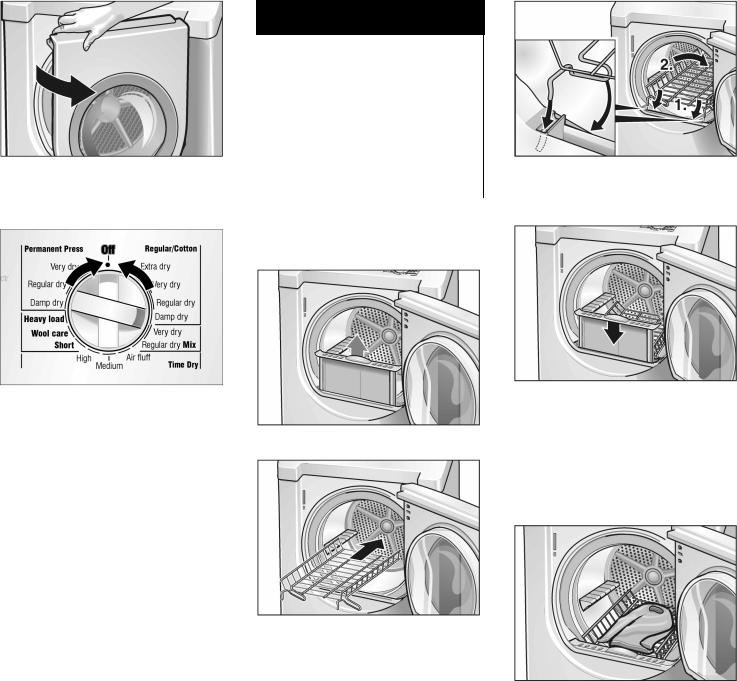
9.Open the door.
10.Take the laundry out of the dryer.
11.Rotate the program selector to •Off".
The dryer light goes out.
12.Clean the filter.
The filter should be cleaned after each drying process. Cleaning the filter reduces the drying time and saves energy.
13.Close the door.
CAUTION!
Dry only |
one item |
of clothing |
or |
||
one pair of shoes - maximal |
dry |
||||
load 2.2 lbs (1 kg)! The laundry |
|
||||
must have been spun! Only dry |
|||||
prewashed |
shoes! The laundry |
||||
must not |
touch the |
drum! |
|||
It could jam and be damaged. |
|||||
After using |
the dryer rack, take it |
||||
out of the dryer immediately. |
|||||
|
|
|
|
|
|
Inserting |
the |
dryer |
rack |
||
5. Place the dryer rack so that the catches are inserted at the front in the locating holes.
6.Insert the lint filter.
The lint filter must be inserted flush with the drum edge!
Drying laundry items on the dryer rack
1.Fold laundry to fit the dryer rack.
Using the dryer rack
Use the dryer rack to dry washable woolen textiles (e.g. sweaters) and shoes. The dryer rack remains stationary while the drum rotates. Damp wool should not be moved,
as it has a tendency to matt. Drying shoes without a rack could damage the drum. You have to use the drying rack if you use the wool care program.
2.Place laundry loosely on the basket. Do not crush! Laundry
must not touch the drum! Do not allow items to hang over the dryer rack!
3.Close the door.
4.Follow directions for time program on next page.
23
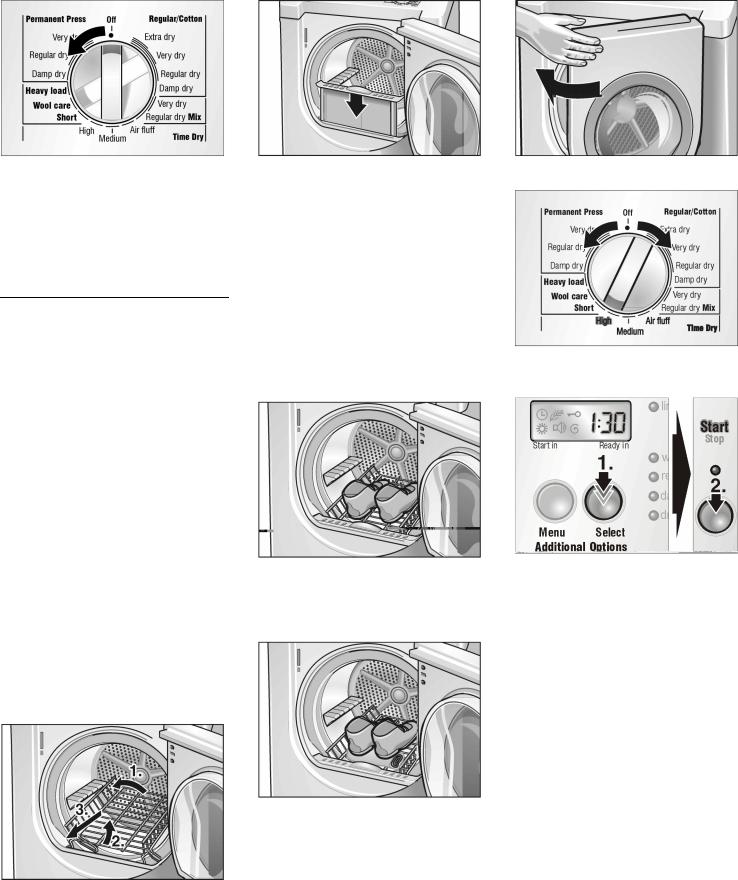
5.Rotate program selector to •Wool Care".
6.Select the required drying time with the •Select" button.
Select the drying time from the following table according to the laundry type.
Laundry type |
Required drying time |
|||
|
|
|
|
|
Thin |
woolen pullover 80 min. |
|
|
|
|
|
(e.g. 60 + 20 min) |
||
Thick woolen pullover90-120 min. |
||||
Skirt |
|
60-90 |
min. |
|
Trousers |
60-90 |
min. |
||
Small |
items |
30 min. |
|
|
(e.g. |
gloves) |
|
|
|
|
|
|
|
|
10. |
Re0insert |
the |
lint filter. |
3. Close the door. |
Dryi g sh es |
the dryer |
rack: |
||
1. |
Prepare |
shoes. |
|
|
Clean shoes to prevent the drum from becoming soiled.
If preparing sports shoes, extend the tongue.
Loosen or remove shoe0laces.
Remove insoles and heel pads.
4.Program selector to •Time dry/High".
7. If the item of clothing still contains residual moisture after the indicated drying time:
Fold the item of clothing so that the damp parts are on the outside.
Restart the program and reduce the drying duration depending on the degree of residual moisture.
8.After drying, spread out the laundry at air for approx. 15 min.
9.Take the dryer rack out of the drum.
2. Place shoes on the rack.Directly on the dryer rack
or
5.Select the required drying time with the •Select" button.
6. |
If there |
is |
still |
residual |
moisture |
||||
|
at the end of the drying time, |
||||||||
|
repeat |
the |
program. |
|
|
|
|||
7. |
At |
the |
end |
of |
the |
drying |
time |
||
|
take the |
shoes |
out |
of |
the |
dryer |
|||
|
and |
leave |
to air for |
approx. |
|||||
30 min.
8. Remove the lint filter.
9.Take the dryer rack out of the drum.
10. Re0insert the lint filter.
Roll up a towel and place the heels of the shoes on the towel.
This will ensure a more uniform drying result.
24
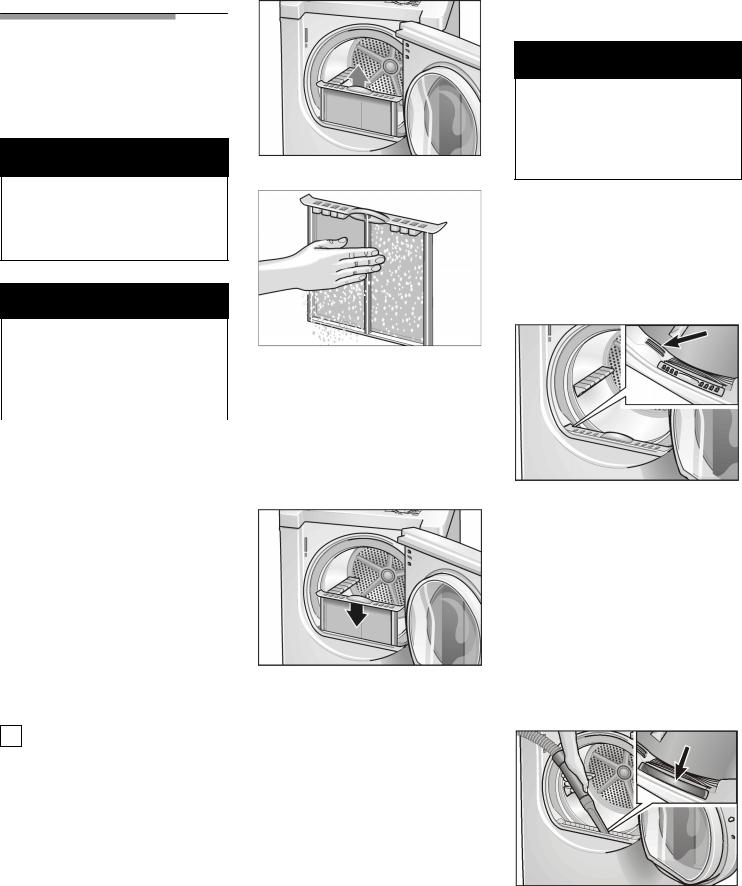
Cleaning and care
Cleaning the dryer
WARNING
3. Remove the lint filter.
TO AVOID
RISK OF EXPLOSION!
4. Remove lint by stroking your hand over the filter.
Vacuum and reconnect the duct.
WARNING
Remove gas connection befo3 re moving the dryer to clean the duct. Be careful not to destroy the gas connection when cleaning the duct.
Cleaning the moisture sensor
The moisture sensor has to be cleaned because a fine layer of transparent buildup is deposited on the sensors.
|
|
|
|
|
The filter should be lightly scrubbed |
|
|
|
|
|
|
twice a year with warm soapy |
|
|
|
|
|
|
||
Wipe the housing and |
fascia with a |
|||||
soft cloth and soapy |
water |
only. |
water. The filter is cleaned when |
|||
no longer holds water. The filter |
||||||
|
|
|
|
|
||
Wipe the drum, door |
seal and |
|
must be dried thoroughly before |
|||
inside |
||||||
of the door with a damp |
cloth |
|
being replaced. |
|||
|
only. |
|||||
Cleaning |
the |
lint |
filter |
|
|
|||
A dirty |
filter |
extends |
the |
drying |
time |
|
|
|
and increases |
energy |
consumption. |
|
|
||||
The filter should be cleaned before |
|
|
||||||
and after each drying process. |
|
|
|
|||||
If a warning signal and an E01 |
|
|
|
|||||
warning |
message |
are |
emitted |
|
|
|
||
during a |
drying |
program, |
clean |
the |
|
|
||
filter immediately and check the |
5. Insert |
the |
filter. |
|||||
|
|
|
||||||
exhaust |
duct. |
|
|
|
|
6. Close |
the |
door. |
iThe program interrupts automatically.
Cleaning the exhaust duct
1. Switch |
off |
the |
dryer. |
Program |
Inspect |
and clean the exhaust |
||||
selector |
to |
•Off". |
|
|
ducting |
at least once a year to |
||||
|
|
|
|
|
|
|
prevent |
clogging. |
A |
partially |
|
CAUTION |
|
|
|||||||
|
clogged |
exhaust |
can |
lengthen the |
||||||
|
|
|
|
|
|
|
drying time. |
|
|
|
The |
inside |
of |
the |
door |
heats |
up |
|
|
||
during the |
drying |
process. |
|
Turn |
off the |
circuit breaker |
||||
|
|
|
|
|
||||||
|
|
|
|
|
|
|
|
|
|
|
2. Open the door.
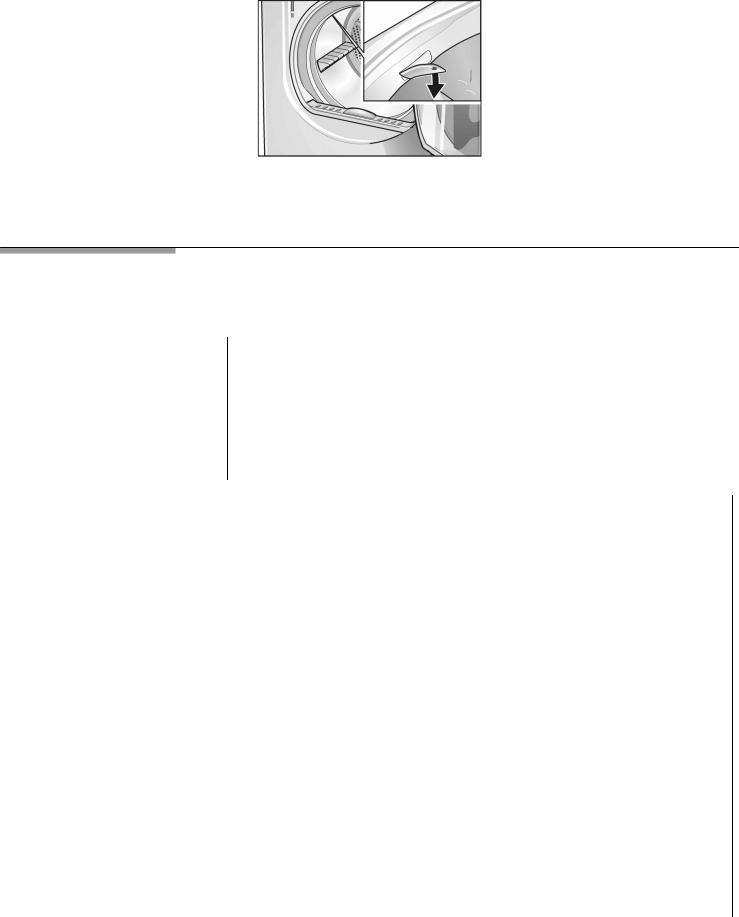
Change he ligh b lb
%" !.4". (&$%0 01.*/ +* &*/&!" 0%" !.1) w%"* 4+1 +,"* 0%" !++..
+ % *$" 0%" (&$%0 1( :
"0 ,.+$. ) /"(" 0+. 0+ • ##".
1.* +## 0%" &. 1&0 ." '"..
1(( +10 ,+w". /1,,(4 ,(1$.
,"* 0%" !++. *! (+ 0" 0%"
(&$%0 1( +* 0%" 1,,". ("#0 /&!" +# 0%" /" (.
L++/"* 0%" / ."w +# 0%" +v".*! +,"* 0%" +v"..
1.* 1( +1*0". (+ 'w&/".",( " 0%" 1( w&0% *"w,,(& * " 1( +*(4 (+ 0 &* (" 0%.+1$% , .0/ !", .0)"*0).
",( " 0%" +v". *! /" 1." w&0% 0%" / ."w.
(1$ &* !.4". +. ." +**" 0 ,+w". /1,,(4.
T o ble hoo ing
WARNING |
|
|
B"#+." |
((&*$ |
0%" |
1/0+)". |
/".v& ", |
||||||
|
|
%" |
' |
w%"0%". |
4+1 |
* |
." |
0 0%" |
|||||
|
|
|
|
# 1(0 |
4+1./"(# 4 |
)" */ |
+# |
0%" |
|||||
AV ID |
I K F |
|
|
||||||||||
|
|
#+((+w&*$ |
0 (". |
|
|
|
|
|
|||||
ELEC ICAL H CK ! |
|
|
|
|
|
|
|
||||||
|
|
|
|
|
|
|
|
|
|
|
|
||
AV ID |
EX L I |
|
|
I# |
|
# 1(0 |
**+0 |
" |
." |
0&"! +. |
|||
|
|
.", &. &/ |
."-1&."!: |
|
|
|
|||||||
HAZA D! |
|
|
|
|
|
|
|||||||
|
|
|
|
|
|
|
|
|
|
|
|
|
|
", &./ +. .",( ")"*0 |
+# , .0/ |
|
|
|
|
|
|
|
|
|
|
||
) 4 " |
..&"! +10 4 |
10%+.&z"! |
|
|
|
|
|
|
|
|
|
|
|
0" %*& & */ |
+*(4. |
|
|
|
|
|
|
|
|
|
|
|
|
|
|
|
|
|
|
|
|
|
|
|
|
|
|
1. "0 ,.+$. ) /"(" 0+. 0+ • ##".
2. |
1.* +## |
0%" |
&. 1&0 |
." '".. |
|
3. |
1(( |
0%" |
) &*/ |
,(1$ |
+10 +# 0%" |
|
/+ |
'"0. |
|
|
|
4.C(+/" 0%" /%107+## v (v".
5.C (( 1/0+)". /".v& " (/"" , $" 27).
Problem |
|
|
|
Possible |
cause |
|
|
|
|
|
|
Remedial |
action |
|
|
|
|
|
||||||||||
|
|
|
|
|
|
|
|
|
|
|
|
|
|
|
||||||||||||||
Dryer |
does |
not |
start. |
Main |
plug |
not |
inserted |
at |
all |
or not inserted |
corrInserctly.main plug correctly. |
|
|
|
||||||||||||||
|
|
|
|
|
|
|
|
|
||||||||||||||||||||
•Start/Stop |
indicator ghtli does not |
A fuse of power supply has tripped. |
Replace/switch |
on |
fuse. |
|
|
|
||||||||||||||||||||
illuminate. |
|
|
|
•Start/Stop |
button |
not |
pressed. |
|
|
Press |
•Start/Stop |
button. |
|
|
|
|||||||||||||
|
|
|
|
|
No |
program |
selected. |
|
|
|
|
Select |
program. |
|
|
|
|
|
||||||||||
|
|
|
|
|
|
|
|
|
|
|
|
|
|
|
|
|
|
|
|
|
|
|
|
|||||
|
|
|
|
|
Door |
|
not |
closed. |
|
|
|
|
|
|
Close |
door. |
|
|
|
|
|
|
|
|||||
|
|
|
|
|
|
|
|
|
|
|||||||||||||||||||
|
|
|
|
|
In Time6Programs duration not chosen. |
Chose time via •Select 6Button. |
|
|
|
|||||||||||||||||||
|
|
|
|
|
|
|
|
|
|
|
|
|
|
|
|
|||||||||||||
|
|
|
|
|
Ambient |
temperature |
below |
°41F/5 °C. |
|
Increase |
room |
temperature. |
|
|
|
|||||||||||||
Laundry is wet after drying. |
The |
|
shut6off |
valve |
is |
closed. |
|
|
Open |
the |
shut6off |
valve. |
|
|
|
|||||||||||||
|
|
|
|
|
|
|
|
|
|
|
|
|
|
|
|
|||||||||||||
Program has been |
interrupted. |
Lint |
|
filter |
dirty. |
|
|
|
|
|
|
Clean filter as described on page 25. |
|
|
|
|||||||||||||
A warning signal is emitted and the |
|
|
|
|
|
|
|
|
|
|
|
|
|
Switch |
|
off/switch |
on |
again. |
|
|
|
|||||||
display |
shows E:01• |
. |
|
|
|
|
|
|
|
|
|
|
|
|||||||||||||||
Exhaust |
air |
duct |
is |
blocked |
or |
too |
long. |
Clean exhaust air duct. Reduce exhaust air duct |
to |
|||||||||||||||||||
|
|
|
|
|
|
|
|
|
|
|
|
|
|
|
|
|
|
maximum length as described on page 10. |
|
|
||||||||
|
|
|
|
|
|
|
|
|
|
|
|
|
|
|
|
|
|
Switch |
|
off/switch |
on |
again. |
|
|
|
|||
|
|
|
|
|
|
|
|
|
|
|
|
|
|
|
|
|
|
|
||||||||||
|
|
|
|
|
Fault |
in |
program |
sequence |
or |
malfunction. |
Switch |
|
off |
dryer, |
leave to cool down for |
30 |
min, |
|||||||||||
|
|
|
|
|
|
|
|
|
|
|
|
|
|
|
|
|
|
switch |
on |
again. |
|
|
|
|
|
|||
|
|
|
|
|
|
|
|
|
|
|
|
|
|
|
|
|
|
Restart |
|
program. |
|
|
|
|
|
|||
|
|
|
|
|
|
|
|
|
|
|
|
|
|
|
||||||||||||||
|
|
|
|
|
The |
|
room/cabinet |
is |
not adequately |
ventilated. |
Provide an adequate supply of fresh air. |
|
|
|
||||||||||||||
|
|
|
|
|
|
|
|
|
|
|
|
|
|
|
|
|
|
Switch |
|
off/switch |
on |
again. |
|
|
|
|||
|
|
|
|
|
|
|
|
|
|
|
|
|
|
|
|
|
|
|||||||||||
Drum |
light |
does |
not function. |
No |
program |
selected. |
|
|
|
|
Select |
program. |
|
|
|
|
|
|||||||||||
|
|
|
|
|
|
|
|
|
|
|
|
|||||||||||||||||
|
|
|
|
|
Light |
bulb |
defective, light bulb burned out. |
Change light bulb, see page 26. |
|
|
|
|||||||||||||||||
|
|
|
|
|
|
|
|
|
|
|
|
|
|
|
|
|
|
|
|
|||||||||
|
|
|
|
|
No |
power |
supply. |
|
|
|
|
|
|
Guarantee |
power |
supply. |
|
|
|
|||||||||
|
|
|
|
|
|
|
|
|
|
|
|
|
|
|
|
|
|
|
|
|
||||||||
|
|
|
|
|
Light |
bulb |
is |
loose. |
|
|
|
|
|
Tighten |
light |
bulb. |
Remove and reinstall |
the |
cover as |
|||||||||
|
|
|
|
|
|
|
|
|
|
|
|
|
|
|
|
|
|
directed |
on |
page |
26. |
|
|
|
||||
|
|
|
|
|
|
|
|
|
|
|
|
|
|
|
|
|
|
|
|
|
|
|
|
|
|
|
|
|
26

STATEMENT OF WARRANTIES BOSCH CLOTHES DRYERS
The warranties provided by BSH |
first using purchaser by Bosch or itsor Canada. |
The |
Warranties |
||
Home Appliances (``Bosch'') in this |
authorized dealers, |
retailers or |
provided herein |
are not |
|
Statement of Warranties apply only |
service centers in |
the United |
Statestransferable. |
|
|
to Bosch Clothes dryers sold to the
LENGTH OF WARRANTY |
|
|
|
|
|
|
|
SCOPE |
OF |
WARRANTY |
|
|
|
|
|
|
|
|
|
|
|
|
|
||||||||
|
|
|
|
|
|
|
|
|
|
|
|
|
|
||||||||||||||||||
1 Year Full Limited Warranty |
|
|
|
|
|
|
Bosch |
will |
repair or replace, free of charge, any |
component part |
|
that |
is |
||||||||||||||||||
From Date of |
Installation* |
|
|
|
|
|
|
proven defective under conditions of normal home use, labor and |
|
|
|
||||||||||||||||||||
|
|
|
|
|
|
|
|
|
|
|
shipping costs |
included. |
Warranty repair |
service must |
be |
performed |
by |
|
|||||||||||||
|
|
|
|
|
|
|
|
|
|
|
an authorized Bosch Service Center. |
|
|
|
|
|
|
|
|
|
|
|
|||||||||
|
|
|
|
|
|
|
|
|
|
|
|
|
|
|
|
|
|
||||||||||||||
2 Year Limited |
Warranty |
|
|
|
|
|
|
|
Bosch |
will |
provide replacement parts, free of |
charge, |
for |
|
any |
|
component |
||||||||||||||
From Date of |
Installation* |
|
|
|
|
|
|
part that is proven defective under conditions of |
normal |
home |
use, |
|
|||||||||||||||||||
|
|
|
|
|
|
|
|
|
|
|
shipping costs included, labor charges excluded. |
|
|
|
|
|
|
|
|
||||||||||||
|
|
|
|
|
|
|
|
|
|
||||||||||||||||||||||
2 Year Limited Warranty on Electronics |
|
|
|
Bosch |
will |
repair or replace, free of charge, any |
microprocessor |
or printed |
|||||||||||||||||||||||
From Date of |
Installation* |
|
|
|
|
|
|
circuit |
board that |
is |
proven |
defective |
under conditions |
of |
|
normal |
home |
|
|||||||||||||
|
|
|
|
|
|
|
|
|
|
|
use |
|
from |
the date of original installation, labor |
charges |
|
excluded. |
|
|||||||||||||
|
|
|
|
|
|
|
|
|
|
|
|
|
|
|
|
|
|||||||||||||||
2 Year Limited Warranty on Motor |
|
|
|
|
Bosch |
will |
repair |
or |
replace, |
free of |
charge, |
any |
motor |
or component |
part |
||||||||||||||||
From Date of |
Installation* |
|
|
|
|
|
|
of the |
motor that |
is |
proven |
defective |
under |
conditions of |
normal |
home |
|
||||||||||||||
|
|
|
|
|
|
|
|
|
|
|
use |
|
from |
the |
date |
of |
original installation, labor |
charges |
|
excluded. |
|
||||||||||
|
|
|
|
|
|
||||||||||||||||||||||||||
* Date of installation shall refer to the earlier of the date the clothes dryer is installed or ten businessivery daysdate. after the del |
|
|
|
|
|||||||||||||||||||||||||||
|
|
|
|
|
|
|
|
|
|
|
|
|
|
|
|
|
|||||||||||||||
Exclusions |
|
|
|
|
|
|
assume the |
identity |
of |
the |
original BE SURE |
TO |
PROVIDE |
YOUR |
|
||||||||||||||||
This warranty |
does |
not |
cover |
|
for purposes |
of |
the |
applicable |
|
CLOTHES |
DRYER'S |
MODEL, |
|
|
|||||||||||||||||
|
warranty period. TO THE EXTENT |
SERIAL |
NUMBER, |
PURCHASE |
|
||||||||||||||||||||||||||
|
|
|
|
|
|
|
|
|
|
||||||||||||||||||||||
service calls or |
repairs |
to |
correct the |
BY |
LAW, THIS |
|
|
DATE AND THE |
SELLER'S |
NAME, |
|||||||||||||||||||||
|
|
|
|
|
|
|
|
|
PERMITTED |
|
|
||||||||||||||||||||
installation of the clothes dryer, to WARRANTY |
IS |
IN |
LIEU |
OF |
ALL |
ADDRESS.AND |
A |
COPY |
OF |
THE |
|
||||||||||||||||||||
provide instructions |
on |
the |
use of |
OTHER EXPRESS |
AND |
IMPLIED |
SALES INVOICE. |
|
|
|
|
|
|
|
|
||||||||||||||||
your clothes dryer, |
to |
replace |
house |
|
|
|
|
|
|
THE |
|
|
|
|
|
|
|
|
|
|
|
|
|
|
|||||||
fuses or correct |
plumbing |
or |
the |
WARRANTIES, INCLUDING |
|
|
|
|
|
|
|
|
|
|
|
|
|
|
|||||||||||||
IMPLIED WARRANTIES |
OF |
|
|
|
|
|
|
|
|
|
|
|
|
|
|
|
|
||||||||||||||
|
|
|
|
|
|
|
|
|
|
|
|
|
|
|
|
|
|
|
|
|
|
|
|
|
|||||||
electric wiring in your home or to MERCHANTABILITY AND FITNESS |
|
|
|
|
|
|
|
|
|
|
|
|
|
||||||||||||||||||
repair any |
clothes |
dryer |
that's use FOR A PARTICULAR PURPOSE. |
|
|
|
|
|
|
|
|
|
|
|
|
|
|||||||||||||||
was in a manner |
other |
than |
what |
is |
|
|
|
|
|
|
|
|
|
|
|
|
|
|
|
|
|
|
|
|
|
|
|||||
normal and customary |
for |
home |
BOSCH DOES NOT ASSUME ANY |
|
|
|
|
|
|
|
|
|
|
|
|
||||||||||||||||
RESPONSIBILITY |
FOR |
|
|
|
|
|
|
|
|
|
|
|
|
|
|
|
|
|
|||||||||||||
use. In addition, |
the |
warranties |
|
|
|
|
|
|
|
|
|
|
|
|
|
|
|
|
|
||||||||||||
INCIDENTAL |
OR |
|
|
|
|
|
|
|
|
|
|
|
|
|
|
|
|
|
|
|
|
||||||||||
|
|
|
|
|
|
|
|
|
|
|
|
|
|
|
|
|
|
|
|
|
|
|
|
|
|
|
|
|
|||
provided in this Statement exclude CONSEQUENTIAL DAMAGES. TO |
|
|
|
|
|
|
|
|
|
|
|
|
|
||||||||||||||||||
any defects or damage arising fromOBTAIN WARRANTY SERVICE, |
|
|
|
|
|
|
|
|
|
|
|
|
|
|
|||||||||||||||||
accident, alteration, misuse, abuse, CONTACT THE NEAREST BOSCH |
|
|
|
|
|
|
|
|
|
|
|
|
|||||||||||||||||||
improper installation, unauthorized |
AUTHORIZED |
SERVICE |
CENTER |
|
|
|
|
|
|
|
|
|
|
|
|
|
|||||||||||||||
service work, |
external |
forces |
|
|
|
|
|
|
|
|
|
|
|
|
|
|
|||||||||||||||
|
OR CALL 1B800B944B2904, |
OR |
|
|
|
|
|
|
|
|
|
|
|
|
|
|
|||||||||||||||
beyond Bosch's |
control, |
such |
as |
|
|
|
|
|
|
|
|
|
|
|
|
|
|
||||||||||||||
WRITE TO: |
|
|
|
|
|
|
|
|
|
|
|
|
|
|
|
|
|
|
|
|
|
|
|||||||||
|
|
|
|
|
|
|
|
|
|
|
|
|
|
|
|
|
|
|
|
|
|
|
|
|
|
|
|
|
|
|
|
fire, flood, |
and |
other |
acts |
of |
God, |
or |
APPLIANCES |
CORP., |
|
|
|
|
|
|
|
|
|
|
|
|
|
||||||||||
installation not in accordance with |
BSH HOME |
|
|
|
|
|
|
|
|
|
|
|
|
|
|||||||||||||||||
5551 MCFADDEN |
AVENUE |
|
|
|
|
|
|
|
|
|
|
|
|
|
|
|
|||||||||||||||
local electrical and plumbing codes.HUNTINGTON BEACH |
|
|
|
|
|
|
|
|
|
|
|
|
|
|
|
|
|
||||||||||||||
Labor charges |
incurred |
in |
the |
repair |
|
|
|
|
|
|
|
|
|
|
|
|
|
|
|
|
|
|
|
|
|
|
|||||
|
|
|
|
|
|
|
|
|
CA 92649. |
|
|
|
|
|
|
|
|
|
|
|
|
|
|
|
|
|
|
|
|
|
|
or replacement of any clothes dryer |
|
|
|
|
|
|
|
|
|
|
|
|
|
|
|
|
|
|
|
|
|
|
|||||||||
after a period |
of one |
year |
from date |
|
|
|
|
|
|
|
|
|
|
|
|
|
|
|
|
|
|
|
|
|
|
||||||
of installation |
shall |
not |
be |
covered |
|
|
|
|
|
|
|
|
|
|
|
|
|
|
|
|
|
|
|
|
|
|
|
||||
by this warranty. Any and all |
|
|
|
|
|
|
|
|
|
|
|
|
|
|
|
|
|
|
|
|
|
|
|
|
|||||||
replaced and/or |
repaired |
parts |
shall |
|
|
|
|
|
|
|
|
|
|
|
|
|
|
|
|
|
|
|
|
|
|
|
|||||
28

Table des matière
Définitions . . . . . . . . . . . . . . . . . . . . . . . . . . . . . . . .. .. .. .. .. .. .. .. .. .31. .. .. .. ..
INSTRUCTIONS DE SÉCURITÉ IMPORTANTES. . . . . . . . . . . . . . . . . . . . . . . . . . 31. . .
nstructions de mise à la terre. . . . . . . . . . . . . . . . . . . . . . . . . . . . . . . . . 33. . . . .
INSTRUCTIONS D INSTALLATION. . |
. . |
. . |
. . |
. . . . . . |
. . |
. . |
. . |
. |
. |
. . |
. |
. |
. |
. |
. . 34. . . . . |
ntroduction . . . . . . . . . . . |
. . |
. . |
. . |
. . . . . . |
. . |
. . |
. . |
. . |
. |
. . |
. |
. |
. |
. |
. . .34. . . . . |
nformations sur la mise au .rebut. . |
. |
. . |
. . . |
. . . . . . |
. . |
. . |
. . |
. |
. |
. . |
. |
. |
. . |
. |
. . 34. . . . . |
Avant d'installer le sèche8linge. . . . . . . . . . . . . . . . . . . . . . . . . . . . . . . . .35. . . . .
Branchement |
électrique. . . |
. . . . |
. |
. |
. |
. |
. |
. |
. |
. |
. |
. |
. |
. |
. . . |
. . . . |
. |
. |
. |
. |
. |
. |
. |
. . .36. . . . . |
Branchement |
du gaz. . . . . |
. . . |
. |
. |
. |
. |
. |
. |
. |
. |
. |
. |
. |
. |
. . . . |
. . . |
. |
. |
. |
. |
. |
. . |
. |
. . 37. . . . . |
accordement du conduit d'échappement. . . . . . . . . . . . . . . . . . . . . . . . . . . . . 38. . . .
Accessoires . . . . . . . . . . . . . . . . . . . . . . . . . . . . . . . . . . . . . . . . .40. . . . .
nstallation pas à pas. . . . . . . . . . . . . . . . . . . . . . . . . . . . . . . . . . . . . 41. . . . .
Check8list préalable à l'emploi du sèche8linge. . . . . . . . . . . . . . . . . . . . . . . . . . . . .41. . .
réparation pas à pas au transport du sèche8linge. . . . . . . . . . . . . . . . . . . . . . . . . . . . 41. .
INSTRUCTIONS D UTILISATION . . . . . . . . . . . . . . . . . . . . . . . . . . . . . . .42. . . . .
résentation de votre nouveau sèche8linge. .. . . . . . . . . . . . . . . . . . . . . . . . . . . . 42. . .
Le bandeau de commande. . . . . . . . . . . . . . . . . . . . . . . . . . . . . . . . . . 43. . . . .
Résumé des instructions. . . . . . |
. . . . |
. . |
. . . . |
. . . . . . . . |
. . |
. . . . |
. .. .. .. 44.. . . . . |
||
Informations de sécurité. . . . . . |
. . . . |
. . |
. . . . |
. . . . . . . . |
. . |
. . . . |
. .. .. .. ..45.. . . . |
||
Avant d'allumer le sèche8linge. . . . |
. . . . |
. . |
. . . . |
. . . . . . . . |
. . |
. . . . . |
. . . . 45. . . . . |
||
tilisation |
du |
sèche8linge. . . . . . |
. . . . |
. . |
. . . . |
. . . . . . . . |
. . |
. . . . . |
. . . . 45. . . . . |
rotection |
du |
sèche8linge. . . . . |
. . . . |
. . |
. . . . |
. . . . . . . . . |
. . |
. . . . |
. . . . .45. . . . . |
Protection de l environnement. . . . . . . . . . . . . . . . . . . . . . . . . . . . . . . .45. . . . .
Avant d utiliser le sèche6linge pour la première. . fois. . . . . . . . . . . . . . . . . . . . . . . . 46. . Débranchement temporaire du sèche6linge. . . . . . . . . . . . . . . . . . . . . . . . . . . .46. . .
Linge . . . . . . . . . . . . . . . . . . . . . . . . . . . . . . . .. .. .. .. .. .. .. .. .. .. .. ..46.. .. .. .. .
Détermination de la nature du .tissu. . . . . . . . . . . . . . . . . . . . . . . . . . . . . . . . .46. . Conseils pour le séchage. . . . . . . . . . . . . . . . . . . . . . . . . . . . . . . . . . . 46. . . . .
Sélection du programme. . . . . . . . . . . . . . . . . . . . . . . . . . . . . . . .. .. .. 47.. . . . .
rogrammes automatiques. . . . . . . . . . . . . . . . . . . . . . . . . . . . . . . . . . 47. . . . .
rogrammes mixtes. . . . . . . . . . . . . . . . . . . . . . . . . . . . . . . . . . . . . 47. . . . .
rogrammes spéciaux. . . . . . . . . . . . . . . . . . . . . . . . . . . . . . . . . . . . 47. . . . .
rogrammes assortis d'une durée. . . . . . . . . . . . . . . . . . . . . . . . . . . . . . . . .47. . .
ptions additionnelles . . . . . . . . . . . . . . . . . . . . . . . . . . . . . . . . . . . . 48. . . . .
ptions . . . . . . . . . . . . . . . . . . . . . . . . . . . . . . . . . . . . . . . . . . 49. . . . .
ndicateur de déroulement du programme. . . . . . . . . . . . . . . . . . . . . . . . . . . . . . 49. . .
Tableau de sélection des programmes. . . . . . . . . . . . . . . . . . . . . . . . . . . . . . .50. .
Utilisation . |
. . |
. . . . . . . . |
. . . . . . |
. . . . |
. . |
. . |
. . . . |
. . .. |
.. .. .. .. .. .. .. .. ..51.. .. .. .. . |
tilisation |
du |
sèche8linge. . . . |
. . . . . . |
. . . . |
. . |
. . |
. . . . . |
. . . |
. . . . . . . . . 51. . . . . |
tilisation du tiroir de séchage. . . . . . . . . . . . . . . . . . . . . . . . . . . . . . . . . 52. . . . .
Nettoyage et entretien. . . . . . . . . . . . . . . . . . . . . . . |
. |
. |
. |
. |
. |
. |
. |
. .. |
.. .. |
|
.. 54.. .. . . . |
||||
ettoyage |
du |
sèche8linge. . . . . . . . . . . . . . . . . . . . . . |
. |
. |
. |
. |
. |
. |
. |
. . |
. . |
. .54. . . . . |
|||
ettoyage |
du |
filtre à peluches. . . . . . . . . . . . . . . . . . . . . |
. |
. |
. |
. |
. |
. |
. |
. . |
. . . 54. . . . . |
||||
ettoyage |
du |
conduit d'échappement. . . . . . . . . . . . . . . . . |
. |
. |
. |
. |
. |
. |
. |
. . |
. . . |
. |
. |
55. . . . |
|
ettoyage |
des |
capteurs d'humidité. . . . . . . . . . . . . . . . . . |
. |
. |
. |
. |
. |
. |
. |
. . |
. . |
. |
. |
. |
55. . . . |
ettoyage de la flasque. . . . . . . . . . . . . . . . . . . . . . . . . . . . . . . . . . . .55. . . . .
Changer l'ampoule de l'éclairage. . . . . . . . . . . . . . . . . . . . . . . . . . . . . . . .55. . . . .
Dérangement et |
remèdes. . . . . |
. . . . |
. . |
. . . . . . . . . . . . |
. . |
. . |
. . |
. |
. |
.. |
.. |
.. 56.. . . . . |
E CE and |
E A A . . |
. . . . . |
. . |
. . . . . . . . . . . . |
. . |
. . |
. . . |
. |
. |
. |
. |
. 58. . . . . |
DECLARATION DES GARANTIES SÈCHE6LINGE BOSCH. . . . . . . . . . . . . . . . . . . . . . .59. .
Exclusions de garantie. . . . . . . . . . . . . . . . . . . . . . . . . . . . . . . . . . . . 60. . . . .
29
 Loading...