


 Loading...
1
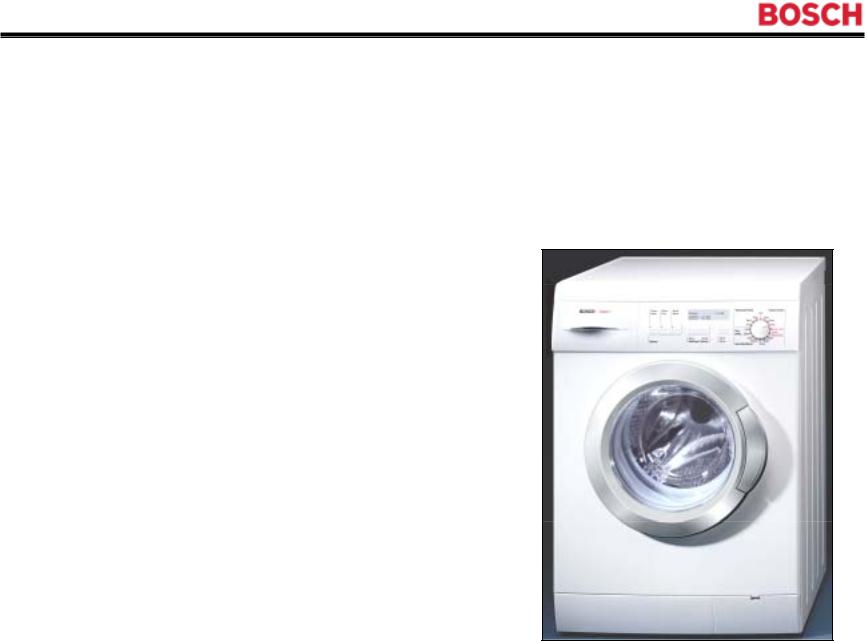
WFL 2060UC & WFR 2460UCUC
Washer Training Program
LED display model - WFL2060UC |
Digital display model - WFR2460UC |
1st Edition/Revision 5 (1/20/04)

2
WFL 2060 & WFR 2460 Training Programrogram
•Features and Benefits
•Product Description
•Warranty
•Installation
•Operation
•Disassembly
•Reassembly
•Wiring Diagram
•Service Tips
1st Edition/Revision 5 (1/20/04)
3
Features and Benefits
•Larger door - 25% larger vs. WFK 2401
•Larger opening - 15% larger vs. WFK 2401 (easier
loading and unloading)
• Larger drum - 19% larger vs. WFK 2401 (13 lb. capacity vs. 11 lb. for WFK 2401)
•Very energy efficient - Energy Star rated
•Stainless steel drum - won’t rust & is gentle to clothes
•Uses little water
•3-Tier water fill for fast & equal water fill
•180° door opening
•Up to 5 rinses
•Suds sensing - rinses out suds leaving no soap film
•Unbalanced load sensor - adjusts spin to balance load
•UL listed (U.S. & Canada)
1st Edition/Revision 5 (1/20/04)
4
Extra Features and Benefits -- WFRR 24602460
•Continuous cycle notification - digital display
•Sensotronic II Plus electronic control
•Accurate water level control independent of water pressuressure
•Digital clock
•Real time cycle finish (displays actual time of day cycle stops)stops)
•Real time delay (enter actual time of day for wash to end)
•Reduced ironing
•Interactive language display - choose desired language (English, French, Spanish, German)
•Continuous suds sensing
•Child lockout
1st Edition/Revision 5 (1/20/04)
5
Product Description
•Electronic Sensotronic controls
•Larger capacity & door opening
•Detergent & softener dispenser
•Regular/Cotton, Permanent Press, Delicates & Hand Washables settings
•180º door opening
•Stainless steel inner drum
•Durable Polinox outer drum
•Power Wash, Rinse Plus & Quick Wash buttons
•Adjustable spin speeds
•Guaranteed temperatures
Electronic |
Energy |
controls |
Star rated |
Safety door lock
Accessible drain trap
1st Edition/Revision 5 (1/20/04)

6
Warranty (1)
Bosch Washers and Dryers Limited Lifetime Warranty
Statement of Limited Warranty
The warranties provided by BSH Home Appliances ("Bosch") in this Statement of Warranties apply only to Bosch clothes washers and dryers sold to the first using purchaser by Bosch or its authorized dealers, retailers or service centers in the United States or Canada. The Warranties provided herein are not transferable, and take place from date of installation.
1 Year Full Limited Warranty
Bosch will repair or replace, free of charge, any component part that proves defective under conditions of normal home use, labor and shipping costs included. Warranty repair service must be performed by an authorized Bosch Service Center.
2 Year Limited Warranty
Bosch will provide replacement parts, free of charge, for any component part that proves defective under conditions of normal home use, shipping costs included.
1st Edition/Revision 5 (1/20/04)

7
Warranty (2)
5 Year Limited Warranty On Electronics
Bosch will repair or replace, free of charge, any microprocessor or printed circuit board that proves defective under conditions of normal home use for a period of five years from the date of original installation, labor charges excluded.
5 Year Limited Warranty On Motor
Bosch will repair or replace, free of charge, any pump or component part of the pump that proves defective under conditions of normal home use for a period of five years from the date of original installation, labor charges excluded.
5 Year Limited Warranty On Cabinet Rust-Through
Bosch will replace any cabinet part, free of charge, if that cabinet part should rust through under conditions of normal home use, labor charges excluded.
Lifetime Limited Warranty Against Stainless Steel Rust-Through
Bosch will replace your clothes washer or dryer, free of charge, with the same model or a current model that is equivalent or better in functionality if the drum should rust through under conditions of normal home use, labor charges excluded.
For location of nearest repair depot call 1-800-944-2904 from 5:00 AM - 5:00:00 PMPM M-F (Pacific time)
8
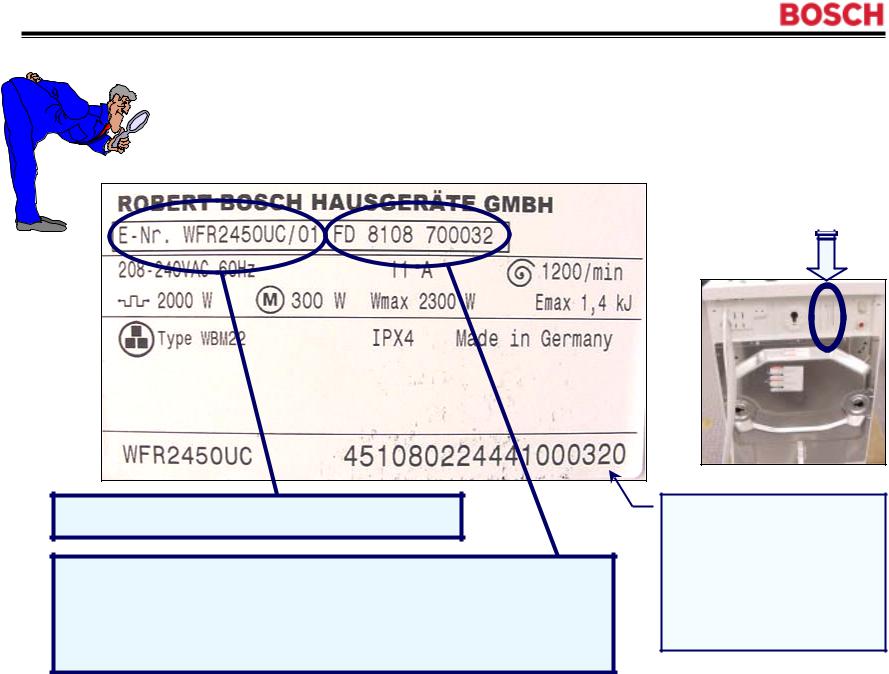
Warranty -- Serial # Label
The serial # label, located on the rear of the washer, shows necessary warranty information.
Serial #
label
6
6
•Model # - “WFR2460UC/01”.
•Serial # - “FD 8108”. To find when the product type
was built, add 20 to the 1st two digits to get the year (81 + 20 = 101 Æ product type was built in 2001). The last two digits show the month (08 = August).
Factory serial # - Can convert factory serial # to FD # for warranty use. 1st 2 digits show factory # (45 = Berlin), 3rd digit shows year (1 = 2001), 4th & 5th digits show month built (08 = August). So, serial # starting with “45108…000320” = washer built @ Berlin with FD 8108 700032.
1st Edition/Revision 5 (1/20/04)
9
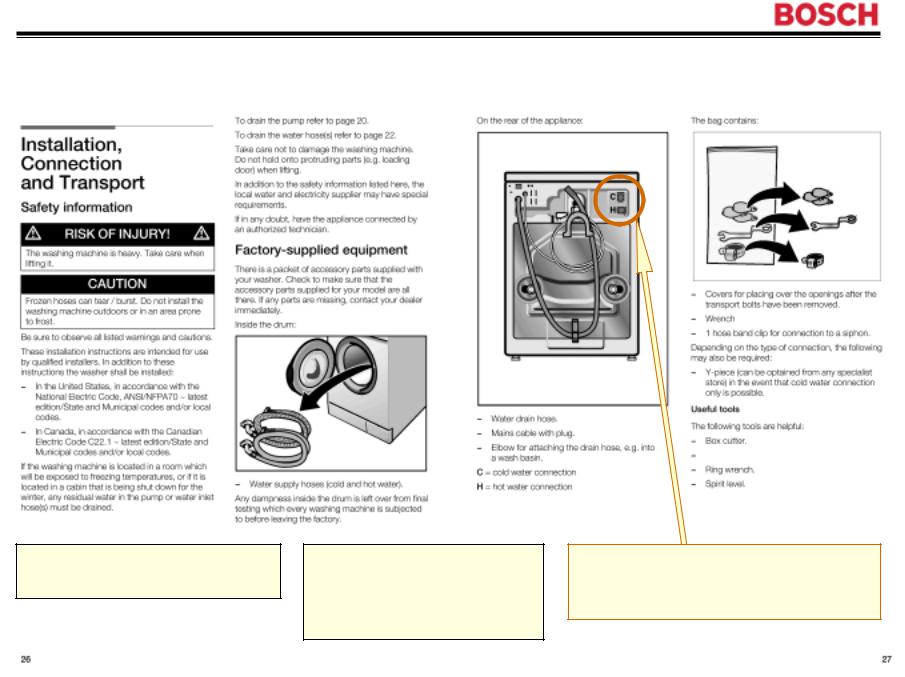
Installation -- Reprint of Installation Instructionsuctions
NOTE: Be sure to follow all national & local codes.
HINT: “Mains” is the European term for “power”, so “mains cable” = “power cord”.
(“utility knife”)
Flat (blade) screwdriver.
HINT: Cold & hot water connections are clearly marked on the rear of the washers.
1st Edition/Revision 5 (1/20/04)
10
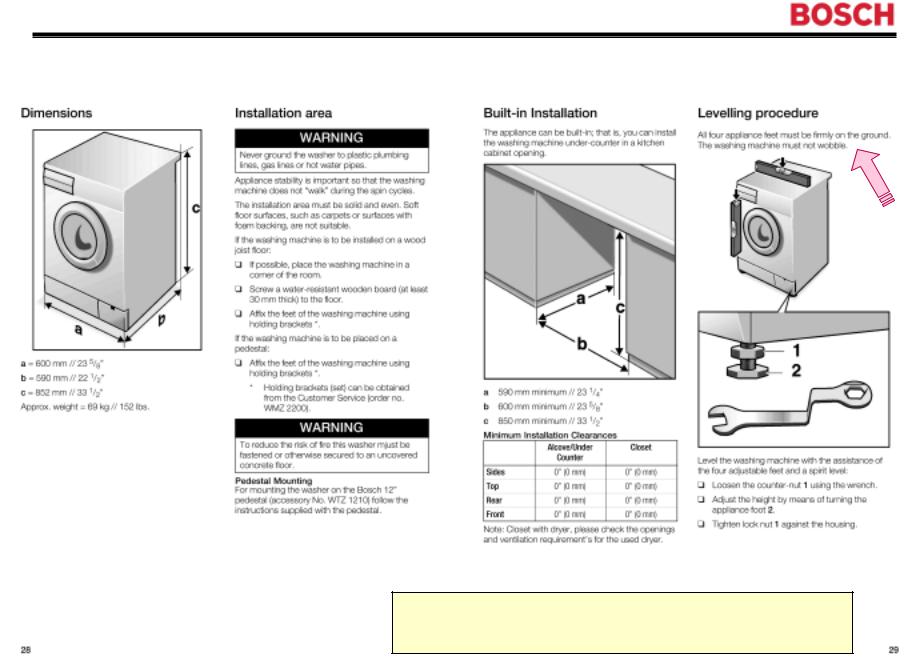
Installation -- Reprint of Installation Instructionsuctions
;
HINT: To avoid damaging washer, don’t move it while the feet (leveling legs) are extended.
1st Edition/Revision 5 (1/20/04)
11
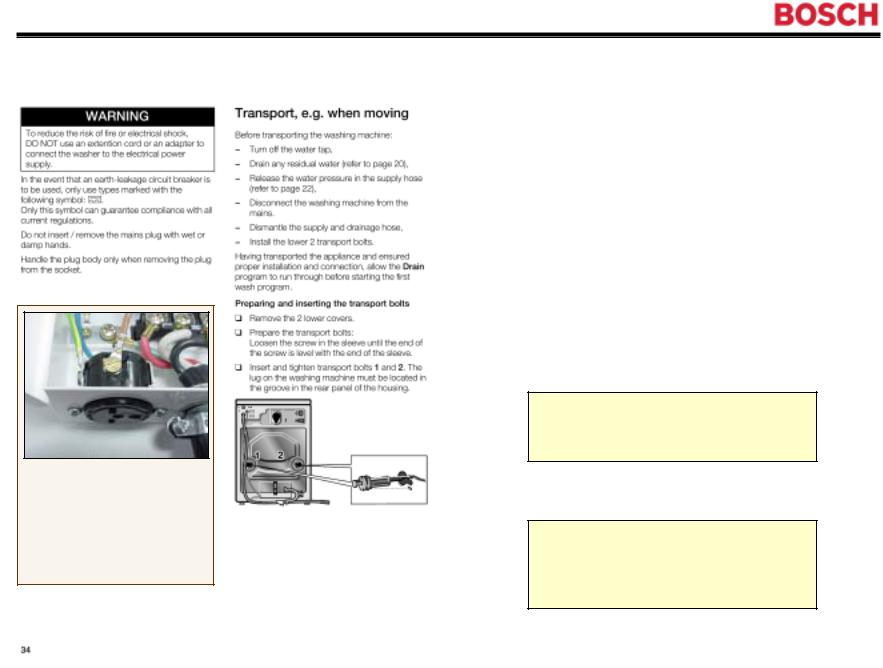
Installation -- Reprint of Installation Instructionsuctions
HINT: Loosen transport (shipping) bolts just enough to remove them from the washer -- don’t unscrew them completely so the bushings fall from the bolts into the washer frame.
HINT: Be sure to remove the transport (shipping) bolts & keep them near the washer (for future shipment).
,
HINT: To eliminate possibility of leaking, don’t overtighten fittings. Teflon tape can also be used on all threads.
1st Edition/Revision 5 (1/20/04)

12
Installation -- Reprint of Installation Instructionsuctions
HINT: The washer uses a NEMA 6-15P 240V, 15A, 3- wire plug, which mates to a NEMA 6-15R outlet (receptacle).
HINT: Bosch dryers include a NEMA 6-15R outlet which the washer NEMA 6-15P 240V, 15A, 3-wire plug can be plugged into.
HINT: “Mains” is the European term for “power”, so “mains cable” = “power cord”.
1st Edition/Revision 5 (1/20/04)
13
Installation -- Reprint of Installation Instructionsuctions
Be sure to remove the transport (shipping) bolts!
HINT: Bosch dryers include a NEMA 6-15R outlet which the washer
NEMA 6-15P 240V, 15A, 3-wire plug can be plugged into.
HINT: When moving an existing washer, screw in the feet (leveling legs) first so they won’t be damaged.
HINT: “Earth” is the European term for “ground”, so “earth leakage” = “ground fault” (GFCI or GFI receptacle).
1st Edition/Revision 5 (1/20/04)
14
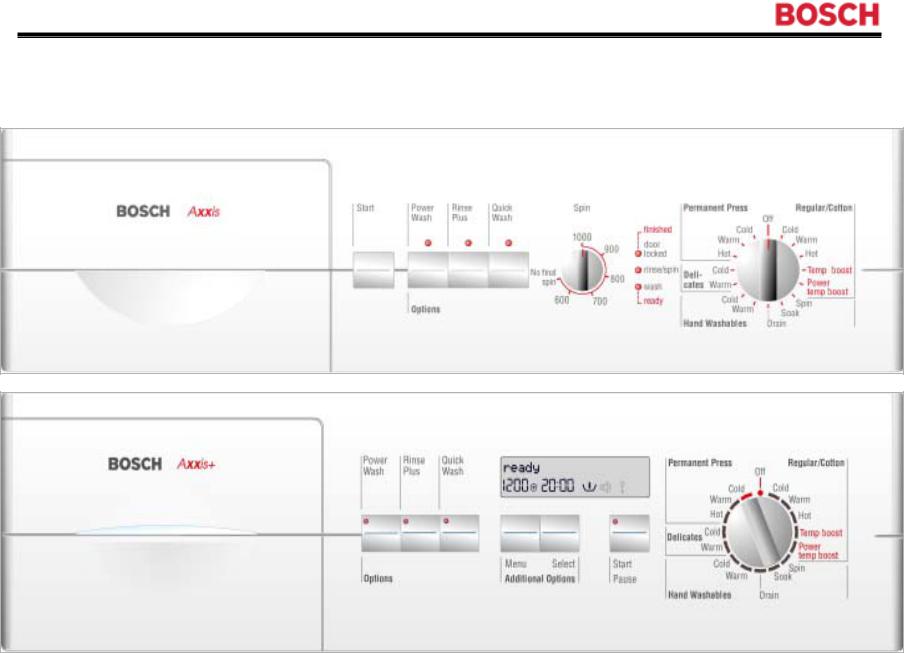
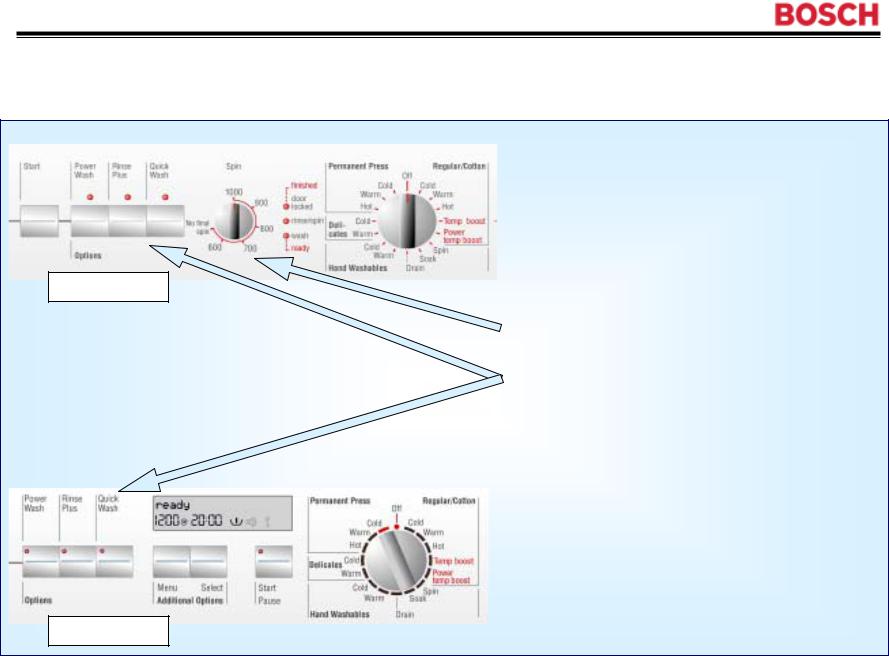
Operation -- Fascia Panels
WFL 2060UC
WFR 2460UC
1st Edition/Revision 5 (1/20/04)
15
Operation -- Controls
WFL 2060UC
Both have Regular/Cotton,
Permanent Press, Delicates,
Hand Washables, Temperature
Boost & Power Temperature
Boost settings.
Spin Speed Selector knob


 Special Wash Buttons
 Digital Display
WFR 2460UC
1st Edition/Revision 5 (1/20/04)

16
Operation -- Sensors (1)
1A. Load Sensor (WFL2060UC)
At a predefined points during the initial fill, the washer determines if it needs more water using a pressure switch. This is due to differences in the absorption of the laundry and the size of the loads.
1B. Dynamic Load Sensor (WFR2460UC)
During the entire fill the washer continually adjusts for the size of the load and determines if more water is needed using an analog pressure switch and a flow meter.
2. Digital Temperature Sensor (WFL2060UC & WFR2460UC)
The thermostat monitors the temperature of the water and controls the length of time the heating element is on, ensuring the proper temperature for the chosen cycle.
3A. Suds Sensor (WFL2060UC)
During the beginning of the1st rinse/spin phase, the washer determines if there are excessive suds and automatically adds 2 rinses (if necessary). This is accomplished via the pressure switch and the motor synchronization system.
3B. Continuous Suds Sensor (WFR2460UC)
Checking the pumping out phase of the main wash, the beginning of the 1st rinse/spin phase and the actual spin speed vs. the programmed spin speed, the washer determines if there are excessive suds and automatically adds up to 2 rinses (if necessary). This is accomplished via the pressure switch, analog pressure switch and the motor synchronization system.
4. Unbalanced Load Sensor (WFL2060UC & WFR2460UC)
During the final spin cycle the washer monitors the positioning and balance of the load. If the load unbalanced, the washer stops and adjusts the load up to 15 times and reduces the spin speed to finish the cycle. This is accomplished via the motor synchronization system.
1st Edition/Revision 5 (1/20/04)

17
Operation -- Sensors (2)
1A/1B. Load & Dynamic Load Sensors
Mechanical Pressure Switch - (WFL 2060UC & WFR 2460 UC) measures the water
level after the first fill. If the water level is high (like for smaller loads), the pressure increases and the pressure switch does not provide more water.
Analog Pressure Switch - (WFR 2460UC)
•Precise measuring of actual water level
•Accurate load detection
•Control of the pump - noise reduction
•Time reduction - no pumping when empty
Mechanical Analog
Pressure Pressure
Switch Switch
BENEFITS: Continuous adjustment of wash times
Water and energy consumed varies according too loadload sizesize
1st Edition/Revision 5 (1/20/04)

18
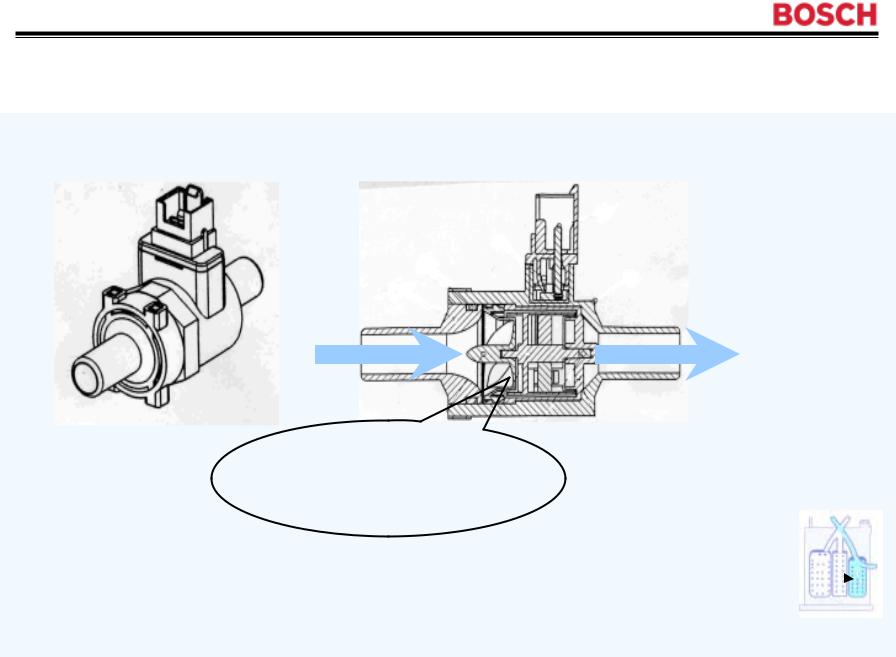
Operation -- Sensors (3)
1A/1B. Flow Meter
¾Exact monitoring of water inflow.
¾Ensures exact control of water inlet valves so that there is always the right amount of water for wash and rinse cycles.
¾Together with the pressure switch, there is a continuous adjustment of wash time, water and energy in relation to the load size.
¾The flow meter works independently of water pressure.
BENEFITS: Minimizes water consumption
Exact Load Detection
Superior Cleaning Performance
1st Edition/Revision 5 (1/20/04)
19
Operation -- Sensors (4)
1A/1B. Flow Meter
Water
Propeller emits signals
(independent from water pressure)
9An internal water clock monitors water inflow via soak compartment.
9Ensures exact control of water inlet valves - always right amount of water.
9Independent from water pressure.
1st Edition/Revision 5 (1/20/04)
20
Operation -- Sensors (5)
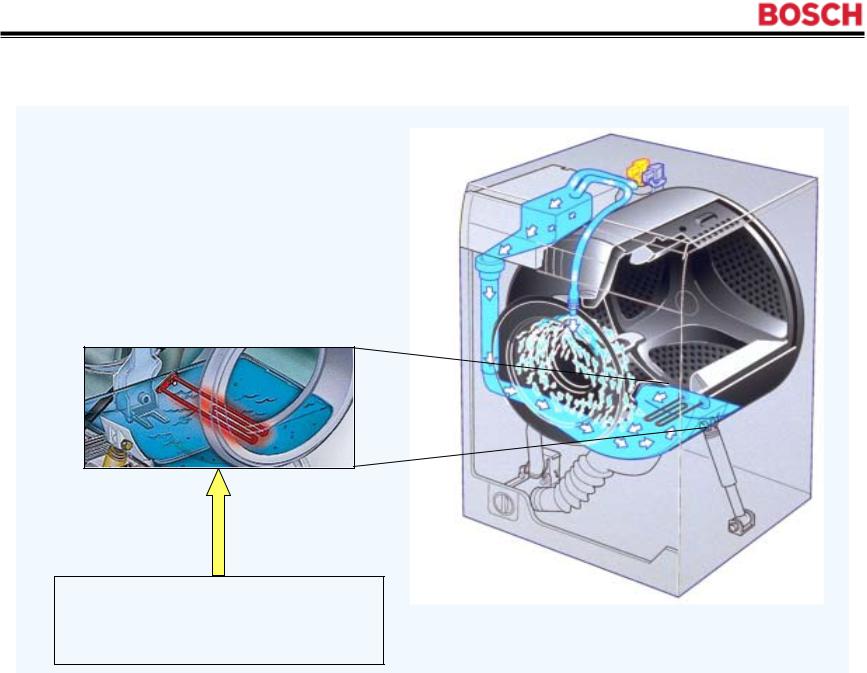
2. Digital Temperature Sensor
Both models are equipped with the Temperature Sensor to deliver guaranteed wash temperatures
Thermostat & Heating
Element
1st Edition/Revision 5 (1/20/04)
21
|
|
Operation -- Sensors (6) |
|
||
3A/3B. Suds & Continuous Suds Sensors |
||
WFR2460 |
9 |
Detection during draining out after main wash |
|
|
Î immediate additional rinse & cancelling of 1st rinse spin |
WFR2460 |
9 |
Detection during 1st rinse spin |
|
|
Î immediate interuption of spin |
WFL2060 |
|
Î insertion of one or two additional rinses |
|
|
Î reduced agition during additional anti foam rinse |
WFR2460 |
9 |
Detection during any other rinse spin |
|
|
Î immediate interuption of spin |
|
|
Î reduced agitiation in following rinse cycle |
|
9 |
All subsequent rinse spin cycles are always rechecked for suds |
|
|
|
NOTE: Suds build-up usually occur only when way too much detergent is used with lightly soiled loads.
1st Edition/Revision 5 (1/20/04)

22
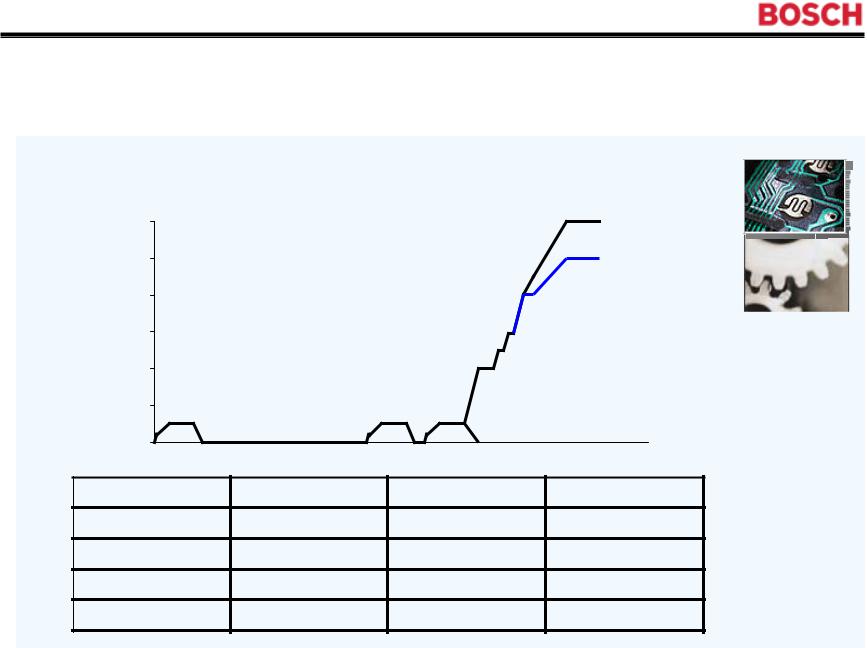
Operation -- Sensors (7)
4. Unbalanced Load Sensor |
New 2-step detection |
9Accurate measuring of unbalance by deviation of spin speed and slow down time of drum
9Infinite adapting of spin speeds
9Compensates reducing of spin speeds by prolonging spinning times
9Will attempt up to 15 times to redistribute a load
Advantages:
9 Reduction of noise
9 Better stability of machine
9 Good spinning results with big unbalances
1st Edition/Revision 5 (1/20/04)
23
Operation -- Sensors (8)
4. Unbalanced Load Sensor
1200
[rpm] |
1000 |
|
|
|
|
speed |
800 |
|
600 |
|
|
Spin |
|
|
400 |
|
|
|
200 |
max. 15 trials |
|
0 |
|
New 2-step detection
I
II
 III
III
IV
load distribution |
unbalance |
Spin speed (rpm) |
spinning profile |
|
|
good |
small |
1200 |
(max.) |
I |
After 4 attempts |
uneven |
medium |
1000 |
(reduced) |
II |
After 7 attempts |
bad |
big |
800 (low) |
III |
After 14 attempts |
|
none |
dangerous |
no spinning |
IV |
|
|
|
|
|
|
|
|
1st Edition/Revision 5 (1/20/04)
24
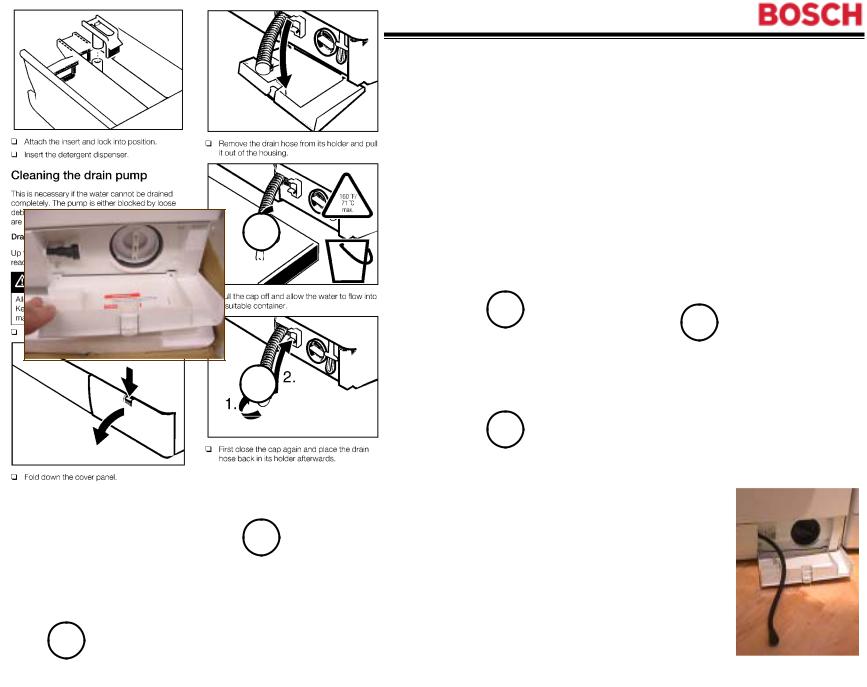
Operation -- Cleaning Drain Pump Traprap
Larger objects such as coins and paper clips are collected in the drain pump trap so they won’t plug up or damage other parts of the washer. The drain pump trap can easily be cleaned by customers.
2
5 7
3
6
4
1
1st Edition/Revision 5 (1/20/04)

25
Operation -- WFR 2460UC Sales Demo Modeode
CAUTION: To avoid danger of electrical |
IMPORTANT: When reselling any WFL2060 or WFR2460 washers from display |
shock, make sure the washer is unplugged |
floors, replace the white (or gray) drain pump connector so washers will run properly |
before changing any electrical connections! |
and replace the shipping bolts so washers won’t be damaged during shipment. |
SALES DEMO MODE PROCEDURE: Preparing WFR2460 washers for display involves removing three shipping bolts and disconnecting the drain pump. To set up WFR2460 washers for display:
Conversion: Make sure the washer is unplugged and is not connected to any water lines.
1.Remove the three shipping bolts from the washer back panel, removing the top bolt last. Each bolt has an insert wedging up to the inside of the back panel. When removing bolts, loosen them, then move them (up, left or right) until they slide out the large circular holes (matching the insert sizes). Don’t unscrew shipping bolts completely so inserts won’t drop into the washer base. After removing bolts, cover the holes with white caps included with the washer.
2.To access the white (or gray) drain pump connector from the back of the washer, remove the back panel by removing (7) T-20 & (4) T-30 Torx screws. Pull the white (or gray) drain pump connector to remove it, then secure the loose connector away from the frame or any washer parts with electrical tape (to avoid possibility of electrical shock).
3.Replace the back panel, then attach the fuscia label to the rear of the washer so its visible.
Power hook-up: Plug the washer into a 120V/240V transformer, then plug the transformer into a 120V, 15A power outlet.
Using demo mode: Rotate the cycle selector knob to the “Spin” position and then push the “Start” button to perform a complete spin cycle. To interrupt the spin cycle, push the “Start/Pause” button.
HINT: Before starting, make sure you have the following:
9B120V/240V transformer
9Fuscia demo mode label (“IMPORTANT”)
9Access to 120V, 15A, 60Hz electrical outlet
9T-20 & T-30 Torx screwdrivers
9Electrical tape
NOTE: Do not connect WFL2060 washers for sales demonstration -- all lights will turn on and washers won’t run.
IMPORTANT
Shipping bolt locations
Suggested placement for fuscia label (“IMPORTANT”)
WFR2460 drain pump is located at washer right front corner (photo viewing rear of washer)
Pull off white (or gray) drain pump electrical connector
1st Edition/Revision 5 (1/20/04)
26
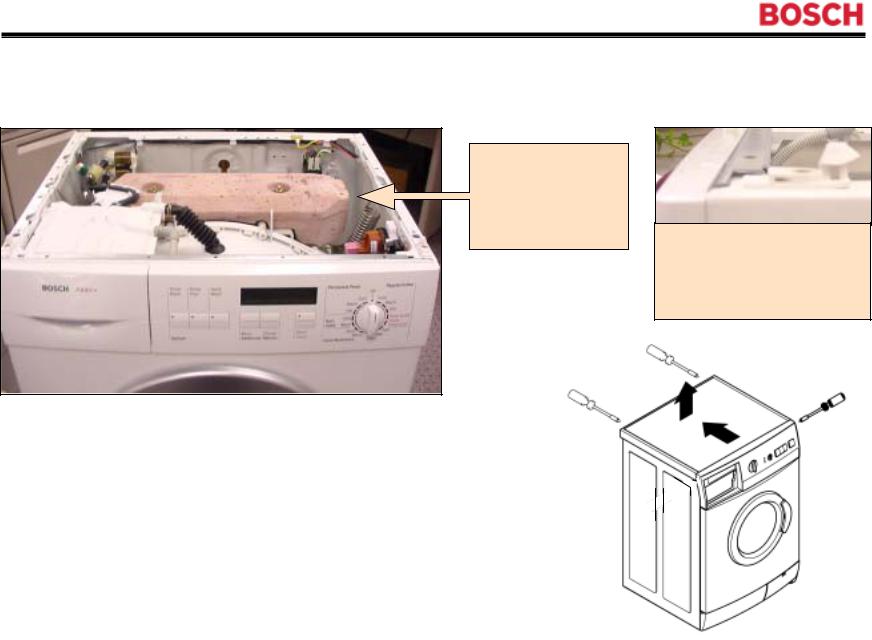
Disassembly -- Top & Rear Panels (1)(1)
NOTE: Washers have 2 concrete counterweights (top & front) to dampen vibrations.
NOTE: When removing top panel, don’t damage white plastic top panel latches.
To remove top panel to access control module, dispenser, inlet valves, pressure switch(es), drain reservoir, surge protector & wiring, remove (2) rear screws, then carefully slide panel toward rear of washer (until panel stops) and lift panel up.
1st Edition/Revision 5 (1/20/04)
Loading...