


W
O
O
c

Table of Contents
Your Bosch washing machine. . . . . . . . . . . . . . . . . . . . . . . . . . . . . . . . .3 . . . .
General safety instructions. . . . . . . . . . . . . . . . . . . . . . . . . . . . . . . .. .. .3 . . . .
Information concerning waste disposal. . . . . . . . . . . . . . . . . . . . . . . . . . . . . . 3. . .
Installation Instructions. . . . . . . . . . . . . . . . . |
. . . . . . . . |
. |
. |
. |
. |
. |
. |
.. |
.. |
.. |
.. ..4.. . . . |
||||||||||||||||||||||||||||||||||||||||||||
,1/-#2"1(-, |
|
|
|
|
|
|
|
|
|
|
|
|
|
|
|
|
|
|
|
|
|
|
|
|
|
|
|
|
|
|
|
|
|
|
|
|
|
|
|
|
|
|
|
4 |
|
|
|
|
|||||||
,%-/+ 1(-, |
"-,"$/,(,& |
4 |
01$ |
|
#(0.-0 * |
|
|
|
|
|
|
|
|
|
|
|
|
|
|
|
|
|
|
|
|
|
|
|
|
|
|
|
|
|
|
4 |
|
|
|||||||||||||||||
/-1$"1(-, |
-% 1'$ $,3(/-,+$,1 |
(,10 |
|
,# |
1(. 0 |
|
|
|
|
|
|
|
|
|
|
|
|
|
|
|
|
|
|
|
|
4 |
|
||||||||||||||||||||||||||||
1 ,# /# |
""$00-/($0 |
||||||||||||||||||||||||||||||||||||||||||||||||||||||
(+$,0(-,0 |
|
|
|
|
|
|
|
|
|
|
|
|
|
|
|
|
|
|
|
|
|
|
|
|
|
|
|
|
|
|
|
|
|
|
|
|
|
|
|
|
|
|
|
|
|
|
|
||||||||
,01 ** 1(-, |
02/% "$ |
|
|
|
|
|
|
|
|
|
|
|
|
|
|
|
|
|
|
|
|
|
|
|
|
|
|
|
|
|
|
|
|
|
|
|
|
|
|
|
|
|
|
|
|
|
|
|
|||||||
$+-3$ 1'$ 1/ ,0.-/1 1(-, 0 %$156#$3("$0 |
|
|
|
|
|
|
|
|
|
|
|
|
|
|
|
|
|
|
|
|
|
|
|
|
|
|
|||||||||||||||||||||||||||||
*(&,(,& |
1'$ |
4 0'(,& |
+ "'(,$ |
|
|
|
|
|
|
|
|
|
|
|
|
|
|
|
|
|
|
|
|
|
|
|
|
|
|
|
|
|
|
|
|
|
|
|
|
||||||||||||||||
-,,$"1(,& 1'$ .-4$/ |
|
|
|
|
|
|
|
|
|
|
|
|
|
|
|
|
|
|
|
|
|
|
|
|
|
|
|
|
|
|
|
|
|
|
|
|
|
|
|
|
|
|
|
|
|
||||||||||
-0$ ,#7" |
!*$ |
*$,&1'0 |
|
|
|
|
|
|
|
|
|
|
|
|
|
|
|
|
|
|
|
|
|
|
|
|
|
|
|
|
|
|
|
|
|
|
|
|
|
|
|
|
7 |
|
|
|
|
||||||||
|
1$/ |
|
"-,,$"1(-, |
|
|
|
|
|
|
|
|
|
|
|
|
|
|
|
|
|
|
|
|
|
|
|
|
|
|
|
|
|
|
|
|
|
|
|
|
|
|
|
|
|
|
|
|
|
|
|
|||||
Operating manual. . . . . . . . . . . . . . . . . . . |
. . . . . . . . |
. |
. |
. . .. .. .. .. .. .. .. 9.. .. .. .. |
|||||||||||||||||||||||||||||||||||||||||||||||||||
-2/ ,$4 |
4 0'(,&6+ "'(,$ |
|
|
|
|
|
|
|
|
|
|
|
|
|
|
|
|
|
|
|
|
|
|
|
|
|
|
|
|
|
|
|
|
|
|
|
|
|
|
||||||||||||||||
-,1/-* . ,$* |
|
|
|
|
|
|
|
|
|
|
|
|
|
|
|
|
|
|
|
|
|
|
|
|
|
|
|
|
|
|
|
|
|
|
|
|
|
|
|
|
|
||||||||||||||
Before using your washing machine for the |
first. . |
time. . |
. . . . . . . . |
. |
. |
. |
|
. |
. |
. |
. |
. . . . . |
. . |
|
.1 |
||||||||||||||||||||||||||||||||||||||||
First |
wash |
cycle. . . . . . . . . . . . . . . . . . . . |
. . . . . . . . |
. |
. . .. .. .. .. .. .. .. |
11.. .. .. .. .. |
|||||||||||||||||||||||||||||||||||||||||||||||||
$*$"1(,& |
1'$ |
* ,&2 |
&$ |
|
|
|
|
|
|
|
|
|
|
|
|
|
|
|
|
|
|
|
|
|
|
|
|
|
|
|
|
|
|
|
|
|
|
|
|
|
|
|
|
|
|
|
|
|
|||||||
$11(,& 1'$ 1(+$ |
|
|
|
|
|
|
|
|
|
|
|
|
|
|
|
|
|
|
|
|
|
|
|
|
|
|
|
|
|
|
|
|
|
|
|
|
|
|
|
|
|
|
|
|
|
|
|||||||||
(/01 4 0' "5"*$ |
4(1'-21 |
|
4 |
0'(,& |
|
|
|
|
|
|
|
|
|
|
|
|
|
|
|
|
|
|
|
|
|
|
|
|
|
|
|
|
|
|
|
|
|
|
|||||||||||||||||
/$. |
/(,& |
1'$ |
4 |
0'(,& |
|
|
|
|
|
|
|
|
|
|
|
|
|
|
|
|
|
|
|
|
|
|
|
|
|
|
|
|
|
|
|
|
|
|
|
|
|
|
|
|
|
|
|
|
|
|
|||||
-/1(,& 1'$ 4 |
0'(,& |
|
|
|
|
|
|
|
|
|
|
|
|
|
|
|
|
|
|
|
|
|
|
|
|
|
|
|
|
|
|
|
|
|
|
|
|
|
|
|
|
|
|
|
|
|
|
|
|||||||
$&/$$0 -% |
#(/1 |
|
|
|
|
|
|
|
|
|
|
|
|
|
|
|
|
|
|
|
|
|
|
|
|
|
|
|
|
|
|
|
|
|
|
|
|
|
|
|
|
|
|
|
|
|
|
|
|||||||
- #(,& 1'$ * 2,#/5 |
|
|
|
|
|
|
|
|
|
|
|
|
|
|
|
|
|
|
|
|
|
|
|
|
|
3 |
|
|
|
|
|||||||||||||||||||||||||
Laundry Detergents and Additives. . . . . . . . . . . . . . . . . . . . . . . . . . . . . . |
13. . . . . |
||||||||||||||||||||||||||||||||||||||||||||||||||||||
(0.$,0(,& |
1'$ "-//$"1 |
|
+-2,1 |
-% #$1$/&$,1 |
|
|
|
|
|
|
|
|
|
|
|
|
|
|
|
|
|
|
|
|
|
|
|
|
|
|
|
3 |
|
||||||||||||||||||||||
-2/ (, #$1$/&$,1 |
,#-/ |
|
"*$ |
,(,& |
./-#2"1 |
|
|
|
|
|
|
|
|
|
|
|
|
|
|
|
|
|
|
|
|
|
|
3 |
|
||||||||||||||||||||||||||
Programmes |
and |
functions. . . . . . . . . . . . . . . |
. . . . . . . . |
. |
. |
. |
|
. |
. |
. |
. |
. .. .. |
14. . . . . |
||||||||||||||||||||||||||||||||||||||||||
|
0(" |
./-&/ |
++$0 |
|
|
|
|
|
|
|
|
|
|
|
|
|
|
|
|
|
|
|
|
|
|
|
|
|
|
|
|
|
|
|
|
|
|
|
|
|
|
|
|
|
4 |
|
|
|
|
||||||
.$"( |
* |
..*(" |
1(-,0 |
|
|
|
|
|
|
|
|
|
|
|
|
|
|
|
|
|
|
|
|
|
|
|
|
|
|
|
|
|
|
|
|
|
|
|
|
|
|
|
|
|
|
4 |
|
|
|
|
|||||
(0.* 5 |
|
|
|
|
|
|
|
|
|
|
|
|
|
|
|
|
|
|
|
|
|
|
|
|
|
|
|
|
|
|
|
|
|
|
|
|
|
|
|
|
|
|
|
|
|
|
|||||||||
##(1(-, * |
-.1(-,0 |
|
|
|
|
|
|
|
|
|
|
|
|
|
|
|
|
|
|
|
|
|
|
|
|
|
|
|
|
|
|
|
|
|
|
|
|
|
|
|
|
|
|
|
|
|
|
|
|||||||
,#(" 1-/ *(&'1 (, 1'$ |
1 |
/1 |
|
20$ |
!211-, |
|
|
|
|
|
|
|
|
|
|
|
|
|
|
|
|
|
|
|
|
|
|
|
|
|
|
|
|
|
|
|
|||||||||||||||||||
.$"( |
* |
..*(" |
1(-,0 |
|
|
|
|
|
|
|
|
|
|
|
|
|
|
|
|
|
|
|
|
|
|
|
|
|
|
|
|
|
|
|
|
|
|
|
|
|
|
|
|||||||||||||
Washing with standard settings. . . . . . . . . . . . . . . . . . . . . . . . . . . . . . . |
17. . . . . |
||||||||||||||||||||||||||||||||||||||||||||||||||||||
Washing |
with |
individual |
|
settings. . . . . . . . . . . . . |
. . . . . . . . |
. |
. |
|
. |
. |
. |
. . . . |
.18. . . . . |
||||||||||||||||||||||||||||||||||||||||||
/-&/ ++$ 3$/3($4 |
|
|
|
|
|
|
|
|
|
|
|
|
|
|
|
|
|
|
|
|
|
|
|
|
|
|
|
|
|
|
|
|
|
|
|
|
|
|
|
||||||||||||||||
.(, 0.$$# |
|
|
|
|
|
|
|
|
|
|
|
|
|
|
|
|
|
|
|
|
|
|
|
|
|
|
|
|
|
|
|
|
|
|
|
|
|
|
|
|
|
|
|
|
|
||||||||||
/-&/ ++$ |
%(,(0'$# |
1 |
|
|
|
|
|
|
|
|
|
|
|
|
|
|
|
|
|
|
|
|
|
|
|
|
|
|
|
|
|
|
|
|
|
|
|
|
|
|
|
|
|
|
|
|
|||||||||
|
0' |
|
|
|
|
|
|
|
|
|
|
|
|
|
|
|
|
|
|
|
|
|
|
|
|
|
|
|
|
|
|
|
|
|
|
|
|
|
|
|
|
|
|
|
|
|
|
|
|
||||||
(&, * |
|
|
|
|
|
|
|
|
|
|
|
|
|
|
|
|
|
|
|
|
|
|
|
|
|
|
|
|
|
|
|
|
|
||||||||||||||||||||||
'(*#./--% |
*-") |
|
|
|
|
|
|
|
|
|
|
|
|
|
|
|
|
|
|
|
|
|
|
|
|
|
|
|
|
|
|
|
|
|
|
|
|
|
|
|
|
|
|
|
|
|
|
|
|||||||
$11(,& 1'$ 1(+$ |
|
|
|
|
|
|
|
|
|
|
|
|
|
|
|
|
|
|
|
|
|
|
|
|
|
|
|
|
|
|
|
|
|
|
3 |
|
|
|
|
||||||||||||||||
During |
washing. . . . . . . . . . . . . . . . . . . . |
. . . . . . . . |
. |
. . .. .. .. .. .. .. .. .24. .. .. .. .. |
|||||||||||||||||||||||||||||||||||||||||||||||||||
$*$"1 |
|
./-&/ ++$ |
|
& (, |
|
|
|
|
|
|
|
|
|
|
|
|
|
|
|
|
|
|
|
|
|
|
|
|
|
|
|
|
|
|
|
|
|
|
|
|
4 |
|
|
|
|
||||||||||
-..(,& 2. 1'$ |
4 0'(,& ,1$//2.1(,& |
1'$6./-&/ |
++$ |
|
|
|
|
|
|
|
|
|
|
|
|
|
|
|
|
|
|
|
|
|
|
|
4 |
|
|||||||||||||||||||||||||||
|
,"$**(,& |
|
"1(3$ ./-&/ |
++$ |
|
|
|
|
|
|
|
|
|
|
|
|
|
|
|
|
|
|
|
|
|
|
|
|
|
|
|
|
|
|
|
|
|
|
4 |
|
|
|
|||||||||||||
After washing. . . . . . . . . . . . . . . . . . . . . |
. . . . . . . . |
. . .. .. .. .. .. .. .. ..25.. .. .. .. .. |
|||||||||||||||||||||||||||||||||||||||||||||||||||||
Maintenance |
and |
care |
information. . . . . . . . . . . . |
. . . . . . . . |
. |
. |
|
. |
. |
. |
. |
. . . . . 26. . . . |
|||||||||||||||||||||||||||||||||||||||||||
*$ ,(,& |
,# |
|
/$ |
|
|
|
|
|
|
|
|
|
|
|
|
|
|
|
|
|
|
|
|
|
|
|
|
|
|
|
|
|
|
|
|
|
|
|
|
|
|
|
|
|
|
|
|
|
|
||||||
$0" |
*(,& |
1'$ |
4 |
0'(,& |
|
+ "'(,$ |
|
|
|
|
|
|
|
|
|
|
|
|
|
|
|
|
|
|
|
|
|
|
|
|
|
|
|
|
|
|
|
7 |
|
|
|
||||||||||||||
Troubleshooting |
Minor |
Faults. . . . . . . . . . . . . . |
. . . . . . . . |
. |
. |
. |
|
. |
. |
. |
. . . . |
28. . . . . |
|||||||||||||||||||||||||||||||||||||||||||
|
2*1 |
#(0.* 50 |
|
|
|
|
|
|
|
|
|
|
|
|
|
|
|
|
|
|
|
|
|
|
|
|
|
|
|
|
|
|
|
|
|
|
|
|
|
|
|
|
|
|
|
|
3 |
|
|
|
|
||||
Consumption values. . . . . . . . . . . . . . . . . . |
. . . . . . . . |
. |
. |
. |
. |
. .. .. .. .. .. |
31.. .. .. . . |
||||||||||||||||||||||||||||||||||||||||||||||||
Customer service. . . . . . . . . . . . . . . . . . . |
. . . . . . . . |
. |
. |
. . .. .. .. .. .. .. .32. .. .. .. .. |
|||||||||||||||||||||||||||||||||||||||||||||||||||
Installing |
connecting |
and |
transporting |
the |
appliance. . . . |
. . . . . . . . |
. |
. |
|
. |
. |
. |
. |
. . . . . |
. 33. . . |
||||||||||||||||||||||||||||||||||||||||
|
%$15 |
(,01/2"1(-,0 |
|
|
|
|
|
|
|
|
|
|
|
|
|
|
|
|
|
|
|
|
|
|
|
|
|
|
|
|
|
|
|
|
|
33 |
|
|
|
|
|||||||||||||||
Quick2reference |
instructions. . . . . . . . . . . . . . . . . . . . . . . |
. |
. . |
. . . . |
. .. |
.34. . . . |
|||||||||||||||||||||||||||||||||||||||||||||||||
2

Your |
Bosc |
General safety |
was n |
nstruct ons |
|
mac ne |
Your washing machine is intended for |
|
|
|
|
The new washing machine which you |
- use in the household only, |
|
have just purchased is a modern, |
- washing machine0washable textiles |
|
high/quality |
domestic appliance. |
in water, |
Your washing machine is distinguished - by/its economical consumption of
energy, water and detergent.
Each washing machine which leaves our factory is checked carefully to ensure that it functions properly and is/in perfect condition.
operation with cold drinking water and commercially available detergents and cleaning products which are suitable for use in washing machines.
If you have any questions - especially |
Keep pets away from the washing |
|||||
with respect to installing and |
machine. |
|
||||
connecting |
your |
washing machine - |
Do |
not |
insert/pull out the mains plug |
|
please do not hesitate to contact our |
||||||
with |
wet |
hands. |
||||
customer |
service |
department. |
|
|
|
|
Further |
information and a selection of |
our products can be found on our |
|
Internet |
page: |
http://www.bosch0hausgeraete.de
Please read these operating and installation instructions and all other information enclosed with the washing machine and act accordingly.
Retain |
all |
documentation for |
subsequent |
use or for the next owner |
|
of the |
appliance. |
|
Do not pull out the mains plug by tugging the cable.
Caution when draining hot water.
Do not touch the loading door when washing at high temperatures.
Do not climb onto the washing machine.
Do not lean on the open washing machine door.
Informat on concern n waste d sposal
D sposal of packa n
Your new appliance was delivered to you in protective packaging. All utilised materials are ecologically harmless and recyclable. Please help by disposing of packaging in an environmentally
friendly manner.
Please ask your dealer or inquire at your local authority about current means of disposal.
R sk of c ok n ! |
|
Do not let children play with |
packaging |
and associated parts. Risk of |
choking |
on plastic film and collapsible |
|
cardboard boxes. |
|
D spos n of your old appl ance
Old appliances are not worthless rubbish! Valuable raw materials can be
reclaimed |
by recycling |
old |
appliances. |
||
Dan er |
of |
deat ! |
|
|
|
Unplug mains |
plug |
on |
redundant |
||
appliances. |
Cut |
off |
mains |
cable and |
|
discard with mains |
plug. |
|
|||
Destroy the lock on the door. This will prevent children from locking
themselves in the appliance and suffocating.
3

nstructions
ntroduction |
|
|
|
|
|
nformation |
|
|
Protection |
of |
the |
|
|
|||||||||||
Observe |
and follow |
the |
warnings |
|
concerning |
aste |
environment / |
|
|
|
|
|||||||||||||
and*instructions |
below: |
|
|
|
|
disposal |
|
|
Hints |
and |
tips |
|
|
|||||||||||
These |
installation instructions |
are |
|
Disposing |
of the |
packaging |
Your washing machine |
uses |
water, |
|||||||||||||||
intended |
for |
qualified |
fitters. |
|
|
|||||||||||||||||||
|
|
Your new appliance was delivered |
energy |
and |
detergent |
efficiently, |
|
|||||||||||||||||
In*addition to these |
installation |
|
|
|||||||||||||||||||||
|
thereby |
protecting |
the |
environment |
||||||||||||||||||||
|
to*you in |
protective |
packaging. |
|||||||||||||||||||||
instructions, |
observe |
the |
following |
|||||||||||||||||||||
and |
reducing your |
household |
costs. |
|||||||||||||||||||||
All*utilised |
materials |
are ecologically |
||||||||||||||||||||||
when |
installing |
the appliance: |
|
|
||||||||||||||||||||
|
|
harmless and recyclable. |
|
|
|
|
|
|
|
|
|
|
||||||||||||
If the |
washing |
machine is in |
a |
|
Using your |
washing |
machine |
in |
an |
|||||||||||||||
room |
|
to |
a better |
efficient |
and environmentally |
|
|
|||||||||||||||||
exposed |
to |
low |
temperatures |
or |
if |
Please*contribute |
|
|
||||||||||||||||
environment by |
disposing of |
friendly |
manner: |
|
|
|
|
|
|
|||||||||||||||
the washing |
machine |
is |
in a |
room packaging |
materials |
in an |
- |
Avoid using |
too |
much |
|
|
||||||||||||
which is*not used over winter, the |
environmentally conscious manner. |
|
|
|||||||||||||||||||||
|
detergent. |
|
|
|
|
|
|
|||||||||||||||||
residual |
watermust beremoved |
|
|
Please ask your dealer or inquire at |
|
|
|
|
|
|
||||||||||||||
from the |
water |
pump |
and the |
|
|
|
|
|
|
|
|
|
|
|||||||||||
|
your local |
authority |
about current |
- |
Use |
an |
efficient |
detergent |
|
|||||||||||||||
hoses. |
|
|
|
|
|
|
|
|
|
|
||||||||||||||
|
|
|
|
|
|
|
|
|
|
suitable |
for |
front |
loader |
|
|
|||||||||
|
|
|
|
|
|
|
|
|
means of |
disposal. |
|
|
|
|
||||||||||
|
|
|
|
|
|
|
|
|
|
|
|
|
|
|||||||||||
Do not damage the washing |
|
|
|
|
washing |
machines. |
|
|
|
|||||||||||||||
|
|
|
|
|
|
|
|
|
|
|||||||||||||||
machine. |
|
|
|
|
|
|
|
|
|
|
|
|
- |
Add |
detergent |
according |
to |
the |
||||||
Do not |
lift |
the |
washing |
machine |
|
|
|
|
|
|||||||||||||||
|
|
|
|
|
|
degree |
of soiling, |
amount |
of |
|
||||||||||||||
by*its |
projecting |
parts |
(e. g. door). |
|
|
|
|
|
|
|
||||||||||||||
|
|
|
|
|
|
laundry |
and |
water |
hardness, |
|
||||||||||||||
In addition |
to the safety |
information |
|
|
|
|
|
|
||||||||||||||||
|
|
|
|
|
and*observe |
the |
detergent |
|
|
|||||||||||||||
listed |
here, |
the |
local |
|
water and |
|
|
|
|
|
|
|
|
|||||||||||
|
|
|
|
|
|
|
manufacturer's |
instructions. |
|
|||||||||||||||
electricity |
supplier may |
have |
special |
|
|
|
|
|
|
|||||||||||||||
|
|
|
|
|
|
|
|
|
|
|
|
|
|
|||||||||||
requirements.
If in doubt, have the appliance connected by a specialist.
4
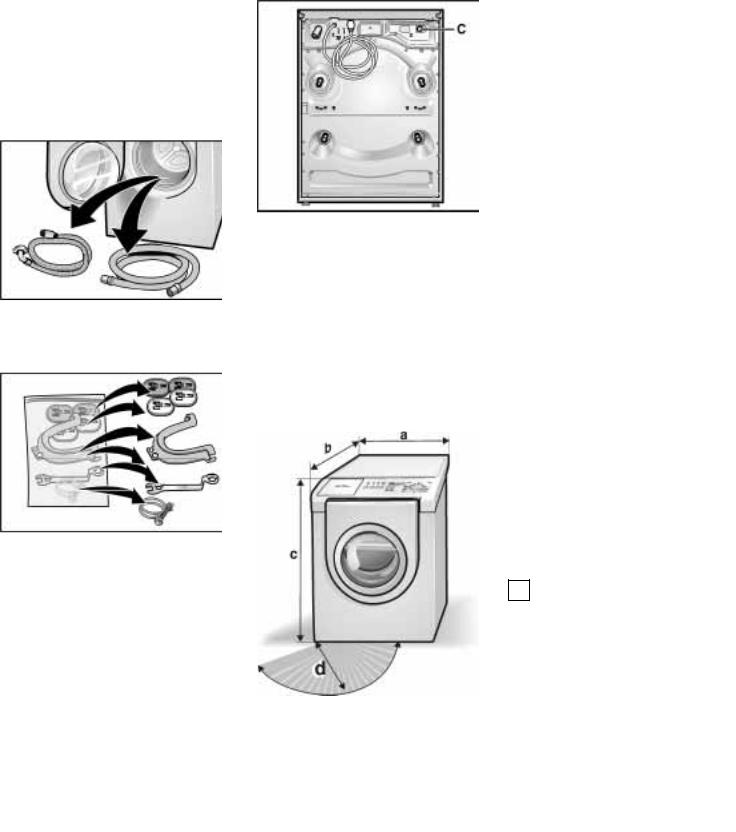
Standard accessories On the rear of the appliance:
Several accessories are enclosed with your washing machine. Check that all the accessories for your model are enclosed. If specific parts are missing, contact your dealer immediately.
Inside the drum:
|
|
|
- |
Power cord with plug. |
|
|
|
|
....Connection for supply hose |
||
|
|
|
Useful tools |
|
|
|
|
|
The |
following tools are helpful: |
|
- |
Supply |
hose (blue mark) |
- |
Screwdriver. |
|
- |
Water |
drainage hose. |
- |
Ring wrench (SW 13) for |
|
- |
The bag contains: |
|
removing the |
transport bolts. |
|
|
|
|
- |
Spirit level for |
adjustment. |
Dimensions
-Covers for placing over the openings when the
transportation bolts have been removed.
- Lock for drainage hose. - Wrench for adjustment.
-Elbow for attaching the drain hose, e.g. into a wash basin
Depending on the connection
situation, the following part is also a = 686 mm required:
b = 780 mm c = 940 mm d = 407 mm
Moisture |
in the drum is due to theOpening |
angle |
180° |
||
final inspection which every |
Weight |
approx. |
100 kg |
||
washing |
machine undergoes before |
||||
|
|
|
|||
it leaves |
the factory. |
|
|
|
|
nstallation surface
Stability is important to prevent the washing machine from •wandering" during the spin cycle.
The installation surface must be solid and level. Soft floor surfaces, such as carpets or surfaces with foam backing, are not suitable.
If the washing machine is to be installed on a wooden floor:
If possible, install the washing
machine in a corner.
Screw a water resistant wooden board (min. 30 mm
thick) to the floor.
Secure the front feet of the washing machine with holding brackets.
Holding brackets (set) can be obtained from a specialist store or@the Customer Service (WMZ 2200).
The appliance cannot be topAmounted.
The appliance cannot be built under.
nstallation of |
base |
If the washing |
machine is installed |
on a base (order no. WZ 1295), follow the instructions in the operating manual!
iInstall the holder BEFORE removing the transportation protection devices.
nstallation in |
a recess |
If the washing |
machine is to be |
installed in a recess, observe the minimum distances indicated in the
following |
table: |
|
|
|
|
|
|
|
|
|
|
S e |
|
|
U e e e |
|
|
e |
|
|
|
|
|
|
|
|
5
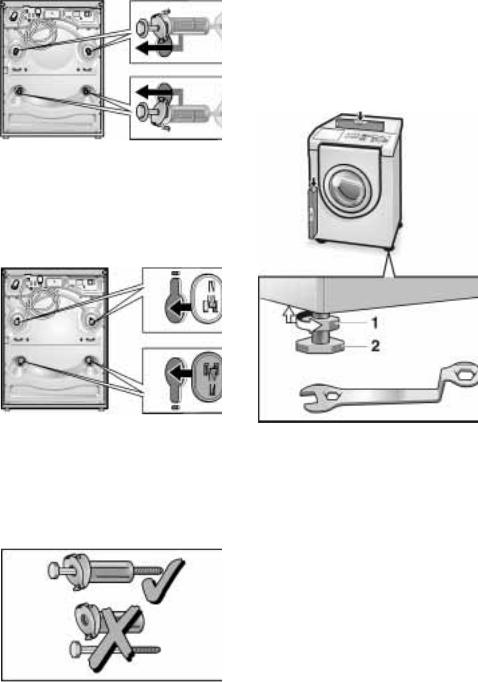
Insert the covers.
Storing the transportation protection devices
Always keep the transport bolts for subsequent transportation of the appliance e. g. when moving
house .
Store transport bolts andscrew washer and bushing onto bolt .
6
Hose and cable lengths
Connection on left side |
Connection on right side |
a |
= |
4 cm approx. |
b |
= |
3 cm approx. |
c |
= |
8 cm approx. |
d |
= |
cm max. |
d
e |
= |
7 cm approx. |
Other hoses |
|
f |
= |
88 cm approx. |
Available from |
specialist dealers: |
g |
= |
4 cm approx. |
- Extended |
supply hose |
|
|
|
approx.' .44 m . |
|
7
Water |
inlet |
hose |
|
|
|
|
Water |
drainage |
hose |
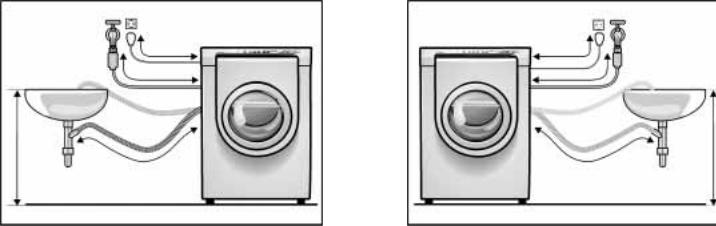
Drainage |
into |
wall!mounted |
|
|||||||||||||
d CAUTION! |
|
|
|
|
|
|
|
|
|
|
|
|
|
|
|
connection |
|
|
|
|
|
|||||
|
|
|
|
|
|
|
Height |
difference |
between |
the |
|
|
|
|
|
|
|
|||||||||
Operate |
the |
washing |
machine |
with |
placement area and drainage point: |
|
|
|
|
|
|
|
||||||||||||||
cold drinking |
water |
only. Do |
not |
maximum |
100 |
cm. |
|
|
|
|
|
|
|
|
|
|
||||||||||
connect |
to the |
mixer |
tap |
of |
an |
|
Connect the |
water |
drainage |
|
|
|
|
|
|
|
||||||||||
unpressurised |
hotwater |
apparatus. |
|
|
|
|
|
|
|
|
||||||||||||||||
|
hose: |
|
|
|
|
|
|
|
|
|
|
|
|
|
|
|||||||||||
|
|
|
|
|
|
|
|
|
|
|
|
|
|
|
|
|
|
|
|
|
|
|
|
|
||
Only use the new delivered supply |
|
|
|
|
|
|
|
|
|
|
|
|
|
|
|
|
||||||||||
and drainage hoses. Never connect |
|
|
|
|
|
|
|
|
|
|
|
|
|
|
|
|
||||||||||
old |
used |
hoses. |
|
|
|
|
|
|
|
|
|
|
|
|
|
|
|
|
|
|
|
|
|
|
||
If in doubt, have the appliance |
|
|
|
|
|
|
|
|
|
|
|
|
|
|
|
|
|
|||||||||
connected |
by |
a |
specialist. |
|
|
|
|
|
|
|
|
|
|
|
|
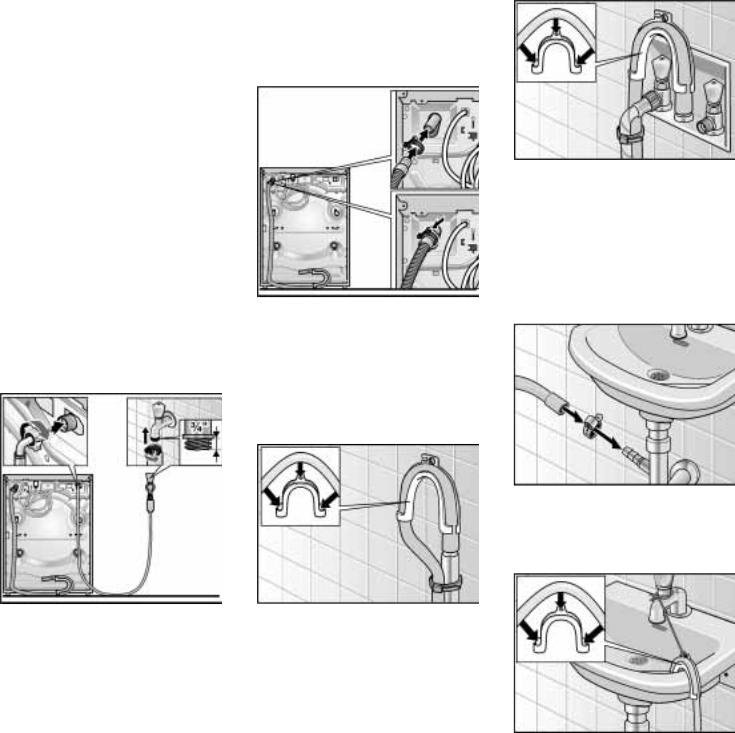
Use |
a |
bend. Attach |
the |
bend t |
||||||
|
|
|
|
|
|
|
|
|
|
|
|
|
|
|
|
|
|
|
||||||||
The |
water |
inlet |
hose |
must |
not |
be |
|
|
|
|
|
|
|
|
|
the end |
of |
the drainage |
hose |
|||||||
|
|
|
|
|
|
|
|
|
and |
insert |
the |
end |
of the hose |
|||||||||||||
- |
kinked |
or |
crushed, |
|
|
|
|
|
|
|
|
|
|
|
|
|||||||||||
|
|
|
|
|
|
|
|
|
|
|
|
into |
the |
waste |
pipe. |
|
|
|||||||||
|
|
|
|
|
|
|
|
|
|
|
|
|
|
|
|
|
|
|
|
|
|
|||||
- |
modified or |
severed strength |
is |
|
|
|
|
|
|
|
|
|
Attach the |
hose in |
the |
correct |
||||||||||
|
no |
longer guaranteed . |
|
|
|
|
|
|
|
|
|
|
|
|||||||||||||
|
|
|
|
|
|
|
|
|
|
|
|
|
position with tape or a fixing |
|||||||||||||
|
|
|
|
|
|
|
|
|
|
|
|
|
|
|
|
|
|
|
|
|||||||
Plastic threads must only be |
|
|
|
|
|
|
|
|
|
|
|
plate. |
|
|
|
|
|
|||||||||
tightened |
by |
hand. |
Do not |
remove |
|
Attach |
the |
drainage |
hose to theDrainage |
into |
a |
siphon: |
|
|||||||||||||
the |
strainers from |
the |
water |
supply |
|
drainage spigot |
on |
the |
|
|
|
|
|
|
|
|
||||||||||
hoses. |
|
|
|
|
|
|
|
|
|
|
|
|
|
|
|
|
|
|
||||||||
|
|
|
|
|
|
|
|
|
|
machine. |
|
|
|
|
|
|
|
|
|
|
|
|
||||
|
|
|
|
|
|
|
|
|
|
|
|
|
|
|
|
|
|
|
|
|
|
|
|
|||
Connecting |
the |
supply |
hose: |
|
Secure |
the |
connection |
point |
|
|
|
|
|
|
|
|||||||||||
|
|
|
|
|
|
|
|
|
|
|
|
with the hose band clip. |
|
|
|
|
|
|
|
|||||||
|
|
|
|
|
|
|
|
|
|
|
|
Use |
a |
screwdriver. |
|
|
|
|
|
|
|
|
|
|||
|
|
|
|
|
|
|
|
|
|
|
Drainage |
into |
a |
standpipe |
|
|
|
|
|
|
|
|||||
Secure connection point with Ø 24-40 mm hose clipspecialist outlet .
Drainage into a wash basin
After connecting the supply hose, turn on the tap and check that water comes out.
Observe the mains water pressure.
-The water pressure should be between 1 and 10 bars when the tap is turned on, at least 8 litres of water is discharged per minute .
-If the water pressure is higher, install a pressure reducing valve.
Use |
a bend. Attach the bend to |
|
the end of the drainage hose |
||
and |
insert the |
end of the hose |
into |
the waste |
pipe. |
Attach the hose in the correct position with tape or a fixing plate
Attach |
drainage hose securely |
to the |
wash basin. |
When the water is being pumped out of the washing machine, check that the water drains away quickly enough.
8

Operating manual
Your new washing machine
Pour n detergent and/or clean ng product
Open the door (red mark) ...
... Close the wash ng mach ne door
9
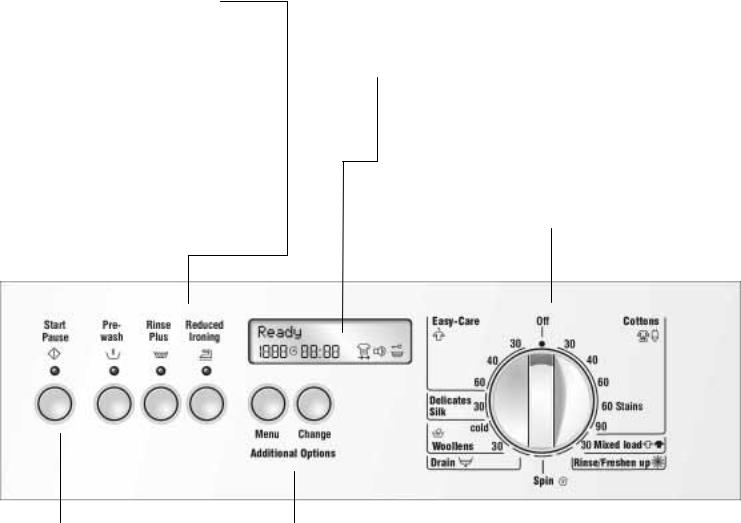
Extra rinsing: Additional rinsing cycle.
Reduced Ironing: Gentler reduced spin cycle with subsequent fluffing.
Additional option selected:
Indicator light isflashing red
Switch off additional option:
Press button again. Indicator light goes out.
Programme selector |
|
|
For |
switching the machine on and |
off and for selecting |
the |
programme. Can be rotated in |
either direction. |
The programme selector does not rotate while the programme is running - the programme sequence is)electronically controlled.
Start/Pause button
For starting or interrupting the washing process (programme must be selected).
Indicator light
The indicator light is lit red: Settings can be
changed or the wash cycle |
can |
be started. |
|
The door is locked for safety reasons, |
|||
childproof lock |
is active or |
the |
programme |
is in •Pause" |
mode. |
|
|
Indicator light is lit red: programme is running and •Pause" mode can be activated.
Indicator light goes out: programme has ended or no programme was selected.
Menu
For selecting settings which are to be changed.
Change
For changing all the settings in the display field.
10
Before using your washing machine for the first time
The washing machine must have been installed and connected properly refer to Page 4.
|
|
|
|
|
|
|
|
First |
wash |
cycle |
||||
|
|
|
|
|
|
|
|
|||||||
First |
wash |
|
|
|
(without |
|
washing) |
|||||||
|
|
|
Your appliance was |
tested before |
||||||||||
cycle |
|
|
|
|
|
|
leaving the factory. To remove any |
|||||||
|
|
|
|
|
|
|
|
|||||||
|
|
|
|
|
|
|
|
water left over from testing |
||||||
|
|
|
|
|
|
|
|
procedures, the first washing cycle |
||||||
Selecting |
the |
language |
should be carried out without |
|||||||||||
laundry |
in |
the machine. |
||||||||||||
i |
The programme |
selector |
must |
|
Do |
not |
load |
any |
washing. |
|||||
|
not3be |
set |
toOff. |
|
|
|
|
|
Turn |
the |
tap |
on. |
|
|
|
|
|
|
|
|
|
|
|
||||||
i |
The language must |
be |
selected |
Open the |
cover |
on the |
||||||||
|
before |
a programme |
is |
started. |
|
detergent |
drawer. |
|
||||||
Before |
using |
your washing machine |
for the |
first |
time: |
The mains voltage and the voltage specifications on the washing machine (rating plate) must correspond.
The washing machine must have been installed and connected properly.
Tap must be turned on.
i
Simultaneously press |
thMenu |
|
and Change buttons |
and hold |
|
down (5 seconds) until the |
|
|
current setting is displayed. |
|
|
i
|
|
|
|
|
|
|
|
|
|
|
|
Press theChange |
button |
until |
|
||
|
|||||
the3desired |
signal |
volume |
is |
|
|
displayed. |
|
|
|
|
|
Confirm the |
language selection |
|
|||
by3pressing |
theMenu button. |
||||
|
|||||
If no button is pressed, the new
language setting is
i
automatically accepted after 5 seconds.
Pour approx. 1 litre of water into dispenserI; see Page 13.
Half fill the measuring beaker with3detergent and pour into chamber I.
Do not use woollens or mild detergent (foam formation).
Close the cover on the detergent drawer.
Close the door.
Set the programme selector to3Cottons 90°.
The Start/Pause indicator light flashes (red).
Press theStart/Pause button. The programme starts.
The indicator light is on (red).
The individual programme steps are indicated in the display field.
i The |
selected setting is |
retained When "Remove washing" is |
||
after |
the |
wash |
cycle. |
displayed: |
Setting |
the |
time |
Open the door. |
|
|
||||
i Before the individual settings can3be selected (in particular "Programme finished at"), the3time must be set, see Page 23.
11
 Loading...