Bogen ASWG1, AS1, ASWG1DK User Manual

Amplified Speakers
Models AS1, ASWG1, and ASWG1DK
Installation and Use Manual
Description
Bogen’s self-amplified ceiling speakers are 8-inch, cone-type loudspeakers, complete with built-in amplifier and volume control.
Model |
Style |
Power |
Power |
Mounting Accessories |
|
Requirements |
Rating |
||||
|
|
|
|||
AS1 |
Unmounted Cone Speaker with 1W Amplifier and |
|
|
Grilles: CG8A, CG8AW, |
|
Volume Control |
|
|
SG8W, PG8A, PG8W |
||
|
|
|
|||
|
|
|
|
|
|
ASWG1 |
AS1 Mounted onto Steel Ceiling Grille (PG8W) with |
1 CU |
1W |
|
|
Fixed, Center Volume Control Knob |
(50 mA) |
|
|||
|
|
TB8, RE84, MR8 |
|||
|
|
|
|
||
ASWG1DK |
AS1 Mounted onto Steel Ceiling Grille (PG8W) & |
|
|
||
|
|
|
|||
Detachable Volume Control Knob |
|
|
|
||
|
|
|
|
||
|
|
|
|
|
Installation Instructions for ASWG1 and ASWG1DK
Note: Do not mount the speaker near noise generating equipment (fans, motors, etc.) and do not use where a normal conversation cannot be conducted.
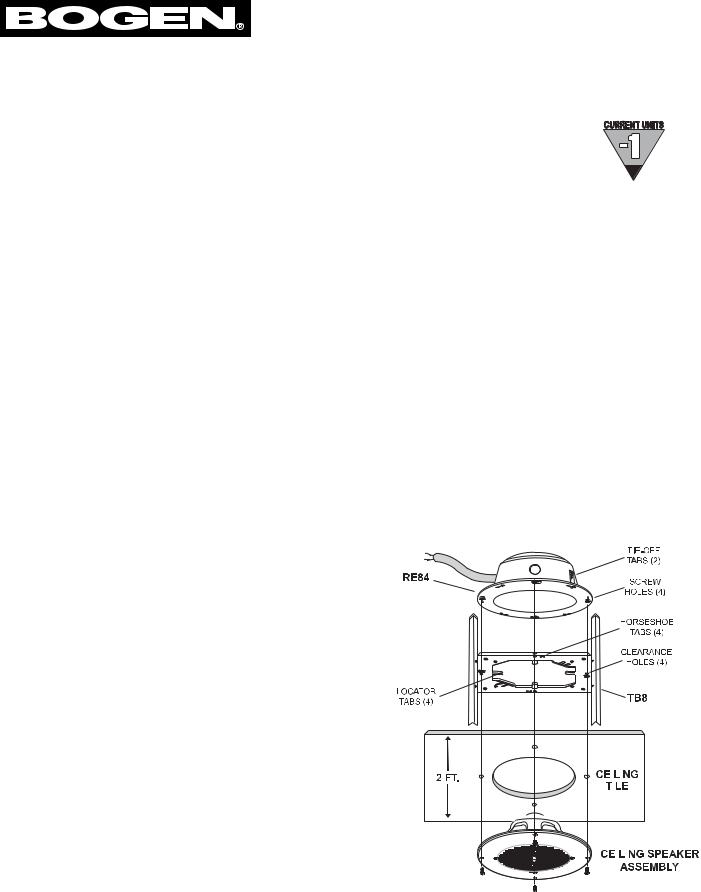
TB8 and RE84 Installation
1.Place ceiling tile with the finished side facing up over a large trash can (to provide support and save cleanup time).
2.Cut hole in the center of the ceiling tile, using the raw speak-
|
er as a guide. |
|
|
|
|
|
|
|
|
3. |
Bend (4) horseshoe tabs upward on tile bridge. |
|
|
|
|
|
|
|
|
4. |
Position the tile bridge on the unfinished side of the ceiling tile |
|
|
|
|
|
|
|
|
|
and bend (4) locator tabs into tile opening to prevent sliding. |
|
|
|
|
|
|
|
|
5. |
Slip tie-off tabs (2) through RE84 tie-off tab slots until they |
|
|
|
|
|
|
|
|
|
click into place and secure customer-supplied “tie-off” wire to |
|
|
|
|
|
|
|
|
|
tab. |
|
|
|
|
|
|
|
|
6. |
Punch out knockout in the RE84 and install Listed metallic |
|
|
|
|
|
|
|
|
|
enclosure entry fitting to knockout to accommodate plenum |
|
|
|
|||||
|
cable or plenum whip and feed cable or whip through the |
|
|
|
|
|
|
|
|
|
knockout. |
|
|
|
|
|
|
|
|
7. |
Install RE84 to tile bridge by orienting horseshoe tab slots (4) |
|
|
|
|
|
|
|
|
|
over horseshoe tabs (4) of bridge. |
|
|
|
|
|
|
|
|
8. |
With pliers, twist horseshoe tabs (4) of tile bridge 1/2 turn, |
|
|
|
|
|
|
|
|
|
|
|
|
|
|
|
|
||
|
securing enclosure to bridge. |
|
|
|
|
|
|
|
|
|
|
|
|
|
|
|
|
|
|
9. |
Screw the Ceiling Speaker assembly to the RE84 using (4) |
|
|
|
|
|
|
|
|
|
8-32 screws provided with the Ceiling Speaker assembly, |
|
|
|
|
|
|
|
|
|
sandwiching the TB8 and ceiling tile in between. The screws |
|
|
|
|
|
|
|
|
|
must go through the TB8 clearance holes as shown. (Screws |
|
|
|
|
|
|
|
|
|
|
|
|
|
|
|
|
|
|
|
anchor into the RE84.) |
|
|
|
|
|
|
|
|
© 2004 Bogen Communications, Inc. All rights reserved.
Specifications subject to change without notice. 54-5850-02B 0412
 Loading...