


Mobile Navigation
TravelPilot Lucca 3.3
Operating Instructions
(long version)
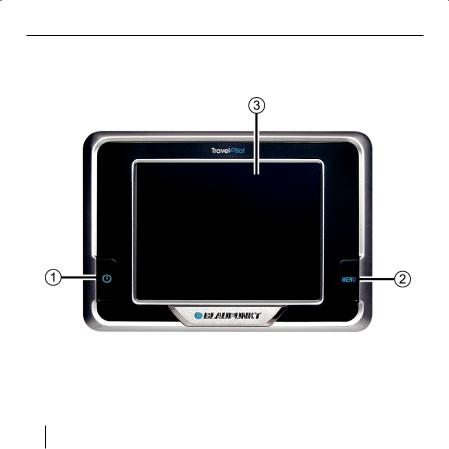
Device Overview
Device Overview
2
Device Overview
The following button are located beside the display:
1.Power (Screen ON/OFF):
Long press (longer than three seconds): Switches the power on/off.
Short press: Switches the screen on/off. (battery saving mode)
2.Menu:
Long press (longer than three seconds): Opens the main menu screen of the device.
Short press: Opens the quick settings menu.
3.3.5" LCD Touchscreen:
All entries and the control of Lucca are carried out in a simple and intuitive way by touching the buttons displayed on the touchscreen.
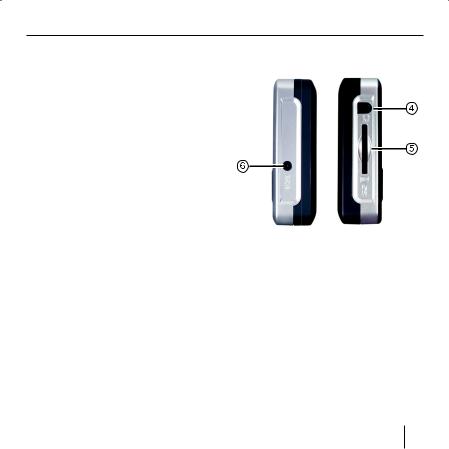
4.Headphone jack
5.SD card slot
6.DC power input jack
3
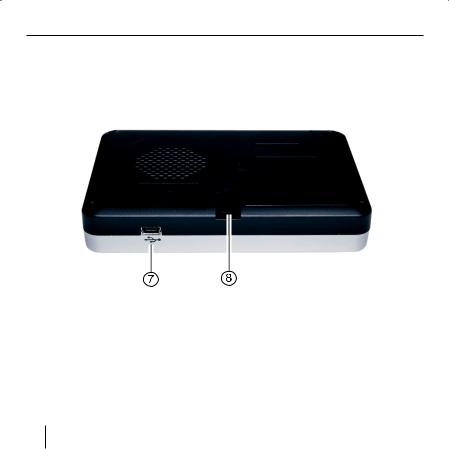
Device Overview
The underside features the following controls:
7.USB Port
8.Connects the Lucca to the suction cup
4

Contents
Device Overview ...................... |
2 |
Safety notes ............................. |
9 |
Safety Notes for Navigation ............ |
9 |
Safety Notes for Handling the |
|
Lucca .............................................. |
9 |
Initial Startup of Lucca .......... |
10 |
Lucca Scope of Delivery ............... |
10 |
Protective Films and Covers ......... |
11 |
Power On/Off......................... |
11 |
Setting the Language ............. |
12 |
Charging the Battery ............. |
12 |
Installation in the Vehicle ..... |
13 |
Attaching the Suction Cup......... |
13 |
Removing the Suction Cup ........ |
14 |
Installing Lucca in the Suction |
|
Cup ............................................ |
14 |
Removing the Lucca................... |
14 |
Power On/Off......................... |
15 |
Power-on.................................... |
15 |
Activating the Idle State............. |
15 |
Power-off ................................... |
15 |
Reactivating ............................... |
15 |
Menu Button .......................... |
16 |
Quick Settings ........................... |
16 |
Info ............................................ |
16 |
Additional Functions .................. |
16 |
Operating the Navigation |
|
Menus..................................... |
17 |
Software Keyboard ....................... |
17 |
Entering Blank Spaces ............... |
17 |
Deleting Characters ................... |
17 |
Switching between Number, |
|
Umlaut and Character Input ...... |
18 |
Lists .............................................. |
18 |
Buttons ......................................... |
19 |
Information ................................... |
19 |
GPS Status ................................ |
19 |
Navigation .............................. |
21 |
General Notes about the |
|
Navigation ..................................... |
21 |
Starting the Navigation ................. |
21 |
Entering a Destination ............... |
22 |
Navigating Home........................ |
22 |
Showing a Map .......................... |
22 |
Settings...................................... |
22 |
5

Contents
Exiting the Menu ....................... |
22 |
Additional Functions .................. |
22 |
GPS Info..................................... |
23 |
Route Planning........................... |
23 |
Select Map................................. |
23 |
Performing Basic Settings ............ |
23 |
Setting the Time Zone ............... |
23 |
Entering the Home Address ....... |
24 |
Specifying a Destination ............... |
25 |
Entering a Destination ............... |
25 |
Entering a Destination Country . 25 |
|
Entering a Destination Address . 26 |
|
Additional Functions ................. |
27 |
Selecting a Point of Interest ......... |
28 |
Point of Interest in the Current |
|
Vicinity ....................................... |
28 |
Additional Functions ................. |
30 |
Point of Interest at a Specific |
|
Location ..................................... |
30 |
Special National Destination ..... |
32 |
Copying a Destination from |
|
the Map......................................... |
34 |
Moving the Map Section ............ |
34 |
Copying the Destination from the |
|
Favourites ..................................... |
37 |
Copying a Favourite for |
|
Destination Guidance ................ |
37 |
Additional Functions ................. |
38 |
Copying one of the Recent |
|
Destinations.................................. |
38 |
Additional Functions ................. |
39 |
Using Home Address as |
|
Destination ................................... |
39 |
Managing Destinations .......... |
40 |
Saving Destinations ...................... |
40 |
Saving one of the Recent |
|
Destinations............................... |
41 |
Renaming a Destination............. |
41 |
Deleting a Destination ............... |
42 |
Deleting the Complete List ........ |
42 |
Route Planning with Stages... |
43 |
Entering Destination Points ....... |
43 |
Editing, Saving and Managing |
|
Routes........................................ |
44 |
Changing the Order ................... |
45 |
Deleting a Route Point ............... |
45 |
Deleting a Complete Route List . 45 |
|
6

Contents
Managing Routes .......................... |
45 |
Saving a route ............................ |
45 |
Loading a route.......................... |
46 |
Calculating a Route....................... |
46 |
Displaying the Route on the Map. 47 |
|
Simulation (demo mode)........... |
47 |
Specifying Route Options...... |
47 |
Destination Guidance ............ |
49 |
Disturbed GPS Reception.......... |
50 |
Quitting the Destination |
|
Guidance.................................... |
50 |
Reaching the Place of |
|
Destination ................................ |
50 |
Working with the Map ........... |
51 |
Map Operation.............................. |
51 |
Showing a Map .......................... |
51 |
Touching the Map ...................... |
51 |
Buttons ......................................... |
52 |
With Map View without GPS |
|
Reception................................... |
52 |
With Map View with GPS |
|
Reception................................... |
52 |
Additional Functions .................. |
54 |
Day/Night Mode ......................... |
54 |
Mute........................................... |
54 |
Settings...................................... |
54 |
Block Road, Unblocking ............. |
54 |
Inserting an Interim Destination .. |
55 |
Route Options............................ |
55 |
Next Destination ........................ |
55 |
Map Display during |
|
Destination Guidance ............ |
56 |
Navigation Tools......................... |
56 |
Route Information...................... |
57 |
Signpost Information ................. |
57 |
Speed Limit ............................... |
57 |
Showing Additional Map |
|
Information ................................... |
58 |
Map Information ........................ |
58 |
Route Information...................... |
59 |
Signpost Information ................. |
59 |
Speed ........................................ |
59 |
Additional Functions during |
|
Navigation .............................. |
61 |
Inserting an Interim Destination ... |
61 |
Approaching the Next Destination .. |
62 |
Blocking route segments ....... |
62 |
Manual Blocking......................... |
62 |
7

Contents
Unblocking ................................. |
63 |
Configuring Lucca/ |
|
Basic Settings ........................ |
64 |
Settings ........................................ |
64 |
Language ................................... |
64 |
Home Address ........................... |
65 |
Map Information ........................ |
65 |
Route Information...................... |
65 |
Routing Options......................... |
66 |
Route Planning........................... |
66 |
Signpost Information ................. |
66 |
Speed Limit ............................... |
66 |
Auto Mode ................................. |
67 |
Time Zone .................................. |
68 |
Format ....................................... |
68 |
Representation .......................... |
69 |
Voice command ......................... |
69 |
Factory Settings......................... |
69 |
Touchscreen............................... |
69 |
Product Information .................. |
70 |
GPS Mode of Operation ........ |
70 |
MP3 Mode.............................. |
71 |
Selecting MP3 Mode..................... |
72 |
Starting Playback.......................... |
72 |
Selecting a MP3 file ...................... |
72 |
Playback the MP3 File................... |
73 |
Repeated Play (Repeat) ................ |
73 |
Quitting Playback.......................... |
73 |
Removing the SD Card.................. |
74 |
Picture Viewer Mode ............. |
74 |
Starting the Picture Viewer........... |
74 |
Selecting a Picture file............... |
75 |
Starting the Slide Show................ |
75 |
Starting the Full Screen ................ |
76 |
Removing the SD Card.................. |
77 |
Installing Street Maps ........... |
77 |
Removing the SD Card............... |
78 |
Technical Data........................ |
78 |
Disposal of old unit ............... |
79 |
Service ................................... |
79 |
Warranty ................................ |
80 |
Preparing the SD Card.................. |
71 |
Fault Removal / Frequently |
|
|
|
|
|
Inserting the SD Card ................... |
71 |
Asked Questions FAQ ............ |
80 |
8
Safety notes
Safety notes
For your personal benefit, please carefully read the following safety notes and warnings before operating your Lucca for the first time.
Safety Notes for Navigation
Caution:
Do not operate the Lucca while driving to protect yourself and others against accidents!
View the display only if you are in a safe travel situation!
The street routing and traffic signs have priority over the instructions of the navigation system.
Follow the instruction of the Lucca only if circumstances and traffic regulations allow! Lucca will bring you to your destination even if you have to deviate from the planned route.
Notes:
•Routes are best planned before starting your trip. If you want to enter a new route while on the road, please head for the next parking or rest area!
•If you did not understand the voice information or if you are not sure what to do at the next intersection, use the map or arrow display for quick orientation.
Safety Notes for Handling the Lucca
Caution:
Protect the device against moisture since it is not waterproof and not splashproof.
Notes:
•Remove the power supply connector of the Lucca if you switch off
9

Safety notes |
Initial Startup |
|
|
the engine since the GPS receiver constantly uses electricity and could discharge the vehicle battery.
•Do not unplug the connector by pulling on the wire. The wire could be damaged!
•Do not use harsh solvents to clean the device; use only a damp, lintfree cloth.
Initial Startup of Lucca
If you are starting up the Lucca for the first time, you must set your preferred language for the menus and the voice output.
Note:
Upon purchasing the Lucca the battery maybe empty. Please charge the battery before using the device.
When starting up the Lucca for the first time please allow the unit a few minutes to enter navigation mode.
Lucca Scope of Delivery
The scope of delivery contains the following components:
•Lucca Unit
•Suction Cup
•Connector charger for connecting to cigarette lighter (Cigar Plug)
•User's Manual (short version)
10
Initial Startup |
Power on/off |
|
|
•CD/DVD with european road map and operating instructions (long versions)
Optional Accessories:
•Carrying Case
•DC Adapter
•USB Cable
•Second car kit
•VAN/SUV Suction Cup
•Holder for air vent opening
Protective Films and Covers
Prior to the initial use, remove the protective films from the display and front of the housing. Before inserting an SD card, please remove the dummy card. To protect the contacts, you can apply the elastic cover and dummy card again after using the Lucca.
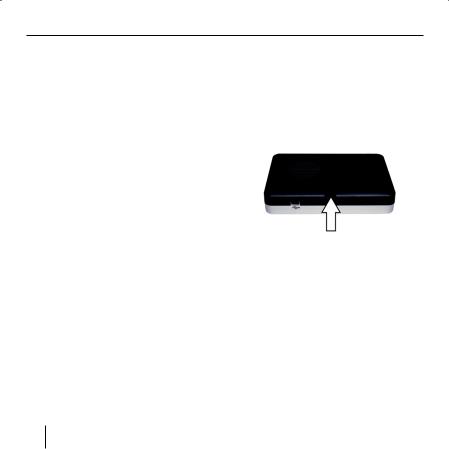
Power On/Off
The Power button allows for turning the Lucca on or off. In its delivery state, the Lucca is switched off.
Press the Power button on the bottom left-hand corner of the Lucca for longer than three seconds.
11

Setting the Language |
Charging the Battery |
|
|
Setting the Language
If the Lucca is switched on for the first time, US English is used as the standard language. If necessary, you may have to set the desired language for the menus and the voice output:
Turn on the Lucca using the Power button.
A dialogue menu displays. In this menu you can select your preferred language.
Please follow the instructions. The language is loaded and the main menu is displayed.
Charging the Battery
The rechargeable battery allows for operating the Lucca battery-operated without the external power supply.
The charge indicator of the battery is located in the top center of the screen. The symbols have the following meaning:
– : The device is supplied by an external power source. The battery is fully charged.
– : The device is supplied by an external power source. The battery is being charged.
– : The device is supplied by its internal battery. The charge state of the battery is sufficient.
– : The device is supplied by its internal battery. The charge state of the battery is low.
The number of dark block segments on the battery indicates the charge
12
Charging the Battery |
Installation in the Vehicle |
|
|
state of the battery (0 to 3 segments).
Note:
If the charge state of the battery is very low, a warning message is displayed.
To charge the battery, attach the supplied charger to the charging socket.
Note:
Use only original chargers for operating and charging the battery.
Note:
Do not discard any batteries in the household trash; instead, return them to the corresponding collection sites.
Installation in the
Vehicle
For temporary installation in a vehicle, the Lucca features a suction cup to attach it to the windshield.
Caution:
Install the Lucca so that it does not block your view and does not distract from the traffic.
Do not install the Lucca in the airbag deployment area.
Ensure that the Lucca does not pose a threat to passengers in the vehicle in case of emergency braking.
Attaching the Suction Cup
The Lucca can be installed in the vehicle in a simple and safe way using the supplied suction cup.
Locate a suitable place for installing the Lucca.
To ensure a perfect hold, the glass must be free of dust and oil. If necessary, clean the glass first.
13
Installation in the Vehicle
Press the suction plate of the support against the glass.
Push the lever on the suction cup towards the glass.
The track for mounting the Lucca must be aligned vertically.
Removing the Suction Cup
If you change vehicles, you can simply remove the suction cup.
Push the lever on the suction cup away from the glass.
Carefully loosen the suction plate at the edge from the glass so that air can enter between suction cup and glass.
Carefully pull the suction cup off of the glass.
Installing Lucca in the Suction Cup
The suction cup features a track for mounting the Lucca on the inside.
Carefully push the guide of the Lucca over the track of the suction cup.
Removing the Lucca
Pull the Lucca up and out of the suction cup.
14

Power on/off
Power On/Off
Power-on
To power on the Lucca, push the Power button.
The device switches on and displays the logo screen.
Activating the Idle State
To activate the idle state, briefly push the Power button.
The Lucca switches to the idle state (screen off state).
Power-off
To power off the device, press and hold the Power button for longer than 4 seconds.
The Lucca is switched off.
Note:
In the power-off mode the Lucca is still using small amount of energy from the battery. After long period of time there is a possibility that the battery may need to be re-charged.
Reactivating
Briefly push the Power button to power on the Lucca.
15

Menu Button
Menu Button
Quick Settings
In the Quick Settings menu volume and brightness can be adjusted. The Quick Settings menu can be entered at any time independent of the current menu being active.
Touch the Menu button.
The Quick Settings menu displays.
Touch the  /
/  buttons to adjust volume or brightness.
 Touch this button to return to the previous menu.
Note:
After 5 seconds without touching the display Lucca returns automatically to the previous menu.
Info
Prerequisite:
• A Navigation is active.
Touch the Info button in the Quick Settings menu.
The last voice instruction is repeated.
Additional Functions
Touch the More button in the
Quick Settings menu to gain access to additional functions.
•Information
–Touch the Information button to gain access to product information.
•Battery
– Touch the Battery button. The battery status displays.
•Power Saving
–Touch the Power Saving button. The Power Saving menu displays.
–Backlight Time Out: Touch the square on the right side to set the time until the backlight will be switched off after the last operation (for battery saving). Press the OK button to confirm.
–Battery Warning Time Out: Touch the square on the right side to set the timing for the battery warning. The battery warning will be displayed ac-
16

Menu Button |
Operating the Navigation Menus |
|
|
cordingly before the battery runs out. Press the OK button to confirm.
Operating the
Navigation Menus
Software Keyboard
If text entries are required, the touchscreen displays a software keyboard. You can perform all entries using your finger. Only capital letters can be entered.
You do not have to enter any special characters or umlauts when entering city or street names. The Lucca completes these characters automatically.
Entering Blank Spaces
To enter a blank space, touch the  button.
Deleting Characters
To delete the last character, touch the  button.
17

Operating the Navigation Menus
Switching between Number, Umlaut and Character Input
To enter numbers, such as postcode,touch the  button
To return to the character entry mode,
touch 
To enter an umlaut,
touch the  button. The umlaut keyboard is displayed.
As soon as you enter an umlaut, the character keyboard is automatically displayed again.
Note:
Umlauts do not have to be entered when entering address information, but they may be helpful for the description of stored destinations and routes.
List
In many cases, you can display lists from which you can select an entry. This is the case, for example, if you do not enter the complete name of a place during the entry. After every entry of a letter, the text field shows the first entry that starts with the previously entered characters. To display a list with additional matching entries, touch the List button.
The end of the list features entries what contain the sequence of previously entered characters not at the beginning, but in the middle or at the end.
One entry of the list is always selected.
The selected entry can be selected by touching the OK button.
These lists contain the following buttons:
 : Touch the OK button to accept the selected entry. Howev-
18

Operating the Navigation Menus
er, you can also directly touch an entry to accept it.
 : Touch this button to scroll up in the list by one page (5 elements).
 : Touch this button to scroll
down in the list by one page (5 elements).
To scroll through the list by several pages, repeatedly touch the corresponding button.
Note:
If the list features more than 5 elements, the scroll bar indicates the current position in the list.
 : Touch this button to return to the entry without selecting a list element.
Buttons
Buttons are located on all menus of the Lucca:
 : Touch this button to return to the previously opened menu. If you are in the Navigation menu, this button takes you to the Blau-
punkt start screen. Here, you can open another application, such as the MP3 player or the Picture Viewer, or reopen the navigation.
More: Touch this button to obtain access to additional functions. Depending on the menu in which this button is located, different functions are offered.
If this button is deactivated, no additional functions are available.
Information
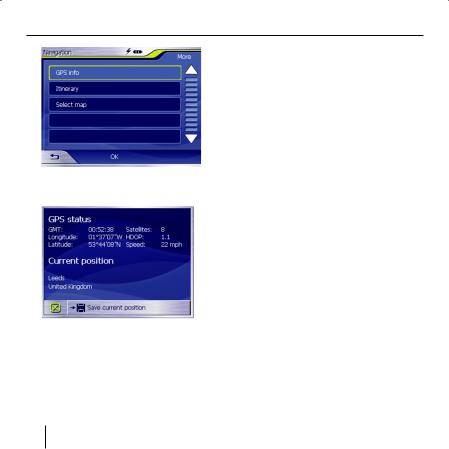
From the Navigation menu, you can display the current GPS status at any time.
GPS Status
The GPS status menu contains information about your current position and your current speed. In addition, you can also save your current position.
In the Navigation menu, touch the More button.
The following window displays:
19
Operating the Navigation Menus
Touch the GPS Info button.
The GPS Status menu displays.
•GMT: Greenwich Mean Time London time without daylight savings time.
•Longitude/Latitude, current Position: Information of the east longitude and north latitude.
•Satellites: Number of satellites received. The navigation requires signals from at least three satellites.
•HDOP: Horizontal Dilution of Precision. Indicates the quality of the positioning. Theoretically, values from 0 to 50 are possible, whereby the following applies: The lower the value, the more precise the positioning (value 0 = no deviation from the actual position). Values up to 8 are acceptable for navigation.
•Speed: Indicates the current speed of the vehicle.
•Position: Indicates the address of the current position (if possible).
•Save current position: Touch this button to save the current position to the favourites.
•Touch the  button to close the GPS window.
20
Navigation
Navigation
General Notes about the Navigation
The use of the Lucca is at your own risk.
Caution:
Do not operate the Lucca while driving to protect yourself and others against accidents!
View the display only if you are in a safe travel situation!
The street routing and traffic signs have priority over the instructions of the navigation system.
Follow the instruction of the Lucca only if circumstances and traffic regulations allow! Lucca will bring you to your destination even if you have to deviate from the planned route.
Starting the Navigation
Power on the device using the Power button.
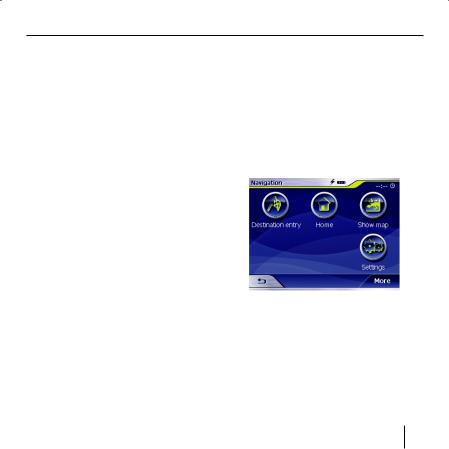
In the start screen, touch the Navigation button.
The Navigation menu displays.
21
Navigation
The Navigation menu allows access to all the functions of the navigation.
Entering a Destination
For further details, please read the section "Configuring Lucca/Basic Settings".
Touch the Destination entry button to enter a destination for the navigation.
For further details, please read the section "Entering a Destination".
Navigating Home
Touch the Home button to use your stored home address as the destination for the navigation.
For further details, please read the section "Using the Home Address as Destination".
Showing a Map
Touch the Show map button to display the loaded street map.
For further details, please read the section "Working with the Map".
Settings
Touch the Settings button to adjust the settings of your Lucca.
Exiting the Menu
In the Navigation menu, touch
 to quit the navigation. The Lucca start screen displays.
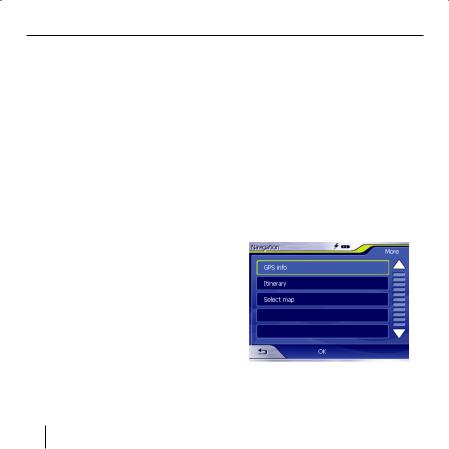
Additional Functions
Touch the More button to gain access to additional functions of the
Navigation.
The list of additional functions displays.
It contains the following functions:
22
Navigation
GPS Info
Touch the GPS Info button to obtain information about the current GPS status and about your current position.
Route Planning
Touch the Itinerary button to plan a route with several stages.
For further details, please read the section "Route Planning with Stages".
Select Map
Touch the Select Map button to choose between different available road maps.
Performing Basic Settings
Before you work with the Lucca,
•you should set the time zone of for your position so that the correct arrival times are displayed during the navigation, and
•you should enter your home address to quickly navigate home from any location.
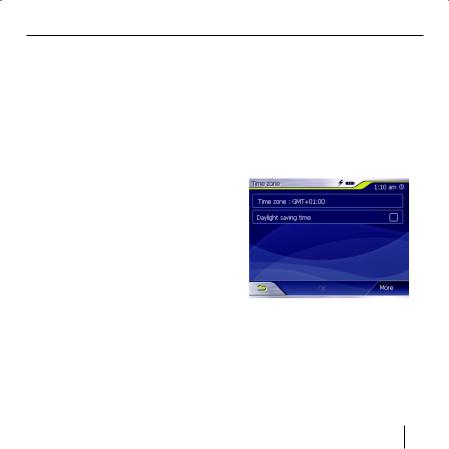
Setting the Time Zone
In the Navigation menu, touch the
Settings button.
The Settings menu displays.
Touch the  button until the screen displays the Time zone button.
Next, touch Time zone.
The Time zone menu displays.
Touch Time zone.
Touch the time zone in the list that is valid for your current position (GMT without daylight savings time).
23
Navigation
Note:
The selection is facilitated by the display of the capitols in the respective time zone.
Touch the OK button.
If daylight savings time currently applies to your position, touch the
Daylight saving time button.
The button displays a check mark.
Note:
If the time is changed at your position or if you drive into a different time zone, you must adjust the corresponding settings.
Touch the OK button.
The Navigation menu displays.
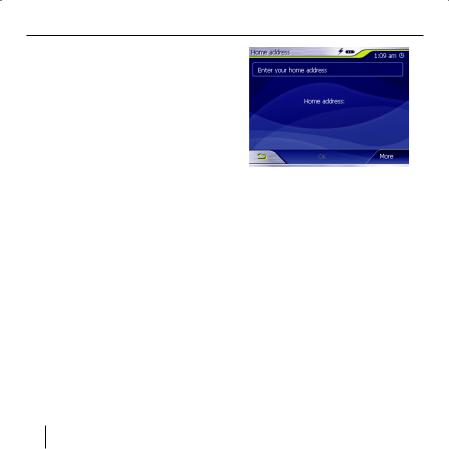
Entering the Home Address
In the Navigation menu, touch the
Settings button.
The Settings menu displays.
Repeatedly touch the  buttons until the Home address button displays.
Touch the Home address button. The Home address menu displays.
Touch the Enter your home address button.
The Destination entry menu displays.
Touch the Address button and enter your home address. See "Entering a Destination Address".
Touch the Set as home address button.
The address is copied into the
Home address menu.
Touch the OK button.
The Navigation menu displays again.
24
Navigation
Specifying a Destination
This section contains information about the different methods for entering, selecting and managing destinations with the Lucca.
How to start the navigation to a destination is described in the chapter "Destination Guidance".
Entering a Destination
With the Lucca, you can enter or select destinations in different ways:
•Entering a destination address
•Selecting a point of interest
•Copying a destination from the map
•Copying a destination from the favourites
•Reusing one of the Last destinations
•Using the home address
Entering a Destination Country
First, enter the country in which your destination is located.
Note:
This entry does not have to be repeated. If your destination is in a different country than the previous one, you must re-enter the country.
In the main menu touch the Navigation button.
The Navigation menu displays.
Touch the Destination entry button.
The Destination entry menu displays.
25

Navigation
Touch the Country button. The list of countries displays.
Note:
You can only select countries which are at least partially displayed on the currently loaded map.
Entering a Destination Address
In the main menu touch the Navigation button.
The Navigation menu displays.
In the Navigation menu, touch the
Destination entry button.
The Destination entry menu displays.
Touch the Address button. The Address menu displays.
Touch the country in which your destination is located.
The Address menu displays.
26
Navigation
Note:
If the country containing your destination is not displayed in the top line, touch the  button and select the correct country. How to select a country is described in the chapter "Entering a Destination Country".
Touch the Town field and enter the target location. You can enter either the postcode
or the name of the location.
Touch the Street field |
and |
enter the street. |
|
If you know the house number of your destination, touch the House
Number field to enter the house number.
Note:
If no house number is stored for the specified street in the maps, the House Number field is deactivated.
field to enter the crossroad to the defined street.
Note:
How to save a defined destination is described in the chapter "Saving one of the recent destinations".
Additional Functions
Touch the More button to gain access to additional functions of the
Address menu.
The list of Additional functions displays.
The list of Additional functions contains the following functions:
• Route options:
–Here you can set the route options for the next navigation.
For further details, please read the chapter "Specifying route options".
•Show:
–Select this button to view the specified address on the map.
If you want to define an inFor further details, please read the tersection as the destinachapter "Working with the map". tion, touch the Intersection
27
 Loading...