


CassetteRadio
Coburg RCR 168
Colorado RCR 168
Portofino RCR 168
Operating instructions
1

1 |
2 |
3 |
4 |
5 |
6 |
7 |
8 |
9 |
10 |
17 |
16 |
15 |
14 |
13 |
12 |
11 |
10
3
A készülék a 70 MHz.-es sávban mæködœ URH adók vételére nem alkalmas. Az OIRT sáv vételét (Kossuth, Petœfi, Bartók) lehetœvé tevœ keverœ, külön tartozékként
2 9 megvásárolható, az egy éves jótállási idœn belül. A vásárlás lehetœségét a jótállást vállaló biztositja.
2
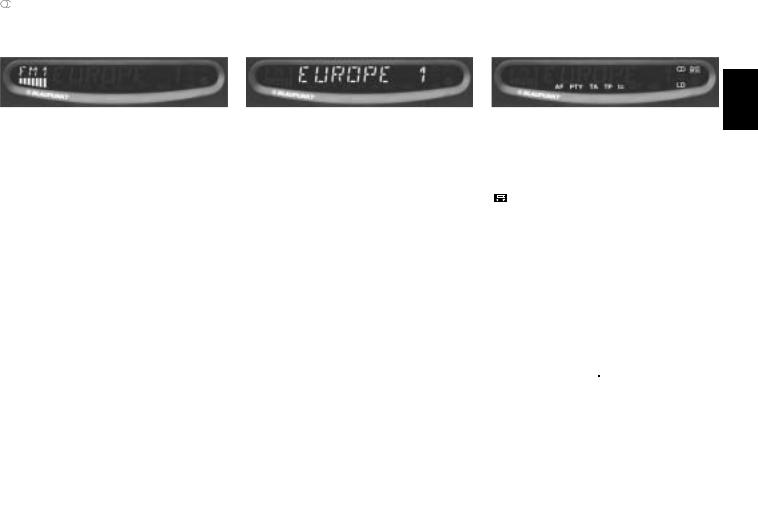
Display
The display consists of three fields and varies according to the operating mode and function.
Display field 1:
Radio mode
Memory banks and wavebands
Brief indication of preset station (e.g. P1)
Cassette mode
CAS - cassette inserted
MTL - tape type
Audio
Numeric and graphic representation of volume and audio settings
DSC
Permanent display for DSC programming. Graphic representation of the adjusted volume level.
Display field 2:
Radio mode
Radio frequency or station name PTY programme type
Clock display
Cassette mode
TAPE1/TAPE2 - side of tape playing Active functions (e.g. CPS)
Clock display
DSC
Serves as display and input field during DSC programming
Clock display
Miscellaneous
Indicates new source (e.g. when changing from radio to cassette) and active functions (e.g. BASS, SCAN)
Display field 3:
Active functions
|
- Stereo |
|
- Cassette inserted |
LD |
- Loudness |
Radio mode |
|
AF |
- Alternative Frequency for RDS |
PTY |
- RDS programme type |
TA |
- Priority for traffic information |
TP |
- Traffic programme station |
lo |
- Seek tuning sensitivity |
DEUTSCH ENGLISH FRANÇAIS ITALIANO NEDERLANDS SVENSKA ESPAÑOL PORTUGUÊS
21

Contents |
|
Display ......................................... |
21 |
Quick reference ........................... |
23 |
Remote control operation .................... |
26 |
Important notes ........................... |
26 |
What you need to know ....................... |
26 |
Traffic safety ........................................ |
26 |
Installation ............................................ |
26 |
Telephone mute ................................... |
26 |
Warning note .................................. |
27 |
Accessories ......................................... |
27 |
Release panel .............................. |
27 |
Theft protection .................................... |
27 |
Detaching the release panel ................ |
27 |
Attaching the release panel ................. |
27 |
Fixing the release panel ...................... |
28 |
Selecting the operating mode .... |
28 |
Radio operation with RDS .......... |
28 |
AF - Alternative frequency ................... |
28 |
REG - regional programme ................. |
28 |
Selecting a waveband ......................... |
29 |
Station tuning ....................................... |
29 |
Automatic seek tuning / ............. |
29 |
Scrolling through the broadcast |
|
networks (FM only) .............................. |
29 |
Switching between the memory |
|
banks (FM) ........................................... |
29 |
Storing stations .................................... |
29 |
Automatically storing the strongest |
|
stations with Travelstore ...................... |
30 |
Recalling stored stations ..................... |
30 |
Scanning stored stations with |
|
Preset Scan ......................................... |
30 |
Scanning stations with Radio Scan ..... |
30 |
Changing the scan time ....................... |
30 |
Selecting the automatic tuning |
|
sensitivity ............................................. |
30 |
PTY - Programme Type ....................... |
31 |
Programme types ............................. |
31 |
Switching PTY ON/OFF ................... |
31 |
Checking the programme type of |
|
the station ......................................... |
31 |
Displaying the selected programme |
|
type ................................................... |
31 |
Selecting a programme type ............ |
31 |
Storing programme types ................. |
32 |
Scanning stations with PTY SCAN .. |
32 |
PTY priority ....................................... |
32 |
Traffic programme station |
|
reception with RDS-EON ............ |
33 |
Traffic announcement priority on/off ... |
33 |
Warning beep ...................................... |
33 |
Switching the warning beep off ........ |
34 |
Automatic seek tuning start |
|
(Cassette mode) .................................. |
34 |
Adjusting the volume for traffic an- |
|
nouncements and the warning beep ... |
34 |
Cassette deck operation ............ |
34 |
Cassette playback ............................... |
34 |
Reversing the tape .............................. |
34 |
Skipping cassette titles ........................ |
34 |
Scan ..................................................... |
34 |
Fast winding ......................................... |
34 |
Tape type selection ............................. |
35 |
Cassette eject ...................................... |
35 |
Traffic information during cassette |
|
playback ............................................... |
35 |
Clock ............................................ |
35 |
Setting the clock .................................. |
35 |
Setting the TIMER ............................... |
35 |
Naming an external audio |
|
source .......................................... |
36 |
DSC programming ...................... |
36 |
Overview of the DSC factory settings . 37 |
|
Specifications .............................. |
38 |
Amplifier ............................................... |
38 |
Tuner .................................................... |
38 |
Cassette ............................................... |
38 |
22

Quick reference
1REL
To release the detachable panel (theft protection).
Press this knob and remove the release panel.
2ON - Power on/off
Press this button to turn the unit on. It will play at the preset volume.
If you press this button briefly while listening to the radio, the volume will mute instantly
(MUTE).
Cancel this function by pressing the ON button again. You can adjust the mute volume (refer
to the section on DSC programming). Press the button for about 2 seconds to turn the unit off.
Switching on/off with the ignition:
If the unit has been connected as described in the instructions, it can also be turned on and
off with the vehicle ignition.
Press the ON button to keep on operating the unit when the ignition is switched off.
To prevent the battery from running down, the system will turn off automatically after one hour of playback.
3Volume knob
Turn the knob to adjust the volume.
4DSC Direct Software Control
This feature allows you to adjust the basic programmable settings.
For further information, refer to the section on DSC programming.
5Cassette slot
Insert the tape into the slot with the open side showing to the right. The tape will be played in direction "TAPE 1".
6Display
The display indicates all settings, operating modes and functions.
7
This button switches tape playback between Tape 1 and Tape 2 (different sides of the tape).
8  Eject
Eject
Press this button to eject the cassette.
9 Rocker switch
Radio mode
 /
/  Seek tuning
Up
Down
<< / >> Up/down in short intervals (for FM only if "AF" is off)
For FM only:
<< / >> Scrolls through the broad cast networks, if AF is on. Example: NDR 1, 2, 4,
Cassette mode
 /
/  CPS function
Up
Down
Press repeatedly to skip over the corresponding number of songs. Press the button indicating the opposite direction or << >> to stop the function.
DEUTSCH ENGLISH FRANÇAIS ITALIANO NEDERLANDS SVENSKA ESPAÑOL PORTUGUÊS
23

>> Fast forward
<<Fast rewind
Press the button indicating the opposite direction or  /
/ to stop tape winding.
Additional rocker switch functions:
For additional settings use
AUD ;
DSC-MODE 4
PTY @
Important: The corresponding function must be active.
:SRC (Source)
Press button briefly to select the operating mode (tuner, cassette or AUX IN). The active mode will appear in the display.
;AUD
Treble and bass adjustment
You can store different settings for the FM, MW, LW, cassette mode and AUX IN.
Setting the tone:
• Select the operating mode.
Press AUD once and use the rocker switch to set the tone.
Treble + Treble -
<< Bass -
>>Bass
For Fader and balance adjustment: press AUD twice.
 Fader front
  Fader rear << Balance left
>>Balance right
The selected values will appear in the display. The last setting is stored automatically.
Switching AUD off: Press the button again briefly.
If you do not make any adjustments to the tone within 8 seconds, the AUD mode will quit automatically.
Extra function: LD
Loudness boosts the bass frequency at low volume.
Loudness on/off: Press AUD for approx. 1 second.
"LD" will appear when this setting is active.
Refer to the section on DSC programming to adjust Loudness to different levels.
<SCA Scan
Scans radio stations or song titles/ tracks.
You can set the scan time in DSC programming.
Radio mode
Press SCA briefly.
All of the FM stations within reception range will be scanned. "SCAN" will appear in the display, alternating with the radio station currently being scanned (flashing).
Preset Scan
Press SCA for approx. 2 seconds until you hear a beep. "PS Scan" will appear in the display, followed by the station symbol (flashing).
The stations stored on the station preset buttons and within reception range will be scanned.
To stop Scan / Preset Scan: Press SCA again.
PTY Scan
PTY Scan cannot be started unless PTY is switched on ("PTY" will light up in the display.)
The radio stations for the program type selected will be scanned. "PTY SCAN" will appear in the dis-
24

play, alternating with radio station currently being scanned (flashing). To stop Scan / PTY Scan:
Press SCA again.
Cassette mode
Press SCA briefly.
All of the titles on the cassette will be scanned.
To stop Scan: Press SCA again
= DIS - Clock display
Radio mode
Press this button briefly and the time will appear in the display for a short while.
Cassette mode
Press this button to switch the display between the time and the cassette track (TAPE 1/TAPE 2).
>Preset buttons 1 to 6
Radio mode
You can store six stations in each FM memory bank (1, 2, and "T").
On MW and LW you can also store six stations each (Coburg RCR 168 without MW, LW).
Store station - Hold down a preset button in radio mode until you hear a beep.
Recall station - Select a waveband and the memory bank on FM as well; press the
corresponding preset button briefly.
Cassette mode
1/MTL -
Selects between chrome or iron oxide tape types.
Press 1/MTL.
3/ - Pause
Interrupts tape playback. "PAUSE" will appear in the display.
Press this button once again to resume playback.
?BA/TS
Switches between the wavebands/ memory banks FM1, FM2, FMT (Travelstore), MW and LW (Coburg RCR 168 without MW, LW).
Extra function: Travelstore
To store the six most powerful radio stations in the Travelstore bank: Press BA/TS until a beep sounds and "T-STORE" appears.
@PTY (Programme Type)
You can select among various programme types. Using the rocker switch <<>> it is possible to recall all PTY programme types, if PTY is activated ("PTY" lights up in the display).
AAF·TA
Alternative Frequency in RDS mode: If "AF" appears in the display, the radio will automatically search for the best radio frequency offering the same programme.
AF on/off:
Press AF·TA until a beep is emitted.
TA (Traffic Announcement = priority for traffic programmes)
TA on/off:
Press AF·TA briefly: "TA" will appear in the display, priority for traffic programmes activated.
“TP” (Traffic Programme) will be displayed when the radio is tuned into a station which broadcasts traffic information.
DEUTSCH ENGLISH FRANÇAIS ITALIANO NEDERLANDS SVENSKA ESPAÑOL PORTUGUÊS
25
 Loading...