


Radio / CD
Alicante CD30
Kiel CD30
Lausanne CD30
Operating instructions
2 3 5
1 |
4 |
6 |
7 |
8 |
14 |
13 |
12 |
11 |
10 |
9 |
DEUTSCH ENGLISH FRANÇAIS ITALIANO NEDERLANDS SVENSKA ESPAÑOL PORTUGUÊS
3

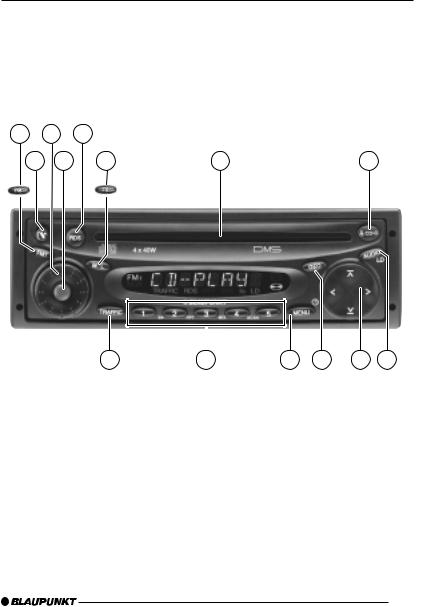
CONTROLS
1Button to release the control panel
2FM button – selects the FM memory
FMT button – Travelstore (not on the Kiel CD30)
3Volume control
4ON button – switches the unit on/off
5RDS button – switches the RDS function on/off
6M•L button – selects the MW and LW frequency ranges TS button – activates the
Travelstore function on the Kiel CD30
7CD compartment
8CD eject
CD•C button – selects CD, radio and CD changer (if connected) sources
9AUDIO button – sets bass and treble
LD button – switches the loudness function on/off
:Arrow buttons
;GEO button – sets balance and fader
<MENU button – opens the basic settings menu
=Buttons 1-5
>TRAFFIC button – activates/ deactivates traffic information standby
22

CONTENTS
Important information ............ |
24 |
Road safety ................................... |
24 |
Installation ..................................... |
24 |
Accessories .................................. |
24 |
Guarantee ..................................... |
24 |
International telephone hotline ........ |
24 |
Theft protection ..................... |
25 |
Removable control panel ............... |
25 |
Theft protection CODE .................. |
26 |
Switching on/off .................... |
27 |
Volume adjustment ................ |
27 |
Setting the power-on volume ......... |
27 |
Mute setting .................................. |
28 |
Mute while telephoning .................. |
28 |
Radio mode ............................ |
28 |
Switching to radio mode ................ |
28 |
Changing the display ..................... |
28 |
RDS functions (AF, REG) .............. |
28 |
Selecting the frequency range / |
|
memory ......................................... |
29 |
Tuning into a station ....................... |
29 |
Setting the sensitivity of the station |
|
search mode ................................. |
29 |
Storing stations ............................. |
30 |
Storing stations automatically |
|
(Travelstore) .................................. |
30 |
Listening to preset stations ............ |
30 |
Programme type (PTY) .................. |
30 |
Treble reduction feature during |
|
interference (HICUT) ..................... |
31 |
Traffic information reception . 32
Switching traffic information priority |
|
on/off ............................................ |
32 |
Setting the traffic announcement |
|
volume .......................................... |
32 |
Switching off the warning sound .... |
33 |
CD mode ................................ |
33 |
Switching to CD mode .................. |
33 |
Selecting a track ........................... |
33 |
Random play (MIX) ........................ |
34 |
Scanning tracks (SCAN) ............... |
34 |
Setting the scantime ...................... |
34 |
Repeating a track (REPEAT) .......... |
34 |
Pausing playback (PAUSE) ............ |
34 |
Changing the display ..................... |
34 |
Traffic announcements in CD mode 35 |
|
Ejecting a CD ................................ |
35 |
CD changer mode .................. |
35 |
Switching to CD changer mode ..... |
35 |
Selecting a CD .............................. |
35 |
Selecting a track ........................... |
35 |
Changing the display ..................... |
35 |
Repeating individual tracks or |
|
whole CDs (REPEAT) .................... |
36 |
Random play (MIX) ........................ |
36 |
Scanning all tracks on all CDs |
|
(SCAN) ......................................... |
36 |
Pausing playback (PAUSE) ............ |
36 |
Time (CLOCK) ........................ |
37 |
Displaying the time ........................ |
37 |
Setting the time manually ............... |
37 |
Selecting 12/24-hour clock mode .. |
37 |
Displaying the time when the unit |
|
is off .............................................. |
37 |
Audio settings ........................ |
38 |
Switching loudness on/off ............. |
38 |
Volume distribution settings .. |
38 |
Balance settings ............................ |
38 |
Fader settings ............................... |
38 |
External audio sources .......... |
39 |
Technical data ........................ |
39 |
DEUTSCH ENGLISH FRANÇAIS ALIANOIT NEDERLANDS SVENSKA AÑOLESP TUGUÊSPOR
23

IMPORTANT INSTRUCTIONS
Important information
Before using your car radio, please read these instructions carefully and familiarise yourself with the unit. Keep these instructions in your vehicle for later reference.
Road safety
 Road safety has priority. Only operate your car radio if the road and traffic conditions allow you to do so. Familiarise yourself with the unit before setting off on your journey.
You should always be able hear police, fire and ambulance sirens from afar. For this reason, set your car radio’s volume to a suitable level.
Installation
If you want to install your car radio yourself, read the installation and connection instructions that follow these operating instructions.
Accessories
Only use accessories approved by Blaupunkt.
Remote control
The optional RC 08 remote control allows you to safely access the most important functions from your steering wheel.
Amplifier
All Blaupunkt amplifiers can be used.
24
CD changer
You can connect the following Blaupunkt CD changers:
CDC A 06, CDC A 08, CDC A 072 and IDC A 09.
You can also connect the CDC A 05 and CDC A 071 CD changers by using a special adapter cable (Blaupunkt no.: 7 607 889 093).
Guarantee
The scope of the guarantee is orientated around the regulations in force within the country in which the unit was purchased.
Regardless of what the legal regulations may stipulate, Blaupunkt provides a twelve-month guarantee.
If you have any questions regarding the guarantee, please contact your authorised Blaupunkt dealer. The purchase receipt is accepted as proof of guarantee in all cases.
International telephone hotline
If you have any questions regarding the operation of your car radio or if you require further information, please do not hesitate to call us!
The information hotline numbers are printed on the last page of these instructions.
THEFT PROTECTION
Theft protection
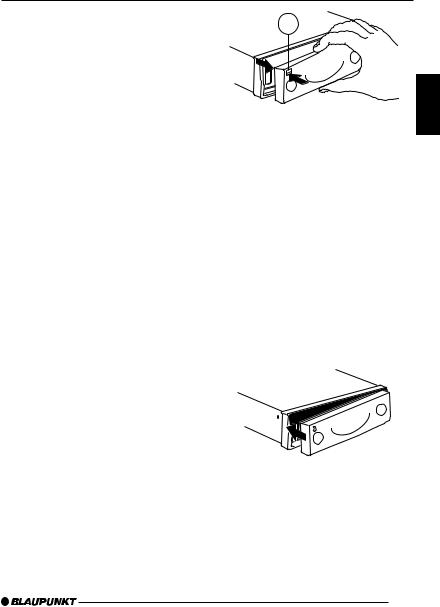
Removable control panel
As a way of protecting your car radio against theft, the unit is equipped with a removable control panel (release panel). Without this control panel, the car radio is worthless to a thief.
Protect you car radio against theft by taking the control panel with you every time you leave your vehicle. Do not leave the control panel in your vehicle – not even in a hiding place.The control panel has been designed to be easy to use.
Note:
●Never drop the control panel.
●Never expose the control panel to direct sunlight or other heat sources.
●Protect the control panel against moisture.
●Store the control panel in the supplied case.
●If the unit was still switched on when you removed the control panel, the unit will automatically switch on with the last settings activated (i.e. radio, CD or CD changer mode) when the panel is replaced.
Removing the control panel
Press button 1.
The control panel locking mechanism opens.
1
First, pull the control panel straight off the unit and then out towards the left.
●The unit switches off after the control panel is removed.
●The current settings are saved.
●Any CD already inserted in the unit remains there.
Attaching the control panel
Slide the control panel from left to right into the unit’s panel locking mechanism.
Press the left-hand edge of the control panel into the unit until it clicks into place.
Note:
●When attaching the control panel, make sure you do not press the display.
DEUTSCH ENGLISH FRANÇAIS ITALIANO NEDERLANDS SVENSKA ESPAÑOL PORTUGUÊS
25

THEFT PROTECTION
Theft protection CODE
As a way of protecting your car radio against theft, the system features a fourdigit code.You have to enter this number every time the unit is disconnected from your vehicle’s electrical power supply.
As a factory default, the code entry request function is deactivated. However, you do have the option of activating this function.
The numerical code is printed on the pass card supplied with your unit.
Note:
Never keep your radio’s pass card in your vehicle!
Activating/deactivating the code
In order to activate/deactivate the code request function, proceed as follows:
Press the ON button 4to switch off the unit.
Press station buttons 1 and 4 =at the same time.
Keep these station buttons pressed
while switching the unit on by pressing the ON button 4.
Keep station buttons 1 and 4 = pressed until “PUNKT” appears in the display.
Release the station buttons.
The code request function is now activated.
Follow the same procedure to deactivate the code request function.
26
Note:
To prevent unauthorised persons from deactivating the code, you will have to enter the numerical code in order to deactivate the code request function.
Entering the code
Switch on the unit.
“CODE” appears in the display first of all and is followed by four zeros.
Keep pressing station button 1 = until the first number of your code appears in the display.
Keep pressing station button 2 = until the second number of your code appears in the display.
Keep pressing station button 3 = until the third number of your code appears in the display.
Keep pressing station button 4 = until the fourth number of your code appears in the display.
Once the correct code is displayed, press the  or
or  button :.
Note:
If the code is entered incorrectly three times, you will have to wait for a fixed time period. “WAIT 1 H” appears in the display. The unit must remain switched on during this hour.
 Loading...