


SW100
• Turns off the light if the room becomes brighter, for instance due to opening a window
shade. You can control the brightness setting for this feature.
Selecting Where to Use the Auto Switch
The Lights Out™ Auto Switch can be installed on toggle-style light switches, including
switches that are part of a “ganged” multi-switch outlet.
Use the Auto Switch in a location where the light switch has a clear view of room occupants,
and where occupants are likely to be moving within range of the detector. Note that the Auto
Switch will turn the lights off if it does not detect motion within the selected time period. The
Auto Switch is especially useful in areas where a light is likely to be left on unnecessarily.
Ideal locations are entry ways, bathrooms, garages, offices, basements and playrooms.
The Auto Switch is not
compatible with the following:
• Paddle-style switches
• Heavy-duty industrial-grade switches
• Toggle switches with side-to-side motion, rather than up-and-down motion
• “Three-way” switches (where the light is controlled by more than one switch)
• Dimmer switches
Assembly/Set-up
This product requires three AA batteries (not included).
Installing the Batteries
NOTE: Use only with the specifically designated batteries (AA non-rechargeable alkaline or
lithium). Use of any other batteries may create a risk of fire.
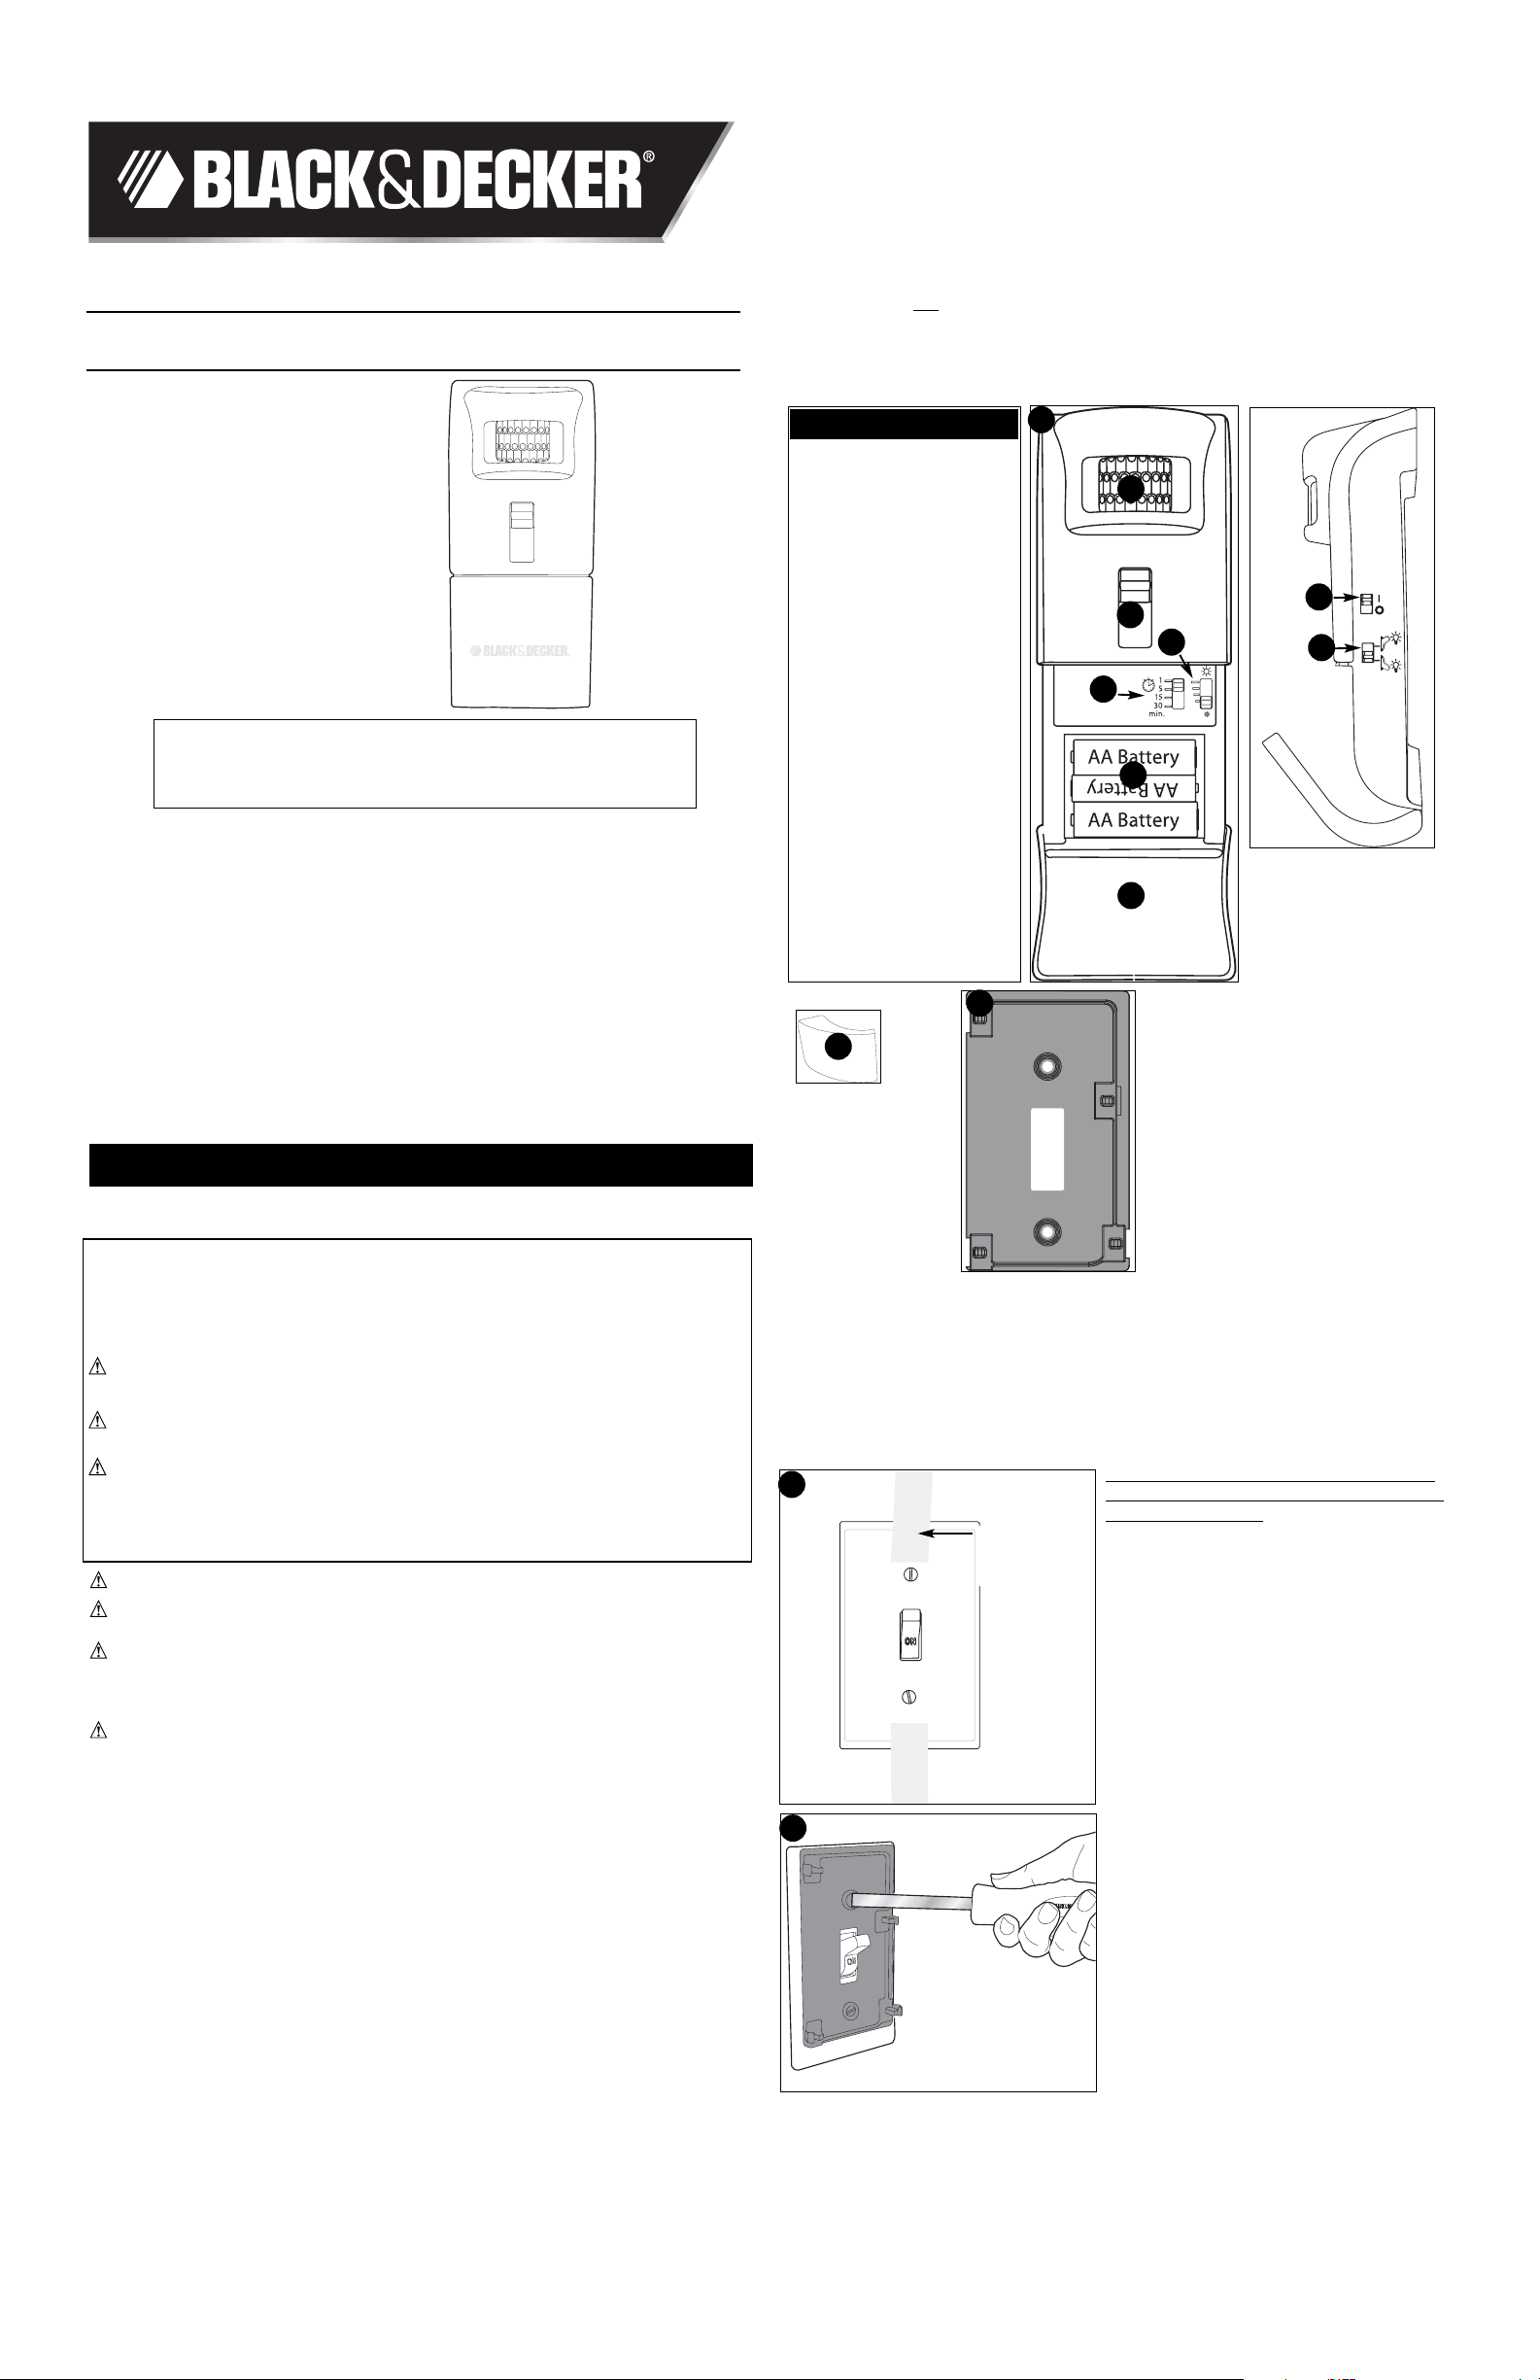
• Open the battery compartment cover (I) as shown in figure 1.
• Insert batteries in the orientation indicated, making sure to match (+) and (-) terminals to the
illustration inside the compartment, then close the battery compartment cover.
Instructions for Mounting to a Switch
NOTE:
Do not install where more than one
light switch controls a single light fixture (a
“three-way” switch).
• Note whether the light turns on when the
switch is flipped up, or when the switch is flipped
down. The Auto Switch can be configured for
either case.
• Use a piece of tape (not included) to tape the
switch plate in place before the screws are
removed. See figure 2. You can skip this step if
the switch plate is held to the wall with more
than two screws (for example, when there is
more than one switch.)
• Remove the two screws from above and
below the switch you want to control.
• Orient the mounting plate as shown in
figure 3, and line up the mounting plate holes
with the holes in the cover plate.
• Using the two screws supplied, lightly screw in
the mounting plate (j) over the switch plate as
shown in figure 3.
• Tighten both screws until just snug. Do not
over-tighten.
SAFETY GUIDELINES - DEFINITIONS
It is important for you to read and understand this manual.
The information it contains relates to protecting YOUR
SAFETY and PREVENTING PROBLEMS. The symbols below are used to help you
recognize this information.
DANGER: Indicates an imminently hazardous situation which, if not avoided, will result
in death or serious injury.
WARNING: Indicates a potentially hazardous situation which, if not avoided, could
result in death or serious injury.
CAUTION: Indicates a potentially hazardous situation which, if not avoided, may result
in minor or moderate injury.
CAUTION: Used without the safety alert symbol indicates a potentially hazardous
situation which, if not avoided, may result in property damage.
WARNING: To reduce risk of injury, user must read and understand instruction manual.
WARNING: To reduce the risk of shock, remove this device and disconnect branch circuit
when servicing switch or light fixture.
WARNING: Do not use on a switch that controls a power receptacle.
• Use with toggle-style switches only.
• For indoor use only.
• Not for use where the light fixture is controlled by more than one switch (a “three-way” switch).
WARNING: Fire or burn hazard. Batteries can explode or leak, and can cause injury
or fire. To reduce this risk:
• Carefully follow all instructions and warnings on the battery label and package.
• Always insert batteries correctly with regard to polarity (+ and -), marked on the battery
and the equipment.
• Do not short battery terminals.
• Do not recharge.
• Do not mix old and new batteries. Replace all of them at the same time with new batteries
of the same brand and type.
• Remove dead batteries immediately and dispose of per local codes.
• Do not dispose of batteries in fire.
• Keep batteries out of reach of children.
• Remove batteries if the device will not be used for several months.
"Transporting batteries can possibly cause fires if the battery terminals inadvertently
come in contact with conductive materials such as keys, coins, hand tools and the like.
The US Department of Transportation Hazardous Material Regulations (HMR) prohibits
transporting batteries in commerce or on airplanes (i.e. packed in suitcases and carryon
luggage) UNLESS they are properly protected from short circuits. So when transporting
individual batteries, make sure that the battery terminals are protected and well insulat-
ed from materials that could contact them and cause a short circuit.
SAVE THESE INSTRUCTIONS
Introduction
The Lights Out™ Auto Switch will reduce your electricity usage and save you money by
turning off a light when it is not needed. It uses motion and light detectors to automatically
control an existing toggle-style light switch.
The Auto Switch performs these functions:
• Turns on the light when motion is detected.
• Turns off the light when no motion has been detected for a selectable time period.
• Does not turn on lights if the room is already illuminated with sunlight. You can control the
brightness setting for this feature.
Cat No. SW100 Form # 90539953 (OCT.’08)
Copyright © 2008 Black & Decker Printed in China
FEATURES
A.) Motion Detector
B.) Motion Detector Shade
C.) Manual On/Off Switch
D.) Timer Switch
E.) Ambient Light Switch
F.) Power Switch
G.) Polarity Switch
H.) Battery Compartment
I .) Battery Compartment Cover
J.) Mounting Plate
VEA EL ESPAÑOL EN LA CONTRAPORTADA.
SAVE THIS MANUAL FOR FUTURE REFERENCE.
INSTRUCTIVO DE OPERACIÓN, CENTROS DE SERVICIO Y PÓLIZADE GARANTÍA.
ADVERTENCIA: LÉASE ESTE INSTRUCTIVO ANTES DE USAR EL PRODUCTO.
Catalog Number
SW100
Lights Out™ Auto Switch
1
3
A
C
D
E
H
I
F
G
J
B
2
Tape
Ruban adhesif
Cinta
Thank you for choosing Black & Decker!
Go to www.BlackandDecker.com/NewOwner
to register your new product.
PPLLEEAASSEE RREEAADD BBEEFFOORREE RREETTUURRNNIINNGG TTHHIISS
PPRROODDUUCCTT FFOORR AANNYY RREEAASSOONN::
If you have a question or experience a problem with your Black & Decker purchase, go to
HTTP://WWW.BLACKANDDECKER.COM/INSTANTANSWERS
If you can’t find the answer or do not have access to the internet,
call 1-800-544-6986 from 8 a.m. to 5 p.m. EST Mon. -- Fri. to speak with an agent.
Please have the catalog number available when you call.
for instant answers 24 hours a day.
SAVE THIS INSTRUCTION MANUAL FOR FUTURE REFERENCE.
INSTRUCTION MANUAL
• Check if the light switch is up or down. Move
the switch on the front of the Auto Switch to
match the position of the light switch.
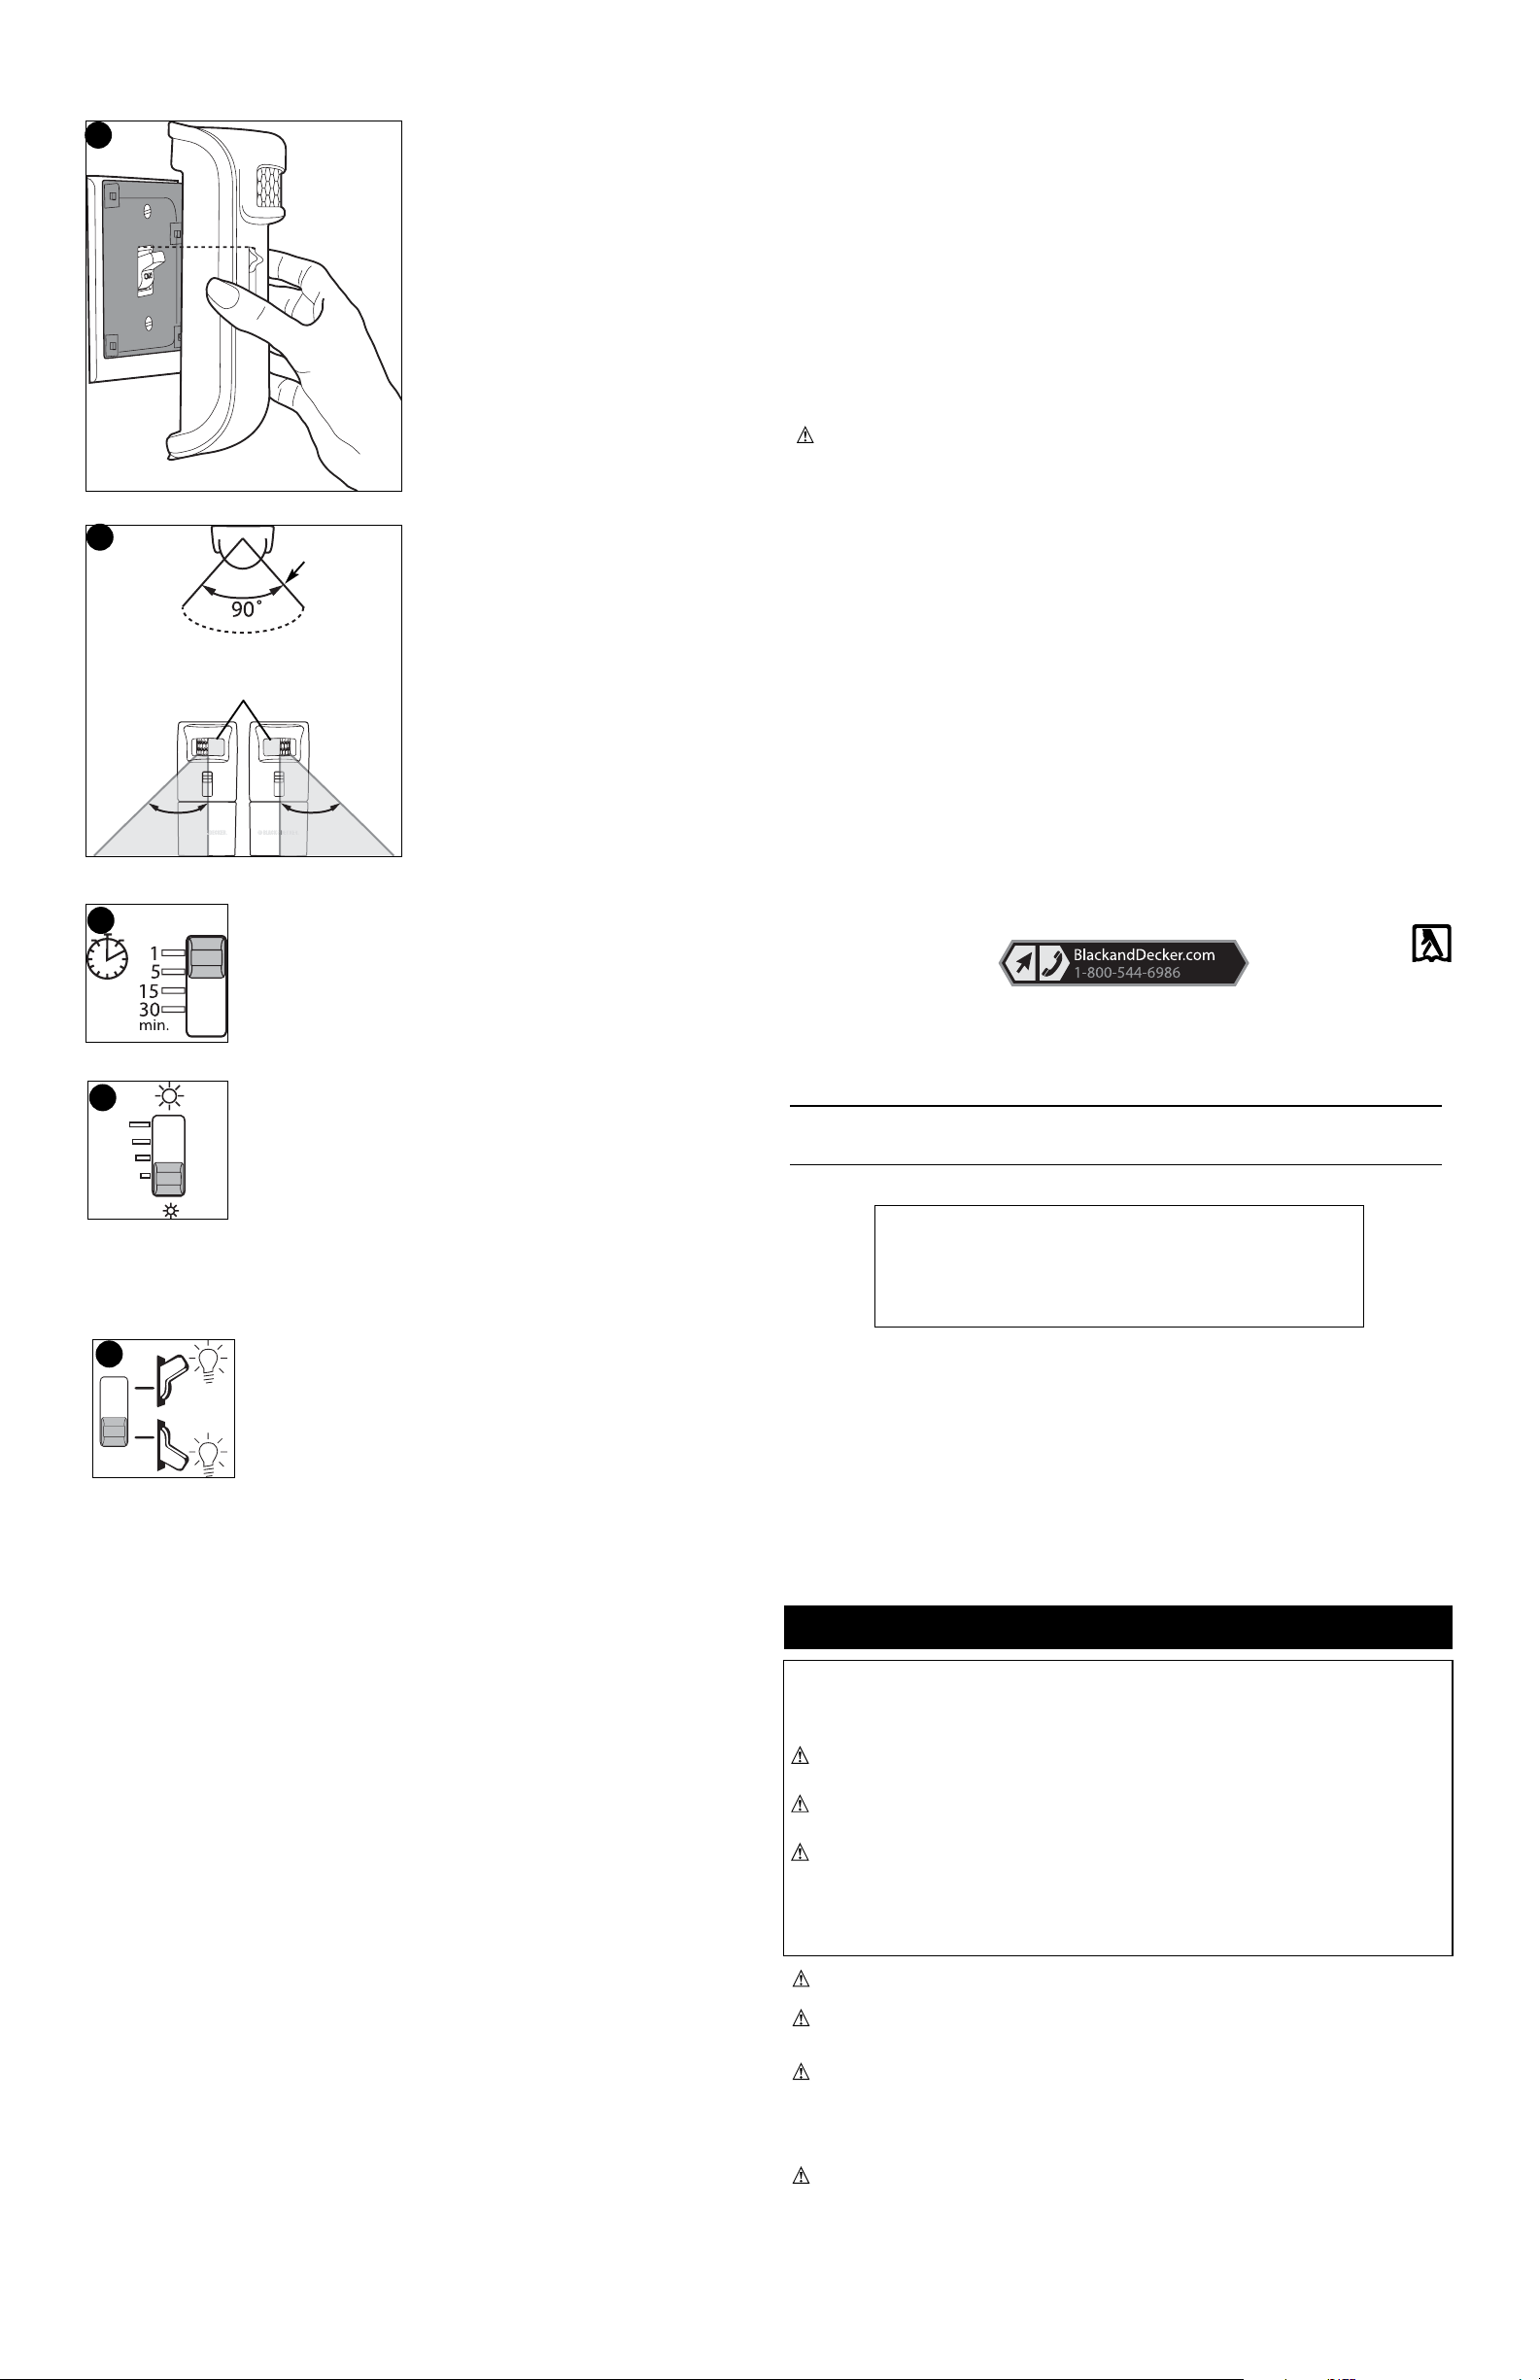
• Make sure that the back of the Auto Switch
is completely flush with the wall.
• Snap the Auto Switch onto the mounting
plate fingers as shown in figure 4.
NOTE: The Auto Switch will not operate if the
light switch and the Auto Switch are not
aligned as shown before installation.
Set the Field of View
• The field of view of the motion detector (A) is
12 feet (3m) at 90˚.
• Amotion detector shade (B) is provided
should you desire to block the field of view
from the left side or the right side. The shade
snaps in place over either side of the motion
detector as shown in figure 5.
Set the “Lights Out” Time Period
• The motion detector time switch (D) can be set to one of four different
time intervals (figure 6); 1, 5,15 or 30 minutes.
• The time interval selected determines how long you want the lights to
stay on after no motion is detected.
• The lights turn off automatically when there is no motion detected for
the time set on the switch.
NOTE: You might want to use a longer time period for an office where
the occupant might be still for long periods of time.
Set the Ambient Light Level
• The ambient light level switch (E) can be set to one of four different
levels (figure 7).
• If sunlight falling on the Auto Switch is brighter than the switch setting,
the Auto Switch will ignore motion and turn the light off (or not turn the
light on).
• If you want the lights off when there's only a little bit of sunlight, move
the switch to the bottom setting.
• If you want the lights off when there's a lot of sunlight, move the switch
to a higher setting.
• If you want the Auto Switch to ignore ambient light and respond only to motion, move the
switch to the top setting.
NOTE: Extremely bright room lighting can also cause the Auto Switch to turn the lights off. If
this happens, move the Light Level switch to a higher setting.
Set the Polarity of the Switch
• Set the polarity switch (G) to match the light switch.
• If the light is turned on by moving the switch up, set the polarity
switch to the upper position.
• If the light is turned on by moving the switch down, set the polarity
switch to the lower position.
Operating Instructions
Turning on the Auto Switch
• Turn on the Auto Switch by moving the Power Switch (F) to the up position.
• Ared light will blink slowly for 40 seconds while the motion detector (A) calibrates to the
room.
• The mechanism will turn the light on if it is not on already.
NOTE: When the mechanism operates, the motor will continue to run for several
seconds after the light switch flips. This is normal.
• When the red light stops blinking, the unit is ready to operate.
• If the Auto Switch is turned off, you can manually operate the light switch with the manual
On/Off switch (C) on the front of the unit.
Leaving the Room
• The lights turn off automatically when there is no motion detected for the time set on the
timer switch (D).
• If you are leaving the room and want the lights to turn out sooner than the timer would do
it automatically, you can manually flip off the light using the manual On/Off switch (C).
• The motion detector will wait 15 seconds before detecting motion again, so you have
time to leave the room without the lights turning back on by themselves.
Sensor Light
• A red warning light behind the sensor lens will flash rapidly if there's a fault due to weak
batteries, a malfunction, or if the mechanism is not able to move the light switch. The
Auto Switch will be disabled, but you can operate the light switch manually.
• Replace batteries.
• If there's still a fault, remove from the wall.
Troubleshooting
If the red light is flashing rapidly, follow these steps in order:
1.) If you just installed the Auto Switch and it has never operated properly, check that the
light switch is aligned with the Manual On/Off switch (C) on the front of the unit as
shown in Figure 4. Turn the Power Switch (F) off, then on again to reset the unit.
2.) Turn off the power switch (F). Replace the batteries, and turn the power switch back
on. Be sure to use fresh batteries of the same brand and type. The red light will blink
slowly for 40 seconds while the motion sensor calibrates.
3.) If the red light begins to blink rapidly again, try moving the light switch (C ) up and
down manually. The switch should flip up and down with reasonable force.
4.) If the light switch (C ) does not move easily, remove the Auto Switch from the wall.
5.) Inspect the wall light switch. If you have difficulty flipping the wall light switch up and
down, the switch may be faulty. Have a qualified electrician check or replace the switch.
6.) If the wall light switch operates normally, test the Auto Switch operation while it is
disconnected from the wall. Turn the power switch (F) off and then on again. The red
light will blink slowly for 40 seconds while the motion sensor calibrates.
If the Auto Switch operates normally when disconnected from the wall switch, try using
it on a switch that is easier to operate. Some light switches in older homes (more than
50 years old) may require too much force for the Auto Switch to operate.
5
SHADE, MASQUE, PANTALLA
12 feet (3m)
If the Auto Switch does not operate and the red light blinks rapidly, call the Black and
Decker help line at 1-800-544-6986.
There are no user serviceable parts inside except for the batteries. Always insert
batteries correctly with regard to polarity (+ and -), marked on the battery and the
equipment.
For assistance with your product, visit our website www.blackanddecker.com for the
location of the service center nearest you or call the BLACK & DECKER help line at
1-800-544-6986.
Maintenance
Use only mild soap and damp cloth to clean the tool. Never let any liquid get inside the tool;
never immerse any part of the tool into a liquid.
IMPORTANT: To assure product SAFETY and RELIABILITY, repairs, maintenance and
adjustment (other than those listed in this manual) should be performed by authorized
service centers or other qualified service personnel, always using identical replacement parts.
Accessories
Recommended accessories for use with your tool are available from your local dealer or
authorized service center. If you need assistance regarding accessories, please call:
1-800-544-6986.
WARNING: The use of any accessory not recommended for use with this tool could
be hazardous.
Service Information
All Black & Decker Service Centers are staffed with trained personnel to provide customers
with efficient and reliable power tool service. Whether you need technical advice, repair, or
genuine factory replacement parts, contact the Black & Decker location nearest you. To find
your local service location, refer to the yellow page directory under "Tools—Electric" or call:
1-800-544-6986 or visit www.blackanddecker.com
Full Two-Year Home Use Warranty
Black & Decker (U.S.) Inc. warrants this product for two years against any defects in
material or workmanship. The defective product will be replaced or repaired at no charge in
either of two ways.
The first, which will result in exchanges only, is to return the product to the retailer from
whom it was purchased (provided that the store is a participating retailer). Returns should
be made within the time period of the retailer’s policy for exchanges (usually 30 to 90 days
after the sale). Proof of purchase may be required. Please check with the retailer for their
specific return policy regarding returns that are beyond the time set for exchanges.
The second option is to take or send the product (prepaid) to a Black & Decker owned or
authorized Service Center for repair or replacement at our option. Proof of purchase may
be required. Black & Decker owned and authorized Service Centers are listed under "Tools-
Electric" in the yellow pages of the phone directory and on our website
www.blackanddecker.com.
This warranty does not apply to accessories. This warranty gives you specific legal rights
and you may have other rights which vary from state to state. Should you have any
questions, contact the manager of your nearest Black & Decker Service Center. This
product is not intended for commercial use.
FREE WARNING LABEL REPLACEMENT: If your warning labels become illegible or are
missing, call 1-800-544-6986 for a free replacement.
See ‘Tools-
Electric’
– Yellow Pages –
for Service &
Sales
Imported by
Black & Decker (U.S.) Inc.,
701 E. Joppa Rd.
Towson, MD 21286 U.S.A.
LIGNES DIRECTRICES EN MATIÈRE DE SÉCURITÉ - DÉFINITIONS
Il est important que vous lisiez et compreniez ce mode d’emploi. Les informations qu’il
contient concernent VOTRE SÉCURITÉ et visent à ÉVITER TOUT PROBLÈME. Les
symboles ci-dessous servent à vous aider à reconnaître cette information.
DANGER : Indique une situation dangereuse imminente qui, si elle n’est pas évitée,
causera la mort ou des graves blessures.
AVERTISSEMENT : Indique une situation potentiellement
dangereuse qui, si elle n’est pas évitée, pourrait causer la mort ou de graves blessures.
MISE EN GARDE : Indique une situation potentiellement dangereuse qui, si elle n’est pas
évitée, pourrait causer des blessures mineures ou modérées.
MISE EN GARDE : Utilisé sans le symbole d’alerte à la sécurité, indique une situation
potentiellement dangereuse qui, si elle n’est pas évitée, peut résulter en des dommages à la
propriété.
AVERTISSEMENT : afin de réduire le risque de blessures, l’utilisateur doit lire et
comprendre le mode d’emploi.
AVERTISSEMENT : pour réduire le risque de décharge électrique, retirer ce dispositif et
couper le circuit de dérivation lors de tout travail sur le commutateur ou l’appareil
d’éclairage.
AVERTISSEMENT : ne pas utiliser dans un circuit dont le commutateur commande une
prise murale.
• N’utiliser qu’avec des commutateurs à bascule.
• Pour un usage intérieur seulement.
• Ne pas utiliser là où l’appareil d’éclairage est commandé par plus d’un commutateur (un
commutateur « trois voies »).
AVERTISSEMENT : risque d’incendie ou de brûlures. Les piles peuvent exploser ou
couler et causer des blessures ou un incendie. Pour réduire ce risque :
• Respecter attentivement toutes les directives et tous les avertissements apposés sur
l’étiquette et l’emballage des piles.
• Toujours insérer les piles en respectant les polarités (+ et -) indiquées sur la pile et le matériel.
N° de catalogue SW100
Commutateur automatique
Lights Out™
6
7
8
Merci d’avoir choisi Black & Decker!
Consulter le site Web
www.BlackandDecker.com/NewOwner
pour enregistrer votre nouveau produit.
À
LLIIRREE AAVVAANNTT DDEE RREETTOOUURRNNEERR CCEE PPRROODDUUIITT
PPOOUURR QQUUEELLQQUUEE RRAAIISSOONN QQUUEE CCEE SSOOIITT ::
Si des questions ou des problèmes surgissent après l’achat d’un produit Black & Decker,
consulter le site Web
HTTP://WWW.BLACKANDDECKER.COM/INSTANTANSWERS
Si la réponse est introuvable ou en l’absence d’accès à Internet, composer le
1-800-544-6986 de 8 h à 17 h HNE, du lundi au vendredi, pour parler avec un agent.
Prière d’avoir le numéro de catalogue sous la main lors de l’appel.
pour obtenir des réponses instantanément 24 heures par jour.
MODE D’EMPLOI
CONSERVER CE MANUEL POUR UN USAGE ULTÉRIEUR.
4
 Loading...