


JS700L
OO
OO
rr
rr
bb
bb
ii
ii
tt
tt
aa
aa
ll
ll
AA
AA
cc
cc
tt
tt
ii
ii
oo
oo
nn
nn
//
//
SS
SS
cc
cc
rr
rr
oo
oo
ll
ll
ll
ll
ii
ii
nn
nn
gg
gg
JJ
JJ
ii
ii
gg
gg
SS
SS
aa
aa
ww
ww
ww
ww
ii
ii
tt
tt
hh
hh
LL
LL
aa
aa
ss
ss
ee
ee
rr
rr
INSTRUCTION MANUAL
Catalog Number JS700L
SSAAVVEE TTHHIISS MMAANNUUAALL FFOORR FFUUTTUURREE RREEFFEERREENNCCEE..
VVEEAA EELL EESSPPAAÑÑOOLL EENN LLAA CCOONNTTRRAAPPOORRTTAADDAA..
INSTRUCTIVO DE OPERACIÓN, CENTROS DE SERVICIO Y PÓLIZA DE
GARANTÍA. ADVERTENCIA:
LÉASE ESTE INSTRUCTIVO ANTES DE USAR EL PRODUCTO.
CAT. NO. JS700L FORM NO. 490525-00 Copyright Black & Decker © 2005 (SEPT. 05) Printed in China
General Safety Rules
WARNING! Read all instructions. Failure to follow all instructions listed below may
result in electric shock, fire and/or serious injury. The term “power tool” in all of the
warnings listed below refers to your mains-operated (corded) power tool or
battery-operated (cordless) power tool.
SAVE THESE INSTRUCTIONS
1) WORK AREA SAFETY
a) Keep work area clean and well lit.
Cluttered or dark areas invite accidents.
b) Do not operate power tools in explosive atmospheres, such as in the presence of
flammable liquids, gases or dust.
Power tools create sparks which may ignite the dust
or fumes.
c) Keep children and bystanders away while operating a power tool.
Distractions can
cause you to lose control.
2) ELECTRICAL SAFETY
a) Power tool plugs must match the outlet. Never modify the plug in any way. Do not
use any adapter plugs with earthed (grounded) power tools.
Unmodified plugs and
matching outlets will reduce risk of electric shock.
b) Avoid body contact with earthed or grounded surfaces such as pipes, radiators,
ranges and refrigerators.
There is an increased risk of electric shock if your body is
earthed or grounded.
c) Do not expose power tools to rain or wet conditions.
Water entering a power tool will
increase the risk of electric shock.
d) Do not abuse the cord. Never use the cord for carrying, pulling or unplugging the
power tool. Keep cord away from heat, oil, sharp edges or moving parts.
Damaged
or entangled cords increase the risk of electric shock. Replace or repair damaged cords.
Make sure your extension cord is in good condition. Use only 3-wire extension cords that
have 3-prong grounding-type plugs and 3-pole receptacles that accept the tool’s plug.
e) When operating a power tool outdoors, use an extension cord suitable for outdoor
use.
Use of a cord suitable for outdoor use reduces the risk of electric shock. When
using an extension cord, be sure to use one heavy enough to carry the current your prod-
uct will draw. An undersized cord will cause a drop in line voltage resulting in loss of
power and overheating. The following table shows the correct size to use depending on
cord length and nameplate ampere rating. If in doubt, use the next heavier gage. The
smaller the gage number, the heavier the cord.
Minimum Gage for Cord Sets
Volts Total Length of Cord in Feet
120V 0-25 26-50 51-100 101-150
240V 0-50 51-100 101-200 201-300
Ampere Rating
More Not more AWG
Than Than
0- 6 18 16 16 14
6 - 10 18 16 14 12
10 - 12 16 16 14 12
12 - 16 14 12 Not Recommended
3) PERSONAL SAFETY
a) Stay alert, watch what you are doing and use common sense when operating a
power tool. Do not use a power tool while you are tired or under the influence of
drugs, alcohol or medication.
A moment of inattention while operating power tool may
result in serious personal injury.
b) Use safety equipment. Always wear eye protection.
Safety equipment such as dust
mask, non-skid safety shoes, hard hat, or hearing protection used for appropriate
conditions will reduce personal injuries.
c) Avoid accidental starting. Ensure the switch is in the off-position before plugging
in.
Carrying power tools with your finger on the switch or plugging in power tools that
have the switch on invites accidents.
d) Remove any adjusting key or wrench before turning the power tool on.
A wrench or
a key left attached to a rotating part of the power tool may result in personal injury.
e) Do not overreach. Keep proper footing and balance at all times.
This enables better
control of the power tool in unexpected situations.
f) Dress properly. Do not wear loose clothing or jewelry. Keep your hair, clothing and
gloves away from moving parts.
Loose clothes, jewelry or long hair can be caught in
moving parts. Air vents often cover moving parts and should also be avoided.
g) If devices are provided for the connection of dust extraction and collection
facilities, ensure these are connected and properly used.
Use of these devices can
reduce dust-related hazards.
4) POWER TOOL USE AND CARE
a) Do not force the power tool. Use the correct power tool for your application.
The
correct power tool will do the job better and safer at the rate for which it was designed.
b) Do not use the power tool if the switch does not turn it on and off.
Any power tool
that cannot be controlled with the switch is dangerous and must be repaired.
c) Disconnect the plug from the power source and/or the battery pack from the
power tool before making any adjustments, changing accessories, or storing
power tools.
Such preventive safety measures reduce the risk of starting the power
tool accidentally.
d) Store idle power tools out of the reach of children and do not allow persons
unfamiliar with the power tool or these instructions to operate the power tool.
Power tools are dangerous in the hands of untrained users.
e) Maintain power tools. Check for misalignment or binding of moving parts,
breakage of parts and any other condition that may affect the power tools
operation. If damaged, have the power tool repaired before use.
Many accidents
are caused by poorly maintained power tools.
f) Keep cutting tools sharp and clean.
Properly maintained cutting tools with sharp
cutting edges are less likely to bind and are easier to control.
g) Use the power tool, accessories and tool bits etc., in accordance with these
instructions and in the manner intended for the particular type of power tool,
taking into account the working conditions and the work to be performed.
Use of
the power tool for operations different from those intended could result in a hazardous
situation.
5) SERVICE
a) Have your power tool serviced by a qualified repair person using only identical
replacement parts.
This will ensure that the safety of the power tool is maintained.
b) If the replacement of the supply cord is necessary,
this has to be done by the
manufacturer or his agent in order to avoid a safety hazard
.
Specific Safety Rules
• Hold tool by insulated gripping surfaces when performing an operation where the
cutting tool may contact hidden wiring or its own cord.
Contact with a "live" wire will
make exposed metal parts of the tool "live" and shock the operator.
• Keep hands away from cutting area.
Never reach underneath the material for any
reason. Hold front of saw by grasping the contoured gripping area. Do not insert fingers
or thumb into the vicinity of the reciprocating blade and blade clamp. Do not stabilize the
saw by gripping the shoe.
• Keep blades sharp.
Dull blades may cause the saw to swerve or stall under pressure.
• When cutting pipe or conduit ensure that they are free from water, electrical wiring,
etc.
WARNING: Some dust created by power sanding, sawing, grinding, drilling, and
other construction activities contains chemicals known to cause cancer, birth
defects or other reproductive harm. Some examples of these chemicals are:
• lead from lead-based paints,
• crystalline silica from bricks and cement and other masonry products, and
• arsenic and chromium from chemically-treated lumber (CCA).
Your risk from these exposures varies, depending on how often you do this type of
work. To reduce your exposure to these chemicals: work in a well ventilated area, and
work with approved safety equipment, such as those dust masks that are specially
designed to filter out microscopic particles.
• Avoid prolonged contact with dust from power sanding, sawing, grinding, drilling,
and other construction activities. Wear protective clothing and wash exposed
areas with soap and water.
Allowing dust to get into your mouth, eyes, or lay on the
skin may promote absorption of harmful chemicals.
WARNING: Use of this tool can generate and/or disperse dust, which may cause
serious and permanent respiratory or other injury.
Always use NIOSH/OSHA
approved respiratory protection appropriate for the dust exposure. Direct particles
away from face and body.
CAUTION: Wear appropriate hearing protection during use.
Under some
conditions and duration of use, noise from this product may contribute to hearing loss.
WARNING:
This product contains chemicals, including lead, known to the State of
California to cause cancer, and birth defects or other reproductive harm. Wash hands
after handling.
The label on your tool may include the following symbols.
V................volts A ............amperes
Hz..............hertz W............watts
min ............minutes alternating current
..........direct current
n
o ..........no load speed
............
Class II Construction
..........
earthing terminal
..............safety alert symbol .../min ........revolutions or
reciprocations per minute
mW............milliwatts nm ............wavelength in nanometers
II ................Class II Laser
SAFETY INSTRUCTIONS - LASERS
DANGER: Laser Radiation, avoid direct eye exposure, serious eye injury can result.
• Do not use optical tools such as a telescope or transit to view the laser beam.
• Position the laser so unintentional eye contact will be avoided.
• Do not operate the laser around children or allow children to operate the laser.
• Do not disassemble. Modifying the product in any way can increase the risk of laser
radiation.
WARNING: Use of controls or adjustments or performance of procedures other than those
specified in this manual may result in hazardous laser radiation exposure.
• Do not adjust the laser on the saw unit, when the saw is plugged in.
• Do not operate in explosive atmospheres, such as in the presence of flammable liquids,
gases, or dust.
• Use only with the specifically designated batteries in laser. Use of any other batteries may
create a risk of fire.
• Store idle product out of reach of children and other untrained persons. Lasers are
dangerous in the hands of untrained users.
• Use only accessories that are recommended by the manufacturer for your model.
Accessories that may be suitable for one laser, may create a risk of injury when used on
another laser.
• Repairs and servicing MUST be performed by a qualified repair facility. Repairs performed
by unqualified personnel could result in serious injury.
• Do not remove or deface warning labels. Removing labels increases the risk of exposure to
radiation.
• For indoor use only.
• This product is intended for use in a temperature range of 41°F(5°C) - 104°F(40°C).
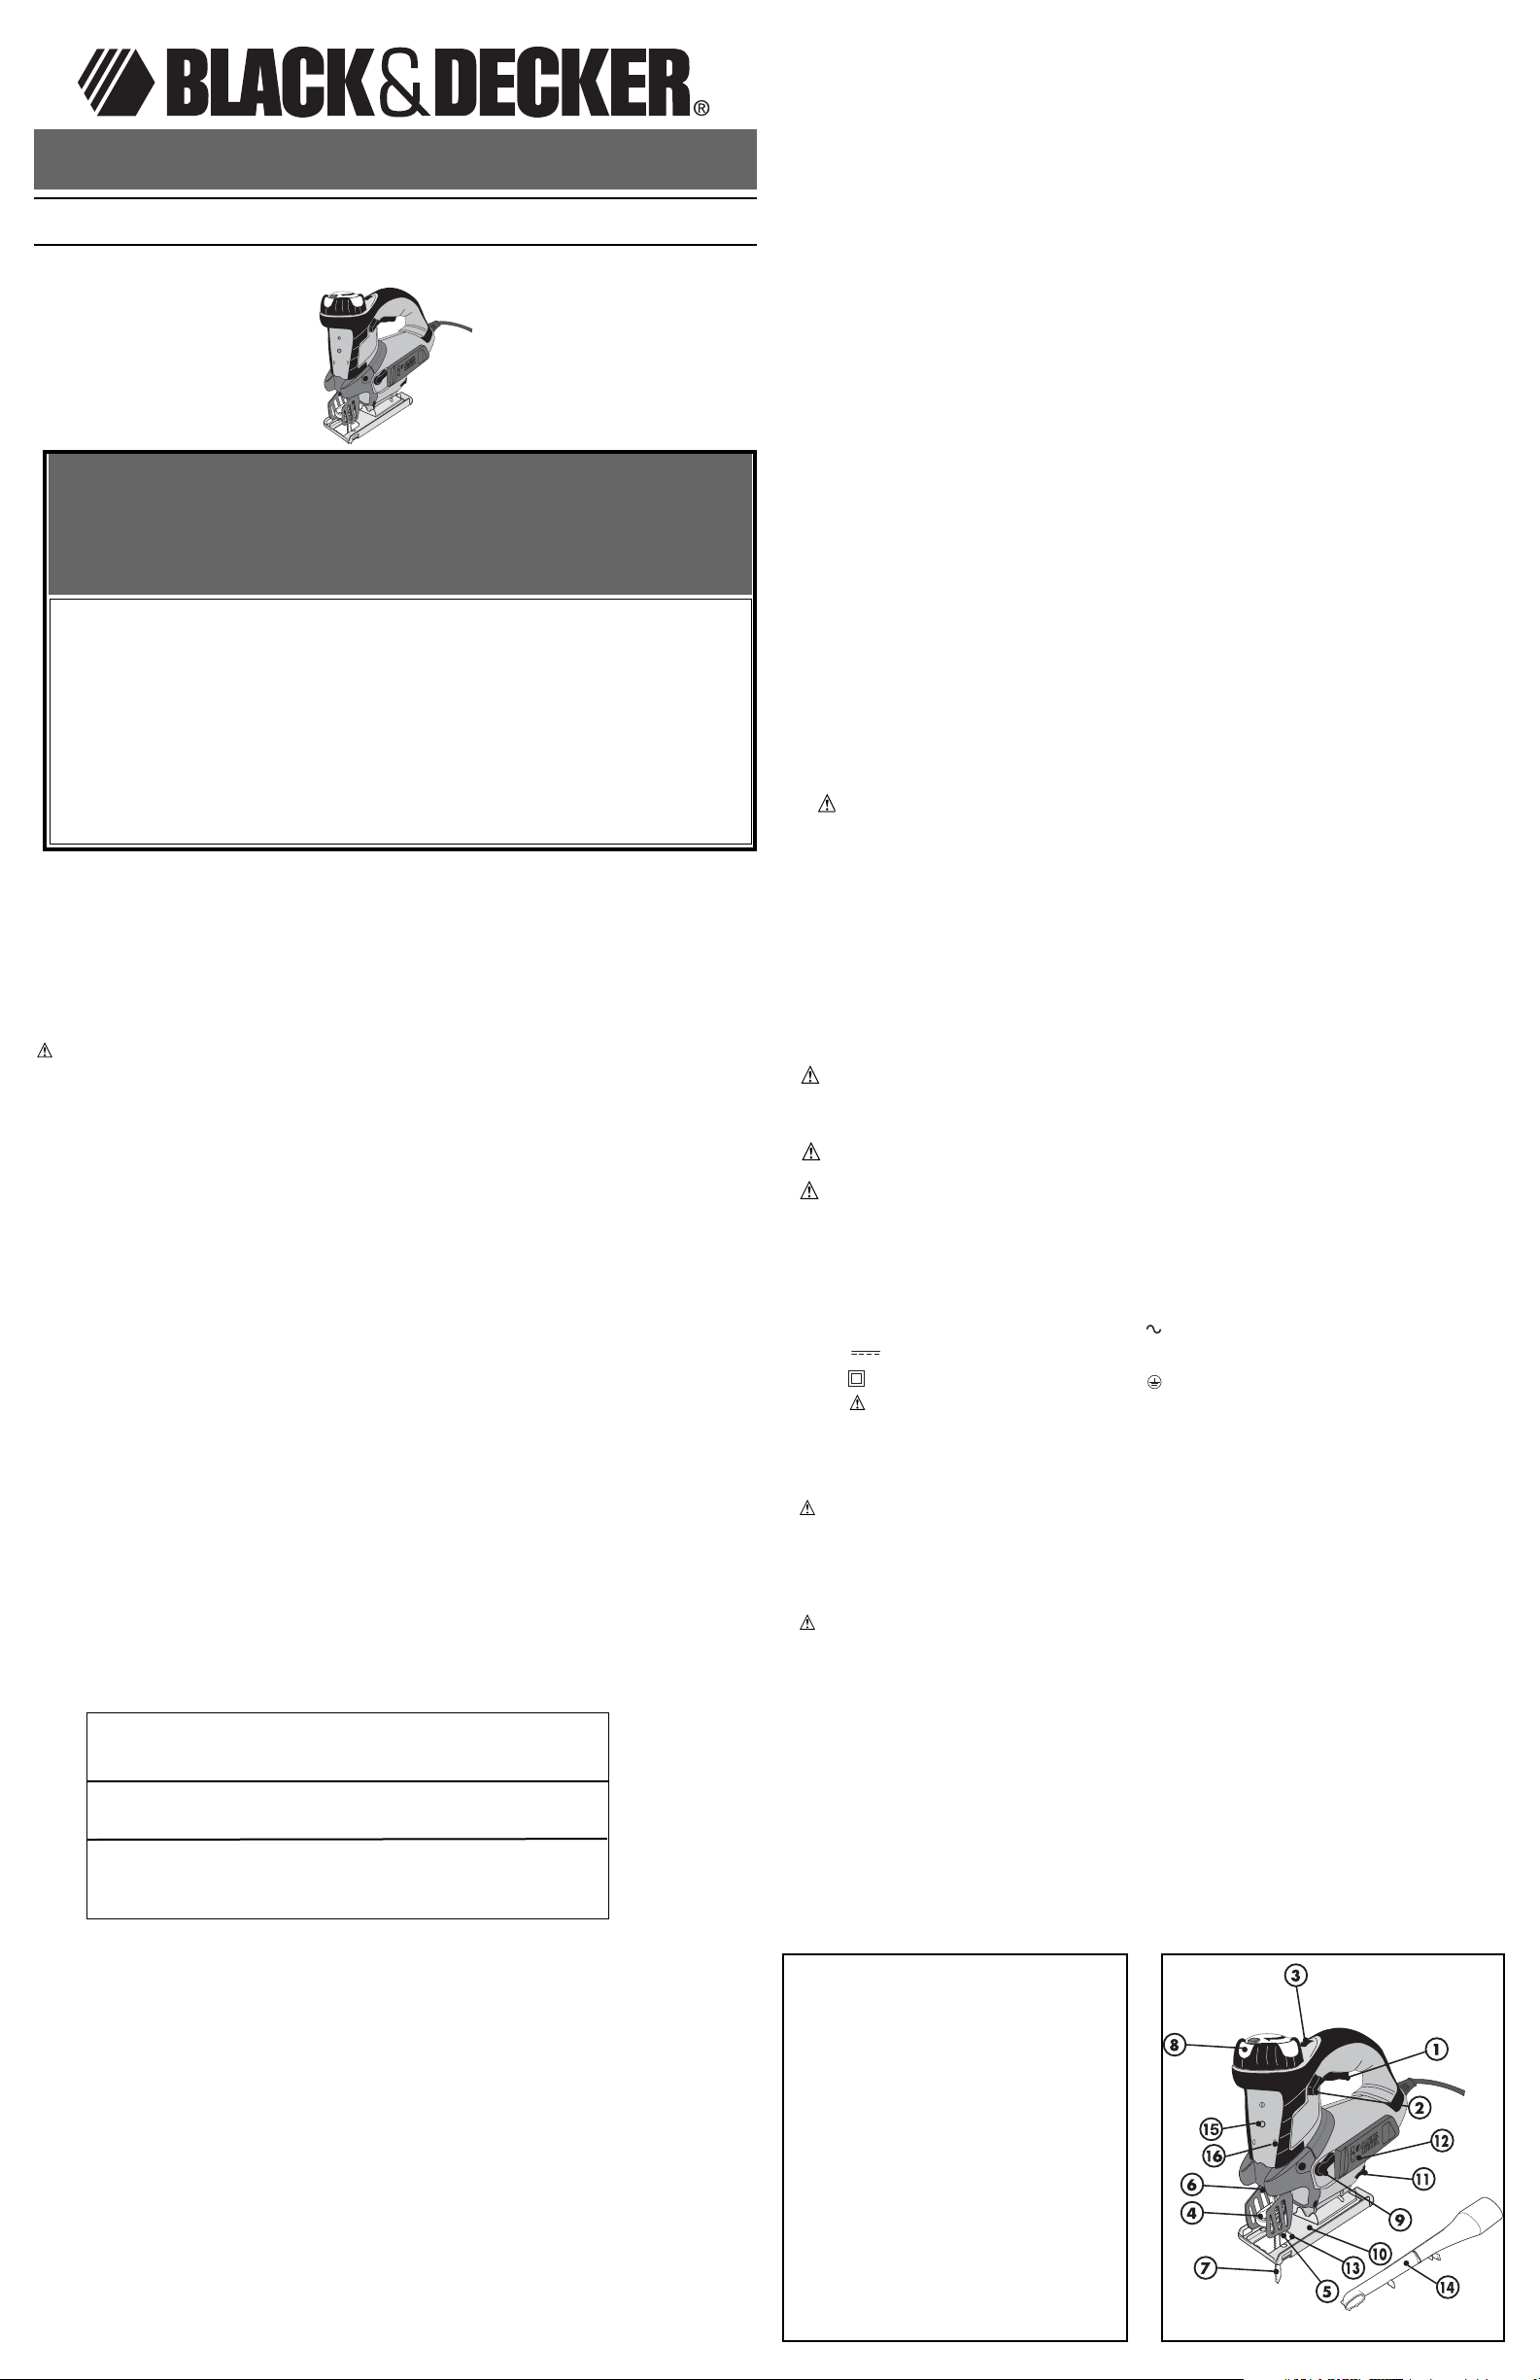
Features - JS700L
1. Jig Saw On/Off switch
2. Lock-on button
3. Variable Speed control knob
4. Saw blade clamp
5. AccuCut
TM
saw blade support roller
6. Support roller adjustment screw
7. Saw blade
8. Scroller knob
9. Mode selector
10. Shoe plate
11. Shoe plate locking knob
12. Saw blade storage compartment
13. Dust blower
14. Dust extraction adaptor
15. Laser On/Off switch
16. Laser adjustment screw
LASER
LASER
BEFORE RETURNING THIS PRODUCT
FOR ANY REASON PLEASE CALL
1-800-544-6986
IF YOU SHOULD EXPERIENCE A PROBLEM
WITH YOUR BLACK & DECKER PRODUCT,
CCAALLLL 11--880000--554444--66998866
BEFORE YOU CALL, HAVE THE FOLLOWING INFORMATION AVAILABLE, CATALOG No.,
TYPE No., AND DATE CODE. IN MOST CASES, A BLACK & DECKER REPRESENTATIVE CAN
RESOLVE THE PROBLEM OVER THE PHONE. IF YOU HAVE A SUGGESTION OR COMMENT,
GIVE US ACALL. YOUR FEEDBACK IS VITAL TO BLACK & DECKER.
Motor
Be sure your power supply agrees with nameplate marking. 120 Volts AC only means
your tool will operate on standard 60 Hz household power. Do not operate AC tools on DC.
A rating of 120 volts AC/DC means that you tool will operate on standard 60 Hz AC or DC
power. This information is printed on the nameplate. Lower voltage will cause loss of power
and can result in over-heating. All Black & Decker tools are factory-tested; if this tool does
not operate, check the power supply.
SAVE THESE INSTRUCTIONS
Assembly
WARNING: Sharp blade. To prevent accidental operation, turn off and unplug saw
before performing the following operations. Failure to do this could result in serious
personal injury.
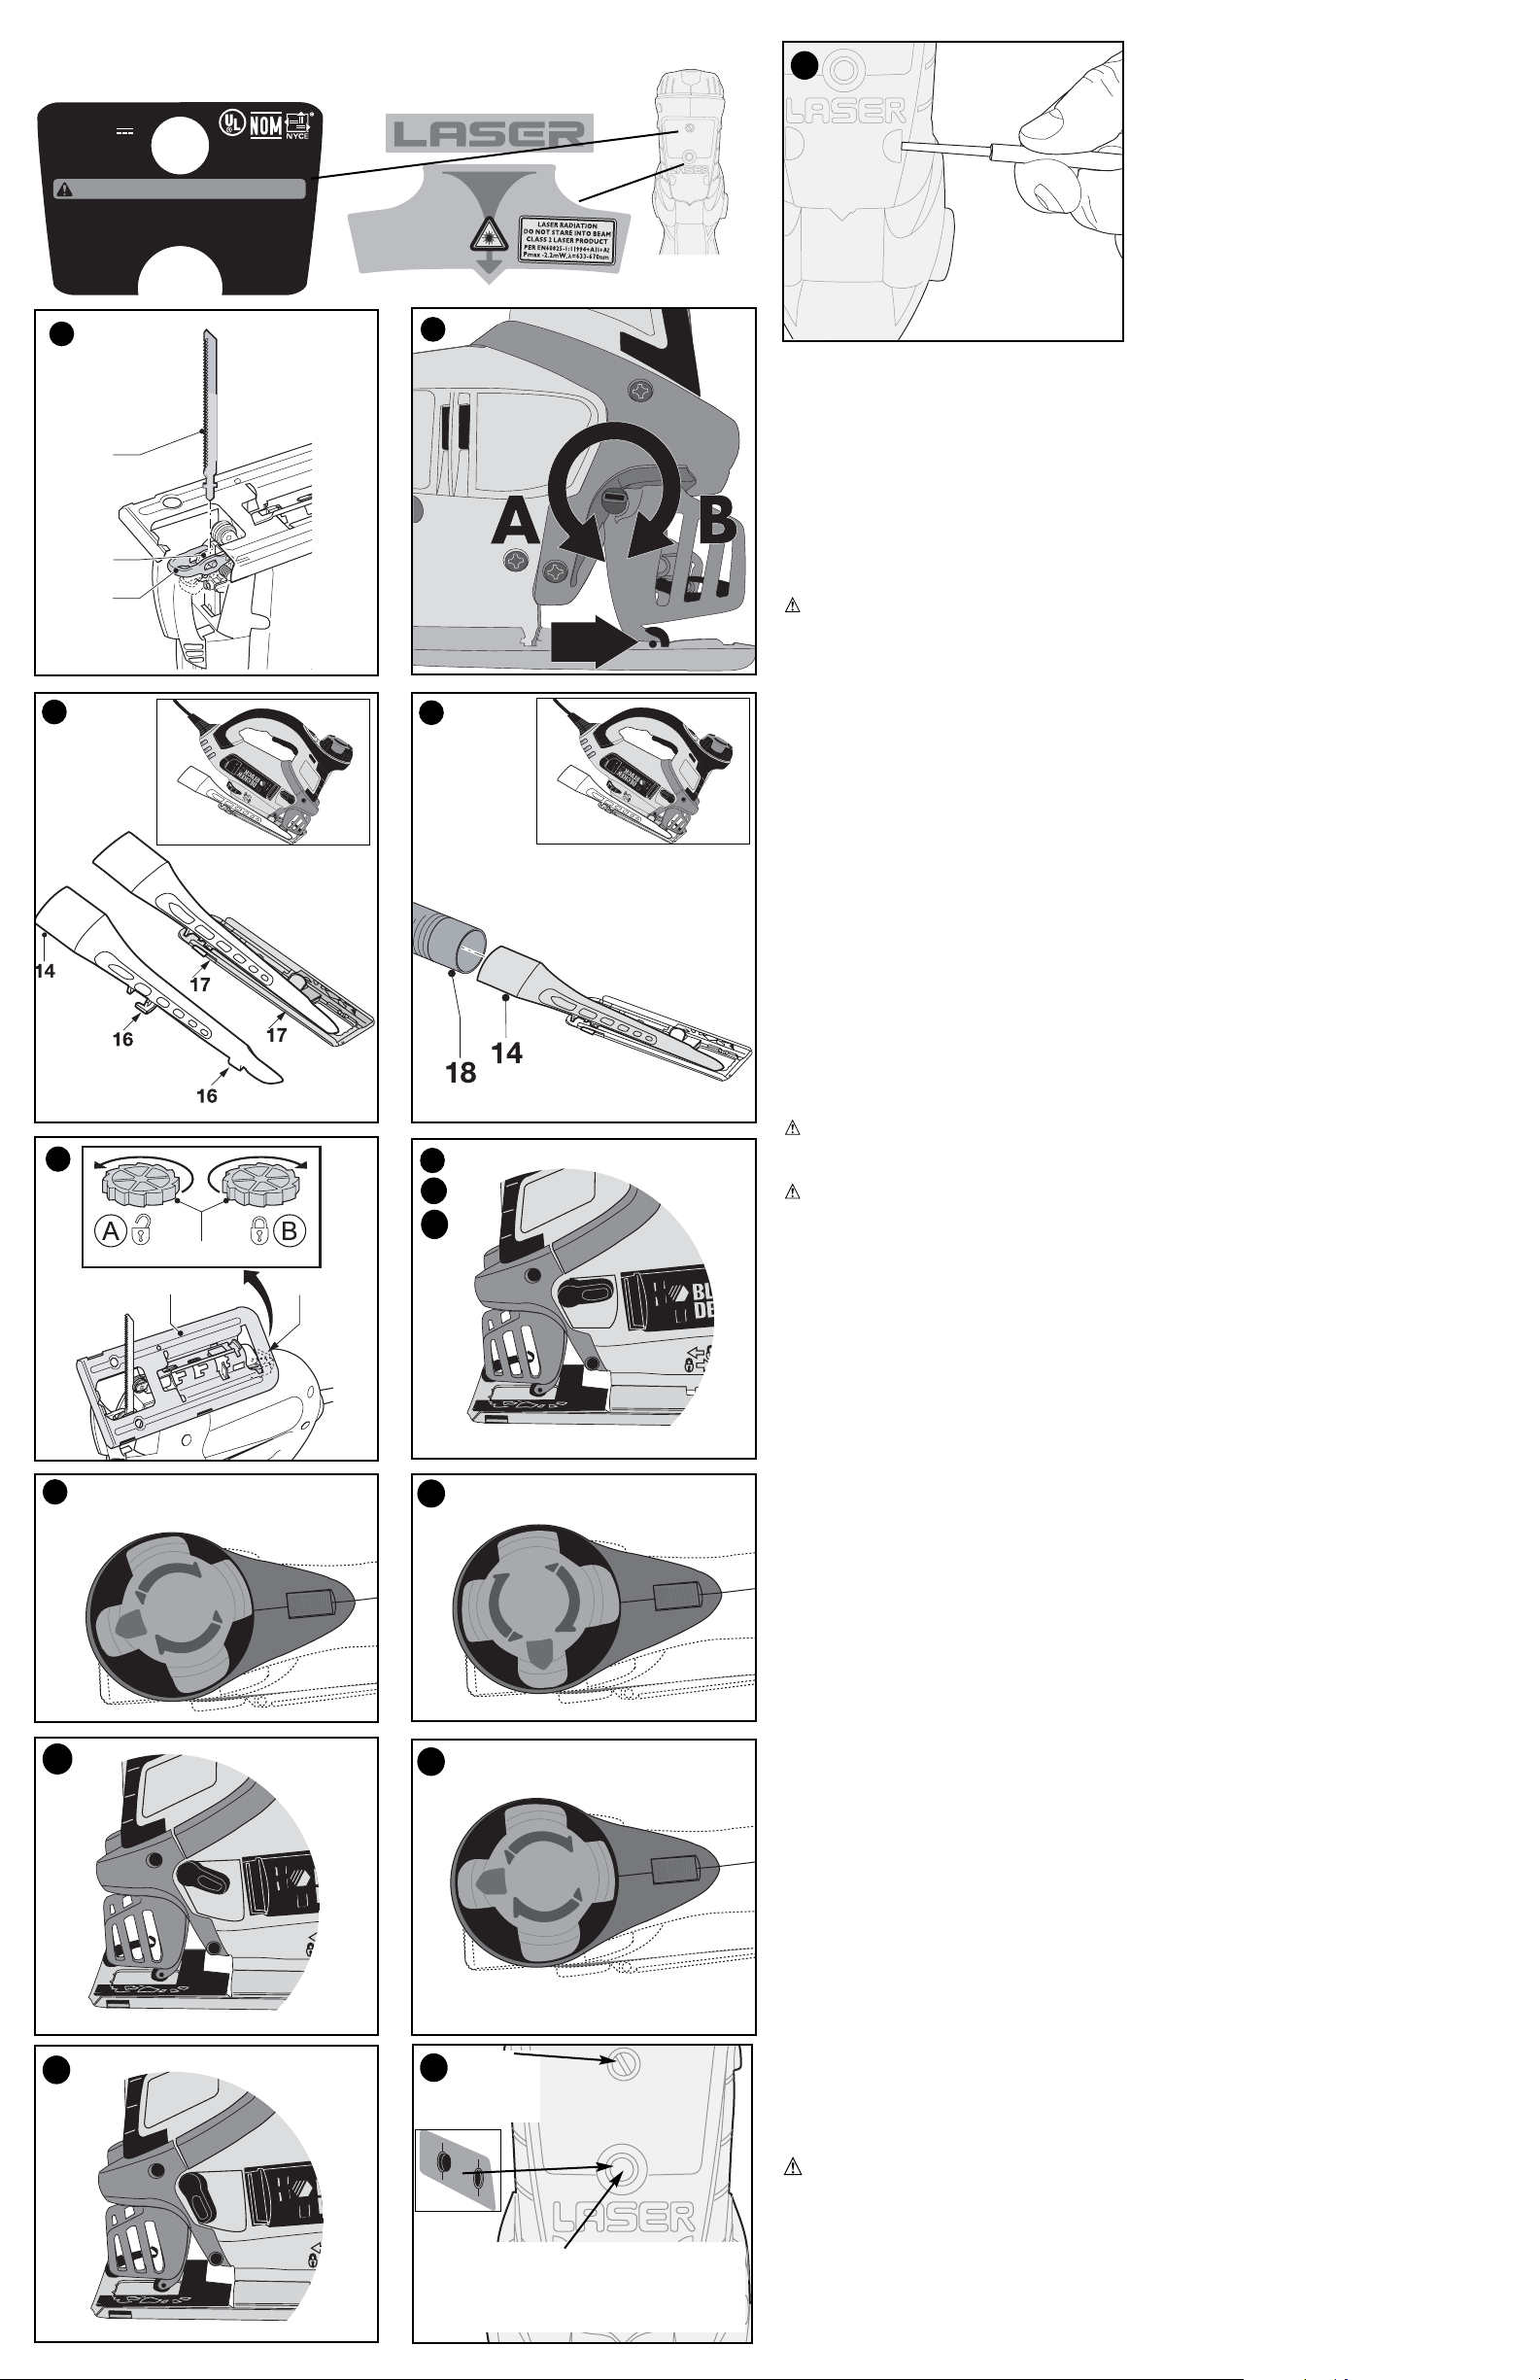
Fitting the saw blade (fig. A)
- Hold the saw blade (7) as shown, with teeth facing forward.
- Push the lever (4) downwards.
- Insert the shank of the saw blade into the blade holder (15) as far as it will go.
- Release the lever.
- Adjust the blade support roller as described below.
AccuCut
TM
blade support roller (fig. B)
After fitting the blade, you need to adjust the blade support roller (5).
Screwdriver Method
- Turn the slotted blade support adjustment screw (6) in direction A.
- Slide the blade support roller against the rear of the blade. The blade must locate
in the central recess of the roller.
- Turn the blade support adjustment screw in direction B to lock the blade support in place.
Tool Free Method
- The blade support roller can be adjusted in a “tool free” manner, by turning the scrolling
knob (8) so that the adjustment screw is rotated around to the front of the unit where it can
be turned by hand.
Connecting a vacuum cleaner to the tool (fig. C & D)
- Align the dust extraction adaptor (14) with the saw shoe as shown.
- Insert the ribs (16) into the slots (17).
- Pull the adaptor towards the rear of the jigsaw to secure.
- Connect the vacuum cleaner hose (18) (not supplied) to the adaptor.
- Dust extraction is not possible when making bevel cuts.
WARNING: Fire Hazard. Do not use vacuum adapter when cutting metal. Metal
filings will be hot and could cause a fire in the vacuum container.
Operating the Jig Saw
WARNING: Laceration Hazard. To prevent loss of control, never use the tool when
the saw shoe is loose or removed. Failure to do this could result in serious personal injury.
Adjusting the shoe plate for bevel cuts (fig. E)
The shoe plate can be set to a left or right bevel angle of up to 45°.
- Turn the locking knob (11) in direction A to release the shoe plate (10).
- Pull the shoe plate (10) backwards and set it to the required angle. You can use the
scale or a protractor to check the angle.
- Turn the locking knob (11) in direction B to lock the shoe plate in place.
To reset the shoe plate for straight cuts:
- Turn the locking knob (11) in direction A to release the shoe plate (10).
- Pull the shoe plate backwards and set it to an angle of approximately 0.
- Push the shoe plate forward.
- Turn the locking knob (11) in direction B to lock the shoe plate in place. Make sure that
the shoe plate is supported by the guide ribs.
Variable speed control
- Set the variable speed control knob (3) to the required speed range. Use a high speed
for wood, medium speed for aluminum and PVC and low speed for metals other than
aluminum.
Switching On and Off
- To switch the tool on, press the on/off switch (1).
- For continuous operation, press the lock-on button (2) and release the on/off switch.
- To switch the tool off, release the on/off switch. To switch the tool off, when in continuous
operation, press the on/off switch once more and release it.
Using the mode selector
The mode selector (9) can set in 3 positions
1. Scrolling position (figs F and G) - this position allows the scroller knob (8) to be
rotated for intricate and accurate sawing. (In this position there is no orbital action.)
It is recommended to use scroller blades when in this mode.
2. Straight cutting position (figs Ha, Hb and Hc ) this position turns off orbital action and
locks the scroller knob to prevent its rotation. The scroller knob can be locked in any
of 4 positions for straight cutting.
Method of engagement:
a. Turn the Mode Selector to the scrolling position.
b. Rotate the scroller knob to the desired position (this can be any of 4 positions -
the blade can point forwards, reverse, left or right).
c. Turn the Mode Selector to the neutral position. (In this position the Scroller Knob
cannot be turned).
3. Orbital Action Position (figs Ia, Ib and Ic) - this position switches on the orbital action
for fast and efficient straight cuts. This mode can only be selected with the blade
pointing forwards.
Method of engagement:
a. Turn the mode selector to the scrolling position.
b. Rotate the scroller knob to point the blade forwards.
c. Turn the Mode Selector to the orbital position. (In this position the Scroller Knob
cannot be turned).
Operating the Laser
Installing the batteries
Detach the laser from the jig saw by removing the screw shown in figure J and pulling laser
forward. Insert 2 fresh 1.5 volt AAA alkaline batteries making sure to match (+) and (-)
terminals correctly. Reattach the laser.
WARNING: Batteries can explode, or leak, and can cause injury or fire. To reduce this
risk:
• Carefully follow all instructions and warnings on the battery label and package. • Always
insert batteries correctly with regard to polarity (+ and -), marked on the battery and the
equipment. • Do not short battery terminals. • Do not charge batteries. • Do not mix old
and new batteries. Replace all of them at the same time with new batteries of the same
brand and type. • Remove dead batteries immediately and dispose of per local codes. •
Do not dispose of batteries in fire. • Keep batteries out of reach of children. • Remove bat-
teries if the device will not be used for several months.
11
10
11
E
max
6
max
6
F
G
Hb
max
6
Hc
Ib
Ha
Ia
Ic
J
15
4
7
A
B
C
D
K
COMPLIES
WITH 21CFR
PARTS 1040.10 AND
1040.11 EXCEPT FOR
DEVIATIONS PURSUANT
TO LASER NOTICE NO.50,
DATED JULY 26,2001.
588808-01 Made in China
Type 1 3V DC
Use with compatible
B&D Jig Saws.
Pats. Pend.
1-800-54-HOW-TO
Black & Decker (U.S.) Inc.,
Towson, MD 21286 U.S.A.
LISTED
406A
WARNING
/
ADVERTENCIA
/
AVERTISSEMENT
To reduce the risk of injury,
user must read and
understand instruction
manual. Use (2) AAA
size alkaline batteries.
À titre préventif,
lire le guide.
Para reducir el riesgo de
lesiones, el usuario debe
leer y entender el
manual de
instrucciones.
Utilice (2) baterías
alcalinas AAA.
ON/OFF
For your convenience and safety, the following labels are on the laser.
Pour plus de commodité et de sécurité, les étiquettes suivantes sont apposées sur le laser.
Para su comodidad y seguridad, el láser incluye las siguientes etiquetas.
Laser On/Off Button
Bouton marche/arrêt du laser
Botón de encendido/apagado del láser
Screw
Vis
Tornillo
ON
OFF

NO DE CAT. JS700L
SS
SS
CC
CC
II
II
EE
EE
SS
SS
AA
AA
UU
UU
TT
TT
EE
EE
UU
UU
SS
SS
EE
EE
DD
DD
ÉÉ
ÉÉ
FF
FF
II
II
LL
LL
AA
AA
NN
NN
TT
TT
EE
EE
//
//
ÀÀ
ÀÀ
FF
FF
OO
OO
NN
NN
CC
CC
TT
TT
II
II
OO
OO
NN
NN
NN
NN
EE
EE
MM
MM
EE
EE
NN
NN
TT
TT
OO
OO
RR
RR
BB
BB
II
II
TT
TT
AA
AA
LL
LL
AA
AA
VV
VV
EE
EE
CC
CC
LL
LL
AA
AA
SS
SS
EE
EE
RR
RR
AA
AA
VV
VV
AA
AA
NN
NN
TT
TT
DD
DD
EE
EE
RR
RR
EE
EE
TT
TT
OO
OO
UU
UU
RR
RR
NN
NN
EE
EE
RR
RR
LL
LL
EE
EE
PP
PP
RR
RR
OO
OO
DD
DD
UU
UU
II
II
TT
TT
PP
PP
OO
OO
UU
UU
RR
RR
QQ
QQ
UU
UU
EE
EE
LL
LL
QQ
QQ
UU
UU
EE
EE
RR
RR
AA
AA
II
II
SS
SS
OO
OO
NN
NN
QQ
QQ
UU
UU
EE
EE
CC
CC
EE
EE
SS
SS
OO
OO
II
II
TT
TT
,,
,,
CC
CC
OO
OO
MM
MM
PP
PP
OO
OO
SS
SS
EE
EE
RR
RR
LL
LL
EE
EE
11
11
88
88
00
00
00
00
55
55
44
44
44
44
--
--
66
66
99
99
88
88
66
66
Règles de sécurité générales
AVERTISSEMENT! Lire toutes les directives. Tout manquement aux directives
suivantes pose des risques de choc électrique, d’incendie et/ou de blessure grave.
Le terme « outil électrique » dans tous les avertissements ci-après se rapporte à
votre outil électrique à alimentation sur secteur (avec fil) ou par piles (sans fil).
CONSERVER CES DIRECTIVES
1) SÉCURITÉ DU LIEU DE TRAVAIL
a) Tenir la zone de travail propre et bien éclairée.
Les endroits sombres sont souvent
des causes d'accidents.
b) Ne pas faire fonctionner d’outils électriques dans un milieu déflagrant, soit en
présence de liquides inflammables, de gaz ou de poussière.
Les outils électriques
produisent des étincelles qui peuvent enflammer la poussière ou les vapeurs.
c) Éloigner les enfants et les curieux au moment d’utiliser un outil électrique. Une
distraction pourrait vous en faire perdre la maîtrise.
2) SÉCURITÉ EN MATIÈRE D’ÉLECTRICITÉ
a) Les fiches des outils électriques doivent correspondre à la prise. Ne jamais
modifier la fiche en aucune façon.
Ne jamais utiliser de fiche d’adaptation avec un
outil électrique mis à la terre. Le risque de choc électrique sera réduit par l’utilisation de
fiches non modifiées correspondant à la prise.
b) Éviter tout contact physique avec des surfaces mises à la terre comme des
tuyaux, des radiateurs, des cuisinières et des réfrigérateurs.
Le risque de choc
électrique est plus élevé si votre corps est mis à la terre.
c) Ne pas exposer les outils électriques à la pluie ou à d'autres conditions où il
pourrait être mouillé.
La pénétration de l’eau dans un outil électrique augmente le
risque de choc électrique.
d) Ne pas utiliser abusivement le cordon d’alimentation. Ne jamais utiliser le cordon
pour transporter, tirer ou débrancher un outil électrique. Tenir le cordon éloigné
de la chaleur, de l’huile, des bords tranchants ou des pièces mobiles.
Les cordons
endommagés ou emmêlés augmentent les risques de choc électrique. Remplacer ou
réparer les cordons endommagés. S’assurer que la rallonge est en bon état. Utiliser
uniquement une rallonge à 3 fils pourvue d'une fiche de mise à la terre à 3 lames et une
prise à 3 fentes correspondant à la fiche.
e) Pour l’utilisation d’un outil électrique à l’extérieur, se servir d’une rallonge
convenant à une telle utilisation.
L’utilisation d’une rallonge conçue pour l’extérieur
réduit les risques de choc électrique. Lorsque qu’une rallonge électrique est utilisée,
s’assurer d’en utiliser une de calibre suffisamment élevé pour assurer le transport du
courant nécessaire au fonctionnement de votre appareil. Un cordon de calibre inférieur
causera une chute de tension de ligne et donc une perte de puissance et une
surchauffe. Le tableau suivant indique le calibre approprié à utiliser selon la longueur du
cordon et l’intensité nominale de la plaque signalétique. En cas de doute, utiliser le
calibre suivant le plus gros. Plus le numéro de calibre est petit, plus le cordon est lourd.
3) SÉCURITÉ PERSONNELLE
a) Être vigilant, surveiller le travail effectué et faire preuve de jugement lorsqu’un
outil électrique est utilisé. Ne pas utiliser d’outil électrique en cas de fatigue ou
sous l’influence de drogues, d’alcool ou de médicaments.
Un moment d’inattention,
durant l’utilisation d’un outil électrique, peut se solder par des blessures graves.
b) Utiliser un équipement de sécurité. Toujours porter une protection oculaire.
L’utilisation d’un équipement de sécurité comme un masque anti-poussières, des
chaussures antidérapantes, un casque de sécurité ou des protecteurs auditifs lorsque la
situation le requiert réduira les risques de blessures corporelles.
c) Attention de ne pas mettre en marche l’outil accidentellement. S’assurer que
l’interrupteur est en position d’arrêt avant tout branchement.
Transporter un outil
électrique alors que le doigt est sur l’interrupteur ou brancher un outil électrique alors
que l’interrupteur est en position de marche risque de causer un accident.
d) Retirer toute clé de réglage ou clé standard avant de démarrer l’outil.
Une clé
standard ou une clé de réglage attachée à une partie pivotante peut causer des
blessures.
e) Ne pas trop tendre les bras. Conserver son équilibre en tout temps.
Cela permet
de mieux maîtriser l’outil électrique dans les situations imprévues.
f) S’habiller de manière appropriée. Ne pas porter de vêtements amples ni de
bijoux. Maintenir cheveux, vêtements et gants éloignés des pièces mobiles.
Les
vêtements amples, bijoux ou cheveux longs pourraient s'enchevêtrer dans les pièces
mobiles. Se tenir éloigné des évents puisque ces derniers pourraient camoufler des
pièces mobiles.
g) Si des composants sont fournis pour le raccordement de dispositifs de
dépoussiérage et de ramassage, s’assurer que ceux-ci sont bien raccordés et
utilisés.
L’utilisation de ces dispositifs peut réduire les risques engendrés par les
poussières.
4) UTILISATION ET ENTRETIEN D’UN OUTIL ÉLECTRIQUE
a) Ne pas forcer un outil électrique. Utiliser l’outil électrique approprié à
l’application.
L’outil électrique approprié effectuera un meilleur travail, de façon plus
sûre et à la vitesse pour laquelle il a été conçu.
b) Ne pas utiliser un outil électrique dont l’interrupteur est défectueux.
Tout outil
électrique dont l’interrupteur est défectueux est dangereux et doit être réparé.
c) Débrancher la fiche du secteur ou le bloc-piles de l’outil électrique avant de faire
tout réglage ou changement d’accessoire, ou avant de ranger l’outil électrique.
Ces mesures préventives réduisent les risques de démarrage accidentel de l’outil
électrique.
d) Ranger les outils électriques hors de la portée des enfants, et ne permettre à
aucune personne n’étant pas familière avec un outil électrique (ou son manuel
d’instruction) d’utiliser ce dernier.
Les outils électriques deviennent dangereux entre
les mains d’utilisateurs inexpérimentés.
e) Entretenir les outils électriques. Vérifier les pièces mobiles pour s’assurer
qu’elles sont bien alignées et tournent librement, qu’elles sont en bon état et ne
sont affectées par aucun trouble susceptible de nuire au bon fonctionnement de
l’outil électrique.
En cas de dommage, faire réparer l’outil électrique avant toute
nouvelle utilisation. Beaucoup d’accidents sont causés par des outils électriques mal
entretenus.
“Transporting batteries can possibly cause fires if the battery terminals inadvertently come
in contact with conductive materials such as keys, coins, hand tools and the like. The US
Department of Transportation Hazardous Material Regulations (HMR) actually prohibit
transporting batteries in commerce or on airplanes (i.e. packed in suitcases and carryon
luggage) UNLESS they are properly protected from short circuits. So when transporting
individual batteries, make sure that the battery terminals are protected and well insulated
from materials that could contact them and cause a short circuit.”
On Board Laser
Your saw is equipped with a removable laser which is turned on and off separately from the
jig saw. Laser is compatible with JS700L jig saw.
WARNING: NEVER aim the beam at a workpiece with a reflective surface. Bright
shiny reflective sheet steel or similar reflective surfaces are not recommended for laser use.
Reflective surfaces could direct the beam back toward the operator.
DANGER: LASER RADIATION. AVOID DIRECT EYE EXPOSURE. Do not stare into
the laser light source. Never aim light at another person or object other than the
workpiece. Laser light can damage your eyes.
WARNING: DO NOT use tinted glasses to enhance the laser light. Tinted glasses will
reduce overall vision for the application and interfere with the normal operation of the tool.
Switching the laser On and Off
To turn the laser on, press in on the button shown in figure J. To turn the laser off, press the
button a second time.
Adjusting the laser side to side
NOTE: Laser is intended to be a cutting aid and does not guarantee a precise cut.
Use laser adjustment screw shown in figure K to align laser line with saw blade if needed.
WARNING: DO NOT adjust the laser when the jig saw is plugged in.
WARNING: Laser circuit will reduce output visibility (power) of laser when overheated.
Laser may be not visible when saw is overloaded for prolonged period of time. Laser visibility
(power) will gradually return back to normal when tool cools down even if the tool is
unplugged.
WARNING: Do not leave overheated laser ON unattended. Make sure the switch is in the
OFF position as shown in the inset of figure J. Remove the batteries to cut power to the
laser.
Hints for Optimum Use
General
- Use a high speed for wood, a medium speed for aluminum and PVC and a low speed
for metals other than aluminum.
Sawing laminates
As the saw blade cuts on the upward stroke, splintering may occur on the surface closest
to the shoe plate.
- Use a fine-tooth saw blade.
- Saw from the back surface of the workpiece.
- To minimize splintering, clamp a piece of scrap wood or hardboard to both sides of
the workpiece and saw through this sandwich.
Sawing metal
- Be aware that sawing metal takes much more time than sawing wood.
- Use a saw blade suitable for sawing metal.
- When cutting thin metal, clamp a piece of scrap wood to the back surface of the
workpiece and cut through this sandwich.
- Spread a film of oil along the intended line of cut.
WARNING: Fire Hazard. Do not use vacuum adapter when cutting metal. Metal
filings will be hot and could cause a fire in the vacuum container.
Maintenance
Use only mild soap and damp cloth to clean the tool. Never let any liquid get inside the tool;
never immerse any part of the tool into a liquid.
IMPORTANT: To assure product SAFETY and RELIABILITY, repairs, maintenance and
adjustment should be performed by authorized service centers or other qualified service
personnel, always using identical replacement parts.
Accessories
Recommended accessories for use with your tool are available from your local dealer or
authorized service center. If you need assistance regarding accessories, please call:
1-800-544-6986.
WARNING: The use of any accessory not recommended for use with this tool could be
hazardous.
Service Information
Black & Decker offers a full network of company-owned and authorized service locations
throughout North America. All Black & Decker Service Centers are staffed with trained
personnel to provide customers with efficient and reliable power tool service. Whether you
need technical advice, repair, or genuine factory replacement parts, contact the
Black & Decker location nearest you. To find your local service location, refer to the yellow
page directory under "Tools—Electric" or call: 1-800-544-6986.
Full Two-Year Home Use Warranty
Black & Decker (U.S.) Inc. warrants this product for two years against any defects in
material or workmanship. The defective product will be replaced or repaired at no charge in
either of two ways. The first, which will result in exchanges only, is to return the product to
the retailer from whom it was purchased (provided that the store is a participating retailer).
Returns should be made within the time period of the retailer’s policy for exchanges (usually
30 to 90 days after the sale). Proof of purchase may be required. Please check with the
retailer for their specific return policy regarding returns that are beyond the time set for
exchanges.
The second option is to take or send the product (prepaid) to a Black & Decker owned or
authorized Service Center for repair or replacement at our option. Proof of purchase may be
required. Black & Decker owned and authorized Service Centers are listed under
"Tools–Electric" in the yellow pages of the phone directory.
This warranty does not apply to accessories. This warranty gives you specific legal rights
and you may have other rights which vary from state to state. Should you have any
questions, contact the manager of your nearest Black & Decker Service Center.
This product is not intended for commercial use.
Free Warning Label Replacement: If your warning labels become illegible or are missing,
call 1-800-544-6986 for a free replacement.
See ‘Tools-Electric’
– Yellow Pages –
for Service & Sales
Imported by
Black & Decker (U.S.) Inc.,
701 E. Joppa Rd.
Towson, MD 21286 U.S.A.
TECHNICAL SPECIFICATIONS OF LASER:
Laser diode wavelength: 633-670nm (red color)
Laser Class: Class II
Working Range: Up to 6 inches (152mm) line span (depends on light
conditions)
Batteries: 2 AAA alkaline (included)
Voltage: 3 Volts
Operating temperature: 41°F (5°C) - 104° F (40°C)
Calibre minimum pour les rallonges
Volts Longueur totale du cordon en pieds
120 V 0-25 26-50 51-100 101-150
240 V 0-50 51-100 101-200 201-300
Intensité nominale
Plus Pas plus Calibrage américain normalisé des fils (AWG)
de de
0 - 6 18 16 16 14
6 - 10 18 16 14 12
10 - 12 16 16 14 12
12 - 16 14 12 Non recommandé
 Loading...