


List of contents
This User’s Manual provides you assistance during the installation and use of plasma screen. Detailed descriptions and drawings as well as the user-friendly on-screen illustrations in the user’s manual makes installation and use easier even for the new users. The contents of this User’s Manual may be altered without prior notification due to technical improvements. Always make sure that you use the latest version of this user’s manual.
Important Considerations to Follow: ..................... |
4-5 |
Safety Warnings........................................................... |
6 |
Product Description:................................................... |
7 |
Special Features:......................................................... |
8 |
Start ........................................................................................... |
9 |
Connecting the mains lead...................................................... |
10 |
Opening the plasma screen, batteries, operation modes ........ |
11 |
Control Unit ............................................................................. |
12 |
Remote Control.......................................................... |
13 |
Initial power on and settings performance............................... |
14 |
Setting up the television .......................................................... |
15 |
Automatic search..................................................................... |
15 |
Manual search.................................................................... |
16-17 |
Program arrangement ............................................................. |
18 |
TV settings:................................................................ |
19 |
Sound Menu ............................................................................ |
19 |
Sound features ........................................................................ |
19 |
Picture menu ........................................................................... |
20 |
Features menu ................................................................... |
21-22 |
Teletext features:.................................................. |
23-24 |
External equipment connections:....................... |
25-30 |
Error analysis and recovery:............................... |
31-32 |
Technical specifications table:................................. |
33 |
ENGLISH -3-

Important Considerations to Follow:
So that a case which endangers your health does not occur during contracted use, read and pay attention to the notes on safety . The errors made during installation and connecting may harm the device or the subsequent respective devices.
Always keep the instructions for use ready. Follow the instructions on the device and in the user’s manual.
• General references
Please read the general considerations on safety and user’s manual in detail before connecting the plasma screen. Only by this way you can use all the functions safely and securely.
Keep the user’s manual as close to the device as possible to search for information. Follow the instructions on the device and in the user’s manual. Never let the children use the electrical devices unattended.
• Use
The plasma TV you have purchased has the highest quality codes and standards possible in this business line. This plasma TV contains a mass comprising of pixels. A pixel comprises of three elements (red, green and blue). Despite the fact that the highest quality check practices have been used during the manufacture of screens, that some pixels or pixel elements are faulty cannot be excluded 100%. These faults may occur as continuously lighted pixels, unlighted pixels or unbalanced pixels (flashing).
Therefore, we beg your understanding, stating that these faults are not covered by guarantee. This is applicable so long as the total of all the faulty pixels or pixel elements do not exceed the 0.01% of the total number. The brightness and contrast of plasma screen decreases in time. Plasma screens are phosporus based and in some operating conditions “Burning” effect may occur. This is actually the natural deterioration of phosphorus and an ordinary course in plasma technology.
The operating conditions mentioned above are:
-displaying static images for long durations
-displaying the same background continuously
-using a format other than full screen (e.g. 4:3) for long durations.
When burning occurs, it is usually not correctable.
Please follow the below listed recommendations to avoid or decrease burning effect:
-For the first 100 hours of use, please use the animated pictures or constantly moving still pictures in full screen mode (slide show).
-Please use your plasma TV in full screen mode (16:9)
-In case the plasma screen is used as a PC monitor,
please use animated pictures.
Always turn the screen off when not in use.
-Reduce contrast and brightness as far as possible.
-If possible, display the images with maximum color profundity and scale.
Certain situations may cause a buzzing sound in the electronics of the screen. This usually results from the fact that the grounded cables of the main electric supply are different. A method to solve this problem is inserting a filter between the antenna cable and antenna input. These filters are available at all specialist commercial stores. If the plasma screen is connected to an external antenna, it should be grounded to protect it from electrical dangers and static discharges. Grounding should be in compliance with the legal regulations in implementation and be performed accordingly.
•Environmental Conditions
Never use the plasma screen in the environmental conditions different from the technical data. Different conditions endangers the device and may cause fire or fault.
Protect the plasma screen from humidity. This refers to high moisture, closeness to water, water drops and water splashes as well as rain. Do not put any container full of water (e.g. a vase) on the device.
Protect the device from heat. Keep away from flames, heating devices, ovens or continuous direct sunlight.
Protect the screen against heat accumulation. Do not cover the ventilation holes. In horizontal position, keep min.10 cm above and below ventilation holes to furniture and ceiling and 4 cm from the sides and the back. Do not cover the device with veils. The screen has been designed to be mounted to wall or equipments in horizontal position.
•Network Connection
Network input and network key is located on the back side. The network input is located on the upper right and the network key is located on the upper middle. To connect the screen to network voltage, the network key should be switched off and the network cable should be removed from the network input module.
Connect the plasma screen to a socket the grounding contacts has been arranged according to the regulations and the main voltage to a socket in compliance with the technical data of the device. Make sure that the network plug and socket are always in an accessible position. Insert the mains lead so that no one gets tripped. Only use the supplied mains lead. Protect it against any damages and do not make any modifications on it. Never use a damaged mains lead.
ENGLISH -4-

•Signal Inputs
Always shut down the plasma screen and signal supply before establishing any connections between two devices.
•Disorders
In case there is any damage in the mains lead or the device, remove the power lead from the socket immediately. Under no circumstances do you dismantle and/or rapair the device by yourself. Instead, contact our Service Support Line or another professional workshop.
•Batteries
When swallowed, the batteries pose fatal danger. Therefore, you should keep the batteries away from the reach of little children. If a batter is swallowed, immediately seek medical assistance. Immediately remove the used up batteries from the remote control since they may leak and consequently cause damage.
The batteries supplied with the device should not be recharged or utilized in any other way, be divided into pieces, thrown into fire or shorted.
DISCONNECT THE TV COMPLETELY, SHUT OFF THE NETWORK OUTLET AND REMOVE THE MAINS LEAD.
Used up batteries should not be disposed of with the normal household waste. Batteries should be disposed of in waste collection points designed for this purpose.
•Cleaning and Maintenance
Switch odd the device before cleaning and remove the mains lead from the socket. Wait for a few minutes for the capasitors in the device to discharge. Use a soft damp cloth for cleaning. You should avoid chemical solutions and cleaning agents, since they will damage the surfaces.
•The plasma screen creates internal high voltage for gas discharge. Power off during installation, maintenance and repair and disconnect the power cable from the plug. Wait for a few minutes for the capasitors in the device to discharge.
•In case foreign substances such as water, fluids, metal fragments, etc. enters into the device, immediately disconnect the mains lead. Never attempt to touch anything in the device with any object. There is the danger of electric shock or accident.
•If an odd smell is emitted or abnormal noises are heard from the device, immediately disconnect the mains lead. If the no image is displayed in the screen after switching on or during use, do the same. In such a case, never attempt to continue operating the screen.
•In case of long terms of disuse or thunderstorm, pull out the mains lead from the socket the antenna plug from the antenna socket.
•Never connect or disconnect the mains lead with your hands wet. Never switch on the network key with wet hands.
•Only use the supplied mains lead. Protect it against any damages and do not make any modifications on it. Never use a damaged mains lead.
•The plasma screen has a glass surface. In case the device is exposed to overload (e.g. shake, vibration, twist or heat shock), the glass surface may get broken. Do not expose the glass surface to any pressure or shake. In case the glass gets broken, disconnect the mains lead and do not touch the glass with naked hands.
•When switched to stand-by mode, the plasma screen remains connected to the network.
To cut the connection completely, you should switch the network key to 0 position or pull out the mains lead from the plug.
•For ergonomic reasons, it is recommended that you avoid using red or blue fonts or symbols on dark backgrounds. Such an image may cause illegibility due to low contrast and tires the eyes early. Therefore, use high contrast images like black font on white background.
•Pay attention to loudspeaker output technical data during the connection of external speakers. In case the loudspeakers are wrong-sized, the loudspeaker and/or internal amplifier may be damaged.
•Now, the unnecessary packs and packaging sources are recyclable and must always be recycled.
•Place the cardboard vertically, bottom side on a firm ground. You may recognize the upper part from the direction of the arrows on the longitudinal side.
•Plasma screen may only be mounted on the vertical (upright) walls with the assembling unit. Make sure that the screen is switched off and the mains lead and signal cable have been disconencted from their plugs.
The background should be firm and of a structure to carry the load. Material suitable for different wall superstructures such as wooden walls or empty walls should be used. If you have any doubt, contact your authorized sales or service department.
ENGLISH -5-

Safety Warnings!
Your and other people’s safety is important. Therefore, please read the Safety Instructions, before using this TV set.
Safety Instructions
!Please read these safety instructions before using your TV set for the first time.
•Position your TV to prevent the sunlight from directly reflecting on the screen. Excessive light results in loss of colour.
•Place the electric supply or other cables so that they are not stepped on or get caught by the objects placed near them.
•Do not place objects full of liquids like vase or pot near the TV.
•Do not expose the TV to liquids drops or splashes.
•Do not place open fire sources on the TV set like lighted candles.
•Make sure that naked flame sources like candles are not placed on the device.
•Keep away your TV from heat radiating sources such as stove, radiator, furnace, etc.
•Do not push, hit or screw the screen of your product.
•The heat generated in the device goes out from the ventilation holes, so do not cover the receiver with veils, thick fabric, etc., since they may prevent air circulation. Do not place your TV on a carpet or a soft ground.
•Never let the children insert foreign substances in the open sections or slots of your TV.
•Clean the TV screen with a slightly damp cloth or chamois. Never use corrosive cleaning agents like liquid or aerosol cleaners.
•Disconnect mains lead of the device from its plug when cleaning.
•Never pressurize the screen when cleaning.
•Never position your screen on hard objects. Your plasma TV might be damaged.
•If you wish to place the TV on a shelf or a wall unit, leave minimum 10 cm of clearance from 10 the top, sides and back of the TV.
cm • Your TV has been designed to operate in 230 AC; 50Hz voltages. Do not connect your TV
to a power supply other than your TV.
230V
50Hz
•If you are not going to use your TV for a while, please pull the power lead from the wall outlet.
•To completely disconnect the TV, the mains lead is used as disconnecting unit and therefore it is ready for use.
ENGLISH -6-

Product Description
High technology signal processing, cross 106 cm flat 16:9 plasma screen, user friendly, interactive remote control together with an attractive case with a less modular depth represents the new generation info presentation.
Use of the best generation of plasma screens, computer images and presentations as well as high contrast warrants perfect video images. A variety of interconnection alternatives makes integration to existing and new visual systems easier.
•Screen: flat – large – thin (for SD)
The new plasma screen offers a resolution of 852x480 pixels on the 920 mm x 512 mm screen surface. 16.7 millions of colours with a degree of 256 RGB offers limitless colour view and an image screening closest to the original. Enjoy the video and data images on the cross 106 cm screen and admire the depth of only 129 mm.
•Silent
A new type of cooling systems enables the plasma screen to operate without disturbing fan noise. The plasma screen which is as silent as a classical TV provides a new standard for living room and conference room. Approximately 15 dB A of noise level, which is the result of the plasma technology, represents the peak of technology for this moment.
•All in one box
The screen, power supply and image and sound signal processing are supplied in one single box. This makes mounting to wall easier. When it is hanged on the wall like a painting, all its signal inputs and outputs are easily accessible. Both loudspeaker slots offers balanced listening together with external loudspeakers.
•Video / Computer VGA / Music
Large connection capacity PAL/NTSC/SECAM offers video standards (CVBS, RGB and Y/C), multi-standard TV radio (99 TV channels with auto and manual programming), VGA/SVGA and it even contains a 16:9 VGA format with a resolution of 848x480 pixels.
•User Interface
IR remote control and On-Screen Controller (OSD) makes operation quite easy. OSD offers net structured menus for the selection of signal sources, image and sound.
•Digital signal processing
The plasma screen is equipped with the latest signal processing standard with 8 bit technology. It contains features such as active algorithm to offer 4:3 video and data images while the image is frozen on 16:9 screen.
•Under any conditions
The new glass panel has been exposed to thin abrasion on the front side to maintain high contrast rate and superior legibility even in poor illumination conditions.
•Installation: Easy and quick
No matter if the screen has been hanged on a wall or installed on a ground or a table, connection devices for installation are supplied.
•Advantages of digital technique
Digital graphics cards offer superior imaging performances. The plasma screen offers an image performance close to the original with its DVI connection and remains compatible with the previous analogue graphics cards.
•Digital noise silencing
You may activate noise silencing adaptable to movement by means of OSD and set the quality of image materials properly. Automatic noise silencing reduction makes it possible to regenerate the fast moving image components in an inartificial way.
•Full and stable color offer
Superior color offer with exquisite details supports the possibility to adjust gamma. By means of OSD’s, you can adjust the most suitable gamma, colour warmth, contrast and brightness for all entries.
ENGLISH -7-

Television
Thank you for purchasing this television which has been designed to keep you satisfied for a long time.
You may already have knowledge about how to use a television; but still spare some time to read the below instructions.
These instructions have been prepared to gain you knowledge about many new features of this television and enable you to benefit from your purchase in the best way possible.
Special Features
•42” PDP VGA Panel
•Available for Cable Broadcasts
•2x5 W Stereo sound
•2000 pages of teletext Feature
•PIP (Picture in Picture) Feature
•Picture Formats; 4:3, 14:9, 16:9 automatic, letterbox, subtitle, panorama
•Zoom feature
•Wide angle of vision
•Scart, AV connection
•S-VHS and Cinch for S-Video connection
•DVI connection
•PC connection
•Low energy consumption
•AVL
•Programmable power off
•Graphic Equalizer
•The feature of sharpness in colour transitions (CTI)
•Sharpness feature and picture feature (LTI) in the black-white transitions
•A clear Picture made by means of the Digital Comb Filter
•On screen viewing of all settings, program numbers and all the processes
•Manual Fine Tuning
•100 Program memory
•Infrared Remote Control equipped all the functions
•Child Lock
•Feature of viewing the NTSC broadcast to be entered via Scart
•Easy performance of the processes via the advanced menu system.
•Ability to choose 24 different menu languages.
•HDMI feature
•YPBPBR component input
ENGLISH -8-

Start
Your plasma screen was elaborately tested and packed before delivery. It is ready to for use after it has been unpacked. After unpacking the screen, please check for possible forwarding damages and the completeness of the delivery. In case there is a damage resulting from forwarding, the supplier may only meet your demands after you inform about the situation before the first installation.
Attention: Always remove the screen from its package with the help of a second person. Trying to remove the screen from its package by yourself is not good to your health.
Note: Scart, DVI, VGA and RCA cables are not supplied.
The contents of the cardboard box are:
1.plasma screen
2.Remote Control
3.Batteries
4.Mains lead
5.User’s Manual
6.Guarantee Certificate
7.Practical Use Card
If there is any missing component in the package, please call the Service Support Line. The missing part will be sent to you free of charge. Please keep this user’s manual near the installation site to have continuous assistance.
Installation site
A proper installation site must be in compliance with the below criteria:
•Light reflections Avoid installing opposite of windows or other light sources.
•Accessibility to network input Network input and network key must always be easily accessible.
•Ventilation Keep minimum 10 cm clearance from above and below the ventilation holes to the furniture and the ceiling.
•Environment Temperature Safe operation should be between 5ºC and 35ºC.
Starting
There are some procedures you should carry out before turning on your plasma TV.
•During all the procedures to be carried out for starting, turn your plasma screen off and disconnect the power lead from the plug.
1.The connection of signal sources: TELEVISION, VIDEO, COMPUTER
2.Sound playback connection
3.Insert the batteries in the remote control
4.Connect the mains lead
5.Turn the plasma screen on
Inserting the Connection Line
When the connecting or inserting the mains lead and video cable (e.g. SCART, Y/C…) the following points should be taken into consideration:
•Please align the connection lines. Note that signal lines are not placed directly on the surface of the screen.
•For high image quality, use only covered high quality signal cable. To connect video signal, high quality 75 coaxial cable should be used. A signal low-quality signal cable may cause distortions and shadows on the displayed picture as well as exceeding the permissible EMC level. For perfect and safe operation of the device, mechanical interlocks for single plug and outlet sockets are necessary.
•You should also avoid placing signal sources such as computer or video recording device in front of the screen.
Please place these signal sources next to or behind the screen.
•Always turn your plasma television off before connecting any signal source to it.
The Connection of Signal Sources:
Connect the cables of your signal sources to the input panel of your plasma screen.
For external sound signal sources, you need an internal television adjuster antenna cable and a proper cinch cable.
Sound Connection (playback)
Your plasma screen has various sound outputs on the input panel for sound playback. It is possible to connect your music set or Dolby Surround System as well as external loudspeakers to your internal amplifier.
•Turn your plasma screen off before connecting external loudspeakers. Take into consideration the technical data of loudspeakers’ output and make sure that the size of the loudspeakers is sufficient.
•Before establishing a connection between you music set or Dolby Surround system and your plasma screen, always turn the device off.
•The PC connection you will establish on the video divider may deteriorate picture quality for the PC mode.
ENGLISH -9-
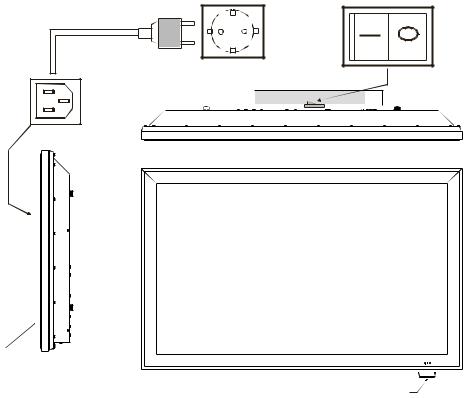
Connecting The Mains Lead
To obtain the best image quality, always use the supplied mains lead.
First insert the mains lead into the input panel and only then plug it into the socket.
•Never ever use a damaged mains lead!
•To ensure safe operation, only use plugs with grounding conductor system.
A line filter and keys ensure safe operation in case of normal network fluctuations to balance the supply voltages. In case the network voltage is out of certain limits, please contact your responsible sales agency. In case the mains lead cannot be used due to the different standards in your country, please make sure to use a mains lead in compliance with the below listed standards unique to countries:
• |
USA |
UL |
• |
Germany |
VDE |
• |
Canada |
CSA |
• |
Switzerland |
SEV |
• |
England |
BASE/BS |
• |
Japan |
MITI |
This is not the exact list. It may be necessary to choose a different safety standard for safety reasons.
To avoid accidents resulting from electric shock, mains leads of all degrees should contain three cable conductors of minimum 10A/0.75 mm2. One of three cables should be applied to the both ends of the mains as grounding contact connection.
Socket |
Network |
|
Input Panel |
|
Input |
|
|
|
|
|
|
|
|
|
|
|
|
|
|
|
On |
Off |
Input Panel (lower)
Network key (Lower side)
User’s display/Infrared sensor
ENGLISH -10-
Turning the Plasma Screen on
You may control your plasma screen with remote control only when the device is in stand-by mode. Switch the network key on the input panel to Position I. The user’s display on the front side of the screen lights red.
•Press a digit key or Program
Up/Program Down key or the
PR+/PR+ or MENU key on the front
7panel of the television to turn the television on. Stand-by indicator turns to green. The picture is displayed on
PR- |
the screen after a few seconds. To |
|
|
PR+ |
switch the television to stand-by mode, |
|
push the Stand-by button. Stand-by |
|
indicator turns to red. |
•Plasma screen is always connected to power supply network in stand-by mode. To cut the connection completely, you should switch the network key to 0 position and disconnect the mains lead from the plug.
•The screen has an electric adaptor and it may be operated with a supply voltage of 230V AC and 50Hz.
Note 1: If there is no broadcast signal, your television will switch to stand-by mode in five minutes.
Note 2: If your remote control has a fault or its batteries have been used up, there are “MENU”
“SOURCE”, “ PROG ”, “ VOL ” front panel buttons to operate it.
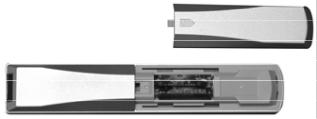
Batteries
To reveal the battery compartment, remove the back cover and make sure that you have inserted the batteries correctly.
The batteries suitable for this remote control are UM- 4, IEC R03 or AAA 1.5V.
Do not mix a used, old battery with a new battery or do not use mixed battery types.
The performance of the remote control will deteriorate from a distance farther than 8 metres or out of an angle of 30 degrees.
Operation Modes
ATTENTION
Note that at the beginning of use, the operation mode should be in full screen format setting especially in the first 100-150 operation hour (see: Displaying of the sub-menu, Picture Format). This prevents differences of brightness on picture areas.
Also, to prevent permanent shadows on the displayed picture, avoid displaying any still images in the first operation hours (computer mode, teletext pages, Photo CD images, etc.). If the plasma television is to be used as computer monitor, it is recommended that you use a screen saver.
Computer mode
For the best image, we recommend 848 x 480, 640 x 480 or 720 x 400 pixel resolution. 848x480 pixel resolution corresponds to the screen matrix and offers the best image. You can obtain the driver for this resolution from the Internet pages of well-known graphic card producers. Unlike the applications in CRT monitors, for a vibration free presentation on flat screens, it is not necessary to select high image reconditioning. 60Hz of reconditioning is recommended.
Video recorder mode
If your recorder offers Y/C (S-Video) format playback, it is recommended to use Y/C (S-Video) inputs to improve image quality. DVD player mode
For the best use, it is recommended to use RGB operation mode connectable to SCART 1 input. In case your player does not offer this operation mode, please use the Y/C (S Video) signal mode.
Image adherence
The manufacturer would like to state that during watching frozen pictures (e.g. computer playback) for long durations, the image remains still visible in full mask for a few minutes when a different source is played afterwards. This is known as “image adherence”. This “lost” image results from the system and it is not an error. Therefore, it is not deemed to be a situation that requires for guarantee.
Video cable
To connect video signal, high quality 75 ? coaxial cable should be used. A signal low-quality signal cable may cause distortions and shadows on the displayed picture as well as exceeding the permissible EMC level. For perfect and safe operation of the device, mechanical interlocks for single plug and outlet sockets are necessary.
ENGLISH -11-

PANEL CONNECTIONS
|
|
|
|
|
|
|
|
1 2 |
|
|
|
|
5 |
|
|
|
|
|
|
|
|
|
|
|
|
|
|
Video |
|
Y |
|
|
|
|
|
|
|
|
|
|
|
Audio In |
|
|
|
|
|
AV-2 |
|
|
|
|
|
Pb |
|
|
|
|
|
|
|
|
|
|
|
L |
|
|
|
|
|
|
|
AV-1 |
|
|
|
|
|
|
|
3 |
|
|
|
ANT-IN |
|
|
|
|
|
PC-IN |
PC-DVI |
||
|
|
|
|
|
|
DVI-D |
|
||||
|
|
|
|
|
|
|
|
|
Audio In |
|
|
|
|
|
|
|
|
|
|
HDMI |
|
|
|
|
|
|
|
S-VHS |
|
|
R |
|
|
|
|
|
|
|
|
AV-3 |
AV-Out |
|
|
|
|
|
|
|
4 |
|
6 |
13 |
|
|
16 |
24 |
15 |
14 |
17 |
|
|
|
|
|
|||||||
SOURCE |
MENU |
|
PROG |
VOL |
7 |
Video |
10 |
Video |
25 |
Y |
|
|
|
|
|
|
|
|
|
|
8
18 |
19 |
20 |
21 |
22 |
23 |
9 |
|
11
L
12
AV-3
|
|
|
Audio In |
|
L |
26 |
Pb |
L |
28 |
|
||||
|
|
|||
|
27 |
|
R |
29 |
|
|
|
AV out |
YPbPr |
|
1. |
Remote control receiver |
13. |
S-VHS connector |
28. Component sound input (L) |
2. |
Standby mode indicator |
14. |
PC-DVI sound input |
29. Component sound input (R) |
3. |
Network power on/off button |
15. |
VGA (PC connection input) |
|
4. |
Scart 1 |
16. |
DVI-D |
|
5. |
Scart 2 |
17. |
Antenna input |
|
6. |
Antenna input |
18. |
Source selection |
|
7. |
Video input CINCH connector |
19. |
Menu Button |
|
8. |
Sound input CINCH |
20. |
Program down button |
|
|
connector (Left/L) |
21. |
Program up button |
|
9. |
Sound input CINCH |
22. |
Volume turn-down button |
|
|
connector (Right/R) |
23. |
Volume turn-up button |
|
10. |
Video output CINCH |
24. |
HDMI |
|
|
connector |
25. |
Component video input (Y) |
|
11. |
Sound output (Left/L) |
26. |
Component video input (Pb) |
|
12. |
Sound output (Right/R) |
27. |
Component video input (Pr) |
|
Please note
•Do not use the Video RCA and S-Video connections at the same time; otherwise they will affect each other’s image.
•RGB inputs from Scart will give you a better image quality.
ENGLISH -12-
 Loading...