Beko AP930 User Manual


 Side by Side


 Frost Free Fridge / Freezer
AP930
20.2 cu.ft.
BEKO plc |
|
|
Beko House |
|
|
Caxton Way |
|
|
Watford |
|
|
Hertfordshire |
|
|
WD18 8UF |
|
|
Tel: 01923 654650 |
|
|
Fax: 01923 819653 |
Printed in Turkey |
|
e-mail: service@beko.co.uk |
Part no: 48 4271 00 02 |
|
website: www.beko.co.uk |
||
Revision no: 2 |

Congratulations on your choice of a 
 quality Appliance which has been designed to give you service for many years.
WARNING !
IMPORTANT !
DO NOT connect your appliance to the electricity supply until all packing and transit protectors have been removed.
•Leave to stand for at least 4 hours before switching on to allow compressor oil to settle if transported horizontally.
•If you are discarding an old refrigerator with a lock or latch fitted to the door, disable the lock/latch, ensure that it is left in a safe condition to prevent the entrapment of young children.
•This fridge/freezer must only be used for its intended purpose i.e. the storing and freezing of edible foodstuff.
•We suggest you contact your local authority for disposal information and facilities available.
•We do not recommend use of this appliance in an unheated, cold room.
(E.g.: garage, conservatory, annex, shed, out-house etc.) See Installation Instructions on page 4 for further information.
•To obtain the best possible performance and trouble free operation from your appliance it is very important to carefully read these instructions.
•On delivery, check to make sure that the product is not damaged and that all the parts and accessories are in perfect condition.
•Ensure that the plug remains readily accessible. Do not use multiple adapter bar or extension cable.
•Failure to observe these instructions may invalidate your right to free service during the guarantee
period.
WARNINGKeep ventilation openings, in the appliance enclosure or in the built-in structure, clear of obstruction.
WARNINGDo not use mechanical devices or other means to accelerate the defrosting process, other than those recommended by the manufacturer.
WARNINGDo not damage the refrigerant circuit.
WARNINGDo not use electrical appliances inside the food storage compartments of the appliance, unless they are of the type recommended by the manufacturer.
• Do not touch moving parts like the slushed ice cutter in the Ice cube container .
• We suggest you keep these instructions in a safe
place for easy reference. |
Frost Free Fridge Freezer |
|
• BEKO plc declines to accept any liability should the |
||
instructions not be followed. |
AP930 |
|
PERFORMANCE |
|
|
|
|
|
Energy efficiency class |
A |
|
|
|
|
Energy consumption - Kwh/year |
529 |
|
Net storage - vol fresh food ltrs (cu.ft.) |
383 lt. (13.5) |
|
Net storage - vol frozen food ltrs (cu.ft.) |
146 lt. (5.2) |
|
Two star section |
6 lt. (0.2) |
|
Total net vol - ltrs (cu.ft.) |
535 lt. (18.9) |
|
Frozen food compartment rating |
4 STAR |
|
Conservation time from failure |
8 h. |
|
Freezing capacity fresh food - kg (lb) / 24 hrs. |
13 |
|
Climate class |
SN |
|
Operating noise level dB(A) |
|
46 |
1

CONTENTS |
PAGE |
|
|
ELECTRICAL REQUIREMENTS |
3 |
|
|
PLUMBING REQUIREMENTS |
4 |
|
|
TRANSPORTATION INSTRUCTIONS |
4 |
|
|
INSTALLATION INSTRUCTIONS |
4-11 |
|
|
STARTING |
12 |
|
|
STORING FRESH FOOD |
13 |
|
|
FRIDGE COMPARTMENT STORAGE ADVICE |
13 |
|
|
STORING PRE-FROZEN FOOD |
14 |
|
|
GETTING TO KNOW YOUR FROST FREE FRIDGE FREEZER |
15-16 |
|
|
USING THE ACCESSORIES |
17-21 |
|
|
SUGGESTED ARRANGEMENT OF FOOD IN THE FRIDGE/FREEZER |
22-23 |
|
|
TEMPERATURE CONTROL AND ADJUSTMENT |
24-26 |
|
|
STORING FROZEN FOOD |
27 |
|
|
FREEZING FRESH FOOD |
27 |
|
|
DEFROSTING |
27 |
|
|
CLEANING AND CARE |
28 |
|
|
REPLACING THE INTERIOR LIGHT BULB |
29 |
|
|
DO'S AND DON'TS |
30 |
|
|
ENERGY SAVING TIPS |
31 |
|
|
PROBLEM SOLVING AND TROUBLE SHOOTING |
31-36 |
|
|
GUARANTEE DETAILS |
37 |
|
|
HOW TO OBTAIN SERVICE |
38 |
2
ELECTRICAL REQUIREMENTS
Before you insert the plug into the wall socket make sure that the voltage and the frequency shown in the rating plate inside the appliance corresponds to your electricity supply.
Rating label is on the left hand side of fridge inner liner.
We recommend that this appliance be connected to the mains supply via a suitable switched and fused socket. The appliance must be positioned so that the plug is accessible.
Should the mains lead of the appliance become damaged or should it need replacing at any time, it must be replaced by a special purpose made mains lead which can only be obtained from a BEKO Authorised Service Agent.
WARNING! THIS APPLIANCE MUST BE EARTHED
If the fitted moulded plug is not suitable for your socket, then the plug should be cut off and an appropriate plug fitted. Destroy the old plug which is cut off as a plug with bared cord could cause a shock hazard if inserted into a socket elsewhere in the house.
The moulded plug on this appliance incorporates a 13 A fuse. Should the fuse need to be replaced an ASTABEAB approved BS 1362 fuse of the same rating must be used. Do not forget to refit the fuse cover. In the event of losing the fuse cover the plug must not be used until a replacement fuse cover has been fitted. Colour of the replacement fuse cover must be the same colour as that visible on the pin face of the plug. Fuse covers are available from any good electrical store.
IMPORTANT! FITTING A DIFFERENT PLUG
As the colours of the wires in the mains lead of this appliance may not correspond with the coloured markings identifying the terminals in your plug proceed as follows:
(See diagram).
1.Connect the green-yellow or green (Earth) wire to the terminal in the plug marked 'E' or with
the symbol  or coloured green and yellow or green.
2.Connect the blue (Neutral) wire to the terminal in the plug marked 'N' or coloured black.
GREEN & |
|
|
|
6mm. |
|
YELLOW |
|
|
|
|
|
OR |
|
|
GREEN |
32mm. |
|
L |
|
|
|
BROWN |
6mm. |
|
N |
|
|
OR |
|
|
22mm. |
RED |
|
|
BLUE |
|
|
|
|
6mm. |
|
|
12mm. |
|
OR |
|
|
||
BLACK |
|
|
|
|

 CORD GRIP
|
|
|
FITTED WITH BS 1362 13A FUSE ALWAYS FIT BS 1362 REPLACEMENT CARTRIDGE FUSE |
|
FUSE |
|
|
|
|
|
|
|
|
|
3.Connect the brown (Live) wire to the terminal in the plug marked 'L'
or coloured red.
With alternative plugs a 13 A fuse must be fitted either in the plug or adaptor or in the main fuse box.
If in doubt contact a qualified electrician. 3

PLUMBING REQUIREMENTS
In order to operate the automatic ice maker/dispenser and chilled water dispenser, you will need to get your appliance plumbed into the cold mains water supply in your house via a standard 1/2 “ valve fitting. If in doubt contact a qualified plumber and your local water company. See page 9.
TRANSPORTATION INSTRUCTIONS
1.The appliance should be transported only in a vertical upright position. The packing as supplied must be intact during transportation.
2.If during the course of transport the appliance has to be transported horizontally, it must only be laid on its left hand side when standing in the front of the appliance. After bringing it to upright position,it must not be operated for at least 4 hours to allow the system to settle.
3.Failure to comply with the above instructions could result in damage occuring to the appliance. The manufacturer will not be held responsible if these instructions are disregarded.
4.The appliance must be protected against rain, moisture and other atmospheric influences.
5.When positioning your appliance take care not to damage your flooring, pipes, wall coverings etc. Do not move the appliance by pulling by the door or handle.
6.Empty any water in the drain tray before moving. See section ‘Care & cleaning’ for further information.
Do not attempt to sit or stand on top of your appliance as it is not designed for such use. You could injure yourself or damage the appliance.
IMPORTANT: Make sure that mains cable is not caught under the appliance during and after carrying / moving the appliance, to avoid the mains cable becoming cut or damaged."
Do not allow children to play with the appliance or tamper with the controls.
IMPORTANT
INSTALLATION INSTRUCTIONS
1.The space in the room where the appliance is installed must not be smaller than 10 cubic metres.
2.Do not put your fridge freezer in a cold room where the temperature is likely to go below +5 degrees C (41 degrees F) during night time and/or especially in winter.
This fridge freezer has been designed to operate in ambient temperatures between +5 and +32 degrees C (41 and 90 degrees F) Therefore if the appliance is installed in an unheated/cold room (eg: conservatory/annex/ shed/garage etc) then the appliance will not operate causing the freezer compartment to run warmer and as a result the storage time of frozen food may be reduced.
3.Do not place the appliance near cookers, radiators or in direct sunlight as this will cause your appliance to work harder. If installed next to a source of heat or freezer, maintain the following minimum side clearances:
From Cookers |
50 mm (2") |
|
|
From Radiators |
300 mm (12") |
|
|
From Freezers |
25 mm (1") |
|
|
From Wall |
50 mm (2") |
4.Adjustable feet adjustment for levelling
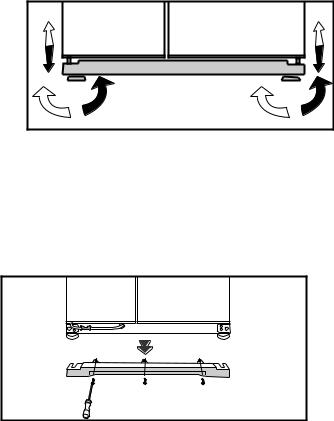
If your refrigerator is not level, you can level it by turning the front feet as illustrated in the figure below. The corner where the feet is lowered when you turn in the direction of black arrow and raised when you turn in the opposite direction. You may need somebody to help you to slightly lift the refrigerator off the floor for a few centimeters. Take care when lifting the appliance because it is very heavy.
5. Door height adjustment
If there is a misalignment between the doors, perform the steps indicated below to adjust door heights:
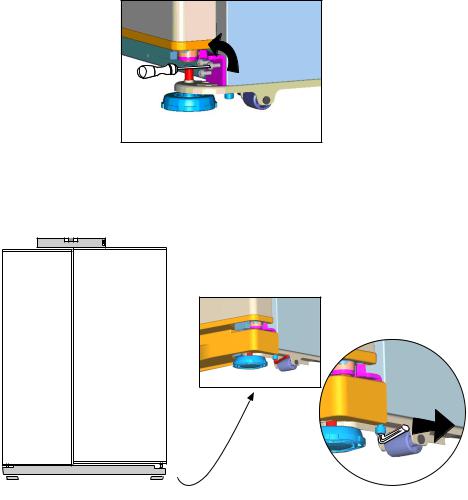
Doors can be raised vertically. This process can be performed easily using a flat tipped screwdriver and an allen key (M6) as illustrated in the following figures. Door racks should be removed when adjusting the door height.
• Remove the screws fastening the lower cover using a flat tipped screwdriver in the order shown in the figure.
|
|
4 |
1 |
2 |
3 |
4 |
5 |

• Loosen the 3 screws of the lower door hinges using a flat tipped screwdriver. (Do not remove completely)
• If the freezer compartment door is lower than the fridge compartment door, bring them to the same level by turning the elevation screw on the freezer compartment side in the direction of arrow using a M6 allen key in the similar way as explained above on the opposite side.
• If the freezer compartment door is higher than the fridge compartment door, bring them to the same level by turning the elevation screw on the fridge compartment side in the direction of arrow using a M6 allen key as illustrated below:
After doing the above adjustments, the doors should be level. If the doors do not close properly, this might adversely affect the operation and efficiency of the refrigerator.
6
BEFORE FIRST USE & OPERATION
Ice/Water Dispenser
•The minimum inlet water pressure required is 1 bar
•The maximum inlet water pressure allowed is 8 bars
•The appliance must be connected to the cold mains water supply and must never be connected to the hot water.
•Make sure the anti-condensation switch underneath the display is pressed after connecting the appliance to the cold mains water supply. (Factory setting is in pressed position)
•You will need to wait for 12 hours before you get your first ice cubes from the ice dispenser. If there is less than 16 ice cubes in the ice cube container, ice dispenser may not operate.
•The dispenser will not be activated if the freezer door is open. Therefore, please make sure that the freezer door is closed in order to allow the dispenser to start operating.
•In order for the ice/water dispenser to operate smoothly, the water pressure in the system should be between 1 – 8 bars. To check this, see if 1 glass of water (100 cc) fills using the dispenser in 10 seconds.
•Do not forget to take out the Ice Hole Cover before using the ice dispenser.
•Water dispenser is automatically activated when the refrigerator starts operating. However it would take up to 12 hours for the water to chill.
•Approximately the first 30 pieces of the ice cubes made and dispensed should not be consumed.
•Water may not flow from the dispenser during the initial operation because of the air trapped in the piping system. Press the latch for about 1 minute three times at intervals to bleed the air trapped in the system. The uneven flow of the water from the dispenser will disappear as soon as the trapped air in the system is released.
•The first 10 glasses of water should not be consumed.
•Always make sure that you fit the water filter before using the ice/water dispenser.
7

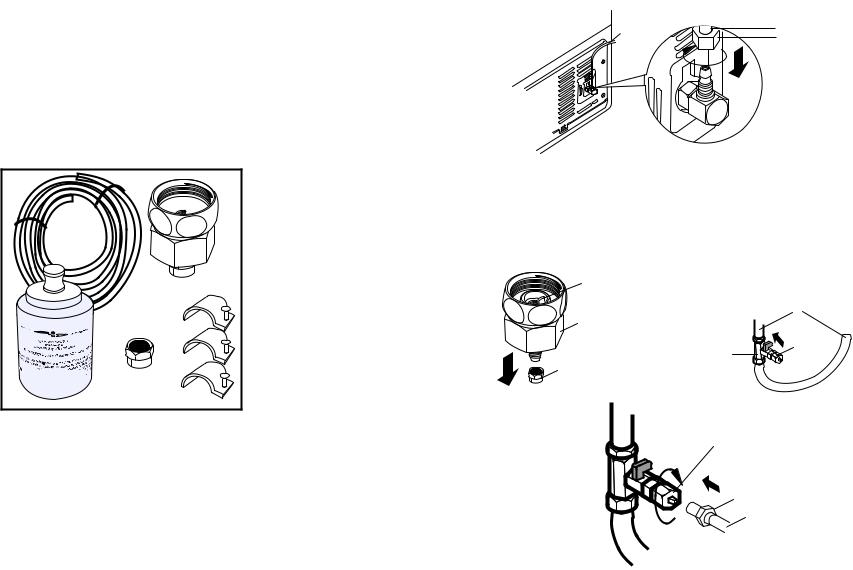
•First Check that the following items are supplied with appliance.
1.5-meter long water pipe (1/4 inch in diameter)
2.Nut for connection of the water pipe to the rear of the appliance
3.Cold mains water valve with mesh filter
4.3 pieces of pipe clips (In case required to secure the water pipe)
5.Water Filter to be fitted to the bracket inside the fridge compartment.
Water Tube |
Water Tube |
|
Nut |
||
|
2 
1
1


 3
3
4


 2 5
2 5
Connection to the Cold Mains Water Valve
Please follow the instructions below
MAKE SURE THAT STANDARD 1/2” VALVE FITTING FED BY COLD MAINS WATER SUPPLY IS AVAILABLE AND IS TURNED OFF FULLY.
Connection of the water pipe to the refrigerator
1.Connect the water pipe to the inlet at the rear of the appliance as shown in the figure below.
2.Fix the nut to the valve as shown in the figure.
3.First offer the nut to the water pipe. Then push water pipe down firmly in to the inlet fitting. Then tighten the nut manually. You should not need to tighten the nut with a tool to achieve water tight assembly. In case of a leak use a spanner or a pair of pliers to tighten the nut.
8
Connecting the water pipe to the cold mains water supply
1.Separate the nut from the valve adaptor.
2.Connect the valve adaptor to the Feed Valve as shown in the figure.
3.Connect the water pipe to the valve adaptor and offer the nut to the valve adaptor as shown in the figure.
4.Tighten the nut manually. In case of a leak use a spanner or a pair of pliers to tighten the nut.
Mesh |
|
|
|
Filter |
|
Main |
|
|
|
Cold Water Line |
|
Tap |
|
|
|
Adaptor |
|
Tap |
|
|
Feed |
||
|
Adaptor |
||
Nut |
Valve |
||
|
|||
|
|
||
Figure 1 |
|
Figure 2 |
|
|
|
Tap
Adaptor
Nut
Water Pipe
Figure 3
Secure the 5-meter water pipe to suitable points by means of the pipe clips supplied to avoid any damage or displacement or accidental disconnection.
Warning: After turning on the water valve, make sure that there is no leakage at both connection points of the water pipe. In case of a leak, turn off the valve immediately and tighten all joints again using a spanner or a pair of pliers.
9

Water Filter
Bypass Cover
Water Tubes |
Water Tubes |
Bypass Cover |
Filter |
Water filter should be replaced every 6 months. Water filter warning on the display will come on after about 6 months. The warning light remain on for about 15 days before it starts to flash. Once the filter has been replaced, this warning light can be cancelled by pressing the “Auto Eco” button on the display for 5 seconds.
The water filter must be removed as shown in the figure when it is going to be replaced or when it will no longer be used. Make sure that the “Ice off” mode is active before removing the water filter.
To fit the water filter follow the instructions below referring to diagrams supplied:
1.Take out the upper salad crisper in the fridge as shown in the figure.
2.Unscrew the water filter by-pass cover.
Warning: Make sure that the “ice off” mode is active before taking out the by-pass cover. Note: It is normal for a few drops of water to drip after the cover has been removed.
3.Remove the red cap on the top of the water filter cartridge and fix it to its place as shown in the figure.
4.Press “Ice off” button on the display again to exit from this mode.
1 |
2 |
3 |
|
10 |
If you do not want to use the water filter, warning light should be cancelled. To do this, “Freezer Set” and “Water/Ice Selection” buttons must be pressed simultaneously for 2 seconds. Filter warning will flash for 5 times when pressed in this way and the warning will be cancelled. Filter warning will flash for 10 times when the same buttons are pressed for 2 seconds and the warning will be reactivated.
Warning: Water filter is for cleaning some foreign particles in the water. It does not purify water from micro-organisms.
Warning: “Ice off” button must always be pressed while replacing the water filter or installing the bypass cover.
Water Reservoir
If you wish to disassemble the water reservoir from the refrigerator for cleaning
purposes follow the below instructions;
• Remove the 2 screws by using a cross headed  screwdriver as shown in the figure.


• Gently hold and remove the water reservoir 


 shown in the figure.


Warning:
Never remove the nuts fitted to the water
reservoir after cleaning the area behind the water reservoir, gently refit and check that there is no water leak. If you over tighten the
nuts, it may cause leakage.
Water Reservoir (Capacity is 0.9 L)
11
 Loading...