


VM9021TS
Instruction Manual Manual de Instrucciones Guide d'instructions
CONTENTS
Thank you for choosing a Jensen product. We hope you will find the instructions in this owner’s manual clear and easy to follow. If you take a few minutes to look through it, you’ll learn how to use all the features of your new Jensen VM9021TS Mobile Multimedia AM/FM/DVD Receiver for maximum enjoyment.
Preparation............................................................................................................................ |
1 |
Installation ............................................................................................................................. |
5 |
Controls and Indicators ......................................................................................................... |
6 |
Front Zone Remote Control .................................................................................................. |
8 |
Multi-ZONE Remote Control ............................................................................................... |
11 |
Using the TFT Monitor ........................................................................................................ |
12 |
Operating Instructions ......................................................................................................... |
14 |
System Setup Menu............................................................................................................ |
15 |
Multi-ZONE Operation......................................................................................................... |
17 |
Tuner Operation .................................................................................................................. |
18 |
XM Radio Operation............................................................................................................ |
19 |
DVD/VCD Video Operation ................................................................................................. |
21 |
DVD/Disc Setup Menu ........................................................................................................ |
24 |
DVD/Disc Audio Operation.................................................................................................. |
27 |
SD Card Reader Operation................................................................................................. |
28 |
iPod Operation .................................................................................................................... |
29 |
TV Tuner Operation ............................................................................................................ |
30 |
Navigation System .............................................................................................................. |
31 |
Troubleshooting .................................................................................................................. |
32 |
Specifications ...................................................................................................................... |
35 |
12-month Limited Warranty................................................................................................. |
36 |
CONTENIDO |
|
Gracias por elegir los productos Jensen. Esperamos que encuentre en este manual |
|
instrucciones claras y fáciles de seguir. Si se toma unos pocos minutos para leerlo, aprenderá cómo utilizar todas las funciones de su nuevo radio Jensen para su máximo entretenimiento.
Preparación......................................................................................................................... |
37 |
Instalación ........................................................................................................................... |
41 |
Controles e Indicadores ...................................................................................................... |
42 |
Control Remoto de Zona Delantera .................................................................................... |
44 |
Control Remoto de Multi-ZONE .......................................................................................... |
47 |
Utilización del Monitor TFT ................................................................................................. |
48 |
Instrucciones De Operación................................................................................................ |
50 |
Menú de Configuración de Sistema .................................................................................... |
52 |
Operación Multi-ZONE........................................................................................................ |
54 |
Operación del Radio ........................................................................................................... |
55 |
Operación de Radio XM®.................................................................................................... |
56 |
Operación del Video de DVD/VCD ..................................................................................... |
58 |
Menú Configuración del DVD/Disc...................................................................................... |
61 |
Operación del Audio de DVD/Disco .................................................................................... |
64 |
Operación del Lector de Tarjeta SD.................................................................................... |
66 |
Operación de iPod .............................................................................................................. |
67 |
Operación del Sintonizador de TV ...................................................................................... |
68 |
Sistema de Navegación ...................................................................................................... |
69 |
Solución de Problemas ....................................................................................................... |
70 |
Especificaciones ................................................................................................................. |
73 |
Garantia Limitade de 12 Meses .......................................................................................... |
74 |
TABLE DES MATIÈRES
Merci d'avoir choisi un produit Jensen . Nous espérons que vous allez trouver les instructions dans ce guide de propriétaire claires et faciles à suivre . Prenez quelques minutes à le consulter, vous apprendrez à utiliser toutes les fonctions de votre nouvelle radio Jensen pour en tirer une jouissance maximum.
Preparation......................................................................................................................... |
75 |
Installation .......................................................................................................................... |
79 |
Controles et indicateurs...................................................................................................... |
80 |
Telecomande de la zone d'avant ....................................................................................... |
82 |
Telecommande Multi-ZONE............................................................................................... |
85 |
Utilisation du moniteur TFT ................................................................................................ |
86 |
Instructions d'operation ...................................................................................................... |
88 |
Menu configuration du systeme ......................................................................................... |
90 |
Operation Multi-ZONE........................................................................................................ |
92 |
Operation tuner AM/FM...................................................................................................... |
93 |
Operation radio XM ............................................................................................................ |
94 |
Operation platine DVD ....................................................................................................... |
96 |
Menu de configuration DVD/disque.................................................................................... |
99 |
Operation audio DVD/DisQUE ......................................................................................... |
102 |
Operation lecteur carte SD............................................................................................... |
104 |
Operation iPod ................................................................................................................. |
105 |
Operation tuner TV........................................................................................................... |
106 |
Systeme de navigation..................................................................................................... |
107 |
Depannage....................................................................................................................... |
108 |
Specifications ................................................................................................................... |
111 |
Garantie limitée de 12 mois.............................................................................................. |
112 |
i
ii

VM9021TS
PREPARATION
Congratulations on your purchase of the Jensen VM9021TS Mobile Multimedia AM/FM/DVD Receiver.
It’s a good idea to read all of the instructions before beginning the installation. We recommend having your Jensen VM9021TS installed by a reputable installation shop.
Features
DVD
•Compatible formats: DVD-R, DVD-RW, DVD+R, DVD+RW, CD-R, CD-RW, CD-DA, MP3, WMA, SVCD, VCD, MPEG1, MPEG2, MPEG4, AVI and JPEG
•Region 1 playback
•16:9 Aspect ratioWide / Normal / Cinema
•Front panel DVD control
•High-speed Fast Forward / Fast Rewind 2X, 4X, 8X, 32X
•Play, Pause, Stop, Slow
•Chapter Up / Down
•MultiZone output 'Kid-Zone'
•Wolfson Microelectronics high performance 24-bit, 192 kHz DAC supports 6-channel and 2-channel "Down-Mix” audio modes
•16MB high-speed flash memory - 80nS access time
•2 second ESP (Electronic Skip Protection)
Integrated SD Card Reader
•Compatible formats: MP3, WMA, AVI, MPEG1, MPEG2, MPEG4 and JPEG
•Supports up to 2GB SD card
MP3/WMA
•GIGA MP3 - Store up to 999 MP3 files on a DVD
•ID3-tag compatible
•Direct track access
•Play, Pause, Stop, Track Up / Down
•60 second (MP3), 120 second (WMA) ESP - Electronic Skip Protection
CD
•CD-text compatible
•4 second ESP (Electronic Skip Protection)
AM/FM Tuner
•User-selectable frequency spacing
•30 Station presets (18FM/12AM) JENSEN Plus Tuner II
Outboard Media Module
•Input adapter for TV Tuner, XM and iPod
TV Tuner (Included)
•VHF 2-13
•UHF 14-69
•TV antenna (3.5mm antenna included)
•F-Connector/Coaxial Antenna Input (optional)
XM Ready
•Requires optional Terk XMD1000 tuner box
•Requires optional Terk XMDJEN100 or Jensen JXMC XM cables
•Advanced display shows the artist, song title, and XM channel and category at a glance
•Direct channel entry
Navigation Ready
•Requires optional NAV100 navigation module
jLink Ready
•Controls and charges all iPod's except "Shuffle"
•Displays all text information including category, track name, artist and channel number
Chassis
•6.5 inch TFT touch screen LCD - 280,800 pixels (1200W X 234H)
•TSD - Touch Screen Display menu control
•Fully automatic motorized TFT LCD flip-down
•16-step TFT LCD tilt adjustment
•Beep Tone confirmation
•2.0 Din
•Import/ISO/DIN mountable
•Heat management system - Incorporates forced aircooling to keep the chip-sets operating at nominal temperatures
•Heavy duty galvanized chassis
Multi-ZONE
•Allows front passengers to listen to the radio while rear passengers listen to a CD, MP3, WMA or watch DVDs
General
•Full function infrared remote control
•Limited function infrared "Kid Zone" remote
•OSD - On Screen Display menu control
•High-performance audio processor
•Electronic volume, bass, treble, balance and fader
•Bass center frequency adjustment - 60, 80, 100, 130, 150 and 200Hz
•Bass Q factor - 1.0, 1.25, 1.5 and 2.0
•Treble center frequency adjustment - 10, 12.5, 15 and 17kHz
•Subwoofer crossover - 80, 120 and 160Hz
•Subwoofer Phase - 0 - 180 degrees
•Subwoofer level - variable
•22 watt center channel amplifier
•Center channel speaker output (JCCSPK sold separately)
•100-ohm low impedance pre-amp outputs, all channels
•5V Peak / 2V RMS RCA outputs, all channels
•1-pair front RCA outputs and 1-pair rear/surround RCA outputs
•Single Subwoofer RCA output
•Center Channel RCA pre-amp output (variable)
•1-pair headphone/Multi-ZONE RCA outputs
•1-pair auxiliary RCA A/V inputs
•Back-up camera input with reverse override
•1 NTSC composite video output for additional screens
•NTSC Multi-ZONE composite video for additional screens
•Flex Fader
•Joystick menu navigation
Tools and Supplies
You will need these tools and supplies to install your VM9021TS:
•Torx type, flat-head and Philips screwdrivers
•Wire cutters and strippers
•Tools to remove existing radio (screwdriver, socket wrench set or other tools)
•Electrical tape
•Crimping tool
•Volt meter/test light
•Crimp connections
•18 gauge wire for power connections
•16 – 18 gauge speaker wire
WARNING! Only connect the unit to a12-volt power supply with proper grounding.
WARNING! Never install this unit where operation and viewing could interfere with safe driving conditions.
WARNING! To reduce the risk of a traffic accident (except when using for rear-view video camera) never use the video display function while driving the vehicle. This is a violation of federal law.
WARNING! Never disassemble or adjust the unit without the assistance of a professional. For details, please consult your local car stereo specialty shop.
WARNING! To prevent injury from shock or fire, never expose this unit to moisture or water.
1

VM9021TS
WARNING! Never use irregular discs.
WARNING! To prevent damage to the mechanism inside this unit, avoid impact to the TFT monitor.
WARNING! Do not change the fuse on the power wire without professional guidance. Using an improper fuse may cause damage to the unit and result in a fire.
WARNING! The monitor employs an automatic motorized mechanism. To prevent damage to the core mechanism, please do not push, pull or swivel the monitor manually.
Optional Accessories
iAUX3 READY (Sold Separately)
•Can connect to any portable media device or multimedia device using a standard 3.5mm plug
•Converts 3.5mm auxiliary input to RCA stereo outputs for easy connection to the radio’s AUX inputs
Disconnecting the Battery
To prevent a short circuit, be sure to turn off the ignition and remove the negative (-) battery cable prior to installation.
NOTE: If the VM9021TS is to be installed in a vehicle equipped with an on-board drive or navigation computer, DO NOT disconnect the battery cable. If the cable is disconnected, the computer memory may be lost. Under these conditions, use extra caution during installation to avoid causing a short circuit.
2

VM9021TS
WIRING DIAGRAM
RED
GREEN
BLUE
BLACK
WHITE
YELLOW
NOTE: See the Multimedia Connections Diagram for additional connections through the Media Module.
|
|
|
Head Unit |
|
|
|
|
|
|
|
|
|
XM Audio Left |
NAVI |
|
|
|
||
|
|
|
||
|
|
|
XM Audio Right |
Media |
|
|
|
XM Control Data |
|
|
|
|
iPod |
Module |
|
|
|
TV Ant - Main |
|
|
|
|
TV Ant - Alternate |
|
|
|
|
|
|
|
Media Module Cable / BLACK |
RED |
|
GREEN |
|
BLUE |
|
BLACK |
Multi-ZONE |
|
Video |
WHITE |
|
|
Additional |
|
Rear Monitor |
YELLOW |
Media Module Video |
CENTER |
SUB.W |
REAR |
RSURROUND |
REAR |
LSURROUND |
FRONT R |
FRONT L |
GREY |
BLUE |
RED |
WHITE |
RED |
WHITE |
Amplifier |
BLUE/WHITE |
PowerExternal |
P.CONT |
YELLOW
|
|
|
|
MULTIZONE |
|
|
|
|
VIDEO |
|
|
|
WHITE |
|
|
|
|
|
HEADPHONE |
|
|
|
RED |
MULTIZONE |
|
Wireless Headphone |
|
||
|
|
|
||
|
(optional) |
|
|
HEADPHONE |
|
|
|
|
MULTIZONE |
|
YELLOW |
|
VIDEOID |
OUT |
|
|
|
||
AUXIN/R |
AUXIN/L |
AUXINVIDEO |
|
|
RED |
WIHTE |
YELLOW |
RED |
WHITE |
YELLOW |
|
3 |
|
3.5mm
iAUX 3 (Optional) |
WHITE(+)FRONTL |
|
GREEN/BLACK(-) |
GREEN(+) WHITE/BLACK(-) |
|
REARL |
|
|
|
|
|
|
|
|
Car Phone |
|
|
|
|
|
|
|
|
|
|
|
|
|
|
|
|
|
|
|
|
|
|
|
|
|
Auto Antenna |
|
|
|
|
|
(-)BROWN |
MUTE |
|
|
|
|
YELLOW |
|
GREEN |
BLUE |
|
ANT.CONT |
|
|
|
|
|
|
|
|
|
(20A) |
BLACK |
|
|
|
|
|
BLUE |
|
)-GREY/BLACK(FRONT |
GREY(+) |
PURPLE(+) |
)-PURPLE/BLACK( |
SWITCHIGNITION |
ACC |
RED |
YELLOW |
FILTER/FUSE |
Rear View Video |
)-/BLACK(BROWN |
(+)BROWN |
)-(PINK |
SWPRK |
GREEN/WHITE |
REVERSE |
|
|
GND |
|||||||||||||||
R |
|
|
REARR |
|
|
|
|
BATT |
|
CAMERA |
|
CENTER |
|
|
(+) |
|
|
|
|
|
|
|
|
|
|
|
YELLOW |
|
|
|
|
|
|
|
|
|
|
|
|
|
|
+ |
- |
|
|
|
|
|
|
|
|
|
|
|
|
|
|
|
BATTERY |
|
|
|
|
|
|
|
|
|
|
|
|
|
|
|
|
|
|
Camera |
|
|
|
|
|
|
|
|
|
|
|
|
|
|
|
|
|
|
|
Gearbox Switch |
|
|
|
NOTE: The white multipin connector will not be used in every installation. In this case, it can be cut-off and discarded. This will not void any warranty that the unit may have.
3

VM9021TS
WIRING DIAGRAM - MULTIMEDIA CONNECTIONS
*TERK XMDJEN100 cables (sold separately)
**TERK XMD1000 Direct Tuner and antenna (sold separately)
***NAV100 (sold separately)
4
VM9021TS
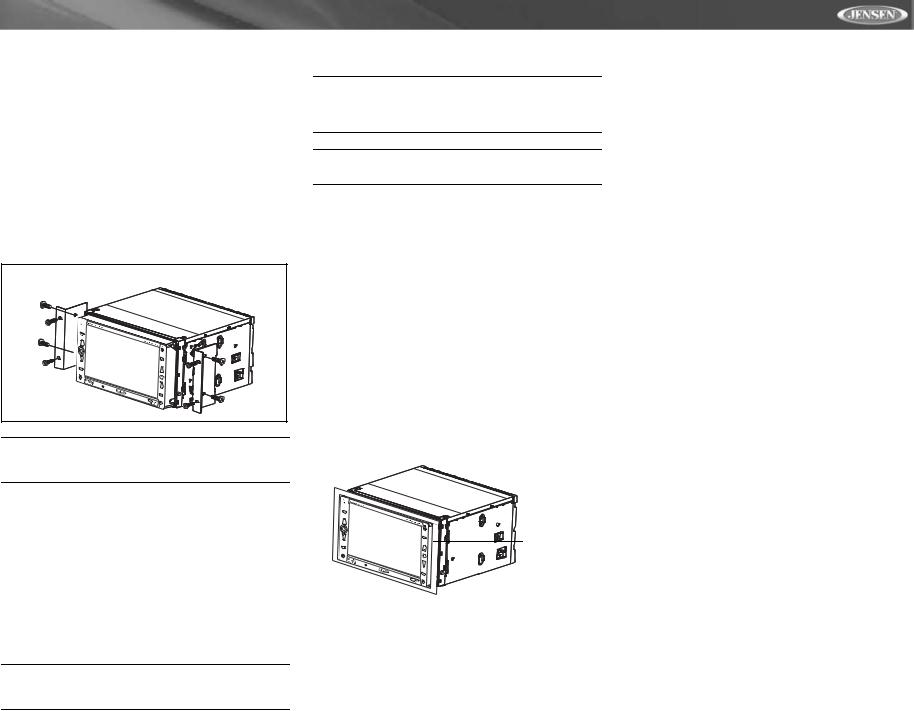
INSTALLATION
This unit is designed to fit into a 2.0 DIN dashboard opening, found in many imported cars. The unit has threaded holes in the chassis side panels which may be used with the original factory mounting brackets of some Toyota, Nissan, Mitsubishi, Isuzu, Hyundai and Honda vehicles to mount the radio to the dashboard. Please consult with your local car stereo specialty shop for assistance on this type of installation.
1.Remove the existing factory radio from the dashboard or center console mounting. Save all hardware and brackets as they will be used to mount the new radio.
2.Remove the factory mounting brackets and hardware from the existing radio and attach them to the new radio.
ISO INSTALLATION |
CAUTION: Do not exceed M5 X 6 MM screw size. Longer screws may touch and damage components inside the chassis.
3.Place the radio in front of the dashboard opening so the wiring can be brought through the mounting sleeve. Follow the wiring diagram carefully and make certain all connections are secure and insulated with wire nuts or electrical tape. After completing the wiring connections, plug the ISO connectors into the mating sockets on the rear of the chassis. Turn the unit on to confirm operation (vehicle ignition switch must be “on”). If the unit does not operate, re-check all wiring until the problem is corrected.
4.Mount the new radio assembly to the dashboard or center console using the reverse procedure in step 1.
CAUTION: For proper operation of the CD player, the chassis must be mounted within 30° of horizontal. Make sure the unit is mounted within this limitation.
NOTE: It is the end-users responsibility to install and operate this unit in a manner in accordance with local, state and federal laws. The PARKING BRAKE wire MUST BE CONNECTED as directed in the manual.
CAUTION: Do not block the cooling fan exit. If blocked, the unit may overheat and become damaged.
Using the iAUX3 External AV Connector
The iAUX3 (sold separately) allows you to connect a variety of external devices, including a VCR, DVD player, portable MP3 player, etc., to your VM9021TS without removing the radio.
To install the iAUX3, connect it to the AUX-IN cables on the back of the VM9021TS (see the Wiring Diagram on page 3),
and then install the iAUX3 in a location convenient for plugging in auxiliary devices.
Using the Cosmetic Trim Ring
A trim ring is packaged with the VM9021TS for installation flexibility. The VM9021TS will fit into most import dashes with little or no modification to the dash board/cavity. Some US domestic vehicle dashes will accept a Double-DIN chassis, but there is usually a small gap between the radio and dash piece after installation is complete. In this case, use the trim ring to conceal any gaps that may be present.
OPTIONAL
TRIM RING
Replacing the Fuse
When replacing the fuse, use a new 20A replacement fuse. Using a fuse with an improper rating could damage the unit and cause a fire.
5
VM9021TS
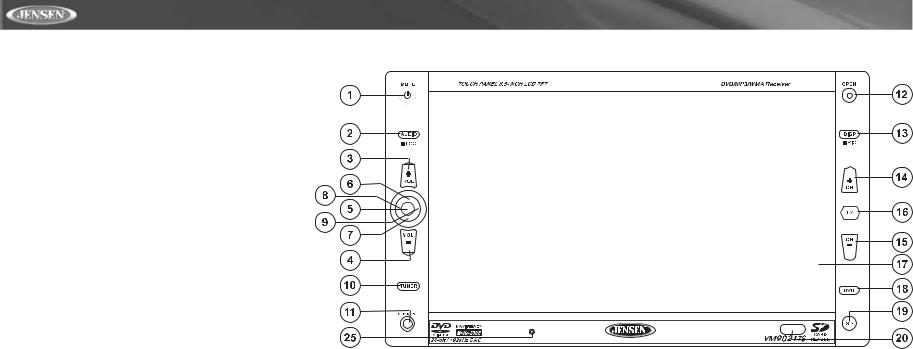
CONTROLS AND INDICATORS
1. POWER/MUTE
Press the POWER/MUTE button (1) once to turn the unit on. Press again to mute the volume. Press and hold to turn the unit off.
2. AUDIO/LOC
Press the AUDIO/LOC button (2) to access the audio menu and change and/or confirm audio settings. Press and hold to activate or deactivate the Local (LOC) setting.
3. VOL +
Press to increase the volume.
4. VOL -
Press to decrease the volume.
5. Joystick/ENTER
Press in on the joystick to perform the “enter” function during various applications. Push the key up, down, left or right to perform the following tasks:
6. Joystick/ 
•DVD Mode: Press once for fast forward/fast reverse.
•TUNER Mode: Press to go up one frequency step.
•MENU Mode: Press once to move the cursor up.
•TV Mode: Press once to select a stored TV channel.
7. Joystick/ 
•DVD Mode: Press once for slow forward/slow reverse.
•TUNER Mode: Press to go down one frequency step.
•MENU Mode: Press once to move the cursor down.
•TV Mode: Press once to select a stored TV channel.
8. Joystick/
•DVD Mode: Press once to play back previous chapter/ track.
•TUNER Mode: Press once to auto search for the previous available radio station. Press and hold to increase the tuner frequency step-by-step.
•MENU Mode: Press once to move the cursor to the left.
•TV Mode: Press to go down one frequency step.
9. Joystick/ 
•DVD Mode: Press once to enter the next chapter or track.
•TUNER Mode: Press once to auto-search the next available radio station. Press and hold to decrease the tuner frequency step-by-step.
•MENU Mode: Press once to move the cursor to the right.
•TV Mode: Press to go up one frequency step.
10. TUNER
Press to access the radio tuner source and then to change between AM and FM bands.
11. MENU/SRC
Press to access the playing source menu.
12. OPEN
Press the OPEN button (12) to activate the automatic mechanical system and move the TFT down, exposing the disc and SD card slots. Press again to close the TFT.
13. DISP/PIC
Press the DISP/PIC button (13) to adjust the display aspect of the picture to one of three settings: Wide, Full or Normal. Press and hold to access picture settings.
14. CH+
•Press and hold the CH+ button (14) to adjust the monitor position upright.
•Press to play the next preset AM/FM station.
•Press to play the next stored TV channel.
15. CH-
•Press and hold the CH- button (15) to adjust the monitor position outward.
•Press to play the previous preset AM/FM station.
•Press to play the previous stored TV channel.
16. TV
Press to access the TV tuner source.
17.TFT Display
18.DVD
Press the access the DVD player source.
19. SD
Press to access the SD card source.
20. IR Remote Control Receiver
6
VM9021TS
CONTROLS AND INDICATORS
21. Disc Slot
22. Eject Button
•Press once to eject the disc.
•Press and hold to reset the mechanism.
23. Disc Indicator
24.SD Card Slot
25.Reset Button (see page 4).
7
VM9021TS
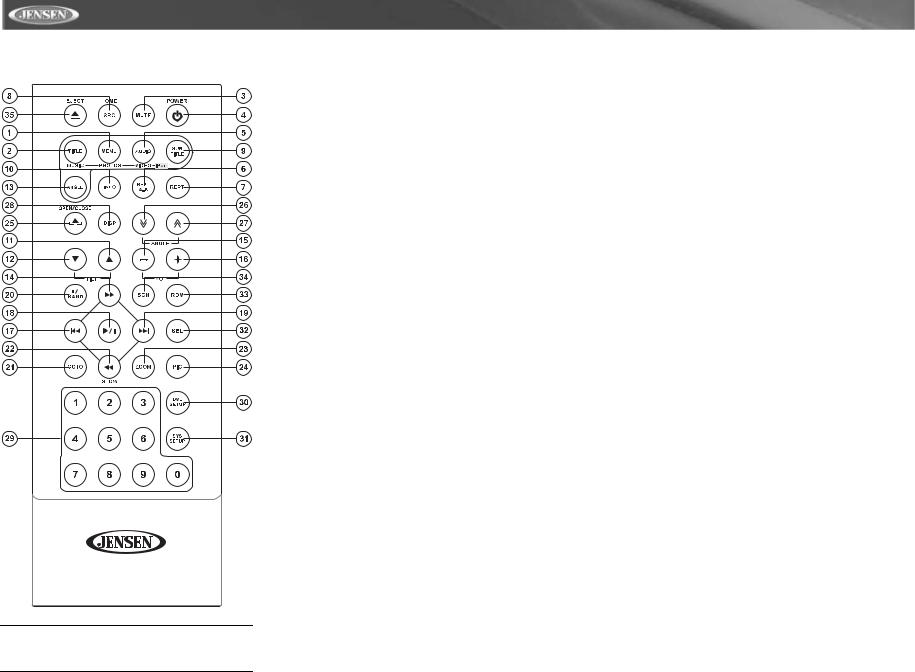
FRONT ZONE REMOTE CONTROL
NOTE: Your remote control may differ slightly from the one pictured here. The above diagram is for illustrative purposes only.
8

VM9021TS
Table 1: Front Zone Remote Control Functions
|
|
|
|
Button |
|
|
|
|
Function |
|
|
|
|||
|
|
|
|
|
|
|
|
|
|
|
|
|
|
|
|
|
|
Name |
|
Ref# |
DVD |
VCD |
TUNER |
CD/MP3 |
TV |
XM |
iPod |
||||
|
|
|
|
|
|
|
|
|
|
|
|
|
|
|
|
|
|
|
|
|
|
|
|
|
|
|
|
|
|
|
|
MENU |
|
1 |
Enters the main menu of |
Turns on PBC when play- |
|
|
|
Displays XM Setup Menu |
Selects Photo mode |
||||||
|
|
|
|
|
|
|
|
|
the disc |
ing VCD |
|
|
|
|
|
TITLE |
|
2 |
Enters the title menu of |
Plays first ten seconds of |
|
|
|
|
Selects Music mode |
||||||
|
|
|
|
|
|
|
|
|
the disc |
each chapter/title |
|
|
|
|
|
MUTE |
|
3 |
Toggles on/off audio out- |
Toggles on/off audio out- |
Toggles on/off audio out- |
Toggles on/off audio out- |
Toggles on/off audio out- |
Toggles on/off audio out- |
Toggles on/off audio out- |
||||||
|
|
|
|
|
|
|
|
|
put |
put |
put |
put |
put |
put |
put |
POWER/ |
|
|
|
4 |
Turns the power on/off |
Turns the power on/off |
Turns the power on/off |
Turns the power on/off |
Turns the power on/off |
Turns the power on/off |
Turns the power on/off |
||||
|
|
||||||||||||||
|
|
||||||||||||||
|
|
|
|
|
|
|
|
|
|
|
|
|
|
|
|
AUDIO |
|
5 |
Changes the audio lan- |
|
|
|
|
|
Selects Video mode |
||||||
|
|
|
|
|
|
|
|
|
guage for disc playback |
|
|
|
|
|
|
REPT A-B |
|
6 |
Setup to repeat playback |
Setup to repeat playback |
|
|
|
|
|
||||||
|
|
|
|
|
|
|
|
|
from time frame A to time |
from time frame A to time |
|
|
|
|
|
|
|
|
|
|
|
|
|
|
frame B |
frame B |
|
|
|
|
|
REPT |
|
7 |
Repeats playback of cur- |
Repeats playback of cur- |
|
Repeats playback of cur- |
|
Selects Category Mode |
Repeats playback of cur- |
||||||
|
|
|
|
|
|
|
|
|
rent chapter |
rent chapter |
|
rent track |
|
|
rent track |
SRC |
|
8 |
Selects playing mode |
Selects playing mode |
Selects playing mode |
Selects playing mode |
Selects playing mode |
Selects playing mode |
Selects playing mode |
||||||
|
|
|
|
|
|
|
|
|
|
|
|
|
|
|
|
SUBTITLE |
|
9 |
Language selection for |
|
|
|
|
|
|
||||||
|
|
|
|
|
|
|
|
|
subtitle |
|
|
|
|
|
|
INFO |
|
10 |
Displays playing informa- |
Displays playing informa- |
Displays playing informa- |
Display playing informa- |
Displays playing informa- |
Displays playing informa- |
Displays playing informa- |
||||||
|
|
|
|
|
|
|
|
|
tion |
tion |
tion |
tion |
tion |
tion |
tion |
ANGLE |
|
11 |
Continuously adjusts |
Continuously adjusts |
Continuously adjusts |
Continuously adjusts |
Continuously adjusts |
Continuously adjusts |
Continuously adjusts |
||||||
|
|
|
|
|
|
|
|
|
front panel tilt angle |
front panel tilt angle |
front panel tilt angle |
front panel tilt angle |
angle of TFT screen |
angle of TFT screen |
angle of TFT screen |
ANGLE |
|
12 |
Continuously adjusts |
Continuously adjusts |
Continuously adjusts |
Continuously adjusts |
Continuously adjusts |
Continuously adjusts |
Continuously adjusts |
||||||
|
|
|
|
|
|
|
|
|
front panel tilt angle |
front panel tilt angle |
front panel tilt angle |
front panel tilt angle |
angle of TFT screen |
angle of TFT screen |
angle of TFT screen |
ANGLE |
|
13 |
Plays back disc in differ- |
Plays back Picture CD |
|
|
|
|
|
||||||
|
|
|
|
|
|
|
|
|
ent angle for a scene |
with different angle of |
|
|
|
|
|
|
|
|
|
|
|
|
|
|
|
picture displayed |
|
|
|
|
|
|
|
|
|
|
|
|
|
14 |
Fast forwards the disc |
Fast forwards the disc |
|
Fast forwards the disc |
|
|
Accesses iPod Menu |
|
|
|
|
|
|
|
|
|
content |
content |
|
content |
|
|
|
VOL - |
|
15 |
Decreases volume |
Decreases volume |
Decreases volume |
Decreases volume |
Decreases volume |
Decreases volume |
Decreases volume |
||||||
|
|
|
|
|
|
|
|
|
|
|
|
|
|
|
|
VOL + |
|
16 |
Increases volume |
Increases volume |
Increases volume |
Increases volume |
Increases volume |
Increases volume |
Increases volume |
||||||
|
|
|
|
|
|
|
|
|
|
|
|
|
|
|
|
|
|
|
|
|
|
|
|
17 |
Selects the previous |
Selects the previous |
Searches an available |
Selects the previous |
Searches an available TV |
Searches an available |
Pauses playback/starts |
|
|
|
|
|
|
|
|
||||||||
|
|
|
|
|
|
|
|
|
chapter for playback |
chapter for playback |
radio station by decreas- |
track for playback |
station by decreasing tun- |
radio station by decreas- |
playback |
|
|
|
|
|
|
|
|
|
|
|
ing tuning frequency |
|
ing frequency |
ing tuning frequency |
|
|
|
|
|
|
|
|
|
|
|
|
|
|
|
|
|
|
|
|
|
|
|
|
|
18 |
Pauses playback/starts |
Pauses playback/starts |
Scans FM/AM radio sta- |
Pauses playback/starts |
Scans TV station; plays/ |
Scans XM radio station; |
|
|
|
|
|
|
|
|
|
|
|||||||
|
|
|
|
|
|
|
|
|
playback |
playback |
tion; plays/stores radio |
playback |
stores TV station; deletes |
plays/stores radio sta- |
|
|
|
|
|
|
|
|
|
|
|
|
station; deletes radio sta- |
|
TV station |
tion; deletes radio station |
|
|
|
|
|
|
|
|
|
|
|
|
tion |
|
|
|
|
|
|
|
|
|
|
|
|
19 |
Selects the next chapter |
Selects the next chapter |
Searches an available |
Selects the next track for |
Searches an available TV |
Searches an available |
Selects the next track for |
|
|
|
|
|
|
|
|
||||||||
|
|
|
|
|
|
|
|
|
for playback |
for playback |
radio station by increas- |
playback |
station by increasing tun- |
radio station by increas- |
playback |
|
|
|
|
|
|
|
|
|
|
|
ing tuning frequency |
|
ing frequency |
ing tuning frequency |
|
|
|
|
|
|
|
|
|
|
|
|
|
|
|
|
|
|
|
|
BAND |
|
20 |
Stops playback |
Stops playback |
Selects FM/AM band |
Stops playback |
|
Selects XM, XM1, XM2, |
|
|||
|
|
|
|
|
|
||||||||||
|
|
|
|
|
|
|
|
|
|
|
|
|
|
or XM3 band |
|
|
|
|
|
|
|
|
|
|
|
|
|
|
|
|
|
9

|
|
|
|
|
|
|
|
|
VM9021TS |
|
|
|
|
|
Table 1: Front Zone Remote Control Functions |
|
|
||
|
|
|
|
|
|
|
|
|
|
Button |
|
|
|
|
Function |
|
|
|
|
|
|
|
|
|
|
|
|
|
|
Name |
|
Ref# |
DVD |
VCD |
TUNER |
CD/MP3 |
TV |
XM |
iPod |
|
|
|
|
|
|
|
|
|
|
|
|
|
|
|
|
|
|
|
|
GOTO |
|
21 |
Goes to specific time |
Goes to specific time |
|
|
|
|
|
|
|
|
frame and playback |
frame and playback |
|
|
|
|
|
|
|
22 |
Slow playback/slow |
Slow playback/slow |
|
|
|
|
|
|
|
|
rewind playback |
rewind playback |
|
|
|
|
|
ZOOM |
|
23 |
Zooms in/out on an |
Zooms in/out on an |
|
|
|
|
|
|
|
|
image |
image |
|
|
|
|
|
PIC |
|
24 |
Displays set-up parame- |
Displays set-up parame- |
|
|
|
|
|
|
|
|
ters |
ters |
|
|
|
|
|
OPEN/ |
|
25 |
Opens/closes the TFT |
Opens/closes the TFT |
Opens/closes the TFT |
Opens/closes the TFT |
Opens/closes the TFT |
Opens/closes the TFT |
Opens/Closes the TFT |
CLOSE |
|
|
monitor |
monitor |
monitor |
monitor |
monitor |
monitor |
monitor |
|
|
26 |
Decreases monitor tilt |
Decreases monitor tilt |
Decreases monitor tilt |
Decreases monitor tilt |
Decreases monitor tilt |
Decreases monitor tilt |
Decreases monitor tilt |
|
|
|
angle |
angle |
angle |
angle |
angle |
angle |
angle |
|
|
27 |
Increases monitor tilt |
Increases monitor tilt |
Increases monitor tilt |
Increases monitor tilt |
Increases monitor tilt |
Increases monitor tilt |
Increases monitor tilt |
|
|
|
angle |
angle |
angle |
angle |
angle |
angle |
angle |
DISP |
|
28 |
Selects display mode: |
Selects display mode: |
Selects display mode: |
Selects display mode: |
Selects display mode: |
Selects display mode: |
Selects display mode: |
|
|
|
CINEMA, WIDE, NOR- |
CINEMA, WIDE, NOR- |
CINEMA, WIDE, NOR- |
CINEMA, WIDE, NOR- |
WIDE or OFF |
WIDE or OFF |
WIDE or OFF |
|
|
|
MAL or Off (Standby) |
MAL or Off (Standby) |
MAL or Off (Standby) |
MAL or Off (Standby) |
|
|
|
1, 2, 3, 4, 5, |
|
29 |
Directly accesses chap- |
|
1-6 selects preset for cur- |
Directly accesses track |
1-6 selects preset TV sta- |
1-6 selects preset for cur- |
|
6, 7, 8, 9, 0 |
|
|
ter |
|
rent band |
|
tions |
rent band |
|
(Numeric |
|
|
|
|
|
|
|
|
|
Keypad) |
|
|
|
|
|
|
|
|
|
DVD |
|
30 |
Displays DVD Setup |
Displays DVD Setup |
Displays DVD Setup |
Displays DVD Setup |
Displays DVD Setup |
Displays DVD Setup |
Displays DVD Setup |
SETUP |
|
|
menu |
menu |
menu |
menu |
menu |
menu |
menu |
SYS |
|
31 |
Displays System Setup |
Displays System Setup |
Displays System Setup |
Displays System Setup |
Displays System Setup |
Displays System Setup |
Displays System Setup |
SETUP |
|
|
menu |
menu |
menu |
menu |
menu |
menu |
menu |
SEL |
|
32 |
|
|
|
|
|
|
|
|
|
|
|
|
|
|
|
|
|
RDM |
|
33 |
Plays all chapters in ran- |
|
|
Plays all tracks in ran- |
|
|
Plays all tracks in random |
|
|
|
dom order |
|
|
dom order |
|
|
order |
SCN |
|
34 |
|
|
|
Plays the first ten sec- |
|
|
|
|
|
|
|
|
|
onds of each track |
|
|
|
EJECT |
|
35 |
Ejects disc |
Ejects disc |
Ejects disc |
Ejects disc |
Ejects disc |
Ejects disc |
Ejects disc |
|
|
|
|
|
|
|
|
|
|
10
VM9021TS
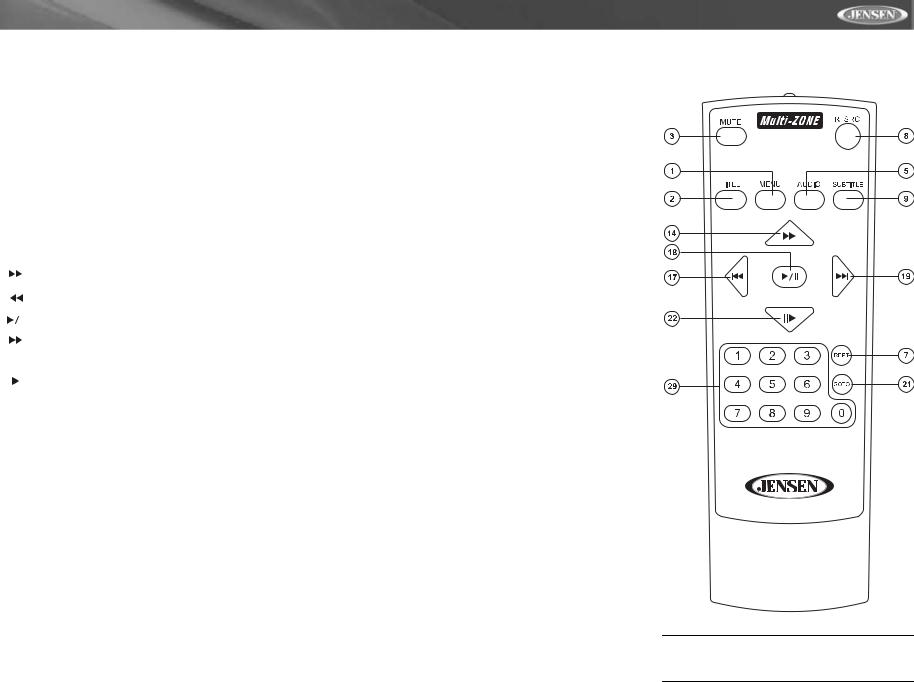
MULTI-ZONE REMOTE CONTROL
Table 2: Multi-Zone Remote Control Functions
|
|
Button |
|
Function |
||
|
|
|
|
|
|
|
|
Name |
Ref # |
DVD |
|
VCD |
|
|
|
|
|
|
|
|
|
|
|
|
|
|
|
MENU |
1 |
Enters the main menu of the disc |
|
Turns on PBC when playing VCD |
||
|
|
|
|
|
|
|
TITLE |
2 |
Enters the title menu of the disc |
|
Plays first ten seconds of each chapter/title |
||
|
|
|
|
|
|
|
MUTE |
3 |
Toggles on/off audio output |
|
Toggles on/off audio output |
||
|
|
|
|
|
|
|
AUDIO |
5 |
Switches the audio language for disc playback |
|
|
||
|
|
|
|
|
|
|
REPT |
7 |
Setup to repeat playback of each chapter/title/disc |
|
Setup to repeat playback of each chapter/title/disc |
||
|
|
|
|
|
|
|
R.SRC |
8 |
Selects playing mode for rear zone |
|
Selects playing mode for rear zone |
||
|
|
|
|
|
|
|
SUBTITLE |
9 |
Language selection for subtitle |
|
|
||
|
|
|
|
|
|
|
|
|
|
14 |
Fast forwards the disc content |
|
Fast forwards the disc content |
|
|
|
|
|
|
|
|
|
|
17 |
Selects the previous track/chapter for playback |
|
Selects the previous track/chapter for playback |
|
|
|
|
|||
|
|
|
|
|
|
|
|
|
|
18 |
Pauses playback/Starts playback |
|
Pauses playback/Starts playback |
|
|
|
|
|||
|
|
|
|
|
|
|
|
|
|
19 |
Selects the next track/chapter for playback |
|
Selects the next track/chapter for playback |
|
|
|
|
|||
|
|
|
|
|
|
|
GOTO |
21 |
Goes to specific time frame and playback |
|
Goes to specific time frame and playback |
||
|
|
|
|
|
|
|
|
|
|
22 |
Slow playback/slow rewind playback |
|
Slow playback/slow rewind playback |
|
|
|
|
|||
|
|
|
|
|
|
|
1, 2, 3, 4, 5, |
29 |
Directly accesses chapter |
|
|
||
6, 7, 8, 9, 0 |
|
|
|
|
||
(Numeric |
|
|
|
|
||
Keypad) |
|
|
|
|
||
NOTE: Your remote control may differ slightly from the one pictured here. The above diagram is for illustrative purposes only.
11

USING THE TFT MONITOR
Open/Close TFT Monitor
Press the OPEN button (12) on the front panel or press the (  ) button (25) of the front zone remote control to open/ close the monitor.
TFT Monitor Auto Open
If “TFT Auto Open” is “on” when the unit is turned on, the monitor automatically moves to the viewing position.
If “TFT Auto Open” is ”off” when the unit is turned on, press the OPEN button (12) or (  ) button (25) on the front zone remote control to move the monitor into the viewing position.
If “TFT Auto Open” is set to ”Manual”, the TFT will not close when the key is turned off.
Reverse Driving Use
If the rear-view video camera is connected, the unit is on, and the monitor is stationed inside the main compartment of the unit, the monitor automatically moves into the viewing position and switches to CAMERA mode upon reverse driving. When the reverse driving stops, the monitor returns to the main storage compartment.
If the monitor is in display mode, the monitor automatically switches to CAMERA mode upon reverse driving. When the reverse driving stops, the monitor return to its original input mode.
Monitor Tilt Angle Adjustment
A known characteristic of LCD panels is the quality of the display in relationship to the viewing angle. The monitor angle can be adjusted for optimum viewing using one of the following methods:
Step by Step Angle Adjustment
Press the (  ) or (
  ) button (3, 4) on the remote control or the CH+ or CH- button (14, 15) on the monitor frame to adjust the tilt angle of the screen one step at a time.
Continuous Angle Adjustment
Press and hold the ( ) or (
 ) button (3, 4) on the remote control or the CH+ or CH- button (14, 15) on the monitor frame to adjust the tilt angle in a continuous motion.
Aspect Ratio
Press the DISP button (28) on the remote control or DISP/ PIC button (13) on the monitor to adjust the aspect ratio as follows:
VM9021TS
CINEMA
The entire screen is extended horizontally to the aspect ratio of 16 to 9. The extension ratio is the same at any point.
WIDE
The screen is extended horizontally to the aspect ratio of 16 to 9. The extension ratio increases toward the right and left ends of the screen.
NORMAL
The conventional display image has a 4 to 3 ratio of horizontal to vertical, leaving a blank area on the right and left sides of the display.
OFF
Image Setting
Table 3 shows the video output mode for each playing source.
Table 3: Video Output Modes
Playing Source |
Video Output Modes |
|
|
|
|
AM/FM TUNER |
RGB Mode |
|
|
XM TUNER |
RGB Mode |
|
|
iPod |
RGB Mode |
|
|
DVD |
RGB Mode |
|
|
NAV |
RGB Mode |
|
|
TV |
CVBS Mode |
|
|
AUX IN |
CVBS Mode |
|
|
CAMERA |
CVBS Mode |
|
|
*CVBS – Composite Video Baseband Signal
Adjustable Parameters
While in DVD or TUNER mode, the only parameter that can be adjusted is brightness (BRIGHT). To access “PICTURE”, “COLOR”, “CONTRAST”, and “TINT” you must be in AUX, CAMERA or TV Tuner mode.
NOTE: The default adjustment is “0” in PAL mode. Tint is unavailable for adjustment.
Parameter Adjustment Procedure
1.Enter Picture Quality Setting mode:
Press the PIC button (24) on the remote or press and hold the DISP/PIC button (13) on the monitor panel.
2.Select Item to Set:
Press the (>>) (<<) buttons (14, 22) on the remote or press and hold the (/\) or (V) buttons (6, 7) on the monitor panel.
3.Set Parameters:
Press (|<<) (>>|) buttons (17, 19) on the remote or press (<) (>) buttons (8, 9) on the monitor panel.
4.Exit Picture Quality Setting Mode:
Press the PIC button (24) on the remote or press and hold the DISP/PIC button (13) on the monitor panel.
Parking Brake
Parking Brake Inhibit
When the pink "Parking" wire is connected to the vehicle brake switch, the front TFT monitor will display video only when the parking brake sequence is engaged. Before starting the parking brake sequence, the radio must be on with the video media disc inserted and playing.
Parking Brake Sequence
There are two situations that can start the Parking Brake Sequence:
•Parking brake is engaged (on) when the vehicle is started or the accessory/ignition is turned on. To activate video, the following sequence of events must be completed:
a.Release parking brake for 2 seconds.
b.Reapply the parking brake for 2 seconds.
c.Video should be displayed on the TFT monitor within 1
~2 seconds.
•Parking break is disengaged (off) when the vehicle is started or the accessory/ignition is turned on. To activate video, the following sequence of events must be completed:
a.Set parking brake for 2 seconds.
b.Release parking brake for 2 seconds.
c.Reapply parking brake.
d.Video should be displayed on the TFT monitor within 1
~2 seconds.
12

VM9021TS
Monitor Movement Mechanism
If an obstruction occurs in the monitor path, the following protective measurements can be executed to prevent damage to the mechanism or monitor:
Table 4: Monitor Protective Measures
Obstruction |
Self |
OPEN Button |
Power |
|
Protection |
Pressed |
Reconnected |
||
|
||||
|
|
|
|
|
|
|
|
|
|
Monitor load- |
Monitor is auto- |
Monitor fully |
Monitor is auto- |
|
ing out hori- |
matically |
extended hori- |
matically |
|
zontally |
loaded into unit |
zontally |
loaded into unit |
|
Monitor load- |
Unit stops at |
Monitor fully |
Monitor is auto- |
|
ing in hori- |
obstruction |
extended hori- |
matically |
|
zontally |
point |
zontally |
loaded into unit |
|
Monitor load- |
Unit stops at |
Monitor swiv- |
Monitor swiv- |
|
ing out verti- |
obstruction |
els back to the |
els back to the |
|
cally |
point |
unit |
unit |
|
Monitor load- |
Unit stops at |
Monitor swiv- |
Monitor swiv- |
|
ing in verti- |
obstruction |
els back to the |
els back to the |
|
cally |
point |
unit |
unit |
After the protective procedure is executed, normal operation is resumed by pressing the OPEN button (12) or disconnecting and reconnecting the power.
13

OPERATING INSTRUCTIONS
Power On / Off
Press the /MUTE button (1) to turn the unit on. The buttons on the front of the unit light up.
Press and hold the /MUTE button (1) on the front panel or the POWER button (4) on the remote to power off the unit..
Audible Beep Confirmation
An audible beep tone confirms each function selection. The beep tone cannot be disabled.
Mute
Press the /MUTE button (1) on the front panel or remote (3) to mute the volume from the unit. Press the MUTE button again to restore the volume. The mute icon flashes on the right side of the screen. Adjusting the volume or using any of the audio set-up features cancels the mute function.
Playing Source Selection
Press the SRC button (11) on the remote to change between available playing sources in the following order: TUNER, DVD, AUX IN or CAMERA (rear view video camera). The playing mode is displayed on the screen.
Press the MENU/SRC button (11) on the unit to access the playing source menu. Use the direction buttons on the joystick (6, 7, 8, 9) or remote control (14, 17, 18, 19, 22) to select a playing source, then press the >/|| button (18) or the joystick enter button (5) to enter the selected source.
AUX IN Mode
An external peripheral device can be connected to this unit via RCA output and “AUX-IN”.
CAMERA Mode
“CAMERA” mode is only available if the camera is connected and during reverse driving. To install a rear view video camera, connect the video input cable to the camera output cable.
Volume Adjustment
To increase the volume level, press the VOL + button (3) on the front panel or remote control. To decrease the volume level, press the VOL - button (4) on the front panel or remote control.The volume ranges from “0” to “40”. When the volume level reaches “0” or “40”, a triple beep sounds, indicating that the adjustment limit has been reached. The screen displays the volume level for 3 seconds.
Programmable Turn-On Volume
This feature allows the user to select a turn-on volume setting regardless of the volume setting prior to turning the unit off.
To program a specific volume level, push and hold the AUDIO button (2) while the yellow volume bar is displayed on the screen. The unit will beep two times to confirm your turnon volume setting.
Audio Control Menu
The Audio Control feature allows you to easily adjust your audio system to meet the acoustical characteristics of your vehicle, which vary depending on the type of vehicle and its measurements. To get the best possible sound quality from your new system, be sure to adjust the settings for the speakers as well. Proper setting of the Fader and Balance boosts the effects of the cabin equalizer.
Accessing the Audio Control Menu
Press the AUDIO/LOC button (2) on the front panel to display the “AUDIO” menu.
Selecting an Audio Feature for Adjustment
Press the (<)/(>) buttons (8, 9) on the joystick or the (|<<)/ (>>|) buttons (17, 19) on the remote control to select the audio feature to be adjusted.
Adjusting an Audio Feature
Press the >> or << buttons (14, 22) on the remote control or the /\ or V buttons (6, 7) on the joystick to adjust the selected feature to the desired setting.
Table 5: Audio Adjustments
Audio Function |
Adjustable Range |
|
|
|
|
EQ |
User |
|
Flat |
|
|
|
Jazz |
|
Pop |
|
|
|
Classical |
|
|
|
Rock |
|
Vocal |
|
|
BASS |
-14 to +14 |
|
|
TREBL |
-14 to +14 |
SUB |
-7 to +7 |
|
|
LOUD |
0 (off), 1-4 |
|
|
FAD (Fade) |
-9 to +9 |
BAL |
-9 to +9 |
|
|
NOTE: The Bass and Treble levels are only adjustable when EQ is set to “User” mode.
VM9021TS
The Loud function compensates for deficiencies in sound ranges at low levels. Loudness levels range from 1-4 or “off”. When the Loud function is on, “LOUD” is displayed on the screen.
Exiting the Audio Control Menu
Press and hold the AUDIO/LOC button (2) or stop making adjustments for a few seconds to exit the audio control menu.
Six-Channel Audio Control
NOTE: Before adjusting the volume of any speaker, please refer to “Surround Sound” on page 25.
Table 6: 6-Channel Audio Adjustments
Item |
Adjustable Range |
|
|
|
|
Master Volume |
00 to 40 |
|
|
Front Left Channel Volume |
-10 to +10 |
|
|
Front Right Channel Volume |
-10 to +10 |
|
|
Rear Left Channel Volume |
-10 to +10 |
|
|
Rear Right Channel Volume |
-10 to +10 |
|
|
Center Channel Volume |
-10 to +10 |
|
|
Subwoofer Volume |
-10 to +10 |
|
|
Rear Zone
If a monitor is installed in the rear zone and connected to the rear zone AV output, passengers in the back seat can control the DVD output using the rear zone remote control. See “Multi-Zone Remote Control” on page 11 for instructions.
System Reset
To correct a system halt or other illegal operation, use the tip of a pen to press the RESET button (25) located on the front
bottom-right corner of the unit. After a system reset, the unit restores all factory default settings.
NOTE: If the unit is reset while a DVD is playing, the DVD resumes play once the reset is complete.
Line Mute
If the “MUTE” wire is connected, audio output mutes when a telephone call is received by the car phone or when verbal navigation is performed.
14
VM9021TS
SYSTEM SETUP MENU
In “System Setup” mode, “ASP CONFIG” and “GENERAL SETUP” are available for adjustment. Setup can be performed by pressing the dedicated button on the remote control or by pressing the MENU/SRC button (11) on the front panel.
For system settings, press the SYS SETUP button (31) on the remote control or touch “SETUP” on the screen to enter the “SETUP” menu. “SYS SETUP” is highlighted in green.
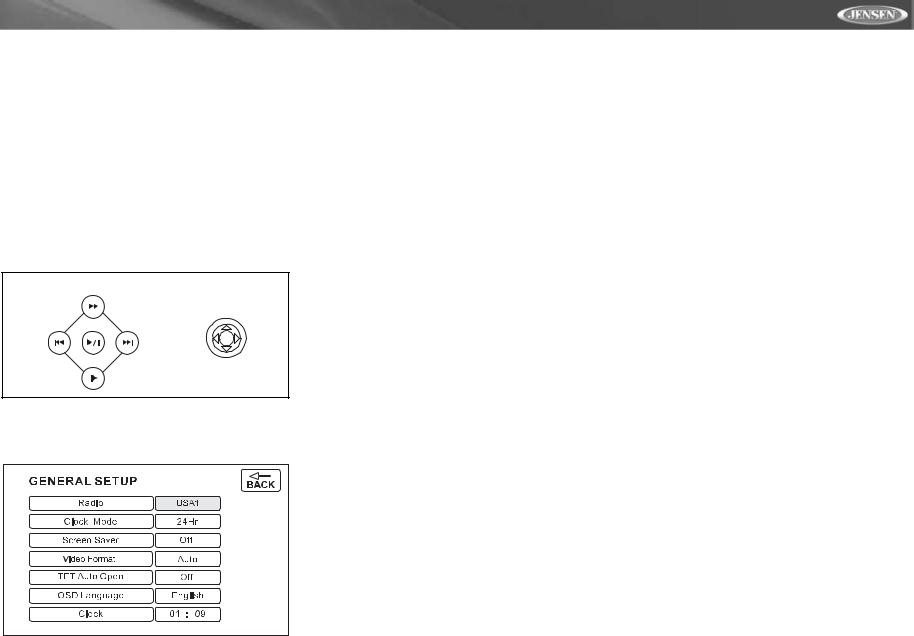
General Setup Menu
Accessing the General Setup Menu
To access the “GENERAL SETUP” Menu, press the direction buttons on the joystick (6, 7, 8, 9) or remote control (14, 17, 18, 19, 22) to highlight “GENERAL SETUP” in green.
DIRECTION BUTTONS
Press the >/|| button (18) on the remote control to enter the “GENERAL SETUP” menu. A menu appears with the option for the first item, “Radio”, highlighted in light blue.
Selecting a Feature for Adjustment
Press the >> or << buttons (14, 22) on the remote control or the /\ or V buttons (6, 7) on the joystick to select the feature to be adjusted.
Adjusting a Feature
1.Enter the option field for the feature you want to adjust by pressing the >/|| button (18) on the remote or by pressing the ENTER (joystick) button (5) on the unit. A submenu appears in a second row with the selected option highlighted in light blue.
2.Select a new value by pressing the >> or << buttons (14, 22) on the remote control or the /\ or V buttons (6, 7) on the joystick.
3.Confirm your selection by pressing the <<, |<<, or >>| buttons (14, 17, 19) on the remote control, or the < or > button (8, 9) on the joystick. The new value is highlighted in light blue and setup is complete.
Table 7: General Setup Menu Features
Setting |
Options |
|
Function |
|
|
|
|
|
|
|
|
Radio |
USA |
• |
AM Frequency Spacing - 10kHz |
|
|
• |
AM Frequency Band - |
|
|
• |
530kHz~1720kHz |
|
|
FM Frequency Spacing - 200kHz |
|
|
|
• |
FM Frequency Band - |
|
|
|
87.5MHz~107.9MHz |
|
Europe |
• |
AM Frequency Spacing - 9kHz |
|
|
• |
AM Frequency Band - |
|
|
|
522kHz~1620kHz |
|
|
• FM Frequency Spacing - 50kHz |
|
|
|
• |
FM Frequency Band - |
|
|
|
87.5MHz~108.0MHz |
|
South |
• |
AM Frequency Spacing - 10kHz |
|
America 1 |
• |
AM Frequency Band - |
|
|
• |
530kHz~1720kHz |
|
|
FM Frequency Spacing - 100kHz |
|
|
|
• |
FM Frequency Band - |
|
|
|
87.5MHz~108.0MHz |
|
South |
• |
AM Frequency Spacing - 5kHz |
|
America 2 |
• |
AM Frequency Band - |
|
|
• |
520kHz~1600kHz |
|
|
FM Frequency Spacing - 100kHz |
|
|
|
• |
FM Frequency Band - |
|
|
|
87.5MHz~108.0MHz |
|
Arabia |
• |
AM Frequency Spacing - 9kHz |
|
|
• |
AM Frequency Band - |
|
|
• |
531kHz~1620kHz |
|
|
FM Frequency Spacing - 100kHz |
|
|
|
• |
FM Frequency Band - |
|
|
|
87.5MHz~108.0MHz |
|
Korea |
• |
AM Frequency Spacing - 9kHz |
|
|
• |
AM Frequency Band - |
|
|
• |
531kHz~1602kHz |
|
|
FM Frequency Spacing - 200kHz |
|
|
|
• |
FM Frequency Band - |
|
|
|
88.1MHz~107.9MHz |
Table 7: General Setup Menu Features
Setting |
Options |
|
Function |
|
|
|
|
|
|
|
|
|
|
|
|
China |
• |
AM Frequency Spacing - 9kHz |
|
|
|
• |
AM Frequency Band - |
|
|
|
• |
522kHz~1620kHz |
|
|
|
FM Frequency Spacing - 100kHz |
||
|
|
• |
FM Frequency Band - |
|
|
|
|
87.5MHz~108.0MHz |
|
Clock Mode |
12H |
Clock displays 12 hour time using |
||
|
|
AM and PM. |
||
|
24H |
Clock displays 24 hour time up to |
||
|
|
23:59. |
||
Screen Saver |
On |
Turn screen saver on/off. |
||
|
|
|
|
|
|
Off |
|
|
|
|
|
|
||
Video Format |
Auto |
The color signal output is switched |
||
(Input cir- |
|
automatically based on the current |
||
cuitry auto- |
|
video input signal - NTSC or PAL. |
||
detects the |
|
|
|
|
NTSC |
The color signals are output in the |
|||
video signal |
||||
from the |
|
standard NTSC format. |
||
CAMERA |
PAL |
The color signals are output in the |
||
and Aux In |
||||
|
standard PAL format. |
|||
video source. |
|
|||
|
|
|
||
Video format |
|
|
|
|
does not |
|
|
|
|
affect the TV |
|
|
|
|
tuner - this is |
|
|
|
|
an NTSC TV |
|
|
|
|
tuner only. |
|
|
|
|
TFT Auto |
On |
The TFT panel automatically opens |
||
Open |
|
when the unit is turned on. |
||
|
Off |
You must press the OPEN button |
||
|
|
(1) to open the TFT panel. |
||
|
Manual |
When the ignition is turned OFF, the |
||
|
|
TFT panel DOES NOT retract if it |
||
|
|
was previously out |
||
OSD Lan- |
English |
The menus are displayed in English |
||
guage |
|
only. |
||
Clock |
(HH:MM) |
See “Adjusting the clock” to learn |
||
|
|
how to set the clock. |
||
BACK |
|
Return to previous menu. |
||
|
|
|
|
|
Adjusting the Clock
1.Access the “Clock” setting under the General Setup menu.
2.Press the >> or << buttons (14, 22) on the remote control or the /\ or V buttons (6, 7) on the joystick to move the cursor to the “Hour” or “Min” position.
3.Press the |<< or >>| buttons (17, 19) on the remote control or the < or > buttons (8, 9) on the joystick to adjust the hour or minutes.
4.Press the << button (14) on the remote control to confirm setup.
15
Returning to the System Setup Menu
To return to the System Setup menu, move to “BACK”, then press the >/|| button (18) on the remote control.
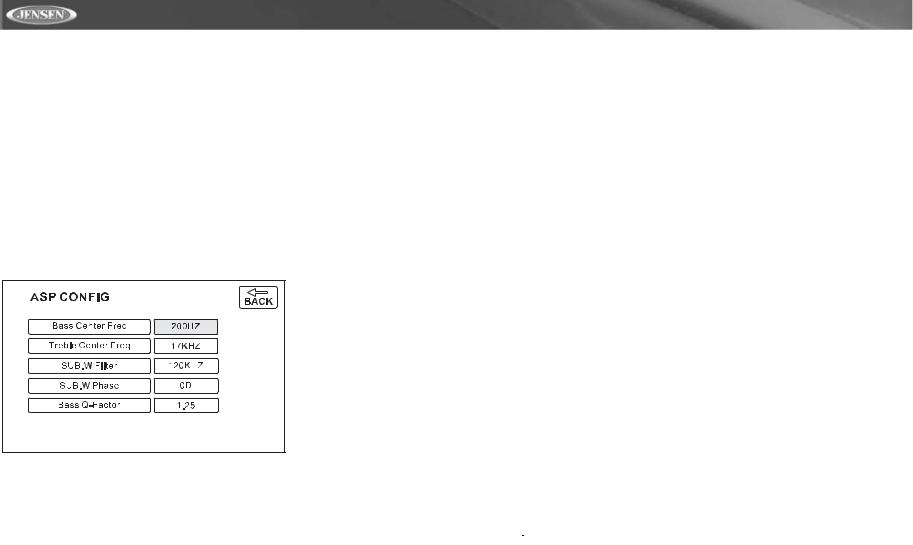
ASP (Audio Sound Processing) Config Menu
The ASP Config Menu allows you to make fine audio adjustments.
Accessing the ASP Config Menu
To access the “ASP CONFIG” Menu from the “SYSTEM SETUP” menu, press the direction buttons on the joystick (16, 17, 18, 19) or remote control (14, 17, 18, 19, 22) to highlight “ASP CONFIG” in green. Press the >/|| button (18) on the remote control to enter the “ASP CONFIG” menu. A menu appears with the option for the first item, “Bass Center Freq”, highlighted in light blue.
Adjusting a Feature
1.Enter the option field for the feature you want to adjust by pressing the >/|| button (18) on the remote or by pressing the ENTER (joystick) button (5) on the unit. A submenu appears in a second row with the selected option highlighted in light blue.
2.Select a new value by pressing the >> or << buttons (14, 22) on the remote control or the /\ or V buttons (6, 7) on the joystick.
3.Confirm your selection by pressing the <<, |<<, or >>| buttons (22, 17, 19) on the remote control, or the < or >
VM9021TS
button (8, 9) on the joystick. The new value is highlighted in light blue and setup is complete.
Table 8: ASP Config Menu Features
Setting |
Options |
Function |
|
|
|
|
|
|
|
|
|
Bass Center |
60Hz |
According to the audio source, select |
|
Freq |
|
the Bass Center Frequency to |
|
80Hz |
|||
|
achieve the best Bass effect. |
||
|
100Hz |
|
|
|
|
|
|
|
130Hz |
|
|
|
|
|
|
|
150Hz |
|
|
|
|
|
|
|
200Hz |
|
|
|
|
|
|
Treble Center |
10KHz |
According to the audio source, select |
|
Freq |
|
the Treble Center Frequency to |
|
12.5KHz |
|||
|
achieve the best Treble effect. |
||
|
15KHz |
|
|
|
|
|
|
|
17KHz |
|
|
|
|
|
|
Sub.W Filter |
80Hz |
Selecting a crossover frequency sets |
|
|
|
a cut-off frequency of the subwoofer's |
|
|
120Hz |
||
|
LPF (low-pass filter) and the |
||
|
160Hz |
“SMALL” speakers' HPF (high-pass |
|
|
filter). The Crossover frequency set- |
||
|
|
||
|
|
ting has no effect if the subwoofer is |
|
|
|
set to “OFF” and any other speaker is |
|
|
|
set to “LARGE”. |
|
Sub.W Phase |
0D |
Subwoofer output IN phase |
|
|
|
|
|
|
180D |
Subwoofer output OUT OF phase |
|
|
|
|
|
|
|
NOTE: Depending on your installa- |
|
|
|
tion, reversing the subwoofer phase |
|
|
|
may increase Bass output. |
|
Bass Q-Factor |
1.0 |
When the Bass Center Frequency is |
|
|
|
selected, adjusting the Bass Q-Fac- |
|
|
1.25 |
||
|
tor alters the sharpness of the Bass |
||
|
1.5 |
output. |
|
|
|
||
|
|
|
|
|
2.0 |
|
|
|
|
|
|
BACK |
|
Return to previous menu. |
|
|
|
|
Screen Calibration
After entering calibration mode, a crosshair  appears in a corner quadrant of the screen. To begin calibration, press and hold the crosshair for one second until it moves to the next quadrant. Continue for each quadrant until the calibration is completed.
Exiting the System Setup Menu
To exit setup mode and resume normal playback, press the SYS SETUP button (31) on the remote control or the DISP button (13) on the front panel.
16
VM9021TS
MULTI-ZONE OPERATION
Independent sources can be played simultaneously on the VM9021TS. For example, a video game console can be seen on the front screen while DVD video is available to rear passengers.
NOTE: If DVD is selected as the front source and SD Card is selected for the rear source, then both sources will switch to SD Card. If SD Card is selected as the front source and DVD is selected for the rear source, then both sources will switch to the DVD source. Since the multimedia processor is shared between optical and SD Card media, one or the other can be selected, but not both simultaneously.
Selecting a Source for the Front Zone
To access the FRONT ZONE SOURCE MENU, touch the TFT screen in the top left corner of the screen.
This menu allows you to select a source for the front zone.
Selecting a Source for the Rear Zone
The Multi-ZONE sources available for selection depends upon which Front Zone source is selected, as indicated in Table 9.
Table 9: Multi-ZONE Source Options
Front Zone Source |
Available Multi-ZONE Sources |
|
|
|
|
AM/FM Tuner |
DVD/CD, SD Card, TV, Aux In, Nav |
|
|
DVD/CD |
DVD/CD, TV, Aux In, Nav |
|
|
SD Card |
DVD/CD, TV, Aux In, Nav |
|
|
iPod |
Aux In, Nav Voice Prompt |
|
|
XM |
Aux In, Nav Voice Prompt |
|
|
Table 9: Multi-ZONE Source Options
Front Zone Source |
Available Multi-ZONE Sources |
|
|
|
|
TV |
DVD/CD, Aux In, TV, Nav |
|
|
Aux In |
DVD/CD, TV, Aux In, Nav |
|
|
Nav |
DVD/CD, SD Card, Aux In, Nav Voice |
|
Prompt |
To access the rear zone SOURCE MENU, touch the top right corner of the screen, near the Multi-ZONE icon.
Select the source to be directed to the rear Multi-ZONE RCA outputs.
NOTE: Optical media and an SD Card cannot be selected from the Multi-ZONE Source Menu simultaneously.
NOTE: The AM/FM tuner graphics will change to a "blue screen" background when any optical or SD Card media is selected from the Multi-ZONE menu. In addition, only the top left (Front Zone Source Menu) and right (MultiZONE Source Menu) quadrants of the touch screen are active during this mode of operation.
17
TUNER OPERATION
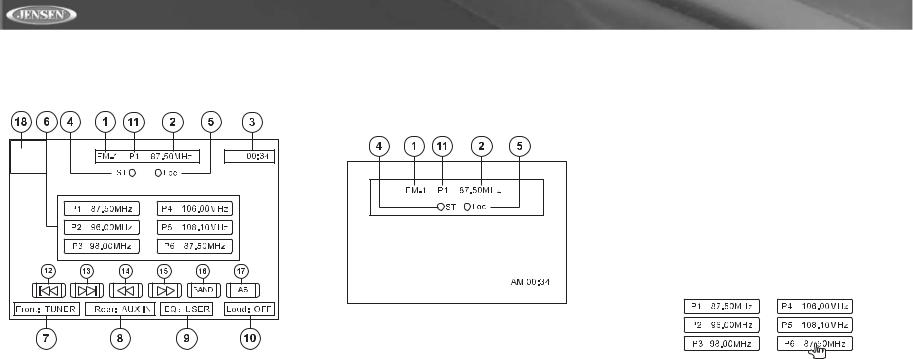
Tuner TFT Display
Default TFT Tuner Display
1.Current Radio Band Indicator
2.Radio Frequency Indicator
3.Clock
4.Stereo Broadcasting Indicator
5.Strong Local Signal Broadcasting Indicator: Touch and hold to activate/deactivate Local function
6.Preset Radio Stations: Touch to recall preset stations or touch and hold to store a station
7.Front Zone Playing Mode
8.Rear Zone Playing Mode
9.User Defined Equalizer Level
10.Loud Setting Indicator
11.Current Preset Station Indicator
12.|<<: Touch to seek backward
13.>>|: Touch to seek forward
14.<<: Touch to tune backward one step
15.>>: Touch to tune forward one step
16.BAND: Touch to change between AM/FM bands
17.AS: Touch to automatically store stations
18.Touch this area to return to the MAIN MENU
Alternate TFT Tuner Display
The VM9021TS offers an alternate display for the AM / FM tuner interface that is less bright than the default tuner display and is more appropriate for night driving.
To activate this feature, open the TFT screen and then press and hold the DISP button (13) for more than one second. To deactivate, press and hold the DISP button again.
Switch to Radio Tuner source
Press the TUNER button (10) on the front panel or the SRC button on the remote control (8) to switch to the TUNER source.
Select FM/AM Band
Touch the BAND button (16) on the screen, or press the TUNER button (10) on the unit or the BAND button on the remote control (20) to change between the following bands: FM1, FM2, FM3, AM1, and AM2.
Auto Tuning
Press and hold the >>| button (19) on remote control or screen, or the > button on the joystick (9) to seek the next available radio station by increasing the tuning frequency. Press the button again to stop searching.
Press and hold the |<< button (17) on the remote control or screen, or the < button on the joystick (8) to seek the next available radio station by decreasing the tuning frequency. Press the button again to stop searching.
Manual Tuning
Press the >> or << buttons (14, 22) on the remote control or screen, or the /\ or V buttons (6, 7) on the joystick to increase or decrease the tuning frequency one step.
VM9021TS
Press and hold the buttons to continuously tune until you release them.
Using Preset Stations
Six numbered preset buttons store and recall stations for each band. All six stored stations (P1-P6) for the current band appear on the screen.
Storing a Station
1.Select a band (if needed), then select a station.
2.Touch and hold an on-screen preset button (6) for three seconds. The preset number appears at the top of the screen.
Recalling a Station
1.Select a band (if needed).
2.Touch an on-screen preset button (6) to select the corresponding stored station.
Auto Store (AS)
Automatic Storing of Preset Stations
To select six strong stations and store them in the current band:
1.Select a band (if needed).
2.Touch AS (17) for 2 seconds to activate the Auto Store function.
The new stations replace stations already stored in that band.
Local Radio Station Seeking (LOC)
When the Local function is on, only radio stations with a strong radio signal are played. To activate the Local function in AM/FM tuner mode, press and hold the AUDIO/LOC button (2) on the front panel while the yellow volume bar IS NOT visible. Press AUDIO/LOC again to turn Local off. When the Local function is active, “LOC” appears on the screen and a green indicator is illuminated.
18
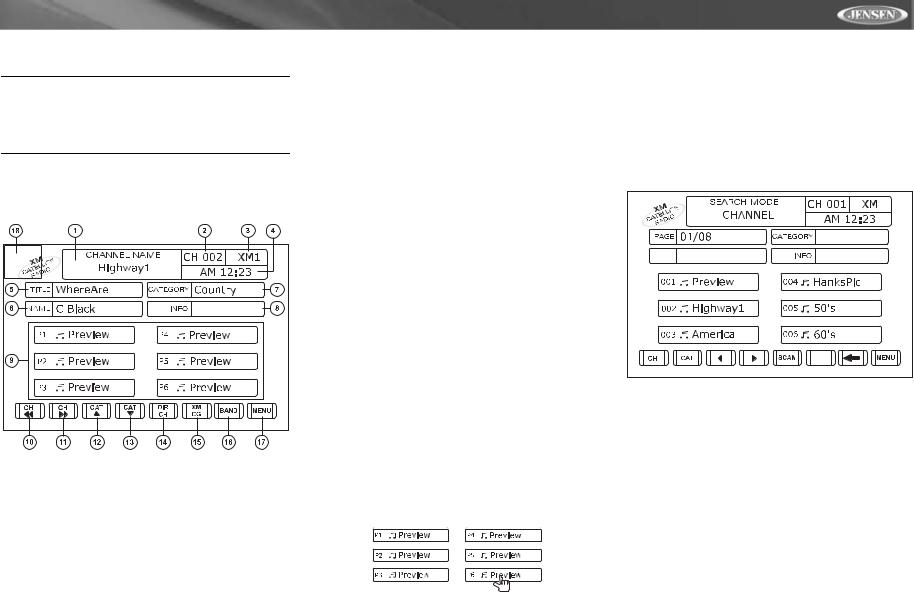
VM9021TS
XM RADIO OPERATION
Listeners can subscribe to XM® Radio on the Web by visiting www.xmradio.com, or by calling (800) 967-2346. Customers should have their Radio ID ready (see “Displaying the Identification (ID) Code”). Customers can receive a limited number of free-to-air channels without activation.
Accessing XM® Radio Mode
Press the SRC button (15) on the front panel or remote control (8) to switch to the XM source.
1.XM channel name
2.XM channel number
3.XM band
4.Time
5.Song title
6.Artist name
7.Song category
8.Data services information
9.Current preset channels/on-screen preset buttons
10.CH <<: Select the previous channel
11.CH >>: Slect the next channel
12.CAT /\: Select next channel in current category only
13.CAT V: Select previous channel in current category only
14.DIR CH: Press to enter channel directly using keypad on screen
15.XM CG: Access Channel/Category Guide mode
16.BAND: Change between XM, XM1, XM2 and XM3 bands
17.MENU: Access the XM Setup Menu
18.Touch this area to return to the MAIN MENU
Displaying the Identification (ID) Code
Before you listen to XM® Radio, you must subscribe to the service using your radio’s identification number. To display the radio ID, press the < or > buttons (16, 17) on the joystick or the CH << or CH >> buttons on the touch screen repeatedly to tune to channel “000”. The screen displays the 8-character XM radio ID under “CHANNEL NAME”.
Selecting a Station
Press the < or > buttons (8, 9) on the joystick, the |<< or >>| buttons (17, 19) on remote control, or the CH << or CH >> buttons on the touch screen to change to another station.
Preset Mode
To enter preset mode, touch the BAND button on the screen or remote control (20) to change between the following bands: XM1, XM2, or XM3 (indicated in the top right corner of the TFT screen).
Six numbered preset buttons store and recall stations for each band. All six stored stations (P1-P6) for the current band appear on the TFT screen.
Storing a Station
1.Select a band (if needed), then select a station.
2.Touch and hold an on-screen preset button for three seconds. The preset number appears at the top of the screen.
Recalling a Station
1.Select a band (if needed).
2.Touch an on-screen preset button to select the corresponding stored station.
Channel/Category Guide Mode
There are two search modes to help navigate through channels and or categories. To access the Channel/Category Guide mode press, the ZOOM button (23) on the remote control or the XM CG button on the touch screen.
Channel Guide is the default search mode. To access Category Guide, press the TITLE button (2) on the remote control or touch CAT on the touch screen. To return to
Channel Guide, press the SUBTITLE button (9) on the remote control.
Channel Guide Mode
When Channel Guide mode is selected, “Search Mode” and “CHANNEL” appear in the top half of the user interface. “XM” appears in the top right corner and the first six XM channels are displayed in the boxes in the bottom half of the TFT screen.
•While in Search Mode, to switch between Channel and Category search modes, press the CH or CAT buttons in the touch screen.
•Press the >> button (14) on the remote control, the /\ button (6) on the joystick, or the > button on the touch screen to view the next page of stations. Each page contains six channels to select from.
•Press the << button (22) on remote control, the V button
(7) on the joystick, or the < button on the touch screen to view the previous page of stations. Each page contains six channels to select from.
•Press the on-screen SCAN button to preview each of the 6 channels on screen for 10 seconds.
•Press the on-screen  button to return to the Preset Mode screen.
•Press the on-screen MENU button to access the XM Setup Menu.
To select a channel while in Channel Guide mode, press the corresponding preset number (1-6) on the unit, remote control, or touch screen. The channel will begin playing and the unit will return to the Preset Mode. While in Preset Mode, press and hold an on-screen preset button (or 1-6 on the unit or remote control) to store the channel playing.
19
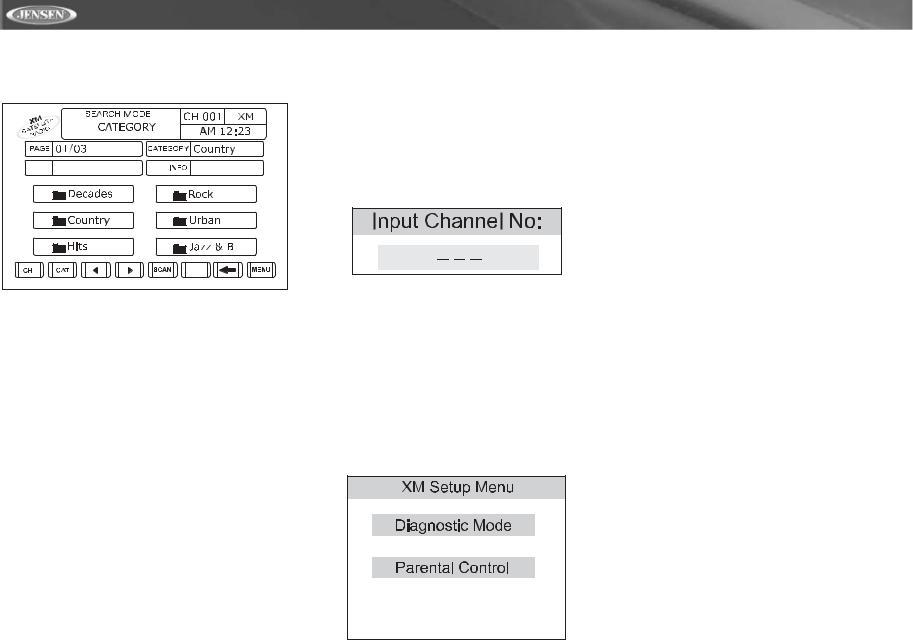
Category Guide Mode
When Category Mode is selected, “Search Mode” and “CATEGORY” appear in the top half of the user interface.
begin playing and the unit will return to the Preset Mode. While in Preset Mode, press and hold an on-screen preset button (or 1-6 on the unit or remote control) to store the channel playing.
Press the TITLE button (2) to return to the Category Mode main page and select a different category.
Direct Tuning
To enter a station directly, perform the following steps.
1.Press the GOTO button (21) until the following screen appears.
•While in Search Mode, to switch between Channel and Category search modes, press the CH or CAT buttons in the touch screen.
•Press the >> button (14) on the remote control, the /\ button (6) on the joystick, or the > button on the touch screen to view the next six categories.
•Press the << button (22) on the remote control, the V button (7) on the joystick, or the < button on the touch screen to view the previous six categories.
•Press the on-screen SCAN button to preview each channel in the selected category for 10 seconds.
•Press the on-screen  button to return to the Preset Mode screen.
•Press the on-screen MENU button to access the XM Setup Menu.
To select a station in a specific category, perform the following steps.
1.To select a category, press the corresponding preset number (1-6) on the front of the unit, the remote control, or the touch screen. Once a category is selected, the stations in that category will be displayed on the screen.
2.Press the >> button (14) on the remote control, the /\ button (6) on the joystick, or the > button on the touch screen to view the next six stations.
Press the << button (22) on remote control, the V button
(7) on the joystick, or the < button on the touch screen to view the previous six stations in the selected category.
3.To select a channel while in Category Guide mode, press the corresponding preset number (1-6) on the unit, remote control, or touch screen. The channel will
2.Use number keys on the remote control to enter the desired XM radio station. You must enter a 3 digit number (for example, 004).
3.Press the >/|| button (18) on the remote control or the joystick ENTER button (5) on the unit or just let the keypad "time out" after 4 seconds and the station will be entered automatically. Use the on-screen “CLR” button to correct entry mistakes and “OK” to enter the channel number.
XM Setup Menu
While in XM radio mode, press the MENU button (1) on the remote control to view the XM Setup Menu.
Press MENU to exit the current submenu or menu and return to the previous screen.
VM9021TS
Diagnostic Mode
This feature is reserved for use by service professionals for troubleshooting.
Parental Control
By default, this feature is unlocked and all channels can be accessed by anyone listening to the radio. To lock a station, press the << button (22) on the remote control or V button (7) on the joystick until "Channel Number" is highlighted blue.
Input the channel number to be locked. Press the << button on the remote control or \/ button on the joystick and select LOCK. Repeat this sequence for each channel to be locked. Press the >> button on the remote control or /\ button (6) on the joystick and navigate back up to Password - input 1264 and the small yellow lock will close indicating that the channel(s) are locked. Press the MENU button (1) twice to return to the main XM page.
20
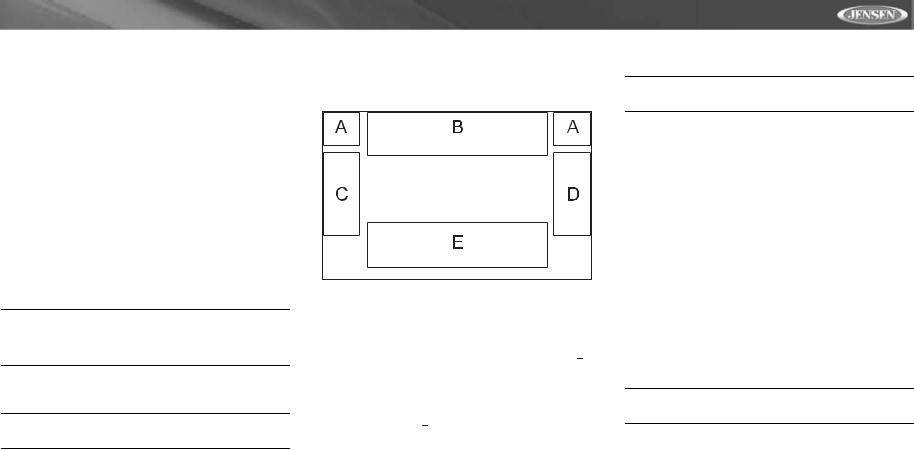
VM9021TS
DVD/VCD VIDEO OPERATION
NOTE: When properly installed, DVD video cannot be displayed on the main TFT screen unless the parking brake is applied. If you attempt to play a DVD while the vehicle is moving, the TFT screen displays “PARKING” with a blue background. Rear video screens, if applicable, will operate normally.
Opening/Closing the TFT Video Screen
Opening the TFT Screen
To open the TFT video screen, press the OPEN button (12). The unit beeps and then opens.
Closing the TFT Screen
Press the OPEN button (12) again to close the TFT screen.
Insert/Eject Disc
Upon inserting a DVD disc, DVD mode is entered and disc play begins.
NOTE: If Parental Lock (Rating) is activated and the disc inserted is not authorized, the 4-digit code must be entered and/or the disc must be authorized (see “RATING (Parental Lock) Menu” on page 26).
You cannot insert a disc if there is already a disc in the unit or if the power is off.
NOTE: DVD-R and DVD-RW will not play unless the recording session is finalized and the DVD is closed.
Ejecting a Disc
Press the  button (22) on the unit or remote control (35) to eject the disc. The unit automatically reverts to Tuner mode. You may eject a disc with the unit powered off. The unit will remain off after the disc is ejected.
Reset the Loading Mechanism
If the disc loads abnormally or an abnormal core mechanism operation occurs, press and hold the  button (22) on the unit or remote control (35) to reset the loading mechanism. Normal operation resumes.
Accessing DVD Mode
To switch to DVD mode when a disc is already inserted, press the DVD button (18) on the front panel or remote control (8) until “DVD” appears at the bottom of the screen.
Using the Touch-Screen Controls
The touch key areas for DVD playback are outlined below.
A – Return to MAIN MENU
B – DISP key: Displays playing information C – Select previous chapter
D – Select next chapter
E – Display the following on-screen controls: Menu, >/||,  ,
,
|<<, >>|, <<, >>.
Controlling Playback
Stopping Playback
Touch the stop button (
 ) on the screen or press the
 / BAND button (20) on the remote control to stop DVD play.
Pausing Playback
Touch the play/pause button (>/||) on the screen or press the >/|| button on the remote control (18) to suspend or resume disc play.
Slow Motion Playback
Press the << button (22) on the remote control or the V button (19) on the joystick to play the current title in slow motion at 1/ 2, 1/4, 1/6 or 1/7, the normal speed. Press >/|| (18) to resume normal play. Continue pressing the << or V button to slow reverse.
Repeat Playback
Press the REPT button (7) on the remote control to alter repeat mode according to the following:
•DVD: Repeat Title, Repeat Chapter, Repeat Off
•VCD (PBC Off): Repeat Single, Repeat Off
•MP3: Repeat Single, Repeat Folder, Repeat Off
NOTE: For VCD play, the repeat function is not available if PBC is on.
Sectional Repeat Function (A-B)
Use the A-B function to define a specific area of a disc to repeat.
•Press the REPT A-B button (6) on the remote control to set the start point (A) of the repeated section.
•Press the REPT A-B button again once you reach the desired end point (B) of the repeated section. The selected portion of the DVD will now repeat continuously.
•Press the REPT A-B button again to cancel the A-B section setting and stop repeat play.
Random Playback
With a DVD, VCD, or CD playing, press the RDM button (33) on the remote control to activate random playback and play all chapters/tracks in random order. “On” appears on the screen.
Press the >>| button (19) on the remote control or the > button on the joystick (9) to play the next random track.
Press the RDM button again to turn random play off.
NOTE: When a VCD is playing with PBC turned “On”, activating random playback automatically turns PBC off.
Accessing the DVD Menu
Press the MENU button (1) on the remote control to recall the main DVD menu. Use the directional (arrow) buttons (<, >, /\ & V) on the joystick (8, 9, 6, 7) to select a title from the menu.
Press the TITLE button (2) on the remote control to select a different title for playback.
Press the >/|| button (18) on the remote control or the ENTER (joystick) button (5) to confirm your selection and begin playback.
Moving Through Chapters
Press the >>| button (19) on the remote control or the > button on the joystick (9) to advance to the next chapter on the DVD.
Press the |<< button (17) on the remote control or the < button on the joystick (8) to move to the previous chapter.
Fast Forward/Fast Reverse
Press the >> button (14) on the remote control or the /\ button
(6) on the joystick to fast forward. Keep pressing and
21
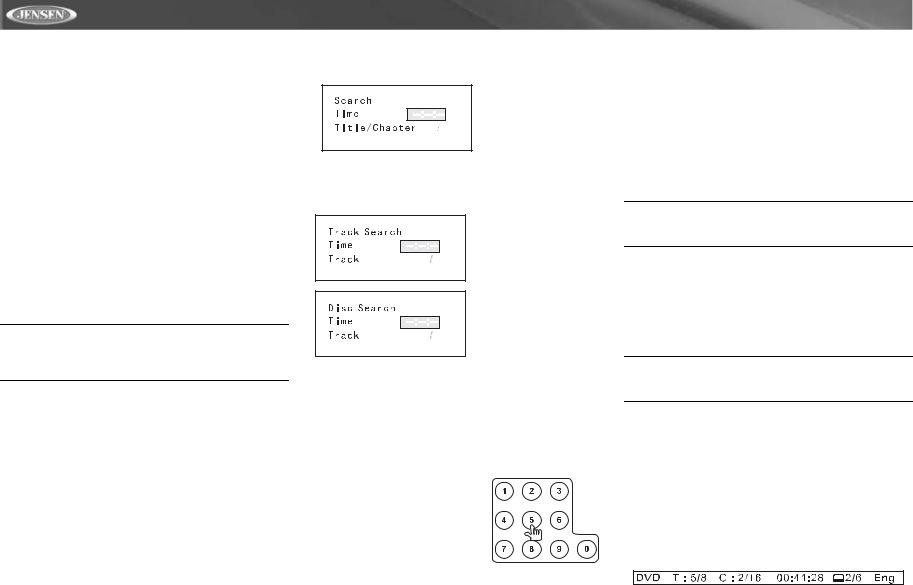
releasing the button to increase the rate from “2X” to “4X”, “8X”, and “20X”. Continue pressing the >> or /\ button to fast reverse.
Scanning
Press the SCN button (34) on the remote control to play the first ten seconds of each chapter. Press SCN again to stop the scan function and play the current chapter.
Selecting 2-Channel and 6-Channel Audio Playback
2-Channel Audio (Down Mix) Support for CD, SD Card and DVD
Linear pulse code modulation (LPCM) and pulse code modulation (PCM) support is available for CD, SD Card and DVD discs when 2-channel audio is selected.
6- Channel Audio Support for CD, SD Card and DVD
Pro-Logic II is available for decoding analog or digital 2- channel down mixed sources. Dolby Digital is available for decoding digital bit-stream sources.
NOTE: 2-channel audio support is available for AM/FM tuner, TV tuner, Aux Input, XM, iPod and Navigation only. 6-channel audio support is available for DVD/CD/CD-R and SD card.
Table 10: Speaker Output Options
Speaker Setup |
Front |
Rear |
Center |
Sub- |
|
Spkr |
Spkr |
Spkr |
Woofer |
||
|
|||||
|
|
|
|
|
|
|
|
|
|
|
|
2CH mode |
X |
X |
|
|
|
Play 2-channel (down |
X |
X |
X |
X |
|
mix) audio in 6-chan- |
|
|
|
|
|
nel mode with Pro- |
|
|
|
|
|
Logic II "ON" |
|
|
|
|
|
Play 6-channel audio |
X |
X |
X |
X |
|
in 6-channel mode |
|
|
|
|
|
with Dolby Digital |
|
|
|
|
|
"ON" |
|
|
|
|
Goto Search
During DVD or VCD playback, perform the following steps to use the GOTO feature to access a specific location on a disc:
1.Press the GOTO button (21) on remote control to enter “GO TO” mode.
2.Press the >> or << buttons (14, 22) on the remote control or the < or > buttons (8, 9) on the joystick to select a category (highlighted in blue).
•For DVD mode, you can choose Time or Title/Chapter search.
DVD Search
Time – Go to specific time in current title
Title/Chapter – Go to specific time in a chapter
•For VCD mode, press the GOTO button to choose between Track Search, Disc Search and Exit.
VCD Track Search
Time – Go to specific time in the current track
Track – Go to specific track
VCD Disc Search
Time – Go to specific time on disc
Track – Go to specific track
3.Enter a time into the field using the numeric keypad (29) on the remote control.
4.Press the >/|| button (18) on the remote control or the ENTER (joystick) button (5) to go to the specified location on the disc.
5.Press the GOTO button again to exit.
Direct Chapter / Track Selection
During DVD, VCD and CD
playback, you can use the numeric keypad on the remote control (29)
to access a track directly.
Viewing an Alternate Picture Angle (DVD Only)
Some DVDs contain scenes that have been shot simultaneously from different angles. For discs recorded with multiple angles, press the ANGLE button (13) on the remote control to toggle available angles of the on-screen image.
Zooming
Press the ZOOM button (23) on the remote control to enlarge and pan through the video image using the following options: “Q1”, “Q2”, “Q3”, and “OFF”.
VM9021TS
Multi-Language Discs (DVD Only)
Changing Audio Language
If you are watching a disc recorded in multiple languages, press the AUDIO button (5) on the remote control to choose a language.
Changing Subtitle Language
If you are watching a disc recorded in multiple languages with subtitles, press the SUBTITLE button (9) on the remote control to choose the language in which you would like the subtitles to appear.
NOTE: During VCD playback, press the AUDIO button (5) on the remote control to choose between Left Channel, Right Channel, and Stereo.
PBC (Play Back Control - VCD Only)
For VCDs with play back functionality, play back control (PBC) provides additional controls for VCD playback.
Press the MENU button (1) on the remote control to toggle the PBC function “On”/”Off”. Once PBC is on, playback starts from track one of the play list.
NOTE: When PBC is activated, fast forward, slow playback, and previous/next track are available. Repeat and direct track selection are not available.
When PBC is activated, selecting random, scan, or search playback automatically deactivates PBC.
Playback Information
During DVD and VCD playback, press the INFO button (10) on the remote control to display playback information on the screen, including the media playing and current playback time.
DVD Playback Information
The following information is displayed at the bottom of the screen during DVD playback:
•T : 5/8 – “5 / 8" indicates the fifth of 8 titles on the DVD is currently playing.
•C : 2/16 – “2 / 16" indicates that the second of 16 titles on the DVD is currently playing.
•00:41:28 – “00:41:28” indicates the playback time of the current title.
22
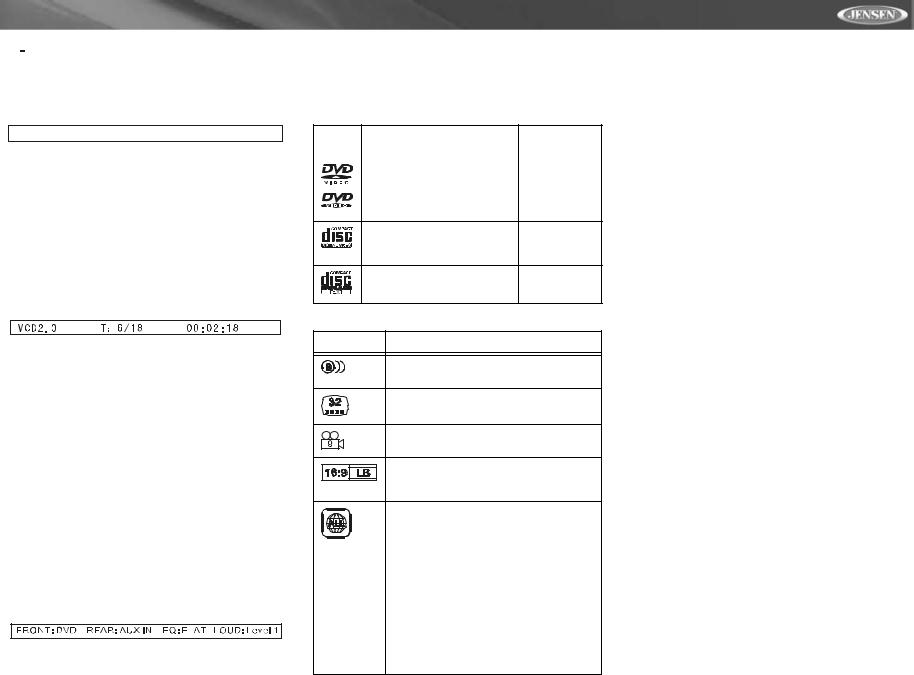
VM9021TS
• 2 / 6 Eng – The language display information indicates the second language out of 6 (English) is currently being used.
The following information appears at the bottom of the screen during DVD playback:
Front: DVD/CD Rear: AUXIN Dolby Digital Bypass
•Front: DVD is the current playback source for the front zone.
•Rear: AUX IN is the current playback source for the rear zone.
"Dolby Digital" is the selected playback audio encoding process.
Bypass indicates that the ASP (Audio Signal Processor) is being bypassed when Dolby Digital decoding is active.
VCD Playback Information
The following information is displayed on the screen during VCD playback:
•VCD2.0 – Format of current disc.
•T: 6/18 – “6/18” indicates the sixth of 18 tracks on the VCD is currently playing.
•00:02:18 – “00:02:18” indicates the playback time of the current track.
The following information appears on the screen during VCD playback in 6-Channel mode:
Front: DVD Rear: AUXIN |
MPEG |
MOVIE |
•Front: DVD – “DVD” is the current playing source for the front zone.
•Rear: AUX IN – “AUX IN” is the current playing source for the rear zone.
“MPEG” is the decoding method in use.
"Movie" indicates that movie effects are being applied to the audio sound track from the VCD.
The following information appears on the screen during VCD playback in 2-Channel mode:
•Front: DVD – “DVD” is the current playing source for the front zone.
•Rear: AUX IN – “AUX IN” is the current playing source for the rear zone.
•EQ: FLAT – The equalizer setting is FLAT.
•Loud: Level 1 – The Loud option is set to Level 1 loudness.
General Disc Information
Table 11: Disc Properties
Symbo |
12cm Disc Properties |
Max Play |
|
l |
Time |
||
|
|||
|
|
|
|
|
Single side single layer (DVD-5) |
(MPEG 2 |
|
|
Method) |
||
|
Single side double layer (DVD-9) |
133 minutes |
|
|
Double side single layer (DVD-10) |
242 minutes |
|
|
Double side double layer (DVD-18) |
266 minutes |
|
|
|
484 minutes |
(MPEG 1 Single side single layer (VCD) Method)
74 minutes
Single side single layer |
74 minutes |
|
Table 12: Disc Symbols |
Symbol |
Meaning |
|
Number of voice languages recorded. The num- |
|
ber inside the icon indicates the number lan- |
|
guages on the disc (maximum of 8). |
|
Number of subtitle languages available on the |
|
disc (maximum of 32). |
|
Number of angles provided (maximum of 9). |
Aspect ratios available. “LB” stands for Letter Box and “PS” stands for Pan/Scan. In the example on the left, the 16:9 video can be converted to Letter Box video.
Indicates the region code where the disc can be played.
•Region 1: USA, Canada, East Pacific Ocean Islands
•Region 2: Japan, Western Europe, Northern Europe, Egypt, South Africa, Middle East
•Region 3: Taiwan, Hong Kong, South Korea, Thailand, Indonesia, South-East Asia
•Region 4: Australia, New Zealand, Middle and South America, South Pacific Ocean Islands/ Oceania
•Region 5: Russia, Mongolia, India, Middle Asia, Eastern Europe, North Korea, North Africa, North-West Asia
•Region 6: Mainland China
•ALL: All regions
23

DVD/DISC SETUP MENU
NOTE: A DVD/disc must be loaded into the mechanism and playing prior to accessing the DVD Setup menu. While the DVD/disc is playing, press the DVD SETUP button (30) on the remote to access the DVD Setup menu.
In “DVD Setup” mode, “LANGUAGE”, “VIDEO”, “AUDIO” “SPK CONFIG”, “PRO-LOGIC II”, and “RATING” (parental lock) are available for setup. These operations can be performed using the remote control or joystick controls.
Accessing the DVD Setup Screen
Setup can be performed by pressing the dedicated button on the remote control, or by pressing the MENU/SRC button (11) on the front panel.
For system settings, press the DVD SETUP button (30) on the remote control or touch “SETUP” on the screen to enter the “SETUP” menu. “SYS SETUP” is highlighted in green.
To access the “DVD SETUP” Menu, press the V button (7) on the remote control to choose the “DVD SETUP” option, then press the >/|| button (18), or just touch “DVD SETUP” on the screen. “LANGUAGE” is highlighted in green.
NOTE: Once the DVD setup is complete, the settings are memorized. To return to the factory default settings, press the RESET button (25) behind the front panel.
Accessing a Menu
To access a menu (LANGUAGE, VIDEO, AUDIO, SPK CONFIG, PRO-LOGIC II, or RATING), press the direction buttons on the joystick (16, 17, 18, 19) or remote control (14, 17, 18, 19, 22) to highlight the desired menu in green. You
VM9021TS
can also touch the on-screen menu selection to access that menu.
DIRECTION BUTTONS
Selecting a Feature for Adjustment
Once inside a menu, press the >> or << buttons (14, 22) on the remote control or the /\ or V buttons (6, 7) on the joystick to select the feature to be adjusted.
Adjusting a Feature
1.Enter the option field for the feature you want to adjust by pressing the >/|| button (18) on the remote or by pressing the ENTER (joystick) button (5) on the unit. A submenu appears in a second row with the selected option highlighted in light blue.
2.Select a new value by pressing the >> or << buttons (14, 22) on the remote control or the /\ or V buttons (6, 7) on the joystick.
3.Confirm your selection by pressing the <<, |<<, or >>| buttons (22, 17, 19) on the remote control, or the < or > button (8, 9) on the joystick. The new value is highlighted in light blue and setup is complete.
LANGUAGE Menu
If a DVD supports more than 1 Subtitle or Audio language, all the languages are available for selection during playback. If the selected language is not supported by the DVD, then the default language is used. During playback, press the SUBTITLE (9) or AUDIO (5) button on the remote control to change the language directly. This will not affect the DVD menu settings.
Table 13: LANGUAGE Menu Features
Setting |
Options |
Function |
|
|
|
|
|
|
Subtitle |
English |
Select the default language in which |
|
|
you would like subtitles (if applicable) to |
|
Auto |
|
|
be displayed. |
|
|
Off |
|
|
|
|
Table 13: LANGUAGE Menu Features
Setting |
Options |
Function |
|
|
|
|
|
|
Audio |
English |
Select the default language in which |
|
|
you would like audio (when optional) to |
|
|
be played. |
DVD Menu |
English |
Select the default language in which |
|
|
you would like the DVD menu (if appli- |
|
|
cable) to be displayed. |
BACK |
|
Return to previous menu. |
|
|
|
VIDEO Menu
Table 14: VIDEO Menu Features
Setting |
Options |
Function |
|
|
|
|
|
|
|
|
|
TV Shape |
4:3 PS |
With 16:9 display, the left and right sides |
|
(Aspect |
|
are cut off. |
|
Ratio) |
|
|
|
4:3 LB |
With 16:9 display, the top and bottom are |
||
|
|||
|
|
cut off. |
|
|
|
|
|
|
16:9 |
Image is presented in wide view with a |
|
|
|
16:9 aspect ratio. |
|
Angle |
On |
Angle indicator (if applicable) is shown. |
|
Mark |
|
|
|
Off |
Angle indicator is not shown. |
||
|
|||
|
|
|
|
View Mode |
Fill |
|
|
|
|
|
|
|
Original |
|
|
|
|
|
|
|
H Fit |
|
|
|
|
|
|
|
W Fit |
|
|
|
|
|
|
|
Fit to |
|
|
|
Scrn |
|
|
|
Pan Scan |
|
|
|
|
|
|
BACK |
|
Return to previous menu. |
|
|
|
|
NOTE: For standard discs not formatted for “widescreen”, use of the 16:9 aspect ratio will result in image distortion.
24
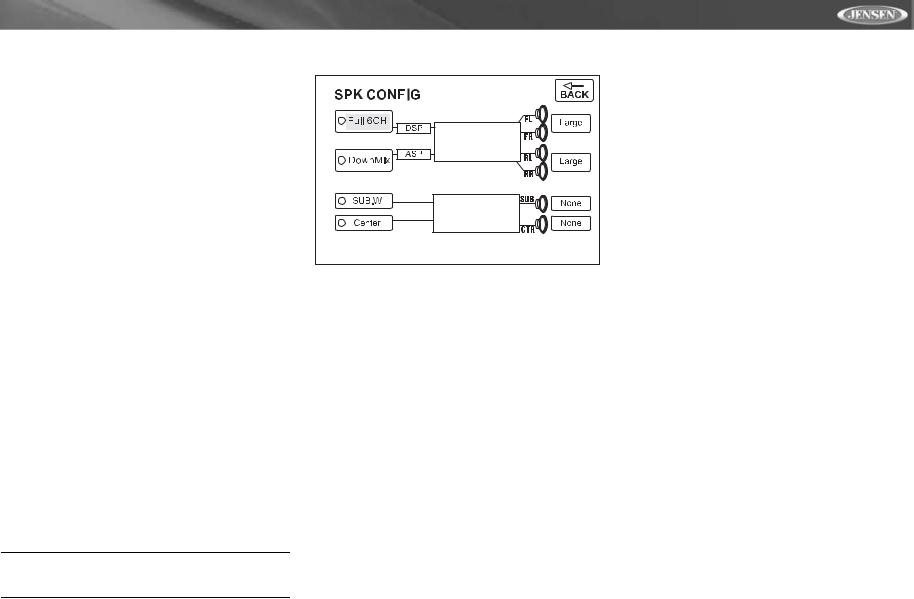
VM9021TS
AUDIO Menu
The VM9021TS has a built-in Pink Noise generator to help set the relative speaker levels for multi-channel audio playback.
Table 15: AUDIO Menu Features
Setting |
Options |
Function |
|
|
|
|
|
|
|
|
|
Pink |
Off |
Stop output of pink noise |
|
Noise |
|
|
|
Left |
Left channel pink noise |
||
|
|||
|
|
|
|
|
Center |
Center channel pink noise |
|
|
|
|
|
|
Right |
Right channel pink noise |
|
|
|
|
|
|
Left Surr |
Left surround channel pink noise |
|
|
|
|
|
|
Right Surr |
Right surround channel pink noise |
|
|
|
|
|
|
Subwoofer |
Subwoofer pink noise |
|
|
|
|
|
DRC |
Off |
Employ the Dynamic Range Control for |
|
|
|
better playback for low volumes. |
|
|
On |
||
|
|
||
|
|
|
|
CNTR |
5ms |
Adjust the time difference between the |
|
CTRL |
|
center and front speakers to create a |
|
4ms |
|||
|
time delay between 1 and 5 millisec- |
||
|
3ms |
onds, producing a more accurate audio |
|
|
effect. |
||
|
|
||
|
2ms |
|
|
|
|
|
|
|
1ms |
|
|
|
|
|
|
|
0ms |
|
|
|
|
|
|
REAR |
15ms |
Adjust the time difference between the |
|
CTRL |
|
rear and front speakers to create a |
|
12ms |
|||
|
time delay between 3 and 15 millisec- |
||
|
9ms |
onds, producing a more accurate audio |
|
|
effect. |
||
|
|
||
|
6ms |
|
|
|
|
|
|
|
3ms |
|
|
|
|
|
|
|
0ms |
|
|
|
|
|
|
Down |
Off |
Normal Output |
|
Sampling |
|
|
|
on |
Audio signal output at 48kHz |
||
|
|||
|
|
|
|
BACK |
|
Return to previous menu. |
|
|
|
|
NOTE: When Down Sampling is ON, the audio output signal will be converted to 48kHz. When Down Sampling is OFF, the original sampling frequency is preserved.
SPK CONFIG Menu
To change speaker settings for 2-channel mode, use the >> or << buttons (14, 22) on the remote control or the /\ or V buttons (6, 7) on the joystick to select “DownMix”. To change speaker settings for 6-channel mode, select “Full 6CH”. After selecting 2 or 6-channel mode, use the >>| button (19) on remote control or the > button on the joystick (9) to move to the speaker settings on the right.
Speaker Selection
Selecting LARGE for the multi-channel speaker option will give a full range output. Selecting SMALL for the multichannel speaker option will activate a high pass filter whose crossover is dependent upon the sub-woofer low pass filter frequency. For example, if the subwoofer low pass filter is set to 80Hz, then the high pass SMALL speaker crossover will be set to 90Hz.
Low pass |
High pass |
80Hz |
90Hz |
120Hz |
135Hz |
160Hz |
180Hz |
Refer to Table 16 when selecting speaker options for each mode.
Table 16: SPK CONFIG Menu Features
Setting |
Options |
Function |
|
|
|
|
|
|
FL (Front Left) / |
Large |
Use when front speakers have |
FR (Front Right) |
|
good bass output. |
|
Small |
Use when speakers do not have |
|
|
good bass output. |
Table 16: SPK CONFIG Menu Features
Setting |
Options |
Function |
|
|
|
|
|
|
LR (Left Rear) / |
Large |
Use when rear speakers have |
RR (Right Rear) |
|
good bass output. |
|
Small |
Use when rear speakers do not |
|
|
have good bass output. |
|
None |
Use when rear speakers are not |
|
|
present. |
SUB (Subwoofer) |
Present |
Use when subwoofer is present. |
|
|
|
|
None |
Use when subwoofer is not |
|
|
present. |
CTR (Center) |
Large |
Use when center speaker has |
|
|
good bass output. |
|
Small |
Use when center speaker does |
|
|
not have good bass output. |
|
None |
Use when center speaker is not |
|
|
present. |
BACK |
|
Return to previous menu. |
|
|
|
Surround Sound
Dolby Digital
Dolby Digital is the reigning standard for surround sound technology in general and 5.1-channel surround sound in particular.
Dolby Digital is a highly sophisticated and versatile audio encoding/decoding technology. Dolby Digital technology can transmit mono, stereo (two-channel), or up to 5.1-channel surround sound.
Pro-Logic II
Pro-Logic II is a dramatically improved matrix surround system based on the original Dolby Pro Logic system. ProLogic II offers two full-range stereo surround channels, more sophisticated steering logic, high channel separation and an exceptionally stable sound field. Dolby Pro-Logic II uses simple servo circuits used to derive the five audio channels. Unlike other "Surround Effects" found in other consumer equipment, Dolby Pro-Logic II does not introduce unwanted delays, echoes, reverberations or tonal colorations.
25

Table 17: Pro-Logic II Menu Features
Setting |
Options |
Function |
|
|
|
|
|
|
|
|
|
Decode Mode |
Off |
Play original audio format. |
|
|
Pro-Logic |
Use Pro-Logic II decoding |
|
|
II |
method. |
|
|
Pro-Logic |
Play mono output with surround |
|
|
II Matrix |
effect. |
|
|
Pro-Logic |
Enhance movie surround effects. |
|
|
II Movie |
|
|
|
Pro-Logic |
Play surround music effects. |
|
|
II Music |
|
|
Panorama |
On |
Extends the audio from front to |
|
(Only available |
|
rear to achieve a better audio sur- |
|
when Pro-Logic II |
|
round effect. |
|
Music Mode is |
|
|
|
Off |
Panorama is turned off. |
||
selected.) |
|||
|
|
|
|
Dimension Ctrl |
0-6 |
Adjusts the distribution of the front |
|
(Only available |
|
and rear audio for a better audio |
|
when Pro-Logic II |
|
surround effect. |
|
Music Mode is |
|
|
|
selected.) |
|
|
|
Center Width Ctrl |
0-6 |
Adjusts the width of the center |
|
(Only available |
|
surround effect. |
|
when Pro-Logic II |
|
|
|
Music Mode is |
|
|
|
selected.) |
|
|
|
BACK |
|
Return to previous menu. |
|
|
|
|
NOTE: Pro-Logic II is recommended when the playback source is LPCM (Linear Pulse Code Modulation) or 2- channel down mixed digital bit-stream.
NOTE: When Pro-Logic II Music mode is selected, Dimension Control and Center Width are available for fine tuning to achieve a more realistic surround sound processing.
RATING (Parental Lock) Menu
The DVD system has a built-in parental lock feature to prevent unauthorized persons from viewing restricted disc content. By default, the rating system is unlocked. Once setup, the parental lock is released only by entering the correct password. Once the password is entered, rating is available for setup.
Table 18: RATING Menu Features
Setting |
Options |
Function |
|
|
|
|
|
|
Password |
_ _ _ _ |
Enter a 4-digit password to acti- |
|
|
vate the “Rating” feature. |
VM9021TS
Table 18: RATING Menu Features
Setting |
|
Options |
Function |
|
|
|
|
|
|
|
|
Rating |
1. Kid Safe |
Select the appropriate rating level |
|
|
|
|
for the intended audience. |
|
2. |
G |
|
|
You may override higher ratings |
||
|
|
|
|
|
3. PG |
||
|
by using your password. |
||
|
|
|
|
|
4. |
PG-13 |
|
|
|
|
|
|
5. PG-R |
|
|
|
|
|
|
|
6. |
R |
|
|
|
|
|
|
7. |
NC-17 |
|
|
|
|
|
|
8. |
Adult |
|
|
|
|
|
Load Factory |
Reset |
Select “Reset” to restore the fac- |
|
|
|
|
tory default settings for the Rating |
|
|
|
system only. |
BACK |
|
|
Return to previous menu. |
|
|
|
|
To reset the password, access the “RATING” menu and enter the current password. Once the correct password is entered, you can access the “Password” field and enter a new one.
NOTE: Record the password and keep it in a safe place for future reference. The rating for each disc is marked on the disc, disc packing, or documentation. If the rating is not available on the disc, the parental lock feature is unavailable. Some discs restrict only portions of the disc and the appropriate content will play. For details, please refer to the disc description.
26
 Loading...