


User’s manual
ML17939/ML17959
Two-line corded telephone/ answering system with caller ID/call waiting

Congratulations
on purchasing your new AT&T product. Before using this AT&T product, please read Important safety information on page 67 of this user’s manual. Please thoroughly read the user’s manual for all the feature operations and troubleshooting information you need to install and operate your new AT&T product. You can also visit our website at www.telephones.att.com or call 1 (800) 222-3111. In Canada, dial 1 (866) 288-4268.
Model #: ML17939/ML17959
Type: Two-line corded telephone/answering system with caller ID/call waiting
Serial #:_________________________________________________________________
Purchase date:___________________________________________________________
Place of purchase:
Both the model and serial numbers of your AT&T product can be found on the bottom of the telephone base.
Compatible with Hearing Aid T-Coil
T
TIA-1083
Telephones identified with this logo have reduced noise and interference when used with most T-coil equipped hearing aids and cochlear implants. The TIA-1083 Compliant Logo is a trademark of the Telecommunications Industry Association. Used under license.
Clearspeak™ is a trademark of Advanced American Telephones.
© 2010 Advanced American Telephones. All Rights Reserved. AT&T and the AT&T logo are trademarks of AT&T Intellectual Property licensed to Advanced American Telephones, San Antonio, TX 78219. Printed in China.
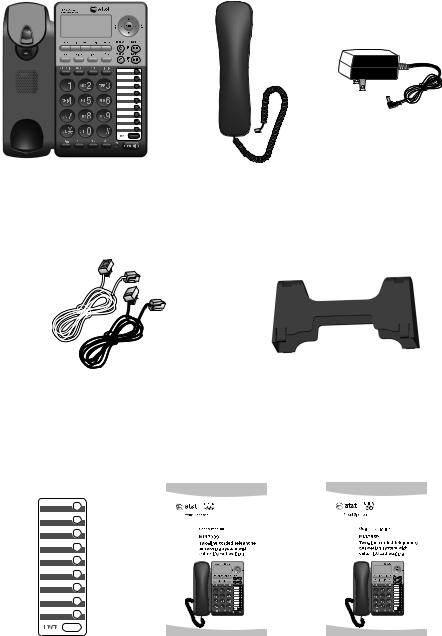
Parts checklist
Your telephone package contains the following items. Save your sales receipt and original packaging in the event warranty service is necessary.
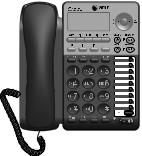
Telephone base |
Handset with coiled |
Power adapter |
|
handset cord |
|
Telephone line cords: clear |
Mounting bracket |
(2-conductor) and black (4-conductor) |
|
|
/ML17959 |
|
|
/ML17959 |
|
|
|
||
|
|
|
||
|
|
|
|
|
Replacement |
User’s manual |
Quick start guide |
directory card |
|
|
User’s manual
ML17939/ML17959
Two-line corded telephone/ answering system with caller ID/call waiting
Table of contents |
|
Getting started |
|
Quick reference guide............................... |
2 |
Optional backup battery |
|
installation................................................. |
4 |
Telephone installation............................... |
5 |
Telephone base installation.............. |
5 |
Data port.......................................................... |
8 |
Installation options..................................... |
9 |
Tabletop to wall installation............. |
9 |
Wall to tabletop installation.......... |
11 |
Optional headset...................................... |
13 |
Directory card............................................. |
13 |
Menu setup |
|
Telephone settings................................... |
14 |
Menu overview...................................... |
14 |
Ringer volume....................................... |
15 |
Ringer melody....................................... |
15 |
LCD language........................................ |
16 |
LCD backlight........................................ |
16 |
Date and time....................................... |
16 |
Key tone................................................... |
17 |
Scroll rate................................................ |
17 |
Call settings................................................. |
18 |
Set the primary line........................... |
18 |
Turn automatic line selection |
|
on or off............................................. |
18 |
Turn auto speaker on or off........... |
18 |
Choose the preferred mode.......... |
19 |
Set home and local area codes... |
19 |
Choose how to store repeat |
|
calls in the call history............... |
20 |
Select tone or pulse dialing........... |
20 |
Answering system settings.................. |
21 |
Answer on/off....................................... |
21 |
Announcement selection................ |
21 |
Announcement A and B................... |
22 |
Announcement A and B time |
|
settings............................................... |
23 |
Call screening....................................... |
24 |
Number of rings................................... |
24 |
Incoming message length............... |
25 |
Remote code......................................... |
25 |
Priority code.......................................... |
26 |
Message alert tone............................. |
26 |
Voicemail indicator settings................ |
27 |
Voicemail indicator............................. |
27 |
Clear voicemail indication............... |
27 |
Turn COVM (central office |
|
voicemail) on or off...................... |
28 |
Telephone operation |
|
Basic operation.......................................... |
29 |
Making, answering or ending |
|
a call ................................................... |
29 |
On hook dialing (predialing).......... |
30 |
Clearspeak™ dial-in-base |
|
speakerphone.................................. |
30 |
Switching between the handset, |
|
headset and speakerphone...... |
30 |
Temporary ringer silencing............. |
30 |
Redial......................................................... |
31 |
Auto redial.............................................. |
32 |
Options while on calls........................... |
33 |
Volume control..................................... |
33 |
Flash/call waiting................................ |
33 |
Mute........................................................... |
33 |
Hold............................................................ |
33 |
Temporary tone dialing.................... |
34 |
Switching between lines.................. |
34 |
Conference calls.................................. |
34 |
Two-way recording............................. |
35 |
Chain dialing.......................................... |
36 |
Speed dial |
|
Speed dial memory overview............. |
37 |
Speed dial operation............................... |
38 |
Storing a number in a |
|
speed dial location....................... |
38 |
Reviewing a speed dial number... |
38 |
Editing a speed dial number.......... |
39 |
Dialing a speed dial number......... |
39 |
Deleting a speed dial number...... |
40 |
Directory |
|
Directory overview................................... |
41 |
Directory memory capacity............ |
41 |
Character chart.................................... |
41 |
Directory operation.................................. |
42 |
Creating a directory entry............... |
42 |
Reviewing directory entries............ |
42 |
Searching by name............................. |
43 |
Editing directory entries................... |
43 |
Copying directory entries to |
|
speed dial memory....................... |
44 |
Dialing directory entries.................. |
44 |
Deleting directory entries............... |
44 |
Caller ID |
|
About caller ID........................................... |
45 |
Information about caller ID with |
|
call waiting....................................... |
45 |
How caller ID history (call log) |
|
works................................................... |
46 |
Caller ID operation................................... |
47 |
Memory match .................................... |
47 |
Missed calls indicator........................ |
47 |
Reviewing call history....................... |
47 |
Dialing options...................................... |
48 |
Dialing a call history entry............. |
48 |
Deleting call history entries........... |
48 |
Saving a call history entry to |
|
the directory.................................... |
49 |
Saving a call history entry to a |
|
speed dial location....................... |
50 |
Reasons for missing caller ID |
|
information............................................. |
51 |
Answering system |
|
Answering system and voicemail..... |
52 |
Answering system operation.............. |
53 |
Message capacity................................ |
53 |
Answering system |
|
new message indication............ |
53 |
Call screening ...................................... |
53 |
Call intercept......................................... |
53 |
Priority code.......................................... |
53 |
Message playback............................... |
54 |
Options during playback................. |
54 |
Delete all old messages.................. |
55 |
Record and play memos.................. |
55 |
Remote access........................................... |
56 |
Appendix |
|
Screen icons, indicator lights and |
|
alert tones.............................................. |
57 |
Indicator lights...................................... |
57 |
Screen icons........................................... |
57 |
Alert tones.............................................. |
58 |
Screen display messages...................... |
59 |
Troubleshooting......................................... |
61 |
General product care.............................. |
66 |
Important safety information.............. |
67 |
Safety information.............................. |
67 |
Especially about corded |
|
telephones........................................ |
67 |
FCC and ACTA information.................. |
68 |
Part 15 of FCC rules................................ |
70 |
Limited warranty....................................... |
71 |
Technical specifications......................... |
73 |
Index................................................................ |
74 |
Remote access wallet card.................. |
76 |

Getting started
Installation preparation
You must install the power adapter before using the telephone.
See pages 6-7 for easy instructions.
If you subscribe to high speed Internet service (DSL - digital subscriber line) through your telephone line, you must install a DSL filter between each telephone line cord and telephone wall jack (pages 6 and 7). The filter prevents noise and caller ID problems caused by DSL interference. Please contact your DSL service provider for more information about DSL filters.
Your product may be shipped with a protective sticker covering the telephone base display - remove it before use.
For customer service or product information, visit our website at www.telephones.att.com or call 1 (800) 222-3111. In Canada, dial 1 (866) 288-4268.
Avoid placing the telephone base too close to:
•Communication devices such as television sets, VCRs, or cordless telephones.
•Excessive heat sources.
•Noise sources such as a window with traffic outside, motors, microwave ovens, refrigerators, or fluorescent lighting.
•Excessive dust sources such as a workshop or garage.
•Excessive moisture.
•Extremely low temperature.
•Mechanical vibration or shock such as on top of the washing machine or work bench.
Getting started
Quick reference guide
DELETE
Press to delete the displayed directory, or call history entry (pages 44 and 48).
Press to backspace and erase a digit or character (pages 38 and 42).
During message playback, press to delete the message currently playing (page 54).
When the telephone is idle, press to delete all old messages (page 55).
ENTER
Press to select a menu item or to save a setting (page 14).
DIR
Press to enter the directory (page 42). menu
Press to enter the main menu (page 14).
CID
Press to display call history information (page 47).
CANCEL
Press to cancel an operation and go back
to the previous menu (page 14).
Press and hold to return to idle mode (page 14).
Conf
Press to initiate a three-way conference call (page 34).
line 1, line 2
Press to make or answer a call on the selected line (page 29).
 /REPEAT
While playing messages, press to repeat the message, or press twice to hear the previous message (page 54).
While entering names or numbers, press to move the cursor to the left (pages 38 and 42).
Press to go back to the previous menu (page 14).
 /ANS ON/OFF LINe1/LINE2
Press to turn the built-in answering system on or off (page 21).
hold
Press to place a call on hold (page 33).
 /SKIP
/SKIP
Press to skip to the next message (page 54).
While entering names or numbers, press to move the cursor to the right (pages 38 and 42).
 /
/
While in the menu, press to scroll up or down (page 14).
While reviewing the directory or call history, press to scroll through entries or press and hold to scroll continuously.
(pages 42 and 47).
 /PLAY/STOP LINE1/LINE2
Press to start or stop message playback (page 54).
Press to stop recording a memo (page 55).
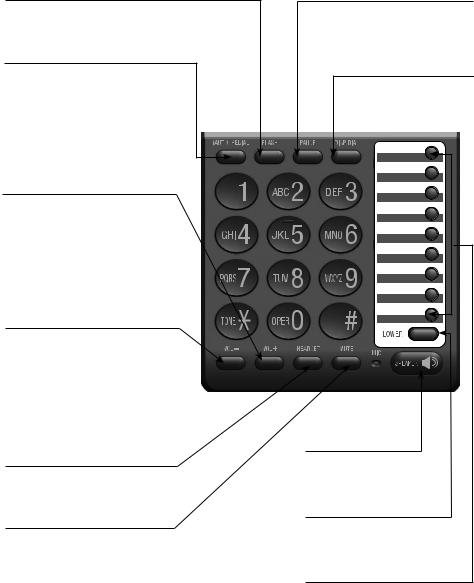
Getting started
Quick reference guide
FLASh
During a call, press to answer an incoming call when you receive a call waiting alert (page 33).
(auto) redial
Press to dial the last number dialed when the telephone is off hook (page 31).
When the telephone is idle, press to display the last five numbers dialed. You can choose to dial a displayed number or use the auto redial feature (pages 31 and 32).
vol+
While the telephone is not in use, press to increase the ringer volume for both lines (page 15).
During a call, press to increase the listening volume (page 33).
During message playback, press to increase the playback volume (page 54).
vol-
While the telephone is not in use, press to decrease the ringer volume for both lines (page 15). During a call, press to decrease the listening volume (page 33).
During message playback, press to decrease the playback volume (page 54).
HEADSET
Press to activate the headset when a corded headset is connected (pages 13 and 29).
MUTE
During a call, press to mute the microphone (page 33).
When a call is ringing, press to mute the ringer (page 30).
Pause
Press to insert a two-second dialing pause in a number stored in the directory or speed dial memory (pages 38 and 42).
DISP DIAL
Press to dial the number currently displayed (page 30).
SPEAKER 
Press to turn the base speakerphone on or off (page 29).
lower
Press to enter the lower locations of the speed dial keys (page 37).
Speed dial keys
Press to dial or review a stored speed dial number when the telephone is idle (pages 38 and 39).
Getting started
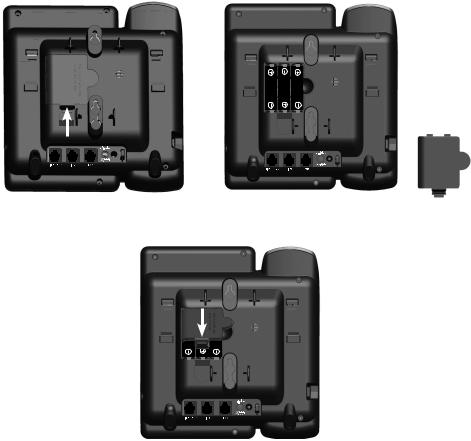
Optional backup battery installation
Install three AA alkaline batteries (purchased separately) to use this telephone in the event of a power failure. If power fails with working batteries installed, all functions work properly except for the display illumination.
If power fails and no batteries are installed, you can make or answer calls on line 1 using only the handset. Last number redial and speed dialing are also supported, but the screen display will be dimmer than usual.
Install the batteries as shown below:
1.Press the tab and pull to remove the battery compartment cover. Insert three AA alkaline batteries (purchased separately) following the polarity markings in the battery compartment.
2. Replace the battery compartment cover.
 NOTE: If no backup batteries are installed and the power adapter is connected,
  appears steady on the screen.
Getting started
Telephone installation
Telephone base installation
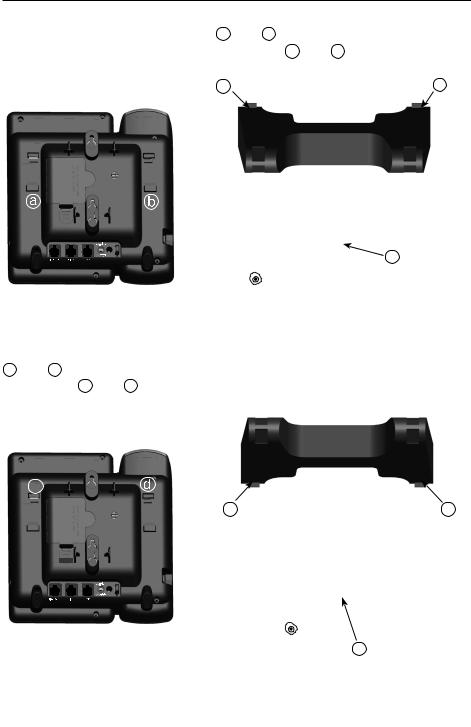
1. Install the mounting bracket for tabletop use.
Option 1: Insert the tabs into slots a and b |
to install your telephone in |
||
a low tabletop position. Press the flexible tabs |
A and B on the mounting |
||
bracket until it clicks into place. |
|
||
|
|
A |
B |
|
|
|
|
|
|
|
|
A
Option 1: Low tabletop position
Option 2: Rotate the mounting bracket 180 degrees. Insert the tabs into slots c and d to install your telephone in a high tabletop position. Press the flexible tabs A and B on the mounting bracket until it clicks into place.
c
A
A
Option 2: High tabletop position
Getting started
Telephone installation
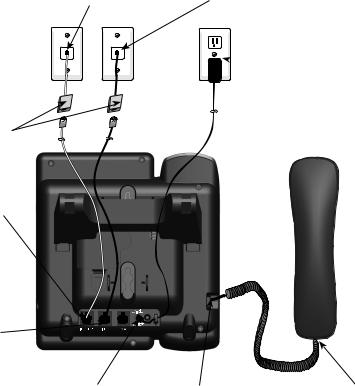
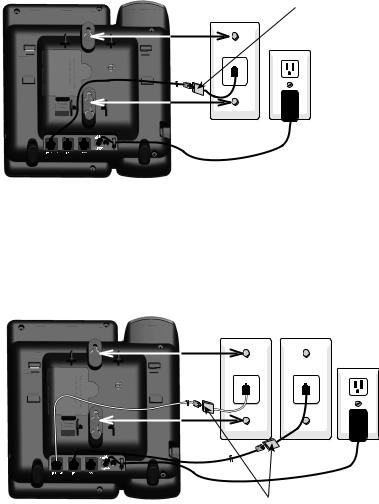
2. Connect the telephone line cord(s) and the power cord to the telephone base.
If you subscribe to high speed Internet service (DSL - digital subscriber line) through your telephone line, you must install a DSL filter between each telephone line cord and telephone wall jack. The filter prevents noise and caller ID problems caused by DSL interference. Please contact your DSL service provider for more information about DSL filters.
Option 1: If you have a two-line wall jack, install your telephone base as
shown below.
L1+L2
If you have DSL high speed Internet service, a DSL filter (not included) is required.
Plug one end of the black telephone line cord (4-conductor) into the jack labeled
LINE 1/L1+L2 on the back of the telephone base.
Plug the small end of the power adapter into the power jack on the back of the telephone base.
 NOTES:
Plug the other end of the black telephone line cord (4-conductor) into the wall jack.
Plug the large end of the power adapter into an electrical outlet not controlled by a wall switch.
Plug the other end of the
coiled handset cord into the
left side of the telephone base. One end of the coiled telephone line cord has already been plugged
into the handset. Make sure it is plugged in firmly.
•Use only the power adapter supplied with this product. To order a replacement power adapter, visit our website at www.telephones.att.com, or call
1 (800) 222-3111. In Canada, dial 1 (866) 288-4268.
•The power adapter is intended to be correctly oriented in a vertical or floor mount position. The prongs are not designed to hold the plug in place if it is plugged into a ceiling, under- the-table or cabinet outlet.
Getting started
Telephone installation
Option 2: If you have two one-line wall jacks, install your telephone base as
shown below.
If you have DSL high speed Internet service, a DSL filter (not included) is required.
Plug one end of the clear telephone line cord (2-conductor) into the jack labeled
LINE 1/L1+L2 on the back of the telephone base.
Plug one end of the black telephone line cord (4-conductor) into the jack labeled LINE 2 on the back of the telephone base.
Plug the other end of the clear telephone line cord (2-conductor) into the wall jack.
L1 |
L2 |
Plug the other end of the black telephone line cord (4-conductor) into the wall jack.
 Plug the large end of the power adapter into an electrical outlet not controlled by a wall switch.
Plug the small end of the power adapter into the power jack on the back of the telephone base.
Plug the other end of the coiled handset cord into the left side of the telephone base.
One end of the coiled telephone line cord has already been plugged into the handset. Make sure it is plugged in firmly.
 NOTES:
•Use only the power adapter supplied with this product. To order a replacement power adapter, visit our website at www.telephones.att.com, or call
1 (800) 222-3111. In Canada, dial 1 (866) 288-4268.
•The power adapter is intended to be correctly oriented in a vertical or floor mount position. The prongs are not designed to hold the plug in place if it is plugged into a ceiling, under- the-table or cabinet outlet.

Getting started
Data port
If you want to connect another device (such as a modem or fax machine) to the wall jack, use the jack labeled DATA on the back of the telephone base. The data port uses line 2 only.
DATA port
Getting started
Installation options
If you want to mount your telephone on a wall, connect the telephone base to a standard dual-stud telephone wall mounting plate. If you do not have this mounting plate, you can purchase one from many hardware or consumer electronics retailers. Professional assistance may be required to install the mounting plate.
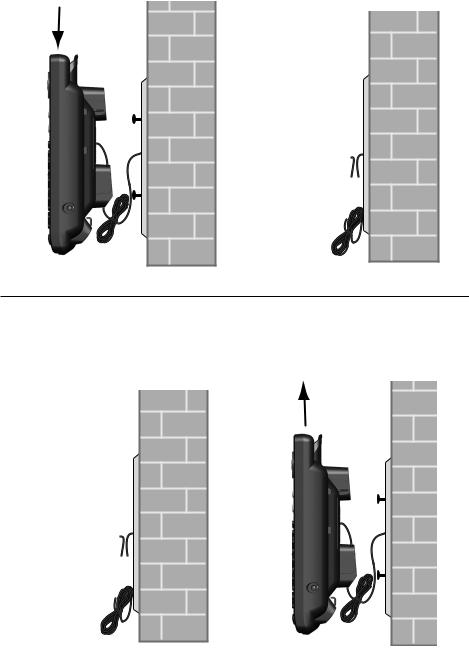
Tabletop to wall installation
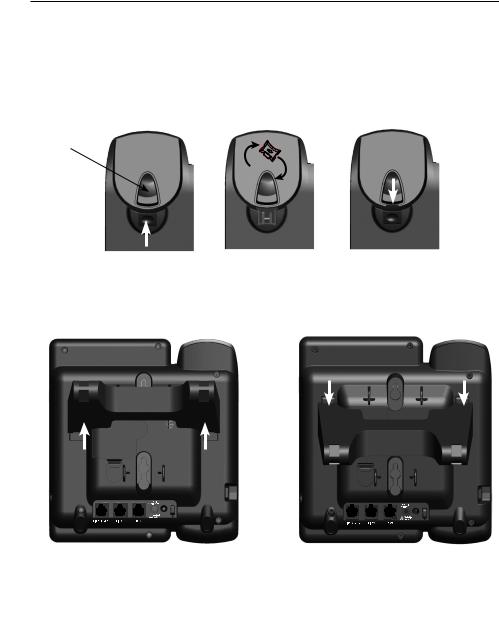
To install your telephone base in the wall installation position, make sure you first unplug the power adapter from the electrical outlet and the telephone line cord from the wall outlet.
1.Hold down the switch hook on the telephone base, then slide the handset tab upwards to remove it from the slot. Rotate the handset tab 180 degrees. Push the handset tab down into the slot until it locks into position.
Switch hook
2.Press in the direction indicated by the arrows to release the mounting bracket. Remove the mounting bracket from the telephone base.
|
|
|
|
|
|
|
|
Option 1: Low tabletop position |
Option 2: High tabletop position |
||||||
Getting started
Installation options
3.Plug the coiled handset cord into the handset and the telephone base. Plug the small end of the power adapter cord into the power jack on the back of the telephone base.
4.Plug the telephone line cords into the wall jacks.
Option 1: If you have a single two-line wall jack, use only the black telephone line cord (4-conductor).
Plug one end of the black telephone line cord into the jack labeled
LINE 1/L1+L2 on the back of the telephone base. Plug the large end of the power adapter into an electrical outlet not controlled by a wall switch.
L1+L2 |
If you have DSL high |
|
speed Internet service, |
||
|
||
|
a DSL filter (not |
|
|
included) is required. |
Option 2: If you have two separate one-line wall jacks, use both telephone line cords.
Plug one end of the clear telephone line cord into the jack labeled LINE 1/L1+L2 on the back of the telephone base. Plug one end of the
black telephone line cord into the jack labeled LINE 2. Plug the other end of the clear telephone line cord and the other end of the black telephone line cord into the wall jacks.
L1 L2
If you have DSL high speed Internet service, a DSL filter (not included) is required.
10
Getting started
Installation options
5.Wrap the telephone line cord as show below. Mount the telephone on the mounting plate until it is held securely into position. Plug the large end of the power adapter into an electrical outlet not controlled by a wall switch.
Wall to tabletop installation
To return the telephone base from wall installation to tabletop position:
1.Unwrap the telephone line cord. Remove the telephone base from the wall. Unplug the telephone line cord from the telephone wall jack and the power adapter cord from the electrical outlet.
11

Getting started
Installation options
2.Hold down the switch hook on the telephone base, then slide the handset tab upwards to remove it from the slot. Rotate the handset tab 180 degrees. Push the handset tab down into the slot until it locks into position.
Switch hook
3.Follow the steps in Telephone base installation on pages 5-7 to install your telephone for tabletop use.
12
Getting started
Optional headset
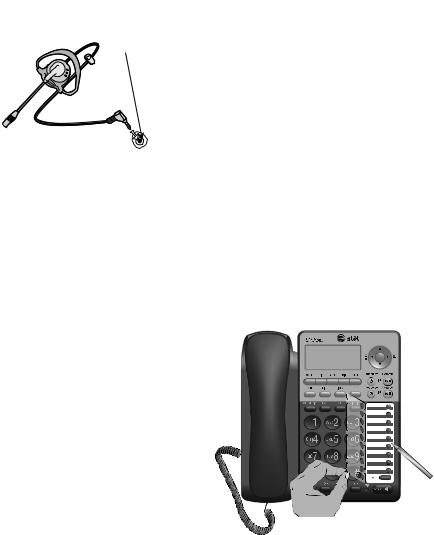
You can use this telephone hands free when you install any industry standard 2.5mm corded telephone headset (purchased separately). The telephone plays an error tone if you press HEADSET when a headset is not plugged into the headset jack.
For best results, use an AT&T 2.5mm headset. To order an AT&T 2.5mm headset, visit our website at www.telephones.att.com or call
1 (800) 222-3111. In Canada, dial 1 (866) 288-4268.
Plug a 2.5mm headset into the jack on the right side of the telephone base (beneath the small rubber flap).
Directory card
Use the directory card to record the names of the speed dial numbers you stored.
To write names on the directory card:
1.Remove the clear plastic cover by inserting the tip of a small item such as a paperclip into the hole at the top edge of the cover.
2.Pull out the directory card.
3.Write the information on the directory
card.
4. Replace the directory card and the plastic cover.
To change the directory card:
1. Follow steps 1 and 2 above to remove the old directory card.
2. Insert the new directory card and replace the plastic cover.
13

Menu setup
Telephone settings
Menu overview
Use the menus to change the telephone settings.
1.When the telephone is idle, press MENU to enter the main menu.
2.Press  or
or  to scroll to the feature to be changed. Press ENTER.
3.Press  or
or  to scroll to the desired settings.
4.Press ENTER to save your selection. The telephone plays a confirmation tone and returns to the previous menu. Press  /REPEAT to go back to the previous menu. To exit without making changes, press CANCEL.
-OR-
Press and hold CANCEL to return to idle mode.
 NOTE: If no key is pressed within 30 seconds, the telephone automatically returns to idle mode.
Menu structure
Directory
Call log
Speed dial
Phone settings
Call settings
Answering sys
Voicemail
Ringers
Ringer volume
LCD language
LCD backlight
Set date/time
Key tone
Scroll rate
Ringer melody
Primary line |
|
|
|
|
|
|
|
|
|||
Auto line sel |
|
|
|
|
|
|
|
|
|||
Auto speaker |
|
|
|
|
|
|
|
|
|||
Preferred mode |
|
|
|
|
|
|
|
|
|||
Set area code |
|
|
|
|
|
|
|
Choose annc |
|||
|
|
|
|
|
|
|
|||||
|
|
|
|
|
|
|
|
||||
Repeat calls |
Play messages |
|
|
|
|
Annc A |
|||||
|
|
|
|
|
|||||||
Dial mode |
|
|
|
|
|
Annc B |
|||||
|
Announcement |
|
|
|
|
|
|||||
|
|
|
|
|
|
|
|||||
|
|
|
|
|
|
|
|
|
Set annc A time |
||
|
|
|
|
|
|
|
|
|
|||
|
|
|
|
Delete all old |
|
|
|
|
|||
Mailbox 1 |
|
|
|
|
|
|
|
Set annc B time |
|||
|
|
|
|
|
|
|
|||||
Mailbox 2 |
|
|
Record memo |
|
|
|
|
||||
|
|
|
|
|
|
Call screening |
|||||
|
|
|
|
|
|
||||||
|
|
|
|
Answer ON/OFF |
|
|
|
|
|||
|
|
|
|
|
|
|
|
# of rings |
|||
|
|
|
|
Ans sys setup |
|
|
|
|
|
|
|
Clr voicemail |
|
|
|
|
|
|
Msg length |
||||
|
|
|
|
|
|
|
|||||
|
|
|
|
|
|
|
Remote code |
||||
L1 covm ON/OFF |
|
|
|
|
|
|
|
||||
|
|
|
|
|
|
|
Priority code |
||||
L2 covm ON/OFF |
|
|
|
|
|
|
|
||||
|
|
|
|
|
|
|
Msg alert tone |
||||
|
|
|
|
|
|
|
|
|
|
|
|
|
|
|
|
|
|
|
|
|
|||
14
Menu setup
Telephone settings
Ringer volume
You can set the ringer volume level (1-6) or turn the ringer off. When the ringer is off, Ringer muted appears on the screen.
1.When the telephone is idle, press MENU.
2.Press  or
or  to scroll to Phone settings. Press ENTER.
3.Press  or
or  to scroll to Ringers. Press ENTER.
4.Press  or
or  to scroll to Ringer volume. Press ENTER.
5.Press  or
or  to select the desired line (Line 1,
Line 2 or Lines 1 & 2). Press ENTER.
PHONE SETTINGS  Ringers
LCD language LCD backlight
RINGERS
 Ringer volume Ringer melody
6.Press  ,
,  , VOL+ or VOL- to adjust the ringer volume for the selected line.
7.Press ENTER to save your setting. The telephone plays a confirmation tone and returns to the previous menu.
 NOTES:
Ringer volume  Line 1
Line 2 Lines 1 & 2
•Pressing VOL+ or VOL- when the telephone is idle adjusts the ringer volume for both lines.
•If the ringer for either or both lines is muted,  for the corresponding line or both lines flashes on the screen when the telephone is idle or there is an incoming call.
Ringer melody
Use this feature to choose one of the 10 ringer melodies for incoming calls. You can choose different ringer melodies for each line or the same ringer melody for both lines. 
1.When the telephone is idle, press MENU.
2.Press  or
or  to scroll to Phone settings. Press ENTER.
RINGERS
Ringer volume  Ringer melody
3.Press  or
or  to scroll to Ringers. Press ENTER.
4.Press  or
or  to scroll to Ringer melody. Press ENTER.
5.Press  or
or  to select the desired line (Line 1, Line 2 or Lines 1 & 2). Press ENTER.
6.Press  or
or  to select the desired ringer melody. The telephone plays each ringer melody as you scroll through the choices.
7.Press ENTER to save your selection. The telephone plays a confirmation tone and returns to the previous menu.
Ringer Melody
Line 1
 Line 2
Lines 1 & 2
Ringer Melody
 Ringer 1
Ringer 2
Ringer 3
 NOTE: If you turn off the ringer volume, you do not hear ringer melody samples.
15
Menu setup
Telephone settings
LCD language
Use this feature to change the display language that is used in all menus and screens. This telephone is set to use English for display by default.
1. When the telephone is idle, press MENU.
2. |
Press |
or |
to scroll to Phone settings. Press ENTER. |
PHONE SETTINGS |
|
|
|
|
Ringers |
3. |
Press |
or |
to scroll to LCD language. Press ENTER. |
LCD language |
4. |
Press |
or |
to select English, Français or Español. |
LCD backlight |
|
||||
5. |
Press ENTER to save your selection. The telephone |
LCD language |
||
|
plays a confirmation tone and returns to the |
|||
|
English |
|||
|
previous menu. |
Francais |
||
Espanol
LCD backlight
Use this feature to turn the LCD backlight on or off.
1.When the telephone is idle, press MENU.
2.Press  or
or  to scroll to Phone settings. Press ENTER.
3.Press  or
or  to scroll to LCD backlight. Press ENTER.
4.Press  or
or  to select On or Off.
5.Press ENTER to save your selection. The telephone plays a confirmation tone and returns to the previous menu.
Date and time
PHONE SETTINGS Ringers
LCD language  LCD backlight
LCD backlight  On
On
Off
The telephone plays the date and time that a message was received by the answering system. If you subscribe to a caller ID service provided by your telephone service provider, the date, month and time are set automatically with each incoming call. The year must be set so that the day of the week can be calculated from the caller ID information. Before using the answering system, set the date and time as follows.
1. When the telephone is idle, press MENU.
2. |
Press |
or |
to scroll to Phone settings. Press ENTER. |
PHONE SETTINGS |
|
LCD language |
|||||
3. |
Press |
or |
to scroll to Set date/time. |
LCD |
backlight |
|
Press ENTER to set the date. |
Set |
date/time |
||
|
|
|
|||
4.Use the dialing keys to enter the date. To enter a number that is less than 10, enter a 0 before the digit. Press  /REPEAT or
  /SKIP to move the cursor to the left or right.
-OR-
Set Date __/__/__ MM/DD/YY
Press  or
or  to scroll to the desired digit. Press ENTER to move on to set the
next digit. Press  /REPEAT or
  /SKIP to move the cursor to the left or right. 16
Menu setup
Telephone settings
5.Press ENTER to move to the time setting.
6.Use the dialing keys to enter the time. To enter a number that is less than 10, you have to enter a 0 before the digit. Press  /REPEAT or
  /SKIP to move the cursor to the left or right.
-OR-
Set Time
__:__ __
Press  or
or  to scroll to the desired digit. Press ENTER to move on to set the next digit. Press
  /REPEAT or
  /SKIP to move the cursor to the left or right.
7.Press  or
or  to select AM or PM.
8.Press ENTER to save the setting. The telephone plays a confirmation tone and returns to the previous menu.
 NOTE: The telephone plays an error tone if the date and time you entered is invalid.
Key tone
Use this feature to turn the key tone on or off. The telephone is set to beep with every key press by default.
1.When the telephone is idle, press MENU.
2.Press  or
or  to scroll to Phone settings. Press ENTER.
PHONE SETTINGS Set date/time  Key tone Scroll rate
3.Press  or
or  to scroll to Key tone. Press ENTER.
4.Press  or
or  to select On or Off.
5.Press ENTER to save your selection. The telephone plays a confirmation tone and returns to the previous menu.
Scroll rate
KEY TONE
 On
On
Off
Use this feature to set the scroll rate when you press and hold  or
or  to scroll through entries in the directory or call history.
1. When the telephone is idle, press MENU.
2. |
Press |
or |
to scroll to Phone settings. |
PHONE SETTINGS |
|
Set date/time |
|||||
|
Press ENTER. |
|
|||
|
|
Key tone |
|||
3. |
Press |
or |
to scroll to Scroll rate. Press ENTER. |
Scroll rate |
|
4. |
Press |
or |
to select Slow, Medium or Fast. |
|
|
5.Press ENTER to save your selection. The telephone plays a confirmation tone and returns to the previous menu.
Scroll Rate
 Slow
Slow
Medium
Fast
17
Menu setup
Call settings
Set the primary line
Use this feature to select the default telephone line to be used when you make calls. The primary line is set to Line 1 by default.
1.When the telephone is idle, press MENU.
2.Press  or
or  to scroll to Call settings. Press ENTER.
3.Press  or
or  to scroll to Primary line. Press ENTER.
4.Press  or
or  to select Line 1 or Line 2.
5.Press ENTER to save your selection. The telephone plays a confirmation tone and returns to the previous menu.
Turn automatic line selection on or off
Call Settings  Primary line Auto line sel Auto speaker
Primary Line
 Line 1
Line 2
When Auto line sel is turned on and both telephone lines are connected, the telephone automatically selects the first available line to use when making a call. The Auto line sel feature is set to On by default. To change the setting:
2.Press  or
or  to scroll to
3.Press  or
or  to scroll to Press ENTER.
Call Settings
Call settings. Press ENTER. Primary line
Auto line sel.  Auto line sel
Auto speaker
4.Press  or
or  to select On or Off.
5.Press ENTER to save your selection. The telephone plays a confirmation tone and returns to the previous menu.
AUTO LINE SEL
 On
On
Off
 NOTE: If only one line is connected and not set as the primary line, you will need to press the LINE button before making a call.
Turn auto speaker on or off
If you set Auto speaker to On, when you press a speed dial key with a stored number, the telephone automatically dials the number using the preferred mode you set (see Choose the preferred mode on page 19). The Auto speaker feature is set to Off by default. To change the setting:
1.When the telephone is idle, press MENU.
2.Press  or
or  to scroll to Call settings. Press ENTER.
3.Press  or
or  to scroll to Auto speaker. Press ENTER.
4.Press  or
or  to select On or Off.
5.Press ENTER to save your selection. The telephone plays a confirmation tone and returns to the previous menu.
Call Settings Primary line Auto line sel  Auto speaker
Auto Speaker
 On
On
Off
18
Menu setup
Call settings
Choose the preferred mode
You can set the Preferred mode to speakerphone or headset. Your selection is used automatically when dialing a number from the directory, redial or call history without lifting the handset. Your selection is also used for speed dialing when auto speaker is set to On (see Turn auto speaker on or off on page 18). If a corded headset is not plugged in, the speakerphone is used automatically. The Preferred mode is set to Speakerphone by default.
To change the setting:
1.When the telephone is idle, press MENU.
2.Press  or
or  to scroll to Call settings. Press ENTER.
3.Press  or
or  to scroll to Preferred mode. Press ENTER.
4.Press  or
or  to select Speakerphone or Headset.
5.Press ENTER to save your selection. The telephone plays a confirmation tone and returns to the previous menu.
Set home and local area codes
Call Settings Auto line sel Auto speaker  Preferred mode
Preferred Mode
 Speakerphone
Headset
If you dial seven digits to make a local call (no area code required), enter your area code into the telephone as the home area code. When you receive a call from within your home area code, the caller ID history only displays the seven digits of the telephone number, and when you dial from the caller ID history, only seven digits are dialed.
This feature makes it easy for you to place a call from the caller ID history. If you must dial 10 digits (area code + telephone number) to make a local call, do not program the home area code. Then, if you receive a call from within your area code, the screen displays the 10 digits of the telephone number, and when you dial from the caller ID history, all 10 digits will be dialed.
1.When the telephone is idle, press MENU.
2.Press  or
or  to scroll to Call settings. Press ENTER.
3.Press  or
or  to scroll to Set area code. Press ENTER.
4.Press  or
or  to scroll to Home area code or
Loc area code 1 - Loc area code 4. Press ENTER.
5.Use the dialing keys to enter a three-digit area code.
•Press  /REPEAT or
  /SKIP to scroll to the digit you want to edit.
•Press DELETE to backspace and delete a digit.
6.Press ENTER to save your setting. The telephone plays a confirmation tone and returns to the previous menu.
Call Settings Auto speaker Preferred mode  Set area code
SET AREA CODE  Home area code
Loc area code 1 Loc area code 2
Home area code
_ _ _
19
Menu setup
Call settings
Choose how to store repeat calls in the call history
Use this feature to choose how new calls from the same number are displayed in the call history. If you want to store only the last call of repeated calls, select Combined. If you want to store all incoming calls separately, select Separate. The default setting is Separate.
1.When the telephone is idle, press MENU.
2.Press  or
or  to scroll to Call settings. Press ENTER.
3.Press  or
or  to scroll to Repeat calls. Press ENTER.
4.Press  or
or  to select Combined or Separate.
5.Press ENTER to save your selection. The telephone plays a confirmation tone and returns to the previous menu.
Select tone or pulse dialing
Call Settings Preferred mode Set area code  Repeat calls
Repeat Calls
 Combined
Separate
You can choose tone or pulse dialing in this menu. The default setting is Tone. Change this to Pulse (rotary) only if you do not have touch-tone dialing service.
1.When the telephone is idle, press MENU.
2.Press  or
or  to scroll to Call settings. Press ENTER.
3.Press  or
or  to scroll to Dial mode. Press ENTER.
4.Press  or
or  to select Tone or Pulse.
5.Press ENTER to save your selection. The telephone plays a confirmation tone and returns to the previous menu.
Call Settings Set area code Repeat calls  Dial mode
DIAL MODE
 Tone
Tone
Pulse
20
 Loading...