


972_00_1ATT BOOK 12/4/01 1:36 PM Page ii
USER’S MANUAL
Part 2
Caller ID Telephone 972
DRAFT 12/4/01
Please also read
Part 1 — Important
Product Information
AT&T and the globe symbol are registered trademarks of AT&T Corp. licensed to Advanced American Telephones.

972_00_1ATT BOOK 12/4/01 1:36 PM Page iii
© 2001 Advanced American Telephones. All rights reserved. Printed in China. Issue 1AT&T 12/01

972_00_1ATT BOOK 12/4/01 1:36 PM Page v
BEFORE YOU BEGIN ................... |
1 |
About Softkeys ..................................... |
1 |
About Home and Local Area Codes...... |
2 |
About Caller Identification................... |
3 |
Headset Jack ......................................... |
3 |
Data Port............................................... |
3 |
INSTALLATION .......................... |
4 |
Battery Installation ............................... |
4 |
Table/Desk Installation ......................... |
5 |
Wall Installation .................................... |
8 |
PROGRAMMING OPTIONS........... |
10 |
Phone Options ................................... |
10 |
Voice Message Options ...................... |
11 |
Caller ID Options ............................... |
12 |
TELEPHONE OPERATION............. |
13 |
Make a Call ......................................... |
13 |
Answer a Call...................................... |
13 |
End a Call............................................ |
13 |
Base Ringer Volume ............................ |
13 |
Handset/Speakerphone/Headset |
|
Volume............................................ |
13 |
Change Time and/or Date ................. |
13 |
Hold .................................................... |
13 |
Redial.................................................. |
13 |
Mute ................................................... |
14 |
Flash ................................................... |
14 |
Automatic Line Selection.................... |
15 |
Automatic Redial ................................ |
15 |
Switching Between Lines |
|
During a Call................................... |
15 |
Conference Calls ................................ |
16 |
Conference Call Options .................... |
16 |
CONTENTS |
|
TELEPHONE MEMORY ............... |
17 |
One-Touch Dialing.............................. |
17 |
Two-Touch Dialing ............................. |
17 |
Storing Numbers in Memory.............. |
17 |
Dialing Memory Numbers .................. |
18 |
Erasing Memory Numbers.................. |
18 |
Viewing Memory Contents ................ |
18 |
Storing Numbers from |
|
Call History in Memory .................. |
19 |
Storing a Pause or Wait in a |
|
Memory Number ............................ |
19 |
CALLER ID OPERATION .............. |
20 |
Review Call History............................ |
20 |
Remove Call Records |
|
from History ................................... |
20 |
Setting Display Screen Options......... |
21 |
Display Screen Messages ................... |
21 |
Message Waiting and |
|
NEW CALL Lights ........................... |
22 |
Call Screening..................................... |
22 |
Call History......................................... |
23 |
Repeat Calls ........................................ |
23 |
Display Dial ........................................ |
24 |
Display Dial Options .......................... |
24 |
Call Waiting......................................... |
24 |
IN CASE OF DIFFICULTY ............. |
25 |

972_00_1ATT BOOK 12/4/01 1:36 PM Page 1
BEFORE YOU BEGIN
About Softkeys
This telephone has been designed with your convenience in mind, offering you many features which you can access using the four “softkeys.”
Softkeys |
PHONE |
VOICE MSG |
Softkeys |
|
|
Select options |
|
||
|
area |
to |
change. |
|
|
CALL |
ID |
|
|
Indicate additional options
Scroll through commands
By pressing the softkey next to the operation indicated on the display screen, you select that operation. Softkey prompts are always underlined on the display.
When there are too many features to fit on the screen at one time, the  and
and  characters are shown. Use the arrow keys below the screen to scroll through to the additional commands.
1

972_00_1ATT BOOK 12/4/01 1:36 PM Page 2
BEFORE YOU BEGIN
About Home Area Code and Local Area Codes
Always program your Home Area Code, and, if you need them, up to four Local Area Codes. (See “Program Home Area Code”on page 7 for information about the Home Area Code). Programming these area codes changes how numbers are displayed in the call history, and allows for correct operation of the Display Dial feature.
Refer to the chart below to determine whether you will need to program Local Area Codes after you install your phone.
If for |
You dial |
Then enter |
|
|
|
All calls outside |
11 digits |
No Local Area Codes |
your Home Area Code |
(1+ area code |
|
|
+ phone number) |
|
|
|
|
Some calls outside |
10 digits |
Area codes that do |
your Home Area Code |
(area code |
not require a “1” |
|
+ phone number) |
|
|
|
|
If you dial 10 digits (area code plus phone number) for calls within your own area code, include your area code as a Local Area Code.
Use the softkeys to select the area code you want to program
(LOCAL1–LOCAL4), then use the keypad to enter each area code.
Use the softkey to select DONE.
If you don’t program your Home Area Code, the system will continue
to display the Home Area Code entry screen, and will be unable to display Caller ID information. If you try to exit area code programming without entering a Home Area Code, you will hear an error tone.
2

972_00_1ATT BOOK 12/4/01 1:36 PM Page 3
BEFORE YOU BEGIN
About Caller Identification (Caller ID)
This unit keeps a record of the names and numbers of the last 99 calls, whether you answer the phone or not.
For each call that comes in, the screen displays the following information between the first and second rings:
•Your caller’s name (15 letters are sent by your telephone company);
•The caller’s area code and telephone number (the area code is not displayed if it is programmed as the Home Area Code);
•The time and date of the call; and
•The position of the call in call history.
If you answer a call before the information appears on the screen, it will not be in the call history.
Headset Jack
You can use this telephone hands-free when you install any industry standard 2.5 mm headset, purchased separately. For best results, use an AT&T 2.5 mm headset.
Plug the headset into the jack. Do not force the connection, but make sure the plug fits securely.
Data Port
If you want to connect another device (such as a modem, fax machine, answering system, or cordless extension phone) to a wall jack used by this phone, you can use the jack on the back of the phone labeled DATA L2. The data port uses Line 2; a call picked up on Line 2 at another extension may interrupt data, fax, or message transmission.
3

972_00_1ATT BOOK 12/4/01 1:36 PM Page 4
INSTALLATION
Battery Installation
Before using the telephone, install a 9V battery (not included). In case of a power failure, you will be able to use the phone normally if a fresh
9V battery is installed, but Caller ID information will not be displayed. This phone has a Memory Loss protection feature and will store your caller ID information, memory and programmed settings until power is restored.
When battery power is low, LOW BATT shows on the display to alert you. Replace batteries promptly.
CAUTION: Always disconnect all cords and remove base before installing new batteries.
1Remove the label covering the display screen.
2Turn the telephone upside down.
3Remove the base (Figure 1).
Place your thumbs in the two openings at the large end of the base. Push down with your thumbs, and lift the base up and away from the phone.
4Open the battery compartment door (Figure 2). Press on the tabs and remove the door.
5Install one new 9V battery (Figure 3).
6Replace the battery compartment door.
7Turn to Step 1 in “Table/Desk Installation” or “Wall Installation”.
Figure 2
Figure 1 |
Figure 3 |
4

972_00_1ATT BOOK 12/4/01 1:36 PM Page 5
INSTALLATION
Table/Desk Installation
Note: Be sure to follow the steps below in order. Do not plug the phone into electrical power until all the cords are properly connected to the phone.
1The base.
Turn the base so the larger end is toward the top of the telephone. Attach the base by inserting the tabs into the slots. Push down on the large end of the base to lock it into place.
2Connect the line cord(s) to the telephone.
•If you have a two-line jack, use only a line cord with clear modular plugs on each end. Plug one end into the jack labeled L1 OR L1/2 on the back of the telephone.
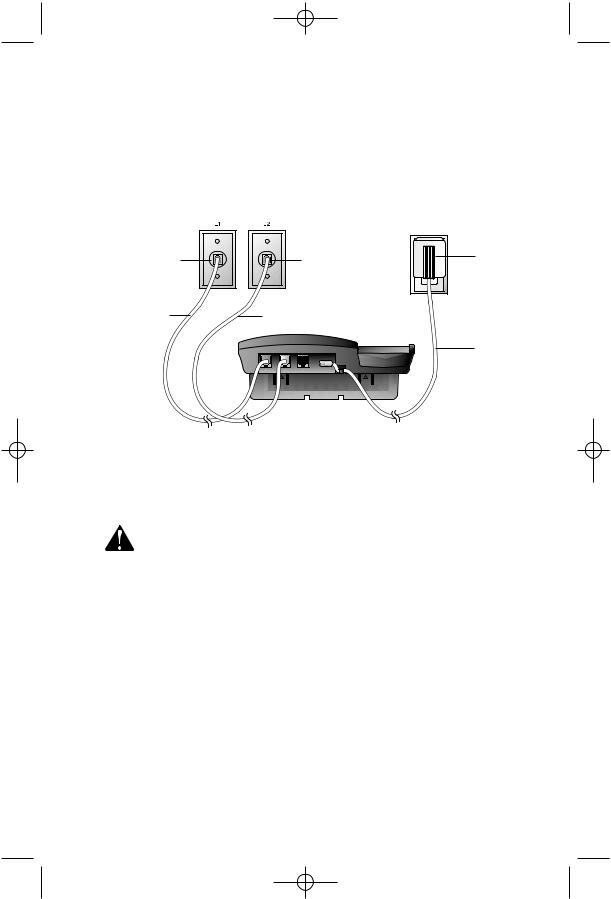
•If you have two separate jacks, use two line cords. Insert one end of a cord with blue plugs into the jack labeled L1 OR L1/2 on the back of the telephone. Insert one end of the cord with clear plugs into the jack labeled L2 on the back of the telephone.
3Connect the line cord(s) to your modular jack(s).
•If you have a two-line jack, plug the free end of the line cord into a modular wall jack. Make sure the cord snaps firmly into place.
Two-line |
AC |
Modular |
Adapter |
Jack |
|
Telephone Line |
|
Cord with clear |
|
modular plugs |
Power |
|
Cord |
5
972_00_1ATT BOOK 12/4/01 1:37 PM Page 6
INSTALLATION
•If you have two separate jacks, plug the free end of the cord with the blue plugs into the modular wall jack for Line 1. Plug the free end of the cord with the clear plugs into the modular wall jack for Line 2. Make sure the cords snap firmly into place.
Modular |
Jack for |
Line 1 |
Telephone Line Cord with blue modular plugs
Modular |
|
Jack for |
AC |
Line 2 |
Adapter |
Telephone Line Cord with |
|
clear modular plugs |
|
|
Power |
|
Cord |
4Connect the handset to the telephone.
Plug the coiled cord into the handset jack on the side of the phone. Plug the other end of the coiled cord into the handset, and then hang up.
5Connect the power cord.
CAUTION: Use only the power cord supplied with this phone.
If you need a replacement cord, call 1 800 222-3111.
Fit the power cord behind the strain relief tab. Then plug the smaller end of the power cord into the jack labeled POWER at the back of the system. Plug the power cord into a standard electrical outlet not controlled by a wall switch.
6Check for dial tone.
Press L, then lift the handset or press Sand listen for a dial tone. Then press land listen for a dial tone. If you do not hear a dial tone, see IN CASE OF DIFFICULTY.
7Confirm Lines 1 and 2.
Press Land call one of your phone numbers. If you hear a busy signal, you called Line 1. If you hear a ringing signal in the receiver, then you called Line 2.
8Select Display Language.
The screen displays ENGLISH (flashing) and ESPANOL. The flashing language is the selected language. Use CALL LIST +or CALL LIST -to select the other language, then use the softkey to select OK.
6
 Loading...