


USER’S MANUAL
Part 2
900 MHz Cordless Answering
System Speakerphone 9370
with Caller ID/Call Waiting
Please also read
Part 1 — Important
Product Information
AT&T and the globe symbol are registered trademarks of AT&T Corp. licensed to Advanced American Telephones.

© 2000 Advanced American Telephones. All rights reserved.
Printed in Mexico. 847479457 Issue 1AT&T 6/00
BEFORE YOU BEGIN ........................ |
3 |
About Caller ID with Call Waiting............ |
3 |
About Home and Local Area Codes........ |
3 |
INSTALLATION................................. |
4 |
Before You Install........................................... |
4 |
Table/Desk & Wall Installation.................... |
5 |
FEATURE SETUP.............................. |
7 |
Softkeys............................................................ |
7 |
Message Window Display for |
|
Feature Setup............................................. |
7 |
Telephone Feature Setup............................. |
8 |
Caller ID Feature Setup ............................... |
9 |
Answering System Feature Setup............ |
10 |
Caller Specific Outgoing |
|
Announcement Feature Setup............. |
15 |
Talking Caller ID Feature Setup............... |
15 |
TELEPHONE OPERATION |
|
At the Handset ............................ |
19 |
Make,Answer, or End a Call..................... |
19 |
Handset Volume........................................... |
19 |
Flash ................................................................. |
19 |
Preview a Number...................................... |
19 |
Redial ............................................................. |
20 |
Temporary Tone .......................................... |
20 |
Mute ............................................................... |
20 |
Hold ............................................................... |
21 |
Intercom........................................................ |
21 |
Record a Phone Conversation ................ |
21 |
Changing Channels ..................................... |
22 |
Headset Jack................................................. |
22 |
TELEPHONE OPERATION |
|
At the Base.................................. |
23 |
Make,Answer, or End a Call..................... |
23 |
Speaker/Base Ringer Volume .................... |
23 |
Flash ............................................................... |
23 |
Redial ............................................................. |
23 |
Mute ............................................................... |
23 |
Hold ............................................................... |
23 |
Page/Intercom .............................................. |
24 |
Handset Locator ......................................... |
24 |
TELEPHONE MEMORY/DIRECTORY... |
25 |
Store a Number in Memory ................... |
25 |
Store a Pause in a Memory Number...... |
26 |
Store a Name with a |
|
Memory Number ................................... |
26 |
Replace a Stored Number ........................ |
26 |
CONTENTS |
|
Store a Number and Name from |
|
Call History ............................................. |
27 |
View Memory Numbers ............................ |
27 |
Delete Memory Numbers ........................ |
28 |
Edit Memory Numbers.............................. |
28 |
Priority Ring Numbers .............................. |
29 |
Dial a Memory Number |
|
from the Handset................................... |
29 |
Dial a Memory Number |
|
from the Base.......................................... |
29 |
ANSWERING SYSTEM OPERATION |
|
At the Base.................................. |
30 |
Audible Indicators....................................... |
30 |
About Mailboxes ......................................... |
30 |
Announcement Play/Silent ........................ |
30 |
Answering Calls........................................... |
31 |
Call Screening/Intercept ............................ |
31 |
Announcement Bypass .............................. |
31 |
Record a Memo .......................................... |
31 |
Listen to, Save & Delete Messages.......... |
32 |
Message Window Display.......................... |
33 |
ANSWERING SYSTEM OPERATION |
|
At Cordless Handset or |
|
Touch Tone Phone ........................ |
34 |
Call Screening .............................................. |
34 |
Connect with the Answering System....... |
34 |
Remote Access Commands...................... |
35 |
Voice Help Menu......................................... |
37 |
Audible Signals ............................................. |
37 |
CALLER ID OPERATION.................. |
38 |
Call Waiting .................................................. |
38 |
Incoming Call History................................ |
38 |
Memory Match ............................................ |
38 |
Review Call History ................................... |
39 |
Display Dial................................................... |
39 |
Delete Call Records from |
|
Call History ............................................. |
40 |
Caller ID Display Messages....................... |
41 |
OPERATING RANGE ....................... |
42 |
BATTERIES .................................... |
43 |
Battery Life................................................... |
43 |
Charge the Handset Battery Pack .......... |
43 |
Replace the Handset Battery Pack ......... |
45 |
IN CASE OF DIFFICULTY ................ |
46 |
1

BEFORE YOU BEGIN
About Caller ID with Call Waiting
This product has a Caller ID with Call Waiting feature that lets you see who’s calling while you’re on another call.
To use this feature, you may need to change your phone service. Contact your local phone service provider if you have:
•no Caller ID or Call Waiting service
•either Caller ID or Call Waiting as a single service
•both Caller ID and Call Waiting, but as separate services (you may need combined service).
You can also use this product with regular Caller ID service or no Caller ID services. To turn off this phone’s Caller ID with Call Waiting feature, see the FEATURE SETUP section of this manual.
There may be fees for Caller ID services, and such services may not be available in all areas. This phone can provide information only if both you and the caller are in areas offering Caller ID service, and if both telephone companies use compatible equipment.
About Home and Local Area Codes
Always program your home area code, and, if you need them, your local area codes (up to four — see page 9). Programming these area codes will change how numbers are displayed in the call history, and will allow for correct operation of the Display Dial feature (see page 39).
If you dial |
For |
Enter as Home Code |
|
|
|
7 digits |
Calls within your |
Your home area code |
(phone number, no area code) |
home area code |
|
|
|
|
10 digits |
Calls within your |
000 |
(area code + phone number) |
home area code |
|
— OR — |
|
|
11 digits |
|
|
(1+ area code + phone number) |
|
|
|
|
|
If you dial |
For |
Enter as Local Codes |
|
|
|
11 digits |
All calls outside |
No Local Area Codes |
(1+ area code + phone number) |
your home area code |
|
|
|
|
10 digits |
Some calls outside |
Area codes that do |
(area code + phone number) |
your home area code |
not require a “1” |
|
|
|
If you dial 10 digits (area code plus phone number) for calls within your own area code, include your area code as a Local Area Code.
3
INSTALLATION
Before You Install
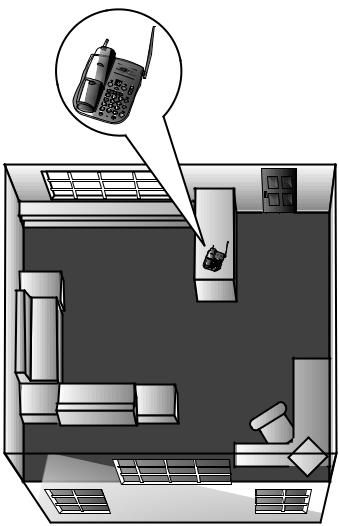
Choose a location for the base near an electrical outlet and a telephone jack. This phone requires a modular telephone jack and a standard electrical outlet (110v AC) not controlled by a wall switch. For optimum performance, install the base on the highest floor of your home.
4
INSTALLATION
Table/Desk and Wall Installation
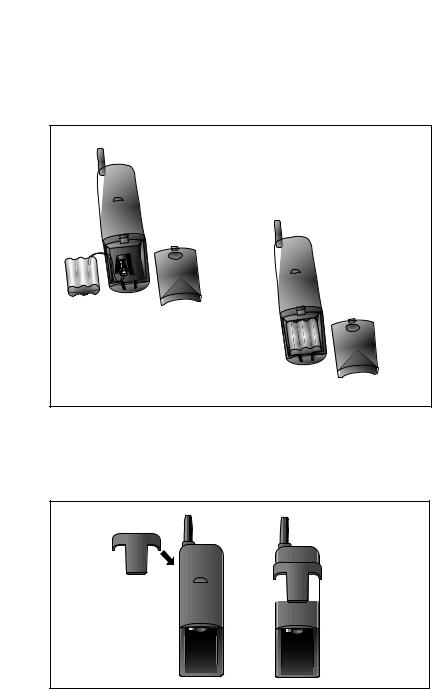
1Install the handset battery.
a)Remove battery compartment cover by pressing
on indentation and sliding
c) Replace cover
downward.
by sliding it on its track up over battery case until it snaps firmly into place.
b) Plug battery pack connector into handset, and place battery pack and wires into compartment.
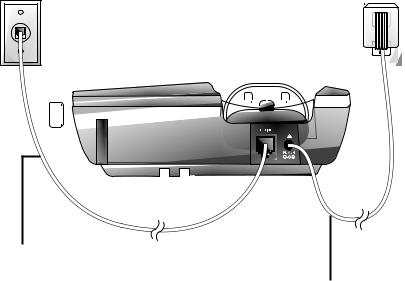
2Attach belt clip to the cordless handset (optional).
NOTE: The handset cannot be charged in the face-up position when the belt clip is attached.
|
b) Push up |
|
|
and |
|
a) Slide down |
away to |
|
remove. |
||
into grooves |
||
|
||
to attach. |
|
NOTE: Connect power to the base unit before placing the handset in the cradle.
5
INSTALLATION
Modular |
Standard |
|
|
|
||||||
|
|
|||||||||
telephone |
electrical outlet |
|
|
|
||||||
jack |
|
|
|
|
|
|
||||
|
|
|
|
|
|
|
|
|
|
|
|
|
|
|
|
|
|
|
|
|
|
|
|
|
|
|
|
|
|
|
|
|
|
|
|
|
|
|
|
|
|
|
|
|
|
|
|
|
|
|
|
|
|
|
|
|
|
|
|
|
|
|
|
|
|
|
|
|
|
|
|
|
|
|
|
|
|
|
|
|
|
|
|
|
|
|
|
|
|
|
|
|
|
|
|
|
|
|
|
|
|
|
|
|
|
|
|
|
|
|
|
|
|
|
|
|
|
|
|
|
|
|
|
|
|
|
|
|
|
|
|
|
|
|
|
|
|
|
|
|
|
|
|
|
|
|
|
|
|
|
|
|
|
|
|
|
|
|
|
|
|
|
|
|
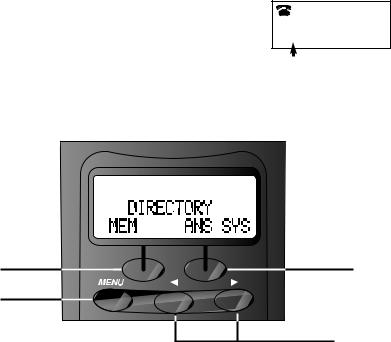
3Connect the telephone line cord.
If you are wall mounting the phone, use the
short line cord and press the excess cord |
4 Connect the |
into the groove on the bottom of the base. |
power cord. |
5Mount the base on the wall. (WALL MOUNTING ONLY)
Hold the base so the mounting knobs on the standard wall jack will fit into the holes on the bottom of the base. Slide the base down onto the knobs until it locks into place.
6Charge the handset battery.
Place the handset face up or face down in the base.
Charge the battery at least 12 hours the first time. After the first charge, the battery will quick-charge in only six hours.
7Check for dial tone.
After the batteries are charged, lift the handset and press P; you should hear a dial tone.
8Set up Telephone features.
See page 8.
9Set up Caller ID features.
See page 9.
10Set up Answering System features.
See pages 10–14.
11Set up Caller Specific Outgoing Announcements and Talking Caller ID.
See pages 15–18.
6
FEATURE SETUP
Softkeys
Use the two “softkeys” on the handset, shown in the illustration, to access many features.
1Press Uto begin viewing options. When you see arrows on the display screen, you can use the <and >buttons beneath the softkeys to scroll through choices or move to the next display.
2Press the softkey below the operation indicated on the display screen to select that operation.
 MENU SETUP INTERCOM
Softkey |
Softkey |
Access |
|
system |
|
features to |
|
program |
<and > |
|
buttons |
Message Window Display for Feature Setup
The message window on the base displays messages during feature setup.
Window Displays: |
When: |
|
|
SU |
System is in Setup Mode |
|
|
CH |
You have pressed c |
|
|
SA |
System is in Setup Mode and Ring Select |
|
is set to Toll Saver |
|
|
7
FEATURE SETUP
Telephone Feature Setup
At the handset, you can set up one feature at a time, or you can set up a feature and then move on to set up another feature.
1Make sure the phone is off (  is not displayed).
2 Press U, then >, and use the softkey to select SETUP.
3 Select DONE if needed to reach the feature you want to set, then use the CHANGE softkey to scroll through the options for that feature.
4Select DONE again when the desired choice is displayed to save your selection and move to the next feature.
When you have finished setting Telephone features, you can continue on to set up Caller ID features. To exit Feature Setup, press U.
Dial Mode
If you have touch tone service, the phone will be ready to use as soon as the battery is charged. Change this setting only if you have dial pulse (rotary) service. This setting affects both the handset and the base.
Handset Ringer Off / Battery Save
When the Ringer is set to OFF, the handset stays ready to use for up to 30 days before you have to return it to the base for recharging. When the Ringer is off, the Intercom/Handset Locator feature does not work, and the screen does not display incoming call information. However, the call information is stored in the call history. When the
Ringer is on, the handset stays ready to use for up to 15 days, and all features are active.
Handset Ringer
You can choose from four different handset Ringer styles. Select DONE to choose a Ringer style.
DIAL MODE:TONE CHANGE DONE
DIAL MODE:PULSE CHANGE DONE
RINGER: ON CHANGE DONE
RINGER: OFF CHANGE DONE
RING TYPE: 1 CHANGE DONE
8
FEATURE SETUP
Caller ID Feature Setup
You can set up Caller ID features at the handset right after setting up the final Telephone feature (Handset Ringer), by programming your Home Area
Code. Otherwise, follow Steps 1-4 in “Telephone Feature Setup” on page 8 to begin setting up Caller ID features.
Program Home and Local Area Codes
Your “home area code” is usually the area code from which you are dialing. “Local area codes” are area codes for which you must dial an area code but not “1.” Always program your home area code, and, if you need them, up to four local area codes to allow for correct operation of the Display Dial feature (see page 39).
NOTE: Do not select CHANGE. Instead, when screen displays
AREA CODE 1:
1Use the keypad to enter your home area code (AREA CODE 1).
2Select CODE 2 to reach AREA CODE 2 (the screen displays any current local area code stored here). Use the keypad to enter a three-digit local area code.
3Continue as in Step 1 for area codes 3, 4 and 5 as needed.
4Select DONE when finished.
Caller ID with Call Waiting
You must subscribe to Caller ID with Call Waiting service (a combined service) in order for this feature to work. If you don’t have Caller ID with Call Waiting service, turn this feature off.
Call List Options
Choose whether the system stores information about ALL CALLS received, or for NO CALLS.
AREA |
CODE 1:000 |
|
CODE |
2 |
DONE |
|
|
|
CIDCW: ON CHANGE DONE
CIDCW: OFF CHANGE DONE
LIST:ALL CALLS CHANGE DONE
LIST:NO CALLS CHANGE DONE
9
FEATURE SETUP
Answering System Feature Setup
|
Stop recording; |
|
Exit Answering |
|
System Feature |
|
Setup |
Delete selected |
|
announcement |
|
Scroll through |
|
screen options |
Scroll through |
|
|
Record/review |
screen options |
outgoing |
|
announcement |
Set/review |
|
answering |
Use with other |
system features |
|
|
buttons to |
|
change settings |
|
|
Set/review day |
|
and time |
At the base, you can set up one feature at a time, or you can set up a feature, and then move on to set up another feature. The system provides audible prompts as you set up Answering System features.
1Make sure the answering system is on, and press *(CHANGE) on the base. The Message Window displays CH.
2Press 9(SETUP) to reach the feature you want to set (the current feature will be announced by the system).
3Press 4(REPEAT) or 6(SKIP) to scroll through the options for that feature.
4Press 9(SETUP) again when the desired choice is displayed to save your selection and move to the next feature.
5To exit Answering System Feature Setup at any time, press Xor x.
10
FEATURE SETUP
Select Your Announcement
NOTE: For information about how to record your announcements, see page 13.
•You can record up to three different announcements — A, B, and AO.
•Announcements A and B are used when you want the system to record callers’ messages. Announcement AO (Announce Only) is used when you want to give information to callers without accepting messages.
•By selecting A, B, or AO, you decide which announcement your callers will hear when the system answers a call (the system comes set to A).
1Press 9(SETUP) until the system announces “Selected announcement is….”
2Press 4(REPEAT) or 6(SKIP) to choose announcement A, B, or AO.
3Press 9(SETUP) when your choice is announced and displayed.
Ring Select / Toll Saver
Choose how many times the phone will ring before the system answers a call (preset to 4). Set for 1 to 7 rings, or set to SA for Toll Saver. With Toll Saver active, the system answers after two rings when you have new messages and after four rings when you have no new messages.
1Press 9(SETUP) until the system announces “Number of rings….”
2Press 4(REPEAT) or 6(SKIP) to choose Ring Select setting.
3Press 9(SETUP) when your choice is announced and displayed.
Audible Message Alert
When Message Alert is on, the base beeps once every 15 seconds when
new mesages have been received. The Message Window displays |
|
|
|
for on |
||||
|
|
|
||||||
|
|
|||||||
|
|
|
||||||
and |
|
|
|
for off. |
|
|
|
|
|
|
|
|
|
|
|||
1Press 9(SETUP) until the system announces “Message Alert is….”
2Press 4(REPEAT) or 6(SKIP) to choose your setting.
3Press 9(SETUP) when your choice is announced and displayed.
11
FEATURE SETUP
Change Remote Access Code
Change the code you use to access features and functions of the answering system from a touch tone phone. The Remote Access Code comes set to 500.
NOTE: Do not use the same code as the Priority Calling Code.
1Press 9(SETUP) until the system announces “Remote access code is….”
2Press 4(REPEAT) or 6(SKIP) to change the first digit, then press 9(SETUP) to move to the next digit. Repeat for second and third digits.
3Press 9(SETUP) when your choice is announced and displayed.
Priority Call Signal
When a caller enters the Priority Calling Code from a touch tone phone, the system “chirps” to alert you that you have a Priority Call. You’ll need to provide select callers with the Priority Calling Code (preset to 999) in order for them to use this feature.
1Your caller dials your telephone number from a touch tone phone.
2When the announcement begins to play, your caller can enter the Priority Calling Code.
3The system “chirps,” then pauses. This continues for up to 30 seconds, unless you answer the phone, or the system picks up the call.
4If you do not answer, your caller can press 5to stop the Priority Call signal.
5The caller can press 1or 2to leave a message in Mailbox 1 or Mailbox 2.
Change Priority Calling Code
Change the code a caller enters to alert you that you have a Priority Call. The Priority Calling Code comes set to 999.
NOTE: Do not use the same code as the Remote Access Code.
1Press 9(SETUP) until the system announces “Priority Calling Code is….”
2Press 4(REPEAT) or 6(SKIP) to change the first digit, then press 9(SETUP) to move to the next digit. Repeat for second and third digits.
3Press 9(SETUP) when your choice is announced and displayed.
12
FEATURE SETUP
Review Feature Settings
Check the status of the answering system feature settings by pressing 9(SETUP) on the base.
Record Your Announcement from the Base
•You can record up to three different announcements — A, B, and AO
— that callers will hear when the system answers a call. Each announcement can be up to three minutes long.
•Announcements A and B are used when you want the system to record callers’ messages. Announcement AO (Announce Only) is used when you want to give information to callers without accepting messages.
•If you choose not to record an announcement for A or B, the system answers with a prerecorded announcement: “Hello. Please leave a message after the tone.” The system does not have a prerecorded announcement for AO.
•For Announcements A and B, make sure you indicate in your announcement who has been assigned to each mailbox, and that callers should press 1or 2to access the appropriate mailbox.
NOTE: For best sound quality, record your announcement from the cordless handset (see “Remote Access Commands” in ANSWERING SYSTEM OPERATION At Cordless Handset or Touch Tone Phone on page 35).
1If the announcement you want to record is the currently selected announcement (A, B, or AO) go to Step 2. If not, select the announcement by following the instructions in “Select Your Announcement” on page 11, then go to Step 2 below.
2Press *(CHANGE) on the base.
3Press 7(ANNC) .
4At the prompt, begin recording your announcement. Speak in a normal tone of voice, about nine inches from the microphone.
5When you are finished, press Xor x. If the announcement did not record successfully, you’ll hear an error tone. Record the announcement again.
To review the announcement at any time, press 7(ANNC).
NOTE: The total recording time for this system is about 12 minutes. Since all messages, memos, and announcements contribute to that time, a short outgoing announcement is recommended.
13
FEATURE SETUP
Delete an Announcement
1If the announcement you want to delete is the currently selected announcement (A, B, or AO) go to Step 2. If not, select the announcement by following the instructions in “Select Your Announcement” on page 11, then go to Step 2 below.
2Press 7(ANNC) on the base.
3Press Dwhile the announcement is playing. The system beeps once when the announcement is deleted.
Set the Clock
1Press *(CHANGE). The Message Window displays CH.
2Press 8(CLOCK). The system announces the current day setting. To change the day setting, hold down 4(REPEAT) or 6(SKIP) until the correct day is announced. Then release the button.
3Press 8(CLOCK). The system announces the current hour setting. To change the hour setting, hold down 4(REPEAT) or 6 (SKIP) until the correct hour is announced. Then release the button.
4Press 8(CLOCK). The system announces the current minutes setting. To change the minutes setting, hold down 4(REPEAT) or 6(SKIP) until the correct minutes are announced. Then release the button.
8 Press 8(CLOCK). The system announces the new day and time.
To check the current clock setting at any time, press 8(CLOCK).
14

FEATURE SETUP
Caller Specific Outgoing Announcement Feature Setup
Record personalized announcements — Caller Specific Outgoing Announcements — that can be played to select callers. You can program Caller Specific Outgoing Announcements to match:
•specific telephone numbers, or
•callers who choose to block their name and number when calling (private calls), or
•callers from areas in which Caller ID information is not transmitted (unknown calls).
Callers from the numbers and call types you designate will hear your special announcement, not the “regular” announcement. You can set the system to record callers’ messages after your special announcement plays, or to give information to callers without accepting messages (see Step 9 in “Review Caller Specific Outgoing and Talking Caller ID Announcements” on page 17).
You can program up to three Caller Specific Outgoing Announcements. Each announcement can be up to three minutes long.
Talking Caller ID Feature Setup
You can also record announcements to be played at the base — Talking Caller ID — when a call is received from a telephone number or call type you program. The Talking Caller ID Announcement will play once, then the phone will ring normally.
You can program up to 10 Talking Caller ID Announcements. Each announcement can be up to five seconds long.
Record Caller Specific Outgoing and Talking Caller ID Announcements from the Handset
1Make sure the phone is off (  is not displayed).
2Press U.
3Use the softkey to select DIR.
MENU |
|
CALL ID |
DIR |
|
|
4 Select ANS SYS. |
|
DIRECTORY |
|
MEM |
ANS SYS |
|
|
|
15
 Loading...